
Find out for yourself just how “secure” your standard wireless network really is.
Despite a few good online articles and countless alarmist news items decrying parasitic War Drivers and War Chalkers contributing to the moral decay of the country, a surprising number of people still install wireless equipment with all of the defaults enabled. There are a huge number of access points in use today that unintentionally advertise a default SSID, bridge directly to an Ethernet network, and use no encryption whatsoever (or a WEP key left on the factory setting, and therefore easily deduced).
But even if all standard precautions are in place, how much “security” do wireless access points actually provide? Having heard all sorts of widely varying estimates and assumptions from people who should be able to make an educated guess, I finally decided to see for myself what it would take to circumvent the security of my own standard 802.11b network.
Since my “production” wireless network is actually an open node on Seattle Wireless, I decided to put together a temporary lab network consisting of the following:
A “Graphite” AirPort
An iMac with an AirPort card running OS X
An iBook with an AirPort card running the Debian Linux distribution
In order to make the test as difficult as possible, I decided to
create a “closed” network (that
doesn’t broadcast the SSID), enable WEP, and
implement a MAC address filter. The AirPort was set to the SSID
stealthy, with the unlikely deduced WEP key of
t8$Gc. I added a MAC address filter that allowed
only the AirPort card in the iMac to connect to it, and I also set
the AirPort to channel 1 (the only unused channel in my immediate
area). The Ethernet on the AirPort was connected to my local house
network and configured to use NAT.
After resetting the Airport, I verified that I
couldn’t detect the stealthy
SSID from either the iMac or the iBook. I then connected
to the AirPort with the iMac, specifying the network name and WEP key
explicitly. I got a DHCP lease of 10.0.1.2, and verified that I could
in fact browse the Web. To be sure that the MAC filter was working
properly, I also verified that I could not associate with the AirPort
from the iBook, even using the proper WEP key and SSID. I then set
the iMac to flood ping the AirPort, in order to generate a large
amount of wireless traffic:
rob@imac:~$ sudo ping -f 10.0.1.1Now everything was in place to test this configuration with the iBook.
Of course, the first step was to detect the
network’s presence. This was easily accomplished
with Kismet
[Hack #31]. As you can see in Figure 7-1, the stealthy network was
detected immediately.
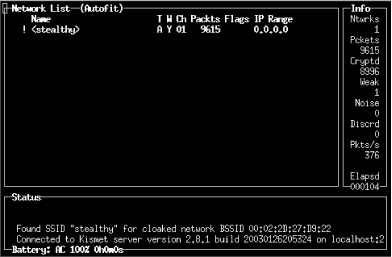
Note that the network would be detected instantly (provided that
someone was actually using it), regardless of whether I had called it
stealthy or something original and tricky like
kpX284W_m. Obfuscating the
SSID of your network does
nothing to enhance the security of your wireless
network, regardless of whether you broadcast beacons. For the record,
I started Kismet at 18:23, at which point it began logging all 802.11
frames that it encountered. Now that I knew the channel and SSID of
the target network, it was time to move to the next step.
I know of two ways to find valid MAC addresses for a given network. You could associate with the AP and run an IP layer network sniffer such as Ethereal [Hack #38] or tcpdump [Hack #37] [Hack #37]. This is, of course, the hard way, particularly if you already have Kismet handy.
The easy way is to select the network you are interested in (press
ss to sort by SSID, and arrow down to it if
necessary) and then view the associated clients (press
c). Presto, you have a list of MAC addresses
for clients that are using the network, and presumably are on the
permitted MAC table. Wireless clients send their MAC address in the
clear, regardless of whether the AP requires WEP.
These steps took just a few seconds (it actually took me longer to run the screen grab utility than to execute the attacks). Now came the tricky part: cracking the WEP key.
It is entirely possible to have AirSnort crack an 802.11 stream in real time. In my meager testing, I have found this to be fairly unstable using Debian on an iBook. Rather than risk a crash in the middle of my test, I decided to just run it against the pcap dump that Kismet creates automatically. I opened the dump file immediately, and then checked its progress every 10 minutes or so.
As you can see in Figure 7-2, AirSnort was
successful in finding the WEP key (t8$Gc) after
only 3.4 million packets.
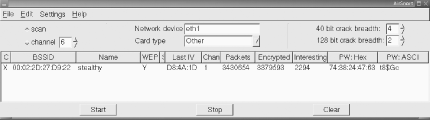
I stopped Kismet, and noted the time. It was now 19:50. 1 hour and 27 minutes had passed, and Kismet had accumulated only 490,796,602 bytes (that’s less than 490 MB, or considerably less than a single CD ISO). I think this was a particularly lucky run, as many people have reported having to log a couple of gigabytes of data before AirSnort could guess the key.
Now armed with the correct SSID, a valid MAC address, and the WEP key, I could actually attempt to access the wireless network. Note that until now, absolutely no information has been transmitted by the iBook, making detection of this attack a practical impossibility.
After quitting Kismet and taking the wireless card out of monitor mode, I configured the iBook to use the proper network parameters:
root@ibook:~#ifconfig eth1 hw ether 00:30:65:1E:81:9Broot@ibook:~#iwconfig eth1 key 's:t8$Gc'root@ibook:~#iwconfig eth1 essid stealthy
Ah, but what IP address information should I use? Up until now, I hadn’t looked at any IP layer traffic. Kismet could not reveal the IP range, because it didn’t have the WEP key. At this point, I could have started up Ethereal and looked at the captured pcap dump [Hack #39], but it was much simpler to view the network data in real time using tcpdump [Hack #37] like so:
root@ibook:~#tcpdump -n -i eth119:52:08.995104 10.0.1.2 > 10.0.1.1: icmp: echo request 19:52:08.996412 10.0.1.1 > 10.0.1.2: icmp: echo reply 19:52:08.997961 10.0.1.2 > 10.0.1.1: icmp: echo request 19:52:08.999220 10.0.1.1 > 10.0.1.2: icmp: echo reply 19:52:09.000581 10.0.1.2 > 10.0.1.1: icmp: echo request 19:52:09.003162 10.0.1.1 > 10.0.1.2: icmp: echo reply^C
Since the ping flood was still running, I quickly hit Control-C to
kill tcpdump. Using tcpdump
with the -n switch, IP addresses that are actively
in use on the network are revealed. Based on this information, it is
possible to infer that the stealthy network is
using 10.0.1.x, it is most likely using a class C or class A netmask,
and 10.0.1.1 is probably a good guess at the default router. Had this
been an actual real-world network, it would have been trivial to find
the default router and local DNS servers by looking at actual network
traffic in Ethereal.
Rather than step on the IP address being used by the iMac (10.0.1.2), I decided to pick a different address altogether. If this would work, it should allow the iMac and iBook to coexist on the network without too much interference.
root@ibook:~#ifconfig eth1 10.0.1.3 netmask 255.255.255.0 broadcast 10.0.1.255root@ibook:~#route add default gw 10.0.1.1root@ibook:~#ping -c2 yahoo.comPING yahoo.com (66.218.71.198): 56 data bytes 64 bytes from 66.218.71.198: icmp_seq=0 ttl=242 time=32.5 ms 64 bytes from 66.218.71.198: icmp_seq=1 ttl=242 time=33.2 ms --- yahoo.com ping statistics --- 2 packets transmitted, 2 packets received, 0% packet loss round-trip min/avg/max = 32.5/32.8/33.2 ms
As you can see, I was able to ping yahoo.com (and had full network access from that point on). Given the correct SSID, WEP key, and a valid MAC address, the AirPort could not distinguish me from the iMac and therefore could do nothing to keep me out. Note that while the AirPort can’t tell the difference, a program such as arpwatch [Hack #100] can detect many sorts of MAC address shenanigans, but only if the AirPort is configured as a bridge. Since it is set up as a NAT in this configuration (as many APs are by default), the sharing of MAC addresses between clients is completely invisible to the rest of the network.
I hope this little experiment gives you some idea of what you are up against when relying on the built-in security measures of 802.11b. Using inexpensive hardware and freely available tools, a typical Wi-Fi network can be easily cracked in a mere hour and a half (although it will probably take a bit longer on average, depending on how busy the network is, potentially offset by a bit of luck).
What does this mean for wireless security? Should we run screaming to our system administrators and toss the whole lot into the garbage? Of course not. This whole exercise is presented to drive home this point: if you are concerned about wireless security, you must use strong application-layer encryption and authentication. Much of the rest of this chapter details other freely available tools that you can use to protect your network and your wireless users against these attacks.