
Developers are writing more and more of their applications to run over the Web.
There are many obvious advantages. For one, you don’t have to create as much of the user interface; you can let Internet Explorer and other browsers handle a lot of the work for you. Another, perhaps bigger, advantage is that distribution of the application and of revisions is faster, easier, and less expensive. Most important, a web application can be run on any platform by any user at any location; this is harder to do (though not impossible) with smart-client applications.
The third advantage of web applications is distributed processing, though smart-client applications are making inroads. With a web-based application, it is easy to provide server-side processing, and the Web provides standardized protocols (e.g., HTTP, HTML, and XML) to facilitate building n-tier applications.
The .NET technology for building web applications (and dynamic web
sites) is ASP.NET
2.0, which provides a rich collection of types for building web
applications in its
System.Web
and System.Web.UI
namespaces. There is a great deal to learn about ASP.NET, but much of
it is language-independent. ASP.NET offers a rich suite of controls
and related tools, including tools to validate data, display dates,
present advertisements, interact with users, and so forth. Most of
these require no coding whatsoever.
The focus of this chapter is where ASP.NET and C# programming intersect: the creation of Web Forms and web services. The role of the C# programmer in ASP.NET development is in writing the event handlers that respond to user interaction. Many of the event handlers will either add data to a database or retrieve data and make it available to the controls. For coverage of ASP.NET alone, see my book (co-written with Dan Hurwitz), Programming ASP.NET (O’Reilly).
Web Forms bring RAD techniques (such as those used in Windows Forms) to the development of web applications. As with Windows Forms, you drag-and-drop controls onto a form and write the supporting code either inline or in code-behind pages. With Web Forms, however, the application is deployed to a web server, and users interact with the application through a standard browser.
.NET web services expand on the concept of distributed processing to build components whose methods can be invoked across the Internet using industry-wide standard protocols. These components can be built in any .NET language,[1] and they communicate using open protocols that are platform-independent. For example, a stock exchange server might provide a web service method that takes a stock ticker symbol as a parameter and returns a quote. An application might combine that service with another service from a different company that also takes a stock symbol but that returns background data about the company. The application developer can concentrate on adding value to these services, instead of duplicating the same service for his own application.
This chapter demonstrates Web Forms and web services programming using C#.
Tip
ASP.NET 2.0 Web Forms are the successor to the enormously successful ASP.NET 1.x Web Forms, which in turn were the successor to ASP pages. The goal of ASP.NET 2.0 was to reduce the amount of coding by 70% compared to ASP 1.x. This means that web programming is increasingly declarative rather than programmatic—that is, you declare controls on your Web Form rather than writing (and rewriting) boiler-plate code.
You still have the option of writing code (you can always write code), but for the vast majority of web programming, you’ll write a lot less code with ASP.NET 2.0 than you did with 1.x.
Web Forms implement a programming model in which web pages are dynamically generated on a web server for delivery to a browser over the Internet. With Web Forms, you create an ASPX page with more or less static content consisting of HTML and web controls, and you write C# code to add additional dynamic content. The C# code runs on the server, and the data produced is integrated with the declared objects on your page to create an HTML page that is sent to the browser.
There are three critical points to pick up from the previous paragraph, and which should be kept in mind for this entire chapter:
Web pages can have both HTML and web controls (described later).
All processing is done on the server (you can have client-side processing with scripting languages, but that isn’t part of ASP.NET).
If you use ASP.NET web controls, what the browser sees is just HTML (there is an exception to this; with up-level browsers some script may be sent as well).
In short, Web Forms are designed to be viewed through any browser, with the server generating the correct browser-compliant HTML. You can do the programming for the logic of the Web Form in any .NET language. I will of course use C#. Just as with Windows Forms, you can create Web Forms in Notepad (or another editor of your choice) rather than in Visual Studio. Many developers will choose to do so, but Visual Studio makes the process of designing and testing Web Forms much easier.
Web Forms divide the user interface into two parts: the visual part or user interface (UI), and the logic that lies behind it. This is very similar to developing Windows Forms as shown in Chapter 13. This is called code separation ; all examples in this book use code separation, though it is possible to write the C# code in the same file with the user interface.
Tip
In Version 2.0 of ASP.NET, Visual Studio takes advantage of partial classes, allowing the code-separation page to be far simpler than it was in 1.x. Because the code-separation and declarative pages are part of the same class, there is no longer a need to have protected variables to reference the controls of the page, and the designer can hide its initialization code in a separate file.
The UI page is stored in a file with the extension
.aspx
. When you run the form, the
server
generates HTML sent to the client browser. This code uses the rich
Web Forms types found in the
System.Web
and System.Web.UI
namespaces of the .NET
FCL.
With Visual Studio, Web Forms programming couldn’t be simpler: open a form, drag some controls onto it, and write the code to handle events. Presto! You’ve written a web application.
On the other hand, even with Visual Studio, writing a robust and complete web application can be a daunting task. Web Forms offer a very rich UI; the number and complexity of web controls have greatly multiplied in recent years, and user expectations about the look and feel of web applications have risen accordingly.
In addition, web applications are inherently distributed. Typically, the client will not be in the same building as the server. For most web applications, you must take network latency, bandwidth, and network server performance into account when creating the UI; a round trip from client to host might take a few seconds.
Web Forms are event-driven. An event represents the idea that “something happened” (see Chapter 12 for a full discussion of events).
An event is generated (or raised) when the user clicks a button, or selects from a listbox, or otherwise interacts with the UI. Events can also be generated by the system starting or finishing work. For example, open a file for reading, and the system raises an event when the file has been read into memory.
The method that responds to the event is called the event handler . Event handlers are written in C# and are associated with controls in the HTML page through control attributes.
By convention, ASP.NET event handlers return
void and take two parameters. The first parameter
represents the object raising the event. The second, called the
event
argument
,
contains information specific to the event, if any. For most events,
the event argument is of type EventArgs, which
doesn’t expose any properties. For some controls,
the event argument might be of a type derived from
EventArgs that can expose properties specific to
that event type.
In web applications, most events are typically handled on the server and, therefore, require a round trip. ASP.NET supports only a limited set of events, such as button clicks and text changes. These are events that the user might expect to cause a significant change, as opposed to Windows events (such as mouse-over) that might happen many times during a single user-driven task.
Postback events are those that cause the form to be posted back to the server immediately. These include click-type events, such as the Button Click event. In contrast, many events (typically change events) are considered nonpostback in that the form isn’t posted back to the server immediately. Instead, these events are cached by the control until the next time a postback event occurs.
A web application’s state is the current value of all the controls and variables for the current user in the current session. The Web is inherently a “stateless” environment. This means that every post to the server loses the state from previous posts, unless the developer takes great pains to preserve this session knowledge. ASP.NET, however, provides support for maintaining the state of a user’s session.
Whenever a page is posted to the server, it is re-created by the
server from scratch before it is returned to the browser.
ASP.NET provides a mechanism that
automatically maintains state for server controls
(ViewState) independent of the
HTTP session.
Thus, if you provide a list and the user has made a selection, that
selection is preserved after the page is posted back to the server
and redrawn on the client.
Every request for a page made to a web server causes a chain of events at the server. These events, from beginning to end, constitute the life cycle of the page and all its components. The life cycle begins with a request for the page, which causes the server to load it. When the request is complete, the page is unloaded. From one end of the life cycle to the other, the goal is to render appropriate HTML output back to the requesting browser. The life cycle of a page is marked by the following events, each of which you can handle yourself or leave to default handling by the ASP.NET server:
- Initialize
Initialize is the first phase in the life cycle for any page or control. It is here that any settings needed for the duration of the incoming request are initialized.
- Load ViewState
The
ViewStateproperty of the control is populated. TheViewStateinformation comes from a hidden variable on the control, used to persist the state across round trips to the server. The input string from this hidden variable is parsed by the page framework, and theViewStateproperty is set. This can be modified via theLoadViewState( )method. This allows ASP.NET to manage the state of your control across page loads so that each control isn’t reset to its default state each time the page is posted.- Process Postback Data
During this phase, the data sent to the server in the posting is processed. If any of this data results in a requirement to update the
ViewState, that update is performed via theLoadPostData( )method.- Load
CreateChildControls( )is called, if necessary, to create and initialize server controls in the control tree. State is restored, and the form controls contain client-side data. You can modify the load phase by handling theLoadevent with theOnLoad()method.- Send Postback Change Modifications
If there are any state changes between the current state and the previous state, change events are raised via the
RaisePostDataChangedEvent( )method.- Handle Postback Events
- PreRender
This is your last chance to modify the output prior to rendering using the
OnPreRender( )method.- Save State
Near the beginning of the life cycle, the persisted view state was loaded from the hidden variable. Now it is saved back to the hidden variable, persisting as a string object that will complete the round trip to the client. You can override this using the
SaveViewState( )method.- Render
This is where the output to be sent back to the client browser is generated. You can override it using the
Rendermethod.CreateChildControls( )is called, if necessary, to create and initialize server controls in the control tree.- Dispose
This is the last phase of the life cycle. It gives you an opportunity to do any final cleanup and release references to any expensive resources, such as database connections. You can modify it using the
Dispose( )method.
To create the simple Web Form that will be used in the next example, start up Visual Studio .NET and select File→ New Web Site. In the New Web Site menu, choose C# as your language, and choose ASP.NET Web Site as the template to use. Finally, locate your web site somewhere on your disk (at the bottom of the dialog), as shown in Figure 15-1.
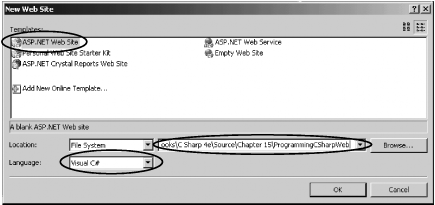
Visual Studio creates a folder named ProgrammingCSharpWeb in the directory you’ve indicated, and within that directory it creates your Default.aspx page (for the User interface), Default.aspx.cs (for your code), and a Data directory (currently empty but often used to hold .mdb files or other data-specific files).
Tip
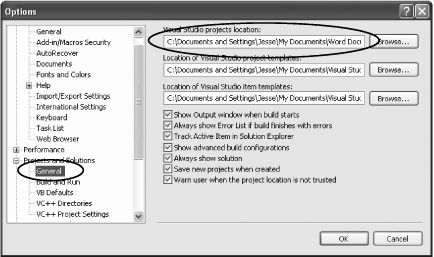
While Visual Studio no longer uses projects for web applications, it does keep solution files to allow you to quickly return to a web site or desktop application you’ve been developing. The solution files are kept in a directory you may designate through the Tools→ Options window, as shown in Figure 15-2.
Tip
ASP.NET 1.1 programmers take
note
:
the code-behind model for ASP.NET has changed. In Versions 1.x, the
code-behind file
defined a class that derived from Page. This
code-behind class contained instance variables for all the controls
on the page, with explicit event binding using delegates and the
.aspx page derived from the code-behind class.
In Version 2.0, ASP.NET generates a single class from the combined .aspx page and partial class definitions in the code-behind file.
ASP.NET can infer the control instances and derive event bindings from the markup during compilation; thus, the new code-behind file includes only the application code you need, such as event handlers, and doesn’t need to include instance variables or explicit event binding. The new code-behind files are simpler, easier to maintain, and always in sync with the .aspx page.
Let’s take a closer look at the .aspx and code-behind files that Visual Studio creates. Start by renaming Default.aspx to HelloWeb.aspx. To do this, close Default.aspx, and then right-click its name in the Solution Explorer. Choose Rename and enter the name HelloWeb.aspx. That renames the file, but not the class. To rename the class, right-click the . aspx page and choose View Code in the code page, then rename the class HelloWeb_aspx . You’ll see a small line next to the name. Click it and you’ll open the smart tag that allows you to rename the class. Click “Rename `Default_aspx’ to `HelloWeb_aspx’” and Visual Studio ensures that every occurrence of Default_aspx is replaced with its real name, as shown in Figure 15-3.

Unfortunately, (at least in Beta) the name of the class
isn’t changed in
HelloWeb.aspx,
so go back to the HelloWeb.aspx file and change
the page directive’s ClassName
attribute to
HelloWeb_aspx :
<%@ Page Language="C#" CompileWith="HelloWeb.aspx.cs"ClassName="HelloWeb_aspx"%>
Within the HTML view of HelloWeb.aspx, you see that a form has been specified in the body of the page using the standard HTML form tag:
<form id="Form1" runat="server">
Web Forms
assumes
that you need at least one form to manage the user interaction, and
creates one when you open a project. The attribute
runat="server" is the key to the server-side magic.
Any tag that includes this attribute is considered a server-side
control to be executed by the ASP.NET framework on the server. Within
the form, Visual Studio has opened div tags to
facilitate placing your controls and text.
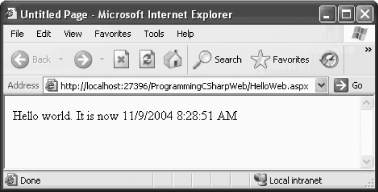
Having created an empty Web Form, the first thing you might want to do is add some text to the page. By switching to HTML view, you can add script and HTML directly to the file just as you could with classic ASP. Adding the following line to the body segment of the HTML page will cause it to display a greeting and the current local time:
Hello World! It is now <% = DateTime.Now.ToString() %>
The <%
and
%> marks work just as they did in classic ASP,
indicating that code falls between them (in this case, C#). The
= sign immediately following the opening tag
causes ASP.NET to display the value, just like a call to
Response.Write( ). You could just as easily write
the line as:
Hello World! It is now
<% Response.Write(DateTime.Now.ToString()); %>
Run the page by pressing F5 (or save it and navigate to it in your browser). You should see the string printed to the browser, as in Figure 15-4.
You
can add
server-side controls to a Web
Form in three ways: by writing
HTML into the HTML page, by dragging
controls from the toolbox to the Design page, or by programmatically
adding them at runtime. For example, suppose you want to use buttons
to let the user choose one of three shippers provided in the
Northwind database. You can write the following HTML into the
<form> element in the HTML window:
<asp:RadioButton GroupName="Shipper" id="Speedy"
    text = "Speedy Express" Checked="True" runat="server">
</asp:RadioButton>
<asp:RadioButton GroupName="Shipper" id="United"
    text = "United Package" runat="server">
</asp:RadioButton>
<asp:RadioButton GroupName="Shipper" id="Federal"
    text = "Federal Shipping" runat="server">
</asp:RadioButton>
The asp tags declare server-side
ASP.NET controls that are replaced
with normal HTML when the server processes the page. When you run the
application, the browser displays three radio buttons in a button
group; pressing one deselects the others.
You can create the same effect more easily by dragging three buttons from the Visual Studio toolbox onto the Form, or, to make life even easier, you can drag a Radio Button List onto the form, which will manage a set of radio buttons declaratively. When you do, the smart tag is opened, and you are prompted to choose a Data Source (which allows you to bind to a collection; perhaps one you’ve obtained from a database) or to Edit Items. Clicking Edit Items opens the ListItem Collection Editor, where you can add three radio buttons.
Each radio button is given the default name ListItem, but you may edit its text and value in the ListItem properties, where you can also decide which of the radio buttons is selected, as shown in Figure 15-6.

Tip
You can add controls to a page in one of two modes. The default mode
is FlowLayout
. With
FlowLayout, the controls are added to the form
from top to bottom, as in a Microsoft Word document. The alternative
is GridLayout, in which the controls
are arranged in the browser using absolute
positioning (x and y coordinates).
To change from Grid to Layout or back, change
the
pageLayout property of the document in Visual
Studio .NET.
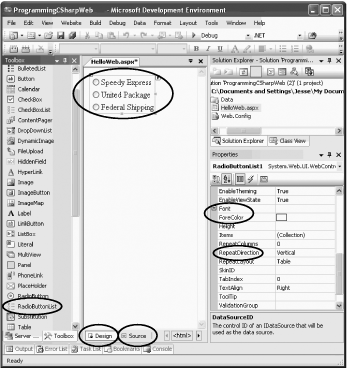
You can improve the look of your radio button list by changing properties in the Properties window, including the font, colors, number of columns, repeat direction (vertical is the default), and so forth.
Click back and forth between Design and Source mode to see the effect of your changes, as shown in Figure 15-7.
Web Forms offer two types of
server-side controls. The first is
server-side HTML controls. These are HTML
controls that you tag with the attribute
runat=Server.
The alternative to marking HTML controls as server-side controls is to use ASP.NET Server Controls, also called ASP controls or web controls. ASP controls have been designed to augment and replace the standard HTML controls. ASP controls provide a more consistent object model and more consistently named attributes. For example, with HTML controls, there are myriad ways to handle input:
<input type="radio">
<input type="checkbox">
<input type="button">
<input type="text">
<textarea>
Each behaves differently and takes different attributes. The ASP controls try to normalize the set of controls, using attributes consistently throughout the ASP control object model. The ASP controls that correspond to the preceding HTML server-side controls are:
<asp:RadioButton>
<asp:CheckBox>
<asp:Button>
<asp:TextBox rows="1">
<asp:TextBox rows="5">
The remainder of this chapter focuses on ASP controls.
Various technologies have offered programmers the opportunity to bind controls to data so that as the data was modified, the controls responded automatically. As Rocky used to say to Bullwinkle, “But that trick never works.” Bound controls often provided the developer with severe limitations in how the control looked and performed.
The ASP.NET designers set out to solve these problems and provide a suite of robust data-bound controls, which simplify display and modification of data, sacrificing neither performance nor control over the UI. In Version 2.0 they have expanded the list of bindable controls and provided even more out-of-the-box functionality.
In the previous section, you hardcoded radio buttons onto a form, one for each of three shippers in the Northwind database. That can’t be the best way to do it; if you change the shippers in the database, you have to go back and rewire the controls. This section shows how you can create these controls dynamically and then bind them to data in the database.
You might want to create the radio
buttons based on data in the database
because you can’t know at design time what text the
buttons will have, or even how many buttons you’ll
need. To accomplish this,
you’ll bind your RadioButtonList
to a data source.
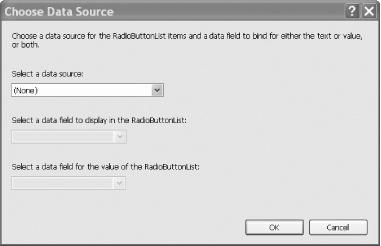
Create a new web site called DisplayShippers and drag a
RadioButtonList onto the form. This time, instead
of choosing EditItems from the Common
RadioButtonList Tasks, click Choose Data Source.... The Choose Data
Source dialog opens, as shown in Figure 15-8.
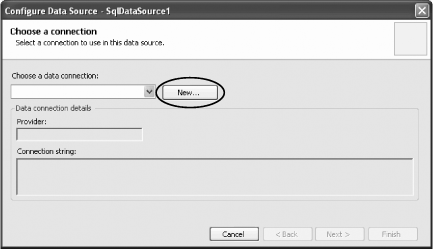
Drop down the Select a data source menu, and choose <New Data Source>. You are then prompted to choose a data source from the datatypes on your machine. Select Database, and the Configure Data Source dialog box opens, as shown in Figure 15-9.
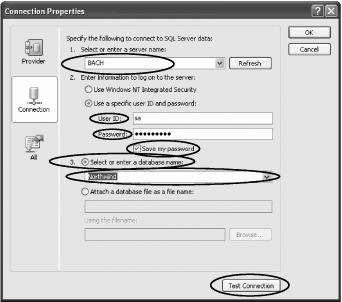
Choose New to configure a new data source, and the Connection Properties Dialog opens. Fill in the fields: choose your server name, how you want to log into the server, and the name of the database. Be sure to click Test Connection to test the connection. When everything is working, click OK as shown in Figure 15-10.
After clicking OK, the connection properties will be filled in for
the Configure Data Source dialog. Review them and if they are OK,
click Next. On the next wizard page, name your connection (e.g.,
NorthWindConnectionString) if you want to save it
to a configuration file that can be reused.
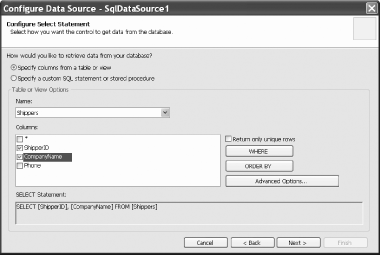
When you click Next, you’ll have the opportunity to specify the columns you want to retrieve, or to specify a custom SQL statement or stored procedure for retrieving the data.
Drop the Table list and scroll down to shippers. Select the
ShipperID and CompanyName
fields, as shown in Figure 15-11.
Tip
While you are here you may want to click the AdvancedOptions button just to see what other options are available to you.
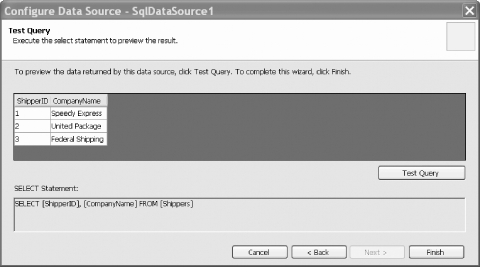
Click Next and test your query to see that you are getting back the values you expected, as shown in Figure 15-12.
It is now time to attach the data source you’ve
just built to the RadioButtonList. A
RadioButtonList (like most lists) distinguishes
between the value to display (e.g., the name of the delivery service)
and the value of that selection (e.g., the delivery service ID). Set
these fields in the wizard, using the drop down, as shown in Figure 15-13.

You can improve the look and feel of the radio buttons by binding to the Shippers table, clicking the Radio Button list, and then setting the list’s properties in the Properties window.
Before moving on, there are a few things to notice. When you press F5 to run this application, it appears in a web browser, and the radio buttons come up as expected. Choose View→ Source and you’ll see that what is being sent to the browser is simple HTML, as shown in Figure 15-14.

Notice that the HTML has no RadioButtonList; it
has a table, with cells, within which are standard HTML input objects
and labels. ASP.NET has translated the developer controls to HTML
understandable by any browser.
Warning
A malicious user may create a message that looks like a valid post from your form, but in which he has set a value for a field you never provided in your form. This may enable him to choose an option not properly available (e.g., a Premier-customer option) or even to launch a SQL injection attack. You want to be especially careful about exposing important data such as primary keys in your HTML, and take care that what you receive from the user may not be restricted to what you provide in your form. For more information on secure coding in .NET, see http://msdn.microsoft.com/security/.
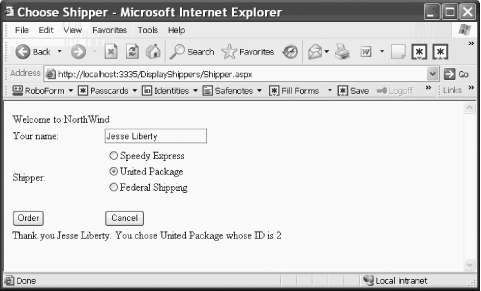
By adding just a few more controls, you can create a complete form with which users can interact. You will do this by adding a more appropriate greeting (“Welcome to Northwind”), a text box to accept the name of the user, two new buttons (Order and Cancel), and text that provides feedback to the user. Figure 15-15 shows the finished form.
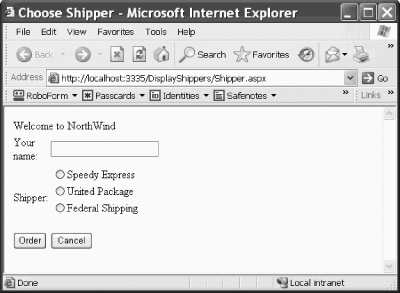
This form won’t win any awards for design, but its use will illustrate a number of key points about Web Forms.
Tip
I’ve never known a developer who didn’t think he could design a perfectly fine UI. At the same time, I never knew one who actually could. UI design is one of those skills (such as teaching) that we all think we possess, but only a few very talented folks are good at it. As a developer, I know my limitations: I write the code, and someone else lays it out on the page and ensures that usability issues are reviewed.
Example 15-1 is the complete HTML for the .aspx file.
Example 15-1. The .aspx file
<%@ Page Language="C#" CompileWith="Shipper.aspx.cs"
  ClassName="Shipper_aspx" %>

<!DOCTYPE html PUBLIC "-//W3C//DTD XHTML 1.1//EN"
  "http://www.w3.org/TR/xhtml11/DTD/xhtml11.dtd">

<html xmlns="http://www.w3.org/1999/xhtml" >
<head runat="server">
    <title>Choose Shipper</title>
</head>
<body>
    <form id="form1" runat="server">
    <table style="width: 166px; height: 33px">
        <tr>
            <td colspan="2" style="height: 20px">Welcome to NorthWind</td>
        </tr>
        <tr>
            <td>Your name:</td>
            <td><asp:TextBox ID="txtName" Runat=server></asp:TextBox></td>
        </tr>
        <tr>
            <td>Shipper:</td>
            <td>
                <asp:RadioButtonList
                    ID="RadioButtonList1"
                    Runat="server"
                    DataSourceID="SqlDataSource1"
                    DataTextField="CompanyName"
                    DataValueField="ShipperID">
                </asp:RadioButtonList>
                   <asp:SqlDataSource
                   ID="SqlDataSource1"
                   Runat="server"
                   SelectCommand="SELECT [ShipperID], [CompanyName]
                          FROM [Shippers]"
                   ConnectionString=
                   "<%$ ConnectionStrings:NorthWindConnectionString %>">
                </asp:SqlDataSource> <br />
            </td>
        </tr>
        <tr>
            <td><asp:Button ID="btnOrder" Runat=server Text="Order" /></td>
            <td><asp:Button ID="btnCancel" Runat=server
                                              Text="Cancel" /></td>
        </tr>
        <tr>
            <td colspan="2"><asp:Label id="lblMsg"
                  runat=server></asp:Label></td>
        </tr>
    </table>
    </form>
</body>
</html>
When the user clicks the Order button, you’ll check that the user has filled in his name, and you’ll also provide feedback on which shipper was chosen. Remember, at design time you can’t know the name of the shipper (this is obtained from the database), so you’ll have to ask the listbox for the chosen name (and ID).
To accomplish all of this, switch to Design mode and double-click the
Order button. Visual Studio will put you in the code-behind page, and
will create an event handler for the button’s
Click event.
Tip
To simplify this code we will not validate that the user has entered a name in the text box. For more on the validation controls that make this simple, please see Programming ASP.NET (O’Reilly).
You add the event-handling code, setting the text of the label to
pick up the text from the text box and the text and value from the
RadioButtonList:
void btnOrder_Click( object sender,EventArgs e )
{

   lblMsg.Text = "Thank you " + txtName.Text.Trim( ) + ".  You chose " +
      rblShippers.SelectedItem.Text.ToString( ) + " whose ID is " +
      rblShippers.SelectedValue.ToString( );
}
When you run this program you’ll notice that none of
the radio buttons is selected. Binding the list did not specify which
one is the default. There are a number of ways around this, but the
simplest is to override the OnLoad event and set
the first radio button to be selected.
Return to Shipper.aspx.cs and type
protected override. You will see a
scrolling list of all the overrideable methods, properties, etc., as
shown in Figure 15-16.
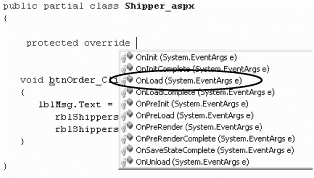
Start typing OnLoad; when it is highlighted press Tab. The stub for
the overridden method is created, but its default body throws the
NotImplementedException.
Delete the exception and replace it with this code:
rblShippers.SelectedIndex = 0;
This sets the RadioButtonList’s
first radio button to selected. The problem with this solution is
subtle. If you run the application, you’ll see that
the first button is selected, but if you choose the second (or third)
button and click OK, you’ll find that the first
button is reset. You can’t seem to choose any but
the first selection. This is because each time the page is loaded,
the OnLoad event is run, and in that event handler
you are (re-)setting the selected index.
The fact is that you only want to set this button the first time the page is selected, not when it is posted back to the browser as a result of the OK button being clicked.
To solve this, wrap the setting in an if statement
that tests if the page has been posted back:
protected override void  OnLoad(EventArgs e)
{
    if ( !IsPostBack )
    {
       rblShippers.SelectedIndex = 0;
    }
}
When you run the page the IsPostBack property is
checked. The first time the page is posted, this value is false and
the radio button is set. If you click a radio button and then click
OK, the page is sent to the server for processing (where the
btnOrder_Click handler is run) and then the page
is posted back to the user. This time the
IsPostBack property is true, and thus the code
within the if statement isn’t
run, and the user’s choice is preserved, as shown in
Figure 15-17.
The complete code-behind form is shown in Example 15-2.
Example 15-2. Code-behind form for Shipper.aspx.cs
using System;
using System.Data;
using System.Configuration;
using System.Text;
using System.Web;
using System.Web.Security;
using System.Web.UI;
using System.Web.UI.WebControls;
using System.Web.UI.WebControls.WebParts;
using System.Web.UI.HtmlControls;

public partial classShipper_aspx
{

   protected override void  OnLoad(EventArgs e)
   {
      if ( !IsPostBack )
      {
         rblShippers.SelectedIndex = 0;
      }
   }

   void btnOrder_Click( object sender, EventArgs e )
   {
      lblMsg.Text = "Thank you " + txtName.Text.Trim( ) + ".  You chose " +
         rblShippers.SelectedItem.Text.ToString( ) + " whose ID is " +
         rblShippers.SelectedValue.ToString( );
   }
}
Tip
ASP 1.1 programmers take
note
: as
mentioned earlier, the aspx.cs file is now
greatly simplified. You can refer to items on the page (e.g.,
lblMsg) without declaring protected members, and
all the designer-generated code is hidden, allowing you to focus
exclusively on the logic of your application.
.NET web services help you write components whose methods can be invoked across the Internet using any .NET programming language. Developers who are creating web services can build one upon another, taking advantage of the connectivity that is at the heart of the Web. Adding value takes precedence over reinventing the wheel.
The list of web services that might be useful to developers and end users seems boundless. A bookstore might provide a web service that takes an ISBN and returns the price and availability of a title. A hotel’s web service might take a date range and number of guests and return a reservation. Another web service might take a telephone number and return a name and address. Yet another might provide information about the weather or shuttle launches.
A single application might draw on and stitch together the services of hundreds of small web services distributed all over the world. This takes the Web to an entirely new dimension: not only is information retrieved and exchanged, but also methods are invoked and applications are executed.
What is needed to make web services possible is a simple, universally accepted protocol for exposing and invoking web service functions.[2] In 1999, Simple Object Access Protocol (SOAP) was proposed to the World Wide Web Consortium. SOAP has the advantages of being based on XML and of using standard Internet communications protocols.
Tip
Since 1999 SOAP ceased to stand for anything, on the grounds that having “object” in there was misleading because SOAP isn’t about objects; rather, it is about messaging. The second, more recent change was a new reverse-engineered term: the Service Oriented Architecture Protocol.
SOAP is a lightweight, message-based protocol built on XML, HTTP, and SMTP. Two other protocols are desirable, but not required, for a client to use a SOAP-enabled web service: a description of the methods provided by a particular service that can be understood and acted upon by clients, and a description of all such services available at a particular site or URL. The first of these is provided in .NET by the Web Service Description Language (WSDL), jointly developed by Microsoft, IBM, and others.
WSDL is an XML schema used to describe the available methods—the interface—of a web service.
The
plumbing necessary to create web
services is integrated into the .NET Framework and provided by
classes within the
System.Web.Services
namespace. Creating a web service
requires no special programming on your part; you need only write the
implementing code, add the [WebMethod] attribute,
and let the server do the rest. You can read about attributes in
detail in Chapter 18.
You make use of a web service by writing client code that acts as though it were communicating directly with a local object, but in reality communicates with a host server through a proxy . The job of the proxy is to represent the server on the client machine, to bundle client requests into SOAP messages that are sent on to the server, and to retrieve the responses that contain the result.
To illustrate the techniques used to implement a web service in C# using the services classes of the .NET Framework, build a simple calculator and then make use of its functions over the Web.
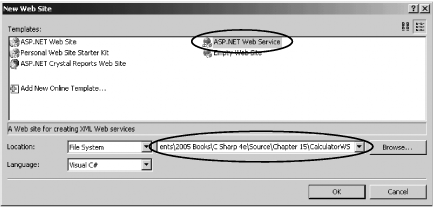
Begin by specifying the web service. To do so, define a class that
inherits from System.Web.Services.WebService. The
easiest way to create this class is to open Visual Studio and create
a new C# web site. In the Templates section choose ASP.NET Web
Service and name your web service CalculatorWS, as shown in Figure 15-18.
Visual Studio .NET creates a skeleton web service and even provides a web service example method for you to replace with your own code, as shown in Example 15-3.
Example 15-3. Skeleton web class generated by Visual Studio .NET
using System.Web;
using System.Web.Services;
using System.Web.Services.Protocols;

[WebServiceBinding(ConformanceClaims=WsiClaims.BP10,
EmitConformanceClaims = true)]
public class Service : System.Web.Services.WebService {

    [WebMethod]
    public string HelloWorld( ) {
        return "Hello World";
    }
}
To flesh out the calculator, replace the
HelloWorld method with five other methods:
Add(),
Sub( ),
Mult()
,
Div( )
, and
Pow( ). Each takes two
parameters of type double, performs the requested
operation, and then returns a value of the same type. For example,
here is the code for raising a number to some specified power:
public double Pow(double x, double y)
{
   double retVal = x;
   for (int i = 0;i < y-1;i++)
   {
      retVal *= x;
   }
   return retVal;
}
To expose each method as a web service, you simply add the
[WebMethod] attribute before each method
declaration:
[WebMethod]
You aren’t required to expose all the methods of
your class as web services. You can pick and choose, adding the
[WebMethod] attribute only to those methods you
want to expose.
That’s all you need to do; .NET takes care of the rest.
Example 15-4 shows the complete source code for the calculator web service.
Example 15-4. Calculator web service program
using System.Web;
using System.Web.Services;
using System.Web.Services.Protocols;

[WebServiceBinding(ConformanceClaims=WsiClaims.BP10,
EmitConformanceClaims = true)]
public class Service : System.Web.Services.WebService {

   [WebMethod]
   public double Add( double x, double y )
   {
      return x + y;
   }

   [WebMethod]
   public double Sub( double x, double y )
   {
      return x - y;
   }
   [WebMethod]
   public double Mult( double x, double y )
   {
      return x * y;
   }
   [WebMethod]
   public double Div( double x, double y )
   {
      return x / y;
   }
   [WebMethod]
   public double Pow( double x, double y )
   {
      double retVal = x;
      for ( int i = 0; i < y - 1; i++ )
      {
         retVal *= x;
      }
      return retVal;
   }
}
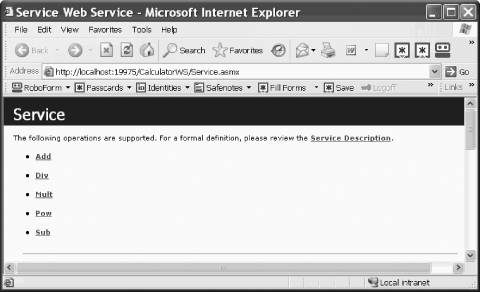
If you invoke the browser by running the program in Visual Studio .NET, you will see an automatically generated, server-side web page that describes the web service, as shown in Figure 15-19. This page offers a good way to test your web service.
Clicking a method brings you to a page that describes the method and allows you to invoke it by typing in parameters and pressing the Clicking button. Figure 15-20 illustrates.
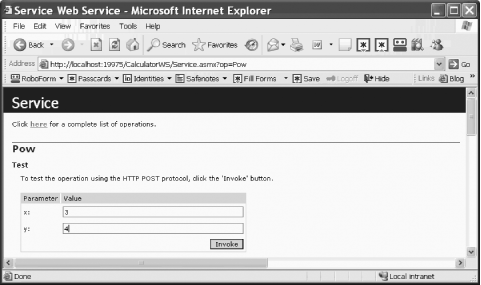
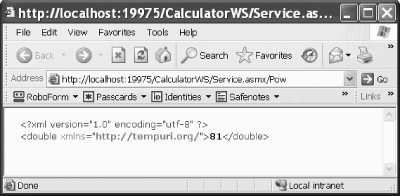
If you type 3 into the first value field,
4 into the second field, and click Invoke, you
will have asked the web service to raise 3 to the
fourth power. The result is an XML page describing the output, as
shown in Figure 15-21.
A lot of work is being done for you automatically. HTML pages describing your web service and its methods are generated, and these pages include links to pages in which the methods can be tested.
All web services can be described in WSDL files. You can see the WSDL document by appending ?WSDL to the web service URL, like this:
http://localhost:19975/CalculatorWS/Service.asmx?wsdlThe browser displays the WSDL document, as shown in Figure 15-22.
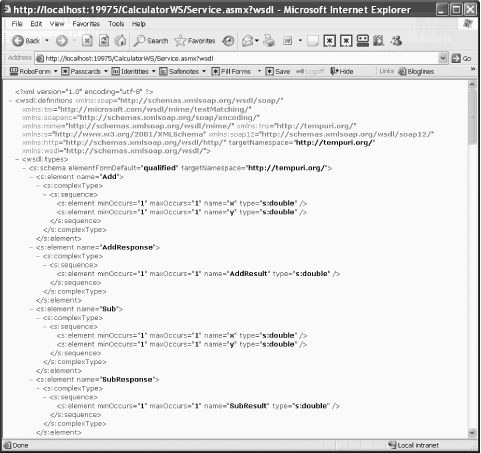
The details of the WSDL document are beyond the scope of this book, but you can see that each method is fully described in a structured XML format. This is the information used by SOAP to allow the client browser to invoke your web service methods on the server.
Before you can create a client application to interact with the calculator web service, you will first create a proxy class. Once again, you can do this by hand, but that would be hard work. The folks at Microsoft have provided a tool called wsdl that generates the source code for the proxy based on the information in the WSDL file.
To create the proxy, enter wsdl at the Visual Studio command-line prompt, followed by the path to the WSDL contract. For example, you might enter:
wsdl http://localhost:19975/CalculatorWS/Service.asmx?wsdlThe result is the creation of a C# client file named Service1.cs, an excerpt of which appears in Example 15-5.
Example 15-5. Sample client code to access the calculator web service
/----------------------------------------------------------------
// <autogenerated>
//     This code was generated by a tool.
//     Runtime Version:2.0.40607.16
//
//     Changes to this file may cause incorrect behavior and
//     will be lost if the code is regenerated.
// </autogenerated>
//----------------------------------------------------------------

using System;
using System.ComponentModel;
using System.Diagnostics;
using System.Web.Services;
using System.Web.Services.Protocols;
using System.Xml.Serialization;

//
// This source code was auto-generated by wsdl, Version=2.0.40607.16.
//

/// <remarks/>
[System.Diagnostics.DebuggerStepThroughAttribute( )]
[System.ComponentModel.DesignerCategoryAttribute("code")]
[System.Web.Services.WebServiceBindingAttribute(Name="ServiceSoap",
Namespace="http://tempuri.org/")]

public class Service : System.Web.Services.Protocols.SoapHttpClientProtocol
{

    private System.Threading.SendOrPostCallback AddOperationCompleted;

    private System.Threading.SendOrPostCallback SubOperationCompleted;

    private System.Threading.SendOrPostCallback MultOperationCompleted;

    private System.Threading.SendOrPostCallback DivOperationCompleted;

    private System.Threading.SendOrPostCallback PowOperationCompleted;

    /// <remarks/>
    public Service( ) {
        this.Url = "http://localhost:19975/CalculatorWS/Service.asmx";
    }

    /// <remarks/>
    public event AddCompletedEventHandler AddCompleted;

    /// <remarks/>
    public event SubCompletedEventHandler SubCompleted;

    /// <remarks/>
    public event MultCompletedEventHandler MultCompleted;

    /// <remarks/>
    public event DivCompletedEventHandler DivCompleted;

    /// <remarks/>
    public event PowCompletedEventHandler PowCompleted;

    /// <remarks/>
    [System.Web.Services.Protocols.SoapDocumentMethodAttribute
  ("http://tempuri.org/Add", RequestNamespace="http://tempuri.org/",
  ResponseNamespace="http://tempuri.org/",
  Use=System.Web.Services.Description.SoapBindingUse.Literal,
  ParameterStyle=System.Web.Services.Protocols.SoapParameterStyle.Wrapped)]
    public double Add(double x, double y) {
        object[] results = this.Invoke("Add", new object[] {
                    x,
                    y});
        return ((double)(results[0]));
    }

    /// <remarks/>
    public System.IAsyncResult BeginAdd(double x, double y, System.
           AsyncCallback callback, object asyncState) {
        return this.BeginInvoke("Add", new object[] {
                    x,
                    y}, callback, asyncState);
    }

    /// <remarks/>
    public double EndAdd(System.IAsyncResult asyncResult) {
        object[] results = this.EndInvoke(asyncResult);
        return ((double)(results[0]));
    }

    /// <remarks/>
    public void AddAsync(double x, double y) {
        this.AddAsync(x, y, null);
    }

    /// <remarks/>
    public void AddAsync(double x, double y, object userState) {
        if ((this.AddOperationCompleted == null)) {
            this.AddOperationCompleted = new
              System.Threading.SendOrPostCallback(
                this.OnAddOperationCompleted);
        }
        this.InvokeAsync("Add", new object[] {
                    x,
                    y}, this.AddOperationCompleted, userState);
    }

    private void OnAddOperationCompleted(object arg) {
        if ((this.AddCompleted != null)) {
            System.Web.Services.Protocols.
              InvokeCompletedEventArgs invokeArgs =
               ((System.Web.Services.Protocols.InvokeCompletedEventArgs)
               (arg));

            this.AddCompleted(this,
              new AddCompletedEventArgs(invokeArgs.Results,
              invokeArgs.Error, invokeArgs.Cancelled,
              invokeArgs.UserState));
        }
    }

    /// <remarks/>
    //...
This complex code is produced by the WSDL tool to build the proxy DLL you will need when you build your client. The file uses attributes extensively, but with your working knowledge of C# you can extrapolate at least how some of it works.
The file starts by declaring the Service1 class
that derives from the
SoapHttp-ClientProtocol
class, which occurs in the namespace
called System.Web.Services.Protocols:
public class Service1 :
   System.Web.Services.Protocols.SoapHttpClientProtocol
The constructor sets the URL property inherited
from SoapHttpClientProtocol to the URL of the
.asmx page you created earlier.
The Add()
method is declared with a host of
attributes that provide the SOAP plumbing to make the remote
invocation work.
The WSDL application has also provided asynchronous support for your
methods. For example, for the Add() method, it
also created BeginAdd() and
EndAdd( ). This allows you to interact with a web
service without performance penalties.
To test the web service, create a simple C# console application. Right-click the project, and add the Service1.cs file you created from the console window. Visual Studio will create a proxy for you named theWebSvc .
This done, you can invoke the
Pow() method as if it
were a method on a locally available object:
for (int i = 2;i<10; i++)
    for (int j = 1;j <10;j++)
    {
       Console.WriteLine(
         "{0} to the power of {1} = {2}", i, j,
        theWebSvc.Pow(i, j));
    }
This simple loop creates a table of the powers of the numbers
2 through 9, displaying for
each the powers 1 through 9.
The complete source code and an excerpt of the output is shown in
Example 15-6.
Example 15-6. A client program to test the calculator web service
#region Using directives

using System;
using System.Collections.Generic;
using System.Text;

#endregion

namespace CalculatorTest
{
   class Program
   {
// driver program to test the web service
      public class Tester
      {
         public static void Main( )
         {
            Tester t = new Tester( );
            t.Run( );
         }

         public void Run( )
         {
            int var1 = 5;
            int var2 = 7;

            // instantiate the web service proxy
            Service theWebSvc = new Service( );

            // call the add method
            Console.WriteLine( "{0} + {1} = {2}", var1, var2,
               theWebSvc.Add( var1, var2 ) );

            // build a table by repeatedly calling the pow method
            for ( int i = 2; i < 10; i++ )
               for ( int j = 1; j < 10; j++ )
               {
                  Console.WriteLine( "{0} to the power of {1} = {2}",
                     i, j, theWebSvc.Pow( i, j ) );
             }
         }
      }
   }
}

Output (excerpt):
5 + 7 = 12
2 to the power of 1 = 2
2 to the power of 2 = 4
2 to the power of 3 = 8
2 to the power of 4 = 16
2 to the power of 5 = 32
2 to the power of 6 = 64
2 to the power of 7 = 128
2 to the power of 8 = 256
2 to the power of 9 = 512
3 to the power of 1 = 3
3 to the power of 2 = 9
3 to the power of 3 = 27
3 to the power of 4 = 81
3 to the power of 5 = 243
3 to the power of 6 = 729
3 to the power of 7 = 2187
3 to the power of 8 = 6561
3 to the power of 9 = 19683
[1] Web services can, of course, be written in any language on any platform; the point of web services is that they are platform-independent. For the purposes of this book, however, we will focus on creating and consuming web services using .NET.
[2] This is a very Remote-Procedure-Call-oriented view of SOAP because that is how .NET encourages the developer to use SOAP. In reality, SOAP is designed to pass messages; but the .NET architecture implements that message-passing to invoke methods and access properties on a remote object.