
The W3C Document Object Model was an early effort to gain fine-grained control over a document in memory. This hack introduces you to how DOM works.
The Document Object Model or DOM (http://www.w3.org/DOM/) is a W3C-specified recommendation set that provides facilities to “allow programs and scripts to dynamically access and update the content, structure and style of documents. The document can be further processed and the results of that processing can be incorporated back into the presented page” (http://www.w3.org/DOM/#what). In other words, DOM is a tree-based API that allows you to pick an XML document (or HTML document) apart into its constituent parts, examine those parts, change them, and stuff them back into a document.
The first release of DOM came out in 1998 as a single document, with a second edition appearing in 2000 (http://www.w3.org/TR/2000/WD-DOM-Level-1-20000929/). Level 2 of DOM appeared later in 2000 and consists of not less than six modules: Core, Views, Events, Style, Traversal, Range, and HTML. You can get the whole package in a single ZIP archive at http://www.w3.org/2001/05/level-2-src.zip. Level 3 just reached recommendation status. It adds a Validation module (http://www.w3.org/TR/DOM-Level-3-Val/) and a Load and Save module (http://www.w3.org/TR/DOM-Level-3-LS/). It also updates the Core module (http://www.w3.org/TR/DOM-Level-3-Core/).
DOM represents documents as a hierarchy or tree of nodes. These nodes include Document, Element, Comment, and Text. These nodes are specified as interfaces that can be implemented by an application of DOM. Usually, the methods specified by these interfaces can manipulate the nodes in some way. Here is a sampling of a few of the methods specified in the Element interface:
-
getAttributeandsetAttribute,getAttributeNSandsetAttributeNS getAttributelets you retrieve an attribute by name, andsetAttributeadds a new attribute with a value. TheNSvariants let you retrieve an attribute by local name and namespace URI, plus add an attribute with qualified name, namespace URI, and a value.-
getElementsByTagNameandgetElementsByTagNameNS These return a list of all descendent elements with the give tag name. The
NSversion uses a local name and a namespace URI.-
hasAttributeandhasAttributeNS hasAttributereturnstruewhen it finds an attribute with the given name; likewise,hasAttributeNSreturnstruewhen it finds an attribute with the given local name and namespace URI.
In general, DOM stores whole documents in memory, which works fine when you are dealing with small or even medium size files; however, with large files you are likely to experience performance hits. Other APIs—such as SAX [Hack #97] , which is event-based—are a better choice for processing large documents.
DOM is implemented in a number of languages, such as Java and Python (http://www.python.org). This hack demonstrates a few small applications that use DOM: DOM Inspector, and Python and Java programs that are run at the command line.
The Mozilla and Firefox browsers offer a feature called DOM Inspector (http://www.mozilla.org/projects/inspector/). DOM Inspector provides a handy, straightforward DOM view of a document. With DOM Inspector, you can examine and even edit attributes in any web document using DOM techniques, and you can navigate through the hierarchy of the document with a two-paned window that allows a variety of document and node views.
In Firefox, you can access this feature by choosing Tools →
DOM Inspector. If you were already viewing
time.xml in Firefox, it would appear in the DOM
Inspector when you invoke the tool. If not, you could enter the URL
for the file in the address bar and then click Inspect.
time.xml is shown in DOM Inspector in Figure 7-2. (I have turned off anonymous content, and the
detection of whitespace nodes under the View menu, plus the display
of id and class attributes by
clicking the small window button on the upper-right of the left
pane.)
Tip
If you close the browser, run DOM Inspector separately, and bring up a new document, that document will appear in a small browser window at the bottom of DOM Inspector.
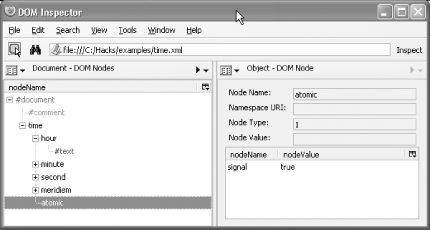
The nodes in time.xml are represented in tree
form in the left pane, and the atomic node (an
element) is highlighted. Information about the
atomic node is displayed in the right pane. There,
for example, you can see that atomic has a
signal attribute node with a value of
true. The representation of node names as
#document, #comment, or
#text, with the preceding #,
comes from the DOM specification.
You can edit attribute values with DOM Inspector. Select a node with
attributes in the left pane, and then select an attribute from that
node in the right pane. Right-click and select Edit from the menu.
You can then change the value of the attribute, but only
temporarily—that is, only for the document in memory (you
can’t write your changes to disk ). Try a document
such as time.html that uses
style attributes with CSS values. When you edit
such values, you can see the change immediately in the browser
window.
With the browser window in the background, click on a node name such
as hour or minute in the DOM
Inspector, or right-click on the name and select Blink Element from
the menu. When you click on the name, watch in the browser window:
you will see a red, blinking box surrounding the node whose name you
clicked. So DOM Inspector is a navigation aid. This will be helpful
when you are looking at larger, more complex documents.
Click through some of the other menus to see what other features DOM
Inspector has. Then, open a more complex document to see a more
intricate representation of the file in DOM. For example, go to
http://www.w3.org/ and bring up
DOM Inspector. Navigate through the nodes in the left pane and select
h2. Then, in the right pane, click on the menu
button next to the words Object-DOM Node in the
pane’s title bar. Choose CSS Style Rules and you
will see a listing of style information that applies to the subject
node.
The Python programming language is
growing in popularity. It is easy to learn—if you have any
programming background—and is easy to use. Python handles XML
well, and has a number of modules to do so; for example,
xml.dom.minidom, which is one of
Python’s implementations of DOM (http://www.python.org/doc/current/lib/module-xml.dom.minidom.html).
Our first example will show how to use minidom
with Python’s command-line interface.
Assuming that you have downloaded (http://www.python.org/download/) and
installed Version 2.3.3 (or later) of Python, type the command
python while in the working directory to see the
following prompt:
Python 2.3.3 (#51, Dec 18 2003, 20:22:39) [MSC v.1200 32 bit (Intel)]
on win32
Type "help", "copyright", "credits" or "license" for more information.
>>>
Now, for each line prefixed by >>> in
Example 7-19, enter the given command, and the
command will be followed by the given output; for example, after you
enter lines 1, 2, and 3, you should get the output on lines 4, 5, and
6.
Example 7-19. Python minidom line-by-line example
>>> from xml.dom import minidom
>>> doc = minidom.parse("time.xml")
>>> doc.toxml()
u'<?xml version="1.0" ?>
<!-- a time instant --><time timezone="PST">
 <hour>1
1</hour>
 <minute>59</minute>
 <second>59</second>
 <meridiem>p.m.</meridiem>

 <atomic signal="true"/>
</time>'
>>> print doc.toxml()
<?xml version="1.0" ?>
<!-- a time instant --><time timezone="PST">
 <hour>11</hour>
 <minute>59</minute>
 <second>59</second>
 <meridiem>p.m.</meridiem>
 <atomic signal="true"/>
</time>
>>> hr = doc.getElementsByTagName("hour")[0]
>>> print hr.toxml()
<hour>11</hour>
>>> ^Z
Line 1 imports the minidom package. On line 2,
minidom’s parse() method places
the document time.xml in a DOM structure named
doc. On line 3, minidom’s
toxml() method outputs the document, as stored,
to standard output (lines 4-6). Without the print
command, the contents of doc are printed out in
raw form; however, with print, you get the nicely
formatted output seen on lines 8 through 15. Line 16 uses the
getElementsByTagName() method to grab the
hour node ([0] specifies the
first item in the structure holding the element), and line 17 prints
it out. The Ctrl-Z on line 19, followed by Enter, ends the Python
command-line session.
Here’s another example. In the file archive you will
find the document time.py
(Example 7-20), a program that uses the
minidom module to convert
time.xml into an HTML document.
Example 7-20. time.py
import xml.dom.minidom

dom = xml.dom.minidom.parse("time.xml")
hour = dom.getElementsByTagName("hour")[0]
minute = dom.getElementsByTagName("minute")[0]
second = dom.getElementsByTagName("second")[0]
meridiem = dom.getElementsByTagName("meridiem")[0]

def getText(nodelist):
    rc = ""
    for node in nodelist:
        if node.nodeType =  = node.TEXT_NODE:
            rc = rc + node.data
    return rc

def doTime(time):
    print "<html>"
    print "<title>Time Instant</title>"
    print "<body>"
    print "<h2>Time Instant</h2>"
    print " <ul>"
    doHour(hour)
    doMinute(minute)
    doSecond(second)
    doMeridiem(meridiem)
    print " </ul>"
    print "</body>"
    print "</html>"

def doHour(hour):

    print "  <li>Hour: %s</li>" % getText(hour.childNodes)

def doMinute(minute):
    print "  <li>Minute: %s</li>" % getText(minute.childNodes)

def doSecond(second):
    print "  <li>Second: %s</li>" % getText(second.childNodes)

def doMeridiem(meridiem):
    print "  <li>Meridiem: %s</li>" % getText(meridiem.childNodes)

doTime(dom)
This program parses time.xml, and then uses the
getElementsByTagName()
method to grab four nodes of interest
out of dom: hour,
minute, second, and
meridiem. Each of these is used in the method
definitions on lines 30 through 40. In these definitions, the
getText()
method (line 9) is called with the
childNodes attribute, which retrieves a list of
all the child nodes (only text nodes in these cases). In each
print call, %s is replaced by
the string value returned by getText().
getText() creates an empty string
rc and then uses a for loop to
collect all the child nodes, if they are text
nodes (node.TEXT_NODE tests for that).
The doTime()
method on line 16 pulls everything
together: the manually printed HTML tags and the method calls
doHour(), doMinute(),
doSecond(), and doMeridiem(),
which together form the HTML list item (li)
elements.
Finally, here is a little bit of DOM as implemented by Java (http://java.sun.com) as part of Sun’s Java API for XML Processing, or JAXP (http://java.sun.com/xml/jaxp/index.jsp). Java 1.4 and later come standard with JAXP and DOM built in. The file BitODom.java , found in the file archive, has code similar to the command-line Python script shown in Example 7-19.
import javax.xml.parsers.DocumentBuilder;
import javax.xml.parsers.DocumentBuilderFactory;
import javax.xml.parsers.ParserConfigurationException;
import org.w3c.dom.Document;
import org.w3c.dom.NodeList;
import org.w3c.dom.Node;
import java.io.File;
import java.io.IOException;
import org.xml.sax.SAXException;

public class BitODom {

    static Document document;

    public static void main(String[  ] args)
        throws IOException, SAXException, ParserConfigurationException {

        DocumentBuilderFactory factory = DocumentBuilderFactory.newInstance();
        DocumentBuilder builder = factory.newDocumentBuilder();
        NodeList list;
        Node node;

        document = builder.parse(new File(args[0]));
        list = document.getElementsByTagName("hour");
        node = list.item(0);
        System.out.println(node);

   }

}
The classes imported on lines 1, 2, and 3 were added by Sun.
DocumentBuilder
allows you to obtain DOM Document instances from an XML document, and
DocumentBuilderFactory
lets applications get a parser that produces DOM object trees.
ParserConfigurationException
throws an exception if there is a configuration problem. The
interfaces imported on lines 4, 5, and 6 are APIs specified by the
W3C. A Document represents an entire XML (or HTML)
document. NodeList provides an abstract order-list
of nodes, and Node represents an individual node
in the DOM. The File class (line 7) helps the
parser accept a file for parsing. IOException and
SAXException (lines 8 and 9) help the program
figure out what to do if there is a problem in main() (line 16).
Line 13 instantiates a Document, and lines 18 and
19 build an object from which we can call the parser( ) method (line 23). The NodeList and
Node (lines 20 and 21) are necessary for actually
doing something with the nodes in
document—first placing the
hour node in list (line 24),
then using the item() method to extract the node
from list and put it in node
(line 25), then finally printing the node (line 26).
Both the source and compiled class files are already in the file
archive (BitODom.java and
BitODom.class). To recompile the source file,
run javac from a command prompt while in the
working directory:
javac BitODom.java
Then run the program with time.xml:
java BitODom time.xml
Your program output should be:
<hour>11</hour>
Try BitODom on other documents that contain the
hour element (find the files with grep "<hour>" *.xml). This little Java program just gives
you a starting point with DOM. Now that you have a basic
understanding of how DOM works in Java, you can consult the DOM APIs
and start adding other method calls or using attributes on your own
to manipulate and change your XML documents (http://java.sun.com/j2se/1.4.2/docs/api/org/w3c/dom/package-summary.html).
Tip
It should be noted once again that Java objects can use considerable memory, and that object creation and deletion takes time, which can make a system quite sluggish. You will find that loading large XML documents in DOM in Java can try your patience. If you are dealing with a good number of large documents, consider an alternative such as SAX [Hack #97] .
“Dive into Python,” by Mark Pilgrim: http://diveintopython.org/toc/index.html
Python in a Nutshell, by Alex Martelli (O’Reilly), pages 494-511
Java 1.4 DOM APIs: Java Version 1.4 DOM tutorial: http://java.sun.com/j2ee/1.4/docs/tutorial/doc/JAXPDOM.html
Microsoft’s DOM Developer’s Guide, with help for programming in C/C++, Visual Basic, and JScript: http://msdn.microsoft.com/library/default.asp?url=/library/en-us/xmlsdk/htm/dom_devguide_overview_2g1j.asp