
Chapter 3. Active Directory Integration
Introduction
Exchange 2000 and Exchange Server 2003 are completely dependent on a functioning Active Directory infrastructure. Exchange 5.5 used its own independent directory that contained mailbox objects that were separate from their corresponding Windows NT domain accounts. Exchange permissions were completely separate from Windows NT permissions, and Exchange had its own authentication and authorization mechanisms for controlling access to Exchange data. In Exchange 2000 and Exchange Server 2003, all authorization and authentication is built on Active Directory. Almost every aspect of Exchange’s normal operation depends on Active Directory in some way:
When a user attempts to log on to a mailbox (whether through MAPI, HTTP, IMAP, or POP), her credentials are passed to an Active Directory domain controller for validation.
Each server’s routing engine retrieves an initial copy of the routing link state table from the forest configuration container, making initial convergence of the routing table much faster.
When mail arrives at a server, the categorizer component of the Exchange transport core looks up the recipient addresses in Active Directory to decide if the recipient has a mailbox on that server or if it must be routed to another server in the organization.
A wide variety of properties and controls for various operations (including automatic conversion of distribution groups to security groups, the location of the SMTP queue directories, and Exchange system policies) are stored as properties on the Exchange organization object and its children.
A complete discussion of Active Directory architecture and design issues is far outside the scope of this book (try O’Reilly’s Active Directory, Second Edition if you’re looking for more background). However, a little background on how Exchange communicates with, and depends on, Active Directory will help make the recipes in this chapter clearer.
Domains, Forests, and Trees
If you’re familiar with Exchange 5.5, you may find the variety of Active Directory components, structures, and roles a little overwhelming. Exchange 2000 and Exchange Server 2003 are tightly integrated with Active Directory, but once you understand a few fairly simple concepts you’ll probably find yourself more comfortable with that integration.
The first thing to know is that Active Directory data can be partitioned. You’re already familiar with the concepts of domains, which are conceptually similar in Windows NT and Active Directory. Each Active Directory domain has a DNS name in addition to the more familiar NetBIOS name.
Active Directory allows the collection of multiple domains into structures known as forests and trees. A tree is a set of domains with a contiguous namespace and a common parent domain: for example, the oreilly.com tree can contain the windows.oreilly.com and macosx.oreilly.com domains. A forest, as you’d expect, is a collection of trees. The forest namespace doesn’t have to be contiguous. Windows automatically creates transitive, bidirectional trust between all domains in a forest.
Forests, trees, and domains can be represented as naming contexts, or NCs. In addition, there’s a special NC known as the configuration NC that lives at the forest level. The point behind these contexts is to allow applications (and the operating system) to store data at the appropriate level. For example, domain-level objects like computer accounts live in the domain NC.
Where Exchange Stores Configuration Data
Exchange depends on stored data in Active Directory. Most obviously, Windows uses the user
objects held in the domain NCs within the forest to authenticate
access requests, including those coming from Exchange. However, most
of the data specific to Exchange’s configuration and security is
actually held in the configuration NC. When you install Exchange 2000
or Exchange Server 2003 for the first time in a virgin forest, or when
you enable the Active Directory Connector to link an existing Exchange
5.5 organization to your forest, an object for the Exchange
organization is created in the configuration NC. This object is
immediately beneath the Exchange object in the configuration NC
(cn=Microsoft Exchange, cn=Services,
cn=configuration, dc=<
yourDomain>), and it has the name you
gave your Exchange organization during initial setup. Beneath the
Exchange organization object, there are separate containers for
address lists, administrative groups, connectors, recipient policies,
system policies, and Exchange settings that should apply to all
Exchange servers in the domain. These containers are used to store
configuration settings that apply to all servers in the
organization.
If you expand the administrative groups object, you’ll find
individual objects for the administrative groups themselves; in each
administrative group is the cn=servers object, which has one child
object for each server. These server objects store most
server-specific settings. Keeping these settings in Active Directory
instead of in the local registry or metabase means that ESM can easily
find and display settings for any server from any computer in the
forest. Many components, such as the routing engine, get settings
primarily from Active Directory. Some Exchange components (notably the
SMTP and HTTP protocol virtual servers) get their settings from the
metabase, which is essentially an IIS-specific cross between Active
Directory and the Windows registry. A special Exchange service called
ds2mb is responsible for reading settings from Active
Directory and stamping them into the metabase on each machine. A few
(notably the information store and system attendant) get settings from
all three locations; this is especially true for machine-specific
settings like the diagnostic logging level.
DC Versus GC
It’s easy to confuse the roles of the domain controller (DC) and the global catalog (GC) in an Exchange network: their acronyms are confusingly similar, and so (at first glance) are their functions. A DC for a particular domain is an authoritative source of information about objects that belong to that domain. Every domain object is represented in the domain NC; for each object contained within the domain, the domain NC stores a complete copy of all of its attributes. These attributes are writable (subject to permissions imposed by the system or the object owner). Every DC in a domain has the same information, assuming that AD replication is working properly, so it doesn’t matter which specific DC an application talks to, as long as it can reach one.
The GC is an additional role enabled on a DC. In addition to maintaining a complete writable replica of its own domain NC, it maintains a partial read-only replica of objects from every other domain NC in the AD forest. The “partial” in that sentence indicates that, for objects that are present in the GC, not all attributes of that object are available. That means that the GC can answer lots of interesting queries (for example, “what server contains the mailbox for the user account paulr?”) for any domain in the forest, not just the domain it happens to belong to. This makes it ideal for use with Exchange, since Exchange 2000 and 2003 are explicitly designed to run properly when users, servers, and recipients are spread across multiple domains in a forest.
The Role of DSAccess
Exchange uses a special-purpose service DLL called DSAccess to talk to Active Directory. Among other things, DSAccess is responsible for building a list of available DCs and GCs, deciding what roles those servers can play, and balancing query traffic between available servers in a particular role. For our purposes, it’s enough to think of DSAccess as the intermediary between Exchange components that don’t talk directly to the directory (such as the categorizer and System Attendant) and Active Directory.
Exchange actually divides directory servers into three separate roles:
The GC role represents servers that can be used to access user account and property information across all domains in the forest. DSAccess communicates with these servers using LDAP on TCP port 3268 (the default; SSL-protected LDAP sessions will use port 636, and you can change either of these ports if necessary). DSAccess will query a DC to get the list of available GCs, then load-balances future queries against the list of available GCs. This list can contain up to 10 GCs from the local site, or up to 200 GCs from other sites.
The DC role represents servers that can be used to answer queries where DSAccess knows what domain contains the requested object. DSAccess communicates with these servers using LDAP on TCP port 389 (the default standard LDAP port). DCs are dynamically detected every 15 minutes. As with the GC role, DSAccess maintains a list of up to 10 DCs, whether or not they’re in the local site.
The configuration role represents the DC used to retrieve information from, and write information to, the forest configuration naming context. Remember that Exchange uses the configuration NC to store information about the Exchange organization, and the routing and administrative groups defined therein, because this container spans all domains in the forest. Unlike the other roles, DSAccess will only use one server at a time for configuration requests—that prevents issues arising from two different servers that may contain different Exchange configuration data until replication converges. Every eight hours, DSAccess retests the chosen configuration server to ensure that it’s still suitable. If the selected server fails this test, or if it becomes unavailable before the eight-hour period expires, DSAccess will choose another DC from the DC list.
Obviously, a single DC can fulfill all three of these roles; it’s equally possible for all three roles to be handled by separate DCs. The interesting part comes about when you consider how DSAccess decides which servers to use for these roles. The basic process is fairly simple:
When the System Attendant starts, it opens an LDAP connection to a randomly chosen DC in the domain that contains the machine where the SA is running. Microsoft calls this initial DC the bootstrap server .
When DSAccess starts, if you’ve configured specific GCs or DCs (as described in Recipe 3.2), DSAccess will use those. If not, it will query the bootstrap server to find out what Active Directory site the Exchange server is in and what secondary sites are connected via site link or site link bridge objects; it uses this information to give preference to local GCs and DCs in the availability lists for those roles.
DSAccess uses the DC connection to the bootstrap server to determine if any of the DCs in the local site are also GCs. If there aren’t any local site GCs, DSAccess will use any available GC in the forest. In this situation, there won’t be any load balancing; DSAccess assumes that using multiple GCs in a remote site might flood a slow inter-site link.
The configuration role is set to the first local DC found by DSAccess. If you force DSAccess to use statically set servers for the DC role, DSAccess use the first designated server.
If individual DC or GC servers go down, they’re marked as down and rechecked every five minutes. If all of the DCs for a particular role fail, and you’re not statically assigning roles, DSAccess will repeat the process described above to redetect available DCs for the role. If you are using static assignments and all assigned DCs for a role fail, Exchange will basically be useless until those DCs come back up—it won’t attempt to dynamically detect DCs since you told it not to. Redetection also happens when the Exchange server’s Kerberos ticket expires (by default, it’s good for ten hours), when DCs or GCs are added or removed in the local site or domain, or when the System Attendant process is restarted. This process is significantly simpler when you install Exchange on a DC, since DSAccess will always attempt to use the local service unless it’s unavailable.
The Role of DSProxy
The DSProxy component has one simple job: it provides a way for Outlook clients using MAPI (or, more precisely, the Name Services Provider Interface, NSPI) to get address book information. In the original Outlook and Exchange design, every Exchange server had its own directory; with Exchange 2000 and Exchange Server 2003, that’s no longer true, because directory services are provided by Active Directory. MAPI provides a referral mechanism that allows an Exchange server to tell the client where the directory server really is; DSProxy’s first job is to generate those referrals for clients that can use them. In this case, that means Outlook 2000 Service Release 2 (SR2) and later, which understands the referral mechanism. Once these clients receive a referral, they’re smart enough to communicate directly with the Active Directory services on the referred server. Earlier versions of Outlook don’t do this, which leads to the second reason for DSProxy’s existence: it accepts NSPI requests and proxies them to Active Directory, emulating the MAPI address book provider provided by Exchange 5.5.
The Role of the Recipient Update Service
The recipient update service, or RUS, is responsible for applying addresses to addressable objects. This sounds simple, and for the most part it is. Every mail-enabled object has to have at least one proxy address associated with it, and the RUS generates that address and applies it to the object according to whatever recipient policies apply to that object class (and the specific object). Besides the proxy address, the RUS also updates a variety of other attributes, including the home mailbox database for mailbox-enabled objects, the object display name, and the Exchange 5.5-style distinguished name (DN) of objects that live in mixed-mode environments. There will normally be two separate RUS instances in an Exchange organization: the enterprise RUS is responsible for stamping attributes on system objects, and the domain RUS applies attributes to objects in an Active Directory domain. If you install Exchange in another domain within your forest, you’ll notice that a RUS for that domain is automatically created; however, if your Exchange servers are in different domains than your user and group objects (as when you have a resource forest design), you can create multiple instances of the RUS (see Recipe 3.7) to give you more control over RUS behavior in individual domains.
The RUS has another important function. You can create security or distribution groups that have hidden membership, but Exchange can’t expand these groups to send mail to the group members! When it encounters such a group object, the RUS adds some nonstandard access control entries to the group object to allow Exchange to expand the group without allowing other users to do the same thing.
Where to Learn More
For Exchange 2000, Microsoft has an excellent white paper, Understanding and Troubleshooting Directory Access, that discusses the algorithm Exchange uses to locate the best domain controllers; this white paper is available for download at:
| http://www.microsoft.com/downloads/details.aspx?FamilyID=c976433f-f979-4745-b7a6-9d8446ef6409&DisplayLang=en. |
Almost all of the mechanisms it describes are identical in Exchange Server 2003, so this paper’s a good reference for either version. The process of topology selection for Exchange Server 2003 is different in some respects; the best guide to it is Chapter 3 of the Exchange Server 2003 Technical Reference Guide:
| http://www.microsoft.com/technet/prodtechnol/Exchange/guides/E2k3TechRef/3d005e5c-c5c6-4bcc-b72f-1ad6069bc917.mspx |
3.1. Determining Which Domain Controllers Exchange Is Using
Problem
You need to know which DCs and GCs your Exchange server is currently configured to use, and whether they have been manually assigned or auto-discovered.
Solution
Using a graphical user interface
Launch the Exchange System Manager (Exchange System Manager.msc).
In the left pane, expand the appropriate Administrative Groups container, and then expand the Servers container.
Right-click the target server and select Properties.
Select the Directory Access tab. This tab will be present if you are using Exchange 2000 SP2 or later.
By default, all DCs that this server can use are shown, regardless of their role. You can determine their role by looking at the Type field.
If you need to limit the display to just a single type, select the appropriate option from the Show combo box. You can show All Domain Controllers, Configuration Domain Controller, Domain Controllers, or Global Catalog Servers.
Using VBScript
' This code queries the list of DSAccess instances and
' reports which DCs DSAccess is using.
' ------ SCRIPT CONFIGURATION ------
strServer = "<ServerFQDN>"  ' e.g., xch01.foobar.com; the NetBIOS name works too
' ------ END CONFIGURATION ---------

Dim objWMIExch
Dim listDCInst
Dim objDCInst
Dim strDCInfo

' Get the Exchange Namespace WMI object
Set objWMIExch =  GetObject("winmgmts:{impersonationLevel=impersonate}!//" &_
  strServer & "/root/MicrosoftExchangeV2")

' Get the list of Exchange_DSAccessDC instances and iterate through them
' to display their properties
Set listDCInst = objWMIExch.InstancesOf("Exchange_DSAccessDC")
strDCInfo = ""
For each objDCInst in listDCInst
   strDCInfo = strDCInfo & "DC: " & objDCInst.Name & " ("
   Select Case objDCInst.Type
     Case 0 strDCInfo = strDCInfo & "Configuration DC)"
     Case 1 strDCInfo = strDCInfo & "Domain Controller)"
     Case 2 strDCInfo = strDCInfo & "Global Catalog)"
   End Select
   Select Case objDCInst.ConfigurationType
     Case 0 strDCInfo = strDCInfo & " is manually configured."
     Case 1 strDCInfo = strDCInfo & " was auto-discovered."
   End Select
   strDCInfo = strDCInfo & VbCrLF
Next
Wscript.Echo strDCInfo
Discussion
The GUI method is straightforward if you are running at least Exchange 2000 SP2. Frankly, if you are still running SP1 or original Exchange 2000, you have bigger problems to worry about. Still, you can find at least a small bit of the information by looking at the field labeled Domain controller used by services on this server on the General tab of the server properties dialog in ESM.
It is normal to see multiple DC instances; at a minimum, you’re going to have three: one for the configuration DC, one for the DC role, and one for the GC role. The additional instances are used for redundancy and failover. DSAccess will allow only one configuration DC instance, to minimize update issues caused by replication latency in Active Directory’s multi-master architecture.
On a machine that is both a DC and Exchange server, you will only see three entries no matter how many other DCs you may have deployed; they will all be the local machine (see Recipe 2.9). This is because when you combine these roles, Exchange makes the optimization decision that you probably only have one DC (as when you’re running Small Business Server)—a reasonable decision in most cases.
Using VBScript
The VBScript solution uses the Exchange WMI namespace and relies on the Exchange_DSAccess class, which was added in Exchange 2000 SP2. If your server is not at least running at that build, the DSADiag utility is going to be your only option; you can get it from Microsoft’s Product Support Services (PSS) organization.
Tip
By default, this script runs under the credentials of the current user, so you must run it as a user with Exchange administrative privileges.
The basic technique we used is to retrieve a collection of
Exchange_DSAccessDC objects, since each configured or discovered DC
instance will be a separate entry. The Name property is a string
with the FQDN of the DC configured for that instance, while the Type
and ConfigurationType properties tell you what type of instance this
is and whether it was auto-discovered or manually configured. Note
that the ConfigurationType property is read-only, while both Name
and Type are read/write. If you’re creating new instances of
Exchange_DSAccessDC, you have to
specify a name and type when you create them.
Additional properties that weren’t included in the solution, but may be of interest to you, include:
IsUpA read-only Boolean property. It is set to
Trueif the DC instance responded the last time that Exchange attempted to access it.IsFastA read-only Boolean property. It is set to
Trueif the DC instance has responded within two seconds to the last request from this instance of DSAccess.IsInSyncA read-only Boolean property. It is set to
Trueif the DC instance is fully synchronized with the GC and Configuration DCs.LDAPPortA 32-bit unsigned integer. It indicates which destination port Exchange will use to communicate with the DC; it’s read/write, so you can set it to force LDAP to use an alternate port (though this is of little value since Active Directory services always run on their default ports).
See Also
Recipe 2.8 for
more on installing Exchange on a DC, Recipe 3.2 for more on
forcing Exchange to use specified DCs, Recipe 3.3 and Recipe 3.4 for more on
verifying which DCs and GCs are in use, and Recipe 3.8 for
troubleshooting the DSAccess discovery process; the
Understanding and Troubleshooting Directory
Access Microsoft white paper, Chapter 3 of the
Exchange Server 2003 Technical Reference Guide,
and MS KB 316300 (Event ID 2080
from MSExchangeDSAccess); MSDN documentation
for the Exchange_DSAccessDC
class
3.2. Forcing Exchange to Use Specific Domain Controllers
Problem
You need to override the DSAccess auto-discovery algorithm and configure your Exchange server to use specific domain controllers.
Solution
Using a graphical user interface
Launch the Exchange System Manager (Exchange System Manager.msc).
In the left pane, expand the appropriate Administrative Groups container, and then expand the Servers container.
Select the desired server.
Right-click and select Properties.
Select the Directory Access tab. This tab will be present if you are using Exchange 2000 SP2 or later.
By default, the Show All Domain Controllers option is selected. While it is, the Automatically discover servers checkbox will be checked and grayed out.
Choose a specific type of DC from the list. You should now be able to uncheck the Automatically discover servers checkbox. You will be asked to confirm that you really want to switch to manual configuration; click Yes to confirm. This step must be done separately for each of the three DC roles.
Click the Add button.
You will be presented with the standard AD-enabled object picker. Type in the name of the DC or click Advanced to search the directory. When you have added the DCs of your choice, click OK.
If you want to manually configure more DCs in the same role for redundancy, repeat steps 7 and 8. If you want to manually configure a different role, return to step 6. Note that you will not be allowed to apply your changes if you have disabled automatic configuration in a role and have not configured at least one entry.
Click OK to close the property sheet.
Optionally, use any of the techniques from Recipe 3.1 to confirm your configuration changes.
Using a command-line interface
While there is no native command-line utility to force a particular topology on Exchange, by using the registry manipulation utility (reg.exe ) you can specify the various types of DCs. For each GC you want to hardcode, run the following commands, using UserGC1, the key name for the first GC, UserGC2 for the second, and so on:
> reg add HKLMSystemCurrentControlSetServicesMSExchangeDSAccess
ProfilesDefaultUserGC1 /t REG_SZ /v "Hostname" /d "<FQDN server name>"
> reg add HKLMSystemCurrentControlSetServicesMSExchangeDSAccess
ProfilesDefaultUserGC1 /t REG_DWORD /v "IsGC" /d 1
> reg add HKLMSystemCurrentControlSetServicesMSExchangeDSAccess
ProfilesDefaultUserGC1 /t REG_DWORD /v "PortNumber" /d 3268
For each DC you want to hardcode, run the following commands:
> reg add HKLMSystemCurrentControlSetServicesMSExchangeDSAccess
ProfilesDefaultUserDC1 /t REG_SZ /v "Hostname" /d "<FQDN server name>"
> reg add HKLMSystemCurrentControlSetServicesMSExchangeDSAccess
ProfilesDefaultUserDC1 /t REG_DWORD /v "IsGC" /d 0
> reg add HKLMSystemCurrentControlSetServicesMSExchangeDSAccess
ProfilesDefaultUserDC1 /t REG_DWORD /v "PortNumber" /d 389
For the configuration DC, run the following commands:
> reg add HKLMSystemCurrentControlSetServicesMSExchangeDSAccessInstance0
   /t REG_SZ /v "ConfigDCHostname" /d "<FQDN server name>"
> reg add HKLMSystemCurrentControlSetServicesMSExchangeDSAccessInstance0
   /t REG_DWORD /v "ConfigDCPortNumber" /d 389
Using VBScript
' This code removes all existing instances of the Exchange_DSAccessDC object.
' Doing so forces Exchange to rerun the topology discovery process.
' ------ SCRIPT CONFIGURATION ------
strServer = "<ServerFQDN>"  ' e.g., xch01.foobar.com
strDC = "<DomainControllerFQDN>" ' e.g., dc01.foobar.com
configType = 0         ' 0 = manual; 1 = automatic
' ------ END CONFIGURATION ---------

Dim objWMIExch
Dim listDCInst
Dim objDCInst
Dim strDCInfo

' Get the Exchange Namespace WMI object
Set objWMIExch =  GetObject("winmgmts:{impersonationLevel=impersonate}!//" &_
  strServer & "/root/MicrosoftExchangeV2")

' Get the list of Exchange_DSAccessDC instances and iterate through them
' to modify their properties; all instances of this Type will become manually
' configured.
Set listDCInst = objWMIExch.InstancesOf("Exchange_DSAccessDC")
For each objDCInst in listDCInst
   objDCInst.Name = strDC
   objDCInst.Put_
Next

' Delete all manually configured instances of one Type so that the discovery
' state is reset to Automatic and triggers topology discovery
For each objDCInst in listDCInst
   If (objDCInst.ConfigurationType = configType) Then
      wScript.echo "    **Deleting manually configured DC."
      objDCInst.Delete_
   End if
Next
Discussion
This is a straightforward continuation of the previous recipe. Note that if your Exchange server is also a DC, you will not be able to disable auto-discovery and you will not be able to add or remove instances by any method.
Adding manually-configured entries previous to Exchange 2000 SP2 is a bit different than SP2 and later. In Exchange 2000 and SP1, you cannot set the Configuration DC type via any method. Instead, Exchange examines the list of auto-discovered DCs and chooses the first one to be the configuration DC.
Using the GUI
The GUI creates new keys under HKLMSystemCurrentControlSetServicesMSEx-changeDSAccessProfilesDefault
and names them <FQDN
hostname>.<number>,
where number defines the role of the
entry (1 is for DC, 2 is for GC). If the same server is listed
both as a DC and a GC, it will have two entries. Each entry has four
values: Hostname, IsGC, PortNumber, and DSType. Hostname, IsGC, and PortNumber are the same as for the
command-line solution; DSType is
an enumerated value of 0,
1, or 2, corresponding to configuration DC, DC,
or GC, respectively.
Using a command-line interface
On Exchange 2000 SP2 and later, merely create the Instance0
key and add the ConfigDCHostname
value to set your Configuration DC. ConfigDCPortNumber is not required.
The registry keys used in the command-line solution are the
registry entries that are recommended by all of the Microsoft
guidance; they are not the same registry keys that the Exchange GUI
creates. When creating these keys manually, you must have a Hostname and IsGC value for each one or Exchange will
ignore the entry. PortNumber is
optional and is assumed to be the default for each role (389 for DCs, 3268 for GCs). The DSAccess component and
DC detection algorithm is described in detail in MS KB 250570
(Directory Service Server Detection and DSAccess Usage).
Using VBScript
Since each instance is really built up from the base WMI
SWbemObject, instances inherit the Put_ method which allows us to write the
instance back into the active configuration. The Put_ method will
validate the instance data for us before writing and successfully
update the configuration as long as the following conditions are
met:
The specified DC exists (the
Nameproperty is set and valid).The instance
Typeproperty is set and valid and the specified DC can function in that role (i.e., we’re not trying to declare a regular DC as a GC).The specified DC can be contacted on the configured port (if the
LDAPPortproperty is specified).We’re not trying to change and write back read-only properties.
As soon as you manually configure one instance of a particular
Type, all other entries of that
Type will be removed; be sure to
add all of the instances you need.
The second loop in the script demonstrates how to clear all
manually configured instances of a Type using the Delete_ method. Once you delete the last
manually configured instance of that Type, Exchange will revert to
auto-discovery for that type.
See Also
Recipe 3.1 for determining which DCs Exchange is using, MS KB 250570 (Directory Service Server Detection and DSAccess Usage), and the Understanding and Troubleshooting Directory Access Microsoft white paper
3.3. Determining and Specifying the DC That ESM Uses
Problem
You want to know which DC ESM is using to retrieve and display information from Active Directory, or you want to control which DC it will use.
Solution
Using a graphical user interface
To see which DC Exchange System Manager is using:
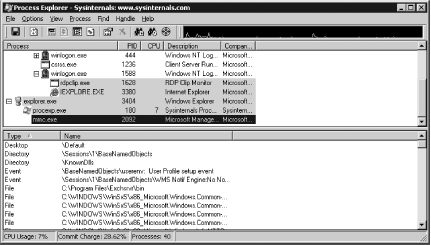
Download, install, and launch Process Explorer from http://www.sysinternals.com.
The Process Explorer window has two panes. In the top pane, on the left, there’s a list of all processes running on the local machine. Expand the explorer.exe process.
Expand the Explorer and you will see a process called mmc.exe and the ESM icon (see Figure 3-1).
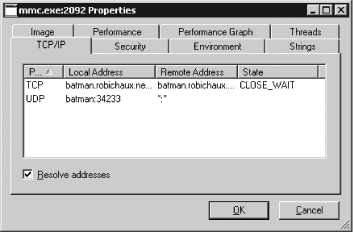
Double-click mmc.exe. Open the TCP/IP properties tab, as shown in Figure 3-2.
The Remote Address column will show the name of the DC that ESM is using (in this case, batman.robichaux.net).
To choose the DC that that ESM uses, do the following:
On as computer that has the Exchange System Manager installed, select Start→ Run, then type
mmcto launch the MMC application.Choose File→ Add/Remove Snap-in, then click the Add button.
From the list of snap-ins shown in the Add Standalone Snap-in window, select Exchange System and click Add.
The Change Domain Controller window will appear. By default, Any Writable Domain Controller is selected; if you want to select a specific DC, pick it from the list, then click OK.
Using a command-line interface
Close all open MMC snap-ins.
Launch the Exchange System Manager (Exchange System Manager.msc).
Open a new command window.
On the command line, type
tasklist/FI"imagenameeqmmc.exe"to find the process ID of the ESM process.Use the netstat command to find the corresponding process’ network connections:
> netstat-ano -p tcp | findstr "<
pid>"where
<pid>is the PID you found in step 4.The command-line output will list the source and destination IP addresses used by the TCP connections for the process you specified. The destination address is the address of the selected DC; you can use
ping-a<ipAddr> to resolve it if necessary.
Discussion
ESM displays information about the Exchange organization by reading information from the configuration partition in Active Directory. You may be surprised to learn that ESM doesn’t choose a DC using DSAccess, but rather on its own using ADSI serverless binding. Due to replication delays and possible problems, the information on one DC may not be entirely consistent with the information on another DC. Unfortunately, there is no way to determine which DC ESM is using from within the tool itself. This can be frustrating in situations where the information displayed by ESM does not match with what you expect and you want to know the DC name to start some troubleshooting.
The GUI method to determine the DC uses the Process Explorer tool from www.sysinternals.com. It is probably the simplest method to use. The only wrinkle we’ve found is if you start ESM after you’ve started Process Explorer, you don’t see the ESM icon associated with mmc.exe. This can cause some confusion if you have more than one mmc snap-in open.
The command-line method is a little cumbersome, but does the job. Before using this method, it is advisable to close all open MMC snap-ins and then start ESM to avoid confusion with tasklist.exe finding multiple MMC snap-ins.
The second GUI method shows how to specify the DC you want to use with ESM at startup. Not many people know about this because they tend to launch ESM directly from the Microsoft Exchange group in the programs list that is created when you install the Exchange System Management Tools. Sadly, it is not possible to connect to a different DC once ESM has started, as you can with ADUC. Hopefully, Microsoft will implement this feature in a future Service Pack.
See Also
How ESM discovers domain controllers (http://blogs.msdn.com/exchange/archive/2004/02/16/73915.aspx)
3.4. Removing Exchange from Active Directory
Solution
Using a graphical user interface
Prior to removing Exchange from Active Directory, you must uninstall Exchange 2000 or Exchange Server 2003 server. During the uninstall process, ensure that the Exchange System Manager MMC is not in use on the server.
Insert the Exchange 2000 or 2003 installation CD-ROM into the CD drive of the server (the installation CD-ROM must match the version of Exchange Server that you will be uninstalling).
Go to Start→ Run→ Browse and browse to the setupi386 directory; highlight setup.exe and click Open.
In the Open dialog box, select OK.
The Exchange installation wizard will launch; click Next.
In the Action column, select Remove next to the top-level Microsoft Exchange listing.
If a dialog box opens with details on why you cannot uninstall the server, note the items listed and resolve each item.
Click Next; review the Installation Summary listing and click Next again.
During the uninstall process, respond OK to the prompt notifying you that your Exchange information will be removed from Active Directory.
Click Finish.
If there are any Exchange 5.5 servers, use the Exchange 5.5 Administrative program to connect to each 5.5 server in the site the Exchange 2000 server was linked to and check to see if there are any references to the Exchange 2000 server. If there are any references to the Exchange 2000 server you need to remove, delete them by highlighting the object and deleting it. Wait until replication completes throughout the site before proceeding.
From a domain controller:
To remove an Exchange 2000 server installation: insert the Exchange 2000 SP2 (or higher) CD-ROM into your CD drive and browse to the update file (setupi386updatesupdate.exe) using Start→ Run; type
/removeorgat the end of the string, so the command looks like this:d:setupi386updatesupdate.exe /removeorg
To remove an Exchange Server 2003 installation: insert the Exchange Server 2003 installation CD-ROM into your CD drive and browse to the setup file (usually ...setupi386setup.exe) using Start→ Run; type
/removeorgat the end of the string, so the command looks like this:d:...setupi386setupsetup.exe /removeorg
Click Start and then Shut Down or Turn Off Computer (depending on the version of Windows Server you are running) from the Exchange server console.
Restart the domain controller that you were using to remove the Exchange organization.
Allow replication to occur between domain controllers.
Discussion
It is sometimes necessary to remove all Exchange-related objects from AD (bearing in mind that you can’t back out of the changes Exchange forestprep operations make to the schema). This is typically done when you’re cleaning up a failed installation to try again, or when you’re rebuilding a test or lab system but don’t want to have to roll back to a previous backup. The Exchange installer will remove the binaries, but it purposefully doesn’t touch anything in AD. Removing Exchange manually from AD is a tricky job—Exchange hooks deeply into AD, and it is often very hard to remove Exchange’s tentacles. If you are unsure if the remove operation has removed all traces of Exchange, you can follow the instructions in MS KB 260378 to verify that Exchange has been fully removed. If you’re trying to remove the first Exchange 2000 or Exchange Server 2003 server in an administrative group, you should check the steps described in MS KB 822931; the procedure described in this recipe doesn’t clean up Exchange-specific objects and shouldn’t be used for that purpose.
See Also
MS KB 822931 (How to remove the first Exchange Server 2003 computer from the administrative group), MS KB 260378 (How to Manually Remove an Exchange 2000 Installation), MS KB 273478 (How to Completely Remove Exchange 2000 from Active Directory), MS KB 312878 (The Exchange 2000 Service Pack 2 Removeorg Option for Update.exe), and MS KB 830185 (The REMOVEORG option in Exchange Server 2003)
3.5. Changing the Forest Functional Level
You want to change the mode of operation for your Windows 2003 forest from mixed mode to native mode so that you can create forest trusts to improve interoperability between two separate Exchange organizations.
Solution
Using a graphical user interface
Go to Start→ Administrative Tools and select Active Directory Domains and Trusts.
In the left pane, right-click Active Directory Domains and Trusts and select the Raise Forest Functional Level command. You won’t see it if the forest functional level has already been raised.
Select Windows Server 2003 Functional Level and click OK.
Click OK to acknowledge the dialog box.
Using a command-line interface
To retrieve the current forest functional level, use the following command:
> dsquery * <ForestRootDN> -scope base -attr msDS-Behavior-VersionOr you can use the enumprop
command found in the Windows 2000 Resource Kit:
> enumprop /ATTR:msDS-Behavior-Version "LDAP://<ForestRootDN>"To change the functional level to Windows Server 2003, use Notepad to create an LDIF file called raise_forest_func_level.ldf with the following contents:
    dn: cn=partitions,cn=configuration,<ForestRootDN>
    changetype: modify
    replace: msDS-Behavior-Version
    msDS-Behavior-Version: 2
    -
Next, run the ldifde
command to import the change.
> ldifde -I -f raise_forest_func_level.ldf
Using VBScript
' This code changes the functional level of the forest.
' ---------------------------------------------------------------
' From the book "Active Directory Cookbook" by Robbie Allen
' Publisher: O'Reilly and Associates
' ISBN: 0-596-00466-4
' Book web site: http://rallenhome.com/books/adcookbook/code.html
' ---------------------------------------------------------------

Set objRootDSE = GetObject("LDAP://RootDSE")
Set objDomain = GetObject("LDAP://cn=partitions,"& _
                           objRootDSE.Get("configurationNamingContext") )
if ObjDomain.Get("msDS-Behavior-Version") <> 2 then
    Wscript.Echo "Attempting to change forest to " &_
                 "Windows Server 2003 functional level..."
    objDomain.Put "msDS-Behavior-Version", 2
    objDomain.SetInfo
else
    Wscript.Echo "Forest already at Windows Server 2003 functional level"
end if
Discussion
The forest functional level can only be changed to Windows 2003 after all NT4 and Windows 2000 domain controllers have been either removed or upgraded to Windows Server 2003; once you have removed all of those older machines, you can raise the domain functional level of each domain in the forest. After all domains’ functional levels have been raised, you’ll be able to raise the forest functional level. The forest functional mode in Windows 2003 enables several Windows 2003-specific AD features, such as the ability to deactivate or redefine classes and attributes within the schema and the ability to rename a domain.
The msDS-Behavior-Version
attribute identifies the forest functional level within
Windows Server 2003. A setting of 0
indicates a Windows 2000 forest functional level, 1 indicates Windows 2000 interim mode, and
2 indicates Windows Server 2003
mode. The status of your forest can also be viewed by using ADSI Edit
(from the Windows 2000 and Windows 2003 Support Tools) and drilling
down through the Configuration container to the CN=Partitions object, then right-clicking
the object and selecting Properties from the drop-down listing. You
can then find the msDS-Behavior-Version attribute in the
Select a property to view area; once this attribute is selected, you
can view the current value.
See Also
Chapter 2 of Active Directory Cookbook for Windows Server 2003 and Windows 2000 (with special thanks to Robbie Allen for allowing us to reuse much of his recipe), for changing the functional level of a forest, and MS KB 322692 (Raise the Domain Functional Level in Windows Server 2003)
3.6. Controlling Exchange Settings Through Group Policy Objects
Problem
You want to apply Exchange settings like the GC/DC profiles described in Recipe 3.0 to all the servers in your organization.
Solution
Using a graphical user interface
Create a policy template file for the registry key or keys you want to apply. (See the Discussion section for more on these files and how to create and use them.)
Launch the Microsoft Management Console (mmc.exe).
Add the Group Policy Object snap-in using the File→ Add/Remove Snap-in command.
When prompted for the target of the snap-in, use the Browse button to select the domain or OU policy where you want to apply the settings. (See the Discussion section for more on choosing a target.)
In the Group Policy Object snap-in, expand the policy and the Computer Configuration and Administrative Templates nodes.
Right-click the Administrative Templates node and choose the Add/Remove Templates command.
In the Add/Remove Templates dialog box, click the Add button, then browse to the location of your template file and click Open.
Click the Close button.
In the Administrative Templates node, navigate to the newly added policy item and apply the appropriate settings.
Tip
You can also use the Group Policy Management Console (GPMC), which is much more versatile than the Windows 2000 MMC snap-in. GPMC is available from http://www.microsoft.com/windowsserver2003/gpmc and can be used on Windows XP or Windows 2003 to manage Windows 2000 or Windows 2003 Active Directory environments.
Discussion
There are several ways to apply settings to Exchange servers. Depending on the kind of setting you’re changing, the value that Exchange uses may come from Active Directory, the IIS metabase, or the local machine’s registry. Exchange system policies (described in Recipe 4.5) allow you to set some policies on a per-administrative group basis, but if you have a setting that depends on registry keys, you’ll need to use the group policy object mechanism to get these changes applied to the servers en masse. If you want to create custom values for registry-based settings across Exchange servers, the simplest way to do so is to create a template (or ADM file) and attach it to a group policy object. For example, you can create a template that implements the Outlook Web Access 2003 timeout settings (described in MS KB 830827), then apply the template settings to the OU that contains all of your Exchange OWA servers. The template format is documented on MSDN.
See Also
Recipe 4.5 for using Exchange system policies, “Administrative Template File Format” definition on MSDN (http://msdn.microsoft.com/library/en-us/policy/policy/administrative_template_file_format.asp), Chapter 9 of the Active Directory Cookbook, and Chapter 6 of Learning Windows 2003 (O’Reilly)
3.7. Installing Additional Recipient Update Service Instances
Problem
You need to ensure that additions, deletions, and changes to mail-enabled objects are updated in the GAL in a timely fashion, even in domains with no Exchange servers or where large numbers of directory changes are common.
Solution
Using a graphical user interface
Launch the Exchange System Manager (Exchange System Manager.msc).
In the left pane, expand the Recipients container, then the Recipient Update Services container.
Check the list of existing RUS instances. There should be one labeled Enterprise Configuration, as well as at least one for each domain in the forest in which an Exchange server has been located.
Right-click on the Recipient Update Services folder or in the Detail pane and select New→ Recipient Update Service.
Select the domain in your forest you wish this RUS instance to service and click Next.
Select the Exchange server you want this RUS instance to be hosted on. It does not need to be in the same domain and click Next.
Review the information. A DC in the domain will be selected for this RUS instance to connect to. If you are satisfied, click Finish to create the RUS instance.
Ensure that the new instance shows up in the listing.
Discussion
The RUS is the component of Exchange that watches over changes to the various mail-enabled objects, recipient policies, and address lists in the domain to make sure that all changes are visible in a timely fashion. By default, there is one Enterprise Configuration instance for the entire organization, as well as one for each domain in which an Exchange server has been installed. If there is no RUS instance corresponding to a domain (as would be the case in certain Exchange deployments) then no recipients can be created in that domain unless you stamp the attributes yourself.
Each instance is tied both to a specific DC and a specific Exchange server. There can only be one RUS per DC (with the sole exception of the Enterprise Configuration instance), but an Exchange server can host multiple RUS instances (each of which will take a small amount of processor and memory resources). In a mixed Exchange 2000/2003 organization, instances may be hosted on either version of Exchange.
Normally, Exchange will add RUS instances as needed. However, if you have a large AD domain that spans multiple sites and network latency is an issue, you might consider installing additional instances so that there is at least one per site. This ensures that updates, no matter where they are generated, are quickly reflected in the organization address lists. However, in some environments this introduces problems with duplication of proxy addresses; a better general approach is probably to reduce the replication latency between sites first, and if that doesn’t work, add more RUS instances.
Another case that requires the manual configuration of RUS instances are domains that will host mail-enabled objects, but do not have an Exchange server installed within them. A somewhat common example of this situation is the placeholder root domain configuration. In this instance, this also gives the benefit that Exchange servers can make use of GCs in the root domain in the event that none are available in the child domains.
In theory, the addition and removal of RUS instances is scriptable via ADSI; MSDN documents the MS-Exch-Address-List-Service-Container class in the AD schema. This class is the base of all RUS instance containers. In practice, there are a formidable number of properties that must be configured with the appropriate GUIDs for various servers and domain; these linkages are not documented and there are no methods provided in the various scripting interfaces to create or manage RUS instances themselves.
Since you can easily add RUS instances for your entire organization through the same node in ESM, and since these assignments should be relatively stable, stick to using ESM to manage your RUS instances.
See Also
Recipe 5.19 for working with recipient policies, MS KB 253838 (How the Recipient Update Service Applies System Policies), MS KB 288807 (Troubleshooting the Recipient Update Service), and MS KB 319065 (HOW TO: Work with the Recipient Update Service in Exchange 2000)
3.8. Troubleshooting DSAccess Topology Discovery
Problem
You notice that DSAccess is using a DC or GC that is out of site, or otherwise not optimal, and you want to know why.
Solution
Using a graphical user interface
Launch the Exchange System Manager (Exchange System Manager.msc).
In the left pane, expand the appropriate Administrative Groups container, and then expand the Servers container.
Right-click the target server and select Properties.
Click the Diagnostics Logging tab.
In the Services pane, scroll down and select MSExchangeDSAccess.
In the Categories pane, select Topology and change the Logging Level to Maximum. Click OK.
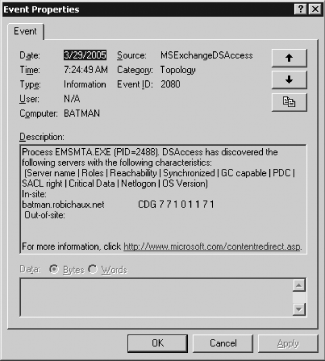
Open the Application event log and look for recent event with the ID 2080 from the source MSExchangeDSAccess, similar to that shown in Figure 3-3.
Use the MS KB 316300 to interpret the information from the ten columns shown in the 2080 event.
When finished, reset the diagnostics logging level for MSExchangeDSAccess Topology back to a lower level (e.g., none).
Discussion
We know from the description of the role of DSAccess earlier in this chapter that it is central to the smooth running of Exchange. Hence, when things go wrong it is useful to know what view of AD Exchange has. Setting diagnostics logging for DSAccess Topology lets us do this. DSAccess uses a wide range of criteria to determine which DCs and GCs are most suitable for it to use. Sometimes changes in the AD environment, either planned or unplanned, can impact the DCs and GCs selected by DSAccess. For example, if your AD team removes the only GC from a site, or if that GC is unavailable due to a problem, Exchange will start to use an out-of-site GC, which can severely degrade Exchange performance. Setting Diagnostics Logging for DSAccess Topology discovery will help you to identify the problem quickly.
See Also
MS KB 316300 (Event ID 2080 from MSExchangeDSAccess), Exchange 2003 Technical Reference Guide:
| http://www.microsoft.com/technet/prodtechnol/exchange/2003/library/techrefgde.mspx |
and the Understanding and Troubleshooting Directory Access white paper:
| http://www.microsoft.com/technet/prodtechnol/exchange/2000/library/utda.mspx |
3.9. Checking Which Account or Group Has Been Assigned Permissions During ForestPrep
Problem
Exchange ForestPrep was run at the time that the AD forest was first implemented and you now need to know which account or group has been granted Exchange Full Administrator permissions.
Solution
Using graphical user interface
Open ADSI Edit (ADSIEdit.msc)
Browse to the Exchange Organization container object:
CN=<
orgName>, CN=Microsoft Exchange,CN=Services,CN=Configuration, <ForestDN>Note that if Exchange Server 2003 ForestPrep (as opposed to Exchange 2000) has been run, you may see a GUID here instead of a friendly name. For example:
CN={335A1087-5131-4D45-BE3E-3C6C7F76F5EC},CN=Microsoft Exchange,
CN=Services,CN=Configuration,DC=company,DC=com
Right-click on the organization object and select Properties.
Click the Security tab, then click the Advanced button. Look for an account or group that has the permissions shown in Table 3-1.
Type | Permission | Inherited from | Apply to |
Deny | Receive As | <not inherited> | This object and all child objects |
Deny | Send As | <not inherited> | This object and all child objects |
Allow | Full Control | | This object and all child objects |
Using a command-line interface
Find the Exchange organization name using the following command:
> dsquery * forestroot "CN=Microsoft Exchange,CN=Services,CN=Configuration,
<ForestDN>" -scope subtree -filter "(objectclass=msExchOrganizationContainer)"
For example, this will produce the organization name for the
robichaux.net domain:
> dsquery * "CN=Microsoft Exchange,CN=Services,CN=Configuration,DC=robichaux,DC=net"
  -scope subtree -filter "(objectclass=msExchOrganizationContainer)"
This query will return a distinguished name that you can use as the target for the dsacls.exe utility. For Exchange 2000, this will be the friendly organization name; for Exchange Server 2003, it may be a GUID. Use the returned DN in a dsacls query:
> dsacls "CN<orgName>,CN=Microsoft Exchange,CN=Services,CN=Configuration, <ForestDN>"
For example:
> dsacls "CN={335A1087-5131-4D45-BE3E-3C6C7F76F5EC},CN=Microsoft
Exchange,CN=Services,CN=Configuration,DC=robichaux,DC=net"
The output from dsacls will show the permissions on the object. Look for the same account or group as suggested in the GUI solution.
Discussion
Many larger organizations tend to run Exchange ForestPrep at the time the AD forest is implemented. They do this to avoid the replication impact caused by running ForestPrep in a fully populated, live AD infrastructure. This may precede the installation of the first Exchange Server 2003 Server by some time and it may not be well documented. At the time Exchange ForestPrep is run, the setup program prompts for an account (or group) name. This account or group is then given Exchange Full Administrator permissions. When you want to install the first Exchange server, you may need to check, and optionally change, the account or group has been assigned these permissions.
The reason Exchange Server 2003 ForestPrep stamps a GUID instead of an organization is quite sensible. It gives you more flexibility to change your mind about the name in the time between running ForestPrep and installing the first Exchange Server 2003 Server. The Exchange 2000 ForestPrep would assign an organization name as one of its tasks, making it necessary to run setup with the /removeorg option if you subsequently wanted to change the organization name.
See Also
MS KB 312371 (HOW TO: Prepare the Forest by Using ForestPrep in Exchange 2000 Server)