
Chapter 14. Tiles and Other Presentation Approaches
Introduction
Struts is primarily intended to provide the controller for web applications. Some developers immediately associate Struts with the Struts JSP tags, but any Struts enthusiast will tell you that the Struts controller framework and API, not the tags, comprise the heart of the framework. You can limit, augment, and even replace your use of the Struts view-rendering features and still gain many of the advantages afforded by Struts.
The first half of this chapter focuses on Tiles. This framework, distributed and integrated with Struts, provides a robust approach for reusing pages and page layouts across your application. If you’ve never used Tiles, you’ll find recipes to get you started along with some more advanced uses of Tiles. The second half of this chapter takes a step back and shows you how to use new ways of generating HTML within the context of a Struts application.
The topics in this chapter, particularly the latter half, are broader in scope than most of the recipes in this book. Entire books have been written about some of these technologies, such as Java ServerFaces and XSLT, and it would be impossible to cover them completely in a single chapter, let alone a single recipe. The recipes here will help you get started using these technologies and will give you some insight and understanding on the technology and its application.
14.1. Reusing a Common Page Layout with Tiles
Problem
You want to define a common layout for your application and use that layout throughout your application without having to cut and paste HTML everywhere.
Solution
Use Tiles with your Struts application.
Discussion
Tiles has been distributed with Struts since the Struts 1.1 release. Prior to that, it was available as a separate add-on known as Components. Tiles allows you to create page component definitions that can be reused throughout your application.
The first step in using Tiles is to understand your needs. What are the common elements and what are the elements that change on every page? Is the layout the same across your application? If not, would your application be more usable if it did have a common layout?
To understand how to apply Tiles, this recipe walks you through its application for a simple web site. Say you want to apply a common page layout, such as the one in Figure 14-1, to every page of your application.
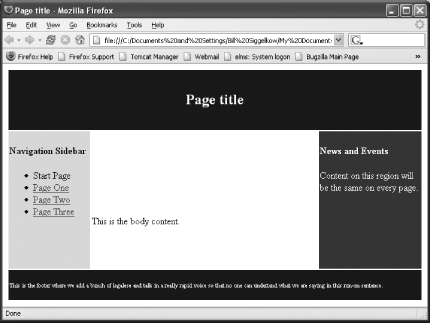
Moving from left to right and top to bottom, you pull the page apart into its component pieces described in Table 14-1.
|
Component name |
Description |
Page position |
|
Title |
Text, specific to the body content, displayed in the browser title as well as the header |
Browser title bar and within the header |
|
Header |
Contains the page title as header text |
Top, from left to right margin |
|
Navigation Bar |
Contains a set of links for pages that you can display as the body content |
Left sidebar |
|
Body Content |
Primary content of the page, varies for every page |
Centered below the header and between the sidebars |
|
News Sidebar |
News and events; this content will be the same on every page |
Right sidebar |
|
Footer |
Contains legalese and related information, displayed in a smaller font |
Bottom, from left to right margin |
You can think of the entire page as a single component that contains these components laid out in a particular fashion. You can define this set of components in a Tiles definition file (tiles-defs.xml), as shown in Example 14-1.
<?xml version="1.0" encoding="ISO-8859-1" ?>

<!DOCTYPE tiles-definitions PUBLIC
       "-//Apache Software Foundation//DTD Tiles Configuration 1.1//EN"
       "http://jakarta.apache.org/struts/dtds/tiles-config_1_1.dtd">

<tiles-definitions>
    <definition name="mainLayoutDef" path="/layouts/mainLayout.jsp">
        <put name="title" value="Struts Cookbook - Chapter 14 : Tiles"/>
        <put name="header" value="/common/header.jsp"/>
        <put name="navbar" value="/common/navbar2.jsp"/>
        <put name="body"   type="string"/>
        <put name="news"   value="/common/news.html"/>
        <put name="footer" value="/common/footer.jsp"/>
    </definition>
</tiles-definitions>
The path attribute of the
definition element specifies the location of the
JSP page that lays out the components. Each put
element defines a page component, and the value
attribute specifies the contents of that component.
If you have prototyped the layout using an HTML or JSP page, you can transform it into a Tiles layout page. Example 14-2 (sample.html) shows the static source HTML from Figure 14-1.
<html>
<head>
    <title>Page title</title>
</head>
<body bgcolor="white">
    <table border="0" width="100%">
        <tr>
            <td align="center" colspan="3" height="100" bgcolor="darkblue">
                <h2><font color="white">Page title</font></h2>
            </td>
        </tr>
        <tr height="300">
            <td width="20%" valign="top" bgcolor="gold">
                <p></p><h4>Navigation Sidebar</h4>
                <ul>
                    <li>Start Page</li>
                    <li><a href="page1.jsp">Page One</a></li>
                    <li><a href="page2.jsp">Page Two</a></li>
                    <li><a href="page3.jsp">Page Three</a></li>
                </ul>
            </td>
            <td width="55%" bgcolor="white">This is the body content.</td>
            <td width="25%" bgcolor="blue" valign="top">
                <span style="color:white">
                    <h4>News and Events</h4>
                    <p>Content on this region will be the same
                    on every page.</p>
                </span>
            </td>
        </tr>
        <tr><td colspan="3" height="50" bgcolor="darkblue">
                <font color="white" size="-2">
                    This is the footer where we add a bunch of legalese and
                    talk in a really rapid voice so that no one can undertand
                    what we are saying in this run-on sentence.
                </font>
            </td>
        </tr>
    </table>
</body>
</html>
To convert this page for Tiles, you use the Tiles JSP tags. The
tiles:insert tag serves as a placeholder for a
component named in a Tiles definition. Example 14-3
(mainLayout.jsp) shows the results of converting
the static page in Example 14-2. Though not required,
it helps organize your application if you save your layout pages in a
separate directory of your application. Conventionally, these common
layout JSPs are stored in the web/layouts
directory.
<%@ taglib uri="http://struts.apache.org/tags-bean" prefix="bean" %>
<%@ taglib uri="http://struts.apache.org/tags-html" prefix="html" %>
<%@ taglib uri="http://struts.apache.org/tags-logic" prefix="logic" %>
<%@ taglib uri="http://struts.apache.org/tags-tiles" prefix="tiles" %>

<html:html lang="true">
<head>
  <title><tiles:getAsString name="title"/></title>
  <html:base/>
</head>
<body bgcolor="white">
    <table border="0" width="100%">
        <tr>
            <td align="center" colspan="3" height="100" bgcolor="darkblue">
                <tiles:insert attribute="header">
                    <tiles:put name="title" beanName="title" beanScope="tile"/>
                </tiles:insert>
            </td>
        </tr>
        <tr height="300">
            <td width="20%" valign="top" bgcolor="gold">
                <tiles:insert attribute="navbar"/>
            </td>
            <td width="55%" bgcolor="white">
                <tiles:insert attribute="body"/>
            </td>
            <td width="25%" bgcolor="blue" valign="top">
                <tiles:insert attribute="news"/>
            </td>
        </tr>
        <tr>
            <td align="center" colspan="3" height="50" bgcolor="darkblue">
                <tiles:insert attribute="footer"/>
            </td>
        </tr>
    </table>
</body>
</html:html>
You can create a JSP page, as shown in Example 14-4 (view_start_page.jsp), that renders the definition using the layout.
<%@ taglib uri="http://struts.apache.org/tags-tiles" prefix="tiles" %>
<tiles:insert definition="mainLayoutDef">
    <tiles:put name="title" type="string" value="Start Page"/>
    <tiles:put name="body" value="/pages/pageStart.jsp"/>
</tiles:insert>
Here’s another JSP page (view_page_one.jsp) that uses the same definition:
<%@ taglib uri="http://struts.apache.org/tags-tiles" prefix="tiles" %>
<tiles:insert definition="mainLayoutDef">
    <tiles:put name="title" type="string" value="Page One"/>
    <tiles:put name="body" value="/pages/pageOne.jsp"/>
</tiles:insert>
With Tiles, you reduce the amount of HTML that you have to cut and paste. More importantly, when you need to modify the layout for all pages, you only have to make the change in one place. If you wanted to swap the position of the sidebars, you could make the change in the layout JSP page and all the Tiles that use the corresponding definition would reflect the new layout.
Tiles ships with Struts so no installation is required. To enable Tiles for your application, do the following:
Place your Tiles definition file (tiles-defs.xml) in your /WEB-INF directory.
Add the Tiles plug-in to your struts-config.xml file, setting the definitions-config property appropriately:
<plug-in className="org.apache.struts.tiles.TilesPlugin" >
    <!-- Path to XML definition file -->
    <set-property property="definitions-config"
                     value="/WEB-INF/tiles-defs.xml" />
</plug-in>
See Also
The Struts User’s Guide includes a section called "Page Composition with Tiles” available at http://struts.apache.org/userGuide/building_view.html#Tiles.
Struts ships with a sample Tiles web application, tiles-documentation.war. This application includes the Tiles documentation and highlights the power of Tiles for complex portal-style applications.
Recipe 14.2 shows you how to create definitions by extending a base definition. Instead of using a JSP to render a Tiles definition, such as the one shown in Example 14-4, you can use the technique shown in Recipe 14-3.
Cedric Dumoulin, the creator of Tiles, has a number of resources, papers, and sample code for Tiles. You can find these materials on his Tiles portal site at http://www.lifl.fr/~dumoulin/tiles/.
14.2. Extending Tile Definitions
Problem
You want to create a new Tiles definition that reuses a similar one.
Solution
When you define a new definition in your Tiles definition file
(tiles-def.xml), you can specify a definition to
extend using the
extends="definitionName"
attribute. The new definition inherits attributes of the extended
definition and can override attribute values. (See Example 14-5.)
<?xml version="1.0" encoding="ISO-8859-1" ?>

<!DOCTYPE tiles-definitions PUBLIC
       "-//Apache Software Foundation//DTD Tiles Configuration 1.1//EN"
       "http://jakarta.apache.org/struts/dtds/tiles-config_1_1.dtd">

<tiles-definitions>
    <!-- A base Tile -->
    <definition name="mainLayoutDef2" path="/layouts/mainLayout.jsp">
        <put name="title" value="Struts Cookbook - Chapter 14 : Tiles"/>
        <put name="header" value="/common/header.jsp"/>
        <put name="navbar" value="/common/navbar2.jsp"/>
        <put name="body"   type="string"/>
        <put name="news"   value="/common/news.html"/>
        <put name="footer" value="/common/footer.jsp"/>
    </definition>

    <!-- Extensions of the base mainLayoutDef2 tile -->
    <definition name=".start" extends="mainLayoutDef2">
        <put name="title" value="Start Page"/>
        <put name="body"  value="/pages/pageStart.jsp"/>
    </definition>

    <definition name=".pageOne" extends="mainLayoutDef2">
        <put name="title" value=" Page One"/>
        <put name="body"  value="/pages/pageOne.jsp"/>
        <put name="news"  value="/pages/pageOneNews.jsp"/>
    </definition>
<tiles-definitions>
Discussion
With Tiles, you can base a Tile definition on the definition of
another Tile. The new definition, which extends the base definition,
inherits the attributes of the base definition and overrides
attributes as needed. When using Tiles, developers commonly use the
approach shown in the Solution. The mainLayoutDef2
definition defines the basic layout to be used across the
application. In object-oriented terms, you can think of the base
definition as an abstract class. The .start and
.pageOne definitions extend
mainLayoutDef2. These definitions are like
concrete subclasses of the abstract base class.
The .start definition overrides two
attributes: title and body. The
overridden title specifies title text appropriate
for the Start page. The body attribute in the base
mainLayoutDef2 does not specify a value; think of
it as an abstract property. The .start definition
overrides the body attribute by specifying a
concrete value, a JSP page. The .pageOne
definition, which extends the mainLayoutDef2
definition, overrides the news attribute and sets
the title and body.
To create a page that uses the new definition, you insert the definition using the tiles:insert JSP tag as shown by Example 14-6 (startPage.jsp).
See Also
You can bypass the trivial JSP page used in Example 14-6 by forwarding directly to a definition, as shown in Recipe 14.3.
14.3. Displaying Tiles Using a Struts Forward
Problem
You don’t like having to write and maintain minimal JSP pages that insert a Tiles definition.
Solution
Use action forwards in your
struts-config.xml file
that specify the definition name for the path
attribute on the forward element. The
TilesRequestProcessor, deployed behind the scenes
by the TilePlugin, will forward to the definition
as if it were inserted by a JSP.
Assuming Tiles definitions are in your
tiles-defs.xml file named
.someTilesDef and
.anotherTilesDef, you can create actions such as
the following in your struts-config.xml file:
<action path="/doStartPage"
     forward=".someTilesDef"/>

<action path="/doPageOne"
        type="com.foo.SomeAction">
    <forward name="success" path=".anotherTilesDef"/>
</action>
Discussion
If you’ve read over the first couple of Tiles
recipes, you’ll notice that once a definition is
created, its trivial to write JSP code to render the page. Tiles uses
a custom request processor to eliminate the need for these trivial
pages. The TilesPlugin installs the
TilesRequestProcessor when the plug-in
initializes. The
TilesRequestProcessor
provides special handling that allows you to use a Tiles definition
as the target path for a Struts forward. When the
TileRequestProcessor processes the forward, if the
forward path matches a Tiles definition name, it loads the
definition, creates and initializes the Tile’s
context attributes, and inserts the corresponding definition. If the
path doesn’t match a definition, the
TilesRequestProcessor lets the base
RequestProcessor handle the request.
Using this approach you can elminate almost all direct references to
JSPs in your
struts-config.xml
file. You will end up with many actions and definitions; for each
action, you eliminate one JSP file that you would have had to
maintain. Instead of n JSP pages, you will
have n actions mappings in your
struts-config.xml file.
Local and global forwards can use this technique. The common convention is to specify definition names using a dot (“.”) separator instead of a slash (“/”).
See Also
For more information, check out the JavaDocs for the
TilesRequestProcessor. These are included with Struts, or
you can find this documentation at http://struts.apache.org/api/org/apache/struts/tiles/TilesRequestProcessor.html.
14.4. Creating Tabbed Panes
Problem
You want your pages to display as tabbed folders.
Solution
Use the Tiles Tabbed Layout. Example 14-7 shows the JSP page (tabsLayout.jsp) that lays out components in a tabbed fashion.
<%@ taglib uri="http://struts.apache.org/tags-bean" prefix="bean" %> <%@ taglib uri="http://struts.apache.org/tags-logic" prefix="logic" %> <%@ taglib uri="http://struts.apache.org/tags-tiles" prefix="tiles" %> <%-- Tabs Layout . This layout allows to render several tiles in a tabs fashion. @param tabList A list of available tabs. We use MenuItem to carry data (name, body, icon, ...) @param selectedIndex Index of default selected tab @param parameterName Name of parameter carrying selected info in http request. --%> <%-- Use tiles attributes, and declare them as page java variable. These attribute must be passed to the tile. --%> <tiles:useAttribute name="parameterName" classname="java.lang.String" /> <tiles:useAttribute id="selectedIndexStr" name="selectedIndex" ignore="true" classname="java.lang.String" /> <tiles:useAttribute name="tabList" classname="java.util.List" /> <% String selectedColor="#98ABC7"; String notSelectedColor="#C0C0C0"; int index = 0; // Loop index int selectedIndex = 0; // Check if selected come from request parameter try { selectedIndex = Integer.parseInt(selectedIndexStr); selectedIndex = Integer.parseInt(request.getParameter( parameterName )); } catch( java.lang.NumberFormatException ex ) { // do nothing } // Check selectedIndex bounds if( selectedIndex < 0 || selectedIndex >= tabList.size( ) ) selectedIndex = 0; String selectedBody = ((org.apache.struts.tiles.beans.MenuItem) tabList.get(selectedIndex)).getLink( ); // Selected body %> <table border="0" cellspacing="0" cellpadding="0"> <%-- Draw tabs --%> <tr> <td width="10"> </td> <td> <table border="0" cellspacing="0" cellpadding="5"> <tr> <logic:iterate id="tab" name="tabList" type="org.apache.struts.tiles.beans. MenuItem" > <% // compute href String href = request.getRequestURI( ) + "?"+parameterName + "=" + index; // Don't add request URI prefix , but let the client compute the // original URL. This allows to use a Struts action as page URL, // and perform a forward. // Bug reported by Don Peterkofsky //String href = "" + "?"+parameterName + "=" + index; String color = notSelectedColor; if( index == selectedIndex ) { selectedBody = tab.getLink( ); color = selectedColor; } // enf if index++; %> <td bgcolor="<%=color%>"> <a href="<%=href%>" ><%=tab.getValue( )%></a> </td> <td width="1" ></td> </logic:iterate> </tr> </table> </td> <td width="10" > </td> </tr> <tr> <td height="5" bgcolor="<%=selectedColor%>" colspan="3" > </td> </tr> <%-- Draw body --%> <tr> <td width="10" bgcolor="<%=selectedColor%>"> </td> <td> <tiles:insert name="<%=selectedBody%>" flush="true" /> </td> <td width="10" bgcolor="<%=selectedColor%>"> </td> </tr> <tr> <td height="5" bgcolor="<%=selectedColor%>" colspan="3" > </td> </tr> </table>
Create a definition in your tiles-defs.xml file that uses this layout such as the following:
<!-- Tiles used for Tabbed pane recipe -->
<definition name="example.tabs" path="/layouts/tabsLayout.jsp">
    <put name="selectedIndex" value="0"/>
    <put name="parameterName" value="selected"/>
    <putList name="tabList">
        <item value="Page One" link="/pages/pageOne.jsp"
             classtype="org.apache.struts.tiles.beans.SimpleMenuItem"/>
        <item value="Page Two" link="/pages/pageTwo.jsp"
             classtype="org.apache.struts.tiles.beans.SimpleMenuItem"/>
        <item value="Page Three" link="/pages/pageThree.jsp"
             classtype="org.apache.struts.tiles.beans.SimpleMenuItem"/>
    </putList>
</definition>
Finally, create a JSP page that inserts the definition:
<%@ taglib uri="http://struts.apache.org/tags-tiles" prefix="tiles" %>
<html>
    <head>
        <title>Tiles Tabbed Panes</title>
    </head>
    <body>
        <tiles:insert definition="example.tabs"/>
    </body>
</html>
Discussion
Tiles includes a tabbed layout that you can use and customize for your own user interfaces. This layout creates a page that will look something like Figure 14-2.
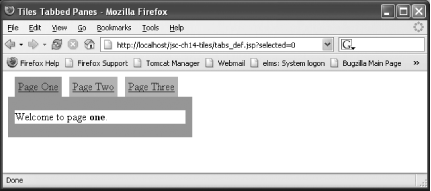
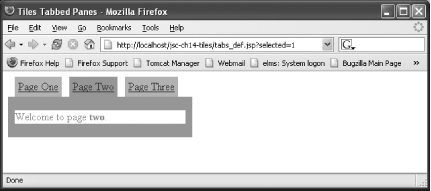
When you click on a link on a tab, the tab becomes highlighted and the content associated with that tab is displayed. Tiles uses the URL to determine the page to display as defined in the definition. For example, when you click on the “Page Two” tab, you will see the URL:
http://localhost/jsc-ch14-tiles/tabs_def.jsp?selected=1
Tiles uses the selected request parameter to index
into the items specified in the definition. As shown in Figure 14-3, this results in the display of the content
from the /pages/pageTwo.jsp page.
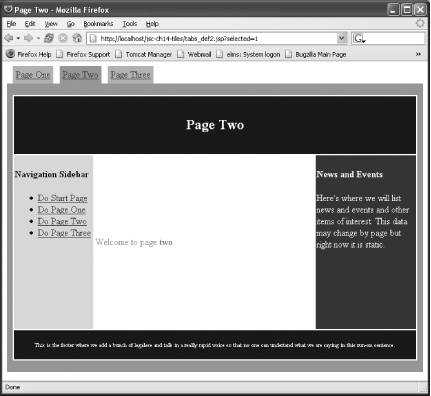
You can see the power of Tiles when you combine different Tiles
together. For example, you can combine the classic layout defined in
mainLayoutDef2 with the tabbed layout using the
definitions shown in Example 14-8. In this example,
the example.tabs2 definition creates the list of
tabs using the putList element. This element
contains three item elements that define the tabs.
Each item specifies a link attribute. The value of
this attribute dictates the page to be displayed when you select the
tab. Like most other Tiles definitions, the link
attribute accepts a URL to a web resource or a definition name.
<?xml version="1.0" encoding="ISO-8859-1" ?>

<!DOCTYPE tiles-definitions PUBLIC
       "-//Apache Software Foundation//DTD Tiles Configuration 1.1//EN"
       "http://jakarta.apache.org/struts/dtds/tiles-config_1_1.dtd">

<tiles-definitions>
    <!-- Tiles used for Recipe 14.1, 14.2, and 14.3 -->
    <!-- A base Tile -->
    <definition name="mainLayoutDef2" path="/layouts/mainLayout.jsp">
        <put name="title" value="Struts Cookbook - Chapter 14 : Tiles"/>
        <put name="header" value="/common/header.jsp"/>
        <put name="navbar" value="/common/navbar2.jsp"/>
        <put name="body"   type="string"/>
        <put name="news"   value="/common/news.html"/>
        <put name="footer" value="/common/footer.jsp"/>
    </definition>

    <!-- Extensions of the base mainLayoutDef tile -->
    <definition name=".start" extends="mainLayoutDef2">
        <put name="title" value="Start Page"/>
        <put name="body"  value="/pages/pageStart.jsp"/>
    </definition>

    <definition name=".pageOne" extends="mainLayoutDef2">
        <put name="title" value=" Page One"/>
        <put name="body"  value="/pages/pageOne.jsp"/>
    </definition>

    <definition name=".pageTwo" extends="mainLayoutDef2">
        <put name="title" value="Page Two"/>
        <put name="body"  value="/pages/pageTwo.jsp"/>
    </definition>

    <definition name=".pageThree" extends="mainLayoutDef2">
        <put name="title" value="Page Three"/>
        <put name="body"  value="/pages/pageThree.jsp"/>
    </definition>

    <!-- Tabbed layout that uses nested components -->
    <definition name="example.tabs2" path="/layouts/tabsLayout.jsp">
        <put name="selectedIndex" value="0"/>
        <put name="parameterName" value="selected"/>
        <putList name="tabList">
            <item value="Page One" link=".pageOne"
                 classtype="org.apache.struts.tiles.beans.SimpleMenuItem"/>
            <item value="Page Two" link=".pageTwo"
                 classtype="org.apache.struts.tiles.beans.SimpleMenuItem"/>
            <item value="Page Three" link=".pageThree"
                 classtype="org.apache.struts.tiles.beans.SimpleMenuItem"/>
        </putList>
    </definition>

</tiles-definitions>
Rendering the examples.tabs2 Tiles definition
results in a page such as the one in Figure 14-4.
See Also
Tiles includes a nested tabbed layout that allows you to contain submenus on each tab. Tiles comes with several other useful layouts. You can see these layouts in action with the tiles-documentation sample application included with Struts. The source code for these layouts ships with the Struts source distribution.
14.5. Using Tiles for I18N
Problem
You want to customize a Tiles definition based upon the user’s language and country.
Solution
Create a separate version of your Tiles definition file for the specific locale; appending the locale code to the file name. If you saved your Tiles definition file as tiles-def.xml, you would save the locale-specific definitions file for Spanish as tiles-def_es.xml.
Discussion
Developers commonly localize JSP pages in a Struts application using
a localized message resources file and the
bean:message tag. If you need to display a
different page and you are using Tiles, you can set aside a Tiles
definition for a specific locale by placing it in a locale-specific
Tiles definition file. At runtime, Tiles searches for a matching
definition by considering the definition name and the current locale.
You indicate the locale that applies to the definition by appending
the locale’s language and country code to the file
name, as you would for localizing a message resources properties
file. For example, if your Tiles definitions are specified in
tiles-def.xml, definitions specific to the
Spanish language will be placed in
tiles-def_es.xml. If you needed definitions
specific for French-Canadians, you would store them in
tiles-def_fr_CA.xml.
Example 14-9 shows the Tiles definition file,
tiles-def_es.xml, that overrides the
.pageOne definition from Example 14-5.
<?xml version="1.0" encoding="ISO-8859-1" ?>

<!DOCTYPE tiles-definitions PUBLIC
       "-//Apache Software Foundation//DTD Tiles Configuration 1.1//EN"
       "http://jakarta.apache.org/struts/dtds/tiles-config_1_1.dtd">

<tiles-definitions>
    <definition name=".pageOne" extends="mainLayoutDef2">
        <put name="title" value=" Page One"/>
        <put name="body"  value="/pages/pageOneEs.jsp"/>
    </definition>
</tiles-definitions>
This technique is useful for localizing the layout. For some locales, you may want to reorient the sidebars so the predominant sidebar is on the right instead of the left. Tiles localization solves this problem.
See Also
Development of an internationalized application takes planning and forethought. Chapter 12 addresses a number of problems that you may run into when localizing a Struts application.
14.6. Using Tiles in a Modular Application
Problem
You are using Struts modules, and you want to define module-specific Tiles definitions.
Solution
Create a separate Tiles definitions file for each module. Then, in
each module’s Struts configuration file, configure
the TilesPlugin, as shown in Example 14-10, to use that module’s
definitions file and be module-aware.
<plug-in className="org.apache.struts.tiles.TilesPlugin" >
    <!-- Path to XML definition file -->
    <set-property property="definitions-config"
                     value="/WEB-INF/tiles-defs-module1.xml" />
    <!-- Set Module-awareness to true -->
    <set-property property="moduleAware" value="true" />
</plug-in>
Discussion
Like configuration files for the Struts Validator, you can separate
your Tiles definitions into multiple files. If you are using modules,
you can create Tiles definitions, which can only be accessed from
within a specific module, by declaring that definition file in the
module’s Struts configuration file. To ensure that
Tiles handles module-relative paths when it processes requests, you
must set the moduleAware property to
true. By being module-aware when you forward to a
definition, the definition name will be pulled from the definitions
for that module. Definition names have to be
unique within a module.
Suppose your application has two modules: the default module and an administration module. The struts-config-admin.xml file, shown in Example 14-11 configures the administration module.
<?xml version="1.0" encoding="ISO-8859-1" ?>

<!DOCTYPE struts-config PUBLIC
          "-//Apache Software Foundation//DTD Struts Configuration 1.2//EN"
          "http://jakarta.apache.org/struts/dtds/struts-config_1_2.dtd">

<struts-config>

    <action-mappings>
        <action
            path="/doStartPage"
            forward=".start"/>
    </action-mappings>

    <plug-in className="org.apache.struts.tiles.TilesPlugin" >
        <set-property property="definitions-config"
                         value="/WEB-INF/tiles-defs-admin.xml" />
        <set-property property="moduleAware" value="true" />
    </plug-in>

</struts-config>
You can specify the Tiles definitions used by the administration module in the tiles-defs-admin.xml file shown in Example 14-12.
<?xml version="1.0" encoding="ISO-8859-1" ?>

<!DOCTYPE tiles-definitions PUBLIC
       "-//Apache Software Foundation//DTD Tiles Configuration 1.1//EN"
       "http://jakarta.apache.org/struts/dtds/tiles-config_1_1.dtd">

<tiles-definitions>
    <definition name="adminLayout" path="/layouts/adminLayout.jsp">
        <put name="title" value="Struts Cookbook - Chapter 14 : Tiles"/>
        <put name="body"   type="string"/>
    </definition>

    <definition name=".start" extends="adminLayout">
        <put name="title" value="Admin Start Page"/>
        <put name="body"  value="/pages/adminMain.jsp"/>
    </definition>
</tiles-definitions>See Also
This topic has been discussed on the struts-user mailing list. One particular thread you may find helpful is archived at http://marc.theaimsgroup.com/?l=struts-user&m=109579114312336&w=2.
If you are unfamiliar with Struts modules, see Recipe 2.5.
14.7. Reusing a Common Page Layout with SiteMesh
Problem
You want render your application’s pages using a common layout without having to change your JSP pages or your application’s Struts configuration.
Solution
Use SiteMesh to wrap your application’s pages with a common layout and other presentation features.
Discussion
SiteMesh (http://www.opensymphony.com/sitemesh/) is a
web-page layout and decoration framework. It allows you to decorate
the web pages of an existing application with a common layout. It
provides similar features as Tiles but uses a completely different
approach. When you use Tiles, you adopt the Tiles-way of doing things
by constructing pages using Tiles custom JSP tags, creating
definitions in a Tiles configuration file, and linking actions to
Tiles using the TilesRequestProcessor. Tiles
becomes a pervasive part of your web application.
SiteMesh takes a different approach. It uses a servlet filter to modify the HTTP responses generated by your application, with responses typically generated by JSP pages. SiteMesh amends the response based on settings in a configuration file.
Suppose you have a site with three web pages: a main page, and two secondary pages. The main page looks something like Figure 14-5.
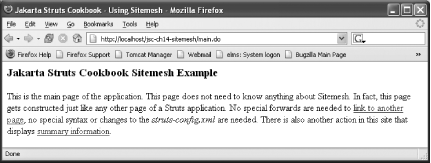
The secondary pages referred to by the two hyperlinks are, like this page, simple. The struts-config.xml file for this application is shown in Example 14-13.
<!DOCTYPE struts-config PUBLIC
          "-//Apache Software Foundation//DTD Struts Configuration 1.2//EN"
          "http://jakarta.apache.org/struts/dtds/struts-config_1_2.dtd" >
<struts-config>

    <global-forwards>
        <forward name="main" path="/main.do"/>
    </global-forwards>

    <!--  Action Mapping Definitions  -->
    <action-mappings>
        <action path="/main"
                type="org.apache.struts.actions.ForwardAction"
                parameter="/WEB-INF/jsps/main.jsp"
        />
        <action path="/test"
                type="org.apache.struts.actions.ForwardAction"
                parameter="/WEB-INF/jsps/test.jsp"
        />
        <action path="/summary"
                type="org.apache.struts.actions.ForwardAction"
                parameter="/WEB-INF/jsps/summary.jsp"
        />
    </action-mappings>

    <!-- message resources -->
    <message-resources parameter="ApplicationResources"/>

</struts-config>
Now your boss comes along and tells you that the site needs to be revised. He wants a titled header across the top of the page, a sidebar with navigation links on the left, and a footer with legalese on the bottom. He also wants the summary page to be displayed in a pop-up window. There are three choices for implementing these changes:
Add the new sections to the existing JSPs.
Convert your application to use Tiles.
Use SiteMesh to adorn the existing site with the new sections.
If your site has only three pages, then the first solution is the most cost effective. However, if your site has 300 pages, the first solution requires changing every page, and the second solution requires refactoring your entire application.
The third solution, using SiteMesh, can be your savior. To install SiteMesh and enable it for your web application, you need to do the following:
Download the SiteMesh full source ZIP file from http://www.opensymphony.com/sitemesh. Version 2.2.1 was used for this recipe. Extract the ZIP file into a directory named something like /sitemesh.
Copy all the JAR files from /sitemesh/lib into your application’s WEB-INF/lib directory.
Add the SiteMesh servlet filter and corresponding filter mapping shown in Example 14-14 to your application’s web.xml file.
Create the decorators.xml file shown in Example 14-15. Save this file to your application’s WEB-INF directory.
You are ready to define the decorating content to be added to your existing JSPs. Create the web/decorators directory. This directory, similar to the layouts directory used in a Tiles-based application, contains your decorating JSP pages and stylesheet. Example 14-16 shows the mainDecorator.jsp page.
<%@ taglib prefix="decorator" uri="http://www.opensymphony.com/sitemesh/
decorator" %>
<%@ taglib prefix="page" uri="http://www.opensymphony.com/sitemesh/page" %>
<%@ taglib prefix="bean" uri="http://struts.apache.org/tags-bean" %>
<%@ taglib prefix="html" uri="http://struts.apache.org/tags-html" %>
<%@ taglib prefix="c" uri="http://java.sun.com/jsp/jstl/core" %>
<html>
    <head>
        <title>
            <decorator:title default="{ Unknown Page - shouldn't see this, since
                                        pages should define title }" />
        </title>
        <html:base/>
        <link href="decorators/main.css" rel="stylesheet" type="text/css">
        <%--pulls the header from the page we are decorating and inserts
             it here --%>
        <decorator:head />
    </head>

    <body>
        <table width="100%" height="100%">
            <tr>
                <td id="header" colspan="2">
                   <bean:message key="label.header" />
                </td>
            </tr>
            <tr>
                <td valign="top" width="20%">
                    <%-- grabs the navigation.jsp page and decorates with the
                         panel decorator and puts it here --%>
                    <page:applyDecorator page="/WEB-INF/jsps/navigation.jsp"
                </td>
                <td>
                    <table width="100%" height="100%">
                        <tr>
                            <td id="pageTitle">
                                <div class="pageTitle">
                                    <%--pulls the title from the page we are
                                        decorating and inserts it here --%>
                                    <decorator:title />
                                </div>
                            </td>
                        </tr>
                        <tr>
                            <td valign="top" height="100%">
                                <%--pulls the body from the page we are
                                    decorating and inserts it here --%>
                                <decorator:body />
                            </td>
                        </tr>
                    </table>
                </td>
            </tr>
            <tr>
                <td id="footer" colspan="2">
                    <bean:message key="label.footer" />
                </td>
            </tr>
        </table>
    </body>
</html>
This decorator page references the “panel” decorator defined by the panelDecorator.jsp page shown in Example 14-17.
Example 14-18 shows the decorator (popupDecorator.jsp) used for pop-up windows.
<%@ taglib prefix="decorator" uri="http://www.opensymphony.com/sitemesh/
decorator" %>
<html>
    <head>
        <title><decorator:title default="{ Unknown Page - shouldn't see this,
                                 since pages should define title }" />
        </title>
        <link href="<%= request.getContextPath( ) %>/decorators/main.css"
               rel="stylesheet" type="text/css">
        <%--pulls the header from the page we are decorating and
            inserts it here --%>
        <decorator:head />
    </head>

    <body>
        <div class="popupDiv">
            <span class="popupTitle"><decorator:title
                        default="Unknown Title - shouldn't see this" />
            </span>
            <br/>
            <%--inserts the body of whatever we are decorating here --%>
            <decorator:body />
        </div>
    </body>
</html>
Finally, Example 14-19 shows the main.css stylesheet, used by the main decorator, you need to create.
body, td, p {
    font-family: verdana, arial, helvetica, sans-serif;
    font-size: 12px;
}
.panelDiv {
    border-color: black;
    border-width: 2;
    border-style: solid;
    padding: 4px;
    font-size: 12px;
    color: black;
    background: #C0C0C0;
    height: 450px;
}
.panelTitle {
    font-size: 14px;
    font-weight: bold;
}
.popupDiv {
   font-family: verdana, arial, helvetica, sans-serif;
   font-size: 12px;
   background-color:yellow;
}
#pageTitle {
    background-color: #C0C0C0;
    color: black;
    font-weight: bold;
    font-size: 14px;
    border-color: black;
    border-width: 1;
    border-style: solid;
    padding: 3px;
}
#header {
    padding: 5px;
    font-size: 16px;
    color: White;
    font-weight: bold;
    background-color: Navy;
    text-align: center;
    height: 75px;
}
#footer {
    border-color: navy;
    border-width: 2;
    border-style: solid;
    font-size: 10px;
    color: black;
    font-weight: bold;
    text-align: center;
    padding-top: 10px;
    background: white;
}
The only additional JSP page you need to create is for the sidebar navigation. Example 14-20 (navigation.jsp) shows this JSP page.
<%@ taglib uri="http://struts.apache.org/tags-bean" prefix="bean" %>
<%@ taglib uri="http://java.sun.com/jsp/jstl/core" prefix="c" %>
<html>
<head>
<title><bean:message key="title.navigation"/></title>
<script>
function popUp( url ) {
var windowFeatures = "scrollbars=yes,resizable=yes,width=300,
height=300";
popUp = window.open(url,"popup",windowFeatures);
popUp.focus( );
}
</script>
</head>
<body>
<br/>
<c:url var="url" value="/main.do"/>
<a href="<c:out value='${url}'/>">Main Page</a>
<br/><br/>
<c:url var="url" value="/test.do"/>
<a href="<c:out value='${url}'/>">Test Another Page</a>
<br/><br/>
<c:url var="url" value="/summary.do"/>
<a href="<c:out value='${url}'/>">Summary Example</a>
<br/><br/>
<%-- Look at the ParameterDecoratorMapper definition in the
sitemesh.xml, You will see how it takes a decorator parameter
and can take a confirm parameter --%>
<c:url var="url" value="/summary.do">
<c:param name="decorator" value="popup"/>
<c:param name="confirm" value="true"/>
</c:url>
<a href="javascript:popUp( '<c:out value='${url}'/>' );">
Summary As PopUp</a>
</body>
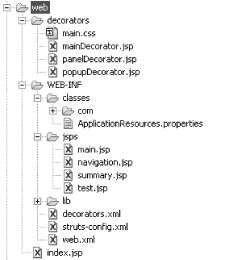
</html>After you’ve created these directories and files, your application’s file structure should look something like Figure 14-6.
Once you’ve got all of this in place, you can build and deploy your application. Figure 14-7 shows the main page now decorated by SiteMesh.

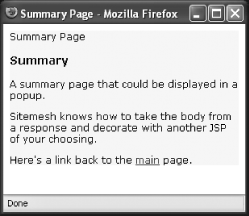
The pop-up window displayed when you click on the “Summary As PopUp” link is shown in Figure 14-8.
See Also
You’ll find a good tutorial on using SiteMesh with Struts in one of Rick Reumann’s “Struttin’ with Struts” lessons at http://www.reumann.net/struts/lessons/sitemesh/rr_sitemesh_example.jsp.
Will Iverson has written a good SiteMesh introduction available at http://today.java.net/pub/a/today/2004/03/11/sitemesh.html.
14.8. Integrating JavaServer Faces with Struts
Problem
You want to migrate an existing Struts application to JavaServer Faces without having to rewrite the entire application.
Solution
Use the Struts-Faces integration library.
Discussion
It’s reasonable to consider JavaServer Faces (JSF) to be the “son of Struts.” In fact, the creator of Struts, Craig McClanahan, serves as co-lead for the JSF specification. Unlike Struts, JSF specifies a component model for the user interface of applications. Theoretically, that model can be rendered by any type of user interface, and not just a web-based interface. But in its current release, JSF targets web application development. There are two implementations of JSF available. The reference implementation (RI) has been developed and is distributed by Sun. MyFaces, an open source Apache project, implements the JSF specification and adds additional components not contained in the reference implementation.
Struts-Faces, initially developed by Craig McClanahan, allows you to use JSF technology in a Struts application. Using this library, you can continue to use your actions and action forms as written, but you use the JSF custom tags instead of the Struts tags for the user interface. Struts-Faces allows you to migrate your existing Struts applications to JSF a page at a time.
This recipe will help you get started with Struts-Faces. It applies this technology to a three-page application having an index page, a login page, and a welcome page displayed upon login.
Struts-Faces is under active development. For the latest documentation and code, download the nightly build of Struts-Faces from http://svn.apache.org/builds/struts/nightly/struts-faces/, extracting the archive into a directory on your system:
Copy the struts-faces.jar and struts-faces.tld from the struts-faces/lib directory to your WEB-INF/lib directory.
Download and extract Sun’s JSF reference implementation from http://java.sun.com/jsf. At the time of this writing, Version 1.1 was the latest available.
Copy the jsf-api.jar and jsf-impl.jar from the jsf-1.1/lib directory to your WEB-INF/lib directory.
If your application doesn’t use JSTL, copy the jstl.jar and standard.jar files from the jakarta-struts-1.2.x/lib directory to your WEB-INF/lib directory.
Add the servlet declaration and mapping for the JavaServer Faces servlet to your web.xml file. Set the load-on-startup value for the
FacesServletso it starts up before the StrutsActionServlet:<!-- Faces Servlet Configuration --> <servlet> <servlet-name>faces</servlet-name> <servlet-class>javax.faces.webapp.FacesServlet</servlet-class> <load-on-startup>1</load-on-startup> </servlet> <!-- Action Servlet Configuration --> <servlet> <servlet-name>action</servlet-name> <servlet-class>org.apache.struts.action.ActionServlet</servlet-class> <init-param> <param-name>config</param-name> <param-value>/WEB-INF/struts-config.xml</param-value> </init-param> <load-on-startup>2</load-on-startup> </servlet> <!-- Servlet Mappings --> <servlet-mapping> <servlet-name>faces</servlet-name> <url-pattern>*.faces</url-pattern> </servlet-mapping> <servlet-mapping> <servlet-name>action</servlet-name> <url-pattern>*.do</url-pattern> </servlet-mapping>
The servlet mapping for the Faces servlet directs all requests with a
.faces extension through the JSF FacesServlet for standard JSF
processing. You will need to configure Struts to use a custom request
processor for handling JSF integration. Example 14-21
shows the
struts-config.xml,
which specifies the controller declaration for the
FacesRequestProcessor, that includes the action
mappings for this example application.
<?xml version="1.0" encoding="ISO-8859-1" ?>

<!DOCTYPE struts-config PUBLIC
          "-//Apache Software Foundation//DTD Struts Configuration 1.1//EN"
          "http://jakarta.apache.org/struts/dtds/struts-config_1_1.dtd">
<struts-config>
    <form-beans>
        <form-bean name="logonForm" type="org.apache.struts.action.
        DynaActionForm">
            <form-property name="username" type="java.lang.String"/>
            <form-property name="password" type="java.lang.String"/>
        </form-bean>
    </form-beans>

    <global-forwards>
        <forward name="welcome" path="/welcome.faces"/>
        <forward name="logon" path="/logon.faces"/>
        <forward name="home" path="/index.jsp" redirect="true"/>
    </global-forwards>

    <!-- ========== Action Mapping Definitions =========================== -->
    <action-mappings>
        <action    path="/Logon"
                   name="logonForm"
                  scope="request"
                   type="com.oreilly.strutsckbk.ch14.LogonAction">
            <forward name="success" path="welcome.faces"/>
        </action>
    </action-mappings>

    <controller>
        <set-property property="processorClass"
            value="org.apache.struts.faces.application.FacesRequestProcessor"/>
    </controller>

    <message-resources parameter="ApplicationResources"/>

</struts-config>
The first page of the application, shown in Example 14-22 (index.jsp), provides a link to the “logon” page. This conventional JSP page doesn’t contain any JSF or Struts-Faces components.
<%@ page contentType="text/html;charset=UTF-8" language="java" %>
<%@ taglib prefix="c" uri="http://java.sun.com/jstl/core" %>
<%@ taglib prefix="html" uri="http://struts.apache.org/tags-html" %>

<html>
<head>
  <title>Struts Cookbook - Integrating Struts and JSF</title>
</head>
<body>
  <h2>Struts Cookbook - Integrating Struts and JSF</h2>
  <html:link forward="logon">Try out Struts and JSF</html:link>
</body>
</html>
The second page, logon.jsp shown in Example 14-23, contains the logon form submitted to the /Logon action.
<%@ page contentType="text/html;charset=UTF-8" language="java" %>
<%@ taglib prefix="f" uri="http://java.sun.com/jsf/core" %>
<%@ taglib prefix="h" uri="http://java.sun.com/jsf/html" %>
<%@ taglib prefix="s" uri="http://struts.apache.org/tags-faces" %>

<f:view>
<s:html locale="true">
<head>
  <title>Struts Cookbook - Integrating Struts and JSF</title>
</head>
<body>
  <p />
  <s:form id="logon" action="/Logon"
     focus="username" styleClass="form">
    <h:outputLabel for="username" styleClass="label" value="Username:"/>
    <h:inputText id="username" value="#{logonForm.username}"
           required="true" size="10"/> <p />
    <h:outputLabel for="password" styleClass="label" value="Password:"/>
    <h:inputSecret id="password" value="#{logonForm.password}"
             required="true" size="10"/> <p />
    <h:commandButton id="submit" type="SUBMIT" value="Logon" />
  </s:form>
</body>
</s:html>
</f:view>
If you’ve never used JavaServer Faces, this page
probably looks funky. The page starts conventionally and declares the
taglib directives for the JSF
core and html tag
libraries, as well as the Struts-Faces tag library.
Tip
To prevent collision with the JSTL core tag
library, the taglib declaration for the JSF
core tag library commonly uses
“f” instead of
“c” as the prefix. You can think of
“f” as standing for
“faces” or
“framework.”
On this page, the f:view tag contains the entire
content of the view. All JSF pages must contain a
f:view tag that encapsulates the custom JSF tags.
The s:form tag, from the Struts-Faces library,
creates an HTML form that can be submitted to a Struts action. The
h:outputLabel tags display label text for input
fields declared with the h:inputText tags. The
h:inputSecret tag creates a password input field.
The h:commandButton tag creates the
form’s submit button.
When this page was first written, yours truly inadvertently left off
the value attribute for the
h:inputText and h:inputSecret
tags. As Struts developers, the best practice is to eschew specifying
the value attribute for tags like
html:text since the values are automatically
retrieved from the form based on name. When this application was
tested, data entered on the form wasn’t populated to
the action form. Because JavaServer Faces uses a different binding
convention than Struts, you must explicitly bind each field to a
form-bean property. Adding the value attributes to
the form as shown solved the problem.
The Struts-Faces tags resemble the Struts html
tag library. By design, Struts developers will find it easy to learn
the Struts-Faces tags. The s:form tag, for
example, closely matches the Struts html:form tag.
However, with the s:form tag, you use the JSF
html tags instead of the Struts
html tags. Table 14-2 provides
a complete list of tags included with Struts-Faces.
|
Tag name |
Description |
|
|
Creates a |
|
|
Creates a hyperlink that can be used to submit a form |
|
|
Displays accumulated action errors, similar to the Struts
|
|
|
Creates an HTML form that submits to a Struts action, similar to the
Struts |
|
|
Generates an |
|
|
Generates the JavaScript for client-side validation using the
Validator, similar to the Struts |
|
|
Loads messages resources into a map for access by JSF tags such as
|
|
|
Displays a localized message, similar to the
|
|
|
Generates a link to a stylesheet |
|
|
Renders a property value from a model object, similar to the
|
The FacesRequestProcessor processes the submitted
logon form and executes the LogonAction. This
action doesn’t have to do anything special related
to JSF. The Struts-Faces library integrates Struts and JSF so your
action classes and action
forms require no modification when using JSF. Example 14-24 shows the LogonAction for
this application. A “real” action
would authenticate the user.
package com.oreilly.strutsckbk.ch14;
import javax.servlet.http.HttpServletRequest;
import javax.servlet.http.HttpServletResponse;

import org.apache.commons.beanutils.PropertyUtils;
import org.apache.struts.action.Action;
import org.apache.struts.action.ActionForm;
import org.apache.struts.action.ActionForward;
import org.apache.struts.action.ActionMapping;

public class LogonAction extends Action {
    public ActionForward execute(ActionMapping mapping, ActionForm form,
            HttpServletRequest request, HttpServletResponse response)
            throws Exception {
        String name = (String) PropertyUtils.getSimpleProperty(form,
                                                            "username");
        User user = new User( );
        user.setUsername(name);
        request.getSession( ).setAttribute("user", user);
        return mapping.findForward("success");
    }
}
The application culminates by rendering a “welcome” page that includes text from the message resources bundle as well as the username entered on the preceding form. The welcome.jsp page, accessed through the welcome.faces path, is shown in Example 14-25.
<%@ page contentType="text/html;charset=UTF-8" language="java" %>
<%@ taglib prefix="f" uri="http://java.sun.com/jsf/core" %>
<%@ taglib prefix="h" uri="http://java.sun.com/jsf/html" %>
<%@ taglib prefix="s" uri="http://struts.apache.org/tags-faces" %>

<f:view>
<s:loadMessages var="messages"/>
<s:html locale="true">
<head>
  <title>Struts Cookbook - Integrating Struts and JSF</title>
</head>
<body>
  <h2>Struts Cookbook - Integrating Struts and JSF</h2>
  <h3><s:message key="index.welcome"/></h3>
  <h:outputText value="#{messages['msg.loggedIn']}"/>
  <b><h:outputText value="#{user.username}"/></b>.
</body>
</s:html>
</f:view>
At this point, you have a working application, which uses Struts and JSF together, that preserves your custom action classes and action forms and allows you to take advantage of the rich components afforded by JavaServer Faces.
See Also
For the latest documentation on Struts-Faces, consult the documentation included with the Struts-Faces nightly build. If you’re unsure about using JSF or Struts, Craig McClanahan presents a fair assessment on his blog at http://java.net/craigmcc.
You’ll find a good article on integrating Struts, JSF, and Tiles on IBM’s Developer Works at http://www-106.ibm.com/developerworks/java/library/j-integrate/.
The source for information on JavaServer Faces, including the specification and the reference implementation, can be found at http://java.sun.com/jsf.
You can use Struts-Faces with any JSF compliant implementation. The MyFaces project (http://incubator.apache.org/projects/myfaces.html) implements the JSF specification and provides an alternative to the reference implementation.
You’ll find the quick reference for the standard JSF tags at http://www.horstmann.com/corejsf/jsf-tags.html to be quite handy.
14.9. Integrating Struts and Velocity
Problem
You want to use a template engine for HTML page generation instead of JSPs in your Struts application.
Solution
Integrate the Velocity template engine into your Struts application, replacing your JSP pages with Velocity templates.
Discussion
The Velocity template engine (http://jakarta.apache.org/velocity) can create any kind of textual document by merging Java objects with a template. The template document contains special markup that Velocity parses and replaces with values from Java objects stored in a template context.
When you use Velocity with Struts, instead of forwarding to JSP pages, you forward to a Velocity template. The Velocity servlet services the request, processing the template through the Velocity template engine and returning the generated HTML as the response.
Here’s an action, adapted from the Struts MailReader example, that forwards to a Velocity template to display the “Welcome” page:
<action    path="/WelcomeVel"
           type="org.apache.struts.webapp.example.WelcomeAction">
    <forward name="failure" path="/Error.jsp" />
    <forward name="success" path="/welcome.vm" />
</action>
To use Velocity with Struts, you’ll need to download the Velocity distribution from http://jakarta.apache.org/velocity. You also need to download the VelocityTools from http://jakarta.apache.org/velocity/tools/. VelocityTools includes helper classes that allow you to reference Struts-managed objects such as the action form and message resources. From the Velocity distribution, copy the velocity-1.4.jar and the velocity-dep-1.4.jar from the Velocity distribution directory to your application’s WEB-INF/lib directory. For the VelocityTools /lib directory, copy the velocity-tools-1.1.jar, velocity-tools-generic-1.1.jar, velocity-tools-view-1.1.jar to your application’s WEB-INF/lib directory.
Next, declare the Velocity view servlet and servlet mapping in your web.xml file. Traditionally, the .vm extension is used for Velocity templates. Example 14-26 shows the portion of a web.xml file that configure the Velocity servlet.
<!-- Velocity View Servlet -->
<servlet>
    <servlet-name>velocity</servlet-name>
    <servlet-class>
        org.apache.velocity.tools.view.servlet.VelocityViewServlet
    </servlet-class>

    <init-param>
        <param-name>org.apache.velocity.toolbox</param-name>
        <param-value>/WEB-INF/toolbox.xml</param-value>
    </init-param>

    <init-param>
        <param-name>org.apache.velocity.properties</param-name>
        <param-value>/WEB-INF/velocity.properties</param-value>
    </init-param>

    <load-on-startup>2</load-on-startup>
</servlet>
...
<!-- Map *.vm files to Velocity -->
<servlet-mapping>
    <servlet-name>velocity</servlet-name>
    <url-pattern>*.vm</url-pattern>
</servlet-mapping>
Velocity has the notion of a toolbox containing tools you can use in your templates. A tool is essentially a Java class you can reference by name. The /WEB-INF/toolbox.xml file, shown in Example 14-27, declares the Struts tools available to your templates.
<?xml version="1.0"?>
<!--
  Copyright 2003-2004 The Apache Software Foundation.

  Licensed under the Apache License, Version 2.0 (the "License");
  you may not use this file except in compliance with the License.
  You may obtain a copy of the License at

     http://www.apache.org/licenses/LICENSE-2.0

  Unless required by applicable law or agreed to in writing, software
  distributed under the License is distributed on an "AS IS" BASIS,
  WITHOUT WARRANTIES OR CONDITIONS OF ANY KIND, either express or implied.
  See the License for the specific language governing permissions and
  limitations under the License.

  $Id: ch14.xml,v 1.5 2005/03/21 18:08:10 kend Exp kend $
-->
<toolbox>

    <tool>
        <key>math</key>
        <scope>application</scope>
        <class>org.apache.velocity.tools.generic.MathTool</class>
    </tool>

    <tool>
        <key>link</key>
        <class>org.apache.velocity.tools.struts.StrutsLinkTool</class>
    </tool>

    <!-- ordinarily the SecureLinkTool would simply replace the StrutsLinkTool
         if SSL Ext. is in use - in that case the key would be 'link' but it's
         'slink' here to distinguish between the two. -->
    <tool>
        <key>slink</key>
        <class>org.apache.velocity.tools.struts.SecureLinkTool</class>
    </tool>

    <tool>
        <key>text</key>
        <class>org.apache.velocity.tools.struts.MessageTool</class>
    </tool>

    <tool>
        <key>link</key>
        <scope>request</scope>
        <class>org.apache.velocity.tools.struts.StrutsLinkTool</class>
    </tool>

    <tool>
        <key>errors</key>
        <class>org.apache.velocity.tools.struts.ErrorsTool</class>
    </tool>

    <tool>
        <key>messages</key>
        <class>org.apache.velocity.tools.struts.ActionMessagesTool</class>
    </tool>

    <tool>
        <key>text</key>
        <scope>request</scope>
        <class>org.apache.velocity.tools.struts.MessageTool</class>
    </tool>

    <tool>
        <key>form</key>
        <class>org.apache.velocity.tools.struts.FormTool</class>
    </tool>

    <tool>
        <key>tiles</key>
        <class>org.apache.velocity.tools.struts.TilesTool</class>
    </tool>

    <tool>
        <key>validator</key>
        <class>org.apache.velocity.tools.struts.ValidatorTool</class>
    </tool>

</toolbox>
For each tool, the key element specifies the name
that the tool can be referenced by within your Velocity template. The
/WEB-INF/velocity.properties contains general
configuration information used by the Velocity view servlet. You can
use these properties to control
Velocity’s log level and other settings.
#*
 * Copyright 2003 The Apache Software Foundation.
 *
 * Licensed under the Apache License, Version 2.0 (the "License");
 * you may not use this file except in compliance with the License.
 * You may obtain a copy of the License at
 *
 *     http://www.apache.org/licenses/LICENSE-2.0
 *
 * Unless required by applicable law or agreed to in writing, software
 * distributed under the License is distributed on an "AS IS" BASIS,
 * WITHOUT WARRANTIES OR CONDITIONS OF ANY KIND, either express or implied.
 * See the License for the specific language governing permissions and
 * limitations under the License.
 *
 * $Id: ch14.xml,v 1.5 2005/03/21 18:08:10 kend Exp kend $
 *#

#----------------------------------------------------------------------------
# These are the default properties for the
# Velocity Runtime. These values are used when
# Runtime.init( ) is called, and when Runtime.init(properties)
# fails to find the specificed properties file.
#----------------------------------------------------------------------------


#----------------------------------------------------------------------------
# R U N T I M E  L O G
#----------------------------------------------------------------------------
# Velocity uses the Servlet APIs logging facilites.

#----------------------------------------------------------------------------
# This controls if Runtime.error( ), info( ) and warn( ) messages include the
# whole stack trace. The last property controls whether invalid references
# are logged.
#----------------------------------------------------------------------------

runtime.log.error.stacktrace = false
runtime.log.warn.stacktrace = false
runtime.log.info.stacktrace = false
runtime.log.invalid.reference = true


#----------------------------------------------------------------------------
# T E M P L A T E  E N C O D I N G
#----------------------------------------------------------------------------

input.encoding=ISO-8859-1
output.encoding=ISO-8859-1


#----------------------------------------------------------------------------
# F O R E A C H  P R O P E R T I E S
#----------------------------------------------------------------------------
# These properties control how the counter is accessed in the #foreach
# directive. By default the reference $velocityCount will be available
# in the body of the #foreach directive. The default starting value
# for this reference is 1.
#----------------------------------------------------------------------------

directive.foreach.counter.name = velocityCount
directive.foreach.counter.initial.value = 1


#----------------------------------------------------------------------------
# I N C L U D E  P R O P E R T I E S
#----------------------------------------------------------------------------
# These are the properties that governed the way #include'd content
# is governed.
#----------------------------------------------------------------------------

directive.include.output.errormsg.start = <!-- include error :
directive.include.output.errormsg.end   =  see error log -->


#----------------------------------------------------------------------------
# P A R S E  P R O P E R T I E S
#----------------------------------------------------------------------------

directive.parse.max.depth = 10


#----------------------------------------------------------------------------
# VELOCIMACRO PROPERTIES
#----------------------------------------------------------------------------
# global : name of default global library.  It is expected to be in the regular
# template path.  You may remove it (either the file or this property) if
# you wish with no harm.
#----------------------------------------------------------------------------
#dev-changes by Marino
webapp.resource.loader.cache = false
velocimacro.library.autoreload = true

velocimacro.library = /WEB-INF/VM_global_library.vm,/WEB-INF/
                      Validator_library.vm

velocimacro.permissions.allow.inline = true
velocimacro.permissions.allow.inline.to.replace.global = false
velocimacro.permissions.allow.inline.local.scope = false

velocimacro.context.localscope = false

#----------------------------------------------------------------------------
# INTERPOLATION
#----------------------------------------------------------------------------
# turn off and on interpolation of references and directives in string
# literals.  ON by default :)
#----------------------------------------------------------------------------
runtime.interpolate.string.literals = true


#----------------------------------------------------------------------------
# RESOURCE MANAGEMENT
#----------------------------------------------------------------------------
# Allows alternative ResourceManager and ResourceCache implementations
# to be plugged in.
#----------------------------------------------------------------------------
resource.manager.class = org.apache.velocity.runtime.resource.
ResourceManagerImpl
resource.manager.cache.class = org.apache.velocity.runtime.resource.
ResourceCacheImp
Now, you create the Velocity template itself. Suppose you wanted to replace a JSP page with an equivalent Velocity template. Example 14-28 shows the welcome.jsp page from the Struts MailReader application.
<%@ page contentType="text/html;charset=UTF-8" language="java" %>
<%@ taglib uri="/tags/struts-bean" prefix="bean" %>
<%@ taglib uri="/tags/struts-html" prefix="html" %>

<html>
<head>
<title><bean:message key="index.title"/></title>
<link rel="stylesheet" type="text/css" href="base.css" />
</head>

<h3><bean:message key="index.heading"/></h3>
<ul>
<li><html:link action="/EditRegistration?action=Create">
<bean:message key="index.registration"/></html:link></li>
<li><html:link action="/Logon"><bean:message key="index.logon"/>
</html:link></li>
</ul>

<h3>Language Options</h3>
<ul>
<li><html:link action="/Locale?language=en">English</html:link></li>
<li><html:link action="/Locale?language=ja" useLocalEncoding="true">
Japanese</html:link></li>
<li><html:link action="/Locale?language=ru"
</ul>

<hr />

<p><html:img bundle="alternate" pageKey="struts.logo.path"
altKey="struts.logo.alt"/></p>

<p><html:link action="/Tour"><bean:message key="index.tour"/></html:link></p>

</body>
</html>
Example 14-29 shows this same page implemented as a Velocity template (welcome.vm).
#*
 * These are comments and will be ignored by the Velocity engine.
 *#
<html>
<head>
<title>$text.get("index.title")</title>
<link rel="stylesheet" type="text/css" href="base.css" />
</head>

<h3>$text.get("index.heading")</h3>
<ul>
<li>
    <a href="$link.setAction('/EditRegistration').
                addQueryData('action','Create')">
        $text.get("index.registration")
    </a>
<li>
    <a href="$link.setAction('/Logon')">
        $text.get("index.logon")
    </a>
</ul>

<h3>Language Options</h3>
<ul>
<li><a href="$link.setAction('/Locale').addQueryData('language','en')">
English</a></li>
<li><a href="$link.setAction('/Locale').addQueryData('language','ja')">
Japanese</a></li>
<li><a href="$link.setAction('/Locale').addQueryData('language','ru')">
Russian</a></li>
</ul>

<hr />

<p><a href="$link.setAction('/Tour')">$text.get("index.tour")</a></p>

</body>
</html>
When you build and deploy this modified Struts MailReader application, you’ll see that this page looks and behaves exactly as it does when implemented as a JSP page, and no changes had to be made to any Struts actions or action forms.
See Also
The Velocity project site is located at http://jakarta.apache.org/velocity. From here, you can download Velocity and the VelocityTools used in this recipe. You’ll also find several essays that compare Velocity to JSP and other page-generation technologies.
14.10. Integrating Struts and XSLT
Problem
You want to use XSL transformations for HTML page generation instead of JSP pages in your Struts application.
Solution
Use the STXX framework with Struts.
Discussion
The Struts for Transforming XML with XSL (STXX) framework was
developed by Don Brown. (The STXX project site can be found at
http://stxx.sourceforge.net
.) STXX fits into Struts in a manner
similar to Velocity. Instead of forwarding requests to JSP pages,
your action forwards to a special URL that is processed by the
StxxRequestProcessor. Based on request data, this
custom request processor reads a configuration file to determine the
corresponding XSLT stylesheet. The request processor then uses an
XSLT transformation engine to transform the received XML data, using
the XSLT stylesheet, into XHTML.
Tip
XHTML is HTML that is well-formed, valid XML. XHTML is specified by the World Wide Web Consortium (W3C); details can be found at http://www.w3.org/MarkUp/.
To get started, download STXX from the project web site (http://stxx.sourceforge.net). This recipe was built using the full download of STXX Version 1.3. Extract the download to your system.
Copy the following JAR files to your application’s WEB-INF/lib directory:
dist/stxx-1.3.jar
libs/core/jdom.jar
libs/xform/commons-jxpath-1.1.jar
libs/xform/xmlform.jar
The configuration of STXX is specified in the stxx.properties file. For this recipe, you can use this file without modification. From the STXX directory, copy source/web/WEB-INF/classes/stxx.properties to your application’s WEB-INF/classes directory. STXX uses the concept of pipelines to chain transformations together. The stxx-pipelines.xml controls how the pipelines work. For this recipe, copy the source/web/WEB-INF/stxx-pipelines.xml file to your application’s /WEB-INF directory.
As shown in Example 14-30, add an initialization
parameter specifying the location of the
stxx.properties file to the Struts
ActionServlet declaration in your
web.xml file.
<!DOCTYPE web-app
  PUBLIC "-//Sun Microsystems, Inc.//DTD Web Application 2.2//EN"
  "http://java.sun.com/j2ee/dtds/web-app_2_2.dtd">

<web-app>
    <display-name>Struts Cookbook - Chapter 14 : STXX</display-name>

    <!-- Standard Action Servlet Configuration (with debugging) -->
    <servlet>
        <servlet-name>action</servlet-name>
        <servlet-class>org.apache.struts.action.ActionServlet</servlet-class>
        <init-param>
            <param-name>config</param-name>
            <param-value>/WEB-INF/struts-config.xml</param-value>
        </init-param>
        <init-param>
            <param-name>stxxInit</param-name>
            <param-value>/stxx.properties</param-value>
        </init-param>
        <load-on-startup>2</load-on-startup>
    </servlet>

    <!-- Standard Action Servlet Mapping -->
    <servlet-mapping>
        <servlet-name>action</servlet-name>
        <url-pattern>*.do</url-pattern>
    </servlet-mapping>

    <!-- The Usual Welcome File List -->
    <welcome-file-list>
        <welcome-file>index.jsp</welcome-file>
    </welcome-file-list>

</web-app>
You configure the integration between Struts and STXX in your Struts configuration file. Example 14-31 shows the struts-config.xml used for this sample application.
<?xml version="1.0" encoding="ISO-8859-1" ?>

<!DOCTYPE struts-config PUBLIC
          "-//Apache Software Foundation//DTD Struts Configuration 1.2//EN"
          "http://jakarta.apache.org/struts/dtds/struts-config_1_2.dtd">

<struts-config>

    <form-beans>
        <form-bean name="userForm" type="com.oroad.stxx.xform.JDOMForm"/>
    </form-beans>

    <global-exceptions>
    </global-exceptions>

    <global-forwards>
    </global-forwards>

    <action-mappings>
        <action    path="/viewUserList"
                  type="com.oreilly.strutsckbk.ch14.UserListAction">
            <forward name="success" path="simple/viewUserList.dox"/>
        </action>
        <action    path="/addUser"
                   name="userForm"
                  scope="request"
                forward="simple/addUser.dox"
        />
        <action    path="/saveUser"
                   type="com.oreilly.strutsckbk.ch14.SaveUserAction"
                   name="userForm"
                  scope="request">
            <forward name="success" path="/viewUserList.do"/>
        </action>
    </action-mappings>

    <message-resources parameter="ApplicationResources"
    factory="com.oroad.stxx.util.PropertyMessageResourcesFactory"/>

    <plug-in className="com.oreilly.strutsckbk.ch14.DataLoadPlugIn"/>

    <plug-in className="com.oroad.stxx.plugin.StxxPlugin" >
        <set-property property="pipeline-config"
                         value="/WEB-INF/stxx-pipelines.xml" />
        <set-property property="xmlform-models"
                         value="/WEB-INF/xmlform-models.xml" />
        <set-property property="xmlform-schema"
                         value="" />
    </plug-in>

</struts-config>
In a STXX application, your action form holds XML data. STXX provides
two specialized classes that wrap XML data in an
ActionForm. The contained XML can be represented
as a traditional DOM object using the DOMForm or
as a JDOM object using JDOMForm. JDOM provides a
more natural API than DOM, so the JDOMForm was
used in this recipe.
<form-bean name="userForm" type="com.oroad.stxx.xform.JDOMForm"/>
This form-bean element references an XML model
that describes the XML structure of the form data. The XML models for
your application are defined in the
WEB-INF/xmlform-models.xml file. Example 14-32 shows the model, representing user
information, used in this recipe.
A custom action in STXX performs the same functions as in a conventional Struts application: you retrieve data from the form, access the model, and forward to a destination. For STXX, the pattern can be specifically laid out as follows:
Retrieve the
ActionFormand extract the form data as a DOM or JDOM object.Access the business model to retrieve data.
Format the data into an XML in-memory representation.
Forward the request to a STXX transformation pipeline.
The actions defined in Example 14-31 represent a typical flow common to most web applications. The first action, /viewUserList, displays data on a page. The second action, /addUser, presents a form where a user can input data. The third action, /saveUser, saves the data in the model and forwards back to the first action.
Here’s the first action mapping:
<action    path="/viewUserList"
           type="com.oreilly.strutsckbk.ch14.UserListAction">
    <forward name="success" path="simple/viewUserList.dox"/>
</action>
The UserListAction, shown in Example 14-33, retrieves data stored in application-scope
and builds a JDOM document from it. The action saves the document in
the request and forwards to
“success.”
package com.oreilly.strutsckbk.ch14;

import java.util.Iterator;
import java.util.List;

import com.oroad.stxx.action.Action;

import javax.servlet.http.*;

import org.jdom.*;
import org.apache.struts.action.*;

public class UserListAction extends Action {
    public ActionForward execute(ActionMapping mapping,
                                 ActionForm form,
                                 HttpServletRequest request,
                                 HttpServletResponse response)
            throws Exception {

        List usersList = (List) getServlet( ).getServletContext( ).
                         getAttribute("users");

        //create a new XML document for this Action with the root
        //element of "userList"
        Document document =
        new Document(new Element("userList"));

        //add some data to the XML document so that the Action
        //will produce XML in the form
        Element users = new Element("users");

        for (Iterator k=usersList.iterator( ); k.hasNext( ); ) {
            Element user = new Element("user");
            Element name = new Element("name");
            User u = (User) k.next( );
            name.addContent(new Element("firstname").
            setText(u.getFirstName( )));
            name.addContent(new Element("lastname").
            setText(u.getLastName( )));
            user.addContent(name);
            user.addContent(new Element("email").
            setText(u.getEmail( )));

            // add the user
            users.addContent(user);
        }

        // add to the root element and save the document
        document.getRootElement( ).addContent(users);
        saveDocument(request, document);

        return mapping.findForward("success");
    }
}
The success forward specifies a path of simple/viewUserList.dox. The forward is processed by STXX and matched against patterns in the stxx-pipelines.xml file. In this example, the matching pattern defines a simple XML to XHTML transformation using an XSL stylesheet:
<pipeline match="simple/*.dox">
    <display-name>Simple XSLT</display-name>
    <description>Performs simple XSLT transformations</description>
    <transform type="html">
        <param name="path" value="/xsl/{1}.xsl" />
        <param name="render" value="server" />
    </transform>
</pipeline>
The first param element specifies the
context-relative path to the XSL stylesheet. The value contains a
substitution value retrieved from the wildcard-matched path.
Tip
If the {1} notation looks familiar,
that’s because it’s the same
wildcard-matching approach shown in Recipe 7.8. Wildcard mappings, as well as the STXX
pipeline approach, originated in the Apache Cocoon project.
In this case, the transformation uses the xsl/viewUserList.xsl stylesheet shown in Example 14-34.
<xsl:stylesheet version="1.0"
xmlns:xsl="http://www.w3.org/1999/XSL/Transform">
<xsl:output method="html" />
<xsl:template match="/">
<xsl:apply-templates select="stxx/userList"/>
</xsl:template>
<xsl:template match="userList">
<html>
<body>
<table width="75%" border="1" align="center">
<tr>
<td bgcolor="lightblue" align="center">
<a href="./xsl/viewUserList.xsl">View XSL</a>
</td>
<td bgcolor="lightblue" align="center">
<a href="./index.jsp">
<xsl:value-of
select="/stxx/applicationResources/key[@name='link.index']"/>
</a>
</td>
<td bgcolor="lightblue" align="center">
<a href="./addUser.do">
<xsl:value-of
select="/stxx/applicationResources/key[@name='link.add.user']"/>
</a>
</td>
</tr>
<xsl:apply-templates select="users"/>
</table>
</body>
</html>
</xsl:template>
<xsl:template match="users">
<tr bgcolor="lightgrey">
<td><b>First Name</b></td>
<td><b>Last Name</b></td>
<td><b>Email</b></td>
</tr>
<xsl:apply-templates select="user"/>
</xsl:template>
<xsl:template match="user">
<tr>
<td><xsl:value-of select="./name/firstname"/></td>
<td><xsl:value-of select="./name/lastname"/></td>
<td><xsl:value-of select="./email"/></td>
</tr>
</xsl:template>
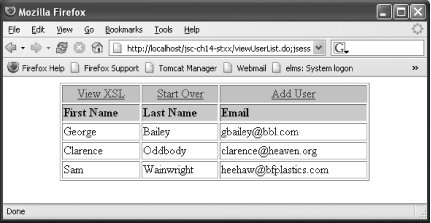
</xsl:stylesheet>Figure 14-9 shows the page that gets displayed when you access the /viewUserList action.
Clicking the “Add User” link sends a request to the /addUser action:
<action    path="/addUser"
           name="userForm"
          scope="request"
        forward="simple/addUser.dox"
/>
STXX processes this request through the xsl/addUser.xsl stylesheet shown in Example 14-35.
<xsl:stylesheet version="1.0" xmlns:xsl="http://www.w3.org/1999/XSL/Transform">
    <xsl:output method="html" />
    <xsl:template match="/">
        <html>
        <body>
             <form action="saveUser.do">
                <table width="75%" border="1" align="center">
                    <tr bgcolor="lightgrey">
                        <td colspan="2"><b>Add User</b>
                            <a href="./xsl/addUser.xsl"> (View XSL) </a>
                        </td>
                    </tr>
                    <tr>
                        <td><font color="red">*</font>First name:</td>
                        <td>
                            <input type="text" name="user/name/firstname"
                                  value="{stxx/form/userForm/user/
                                          name/firstname}"/>
                        </td>
                    </tr>
                    <tr>
                        <td><font color="red">*</font>Last name:</td>
                        <td>
                            <input type="text" name="user/name/lastname"
                                  value="{stxx/form/userForm/user/
                                          name/lastname}"/>
                        </td>
                    </tr>
                    <tr>
                        <td><font color="red">*</font>Email:</td>
                        <td>
                            <input type="text" name="user/email"
                                  value="{stxx/form/userForm/user/email}"/>
                        </td>
                    </tr>
                    <tr align="center">
                        <td colspan="2">
                            <input type="submit" value="Submit"/>
                        </td>
                    </tr>
                </table>
            </form>
        </body>
        </html>
    </xsl:template>
</xsl:stylesheet>
Unlike a conventional Struts application, STXX
doesn’t use the Commons BeanUtils classes to
populate the ActionForm. Instead, it treats the
name attribute as an XPath expression into the XML
form model specified for the action form.
Figure 14-10 shows the rendered form for adding a user.
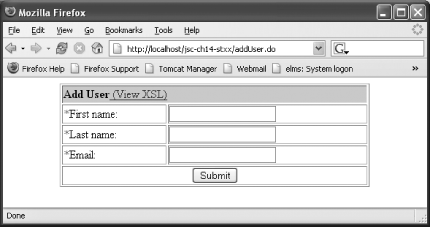
The /saveUser action receives and processes this form:
<action    path="/saveUser"
           type="com.oreilly.strutsckbk.ch14.SaveUserAction"
           name="userForm"
          scope="request">
    <forward name="success" path="/viewUserList.do"/>
</action>
The SaveUserAction, shown in Example 14-36, extracts the data from the JDOM-backed form
and updates the model stored in the servlet context.
package com.oreilly.strutsckbk.ch14;

import java.util.List;

import javax.servlet.http.HttpServletRequest;
import javax.servlet.http.HttpServletResponse;

import org.apache.struts.action.ActionForm;
import org.apache.struts.action.ActionForward;
import org.apache.struts.action.ActionMapping;

import com.oroad.stxx.action.Action;
import com.oroad.stxx.xform.JDOMForm;

public class SaveUserAction extends Action {
    public ActionForward execute(ActionMapping mapping,
                                 ActionForm form,
                                 HttpServletRequest request,
                                 HttpServletResponse response)
            throws Exception {

        List usersList = (List) getServlet( ).getServletContext( ).
                          getAttribute("users");
        JDOMForm jdomForm = (JDOMForm) form;
        String firstName = jdomForm.getValue("/user/name/firstname");
        String lastName  = jdomForm.getValue("/user/name/lastname");
        String email     = jdomForm.getValue("/user/email");
        usersList.add(new User(firstName, lastName, email));
        return mapping.findForward("success");
    }
}
The sample application shown in this recipe represents a fraction of the capabilities of STXX. STXX supports validation, XForms, SOAP, FOP, and Velocity just to name a few. If you have a site that relies heavily on XML-based data, and needs to render that data in a number of formats, STXX may be what you need.
See Also
The STXX project web site (http://stxx.sourceforge.net) has complete details on the full functionality of STXX.
The StrutsCX project (http://it.cappuccinonet.com/strutscx) is another popular Struts-XSL integration framework.