Chapter 3. Backing Up Your Financial Information
Once you start using Quicken, paper and pencil rapidly start to look like an unthinkable hassle. You can now balance your checkbook, prepare your taxes, plan for a comfortable retirement, and have enough time left over to go spend some money—and dutifully enter those transactions into Quicken, as well.
The pleasure of doing your finances in Quicken evaporate instantly, though, if you lose your data to a hard-disk crash or other computer disaster. Good backups, as this chapter outlines, get you back to work quickly.
Backing Up Data Files
Quicken provides several backup methods, all of which work well for backing up your data files. But like millions of others, you may already back up all the information on your PC. If you’re already using, say, Windows Backup, then Quicken backups may seem as useful as an icemaker in Siberia. After all, your Quicken data is getting backed up on a regular basis with all your other files.
Quicken backups can give you an extra layer of flexibility as well as protection. Suppose you’re about to experiment with a Quicken feature, like downloading transactions or archiving your data; there’s no sense backing up everything on your computer. You can back up only your Quicken data by running a Quicken manual backup, which immediately creates a backup data file. Then, if the experiment goes horribly wrong, you can restore your Quicken backup and try a different approach. A Quicken backup is also a good idea if you’ve spent several hours getting your accounts, categories, and preferences just the way you want them, and your next scheduled Windows backup won’t kick in until 3:00 tomorrow morning. Just run a manual backup (and sleep like a baby).
Quicken offers a second type of backup, the online backup. In the Quicken Backup dialog box, select the Online option if you want Intuit to handle backing up your data file. This service sends your files via the Internet to Intuit’s data center, as described in the box on Section 3.2.
Manual Backups
If you just spent several hours creating transactions in Quicken, setting Quicken preferences, activating your bank accounts for online services, and customizing Quicken investment reports, you’re sure to want to save your work right away. Here’s what you do to run a backup immediately:
Open the Quicken Backup dialog box by choosing File → Backup or by pressing Ctrl+B.
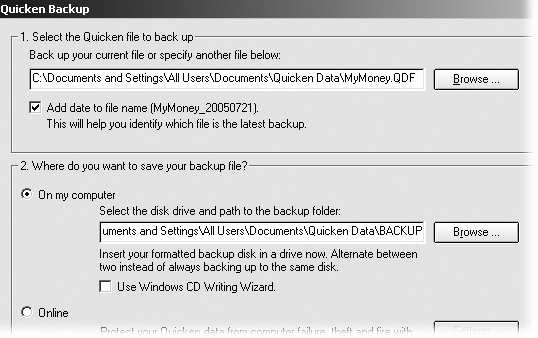
The Quicken Backup dialog box opens, showing your current backup settings (Figure 3-1). The “Select the Quicken file to back up” section displays the name and full path of the data file that’s open, which is the very file you’re about to back up. If you want to back up a Quicken data file other than the one you’re working on, click Browse and select that file instead. (Although Quicken shows only the .qdf file, it backs up all of the files that make up your data file.)
The program also automatically turns on the “Add date to file name” check-box—with good reason. This setting makes it easy to identify your latest backup by appending an eight-digit date to the filename. For example, if you back up your MyMoney.qdf file on July 21, 2005, the backup filename prefix becomes MyMoney_20050721. If you turn this checkbox off, you create a backup that uses the data file’s name as the prefix and each manual backup you perform simply overwrites the previous one.
In the “Where do you want to save your backup file?” section, click Browse and navigate to the folder or removable media you use for backups.
If you want to make a backup of your Quicken data file before you try an unfamiliar procedure, the BACKUP subfolder that Quicken chooses is fine.
Figure 3-1. The first time you back up your data file, Quicken automatically sets the backup location to a subfolder, named BACKUP, within the folder that contains the data file. If you use third-party software like Windows Backup to save all your data, this location is fine. Otherwise, the safest choice is to switch the backup to a CD or other removable media. Quicken uses this location for every subsequent backup of that file.But saving a backup file to the same hard drive that contains your data file won’t help if your hard disk crashes. To protect your data from human error and hardware failure, back up your file to a different hard drive, or to removable media, like a CD or DVD.
For the ultimate in backup protection, rotate your backups among several copies of removable media and store one of your backups offsite. For example, take a backup CD to your office or give it to a trustworthy neighbor. If your house burns down, melting your computer and your removable media, you’ll still be able to retrieve your electronic financial records.
If you’re backing up to removable media (CD, Zip disk, DVD, diskette, and so on), insert it into your PC.
If you’re backing up to a CD, see the box on Section 3.1.2 for further advice on burning CDs.
To begin the manual backup, click OK.
If you turned on the “Add date to file name” checkbox, Quicken most likely displays a message telling you that your data has been backed up successfully. Click OK to close the message box and the Quicken Backup dialog box.
If you’ve already created a backup file with the same name, Quicken asks if you want to overwrite that file. Click Yes only if you are absolutely sure you don’t need the previous backup.
To retain your previous backups, click Cancel. Open the Quicken Backup dialog box again and either turn on the “Add date to file name” checkbox or choose a different folder for your backup.
Backup Reminders
If you have trouble remembering important tasks like backing up your data or picking up your kids at school, Quicken backup reminders help ensure that at least one of your to-dos is done. You can set a preference (Section 1.5.4) that tells Quicken to remind you to back up your data file. After you’ve opened the file the number of times you set in the preference, Quicken reminds you with the message shown in Figure 3-2. If you mangle your data or it becomes corrupt in some way, you can restore one of these backups; see “Restoring Quicken Backups” on Section 3.2.
When you’re choosing a location to save your Quicken backup file, you may notice a Use Windows CD Writing Wizard checkbox. Quicken leaves this checkbox turned off initially, since it apparently assumes you’re going to use a third-party program like Roxio Easy CD Creator. If you back up data frequently, you can leave a CD in the drive and continue writing backups to it. (You must first format the CD and set up your CD drive to work like another hard drive on your computer, also using the third-party software.)
If your computer runs Windows XP, it comes with the Windows CD Writing Wizard for burning files to CD. To backup directly to a CD, turn the Use Windows CD Writing Wizard checkbox on. Quicken hands responsibility for backing up to the Windows CD Writing wizard. Getting through the wizard steps successfully is your responsibility. Here’s what to do:
In the “Select the disk drive and path to the backup folder” box, click Browse and select your CD drive. When you click OK, Quicken displays a message telling you that your data file has been copied to XP’s temporary CD Burning folder.
Just above your System tray (way down in the lower-right corner of your screen), you see a balloon telling you that you have files waiting to be written to a CD. Click the balloon to open the ephemeral “Files Ready to Be Written to the CD” folder in Windows Explorer.
Be sure to insert a CD into your drive, and then click “Write these files to CD,” as shown here. Continue to follow the wizard’s instructions.
When your CD holder pops open, click Finish. Your backup is complete.
Remove the CD from the drive, label it with the backup name
and date, and store it somewhere safe.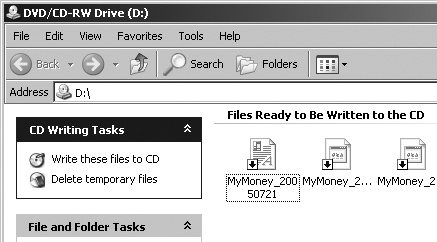

Automatic Backups
It’s a horror story that happens in home offices every day. You try to open your data file and Quicken begins to cough and wheeze (in its own computerized way). You grow nervous as you try to remember the last time you backed up your Quicken data—but what if that’s never? Don’t panic: Quicken actually performs some backups for you behind the scenes, and you may be able to restore one of those files.
Quicken’s automatic backup feature creates a copy of your data file about once a week. (It kicks in when you close the program by choosing File → Exit, opening another data file, closing the Quicken window, and so on.) These copies are separate from backups you create manually or via a Quicken reminder. For example, if your data file is named MyMoney and you peek in the folder that you use for Quicken backups, you see other files like the ones in Figure 3-3. Because automatic backups are copies, you don’t have to choose File → Restore Backup File to open them. Simply choose File → Open and select the name of the automatic backup file you want to open.

Out of the box, Quicken creates five automatic backup files in your backup folder, for example, MyMoney1 through MyMoney5. Here’s what Quicken does when it creates an automatic backup (using the MyMoney data file as an example):
Quicken renames MyMoney1 files to MyMoney2 (including the .qdf, .idx, .qel, and .qph file extensions.)
MyMoney2 files become MyMoney3 files.
MyMoney3 files become MyMoney4 files.
MyMoney4 files become MyMoney5 files.
And finally, Quicken creates a copy of the current MyMoney files and names them MyMoney1. The cycle is complete until the next week.
Quicken includes a backup preference, “Maximum number of backup copies,” that you can set to create more or fewer of these automatic backups (see Section 1.5.5). If you want to keep backups that go back further in time, you can choose a higher number (up to 9). Alternatively, if your computer backup procedures are impeccable and you’d rather conserve disk space, you can choose a number as low as 1.
Restoring Quicken Backups
Here’s the reason you’ve been so carefully getting your Quicken backup routine in place. After you’ve survived a hard drive crash, power outage, or natural disaster, you have to take one of those backup files and turn it into a working data file before you can start using Quicken again.
If you’re restoring a backup file after a hard disk crash, you’ll have to reinstall Windows and Quicken 2006 before you can complete these steps. Once your PC is up and running and you’ve launched Quicken, proceed as follows:
If you backed up your data to removable media, put the disk containing your backup in the appropriate drive.
If you instead backed up your data to another hard drive on your computer or on a home network, you must connect to it. For example, if the backup file is on a laptop, connect it to your desktop PC and turn on file sharing.
Choose File → Restore Backup File.
Quicken displays a submenu, which lists the backup copies that you’ve made. If the backup that you want to restore is listed on the menu, click its name.
To restore any other files, click Browse at the bottom of the submenu. In the Restore Quicken File dialog box, navigate to the folder or media that contains the backup you want to restore.
Select the filename and click OK.
When you see the message that says your data has been restored successfully, you’re ready to open the data file.
Open the data file and look it over. Reenter any transactions that the backup doesn’t contain.
For example, look for a gap between the last check number in Quicken and the number on your next paper check and reenter any checks that don’t appear in Quicken. Alternatively, you can wait until you receive your next bank statement and add missing transactions as you reconcile your account.
Back up your recovered data file onto removable media or a different computer now .
See Section 3.1.1 for instructions on performing a manual backup.
In the process of finding and recovering your data file, you’ve had a chance to see how well (or poorly) your backup system worked. Anything that will make your life easier next time—buying more blank CDs, setting more frequent backup reminders, or signing up for Quicken’s online backup service—do it now before you forget.