Chapter 2. Accounts and Categories
Quicken abounds with tools to help you plan, track, and analyze your finances. If you use the Quicken Guided Setup as described in Chapter 1, it creates an assortment of accounts and categories for you. That arrangement’s a mere starting point, though.
This chapter defines Quicken’s various account types and shows you how to set up new accounts, as well as manage existing ones. You’ll also learn how to organize your finances by category, so you can see where your money’s coming from and what you’re spending it on.
Armed with this knowledge, you can make changes to your data file as your financial needs change over time. For example, whenever you switch banks, succumb to a fabulous credit card offer, or take out a home equity loan to get your mobile dog-grooming business going, you’ll need a new account. Or say you get married and need new accounts and categories to track your husband’s salary, taxes, and all those salon facials.
Tip
Sometimes, the arrival of a new business or person in your life means you need to create an additional data file as well. See the box on Section 2.1.
How Accounts and Categories Work
As you learned in the previous chapter, an account in Quicken corresponds to an account you have at a financial institution, like a checking account at a bank, a savings account at a credit union, a Roth IRA at a brokerage, and so on. Quicken also lets you give each transaction a category, which identifies it as belonging to an area of your financial life. Categories like Groceries, Auto Insurance, and Poker Winnings help you see where your money is going (or coming from). Every time you record a deposit, check, or credit card charge, you can assign it a category.
To get a handle on the difference between accounts and categories, consider how a married couple uses Quicken:
Marsha uses one Quicken data file to manage both her and her husband Jeff’s finances.
She and Jeff have a checking account at Citibank, which she manages with a checking account in Quicken.
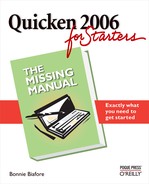
Figure 2-1 demonstrates how checks that Marsha writes in Quicken change the checking account balance and track how the couple spends money.
Types of Accounts
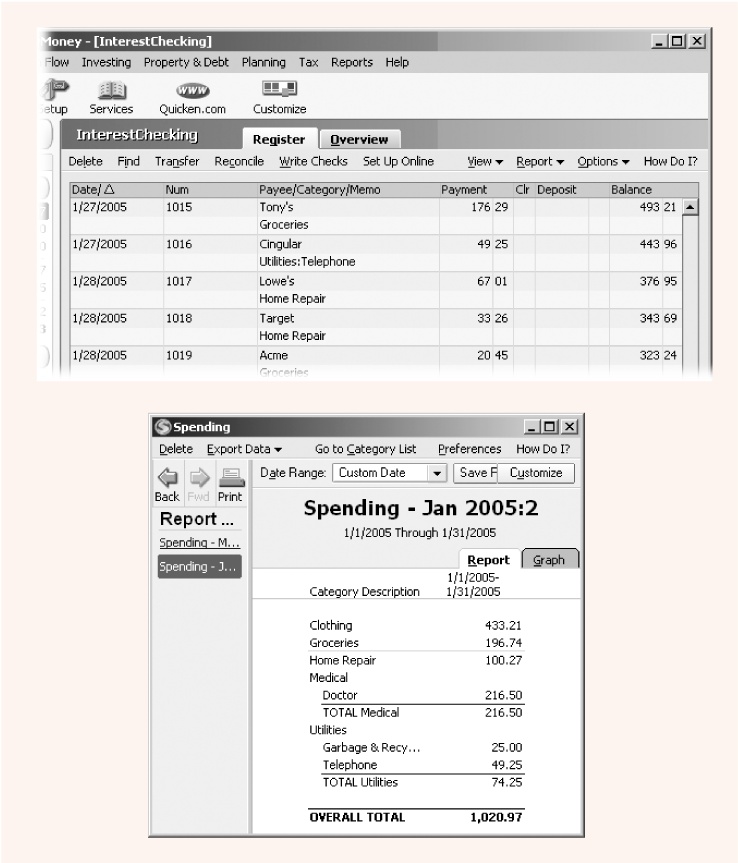
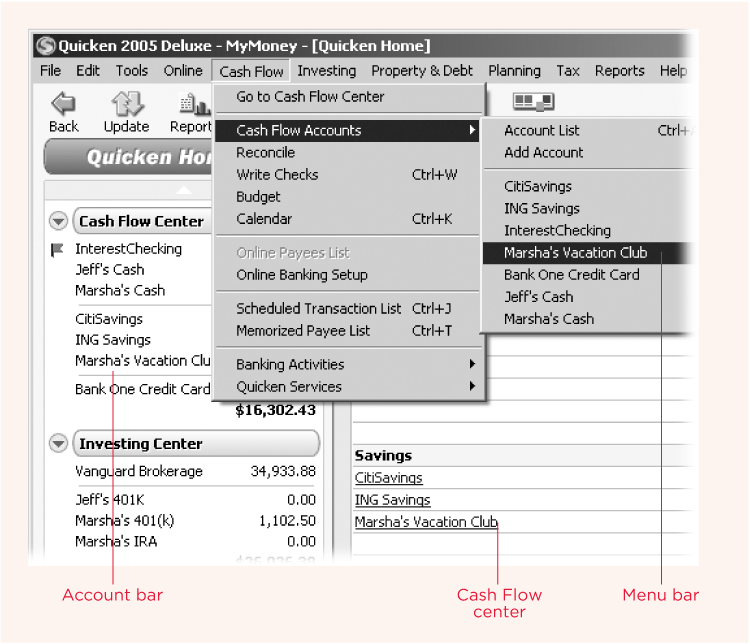
As complicated as personal finances can be in the 21st century, Quicken has an account type for every situation. When you create an account in Quicken, you must choose from the dozen types that the program offers. Quicken further divides each account type into different types of financial activities, as the Account Bar in Figure 2-2 illustrates. This section describes the types of accounts you can create in Quicken and what you use them for.
Cash Flow Accounts
Cash flow accounts deal with the money that flows into and out of your life—checks, paycheck deposits, credit card charges, or the wadded-up bills you hand to the toll taker on the turnpike. Each type of cash flow account offers slightly different features, based on how you use it. For example, Checking and Savings account registers include a Num field for entering a check number. Credit Card and Cash account registers omit this field, because transactions aren’t typically numbered.
Here’s Quicken’s selection of cash flow accounts.
Checking. Use this type of account to track your real-world checking accounts.
Savings. This type of account works for real-world accounts that pay interest on your deposits, including passbook savings accounts, money market accounts, and certificates of deposit. You can also use Savings to track other stockpiles of money that don’t pay interest or aren’t at a bank.
Credit Card. This account type represents real-world accounts that extend a line of credit to you, including credit cards, charge cards, and other lines of credit. Use this type of account when you can withdraw money (charge) and make payments. (By contrast, the Liability account type discussed on Section 2.3 is designed for loans that you pay back through regularly scheduled payments of principal and interest.)
Figure 2-1. Top: As you can see in the checking account register, the checks that Marsha writes reduce the balance in the Quicken checking account. The assigned categories appear below the Payee’s name. Bottom: Marsha can generate a report (see Chapter 10) that uses the categories they assigned to their checks to see how they spent their money.You can even use the Credit Card type for an overdraft protection feature connected to your checking account. Overdraft lines of credit act like credit card accounts, with credit limits, minimum payments, and interest charged on the credit balances.
Cash. Use a cash account if you want to track how you spend your money to the penny (or dollar), or to track travel advances you receive. If you write a check to “cash” or withdraw money at the ATM, for example, you can create those transactions as transfers to your cash account. You can then spend the cash any way you like, but the transaction serves as a record of how much cash you’re spending. (You can see some creative ways of using this type of system on Section 4.6.)
Investing Accounts
The Investing Center is the home for every account in which you hold securities, whether it’s a tax-advantaged 401(k) for your retirement or a taxable brokerage account earmarked for the trip to Tahiti you want for your 20th anniversary.
Creating investing accounts is similar—though not identical—to creating cash flow accounts. To learn the details of creating investing accounts, see “Creating an Investment Account” in Chapter 9. Here’s a list of Quicken’s investing accounts and when you should use them:
Brokerage. Unless your investment account falls into one of the special tax-advantaged categories, this is the investing account type you’ll use most of the time. The Brokerage type handles accounts that hold one or more securities, be they stocks, bonds, mutual funds, annuities, real estate investment trusts—you name it.
IRA, SEP, Keogh. Use this type of account for any type of individual retirement account (IRA). In addition to traditional IRAs, this type includes Roth, Simplified Employee Pension (SEP), Simple, and Education IRAs. Keogh plans also fall in this category.
401(k)/403(b). In the real world, 401(k) and 403(b) accounts are employee-sponsored retirement plans named after the section of the tax code that created them. Use this type of account to track your employer-sponsored accounts (including the matching contributions that your company makes).
Single Mutual Fund. In Quicken, this type of account comes with conditions that render it mostly useless. However, if you buy a mutual fund directly from the mutual fund company, don’t have a cash balance in the account, and hold only one fund in the account, this type is very simple to use.
Property & Debt Accounts
The Property & Debt category contains accounts for tangible things you own and any money you’ve borrowed. Asset and liability accounts in Quicken include more fields for information than other type of accounts. If you wish to track your assets and liabilities in Quicken, learn how to create property and debt accounts in the section “Setting Up Asset and Liability Accounts” on Section 5.2.1.
Meanwhile, here are the account types you can choose from:
House. This special type of asset account comes with features unique to property ownership. For example, you can track your original purchase price and value adjustments for improvements you make. When you create a House account, Quicken can help you create the corresponding liability account for your mortgage.
Vehicle. This special type of asset account includes balance adjustments for reducing the value of a vehicle due to depreciation. Quicken can help you create the corresponding liability account.
Asset. Before you add an asset account for other things you own, consider not only whether the items have value, but also whether you can sell them. For example, your wardrobe may have cost a fortune, but you won’t make much selling it. On the contrary, if you own the white sequined costume Elvis wore in Las Vegas, the selling price on eBay could cover that Miami retirement timeshare you’ve been eyeing. For the Elvis outfit, you may want to create an asset account. (As for your other clothing, you can take digital pictures for insurance purposes and store them on your PC rather than making your wardrobe an asset in Quicken.)
Liability. This account type tracks how much you owe on a loan. For example, when you create an asset account for the $20,000 car you just purchased, Quicken can help set a corresponding liability account for the car loan to track how much you’ve paid and how much you still owe.
Creating Cash Flow Accounts
The steps for creating any type of banking account aren’t difficult. Once you’ve gone through the steps the first time, you’ll get a feel for it and be able to create new accounts much more quickly. This section walks you through the process, start to finish.
To create an account, you must first get to the Quicken Account Setup dialog box, which you can do in any of the following ways:
The Account Bar. If you keep the Account Bar visible (as most people do), right-click it and choose “Add new account” from the shortcut menu.
The Quicken menu bar. Perhaps the fastest access to the Quicken Account Setup dialog box is from the Quicken window’s menu bar. For example, to create a cash flow account, choose Cash Flow → Cash Flow Accounts → Add Account. The Investing and Property & Debt menus have similar entries.
The Account List. In the middle of the Account List menu bar, choose Add Account. For the keyboard maven, opening the Account List window requires no more than pressing Ctrl+A. You can also open the Account List window by choosing Tools → Account List.
Cash Flow Center. If you launch Quicken displaying the Cash Flow Center, simply click Add Account to create any type of cash flow account in Quicken.
The File menu. The fastest (and perhaps least obvious) way to the Account Setup dialog box is choosing File → New. In the “Creating new file” dialog box that opens, choose the New Quicken Account option and click OK
Tip
If you can’t get enough of the Quicken Guided Setup, which you first saw as you were setting up your Quicken environment (Section 1.4), you can instead use that tool to create new accounts.
Creating a Banking Account: Step by Step
Despite a few major differences between types of accounts in the Cash Flow category, you’ll find the steps for creating these accounts refreshingly similar. Savings accounts pay interest, whereas credit card accounts charge interest and limit how much you can spend. Yet, in the Quicken Account Setup dialog box, the fields you must fill in are almost identical.
If you click anywhere in the Quicken main window while the Account List window is open, the Account List window disappears. Don’t panic. Tucked away at the bottom of the Quicken main window are buttons for each window that Quicken has minimized, as shown here. To restore any of these windows, simply click its button.
For some windows, like the Account List, Category List, and Scheduled Transaction List, reissuing the command to open the window simply restores the window to view. Using their corresponding keyboard shortcuts (Ctrl+A, Ctrl+C, and Ctrl+J) restores the windows and may be faster than clicking the buttons at the bottom of the program’s main window.
For reports, be sure to click the report button at the bottom
of the Quicken main window. If you choose Reports and then choose
the report name you want, Quicken creates a
second report window instead of restoring the
first one to view.
Here are the steps for creating a checking, savings, credit card, or cash account:
Choose Cash Flow → Cash Flow Accounts → Add Account.
The Quicken Account Setup dialog box opens and asks the first of several questions you must answer to create an account: “What is the financial institution for this account?” For banking accounts, online or not, leave “This account is held at the following institution” selected (see the box on Section 2.3.1).
For banking accounts, in the text box, begin to type the name of the financial institution.
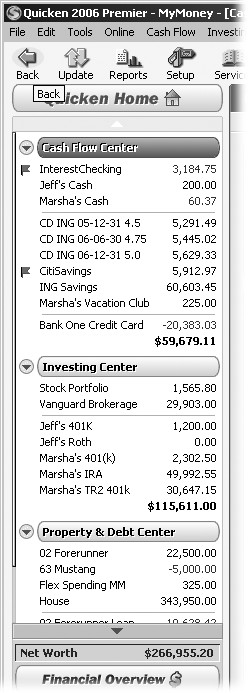
As Figure 2-3 illustrates, Quicken attempts to fill in the name for you.
With the name of the institution in place, click Next.
If the financial institution you specified offers online services, you can set those up now, later, or never, as you can see in Figure 2-4. Click Next to either complete or bypass the online setup. Either way, the next screen is “Choose the type of account to add.”
Tip
Chapter 6 explains in detail how to set up accounts for online services.
Figure 2-3. Quicken displays the names of all the financial institutions that match the letters you’ve typed so far. For example, typing Fid displays the banks shown here. If you see the one you want, click it. If your bank isn’t in Quicken’s database, you’ll have to type the entire name.Figure 2-4. Quicken automatically selects the Online option, which initiates online setup and downloading when you click Next (not shown). The text on the screen describes the type of online services your institution offers and describes the basic setup steps. If you’ve no intention of using online services or simply want to set them up later, choose the Manual option.For account type, select from the following options: Checking, Savings, Credit Card, or Cash. Then click Next.
Each option includes a brief and mostly self-explanatory description of the account type.
In the “Tell us about this _ account” screen, in the Name this account box, type a name to identify the account in Quicken.
Quicken automatically fills in a generic name for the type of account you’re creating—like Checking for a checking account. Change Quicken’s entry to a name that clearly identifies the account in your mind—like ING Savings or Marsha’s Vacation Club, for instance. (For more account-naming advice, see the box on Section 2.3.1.)
Click Next when you’re done.
In the final screen, type the ending date from your bank statement and its ending balance.
Quicken uses the statement date and ending balance to create the opening balance for the account. If you want your Quicken file to provide complete tax records for a year, use the last statement from the previous year as your starting point and type in the date of the statement and its ending balance. This approach requires extra work, because you have to create all the transactions up to today, although downloading transactions electronically may take care of a lot of that grunt work. Most financial institutions provide 30 to 60 days of past transactions.
If you don’t care about tax records, hunt down your most recent bank statement and type in its ending balance and date. The only transactions you have to catch up on are the ones that didn’t clear on that statement or that you made after its ending date.
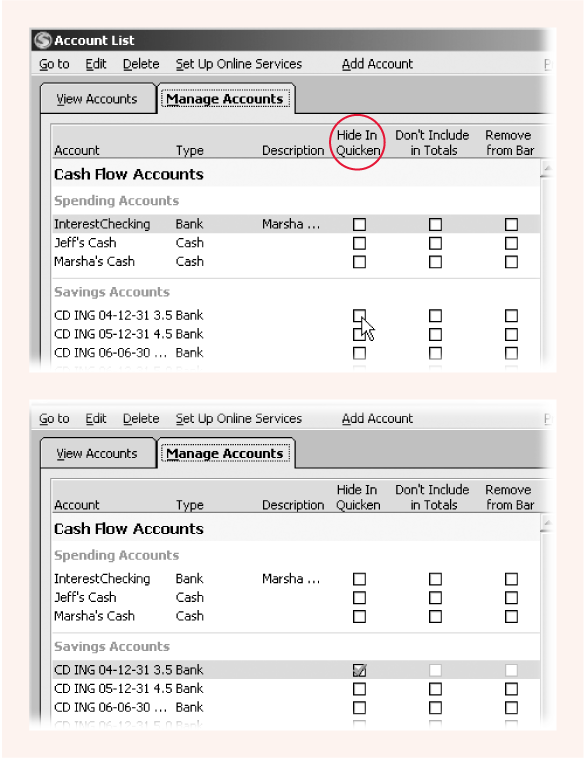
The name you give an account can do much more than identify its financial institution or describe its purpose. Since Quicken lists accounts of each type in alphabetical order, you can get incredible mileage from an organized account naming system. For example, if you name your certificate of deposit (CD) accounts haphazardly, they’ll be scattered among your passbook savings accounts, money market accounts, and other savings accounts. But if you have a naming scheme, perhaps beginning each money market account with “MM” and each CD with “CD,” accounts of similar types all appear together in lists and menus, as shown here.
But why stop there? For CDs and similar products, you may want to keep an eye on when they mature, so you can research rates and options before it’s time to reinvest. Quicken account names can include up to 40 alphanumeric characters, so you’ve got plenty of space to include the financial institution, the maturity date, and the interest rate, such as CD ING 05-12-31 4.5. If you want your CDs to show up in chronological order of maturity, include the year first, then the month, and finally, the day.
In the case of credit cards, it’s a good idea to include only the last four digits of your card number, rather than the full number. (You often see this security measure on credit card receipts, for example.) Those last four digits provide enough information for you to identify the account (Visa 9214, say), without the risk of your entire account number falling into the wrong hands. It’s bad enough if thieves abscond with your computer. You don’t want them to gain access to your bank accounts as well.

Click Done to create the account.
Creating an account doesn’t fill in every field for an account. For example, you may want to specify the interest rate for a savings or interest checking account. Or you can further organize your records by typing in a contact name and phone number. The next section explains how to add and edit all of this information.
Figure 2-5 shows a few of the places that your new account appears in Quicken.

Editing Account Information
Once you’ve created an account, you can edit its details any time you want. You may have set your accounts up perfectly the first time, but the Account Details dialog box is worth a visit, if only to see the many other account characteristics you can document. Look at Figure 2-6, for example. In addition to the name and other information you entered when you set up the account, you’ve got space for comments and a nifty Alerts feature, so you can have Quicken warn you when your balances reach certain levels.
Note
Just about the only thing you can’t change about an account is its type. Quicken doesn’t let you change a savings account into a checking account, for instance.
To edit the details of an account, use either of the following methods:
In the Account Bar, right-click the name of the account and choose Edit Account from the shortcut menu.
In the Account List window, select an account, and then click Edit in the menu bar.
Hiding Closed Accounts
Over time, you’ll probably close some accounts: CDs mature, you switch banks, or you finally smarten up and move your credit card balance to one with a single-digit interest rate. In Quicken, you don’t delete accounts that you’re no longer using, even if they have a zero balance. Deleting an account deletes all of the transactions in the account, including transfers to and from other accounts—potentially mangling those accounts!

Fortunately, there’s a way of getting those old accounts off your Account Bar and Account List (and out of your hair). All you have to do is hide your closed or inactive accounts. Hidden accounts—and, more importantly, their transactions—remain in your data file, but you won’t see them in account lists.
You hide accounts using the Manage Accounts tab of the Account List window. Here’s how:
In the Account Bar, right-click any account and, from the shortcut menu, choose “Delete/hide accounts in Quicken.”
If you press Ctrl+A to open the Account List window, you’ll see the View Accounts tab, which shows your unhidden accounts, their balances, and a few other bits of account information. Click the Manage Accounts tab.
To hide an account, in the “Hide in Quicken” column, turn on the account’s checkbox.
Figure 2-7 shows an account being hidden.
Click Close when you’re done.
Categories
When you first create a new Quicken data file, the program automatically sets up a boatload of categories for you. Quicken chooses these categories based on the answers you give during setup, including your marital status and whether you own a home. For commonly used categories, Quicken also specifies the tax form and line item to which the category applies, saving you a lot of heartburn when it comes time to generate tax reports.
Categories are the foundation of Quicken’s tracking and budgeting features. You can use them to budget how much you spend on different items, see how your income and expenses are allocated, or generate reports to make it easier to fill out that tax return.
In Quicken, categories come in three basic types. Income categories are for the money that comes into your personal coffers, like salary, part-time income, and winnings from the gals’ bunko game. Expense categories represent the money you spend, including unavoidable expenses like Groceries and discretionary expenses like Hobbies. As you create or edit categories as described in this section, you can assign them to either Income or Expense. However, the Category List includes one additional type of category— Transfers and Payments. This type of category works a little differently: Quicken automatically creates categories representing each of your accounts. Then, when you transfer money from checking to savings or make a mortgage payment, you use these categories to show which accounts the money is going into and out of.
Before you start modifying Quicken’s categories en masse, read this section to gain an understanding of how they work as you think about how you need to categorize your own information. (For more advice, see the box on Section 2.7.)
Category. If you want to track how much you earn or spend on some aspect of life, tax-related or not, you need a category to put it in. Likewise, you need a category if you want to establish a budget of how much you’d like to spend in a particular area, such as Supplies or Entertainment.
Subcategory. As its name implies, a subcategory is a category within a category. By lumping several sub-categories underneath one top-level category, you can generate reports that summarize your income and expenses. For example, Quicken automatically includes a Tax category, with sub-categories for federal, state, local, and other types of taxes you pay. Or, you can create a category called Fun and then create subcategories, like Dining Out, Recreation, Vacation, and Horses. The resulting tree structure (which you can see at top in Figure 2-8) makes it easy to spot the categories you want.
Category Group. Out of the box, Quicken includes three Category Groups: Discretionary, Income, and Mandatory Expenses. These are high-level categories that encompass a group of individual categories. You can work with Quicken for years without a glimmer of a reason to use Category Groups. However, power users find all sorts of uses for them. For example, if you want to determine how much money you need to cover expenses should you lose your job, you can create a budget for all the categories in the Mandatory Expenses group.
The Category List Window
The list of categories that Quicken starts with meets most needs for most people, but chances are good you’ll want to make at least a few changes. Choose Tools → Category List to open the Category List window, which is where you make those changes (Figure 2-8, top).
The Category List window gives you plenty of tools to help organize the categories you’re working with:
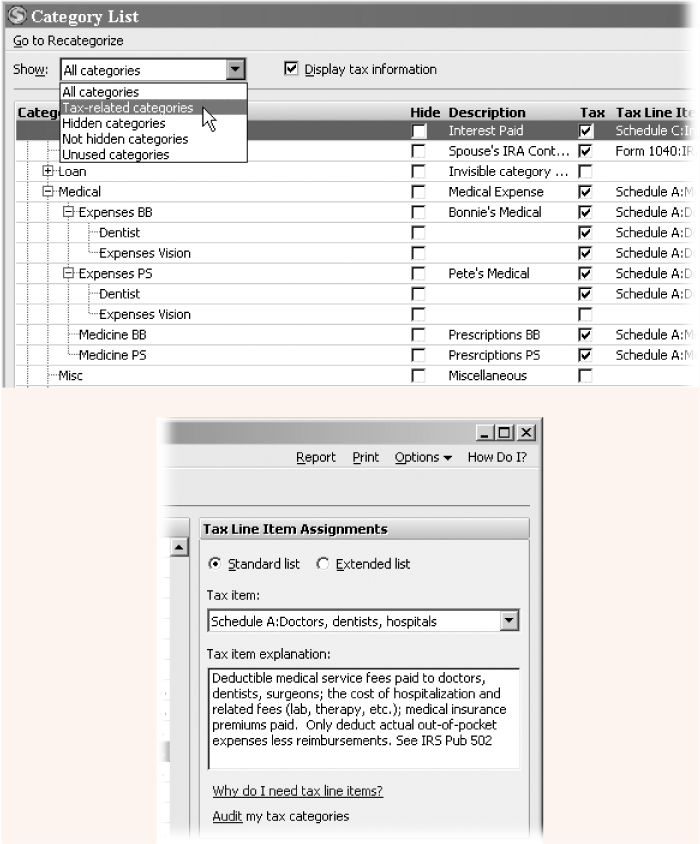
Show. In the Show drop-down menu, choose a type of category to display just those categories (and filter out the others). For instance, choose “Tax-related categories” to check whether you’ve assigned your tax categories to tax line items correctly (see Section 10.2.6).
Figure 2-8. Top: Turning on the “Tax information” checkbox displays tax settings for categories. Quicken shows all categories automatically, but you can filter the list for tax categories by choosing Tax-related categories in the Show drop-down list. Bottom: When you select a category in the Categories List, the Tax Line Item Assignments pane on the right side of the window lets you choose the tax item for the category. Quicken displays an explanation of the tax item you select..Display tax information. Turn on this checkbox to see the Tax Line Item to which categories are assigned. The Tax Line Item Assignments pane appears on the right side of the window, making it easy to choose or correct the tax line item assignment for the selected category.
Go to Recategorize. In the window menu bar, choosing Go To Recategorize opens a dialog box in which you can reassign transactions to a different category (see Section 4.9.2).
Options. From the Options menu, you can choose what you want to see in the window. For example, you can show or hide category descriptions, category groups, or the type (income, expense, and sub). To assign a category group, choose Options → “Assign category group”.
Category tasks. Along the bottom of the Category List window, you’ll find buttons for working with categories, like New, Add from List, Edit, Delete, and Merge. You’ll learn about these in the remainder of this chapter.
Customizing Categories
Now that you understand category characteristics, you can make changes to the categories that Quicken set up for you. Initially, you’ll probably spot several categories that you don’t need (like Rent if you’re a homeowner). You can hide or delete categories you don’t want, or consolidate several of Quicken’s categories under one main category.
You don’t have to get your categories perfect before you start doing your finances in Quicken. If you enter a credit card charge and can’t find the category you want, you can add a new category to the Category List then and there. You can even recategorize transactions if you decide to revamp the categories you use.
Removing Categories
You can remove categories from the Category List by hiding or deleting. For example, if personal hygiene isn’t a priority, you can (if you must) delete the Personal Care category. If you own a home but worry about your spouse kicking you out, you may want to hide the Rent category only temporarily.
Hiding a category. In the Category List window, turn on the Hide checkbox for the category you want to hide. To show it again, turn off the same checkbox.
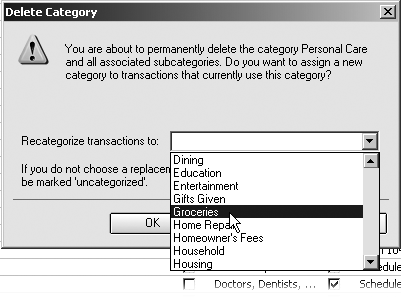
Deleting a category. In the Category List window, click the name of the category you want to delete and then, at the bottom of the window, click Delete. If there are transactions assigned to the category, Quicken asks you to recategorize them, as shown in Figure 2-9. If you don’t recategorize transactions, they become uncategorized and won’t show up in reports (for taxes or actual spending, for example).
Adding Quicken Categories
Keep in mind that the list of categories you see depends on the answers you gave during setup. If you have children, buy a house, or get married (not necessarily in that order), you don’t have to create categories from scratch. Quicken includes predefined categories for those situations. Here’s how you add them to your Category List.
At the bottom of the Category List window, click “Add from List.”
In the Available Categories drop-down menu, choose the category you want.
The categories include life events, like Married, as well as special cases like Rentals & Royalties, for types of income that only some people have. Figure 2-10 demonstrates how to add available categories to your Category List.
Creating Categories
If you want a category that Quicken hasn’t provided, you can create categories from scratch with only a few clicks and keystrokes. Here’s how:
At the bottom of the Category List window, click New.
The Set Up Category dialog box appears with only the Expense option selected.
In the Name box, type a name for the new category.
Use names that completely identify the purpose of the category—even if you’re creating a subcategory. A subcategory name like “Fees” makes sense when you can see the parent category, but could be obscure in a report or transaction.
If you want to assign the category to a category group, in the Group dropdown menu, choose a group.
For example, most people would choose Discretionary for a category that tracks the money you spend on cappuccino. If you can’t function without fancy coffee, choose Mandatory Expenses instead.
Figure 2-10. Top: When you choose an Available Category, Quicken displays the categories in the list box. You can select individual categories by clicking them, or select all categories by clicking Mark All. Click Add. Bottom: When you click Add, Quicken adds the categories to the “Categories to Add” list. These categories still aren’t in your Category List. Click OK to add them (not shown).Choose the type of category.
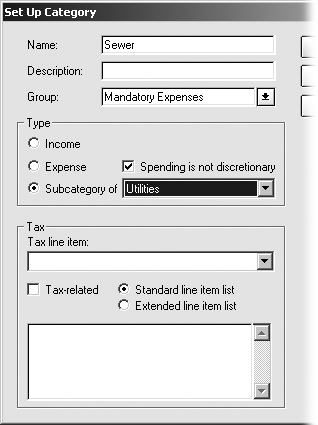
You have three options to choose from. For top-level categories, select either the Income or Expense option—the two broadest categories of all. To create a subcategory, select the “Subcategory of” option, depicted in Figure 2-11.
If the category corresponds to income or deductions on your tax return, turn on the "Tax-related” checkbox. In the “Tax line item” drop-down menu, choose the entry that corresponds to the tax form and line on that form.
When you choose a tax line item, Quicken displays a description of that item, but it doesn’t guarantee that your choice is correct. You can use last year’s income tax return to check your line item assignments, or to be sure, ask the IRS or your accountant.
Figure 2-11. This is the Set Up Category dialog box. In the “Subcategory of” dropdown menu, choose the category that you want as the parent. When you choose a category, Quicken sets the Group field to match that of the parent, and also changes the “Spending is not discretionary” checkbox, based on the parent category’s Group.Click OK.
Quicken adds the category to the Category List window.

Modifying Categories
You can modify any aspect of an existing category. For example, you can rename it to something more meaningful, switch it into a subcategory, assign a tax line item for expenses you joyfully realized qualify for tax deductions, and so on. To change characteristics of a category, in the Category List window, right-click the category you want to change and click Edit on the shortcut menu. The changes you make to a category apply to all transactions that use the category.
Note
If your mouse needs more exercise, you can also click a category and then, at the bottom of the Category List window, click Edit.
The Edit Category dialog box that appears is identical to the Create Category dialog box—except for its title and the fact that the fields are filled in with the category’s current settings. Change the fields you want, and then click OK to save your changes.