
This chapter provides detailed descriptions of some commonly used shell programming tools. Covered are cut, paste, sed, tr, grep, uniq, and sort. The more proficient you become at using these tools, the easier it will be to write shell programs to solve your problems. In fact, that goes for all the tools provided by the Unix system.
Before getting into the tools, you need to learn about regular expressions. Regular expressions are used by several different Unix commands, including ed, sed, awk, grep, and, to a more limited extent, vi. They provide a convenient and consistent way of specifying patterns to be matched.
The shell recognizes a limited form of regular expressions when you use filename substitution. Recall that the asterisk (*) specifies zero or more characters to match, the question mark (?) specifies any single character, and the construct [...] specifies any character enclosed between the brackets. The regular expressions recognized by the aforementioned programs are far more sophisticated than those recognized by the shell. Also be advised that the asterisk and the question mark are treated differently by these programs than by the shell.
Throughout this section, we assume familiarity with a line-based editor such as ex or ed. See Appendix B, “For More Information,” for more information on these editors.
A period in a regular expression matches any single character, no matter what it is. So the regular expression
r.
specifies a pattern that matches an r followed by any single character.
The regular expression
.x.
matches an x that is surrounded by any two characters, not necessarily the same.
The ed command
/ ... /
searches forward in the file you are editing for the first line that contains any three characters surrounded by blanks:
$ ed intro
248
1,$p                    Print all the lines
The Unix operating system was pioneered by Ken
Thompson and Dennis Ritchie at Bell Laboratories
in the late 1960s.  One of the primary goals in
the design of the Unix system was to create an
environment that promoted efficient program
development.
/ ... / Look for three chars surrounded by blanks
The Unix operating system was pioneered by Ken
/ Repeat last search
Thompson and Dennis Ritchie at Bell Laboratories
1,$s/p.o/XXX/g          Change all p.os to XXX
1,$p                    Let's see what happened
The Unix operating system was XXXneered by Ken
ThomXXXn and Dennis Ritchie at Bell Laboratories
in the late 1960s.  One of the primary goals in
the design of the Unix system was to create an
environment that XXXmoted efficient XXXgram
development.
In the first search, ed started searching from the beginning of the file and found the characters “ was ” in the first line that matched the indicated pattern. Repeating the search (recall that the ed command / means to repeat the last search), resulted in the display of the second line of the file because “ and ” matched the pattern. The substitute command that followed specified that all occurrences of the character p, followed by any single character, followed by the character o were to be replaced by the characters XXX.
When the caret character ^ is used as the first character in a regular expression, it matches the beginning of the line. So the regular expression
^George
matches the characters George only if they occur at the beginning of the line.
$ ed intro
248
/^the/                  Find the line that starts with the
the design of the Unix system was to create an
1,$s/^/>>/        Insert >> at the beginning of each line
1,$p
>>The Unix operating system was pioneered by Ken
>>Thompson and Dennis Ritchie at Bell Laboratories
>>in the late 1960s.  One of the primary goals in
>>the design of the Unix system was to create an
>>environment that promoted efficient program
>>development.
The preceding example shows how the regular expression ^ can be used to match just the beginning of the line. Here it is used to insert the characters >> at the start of each line. A command such as
1,$s/^/ /
is commonly used to insert spaces at the start of each line (in this case five spaces would be inserted).
Just as the ^ is used to match the beginning of the line, so is the dollar sign $ used to match the end of the line. So the regular expression
contents$
matches the characters contents only if they are the last characters on the line. What do you think would be matched by the regular expression .$?
Would this match a period character that ends a line? No. This matches any single character at the end of the line (including a period) recalling that the period matches any character. So how do you match a period? In general, if you want to match any of the characters that have a special meaning in forming regular expressions, you must precede the character by a backslash () to remove that special meaning. So the regular expression
.$
matches any line that ends in a period, and the regular expression
^.
matches any line that starts with one (good for searching for nroff commands in your text).
$ ed intro
248
/.$/                   Search for a line that ends with a period
development.
1,$s/$/>>/        Add >> to the end of each line
1,$p
The Unix operating system was pioneered by Ken>>
Thompson and Dennis Ritchie at Bell Laboratories>>
in the late 1960s.  One of the primary goals in>>
the design of the Unix system was to create an>>
environment that promoted efficient program>>
development.>>
1,$s/..$//              Delete the last two characters from each line
1,$p
The Unix operating system was pioneered by Ken
Thompson and Dennis Ritchie at Bell Laboratories
in the late 1960s.  One of the primary goals in
the design of the Unix system was to create an
environment that promoted efficient program
development.
It's worth noting that the regular expression
^$
matches any line that contains no characters (such a line can be created in ed by simply pressing Enter while in insert mode). This regular expression is to be distinguished from one such as
^ $
which matches any line that consists of a single space character.
Suppose that you are editing a file and want to search for the first occurrence of the characters the. In ed, this is easy: You simply type the command
/the/
This causes ed to search forward in its buffer until it finds a line containing the indicated string of characters. The first line that matches will be displayed by ed:
$ ed intro
248
/the/                   Find line containing the
in the late 1960s.  One of the primary goals in
Notice that the first line of the file also contains the word the, except it starts a sentence and so begins with a capital T. You can tell ed to search for the first occurrence of the or The by using a regular expression. Just as in filename substitution, the characters [ and ] can be used in a regular expression to specify that one of the enclosed characters is to be matched. So, the regular expression
[tT]he
would match a lower- or uppercase t followed immediately by the characters he:
$ ed intro
248
/[tT]he/                Look for the or The
The Unix operating system was pioneered by Ken
/                       Continue the search
in the late 1960s.  One of the primary goals in
/                       Once again
the design of the Unix system was to create an
1,$s/[aeiouAEIOU]//g    Delete all vowels
1,$p
Th nx prtng systm ws pnrd by Kn
Thmpsn nd Dnns Rtch t Bll Lbrtrs
n th lt 1960s. n f th prmry gls n
th dsgn f th nx systm ws t crt n
nvrnmnt tht prmtd ffcnt prgrm
dvlpmnt.
A range of characters can be specified inside the brackets. This can be done by separating the starting and ending characters of the range by a dash (-). So, to match any digit character 0 through 9, you could use the regular expression
[0123456789]
or, more succinctly, you could simply write
[0-9]
To match an uppercase letter, you write
[A-Z]
And to match an upper- or lowercase letter, you write
[A-Za-z]
Here are some examples with ed:
$ ed intro
248
/[0-9]/                 Find a line containing a digit
in the late 1960s. One of the primary goals in
/^[A-Z]/                Find a line that starts with an uppercase letter
The Unix operating system was pioneered by Ken
/                       Again
Thompson and Dennis Ritchie at Bell Laboratories
1,$s/[A-Z]/*/g          Change all uppercase letters to *s
1,$p
*he *nix operating system was pioneered by *en
*hompson and *ennis *itchie at *ell *aboratories
in the late 1960s. *ne of the primary goals in
the design of the *nix system was to create an
environment that promoted efficient program
development.
As you'll learn shortly, the asterisk is a special character in regular expressions. However, you don't need to put a backslash before the asterisk in the replacement string of the substitute command. In general, regular expression characters such as *, ., [...], $, and ^ are only meaningful in the search string and have no special meaning when they appear in the replacement string.
If a caret (^) appears as the first character after the left bracket, the sense of the match is inverted.[1] For example, the regular expression
[^A-Z]
matches any character except an uppercase letter. Similarly,
[^A-Za-z]
matches any nonalphabetic character.
You know that the asterisk is used by the shell in filename substitution to match zero or more characters. In forming regular expressions, the asterisk is used to match zero or more occurrences of the preceding character in the regular expression (which may itself be another regular expression).
So, for example, the regular expression
X*
matches zero, one, two, three, … capital X's. The expression
XX*
matches one or more capital X's, because the expression specifies a single X followed by zero or more X's. A similar type of pattern is frequently used to match the occurrence of one or more blank spaces.
$ ed lotsaspaces
85
1,$p
This        is   an example   of a
file   that  contains        a  lot
of   blank spaces                 Change multiple blanks to single blanks
1,$s/  */ /g
1,$p
This is an example of a
file that contains a lot
of blank spaces
The ed command
1,$s/ */ /g
told ed to substitute all occurrences of a space followed by zero or more spaces with a single space.
The regular expression
.*
is often used to specify zero or more occurrences of any characters. Bear in mind that a regular expression matches the longest string of characters that match the pattern. Therefore, used by itself, this regular expression always matches the entire line of text.
As another example of the combination of . and *, the regular expression
e.*e
matches all the characters from the first e on a line to the last one.
$ ed intro
248
1,$s/e.*e/+++/
1,$p
Th+++n
Thompson and D+++S
in th+++ primary goals in
th+++ an
+++nt program
d+++nt.
Here's an interesting regular expression. What do you think it matches?
[A-Za-z][A-Za-z]*
That's right, this matches any alphabetic character followed by zero or more alphabetic characters. This is pretty close to a regular expression that matches words.
$ ed intro
248
1,$s/[A-Za-z][A-Za-z]*/X/g
1,$p
X X X X X X X X
X X X X X X X
X X X 1960X.  X X X X X X
X X X X X X X X X X
X X X X X
X.
The only thing it didn't match in this example was 1960. You can change the regular expression to also consider a sequence of digits as a word:
$ ed intro
248
1,$s/[A-Za-z0-9][A-Za-z0-9]*/X/g
1,$p
X X X X X X X X
X X X X X X X
X X X X.  X X X X X X
X X X X X X X X X X
X X X X X
X.
We could expand on this somewhat to consider hyphenated words and contracted words (for example, don't), but we'll leave that as an exercise for you. As a point of note, if you want to match a dash character inside a bracketed choice of characters, you must put the dash immediately after the left bracket (and after the inversion character ^ if present) or immediately before the right bracket ]. So the expression
[-0-9]
matches a single dash or digit character.
If you want to match a right bracket character, it must appear after the opening left bracket (and after the ^ if present). So
[]a-z]
In the preceding examples, you saw how to use the asterisk to specify that one or more occurrences of the preceding regular expression are to be matched. For instance, the regular expression
XX*
means match at least one consecutive X. Similarly,
XXX*
means match at least two consecutive X's. There is a more general way to specify a precise number of characters to be matched: by using the construct
{min,max}
where min specifies the minimum number of occurrences of the preceding regular expression to be matched, and max specifies the maximum. For example, the regular expression
X{1,10}
matches from one to ten consecutive X's. As stated before, whenever there is a choice, the largest pattern is matched; so if the input text contains eight consecutive X's at the beginning of the line, that is how many will be matched by the preceding regular expression. As another example, the regular expression
[A-Za-z]{4,7}
matches a sequence of alphabetic letters from four to seven characters long.
$ ed intro
248
1,$s/[A-Za-z]{4,7}/X/q
1,$p
The X Xng X was Xed by Ken
Xn and X X at X XX
in the X 1960s.  One of the X X in
the X of the X X was to X an
XX X Xd Xnt X
XX.
A few special cases of this special construct are worth noting. If only one number is enclosed between the braces, as in
{10}
that number specifies that the preceding regular expression must be matched exactly that many times. So
[a-zA-Z]{7}
matches exactly seven alphabetic characters; and
.{10}
matches exactly ten characters (no matter what they are):
$ ed intro
248
1,$s/^.{10}//         Delete the first 10 chars from each line
1,$p
perating system was pioneered by Ken
nd Dennis Ritchie at Bell Laboratories
e 1960s. One of the primary goals in
 of the Unix system was to create an
t that promoted efficient program
t.
1,$s/.{5}$//          Delete the last 5 chars from each line
1,$p
perating system was pioneered b
nd Dennis Ritchie at Bell Laborat
e 1960s. One of the primary goa
 of the Unix system was to crea
t that promoted efficient pr
t.
Note that the last line of the file didn't have five characters when the last substitute command was executed; therefore, the match failed on that line and thus was left alone (recall that we specified that exactly five characters were to be deleted).
If a single number is enclosed in the braces, followed immediately by a comma, then at least that many occurrences of the previous regular expression must be matched. So
+{5,}
matches at least five consecutive plus signs. Once again, if more than five exist, the largest number is matched.
It is possible to capture the characters matched within a regular expression by enclosing the characters inside backslashed parentheses. These captured characters are stored in “registers” numbered 1 through 9.
For example, the regular expression
^(.)
matches the first character on the line, whatever it is, and stores it into register 1. To retrieve the characters stored in a particular register, the construct n is used, where n is from 1–9.
So the regular expression
^(.)1
matches the first character on the line and stores it in register 1. Then the expression matches whatever is stored in register 1, as specified by the 1. The net effect of this regular expression is to match the first two characters on a line if they are both the same character. Go over this example if it doesn't seem clear.
The regular expression
^(.).*1$
matches all lines in which the first character on the line (^.) is the same as the last character on the line (1$). The .* matches all the characters in-between.
Successive occurrences of the (...) construct get assigned to successive registers. So when the following regular expression is used to match some text
^(...)(...)
the first three characters on the line will be stored into register 1, and the next three characters into register 2.
When using the substitute command in ed, a register can also be referenced as part of the replacement string:
$ ed phonebook
114
1,$p
Alice Chebba    973-555-2015
Barbara Swingle 201-555-9257
Liz Stachiw     212-555-2298
Susan Goldberg  201-555-7776
Tony Iannino    973-555-1295
1,$s/(.*)    (.*)/2 1/ Switch the two fields
1,$p
973-555-2015 Alice Chebba
201-555-9257 Barbara Swingle
212-555-2298 Liz Stachiw
201-555-7776 Susan Goldberg
973-555-1295 Tony Iannino
The names and the phone numbers are separated from each other in the phonebook file by a single tab character. The regular expression
(.*) (.*)
says to match all the characters up to the first tab (that's the character between the ) and the ) and assign them to register 1, and to match all the characters that follow the tab character and assign them to register 2. The replacement string
2 1
specifies the contents of register 2, followed by a space, followed by the contents of register 1.
So when ed applies the substitute command to the first line of the file:
Alice Chebba 973-555-2015
it matches everything up to the tab (Alice Chebba) and stores it into register 1, and everything after the tab (973-555-2015) and stores it into register 2. Then it substitutes the characters that were matched (the entire line) with the contents of register 2 (973-555-2015) followed by a space, followed by the contents of register 1 (Alice Chebba):
973-555-2015 Alice Chebba
As you can see, regular expressions are powerful tools that enable you to match complex patterns. Table 4.1 summarizes the special characters recognized in regular expressions.
Table 4.1. Regular Expression Characters
Notation | Meaning | Example | Matches |
|---|---|---|---|
| any character |
|
|
| beginning of line |
|
|
| end of line |
|
|
| a line containing just the characters | ||
| a line that contains no characters | ||
| zero or more occurrences of previous regular expression |
| zero or more consecutive one or more consecutive |
| zero or more characters | ||
|
| ||
| any character in chars |
| lower- or uppercase lowercase letter |
| any character not in chars |
| any nonnumeric character any nonalphabetic character |
| at least min and at most max occurrences of previous regular expressions |
| at least 1 and at and at most 5 anywhere from 3 to 9 successive digits exactly 3 digits at least 3 digits |
| store characters matched between parentheses in next register (1-9) |
| first character on line and stores it in register 1 |
This section teaches you about a useful command known as cut. This command comes in handy when you need to extract (that is, “cut out”) various fields of data from a data file or the output of a command. The general format of the cut command is
cut -cchars file
where chars specifies what characters you want to extract from each line of file. This can consist of a single number, as in -c5 to extract character 5; a comma-separated list of numbers, as in -c1,13,50 to extract characters 1, 13, and 50; or a dash-separated range of numbers, as in -c20-50 to extract characters 20 through 50, inclusive. To extract characters to the end of the line, you can omit the second number of the range; so
cut -c5- data
extracts characters 5 through the end of the line from each line of data and writes the results to standard output.
If file is not specified, cut reads its input from standard input, meaning that you can use cut as a filter in a pipeline.
Let's take another look at the output from the who command:
$ who
root     console Feb 24 08:54
steve    tty02   Feb 24 12:55
george   tty08   Feb 24 09:15
dawn     tty10   Feb 24 15:55
$
As shown, currently four people are logged in. Suppose that you just want to know the names of the logged-in users and don't care about what terminals they are on or when they logged in. You can use the cut command to cut out just the usernames from the who command's output:
$ who | cut -c1-8       Extract the first 8 characters
root
steve
george
dawn
$
The -c1-8 option to cut specifies that characters 1 through 8 are to be extracted from each line of input and written to standard output.
The following shows how you can tack a sort to the end of the preceding pipeline to get a sorted list of the logged-in users:
$ who | cut -c1-8 | sort
dawn
george
root
steve
$
If you wanted to see what terminals were currently being used, you could cut out just the tty numbers field from the who command's output:
$ who | cut -c10-16
console
tty02
tty08
tty10
$
How did you know that who displays the terminal identification in character positions 10 through 16? Simple! You executed the who command at your terminal and counted out the appropriate character positions.[2]
You can use cut to extract as many different characters from a line as you want. Here, cut is used to display just the username and login time of all logged-in users:
$ who | cut -c1-8,18-
root     Feb 24 08:54
steve    Feb 24 12:55
george   Feb 24 09:15
dawn     Feb 24 15:55
$
The option -c1-8,18- says “extract characters 1 through 8 (the username) and also characters 18 through the end of the line (the login time).”[3]
The cut command as described previously is useful when you need to extract data from a file or command provided that file or command has a fixed format.
For example, you could use cut on the who command because you know that the usernames are always displayed in character positions 1–8, the terminal in 10–16, and the login time in 18–29. Unfortunately, not all your data will be so well organized! For instance, take a look at the file /etc/passwd:
$ cat /etc/passwd
root:*:0:0:The Super User:/:/usr/bin/ksh
cron:*:1:1:Cron Daemon for periodic tasks:/:
bin:*:3:3:The owner of system files:/:
uucp:*:5:5::/usr/spool/uucp:/usr/lib/uucp/uucico
asg:*:6:6:The Owner of Assignable Devices:/:
steve:*:203:100::/users/steve:/usr/bin/ksh
other:*:4:4:Needed by secure program:/:
$
/etc/passwd is the master file that contains the usernames of all users on your computer system. It also contains other information such as your user id number, your home directory, and the name of the program to start up when you log in. Getting back to the cut command, you can see that the data in this file does not align itself the same way who's output does. So getting a list of all the possible users of your system cannot be done using the -c option to cut.
One nice thing about the format of /etc/passwd, however, is that fields are delimited by a colon character. So although each field may not be the same length from one line to the next, you know that you can “count colons” to get the same field from each line.
The -d and -f options are used with cut when you have data that is delimited by a particular character. The format of the cut command in this case becomes
cut -ddchar –ffields file
where dchar is the character that delimits each field of the data, and fields specifies the fields to be extracted from file. Field numbers start at 1, and the same type of formats can be used to specify field numbers as was used to specify character positions before (for example, -f1,2,8, -f1-3, -f4-).
So to extract the names of all users of your system from /etc/passwd, you could type the following:
$ cut -d: -f1 /etc/passwd     Extract field 1
root
cron
bin
uucp
asg
steve
other
$
Given that the home directory of each user is in field 6, you can associate each user of the system with his or her home directory as shown:
$ cut -d: -f1,6 /etc/passwd   Extract fields 1 and 6
root:/
cron:/
bin:/
uucp:/usr/spool/uucp
asg:/
steve:/users/steve
other:/
$
If the cut command is used to extract fields from a file and the -d option is not supplied, cut uses the tab character as the default field delimiter.
The following depicts a common pitfall when using the cut command. Suppose that you have a file called phonebook that has the following contents:
$ cat phonebook
Alice Chebba    973-555-2015
Barbara Swingle 201-555-9257
Jeff Goldberg   201-555-3378
Liz Stachiw     212-555-2298
Susan Goldberg  201-555-7776
Tony Iannino    973-555-1295
$
If you just want to get the names of the people in your phone book, your first impulse would be to use cut as shown:
$ cut -c1-15 phonebook
Alice Chebba    97
Barbara Swingle
Jeff Goldberg   2
Liz Stachiw     212
Susan Goldberg
Tony Iannino    97
$
Not quite what you want! This happened because the name is separated from the phone number by a tab character and not blank spaces in the phonebook file. And as far as cut is concerned, tabs count as a single character when using the -c option. So cut extracts the first 15 characters from each line in the previous example, giving the results as shown.
Given that the fields are separated by tabs, you should use the -f option to cut instead:
$ cut -f1 phonebook
Alice Chebba
Barbara Swingle
Jeff Goldberg
Liz Stachiw
Susan Goldberg
Tony Iannino
$
Much better! Recall that you don't have to specify the delimiter character with the -d option because cut assumes that a tab character is the delimiter by default.
But how do you know in advance whether fields are delimited by blanks or tabs? One way to find out is by trial and error as shown previously. Another way is to type the command
sed -n l file
at your terminal. If a tab character separates the fields, will be displayed instead of the tab:
$ sed -n l phonebook
Alice Chebba	973-555-2015
Barbara Swingle	201-555-9257
Jeff Goldberg	201-555-3378
Liz Stachiw	212-555-2298
Susan Goldberg	201-555-7776
Tony Iannino	973-555-1295
$
The output verifies that each name is separated from each phone number by a tab character. sed is covered in more detail shortly.
The paste command is sort of the inverse of cut: Instead of breaking lines apart, it puts them together. The general format of the paste command is
paste files
where corresponding lines from each of the specified files are “pasted” together to form single lines that are then written to standard output. The dash character - can be used in files to specify that input is from standard input.
Suppose that you have a set of names in a file called names:
$ cat names
Tony
Emanuel
Lucy
Ralph
Fred
$
Suppose that you also have a file called numbers that contains corresponding phone numbers for each name in names:
$ cat numbers
(307) 555-5356
(212) 555-3456
(212) 555-9959
(212) 555-7741
(212) 555-0040
$
You can use paste to print the names and numbers side-by-side as shown:
$ paste names numbers   Paste them together
Tony    (307) 555-5356
Emanuel (212) 555-3456
Lucy    (212) 555-9959
Ralph   (212) 555-7741
Fred    (212) 555-0040
$
Each line from names is displayed with the corresponding line from numbers, separated by a tab.
The next example illustrates what happens when more than two files are specified:
$ cat addresses
55-23 Vine Street, Miami
39 University Place, New York
17 E. 25th Street, New York
38 Chauncey St., Bensonhurst
17 E. 25th Street, New York
$ paste names addresses numbers
Tony    55-23 Vine Street, Miami       (307) 555-5356
Emanuel 39 University Place, New York  (212) 555-3456
Lucy    17 E. 25th Street, New York    (212) 555-9959
Ralph   38 Chauncey St., Bensonhurst   (212) 555-7741
Fred   17 E. 25th Street, New York     (212) 555-0040
$
If you don't want the fields separated by tab characters, you can specify the -d option with the format
-dchars
where chars is one or more characters that will be used to separate the lines pasted together. That is, the first character listed in chars will be used to separate lines from the first file that are pasted with lines from the second file; the second character listed in chars will be used to separate lines from the second file from lines from the third, and so on.
If there are more files than there are characters listed in chars, paste “wraps around” the list of characters and starts again at the beginning.
In the simplest form of the -d option, specifying just a single delimiter character causes that character to be used to separate all pasted fields:
$ paste -d'+' names addresses numbers
Tony+55-23 Vine Street, Miami+(307) 555-5356
Emanuel+39 University Place, New York+(212) 555-3456
Lucy+17 E. 25th Street, New York+(212) 555-9959
Ralph+38 Chauncey St., Bensonhurst+(212) 555-7741
Fred+17 E. 25th Street, New York+(212) 555-0040
It's always safest to enclose the delimiter characters in single quotes. The reason why will be explained shortly.
The -s option tells paste to paste together lines from the same file, not from alternate files. If just one file is specified, the effect is to merge all the lines from the file together, separated by tabs, or by the delimiter characters specified with the -d option.
$ paste -s names        Paste all lines from names
Tony    Emanuel Lucy    Ralph   Fred
$ ls | paste -d' ' -s - Paste ls's output, use space as delimiter
addresses intro lotsaspaces names numbers phonebook
$
In the preceding example, the output from ls is piped to paste, which merges the lines (-s option) from standard input (-), separating each field with a space (-d' ' option). Of course, you'll recall from Chapter 2, “A Quick Review of the Basics,” that the command
echo *
would have worked just as well (and is certainly more straightforward).
sed is a program used for editing data. It stands for stream editor. Unlike ed, sed cannot be used interactively. However, its commands are similar. The general form of the sed command is
sed command file
where command is an ed-style command applied to each line of the specified file. If no file is specified, standard input is assumed. As sed applies the indicated command to each line of the input, it writes the results to standard output.
Recall the file intro from previous examples:
$ cat intro
The Unix operating system was pioneered by Ken
Thompson and Dennis Ritchie at Bell Laboratories
in the late 1960s. One of the primary goals in
the design of the Unix system was to create an
environment that promoted efficient program
development.
$
Suppose that you want to change all occurrences of “Unix” in the text to “UNIX.” This can be easily done in sed as follows:
$ sed 's/Unix/UNIX/' intro    Substitute Unix with UNIX
The UNIX operating system was pioneered by Ken
Thompson and Dennis Ritchie at Bell Laboratories
in the late 1960s. One of the primary goals in
the design of the UNIX system was to create an
environment that promoted efficient program
development.
$
For now, get into the habit of enclosing your sed command in a pair of single quotes. Later, you'll know when the quotes are necessary and when to use double quotes instead.
The sed command s/Unix/UNIX/ is applied to every line of intro. Whether or not the line gets changed by the command, it gets written to standard output all the same. Note that sed makes no changes to the original input file. To make the changes permanent, you must redirect the output from sed into a temporary file and then move the file back to the old one:
$ sed 's/Unix/UNIX/' intro > temp Make the changes
$ mv temp intro                      And now make them permanent
$
Always make sure that the correct changes were made to the file before you overwrite the original; a cat of temp could have been included between the two commands shown previously to ensure that the sed succeeded as planned.
If your text included more than one occurrence of “Unix” on a line, the preceding sed would have changed just the first occurrence on each line to “UNIX.” By appending the global option g to the end of the s command, you can ensure that multiple occurrences of the string on a line will be changed. In this case, the sed command would read
$ sed 's/Unix/UNIX/g' intro > temp
Suppose that you wanted to extract just the usernames from the output of who. You already know how to do that with the cut command:
$ who | cut -c1-8
root
ruth
steve
pat
$
Alternatively, you can use sed to delete all the characters from the first blank space (that marks the end of the username) through the end of the line by using a regular expression in the edit command:
$ who | sed 's/ .*$//'
root
ruth
steve
pat
$
The sed command says to substitute a blank space followed by any characters up to the end of the line ( .*$) with nothing (//); that is, delete the characters from the first blank to the end of the line from each line of the input.
We pointed out that sed always writes each line of input to standard output, whether or not it gets changed. Sometimes, however, you'll want to use sed just to extract some lines from a file. For such purposes, use the -n option. This option tells sed that you don't want it to print any lines unless explicitly told to do so. This is done with the p command. By specifying a line number or range of line numbers, you can use sed to selectively print lines of text. So, for example, to print just the first two lines from a file, the following could be used:
$ sed -n '1,2p' intro       Just print the first 2 lines
The UNIX operating system was pioneered by Ken
Thompson and Dennis Ritchie at Bell Laboratories
$
If, instead of line numbers, you precede the p command with a string of characters enclosed in slashes, sed prints just those lines from standard input that contain those characters. The following example shows how sed can be used to display just the lines that contain a particular string:
To delete entire lines of text, use the d command. By specifying a line number or range of numbers, you can delete specific lines from the input. In the following example, sed is used to delete the first two lines of text from intro:
$ sed '1,2d' intro      Delete lines 1 and 2
in the late 1960s. One of the primary goals in
the design of the UNIX system was to create an
environment that promoted efficient program
development.
$
Remembering that by default sed writes all lines of the input to standard output, the remaining lines in text—that is, lines 3 through the end—simply get written to standard output.
By preceding the d command with a string of text, you can use sed to delete all lines that contain that text. In the following example, sed is used to delete all lines of text containing the word UNIX:
$ sed '/UNIX/d' intro   Delete all lines containing UNIX
Thompson and Dennis Ritchie at Bell Laboratories
in the late 1960s. One of the primary goals in
environment that promoted efficient program
development.
$
The power and flexibility of sed goes far beyond what we've shown here. sed has facilities that enable you to loop, build text in a buffer, and combine many commands into a single editing script. Table 4.2 shows some more examples of sed commands.
Table 4.2. sed Examples
The tr filter is used to translate characters from standard input. The general form of the command is
tr from-chars to-chars
where from-chars and to-chars are one or more single characters. Any character in from-chars encountered on the input will be translated into the corresponding character in to-chars. The result of the translation is written to standard output.
In its simplest form, tr can be used to translate one character into another. Recall the file intro from earlier in this chapter:
$ cat intro
The UNIX operating system was pioneered by Ken
Thompson and Dennis Ritchie at Bell Laboratories
in the late 1960s. One of the primary goals in
the design of the UNIX system was to create an
environment that promoted efficient program
development.
$
The following shows how tr can be used to translate all letter e's to x's:
$ tr e x < intro
Thx UNIX opxrating systxm was pionxxrxd by Kxn
Thompson and Dxnnis Ritchix at Bxll Laboratorixs
in thx latx 1960s. Onx of thx primary goals in
thx dxsign of thx UNIX systxm was to crxatx an
xnvironmxnt that promotxd xfficixnt program
dxvxlopmxnt.
$
The input to tr must be redirected from the file intro because tr always expects its input to come from standard input. The results of the translation are written to standard output, leaving the original file untouched. Showing a more practical example, recall the pipeline that you used to extract the usernames and home directories of everyone on the system:
$ cut -d: -f1,6 /etc/passwd
root:/
cron:/
bin:/
uucp:/usr/spool/uucp
asg:/
steve:/users/steve
other:/
$
You can translate the colons into tab characters to produce a more readable output simply by tacking an appropriate tr command to the end of the pipeline:
$ cut -d: -f1,6 /etc/passwd | tr : '    '
root    /
cron    /
bin    /
uucp   /usr/spool/uucp
asg    /
steve  /users/steve
other  /
$
Enclosed between the single quotes is a tab character (even though you can't see it—just take our word for it). It must be enclosed in quotes to keep it from the shell and give tr a chance to see it.
The octal representation of a character can be given to tr in the format
nnn
where nnn is the octal value of the character. For example, the octal value of the tab character is 11. If you are going to use this format, be sure to enclose the character in quotes. The tr command
tr : '11'
translates all colons to tabs, just as in the preceding example. Table 4.3 lists characters that you'll often want to specify in octal format.
Table 4.3. Octal Values of Some ASCII Characters
Character | Octal Value |
|---|---|
Bell | 7 |
Backspace | 10 |
Tab | 11 |
Newline | 12 |
Linefeed | 12 |
Formfeed | 14 |
Carriage Return | 15 |
Escape | 33 |
In the following example, tr takes the output from date and translates all spaces into newline characters. The net result is that each field of output from date appears on a different line.
$ date | tr ' ' '12'   Translate spaces to newlines
Sun
Jul
28
19:13:46
EDT
2002
$
tr can also take ranges of characters to translate. For example, the following shows how to translate all lowercase letters in intro to their uppercase equivalents:
$ tr '[a-z]' '[A-Z]' < intro
THE UNIX OPERATING SYSTEM WAS PIONEERED BY KEN
THOMPSON AND DENNIS RITCHIE AT BELL LABORATORIES
IN THE LATE 1960S. ONE OF THE PRIMARY GOALS IN
THE DESIGN OF THE UNIX SYSTEM WAS TO CREATE AN
ENVIRONMENT THAT PROMOTED EFFICIENT PROGRAM
DEVELOPMENT.
$
The character ranges [a-z] and [A-Z] are enclosed in quotes to keep the shell from replacing the first range with all the files in your directory named a through z, and the second range with all the files in your directory named A through Z. (What do you think happens if no such files exist?)
By reversing the two arguments to tr, you can use it to translate all uppercase letters to lowercase:
$ tr '[A-Z]' '[a-z]' < intro
the unix operating system was pioneered by ken
thompson and dennis ritchie at bell laboratories
in the late 1960s. one of the primary goals in
the design of the unix system was to create an
environment that promoted efficient program
development.
$
You can use the -s option to tr to “squeeze” out multiple occurrences of characters in to-chars. In other words, if more than one consecutive occurrence of a character specified in to-chars occurs after the translation is made, the characters will be replaced by a single character.
For example, the following command translates all colons into tab characters, replacing multiple tabs with single tabs:
tr -s ':' '11'
So one colon or several consecutive colons on the input will be replaced by a single tab character on the output.
Suppose that you have a file called lotsaspaces that has the contents as shown:
$ cat lotsaspaces
This       is   an example  of a
file   that contains       a  lot
of   blank spaces.
$
You can use tr to squeeze out the multiple spaces by using the -s option and by specifying a single space character as the first and second argument:
$ tr –s ' ' ' ' < lotsaspaces
This is an example of a
file that contains a lot
of blank spaces.
$
The options to tr in effect say “translate space characters to space characters, replacing multiple spaces in the output by a single space.”
tr can also be used to delete single characters from a stream of input. The general format of tr in this case is
tr -d from-chars
where any single character listed in from-chars will be deleted from standard input. In the following example, tr is used to delete all spaces from the file intro:
$ tr -d ' ' < intro
TheUNIXoperatingSystemwaspioneeredbyKen
ThompsonandDennisRitchieatBellLaboratories
inthelate1960s.Oneoftheprimarygoalsin
thedesignoftheUNIXSystemwastocreatean
environmentthatpromotedefficientprogram
development.
$
Of course, you probably realize that you could have also used sed to achieve the same results:
$ sed 's/ //g' intro
TheUNIXoperatingsystemwaspioneeredbyKen
ThompsonandDennisRitchieatBellLaboratories
inthelate1960s.Oneoftheprimarygoalsin
thedesignoftheUNIXsystemwastocreatean
environmentthatpromotedefficientprogram
development.
$
This is not atypical for the Unix system; there's almost always more than one approach to solving a particular problem. In the case we just saw, either approach is satisfactory (that is, tr or sed); however, tr is probably a better choice in this case because it is a much smaller program and likely to execute a bit faster.
Table 4.4 summarizes how to use tr for translating and deleting characters. Bear in mind that tr works only on single characters. So if you need to translate anything longer than a single character (say all occurrences of unix to UNIX), you have to use a different program such as sed instead.
Table 4.4. tr Examples
| Description |
|---|---|
| Translate all capital X's to small x's |
| Translate all open parens to open braces, all closed parens to closed braces |
| Translate all lowercase letters to uppercase |
| Translate uppercase letters A–M to N–Z, and N–Z to A–M, respectively |
| Translate all tabs (character in first pair of quotes) to spaces |
| Translate multiple spaces to single spaces |
| Delete all formfeed (octal 14) characters |
|
grep allows you to search one or more files for particular character patterns. The general format of this command is
grep pattern files
Every line of each file that contains pattern is displayed at the terminal. If more than one file is specified to grep, each line is also immediately preceded by the name of the file, thus enabling you to identify the particular file that the pattern was found in.
Let's say that you want to find every occurrence of the word shell in the file ed.cmd:
$ grep shell ed.cmd
files, and is independent of the shell.
to the shell, just type in a q.
$
This output indicates that two lines in the file ed.cmd contain the word shell.
If the pattern does not exist in the specified file(s), the grep command simply displays nothing:
$ grep cracker ed.cmd
$
You saw in the section on sed how you could print all lines containing the string UNIX from the file intro with the command
sed -n '/UNIX/p' intro
But you could also use the following grep command to achieve the same result:
grep UNIX intro
Recall the phonebook file from before:
$ cat phone_book
Alice Chebba    973-555-2015
Barbara Swingle 201-555-9257
Jeff Goldberg   201-555-3378
Liz Stachiw     212-555-2298
Susan Goldberg  201-555-7776
Tony Iannino    973-555-1295
$
When you need to look up a particular phone number, the grep command comes in handy:
$ grep Susan phone_book
Susan Goldberg  201-555-7776
$
The grep command is useful when you have a lot of files and you want to find out which ones contain certain words or phrases. The following example shows how the grep command can be used to search for the word shell in all files in the current directory:
$ grep shell *
cmdfiles:shell that enables sophisticated
ed.cmd:files, and is independent of the shell.
ed.cmd:to the shell, just type in a q.
grep.cmd:occurrence of the word shell:
grep.cmd:$ grep shell *
grep.cmd:every use of the word shell.
$
As noted, when more than one file is specified to grep, each output line is preceded by the name of the file containing that line.
It's generally a good idea to enclose your grep pattern inside a pair of single quotes to “protect” it from the shell. For instance, if you want to find all the lines containing asterisks inside the file stars, typing
grep * stars
does not work as expected because the shell sees the asterisk and automatically substitutes the names of all the files in your current directory!
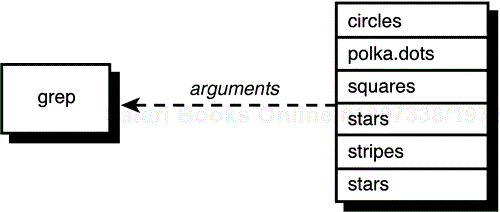
$ ls
circles
polka.dots
squares
stars
stripes
$ grep * stars
$
In this case, the shell took the asterisk and substituted the list of files in your current directory. Then it started execution of grep, which took the first argument (circles) and tried to find it in the files specified by the remaining arguments, as shown in Figure 4.1.
Enclosing the asterisk in quotes, however, removes its special meaning from the shell:
$ grep '*' stars
The asterisk (*) is a special character that
***********
5 * 4 = 20
$
The quotes told the shell to leave the enclosed characters alone. It then started execution of grep, passing it the two arguments * (without the surrounding quotes; the shell removes them in the process) and stars (see Figure 4.2).

There are characters other than * that otherwise have a special meaning and must be quoted when used in a pattern. The whole topic of how quotes are handled by the shell is fascinating; an entire chapter—Chapter 6, “Can I Quote You on That?”—is devoted to it.
grep takes its input from standard input if no filename is specified. So you can use grep on the other side of a pipe to scan through the output of a command for something. For example, suppose that you want to find out whether the user jim is logged in. You can use grep to search through who's output:
$ who | grep jim
jim        tty16             Feb 20 10:25
$
Note that by not specifying a file to search, grep automatically scans its standard input. Naturally, if the user jim were not logged in, you simply would get back a new prompt because grep would not find jim in who's output:
$ who | grep jim
$
Let's take another look at the intro file:
$ cat intro
The UNIX operating system was pioneered by Ken
Thompson and Dennis Ritchie at Bell Laboratories
in the late 1960s. One of the primary goals in
the design of the UNIX system was to create an
environment that promoted efficient program
development.
$
grep allows you to specify your pattern using regular expressions as in ed. Given this information, it means that you can specify the pattern
[tT]he
to have grep search for either a lower- or uppercase T followed by the characters he.
So here's how to grep out all the lines containing the characters the or The:
$ grep '[tT]he' intro
The UNIX operating system was pioneered by Ken
in the late 1960s.  One of the primary goals in
the design of the UNIX system was to create an
$
The -i option to grep indicates that upper- and lowercase letters are not to be distinguished in the matching process. That is, the command
grep –i 'the' intro
tells grep to ignore case when matching the pattern against the lines in intro. Therefore, lines containing the or The will be printed, as will lines containing THE, THe, tHE, and so on.
Table 4.5 shows other types of regular expressions that you can specify to grep and the types of patterns they'll match.
Table 4.5. Some grep Examples
Command | Prints |
|---|---|
| Lines from |
| Lines from |
| Lines from |
|
Sometimes you're interested not in finding the lines that contain a specified pattern, but those that don't. To do this with grep is simple: You use the -v option. In the next example, grep is used to find all the lines in intro that don't contain the characters UNIX.
At times, you may not want to see the actual lines that match a pattern but may be interested in knowing only the names of the files that contain the pattern. For example, suppose that you have a set of C programs in your current directory (these filenames end with the characters .c), and you want to know which files use a variable called Move_history. The following example shows one way of finding the answer:
$ grep 'Move_history' *.c     Find Move_history in all C source files
exec.c:MOVE    Move_history[200] = {0};
exec.c:     cpymove(&Move_history[Number_half_moves -1],
exec.c: undo_move(&Move_history[Number_half_moves-1],;
exec.c: cpymove(&last_move,&Move_history[Number_half_moves-1]);
exec.c: convert_move(&Move_history[Number_half_moves-1]),
exec.c:     convert_move(&Move_history[i-1]),
exec.c: convert_move(&Move_history[Number_half_moves-1]),
makemove.c:IMPORT MOVE Move_history[];
makemove.c:     if ( Move_history[j].from != BOOK (i,j,from) OR
makemove.c:          Move_history[j] .to != BOOK (i,j,to) )
testch.c:GLOBAL MOVE Move_history[100] = {0};
testch.c:    Move_history[Number_half_moves-1].from = move.from;
testch.c:    Move_history[Number_half_moves-1].to = move.to;
$
Sifting through the preceding output, you discover that three files—exec.c, makemove.c, and testch.c—use the variable.
The -l option to grep gives you just a list of files that contain the specified pattern, not the matching lines from the files:
$ grep -l 'Move_history' *.c  List the files that contain Move_history
exec.c
makemove.c
testch.c
$
Because grep conveniently lists the files one per line, you can pipe the output from grep -l into wc to count the number of files that contain a particular pattern:
$ grep -l 'Move_history' *.c | wc -l
      3
$
So the preceding says that precisely three C program files reference the variable Move_history. (What are you counting if you use grep without the -l option?)
If the -n option is used with grep, each line from the file that matches the specified pattern is preceded by its relative line number in the file. From previous examples, you saw that the file testch.c was one of the three files that referenced the variable Move_history; the following shows how you can pinpoint the precise lines in the file that reference the variable:
$ grep -n 'Move_history' testch.c   Precede matches with line numbers
13:GLOBAL MOVE Move_history[100] = {0};
197:    Move_history[Number_half_moves-1].from = move.from;
198:    Move_history[Number_half_moves-1].to = move.to;
$
As you can see, Move_history is used on lines 13, 197, and 198 in testch.c.
You're familiar with the basic operation of sort:
$ sort names
Charlie
Emanuel
Fred
Lucy
Ralph
Tony
Tony
$
By default, sort takes each line of the specified input file and sorts it into ascending order. Special characters are sorted according to the internal encoding of the characters. For example, on a machine that encodes characters in ASCII, the space character is represented internally as the number 32, and the double quote as the number 34. This means that the former would be sorted before the latter. Note that the sorting order is implementation dependent, so although you are generally assured that sort will perform as expected on alphabetic input, the ordering of numbers, punctuation, and special characters is not always guaranteed. We will assume we're working with the ASCII character set in all our examples here.
sort has many options that provide more flexibility in performing your sort. We'll just describe a few of the options here.
The -u option tells sort to eliminate duplicate lines from the output.
$ sort -u names
Charlie
Emanuel
Fred
Lucy
Ralph
Tony
$
Here you see that the duplicate line that contained Tony was eliminated from the output.
By default, sort writes the sorted data to standard output. To have it go into a file, you can use output redirection:
$ sort names > sorted_names
$
Alternatively, you can use the -o option to specify the output file. Simply list the name of the output file right after the -o:
$ sort names -o sorted_names
$
This sorts names and writes the results to sorted_names.
Frequently, you want to sort the lines in a file and have the sorted data replace the original. Typing
$ sort names > names
$
won't work—it ends up wiping out the names file. However, with the -o option, it is okay to specify the same name for the output file as the input file:
Suppose that you have a file containing pairs of (x, y) data points as shown:
$ cat data
5      27
2      12
3      33
23     2
-5     11
15     6
14     -9
$
Suppose that you want to feed this data into a plotting program called plotdata, but that the program requires that the incoming data pairs be sorted in increasing value of x (the first value on each line).
The -n option to sort specifies that the first field on the line is to be considered a number, and the data is to be sorted arithmetically. Compare the output of sort used first without the -n option and then with it:
If you had to sort your data file by the y value—that is, the second number in each line—you could tell sort to skip past the first number on the line by using the option
+1n
instead of -n. The +1 says to skip the first field. Similarly, +5n would mean to skip the first five fields on each line and then sort the data numerically. Fields are delimited by space or tab characters by default. If a different delimiter is to be used, the -t option must be used.
As mentioned, if you skip over fields, sort assumes that the fields being skipped are delimited by space or tab characters. The -t option says otherwise. In this case, the character that follows the -t is taken as the delimiter character.
Look at our sample password file again:
$ cat /etc/passwd
root:*:0:0:The super User:/:/usr/bin/ksh
steve:*:203:100::/users/steve:/usr/bin/ksh
bin:*:3:3:The owner of system files:/:
cron:*:1:1:Cron Daemon for periodic tasks:/:
george:*:75:75::/users/george:/usr/lib/rsh
pat:*:300:300::/users/pat:/usr/bin/ksh
uucp:*:5:5::/usr/spool/uucppublic:/usr/lib/uucp/uucico
asg:*:6:6:The Owner of Assignable Devices:/:
sysinfo:*:10:10:Access to System Information:/:/usr/bin/sh
mail:*:301:301::/usr/mail:
$
If you wanted to sort this file by username (the first field on each line), you could just issue the command
sort /etc/passwd
To sort the file instead by the third colon-delimited field (which contains what is known as your user id), you would want an arithmetic sort, skipping the first two fields (+2n), specifying the colon character as the field delimiter (-t:):
$ sort +2n -t: /etc/passwd              Sort by user id
root:*:0:0:The Super User:/:/usr/bin/ksh
cron:*:1:1:Cron Daemon for periodic tasks:/:
bin:*:3:3:The owner of system files:/:
uucp:*:5:5::/usr/spool/uucppublic:/usr/lib/uucp/uucico
asg:*:6:6:The Owner of Assignable Devices:/:
sysinfo:*:10:10:Access to System Information:/:/usr/bin/sh
george:*:75:75::/users/george:/usr/lib/rsh
steve:*:203:100::/users/steve:/usr/bin/ksh
pat:*:300:300::/users/pat:/usr/bin/ksh
mail:*:301:301::/usr/mail:
$
Here we've emboldened the third field of each line so that you can easily verify that the file was sorted correctly by user id.
Other options to sort enable you to skip characters within a field, specify the field to end the sort on, merge sorted input files, and sort in “dictionary order” (only letters, numbers, and spaces are used for the comparison). For more details on these options, look under sort in your Unix User's Manual.
The uniq command is useful when you need to find duplicate lines in a file. The basic format of the command is
uniq in_file out_file
In this format, uniq copies in_file to out_file, removing any duplicate lines in the process. uniq's definition of duplicated lines are consecutive-occurring lines that match exactly.
If out_file is not specified, the results will be written to standard output. If in_file is also not specified, uniq acts as a filter and reads its input from standard input.
Here are some examples to see how uniq works. Suppose that you have a file called names with contents as shown:
$ cat names
Charlie
Tony
Emanuel
Lucy
Ralph
Fred
Tony
$
You can see that the name Tony appears twice in the file. You can use uniq to “remove” such duplicate entries:
$ uniq names            Print unique lines
Charlie
Tony
Emanuel
Lucy
Ralph
Fred
Tony
$
Tony still appears twice in the preceding output because the multiple occurrences are not consecutive in the file, and thus uniq's definition of duplicate is not satisfied. To remedy this situation, sort is often used to get the duplicate lines adjacent to each other. The result of the sort is then run through uniq:
$ sort names | uniq
Charlie
Emanuel
Fred
Lucy
Ralph
Tony
$
So the sort moves the two Tony lines together, and then uniq filters out the duplicate line (recall that sort with the -u option performs precisely this function).
Frequently, you'll be interested in finding the duplicate entries in a file. The -d option to uniq should be used for such purposes: It tells uniq to write only the duplicated lines to out_file (or standard output). Such lines are written just once, no matter how many consecutive occurrences there are.
$ sort names | uniq -d         List duplicate lines
Tony
$
As a more practical example, let's return to our /etc/passwd file. This file contains information about each user on the system. It's conceivable that over the course of adding and removing users from this file that perhaps the same username has been inadvertently entered more than once. You can easily find such duplicate entries by first sorting /etc/passwd and piping the results into uniq -d as done previously:
$ sort /etc/passwd | uniq -d   Find duplicate entries in /etc/passwd
$
So there are no duplicate entries. But we think that you really want to find duplicate entries for the same username. This means that you want to just look at the first field from each line of /etc/passwd (recall that the leading characters of each line of /etc/passwd up to the colon are the username). This can't be done directly through an option to uniq, but can be accomplished indirectly by using cut to extract the username from each line of the password file before sending it to uniq.
$ sort /etc/passwd | cut -f1 -d: | uniq -d    Find duplicates
cem
harry
$
So there are multiple entries in /etc/passwd for cem and harry. If you wanted more information on the particular entries, you could grep them from /etc/passwd:
$ grep -n 'cem' /etc/passwd
20:cem:*:91:91::/users/cem:
166:cem:*:91:91::/users/cem:
$ grep -n 'harry' /etc/passwd
29:harry:*:103:103:Harry Johnson:/users/harry:
79:harry:*:90:90:Harry Johnson:/users/harry:
$
The -n option was used to find out where the duplicate entries occur. In the case of cem, there are two entries on lines 20 and 166; in harry's case, the two entries are on lines 29 and 79.
If you now want to remove the second cem entry, you could use sed:
$ sed '166d' /etc/passwd > /tmp/passwd     Remove duplicate
$ mv /tmp/passwd /etc/passwd
mv: /etc/passwd: 444 modey
mv: cannot unlink /etc/passwd
$
Naturally, /etc/passwd is one of the most important files on a Unix system. As such, only the superuser is allowed to write to the file. That's why the mv command failed.
The -c option to uniq behaves like uniq with no options (that is, duplicate lines are removed), except that each output line gets preceded by a count of the number of times the line occurred in the input.
$ sort names | uniq –c     Count line occurrences
   1 Charlie
   1 Emanuel
   1 Fred
   1 Lucy
   1 Ralph
   2 Tony
$
Two other options that won't be described enable you to tell uniq to ignore leading characters/fields on a line. For more information, consult your Unix User's Manual.
We would be remiss if we neglected to mention the programs awk and perl that can be useful when writing shell programs. However, to do justice to these programs requires more space than we can provide in this text. We'll refer you to the document Awk—A Pattern Scanning and Processing Language, by Aho, et al., in the Unix Programmer's Manual, Volume II for a description of awk. Kernighan and Pike's The Unix Programming Environment (Prentice Hall, 1984) contains a detailed discussion of awk. Learning Perl and Programming Perl, both from O'Reilly and Associates, present a good tutorial and reference on the language, respectively.