
![]() The integrated Multiprocessing Kernel (MPK) is responsible for providing all multiprocessing capabilities in the OES NetWare environment.
The integrated Multiprocessing Kernel (MPK) is responsible for providing all multiprocessing capabilities in the OES NetWare environment.
![]() All core OES NetWare services are multiprocessor-enabled, including the TCP/IP protocol stack, Novell eDirectory, and the NetWare Core Protocol (NCP) engine.
All core OES NetWare services are multiprocessor-enabled, including the TCP/IP protocol stack, Novell eDirectory, and the NetWare Core Protocol (NCP) engine.
![]() OES NetWare accommodates both multiprocessor-aware and non-multiprocessor applications. Non-multiprocessor applications are simply funneled to processor 0, where they execute as if they were on a uniprocessor system.
OES NetWare accommodates both multiprocessor-aware and non-multiprocessor applications. Non-multiprocessor applications are simply funneled to processor 0, where they execute as if they were on a uniprocessor system.
![]() Threads are the basis for multiprocessing. A thread is a single flow of execution within a server, responsible for completing one very specific task.
Threads are the basis for multiprocessing. A thread is a single flow of execution within a server, responsible for completing one very specific task.
![]() OES NetWare uses a scheduler process and multiple local thread queues to distribute threads to processors for execution.
OES NetWare uses a scheduler process and multiple local thread queues to distribute threads to processors for execution.
![]() OES NetWare uses a load-balancing algorithm to make sure that no processor is overloaded.
OES NetWare uses a load-balancing algorithm to make sure that no processor is overloaded.
![]() Platform Support Modules (PSM) provide a “driver” for multiple processors that abstracts the OES NetWare operating system away from complexity of the multiprocessor hardware itself.
Platform Support Modules (PSM) provide a “driver” for multiple processors that abstracts the OES NetWare operating system away from complexity of the multiprocessor hardware itself.
![]() OES NetWare provides a PSM compatible with the Intel Multiprocessor Specification (MPS), which will support any hardware designed using this specification.
OES NetWare provides a PSM compatible with the Intel Multiprocessor Specification (MPS), which will support any hardware designed using this specification.
![]() You can install NetWare Cluster Services (NCS) from iManager. OES NetWare ships with a license for a two-node cluster. Clusters of a larger size require additional licenses, which are purchased separately.
You can install NetWare Cluster Services (NCS) from iManager. OES NetWare ships with a license for a two-node cluster. Clusters of a larger size require additional licenses, which are purchased separately.
![]() If you are upgrading an existing cluster environment to OES NetWare, make sure you perform the pre-upgrade routine in iManager prior to upgrading the cluster.
If you are upgrading an existing cluster environment to OES NetWare, make sure you perform the pre-upgrade routine in iManager prior to upgrading the cluster.
![]() Configure your cluster environment from the Cluster Config page in NoRM.
Configure your cluster environment from the Cluster Config page in NoRM.
![]() Cluster-enable a volume (storage pool) by selecting New Cluster Volume from the Cluster Config page in NoRM.
Cluster-enable a volume (storage pool) by selecting New Cluster Volume from the Cluster Config page in NoRM.
![]() Cluster-enable an application or service by selecting New Cluster Resource from the Cluster Config page in NoRM.
Cluster-enable an application or service by selecting New Cluster Resource from the Cluster Config page in NoRM.
![]() Configure parameters for individual cluster resources in NoRM by selecting the resource from the Cluster Config page.
Configure parameters for individual cluster resources in NoRM by selecting the resource from the Cluster Config page.
OES NetWare provides robust multiprocessor support that was first released with NetWare 6. However, multiprocessor support of some type has been available in the NetWare operating system since the time of NetWare 4. This chapter presents an overview of the OES NetWare multiprocessor environment and how some common multiprocessor issues have been resolved.
Novell first introduced multiprocessor functionality, in a limited fashion, with NetWare 4. Although NetWare 4 provided multiprocessor capabilities, all its own core operating system processes were not multiprocessor-enabled. External multiprocessor applications could leverage secondary processors, but all operating system processes, such as disk access, network I/O, and so on, had to be funneled through the primary processor, also known as processor 0.
With the release of NetWare 5, multiprocessor functionality was rewritten and integrated with the NetWare operating system kernel to create the MPK. This effort made all but a few of the native NetWare 5 processes multiprocessor-compatible. Unfortunately, two of the most important processes, namely LAN drivers and disk drivers, remained tied to processor 0.
Finally, with the release of NetWare 6 and continuing through OES, all core operating system processes are multiprocessor-compliant. This means that the entire path between network wire and server storage is now multiprocessor-aware and can take advantage of multiple processors in the server hardware.
The core of the NetWare operating system is the integrated multiprocessing kernel. The MPK provides symmetric multiprocessing to the NetWare environment. As such, the MPK manages threads, schedules processor resources, handles interrupts and exceptions, and manages access to memory and the I/O subsystems.
As previously mentioned, all OES NetWare software subsystems are now multiprocessor-enabled. OES NetWare can itself take full advantage of the power of a multiprocessing system. Table 8.1 lists many of the OES NetWare services that are multiprocessor-enabled.
Table 8.1. Multiprocessor-Enabled Services in OES NetWare
|
SERVICE TYPE |
SERVICE COMPONENTS |
|---|---|
|
Protocol stacks |
NetWare Core Protocols (NCP) Service Location Protocols (SLP) IP stack HTTP Ethernet connectivity Token ring connectivity Web Distributed Authoring and Versioning (WebDAV) Lightweight Directory Access Protocol (LDAP) |
|
Storage services |
Novell Storage Services (NSS) Distributed File Service (DFS) Protocol services Request dispatcher Transport service Fiber channel disk support |
|
Security services |
Novell International Cryptographic Infrastructure (NICI) Authentication ConsoleOne authentication snap-ins |
|
Miscellaneous services |
Novell eDirectory Novell Java Virtual Machine (JVM) Web engines Additional web features |
In addition to improved performance and greater scalability, OES NetWare multiprocessing offers these benefits:
![]() Complete backward compatibility with applications written for the older
Complete backward compatibility with applications written for the older SMP.NLM (written for NetWare 4.11), as well as any legacy CLIB application that does not support multiprocessing (they are just funneled to processor 0).
![]() An integrated Multiprocessing Kernel (MPK) that supports both uniprocessing and multiprocessing platforms.
An integrated Multiprocessing Kernel (MPK) that supports both uniprocessing and multiprocessing platforms.
![]() Kernel-level support for preemption. OES NetWare supports applications written for a preemptive multitasking environment natively.
Kernel-level support for preemption. OES NetWare supports applications written for a preemptive multitasking environment natively.
![]() A single Platform Support Module (PSM) that provides full integration between the multiprocessing hardware and the NetWare MPK.
A single Platform Support Module (PSM) that provides full integration between the multiprocessing hardware and the NetWare MPK.
When you install OES NetWare on multiprocessor hardware, the MPK determines how many processors are in the system. Next, the kernel scheduler determines the processor on which to run the waiting threads. This decision is based on information about the threads themselves and on the availability of processors.
Three types of programs can run on OES NetWare:
![]() Multiprocessor-safe—Multiprocessor-safe programs are typically NLMs that are not multiprocessing-enabled, but are safe to run in a multiprocessing environment. These programs run on processor 0, which is home to all multiprocessing-safe programs. OES NetWare is very accommodating to programs that were written prior to the introduction of the NetWare MPK. These non–multiprocessing-aware applications are automatically scheduled to run on processor 0 upon execution.
Multiprocessor-safe—Multiprocessor-safe programs are typically NLMs that are not multiprocessing-enabled, but are safe to run in a multiprocessing environment. These programs run on processor 0, which is home to all multiprocessing-safe programs. OES NetWare is very accommodating to programs that were written prior to the introduction of the NetWare MPK. These non–multiprocessing-aware applications are automatically scheduled to run on processor 0 upon execution.
![]() Multiprocessor-compliant—Multiprocessor-compliant programs are specifically written to run in a multiprocessing environment. When one of these programs loads, the NetWare 6 scheduler automatically assigns the different threads to available processors. The Intel MPS specification enables programs to indicate whether their specific threads want to run on a specific processor. In this case, the NetWare scheduler will assign that thread to run on the requested processor. Although this functionality is available in OES NetWare for those multiprocessing utilities and other programs that require the ability to run on a specific processor, Novell discourages developers from writing programs this way.
Multiprocessor-compliant—Multiprocessor-compliant programs are specifically written to run in a multiprocessing environment. When one of these programs loads, the NetWare 6 scheduler automatically assigns the different threads to available processors. The Intel MPS specification enables programs to indicate whether their specific threads want to run on a specific processor. In this case, the NetWare scheduler will assign that thread to run on the requested processor. Although this functionality is available in OES NetWare for those multiprocessing utilities and other programs that require the ability to run on a specific processor, Novell discourages developers from writing programs this way.
Note
When a multiprocessing-compliant program is loaded, the NetWare scheduler checks for an available processor on which to run the thread (provided its threads don’t request a specific processor). If the first available processor is processor 3, the thread is scheduled to run there. The next thread would go to processor 4, and so on. This assumes that the processors make themselves available in consecutive order. If the system has only one processor, all the applications’ threads will be queued up to run on processor 0, which is always the first processor regardless of whether it is an MP or non-MP environment.
![]() NetWare OS—The NetWare OS is completely MP-compliant, allowing its multitude of threads to run on available processors as needed.
NetWare OS—The NetWare OS is completely MP-compliant, allowing its multitude of threads to run on available processors as needed.
All processes that run on your OES NetWare server will fit into one of these categories.
To understand multiprocessing in general, and the NetWare multiprocessing architecture in particular, you should be familiar with the multiprocessing concepts described in the following sections.
Note
Many people assume that a multiprocessor server with two processors will be twice as powerful as the same server with a single processor. Although this may be the theoretical goal of multiprocessor hardware engineers, you won’t see this linear increase in performance in our imperfect world. Generally, as the number of processors in a server increases, the processing power of the system also increases, although to a lesser degree. Practically, this means that a two-processor system gives you about 1.8 times the processing power as the same system with a single processor. A four-processor system delivers roughly 3.5 times as much processing power, and a six-processor system offers about 5.2 times the processing power.
OES NetWare supports up to 32 processors in a single server, which works out to a whole lot of processing horsepower!
A thread is not some bit of code that the processor is executing. Rather, a thread represents an independent stream of control within the processing environment. Since NetWare was first released, it has been using threads to enable operating system processes to function efficiently. Here’s how they work:
![]() Processes and threads are not equivalent, but they are similar. The main difference between the two is that a process can typically be swapped out of memory to make room for another process (preemptive), whereas a thread is normally allowed to run to completion after it starts (non-preemptive).
Processes and threads are not equivalent, but they are similar. The main difference between the two is that a process can typically be swapped out of memory to make room for another process (preemptive), whereas a thread is normally allowed to run to completion after it starts (non-preemptive).
![]() OES NetWare keeps track of all the threads that run in the server environment with a scheduler and thread queues. The scheduler is multiprocessor-enabled itself and an integral part of the OES NetWare MPK. As a result, each processor maintains its own scheduler for managing its thread execution.
OES NetWare keeps track of all the threads that run in the server environment with a scheduler and thread queues. The scheduler is multiprocessor-enabled itself and an integral part of the OES NetWare MPK. As a result, each processor maintains its own scheduler for managing its thread execution.
![]() Each processor also maintains three thread queues for organizing thread execution. The three queues are the Run queue, the Work To Do queue, and the Miscellaneous queue.
Each processor also maintains three thread queues for organizing thread execution. The three queues are the Run queue, the Work To Do queue, and the Miscellaneous queue.
![]() The threads in the Run queue have priority over threads in the other two queues. Run queue threads are nonblocking, meaning that they do not relinquish control of the processor until they are done. The Run queue is typically reserved for critical systems, such as protocol stacks and many of the other NetWare kernel processes.
The threads in the Run queue have priority over threads in the other two queues. Run queue threads are nonblocking, meaning that they do not relinquish control of the processor until they are done. The Run queue is typically reserved for critical systems, such as protocol stacks and many of the other NetWare kernel processes.
![]() When a Run queue thread completes, the processor checks for additional threads in the Run queue. If no threads are currently in the Run queue, the processor looks in the Work To Do queue. Unlike the Run queue, Work To Do threads can relinquish control of the processor if they rely on less-important functions that can be blocked by the scheduler. The Work To Do queue is usually used by non-critical NetWare services and NLMs.
When a Run queue thread completes, the processor checks for additional threads in the Run queue. If no threads are currently in the Run queue, the processor looks in the Work To Do queue. Unlike the Run queue, Work To Do threads can relinquish control of the processor if they rely on less-important functions that can be blocked by the scheduler. The Work To Do queue is usually used by non-critical NetWare services and NLMs.
![]() Finally, the Miscellaneous queue is checked after the Work To Do queue. The Miscellaneous queue holds most application threads that are running in the NetWare environment.
Finally, the Miscellaneous queue is checked after the Work To Do queue. The Miscellaneous queue holds most application threads that are running in the NetWare environment.
Note
NetWare Loadable Modules (NLMs) often establish multiple threads, each representing a distinct path of execution. Make sure you don’t equate a thread with NLM execution.
In a multiprocessing environment, there are two methods for managing the execution of individual threads:
![]() Global Run queues—This approach to distributing threads has the advantage of automatic load balancing. Waiting threads are automatically doled out to the processor that becomes available first. Unfortunately, the Global queue itself becomes the bottleneck as the number of processors and the number of executing threads increases in a system.
Global Run queues—This approach to distributing threads has the advantage of automatic load balancing. Waiting threads are automatically doled out to the processor that becomes available first. Unfortunately, the Global queue itself becomes the bottleneck as the number of processors and the number of executing threads increases in a system.
![]() Local Run queues—This approach does not have the bottleneck problem associated with the Global queue because a Run queue is created for each processor in the system. It also makes it possible to preferentially schedule threads on the processor on which they last ran, which can increase the efficiency of the system as a whole. The downside to Local queues, however, is that it becomes necessary to spread the load manually on the processors as evenly as possible. Without a load-balancing mechanism, threads might pile up at one processor while another processor remains idle.
Local Run queues—This approach does not have the bottleneck problem associated with the Global queue because a Run queue is created for each processor in the system. It also makes it possible to preferentially schedule threads on the processor on which they last ran, which can increase the efficiency of the system as a whole. The downside to Local queues, however, is that it becomes necessary to spread the load manually on the processors as evenly as possible. Without a load-balancing mechanism, threads might pile up at one processor while another processor remains idle.
NetWare uses Local queues in OES NetWare because of the scalability advantages over a Global queue solution. A sophisticated load-balancing algorithm was built on top of the Local queue solution to help prevent processor imbalances from occurring.
When Novell engineers began considering the details of their load-balancing algorithm, they identified two primary requirements:
![]() Stability—Load balancing would do little good for the system if it reacted to small changes in thread balance by wasting large amounts of time moving threads back and forth between processors.
Stability—Load balancing would do little good for the system if it reacted to small changes in thread balance by wasting large amounts of time moving threads back and forth between processors.
![]() Quick distribution—When the scheduler identifies a situation that requires load balancing, the algorithm better be able to make the necessary changes very quickly so as not to affect the overall performance of the system.
Quick distribution—When the scheduler identifies a situation that requires load balancing, the algorithm better be able to make the necessary changes very quickly so as not to affect the overall performance of the system.
OES NetWare addresses the issue of stability by using a threshold. The threshold determines how far out of balance the thread distribution must get before the system takes action to fix the situation. The next issue became where to set the threshold.
A low threshold would keep processors in closer balance at the risk of causing excessive thread movement due to frequent load balancing. A high threshold would greatly reduce the risk of excessive thread movement at the risk of having some processors with a significantly higher load than others, reducing the overall performance of the system. To resolve this problem, OES NetWare defines its threshold as a range within which a processor load is deemed acceptable.
To determine where in the load spectrum the threshold should be placed, the scheduler calculates the systemwide load and from that the average processor load, on a regular basis. The average processor load becomes the midpoint of the threshold range, as shown in Figure 8.1.

The upper and lower bounds of the threshold become high/low trigger points for the load balancing system. A processor is overloaded when its load exceeds the high trigger. A processor is underloaded when it is below the low trigger.
When this happens, the scheduler moves threads from the overloaded processor to the underloaded processor to bring the system back into balance. You can actually configure the load-balancing threshold in NoRM by completing the following steps:
1. From NoRM, select the Set Parameters page and click Multiprocessor.
2. Click the value currently listed for the System Threshold parameter.
3. Specify a new value and click OK.
The updated threshold parameters will take effect immediately.
Warning
Novell strongly recommends using the default value, unless you have carefully considered your reasons for changing it and tested the new setting in a lab environment before committing it to your production server(s). For more information on multiprocessor SET parameters, see Appendix C, “OES Console and SET Commands.”
As mentioned previously, when discussing the NetWare MPK queues, OES NetWare does allow certain noncritical threads to be preempted, or blocked, to make operation of the system as a whole more efficient. Essentially, less-critical threads are paused in their execution to make way for more-critical threads.
Earlier versions of NetWare multiprocessor support did not support process preemption. Rather, they implemented a round-robin (first-in, first-out) scheduling policy where threads were scheduled to run in the order they entered the Run queue. This makes a simple and very fast operating environment, but at the expense of overall flexibility.
To support a preemptive environment, applications must be explicitly written to identify those critical sections that cannot be blocked. These sections are identified to the scheduler so the thread cannot be preempted while in a critical section.
NetWare will preempt an application thread only under the following conditions:
![]() The code where the thread is running must be preemptable. A flag set in the module’s NLM file format indicates this. When the code is loaded into memory, the memory pages are flagged as preemptable.
The code where the thread is running must be preemptable. A flag set in the module’s NLM file format indicates this. When the code is loaded into memory, the memory pages are flagged as preemptable.
![]() The thread cannot be in a critical section of the code.
The thread cannot be in a critical section of the code.
![]() The thread has run long enough to qualify for preemption. The scheduler checks the elapsed time with every tick.
The thread has run long enough to qualify for preemption. The scheduler checks the elapsed time with every tick.
Support for preemption provides
![]() An execution environment that enables simplified application development. Developers can rely on the Scheduler to handle preemption.
An execution environment that enables simplified application development. Developers can rely on the Scheduler to handle preemption.
![]() A way to manage modules forcibly that are monopolizing the processor.
A way to manage modules forcibly that are monopolizing the processor.
In a uniprocessing environment, there is no problem with memory management because a single processor controls all interaction with system memory. Unfortunately, in a multiprocessing environment, things get a lot more complicated, with multiple processors competing for the use of system memory and the I/O channel. Because of this, NetWare must have control logic to manage processor interaction with other subsystems to prevent memory corruption (process crashes) and, basically, to keep the whole thing from melting down.
For example, it is possible for a single application to have multiple threads running on multiple processors simultaneously. In this situation, it is possible that multiple threads need to update the same memory location at the same time.
This is known as a race condition. Without the proper thread management, you could easily end up with bad data being written to memory.
To avoid this type of dangerous condition, OES NetWare requires that threads emanating from the same connection run on the same processor. By doing this, NetWare ensures that application threads are queued up and run sequentially to eliminate the possibility of memory corruption.
Beyond this, OES NetWare also has to manage requests for server subsystems between all the application threads that might be executing at any given time. To do this, OES NetWare uses what are known as synchronization primitives, which are processes that manage access to shared resources, so everything stays in sync. Synchronization primitives include the following:
![]() Mutually exclusive lock (mutex)—This mechanism ensures that only one thread can access a shared resource at a time, such as system memory or the I/O channel.
Mutually exclusive lock (mutex)—This mechanism ensures that only one thread can access a shared resource at a time, such as system memory or the I/O channel.
![]() Semaphores—These are somewhat similar to mutexes, but semaphores use counters to control access to RAM memory or other protected resources.
Semaphores—These are somewhat similar to mutexes, but semaphores use counters to control access to RAM memory or other protected resources.
![]() Read-write locks—Similar to mutexes, read-write locks work with mutexes to ensure that only one thread at a time has access to a protected resource.
Read-write locks—Similar to mutexes, read-write locks work with mutexes to ensure that only one thread at a time has access to a protected resource.
![]() Condition variables—These are based on an external station. In so doing, they can be used to synchronize threads. Because they are external to the thread synchronization code, they can be used to ensure that only one thread accesses a protected resource at a time.
Condition variables—These are based on an external station. In so doing, they can be used to synchronize threads. Because they are external to the thread synchronization code, they can be used to ensure that only one thread accesses a protected resource at a time.
OES NetWare also uses two other synchronization primitives that are restricted to the kernel address space (ring 0): spin locks and barriers. These primitives are not accessible to applications that run in a protected address space.
Besides NetWare, all that is necessary to enable multiprocessing on a multiprocessor computer is the Platform Support Module (PSM) for your specific hardware platform and NetWare. No other modules are required.
The PSM is a kind of device driver for the processors in your multiprocessing server. It provides an abstraction layer between the multiprocessor hardware and the OES NetWare operating system that shields NetWare from the details and intricacies of the vendor-specific multiprocessing implementation. It also enables secondary processors to be brought online and taken offline without having to shut down the server.
During installation, NetWare detects multiple processors by reading the multiprocessor configuration table in the server’s BIOS. From that information, it determines which of the available NetWare PSM drivers matches the particular multiprocessing hardware platform.
When installation is complete, you can choose not to load the PSM, which results in NetWare running only on processor 0. By default, the OES NetWare installation routine will add the PSM load line to the STARTUP.NCF so that it will load whenever the server is started.
Novell provides MPS14.PSM, which supports any hardware platform that complies with the Intel Multiprocessor Specification (MPS) v1.1 and v1.4. Compaq also provides a PSM for its specific multiprocessing system requirements.
Intel MPS v1.4 defines an environment in which all the processors in the system work and function together similarly. All the processors in the system share a common I/O subsystem and use the same memory pool. MPS-compatible operating systems, such as OES NetWare, can run on systems that comply with this specification without any special modifications.
Because OES NetWare complies with Intel’s specification, it will automatically take advantage of all the processors in your MPS-compliant hardware. At this time, most major computer manufacturers already offer multiprocessing systems compatible with the Intel specification.
Tip
More information on the Intel MPS v1.4 specification is available from Intel at http://developer.intel.com/design/intarch/MANUALS/242016.htm.
To remain competitive, your organization needs to provide customers and employees uninterrupted access to data, applications, websites, and other services 24 hours a day, 7 days a week, 365 days a year.
This makes high availability of your organization’s services more than a technical issue. It’s a business issue that requires a reliable solution.
Novell Clustering Services (NCS) is a multinode clustering system for OES NetWare that is integrated with Novell eDirectory. NCS ensures high availability and manageability of critical network resources including data (server volumes), applications, and OES NetWare services. NCS supports failover, failback, and migration (load balancing) of individually managed cluster resources.
Note
A license for a two-node NCS cluster is included with OES NetWare. Licenses for additional cluster nodes must be purchased separately from Novell.
NCS enables you to configure up to 32 NetWare servers in a high-availability cluster, where resources can be dynamically switched or moved to any server in the cluster. Resources can be configured to switch or move to another node automatically in the event of a server failure. They can also be moved manually, if necessary, to troubleshoot hardware or balance server workload.
One of the best things about NCS is that it enables you to create a high-availability environment from off-the-shelf components. You don’t have to spend millions when you create a cluster, and you can add servers to the cluster as your needs change and grow over time.
Equally important is the capability to reduce unplanned service outages that result from server failures of some sort. You can even reduce the frequency of planned outages for software and hardware maintenance and upgrades because individual nodes can be removed from the cluster without affecting service availability to network users.
NCS provides the following advantages over a nonclustered environment:
![]() Increased availability
Increased availability
![]() Improved performance
Improved performance
![]() Low cost of operation
Low cost of operation
![]() Scalability
Scalability
![]() Disaster recovery
Disaster recovery
![]() Data protection
Data protection
![]() Shared resources
Shared resources
Because of these advantages, clustering systems are becoming mandatory for environments in which system availability is a must.
Suppose you have configured a two-node cluster, with a web server installed on each of the nodes. Each of the servers in the cluster hosts two websites. All the content for all four websites is stored on a shared disk subsystem connected to each of the servers in the cluster. Figure 8.2 shows how such an environment might look.

During normal operation, each clustered node is in constant communication with the other nodes in the cluster through periodic polling. In this way, a node can quickly detect whether something happens to another node in the cluster.
If node 2 fails due to some hardware or software problems, users currently attached to the web server will lose their connections. The IP address associated with node 2, and all its services, are migrated to node 1. Users would likely have to reload their web pages, which would be available from the new node within a few seconds.
After the problem in node 2 is located and repaired, it is restarted and automatically reinserts itself back into the cluster. Node 1 detects the return of node 2 and seamlessly passes back all the addresses and services originally assigned to node 2. The cluster returns to its normal configuration without any administrator intervention.
We all know that clustering provides a high-availability platform for your network infrastructure. High availability is becoming increasingly important for two purposes: file access and network services. The following sections discuss NCS configuration for both of these situations. However, before you start working with an NCS cluster, you should be familiar with the terms described in the following sections.
The first server that comes up in an NCS cluster is assigned the cluster IP address and becomes the master node. (Other nodes in the cluster are often referred to as slave nodes.) The master node updates information transmitted between the cluster and eDirectory and monitors the health of the cluster nodes. If the master node fails, NCS migrates the cluster IP address to another server in the cluster, and that server becomes the master node.
A cluster-enabled volume is an NSS volume configured to provide location-transparent access to NetWare file services. The volume is associated with an eDirectory virtual server object that provides a unique secondary IP address for locating the volume on the cluster’s shared storage device. The volume provides read-write file access to users.
Note
OES NetWare clusters failover storage pools. This means you can migrate more than one volume at a time to another node if they are part of the same storage pool. For more information on NetWare Storage Services (NSS), see Chapter 10, “OES NetWare File Storage and Management.”
A cluster resource is an object in eDirectory that represents an application or other type of service (such as DHCP or the master IP address) that you can migrate or failover from one node to another in an NCS cluster. The cluster resource object includes scripts for unloading the service from one node and loading it on another node. In most cases, make sure the service is installed on all nodes in the cluster that will host the service.
NCS uses heartbeats on the LAN and a Split-Brain Detector (SBD) on the shared storage device to keep all services highly available on the cluster when a node fails. NCS determines when a node fails over the LAN and casts off the failed node through the following process:
![]() Every second (by default), each node in an NCS cluster sends out a heartbeat message over the network.
Every second (by default), each node in an NCS cluster sends out a heartbeat message over the network.
![]() The master node monitors the heartbeats of all other nodes in the cluster to determine whether they are still functioning.
The master node monitors the heartbeats of all other nodes in the cluster to determine whether they are still functioning.
![]() If a heartbeat is not received from a node during a predefined timeout (8 seconds by default), that node is removed (cast off) from the cluster, and migration of services begins.
If a heartbeat is not received from a node during a predefined timeout (8 seconds by default), that node is removed (cast off) from the cluster, and migration of services begins.
Note
If the master node fails to send a heartbeat within the predefined timeout, it is cast off, and another node takes over as the master node.
NCS also uses the SBD to determine when a node fails through the following process:
![]() Each node writes an epoch number to a special SBD partition on the shared storage device. An epoch occurs each time a node leaves or joins the cluster. The epoch number is written at half the predefined timeout value (4 seconds by default).
Each node writes an epoch number to a special SBD partition on the shared storage device. An epoch occurs each time a node leaves or joins the cluster. The epoch number is written at half the predefined timeout value (4 seconds by default).
![]() Each node reads all epoch numbers for all other nodes in the SBD partition.
Each node reads all epoch numbers for all other nodes in the SBD partition.
![]() When the master node sees an epoch number for a specific node that is lower than the others, it knows that the node has failed, and the node is cast off.
When the master node sees an epoch number for a specific node that is lower than the others, it knows that the node has failed, and the node is cast off.
When a node fails in an NCS cluster, the cluster-enabled volumes and resources assigned to that node are migrated to other nodes in the cluster. Although this migration happens automatically, you must design and configure where each volume and resource migrates during failover.
The following list specifies the minimum hardware requirements for installing NCS:
![]() A minimum of two OES NetWare servers.
A minimum of two OES NetWare servers.
![]() At least 512MB of memory on all servers in the cluster. This provides sufficient memory to support failover of multiple applications to the same server node.
At least 512MB of memory on all servers in the cluster. This provides sufficient memory to support failover of multiple applications to the same server node.
![]() At least one local disk device on which the
At least one local disk device on which the SYS: volume will be installed for each node.
![]() A shared disk system, either Storage Area Network (SAN) or iSCSI, is required for each cluster for all cluster data to be available to each node. This is how high availability of data is achieved.
A shared disk system, either Storage Area Network (SAN) or iSCSI, is required for each cluster for all cluster data to be available to each node. This is how high availability of data is achieved.
Note
NCS will create a special cluster partition using one cylinder of one drive of the shared disk system. This will require roughly 15MB of free disk space on the shared disk system for creating the cluster partition.
![]() Make sure the disk system is installed and configured properly. You can verify that all servers in the cluster recognize the drives in the shared disk system by using the
Make sure the disk system is installed and configured properly. You can verify that all servers in the cluster recognize the drives in the shared disk system by using the LIST DEVICES console command. For more information on this command, see Appendix C.
![]() Make sure that the disks in the shared disk system are configured in some type of fault-tolerant configuration, such as mirroring or RAID 5. If this is not done, a single disk error can potentially cause a volume failure across the entire cluster.
Make sure that the disks in the shared disk system are configured in some type of fault-tolerant configuration, such as mirroring or RAID 5. If this is not done, a single disk error can potentially cause a volume failure across the entire cluster.
If you have an existing NCS cluster, using NetWare 5.1 Cluster Services, you need to prepare the existing cluster for the upgrade procedure. The preparation process performs the following tasks:
![]() Saves all trustee assignments so that they will not be lost during the upgrade
Saves all trustee assignments so that they will not be lost during the upgrade
![]() Identifies shared partitions so that OES NetWare safety features can be installed
Identifies shared partitions so that OES NetWare safety features can be installed
![]() Deactivates the cluster in preparation for the upgrade
Deactivates the cluster in preparation for the upgrade
This process also assumes that you are already running Novell eDirectory:
1. Launch iManager and select Install and Upgrade in the left navigation frame. Make sure you have the OES NetWare Operating System CD-ROM loaded and accessible.
2. Select Prepare Cluster for Upgrade and click Prepare a Cluster in the right frame.
3. At the Welcome screen, select Next.
4. At the NCS Cluster Selection screen, specify the required information and click Next:
![]() Cluster object name—Specify the name of the existing Cluster object in your eDirectory tree.
Cluster object name—Specify the name of the existing Cluster object in your eDirectory tree.
![]() Directory services tree—Specify the name of your eDirectory tree.
Directory services tree—Specify the name of your eDirectory tree.
![]() Directory services context—Specify the context of the Cluster object.
Directory services context—Specify the context of the Cluster object.
5. At the Down Servers screen, choose whether you want the clustered servers you are working with to go down after the pre-upgrade procedure. Click Next.
Bringing down all cluster servers before an upgrade ensures that NSS volumes on shared storage devices are deactivated prior to the NCS upgrade.
OES NetWare includes an NCS installation program that you use to do the following:
![]() Create a cluster.
Create a cluster.
![]() Add nodes to an existing cluster.
Add nodes to an existing cluster.
![]() Upgrade NCS software in an existing cluster.
Upgrade NCS software in an existing cluster.
To install Novell Cluster Services, complete the following steps:
1. Launch iManager and select Install and Upgrade in the left navigation frame. Make sure you have the OES NetWare Operating System CD-ROM loaded and accessible.
2. Select Install or Upgrade a Cluster and click Install or Upgrade a Cluster in the right frame.
3. At the Welcome screen, click Next.
4. At the NCS Action screen, select the installation option you want to use and click Next:
![]() Create new cluster—Choose this option to create a new cluster in your network.
Create new cluster—Choose this option to create a new cluster in your network.
![]() Add New Nodes to Existing Cluster—Check this option to add another node to an existing cluster.
Add New Nodes to Existing Cluster—Check this option to add another node to an existing cluster.
![]() Upgrade Software in Existing Cluster—Choose this option to upgrade an existing cluster to OES NetWare NCS. Make sure that you have performed the pre-upgrade, if necessary.
Upgrade Software in Existing Cluster—Choose this option to upgrade an existing cluster to OES NetWare NCS. Make sure that you have performed the pre-upgrade, if necessary.
Note
Checking Skip File Copy prevents NCS files from being copied during the installation. Because NCS files are copied to an OES NetWare server during its original installation, you normally don’t have to copy the files again. However, if you want to refresh the NCS files on a server, you can uncheck this box.
5. At the NCS Cluster Selection screen, specify the required information and click Next:
![]() If this is a new cluster—Specify a name for the Cluster object, the name of your eDirectory tree, and the context for the Cluster object.
If this is a new cluster—Specify a name for the Cluster object, the name of your eDirectory tree, and the context for the Cluster object.
![]() If you are adding nodes—Specify the name of the Cluster object to which you want to add nodes, your eDirectory tree, and the context of the Cluster object.
If you are adding nodes—Specify the name of the Cluster object to which you want to add nodes, your eDirectory tree, and the context of the Cluster object.
![]() If you are upgrading software—Specify the name of the Cluster object to be upgraded, your eDirectory tree, and the context of the Cluster object. Skip to step 9.
If you are upgrading software—Specify the name of the Cluster object to be upgraded, your eDirectory tree, and the context of the Cluster object. Skip to step 9.
6. At the NCS Cluster Node Modification screen, click the Browse button to open a secondary window from which you can select all the server objects you want to add to the cluster. You must select at least two servers. Click OK to exit the secondary window and Next to continue with the installation.
Note
You can remove a node from the cluster by selecting it from the NetWare Servers in Cluster list and clicking Remove. NCS automatically detects the IP address of a server that is added to a cluster. If a specified server has more than one IP address, you will be prompted to select the IP address you want Novell Cluster Services to use.
7. At the Cluster IP Address Selection screen, specify a unique IP address for the Cluster object and click Next. The cluster IP address is separate from the server IP address. ConsoleOne and NoRM use it for cluster management functions. The cluster IP address will be bound to the master node and will remain with the master node, even as it moves from server to server during failover events.
8. (Conditional) If you are creating a new cluster, specify the requested information and click Next:
![]() Specify whether the cluster will be using a shared storage device such as a SAN or shared SCSI system. If you do have shared media, select the shared device from the drop-down list.
Specify whether the cluster will be using a shared storage device such as a SAN or shared SCSI system. If you do have shared media, select the shared device from the drop-down list.
![]() Choose whether you want to mirror the cluster partition. If you do want to mirror the cluster partition, select a location for the mirror partition from the drop-down list.
Choose whether you want to mirror the cluster partition. If you do want to mirror the cluster partition, select a location for the mirror partition from the drop-down list.
Warning
As previously mentioned, you must have roughly 15MB of free (unpartitioned) space on one of the shared disk drives to create the cluster partition. If no free space is available, Novell Cluster Services can’t use the shared disk drives.
9. At the Start Clustering screen, choose whether you want the servers you are upgrading or adding to your cluster to start NCS software after the installation, and then click Next. If you choose not to start NCS, you will need to start it manually after the installation. You can do this by typing LDNCS from the server console of each cluster server.
10. (Conditional) If you are creating a cluster with more than two nodes, browse to and select the Cluster Server License files and click Add. NCS licenses are available separately from Novell. If you do not install NCS licenses during installation, you can add them later from iManager. However, NCS will not function until proper licenses are installed.
11. At the Summary screen, click Finish to install NCS. At the Installation Complete message, click Close.
When NCS is installed and running, you will have access to a new Clustering section in the left navigation frame of NoRM.
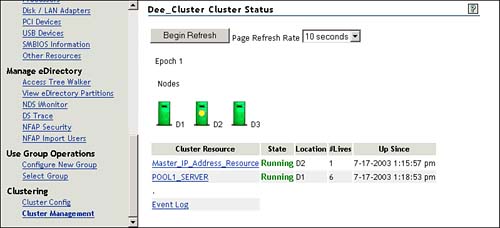
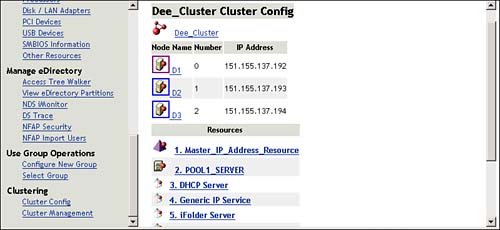
There are some general configuration options for your NCS environment of which you should be aware. All of these configuration options are available from the Cluster Config page, shown in Figure 8.3.
These configuration parameters configure the entire cluster environment. To view these options, select the Cluster object link from the Cluster Config page. This will open the Cluster Configuration fields, shown in Figure 8.4. The various configuration settings available from this page are described next.
You can view and change the IP address and port assigned to the cluster object when you installed NCS. The Cluster IP address normally does not need to be changed, but can be if needed.
The default cluster port number is 7023 and is automatically assigned when the cluster is created. The cluster port number should not be changed unless there is a TCP port conflict with another resource using the same port. If there is a conflict, you can change the port number to any other value that doesn’t cause a conflict.
The Quorum configuration is used to define two trigger values that are used during the startup of the cluster:
![]() Membership—The quorum membership is the number of nodes that must be running in the cluster before resources will start to load. When you first bring up servers in your cluster, NCS reads the number specified in the Membership field and waits until that number of servers is up and running in the cluster before it starts loading resources. Set the membership value to a number greater than 1 so that all resources don’t automatically load on the first server that is brought up in the cluster.
Membership—The quorum membership is the number of nodes that must be running in the cluster before resources will start to load. When you first bring up servers in your cluster, NCS reads the number specified in the Membership field and waits until that number of servers is up and running in the cluster before it starts loading resources. Set the membership value to a number greater than 1 so that all resources don’t automatically load on the first server that is brought up in the cluster.
![]() Timeout—Timeout specifies the amount of time to wait for the number of servers defined in the Membership field to be up and running. If the timeout period elapses before the quorum membership reaches its specified number, resources will automatically start loading on the servers that are currently up and running in the cluster.
Timeout—Timeout specifies the amount of time to wait for the number of servers defined in the Membership field to be up and running. If the timeout period elapses before the quorum membership reaches its specified number, resources will automatically start loading on the servers that are currently up and running in the cluster.
You can use the Protocol link to view or edit the transmit frequency and tolerance settings for all nodes in the cluster, including the master node:
![]() Tolerance—Specifies the amount of time the master node gives all other nodes in the cluster to signal that they are alive. For example, setting this value to 4 means that if the master node does not receive an “I’m alive” signal from a node in the cluster within 4 seconds, that node will be removed from the cluster.
Tolerance—Specifies the amount of time the master node gives all other nodes in the cluster to signal that they are alive. For example, setting this value to 4 means that if the master node does not receive an “I’m alive” signal from a node in the cluster within 4 seconds, that node will be removed from the cluster.
![]() Heartbeat—Specifies the amount of time between transmits for all nodes in the cluster except the master. For example, if you set this value to 1, nonmaster nodes in the cluster will send a signal that they are alive to the master node every second.
Heartbeat—Specifies the amount of time between transmits for all nodes in the cluster except the master. For example, if you set this value to 1, nonmaster nodes in the cluster will send a signal that they are alive to the master node every second.
![]() Master Watchdog—Specifies the amount of time between transmits for the master node in the cluster. For example, if you set this value to 1, the master node in the cluster will transmit an “I’m alive” signal to all the other nodes in the cluster every second.
Master Watchdog—Specifies the amount of time between transmits for the master node in the cluster. For example, if you set this value to 1, the master node in the cluster will transmit an “I’m alive” signal to all the other nodes in the cluster every second.
![]() Slave Watchdog—Specifies the amount of time the master node has to signal that it is alive. For example, setting this value to 5 means that if the nonmaster nodes in the cluster do not receive an “I’m alive” signal from the master within 5 seconds, the master node will be removed from the cluster and one of the other nodes will become the master node.
Slave Watchdog—Specifies the amount of time the master node has to signal that it is alive. For example, setting this value to 5 means that if the nonmaster nodes in the cluster do not receive an “I’m alive” signal from the master within 5 seconds, the master node will be removed from the cluster and one of the other nodes will become the master node.
![]() Max Retransmits—Not currently used with Novell Cluster Services but will be used for future versions.
Max Retransmits—Not currently used with Novell Cluster Services but will be used for future versions.
The master node is generally the first node brought online in the cluster, but if that node fails, any of the other nodes in the cluster can become the master.
The GIPC Stream page enables you to view, but not change, the script used to configure the cluster protocol parameters for your cluster. The script is created based on the settings you make in the protocol settings, described previously.
The Resource Priority page enables you to control the order in which multiple resources start on a given node when the cluster is brought up, or during a failover or failback. For example, if a node fails and two resources failover to another node, the resource priority will determine which resource loads first. This is useful for ensuring that the most critical resources load first and are available to users before less critical resources.
Priority settings can range between 0 (lowest priority) and 65535 (highest priority). Note that the Master IP Address Resource is always the highest priority. To set/change the priority for a resource, enter the new priority value in the dialog box next to that resource. Click Apply when finished.
NCS can automatically send out email messages for certain cluster events, such as cluster and resource state changes or nodes joining or leaving the cluster:
![]() Admin Email Addresses for SMTP—Specify the email address that should receive notifications in the field provided. Repeat this process for each address you want on the notification list. You can provide up to eight email addresses.
Admin Email Addresses for SMTP—Specify the email address that should receive notifications in the field provided. Repeat this process for each address you want on the notification list. You can provide up to eight email addresses.
![]() XML Format—Check this box if you want administrators to receive notifications in XML format. XML messages can be interpreted and formatted in a way that enables you to customize the message information for your specific needs.
XML Format—Check this box if you want administrators to receive notifications in XML format. XML messages can be interpreted and formatted in a way that enables you to customize the message information for your specific needs.
![]() Notification—With the settings in this section, configure the types of messages that will be sent;
Notification—With the settings in this section, configure the types of messages that will be sent;
![]() None—Check this box to disable email notifications effectively.
None—Check this box to disable email notifications effectively.
![]() Critical—Check this box if you want administrators to receive notification of only critical events like a node failure or a resource going comatose.
Critical—Check this box if you want administrators to receive notification of only critical events like a node failure or a resource going comatose.
![]() Verbose—Check this box if you want administrators to receive notification of all cluster state changes, including critical events, resource state changes, and nodes joining and leaving the cluster.
Verbose—Check this box if you want administrators to receive notification of all cluster state changes, including critical events, resource state changes, and nodes joining and leaving the cluster.
The IP address of an individual cluster node can be configured by selecting the node from the Cluster Config page. This is the only setting available for individual nodes.
IP Address specifies the IP address for the selected node. Make sure you click Apply to save any changes.
Click Delete to remove this node from the cluster. When this is done, you must unload and reload NCS on each server in the cluster for the node deletion to take effect. To do this, run UNLDNCS.NCF from the console of each server in the cluster. Reload NCS by running LDNCS.NCF from the console of each server in the cluster.
To make network data constantly available through your newly created cluster, you need to create and configure shared cluster volumes. To create a cluster-enabled volume, complete the following steps:
1. Launch NoRM and select Partition Disks in the left navigation frame.
2. Select the Server object of one of the nodes in the cluster and click Device Disk Management on the ConsoleOne toolbar.
3. Locate the device that corresponds to your shared storage. Click Create next to the free space on that device where you want to create the shared partition.
4. Click Create New Pool and Volume.
5. Provide the required pool information and click Create. For more information on each of the pool configuration parameters, see Chapter 10. You can either select Cluster Enable Pool now or cluster-enable the pool later. You must cluster-enable a pool for it to failover during a failure.
6. (Optional) If you choose to cluster-enable the storage pool now, you have to provide the following information:
![]() (Optional) Virtual Server Name—Change the name of the default virtual server object. When you cluster-enable a pool, the virtual server object is named by combining the Cluster object name and the Pool object name. For example:
(Optional) Virtual Server Name—Change the name of the default virtual server object. When you cluster-enable a pool, the virtual server object is named by combining the Cluster object name and the Pool object name. For example:
QuillsCluster_SharePool_Server
![]() Advertising Protocols—Specify how you want the shared storage pool to advertise its existence to clients. NCP is used by the Novell client, CIFS is used by Microsoft Windows, and AFP is used by Macintosh clients.
Advertising Protocols—Specify how you want the shared storage pool to advertise its existence to clients. NCP is used by the Novell client, CIFS is used by Microsoft Windows, and AFP is used by Macintosh clients.
![]() (Conditional) CIFS Server Name—If you select CIFS as an advertisement protocol, specify a server name that CIFS clients will see for this storage when browsing the network.
(Conditional) CIFS Server Name—If you select CIFS as an advertisement protocol, specify a server name that CIFS clients will see for this storage when browsing the network.
![]() Auto Pool Activate—Select this option to have the pool activate automatically upon creation.
Auto Pool Activate—Select this option to have the pool activate automatically upon creation.
The whole point in creating a cluster is to provide constant access to network resources. Because one of the principal resources on a network is data, cluster-enabling a storage pool will likely be one of the things you do first.
If you chose not to cluster-enable a shared volume when it was initially created, you can do so after the fact from NoRM. Make sure you deactivate the pool and dismount the volume(s) before cluster-enabling them. To cluster-enable an existing volume, complete the following steps:
1. Launch NoRM and select Cluster Config in the left navigation frame. Click New Cluster Volume in the right frame.
2. In the dialog box, specify the path in which the volume that you want to cluster-enable resides.
3. In the drop-down list, select the volume you want to cluster-enable and click Select.
4. Specify the IP address to assign to the cluster-enabled volume and click Save. This IP address is actually assigned to the storage pool associated with the volume you have selected. Any volume in the same pool that is cluster-enabled will share the same IP address. Checking the Auto-Online check box will cause the resource to start automatically after it is created.
You can delete cluster-enabled volumes and pools in the same way that you delete standard NSS volumes and pools. When a cluster-enabled resource is deleted, NCS will automatically modify its load scripts to remove that resource.
When you cluster-enable a storage pool, all nodes in the cluster are automatically assigned to the pool. The order of assignment is the order in which the nodes appear in the list. To assign or un-assign nodes, or to change the failover order, complete the following steps:
1. Launch NoRM and select Cluster Config from the left navigation frame.
2. In the right frame, select the Virtual Server object associated with your cluster-enabled storage pool from the Resources list.
3. Click the Nodes link. Configure the nodes for the cluster-enabled volume as needed and click Apply. The first server in the Nodes list will be the preferred node for the cluster-enabled storage pool. Failover will occur sequentially down the list.
After a storage pool has been cluster-enabled, you can configure the start, failover, and failback parameters. To do this, complete the following steps:
1. Launch NoRM and select Cluster Config from the left navigation frame.
2. In the right frame, select the Virtual Server object associated with your cluster-enabled storage pool from the Resources list.
3. Click the Policies link. Configure the Virtual Server policies as you want them and click Apply:
![]() Ignore Quorum—Check this box if you don’t want the cluster-wide timeout period and node number limit enforced. This makes sure the resource is launched immediately as soon as any server in the Assigned Nodes list is brought online. You can modify the quorum values from the Cluster Configuration Fields page in NoRM.
Ignore Quorum—Check this box if you don’t want the cluster-wide timeout period and node number limit enforced. This makes sure the resource is launched immediately as soon as any server in the Assigned Nodes list is brought online. You can modify the quorum values from the Cluster Configuration Fields page in NoRM.
![]() Start—When set to Auto, the resource will start automatically whenever the cluster is brought online. When it’s set to Manual, you must start the device after the cluster comes online. The default is Auto.
Start—When set to Auto, the resource will start automatically whenever the cluster is brought online. When it’s set to Manual, you must start the device after the cluster comes online. The default is Auto.
![]() Failover—When set to Auto, the resource will automatically move to the next server in the Assigned Nodes list if the node it is currently running on fails. When it’s set to Manual, you will intervene after a failure and reassign the resource to a functioning node. The default is Auto.
Failover—When set to Auto, the resource will automatically move to the next server in the Assigned Nodes list if the node it is currently running on fails. When it’s set to Manual, you will intervene after a failure and reassign the resource to a functioning node. The default is Auto.
![]() Failback—When this is set to Auto, the cluster resource will migrate back to its preferred node when it comes back online. The preferred node is the first node listed in its Assigned Nodes table. When set to Manual, the cluster resource will not failback until you allow it to happen. When set to Disable, the cluster resource will not failback to its most preferred node when the most preferred node rejoins the cluster. The default is Disable.
Failback—When this is set to Auto, the cluster resource will migrate back to its preferred node when it comes back online. The preferred node is the first node listed in its Assigned Nodes table. When set to Manual, the cluster resource will not failback until you allow it to happen. When set to Disable, the cluster resource will not failback to its most preferred node when the most preferred node rejoins the cluster. The default is Disable.
![]() Master only—Select this option if you want the resource to run only on the master node in the cluster. If the master node fails, the resource will failover to the node that becomes the new master node in the cluster.
Master only—Select this option if you want the resource to run only on the master node in the cluster. If the master node fails, the resource will failover to the node that becomes the new master node in the cluster.
These settings enable you to configure the behavior of your clustered storage pools to cluster-specific events.
Before you are ready to start loading applications and services in a clustered environment, there are some extra steps you have to take beyond the standard installation and configuration provided by the application or service. As with a cluster volume, you will most likely need to cluster-enable the application or service. You might also have to make some changes to the cluster object and the cluster nodes so that they can properly support the new application or service.
Before creating a resource for an NCS cluster, you need to be familiar with the following types of applications:
![]() Cluster-aware—Cluster-aware applications are specifically designed to take advantage of a clustered environment. These applications and services recognize when they are running on a cluster. They will automatically tweak their internal settings to be more tolerant of communication lapses that occur in a clustered system.
Cluster-aware—Cluster-aware applications are specifically designed to take advantage of a clustered environment. These applications and services recognize when they are running on a cluster. They will automatically tweak their internal settings to be more tolerant of communication lapses that occur in a clustered system.
![]() Cluster-naive—Although you can cluster-enable any application, if it is not designed to recognize that it is running on a cluster, the application is referred to as cluster-naive. For a cluster-naive application or service, NCS does all the work to ensure that the resource is reloaded on another node if the assigned cluster node fails.
Cluster-naive—Although you can cluster-enable any application, if it is not designed to recognize that it is running on a cluster, the application is referred to as cluster-naive. For a cluster-naive application or service, NCS does all the work to ensure that the resource is reloaded on another node if the assigned cluster node fails.
There are many OES NetWare services, and some third-party applications as well, that are designed to take advantage of Novell Clustering Services when it is detected. For example:
![]() Apache Web Server and Tomcat Servlet Engine
Apache Web Server and Tomcat Servlet Engine
![]() AppleTalk Filing Protocol (AFP)
AppleTalk Filing Protocol (AFP)
![]() BorderManager (proxy and VPN)
BorderManager (proxy and VPN)
![]() DHCP server
DHCP server
![]() GroupWise (MTA, POA, GWIA, WebAccess)
GroupWise (MTA, POA, GWIA, WebAccess)
![]() iFolder
iFolder
![]() iManager
iManager
![]() iPrint
iPrint
![]() NetWare FTP server
NetWare FTP server
![]() Common Internet File System (CIFS)
Common Internet File System (CIFS)
![]() NFS 3.0
NFS 3.0
![]() NDPS
NDPS
![]() Novell clients (Windows 98 and Windows XP/2000)
Novell clients (Windows 98 and Windows XP/2000)
![]() Pervasive Btrieve
Pervasive Btrieve
![]() Symantec Norton AntiVirus
Symantec Norton AntiVirus
![]() NetStorage
NetStorage
![]() ZENworks for Servers
ZENworks for Servers
![]() ZENworks for Desktops
ZENworks for Desktops
As you can see from this list, you can leverage the advantages of clustering with many types of applications, thereby making your entire network more resilient to failures.
You cluster-enable a service or application by creating a cluster resource object for it in eDirectory.
To create a cluster resource for an application, complete the following steps:
1. Launch NoRM and select Cluster Config from the left navigation frame.
2. In the right frame, click New Cluster Resource.
3. At the New Cluster Resource screen, supply the necessary information and click Apply:
![]() Resource Name—Specify a name for the new cluster resource.
Resource Name—Specify a name for the new cluster resource.
![]() (Optional) Template—If a resource template already exists for the resource you are creating, select it from the drop-down list.
(Optional) Template—If a resource template already exists for the resource you are creating, select it from the drop-down list.
![]() Create Resource Template—Similar to templates for other eDirectory objects, cluster resource templates simplify the process of creating similar or identical cluster resources. If you want to create multiple instances of the same resource on different servers, you can create a template that will automatically assign all the necessary properties when the resource object is created, rather than having to set each one up manually.
Create Resource Template—Similar to templates for other eDirectory objects, cluster resource templates simplify the process of creating similar or identical cluster resources. If you want to create multiple instances of the same resource on different servers, you can create a template that will automatically assign all the necessary properties when the resource object is created, rather than having to set each one up manually.
Note
NCS includes resource templates for DHCP, iFolder, MySQL database server, and generic IP services. The generic IP service template can be used when configuring certain server applications to run on your cluster. You can edit and customize any of the templates for your specific needs:
![]() Define Additional Properties—If a resource template does not exist, check this box so that you can set the Cluster Resource object properties after it is created. This opens the Resource Information screen to configure resource properties, as if you were configuring an existing cluster resource.
Define Additional Properties—If a resource template does not exist, check this box so that you can set the Cluster Resource object properties after it is created. This opens the Resource Information screen to configure resource properties, as if you were configuring an existing cluster resource.
The cluster resource includes a unique IP address, which enables it to be migrated from node to node within the cluster, as necessary. Cluster resources are created for both cluster-aware and cluster-naive applications.
When you create a cluster-enabled resource, all nodes in the cluster are automatically assigned to the resource. The order of assignment is determined by the order the nodes appear in the Assigned Nodes list. To assign or un-assign nodes, or to change the failover order for the resource, complete the following steps:
1. Launch NoRM and select Cluster Config from the left navigation frame.
2. In the right frame, select the Virtual Server object associated with the cluster resource from the Resources list.
3. Click the Nodes link. Configure the nodes for the cluster-enabled volume as needed and click Apply.
The first server in the Nodes list will be the preferred node for the cluster-enabled storage pool. Failover will occur sequentially down the list.
After a storage pool has been cluster-enabled, you can configure the start, failover, and failback parameters. To do this, complete the following steps:
1. Launch NoRM and select Cluster Config from the left navigation frame.
2. In the right frame, select the Virtual Server object associated with your cluster resource from the Resources list.
3. Click the Policies link. Configure the Virtual Server policies as you want them and click Apply:
![]() Ignore Quorum—Check this box if you don’t want the cluster-wide timeout period and node number limit enforced. This makes sure the resource is launched immediately as soon as any server in the Assigned Nodes list is brought online. You can modify the quorum values from the Cluster Configuration Fields page in NoRM.
Ignore Quorum—Check this box if you don’t want the cluster-wide timeout period and node number limit enforced. This makes sure the resource is launched immediately as soon as any server in the Assigned Nodes list is brought online. You can modify the quorum values from the Cluster Configuration Fields page in NoRM.
![]() Start—When set to Auto, the resource will start automatically whenever the cluster is brought online. When it’s set to Manual, you must start the device after the cluster comes online. The default is Auto.
Start—When set to Auto, the resource will start automatically whenever the cluster is brought online. When it’s set to Manual, you must start the device after the cluster comes online. The default is Auto.
![]() Failover—When set to Auto, the resource will automatically move to the next server in the Assigned Nodes list if the node it is currently running on fails. When it’s set to Manual, you will intervene after a failure and reassign the resource to a functioning node. The default is Auto.
Failover—When set to Auto, the resource will automatically move to the next server in the Assigned Nodes list if the node it is currently running on fails. When it’s set to Manual, you will intervene after a failure and reassign the resource to a functioning node. The default is Auto.
![]() Failback—When this is set to Auto, the cluster resource will migrate back to its preferred node when it comes back online. The preferred node is the first node listed in its Assigned Nodes table. When set to Manual, the cluster resource will not failback until you allow it to happen. When set to Disable, the cluster resource will not failback to its most preferred node when the most preferred node rejoins the cluster. The default is Disable.
Failback—When this is set to Auto, the cluster resource will migrate back to its preferred node when it comes back online. The preferred node is the first node listed in its Assigned Nodes table. When set to Manual, the cluster resource will not failback until you allow it to happen. When set to Disable, the cluster resource will not failback to its most preferred node when the most preferred node rejoins the cluster. The default is Disable.
![]() Master only—Select this option if you want the resource to run only on the master node in the cluster. If the master node fails, the resource will failover to the node that becomes the new master node in the cluster.
Master only—Select this option if you want the resource to run only on the master node in the cluster. If the master node fails, the resource will failover to the node that becomes the new master node in the cluster.
These settings give you granular control over the behavior of your clustered storage pools.
A node doesn’t have to fail to migrate a resource from one node to another. To migrate a cluster resource, complete the following steps:
1. Launch NoRM and select Cluster Management from the left navigation frame.
2. In the right frame, select the cluster resource that you want to migrate.
3. Select a server from the list of cluster nodes and click Migrate to move the resource to the selected server. If you click Offline instead of Migrate, the resource will be unloaded, and will not load again until it is manually reloaded into the cluster. If you need to modify the resource configuration, Offline enables you to take the resource out of the cluster to do so. Cluster resources can’t be modified while loaded or running in the cluster.
You might want to do this to perform some type of maintenance on one of the nodes or just to balance out the node workload, if one is getting too busy.
Load scripts are required for each resource or volume in your cluster. The load script specifies the commands to start the resource or mount the volume on a node. Unload scripts are used to ensure that when a resource is removed from a node, all modules and resources are properly cleaned up in the process.
Tip
Load and unload scripts are created automatically for disk pools when they are cluster-enabled. Because of this, you shouldn’t have to mess with scripts for cluster-enabled volumes and pools.
To view or edit a script, complete the following steps:
1. Launch ConsoleOne and browse to the appropriate Cluster Resource object.
2. Right-click the Cluster Resource object and select Properties.
3. Double-click the Scripts tab. Select either Cluster Resource Load Script or Cluster Resource Unload Script.
4. Edit or add the necessary commands to the script to load or unload the resource on a node. Some commands might require command-line input. You can add << to a command to indicate command-line input—for example, LOAD SLPDA <<Y. This means that when the module SLPDA is loaded, it will receive a Y response to its command-line prompt, presumably to a question that needs a yes answer. You can string multiple inputs together by specifying them on subsequent lines, as follows (a string up to 32 characters in length):
LOAD SLPDA <<Y
<<Y
<<N
5. Specify a timeout value. The timeout value determines how much time the script is given to complete. If the script does not complete within the specified time, the resource becomes comatose. The default is 600 seconds (10 minutes).
You use the same commands in a load script that you would use to create any other NetWare configuration file that runs from the server console (such as AUTOEXEC.NCF). Applications and services will often include prebuilt NCF files for loading and unloading application modules. You can use these as a template for creating load and unload scripts. Consult the application or service documentation for on necessary load and unload commands.
When running or testing an NCS cluster, you can view valuable information about the current state of your cluster, and its various resources, from the Cluster Management view in NoRM (see Figure 8.5).
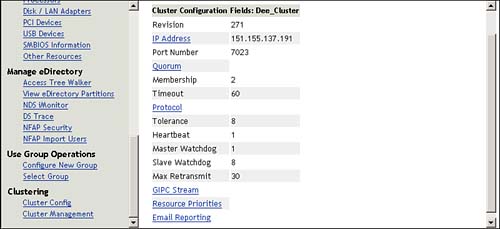
Some of the specific cluster information you can gather from the Cluster Management view includes the following:
![]() An icon represents each node in your cluster. The yellow disk indicates the node that is functioning as the master server in the cluster. The master server can change over time due to failover or migration events that take place.
An icon represents each node in your cluster. The yellow disk indicates the node that is functioning as the master server in the cluster. The master server can change over time due to failover or migration events that take place.
![]() Epoch indicates the number of times the cluster state has changed. The epoch number will increment each time a node joins or leaves the cluster.
Epoch indicates the number of times the cluster state has changed. The epoch number will increment each time a node joins or leaves the cluster.
![]() The Event Log link provides a detailed history of your cluster. Every time the cluster state changes, a new event is added to the event log.
The Event Log link provides a detailed history of your cluster. Every time the cluster state changes, a new event is added to the event log.
![]() Next to each loaded cluster resource is an associated resource state.
Next to each loaded cluster resource is an associated resource state.
Table 8.2 describes different resource states you might see in the Cluster Management view of NoRM and provides some possible actions for each state.
Table 8.2. Cluster Resource States
|
RESOURCE STATE |
DESCRIPTION |
ACTION |
|---|---|---|
|
|
One of the resource policies has been set to Manual. The resource is waiting for admin instructions. |
Click the Alert Status indicator and you will be prompted to start, failover, or failback the resource. |
|
|
The resource is not running and requires administrator intervention. |
Select the Comatose Status indicator and take the resource offline. After resource problems are resolved, the resource can be put back online. |
|
|
The resource is unloading from the server on which it was running. |
None. |
|
The resource is in a normal running state. |
Select the Running Status indicator, and you can choose to migrate the resource to a different node or take the resource offline. |
|
|
|
The resource is loading on a server. |
None. |
|
|
None of the nodes in the Assigned Node list is currently online. |
Select the Unassigned Status indicator and you can take the resource offline. This will prevent the resource from running on any of its preferred nodes should one or more of them rejoin the cluster. |
|
|
The properties of the resource have changed and the changes are still being synchronized in eDirectory. |
None. |
|
|
The resource is shut down or is in a dormant or inactive state. |
Select the Offline Status indicator and, if you want, click the Online button to load the resource. NCS will choose the best node possible, given the current state of the cluster and the resource’s Assigned Nodes list. |
|
|
The resource is waiting for a quorum to be established so that it can begin loading. |
None. |
Being aware of these resource states and what they mean enables you to understand the status of your cluster at a glance.