
![]() Use preconfigured services to make OES NetWare files—as well as common services such as NetStorage, iPrint, and email—available through a single portal website.
Use preconfigured services to make OES NetWare files—as well as common services such as NetStorage, iPrint, and email—available through a single portal website.
![]() Configure Virtual Office through the Virtual Office Management link in iManager.
Configure Virtual Office through the Virtual Office Management link in iManager.
![]() Virtual teams are a specialized instance of Virtual Office that you can use to create ad hoc portals to support a community, group, or team focused on a specific project or topic of discussion.
Virtual teams are a specialized instance of Virtual Office that you can use to create ad hoc portals to support a community, group, or team focused on a specific project or topic of discussion.
![]() Creates a web search engine for use by internal users (indexes relevant Internet websites) or by external users (indexes your web server information so that it can be effectively searched).
Creates a web search engine for use by internal users (indexes relevant Internet websites) or by external users (indexes your web server information so that it can be effectively searched).
![]() Configured and managed through the web search management pages, which are accessible from Web Manager after QuickFinder is installed.
Configured and managed through the web search management pages, which are accessible from Web Manager after QuickFinder is installed.
Novell Virtual Office enables network administrators to provide browser-based access to network resources quickly and easily. Effectively, Virtual Office enables you to create personalized user portals through which users can access their data and applications from a single website. Not only that, but Virtual Office also provides the capability to create virtual teams, or ad-hoc shared portals that can support a project or any other group that needs access to shared resources.
Virtual Office provides services that enable you to access network resources through the Virtual Office interface. Services are little Java-based servlets or applications that provide access to specific types of network resources. OES NetWare includes several default Virtual Office services for accessing network resources and performing common network tasks:
![]() NetStorage—Provides access to the Novell NetStorage service. NetStorage provides Internet-based access to file storage on an OES NetWare server, including access to iFolder. Both NetStorage and iFolder were discussed earlier in this chapter.
NetStorage—Provides access to the Novell NetStorage service. NetStorage provides Internet-based access to file storage on an OES NetWare server, including access to iFolder. Both NetStorage and iFolder were discussed earlier in this chapter.
![]() iPrint—Provides access to Internet printing via iPrint. For more information on iPrint, see Chapter 11, “OES Printing Services.”
iPrint—Provides access to Internet printing via iPrint. For more information on iPrint, see Chapter 11, “OES Printing Services.”
![]() Email and calendaring—Provides support for popular email applications and protocols, including Novell GroupWise, Microsoft Exchange, Lotus Notes, Novell Internet Messaging System (NIMS), POP3, and IMAP.
Email and calendaring—Provides support for popular email applications and protocols, including Novell GroupWise, Microsoft Exchange, Lotus Notes, Novell Internet Messaging System (NIMS), POP3, and IMAP.
![]() eGuide—Provides a simplified screen to access phone numbers and other user information stored in eDirectory. eGuide is discussed in more detail later in this chapter.
eGuide—Provides a simplified screen to access phone numbers and other user information stored in eDirectory. eGuide is discussed in more detail later in this chapter.
![]() Password—Links to a page where users can change their password in eDirectory.
Password—Links to a page where users can change their password in eDirectory.
![]() ZENWorks—Provides integration with Novell ZENWorks for Desktops functionality, such as application delivery, through the Virtual Office interface.
ZENWorks—Provides integration with Novell ZENWorks for Desktops functionality, such as application delivery, through the Virtual Office interface.
Perhaps most important to you as a network administrator, Virtual Office doesn’t require any complicated web development or programming. It’s pretty much ready to go right out of the box.
Virtual Office can be installed as an optional component during the OES NetWare installation or it can be installed later through iManager or the graphical server console.
Note
For most networks, you need to install Virtual Office on only one server in each eDirectory tree.
The only requirement for Virtual Office, beyond the minimum requirements for an OES NetWare server, is a web browser. To install Virtual Office using iManager, complete the following steps:
1. Insert the NetWare 6.5 SP3 CD 1 (Operating System) into your workstation.
2. Launch iManager and open the Install and Upgrade link in the Navigation frame.
3. Select Install OES NetWare Products and then click Remote Product Install in the Content frame.
4. At the Target Server screen, select the server to which you want to install Virtual Office and click Next. Authenticate as an Admin user for your eDirectory tree and click OK.
5. At the components screen, click Clear All and select only Novell Virtual Office. Click Next.
6. At the Summary screen, click Copy Files. You will be prompted to insert the NetWare 6.5 SP3 CD 2 (Products).
7. At the Installation Complete screen, click Reset Apache to restart your web server.
When Virtual Office is loaded, you can access a default Virtual Office web page by pointing your browser to the following page: http://<server DNS name or IP address>/vo—for example, http://wal-serv1.quills.com/vo.
This page will include links to all the gadgets you can use from the Virtual Office portal.
There are two aspects to configuring your Virtual Office environment: configuring Virtual Office itself, and configuring Virtual Office services.
To perform the initial configuration of Virtual Office, complete the following steps:
1. Launch the Virtual Office web interface (https:// <virtual office server> /vo) and authenticate as a user with administrative rights (for example, Admin).
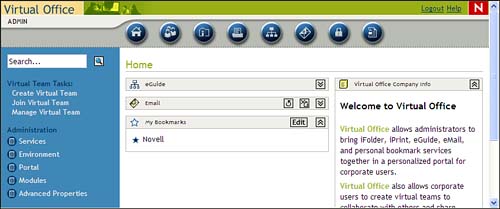
2. When the Virtual Office page loads for administrative users, you will see a set of Administrative links in the Navigation frame that are not present for normal users, as shown in Figure 14.1.
3. Select Environment in the Navigation frame.
4. Configure Virtual Office as required for your environment and click OK to save your changes. There are three tabs available in the Environment page:
![]() Team Configuration—Virtual teams enable you to create virtual ad-hoc groups that can share resources and information through a centralized portal dedicated for that purpose. More information on virtual teams is provided later in this chapter. To configure your virtual team environment, provide the requested information and click Save:
Team Configuration—Virtual teams enable you to create virtual ad-hoc groups that can share resources and information through a centralized portal dedicated for that purpose. More information on virtual teams is provided later in this chapter. To configure your virtual team environment, provide the requested information and click Save:
![]() Virtual Teams—Enables/Disables Virtual Team functionality.
Virtual Teams—Enables/Disables Virtual Team functionality.
![]() Allow access to existing teams—Enables/Disables access to existing virtual teams. When enabled, existing teams are accessible, even if virtual teams and/or new team creation is disabled.
Allow access to existing teams—Enables/Disables access to existing virtual teams. When enabled, existing teams are accessible, even if virtual teams and/or new team creation is disabled.
![]() Enable Team Creation—Enables you to enable virtual team creation. This is enabled by default. When disabled, no virtual team functionality is available.
Enable Team Creation—Enables you to enable virtual team creation. This is enabled by default. When disabled, no virtual team functionality is available.
![]() Manage Team Access—Click Edit to specify those users who have rights to create virtual teams.
Manage Team Access—Click Edit to specify those users who have rights to create virtual teams.
![]() Team File Share—Click Edit to specify the location where virtual team members will be allowed to store shared files. File sharing requires Native File Access (NFA) capabilities of OES NetWare because the location to which virtual team files will be stored must be configured as a CIFS share point. For more information on NFA and configuring a CIFS share point, see Chapter 3, “OES NetWare Clients.”
Team File Share—Click Edit to specify the location where virtual team members will be allowed to store shared files. File sharing requires Native File Access (NFA) capabilities of OES NetWare because the location to which virtual team files will be stored must be configured as a CIFS share point. For more information on NFA and configuring a CIFS share point, see Chapter 3, “OES NetWare Clients.”
![]() SMTP Address—Click Edit to specify the IP address or DNS name of your SMTP mail server. This is required if you want Virtual Office to be able to send email notifications to virtual team members.
SMTP Address—Click Edit to specify the IP address or DNS name of your SMTP mail server. This is required if you want Virtual Office to be able to send email notifications to virtual team members.
![]() Chat Server IP Port—Specifies the TCP port that will be used for chat communications for virtual teams.
Chat Server IP Port—Specifies the TCP port that will be used for chat communications for virtual teams.
![]() Portal Information—This page enables you to define how your Virtual Office portal can be used. There are three options on this page:
Portal Information—This page enables you to define how your Virtual Office portal can be used. There are three options on this page:
![]() Portal Containers—Sets those contexts from which users can log in and access Virtual Office. Effectively, this restricts the list of potential Virtual Office users to those within the contexts you specify.
Portal Containers—Sets those contexts from which users can log in and access Virtual Office. Effectively, this restricts the list of potential Virtual Office users to those within the contexts you specify.
![]() Portal Locations—If you are running Virtual Office on multiple servers, make sure that all portal addresses are listed here. Remember, you can specify the same storage location for multiple Virtual Office portals.
Portal Locations—If you are running Virtual Office on multiple servers, make sure that all portal addresses are listed here. Remember, you can specify the same storage location for multiple Virtual Office portals.
![]() Teams—Lists all virtual teams that have been created on the selected Virtual Office portal.
Teams—Lists all virtual teams that have been created on the selected Virtual Office portal.
![]() Logging—This page enables you to configure the information that will appear in Virtual Office log reports. Virtual Office logs can help you track service usage and diagnose problems. Typically, you won’t use logging because of the overhead that it requires, but it is useful for gathering environment and troubleshooting information:
Logging—This page enables you to configure the information that will appear in Virtual Office log reports. Virtual Office logs can help you track service usage and diagnose problems. Typically, you won’t use logging because of the overhead that it requires, but it is useful for gathering environment and troubleshooting information:
![]() Logging—Check this box to enable logging.
Logging—Check this box to enable logging.
![]() Logging Level—Sets the level of logging that will be performed. There are three levels of information you can obtain from the logging report. It’s counter-intuitive, but selecting Low will log all available information, Medium limits logging output, and High restricts log output even more.
Logging Level—Sets the level of logging that will be performed. There are three levels of information you can obtain from the logging report. It’s counter-intuitive, but selecting Low will log all available information, Medium limits logging output, and High restricts log output even more.
![]() Logging Modules—Enables you to specify the specific Virtual Office modules that you want to include in the logging. Leave the field blank to log all modules.
Logging Modules—Enables you to specify the specific Virtual Office modules that you want to include in the logging. Leave the field blank to log all modules.
![]() Logging to Standard Error—Check this box to log to the defined Standard Error device. By default, this is the Tomcat logger screen.
Logging to Standard Error—Check this box to log to the defined Standard Error device. By default, this is the Tomcat logger screen.
![]() Logging to Standard Out—Check this box to log to the defined Standard Out device. By default, this is the Tomcat logger screen.
Logging to Standard Out—Check this box to log to the defined Standard Out device. By default, this is the Tomcat logger screen.
![]() Logging to File—Check this box to send the log to a file. By default, the log file is
Logging to File—Check this box to send the log to a file. By default, the log file is SYS:TOMCAT4WEBAPPSNPSWEB-INFDEBUG.XML.
When you have completed the initial configuration of Virtual Office, you can move on to the configuration of the services available through the Virtual Office portal.
There are several Virtual Office services that ship with OES NetWare, but to use each you must perform some basic configuration, primarily centered around enabling the service and specifying the location of the service on the network.
Note
If you are interested in doing more advanced customization, or in developing your own Virtual Office services, you can use the Novell exteNd development tools for doing this. For more information on exteNd, see the OES online documentation.
To configure the various Virtual Office services, complete the following steps:
1. Launch the Virtual Office web interface (https:// <virtual office server> /vo) and authenticate as a user with administrative rights (for example, Admin).
2. Select Services in the Navigation frame to open the Services configuration page.
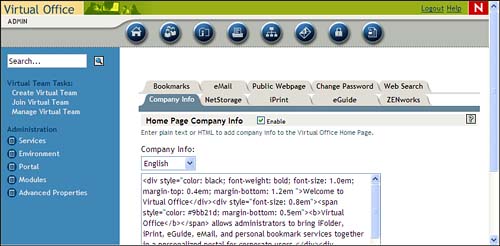
3. Use the tabs provided on the Services page, as shown in Figure 14.2, to configure Virtual Office services. If you don’t select Enable on any of these tabs, that service will be removed from your Virtual Office web page:
![]() Company Info—Use this option to specify the information that will appear in the News field in the Virtual Office web page. Enter regular text or HTML in the text box to specify the information that should appear in the News field.
Company Info—Use this option to specify the information that will appear in the News field in the Virtual Office web page. Enter regular text or HTML in the text box to specify the information that should appear in the News field.
![]() NetStorage—You must have NetStorage installed and configured before enabling this service. For more information on NetStorage, see Chapter 12, “OES NetWare File Access.” Specify the location of the NetStorage service to be used by Virtual Office. You can run NetStorage from the same server that is running Virtual Office or from a different server, or specify a custom location for the NetStorage service. Unless you are using the default local location for NetStorage, you have to provide the complete IP or DNS path to the NetStorage service.
NetStorage—You must have NetStorage installed and configured before enabling this service. For more information on NetStorage, see Chapter 12, “OES NetWare File Access.” Specify the location of the NetStorage service to be used by Virtual Office. You can run NetStorage from the same server that is running Virtual Office or from a different server, or specify a custom location for the NetStorage service. Unless you are using the default local location for NetStorage, you have to provide the complete IP or DNS path to the NetStorage service.
![]() iPrint—You must have NDPS and Novell iPrint installed and configured before enabling this service. For more information on iPrint, see Chapter 11. Specify the location of the iPrint service to be used by Virtual Office. You can run iPrint from the same server that is running Virtual Office or from a different server, or specify a custom location for the iPrint service. Unless you are using the default local location for iPrint, you have to provide the complete IP or DNS path to the iPrint service.
iPrint—You must have NDPS and Novell iPrint installed and configured before enabling this service. For more information on iPrint, see Chapter 11. Specify the location of the iPrint service to be used by Virtual Office. You can run iPrint from the same server that is running Virtual Office or from a different server, or specify a custom location for the iPrint service. Unless you are using the default local location for iPrint, you have to provide the complete IP or DNS path to the iPrint service.
![]() eGuide—You must have eGuide installed and configured before enabling this service. For more information on eGuide, see the OES NetWare online documentation. Specify the location of the eGuide service to be used by Virtual Office. You can run eGuide from the same server that is running Virtual Office or from a different server, or specify a custom location for the eGuide service. Unless you are using the default local location for eGuide, you have to provide the complete IP or DNS path to the eGuide service.
eGuide—You must have eGuide installed and configured before enabling this service. For more information on eGuide, see the OES NetWare online documentation. Specify the location of the eGuide service to be used by Virtual Office. You can run eGuide from the same server that is running Virtual Office or from a different server, or specify a custom location for the eGuide service. Unless you are using the default local location for eGuide, you have to provide the complete IP or DNS path to the eGuide service.
![]() ZENWorks—You must have ZENWorks for Desktops installed and configured before enabling this service. When enabled, certain ZENWorks services can be accessed through Virtual Office, such as application distribution. For more information, see the OES online documentation.
ZENWorks—You must have ZENWorks for Desktops installed and configured before enabling this service. When enabled, certain ZENWorks services can be accessed through Virtual Office, such as application distribution. For more information, see the OES online documentation.
![]() Bookmarks—Virtual Office enables you to specify default web links that you want to appear on the Virtual Office Navigation bar and/or a User’s Virtual Office web page.
Bookmarks—Virtual Office enables you to specify default web links that you want to appear on the Virtual Office Navigation bar and/or a User’s Virtual Office web page.
![]() Email—You must have an email service installed and configured before enabling this service. There are two steps to making a user’s email available through Virtual Office, as follows. First, you specify the type of email system with which Virtual Office will integrate, and then you click the Edit button next to the server link to specify the type and location (IP or DNS name) of the mail server to which Virtual Office should attach.
Email—You must have an email service installed and configured before enabling this service. There are two steps to making a user’s email available through Virtual Office, as follows. First, you specify the type of email system with which Virtual Office will integrate, and then you click the Edit button next to the server link to specify the type and location (IP or DNS name) of the mail server to which Virtual Office should attach.
![]() Public Webpage—Enables/Disables users’ ability to configure personal web pages that will be accessible through Virtual Office. Users will do the Public web page configuration if you enable the service.
Public Webpage—Enables/Disables users’ ability to configure personal web pages that will be accessible through Virtual Office. Users will do the Public web page configuration if you enable the service.
![]() Change Password—Enables/Disables users’ ability to change their passwords, both regular and Universal, through Virtual Office. This can be an important self-service tool to reduce burden on your help desk.
Change Password—Enables/Disables users’ ability to change their passwords, both regular and Universal, through Virtual Office. This can be an important self-service tool to reduce burden on your help desk.
![]() Web Search—Configures access to QuickFinder web search through Virtual Office. You must have QuickFinder installed and configured prior to accessing it through Virtual Office. You can run QuickFinder from the same server that is running Virtual Office or from a different server. Unless you are using the default local location for QuickFinder, you have to provide the complete IP or DNS path to the QuickFinder service.
Web Search—Configures access to QuickFinder web search through Virtual Office. You must have QuickFinder installed and configured prior to accessing it through Virtual Office. You can run QuickFinder from the same server that is running Virtual Office or from a different server. Unless you are using the default local location for QuickFinder, you have to provide the complete IP or DNS path to the QuickFinder service.
After you have configured the various Virtual Office services to your satisfaction, Virtual Office is ready to use.
A virtual team is an ad hoc shared portal that can support a project or any other group that needs access to shared resources. To create a virtual team, complete the following steps:
1. Launch the Virtual Office web page, which is available at http://<server DNS name or IP address>/vo by default.
2. Select Create Virtual Teams in the Navigation bar.
3. Specify a name for the new virtual team and click Create. You can also enter a description for the team you are creating.
Within a virtual team, team members can exchange information, share files, and maintain a calendar of events. Virtual Office enables you to create and manage your own virtual teams and/or become a member of teams created by others.
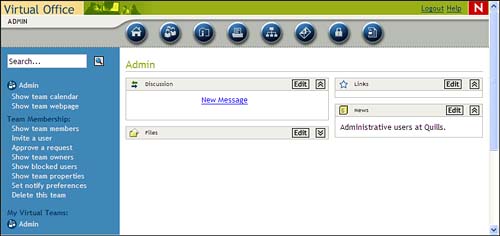
There are certain services that are available only within the context of a virtual team. These special services are designed to enhance communication and productivity between the members of a virtual team. Clicking the Teams icon in the Header frame (see Figure 14.3) will open a web page from which the team-specific services are available:
![]() Discussion—Team members can use the Discussion service as a weblog of sorts to capture online discussions and exchange ideas and messages. The discussion threads are accessible by all members of the team.
Discussion—Team members can use the Discussion service as a weblog of sorts to capture online discussions and exchange ideas and messages. The discussion threads are accessible by all members of the team.
![]() Files—Team members can use the Files service as a web-based file-sharing tool. Files can be created, uploaded, deleted, and browsed through this service. The Files service uses the Team File Share location specified during the configuration of Virtual Office, discussed previously.
Files—Team members can use the Files service as a web-based file-sharing tool. Files can be created, uploaded, deleted, and browsed through this service. The Files service uses the Team File Share location specified during the configuration of Virtual Office, discussed previously.
![]() Chat—Enables members of a virtual team to communicate through instant messaging. With the Chat service, you can do instant messaging with the members of your virtual team, but the instant message capabilities have been enhanced so that you can save conversations, invite multiple users to join a single chat session, and indicate when you are not available to chat.
Chat—Enables members of a virtual team to communicate through instant messaging. With the Chat service, you can do instant messaging with the members of your virtual team, but the instant message capabilities have been enhanced so that you can save conversations, invite multiple users to join a single chat session, and indicate when you are not available to chat.
![]() Links—The Links service enables you to create a list of team-related links that can be shared among team members to facilitate research or collaboration.
Links—The Links service enables you to create a list of team-related links that can be shared among team members to facilitate research or collaboration.
In addition to the team-specific services available through the Virtual Team link, there are two other resources available to virtual team members:
![]() Calendar—From the Navigation frame, select Show Team Calendar. From this page, you can schedule team-related events and appointments and share this information with team members.
Calendar—From the Navigation frame, select Show Team Calendar. From this page, you can schedule team-related events and appointments and share this information with team members.
![]() Team Web Page—From the Navigation frame, select Show Team Webpage. The team web page provides basic information about the virtual team, including its purpose, team members, and lists of published web links and files that the team wants to make readily available.
Team Web Page—From the Navigation frame, select Show Team Webpage. The team web page provides basic information about the virtual team, including its purpose, team members, and lists of published web links and files that the team wants to make readily available.
As the owner of a virtual team, there are several management tasks available to you for configuring and managing your virtual team. After you have created a virtual team, open the team web page to perform one or more of the following tasks:
![]() Show team members—From the Team Membership column, select Show Team Members and then click Membership.
Show team members—From the Team Membership column, select Show Team Members and then click Membership.
![]() Invite a user—From the Team Membership column, select Invite a User and then click Add. When invited, a user can choose to accept or reject the invitation.
Invite a user—From the Team Membership column, select Invite a User and then click Add. When invited, a user can choose to accept or reject the invitation.
![]() Approve a request—From the Team Membership column, select Approve a Request and then click Approve or Deny.
Approve a request—From the Team Membership column, select Approve a Request and then click Approve or Deny.
![]() Show team owners—From the Team Membership column, select Show Team Owners and then click Add. After they’re added, new team owners have the same rights you do, including the capability to remove you as an owner! For this reason, make sure team ownership is handed out carefully.
Show team owners—From the Team Membership column, select Show Team Owners and then click Add. After they’re added, new team owners have the same rights you do, including the capability to remove you as an owner! For this reason, make sure team ownership is handed out carefully.
![]() Show blocked users—From the Team Membership column, select Show Blocked Users and then click Add. This option enables you to manage team membership by exception, rather than having to specify each user who should be a member.
Show blocked users—From the Team Membership column, select Show Blocked Users and then click Add. This option enables you to manage team membership by exception, rather than having to specify each user who should be a member.
![]() Show team properties—From the Team Membership column, select Show Team Properties. From this page, you can update the name, description, or services associated with a virtual team.
Show team properties—From the Team Membership column, select Show Team Properties. From this page, you can update the name, description, or services associated with a virtual team.
![]() Set notify preferences—From the Team Membership column, select Set Notify Preferences and select each event for which you want team members automatically notified via email.
Set notify preferences—From the Team Membership column, select Set Notify Preferences and select each event for which you want team members automatically notified via email.
![]() Delete this team—From the Team Membership column, select Delete this Team and then click Delete twice more. When a virtual team has served its purpose, you can delete it very easily.
Delete this team—From the Team Membership column, select Delete this Team and then click Delete twice more. When a virtual team has served its purpose, you can delete it very easily.
As you can see from this list, virtual team owners have several tools at their disposal to manage the operation of the team portal, control access to the team portal, and make sure that usage of the team portal is only for designated purposes.
You must be a member of a virtual team to have access to information and services associated within that virtual team. To request membership in a virtual team, complete the following steps:
1. Launch the Virtual Office web page, which is available at http://<server DNS name or IP address>/vo by default.
2. Select Join Virtual Team in the Navigation bar.
3. Select the team you want to join from the list of available teams and click Join.
4. Click Request to request permission to join the team of the team’s owner. Click OK to finish the team-joining process.
After the owner approves your request, you become a member of the team and will have access to the virtual team resources. Any user can request membership to virtual teams, but membership is granted only when approved by the virtual team owner.
Although QuickFinder isn’t a required web service for OES NetWare, it is all about making your web resources available to employees and customers as quickly and accurately as possible. Supporting everything from simple internal search solutions to complex search services that you can offer to organizations for a fee, QuickFinder is one of the fastest and most accurate search engines currently available.
QuickFinder offers a powerful, full-text search engine that you can use to add search capabilities to your Internet or intranet websites. Compatible with the Apache Web Server, you can create custom search forms and search result pages either from scratch or by using the included templates.
This section introduces you to QuickFinder and its basic installation and configuration. However, for comprehensive information, see the OES NetWare online documentation.
With Novell QuickFinder, you can
![]() Support searching multiple language indexes from a single interface.
Support searching multiple language indexes from a single interface.
![]() Host search services for multiple organizations.
Host search services for multiple organizations.
![]() Organize collections of related files from diverse sources as a single document.
Organize collections of related files from diverse sources as a single document.
![]() Create custom search and print results and error and response messages and apply them to individual language searches or across all supported languages.
Create custom search and print results and error and response messages and apply them to individual language searches or across all supported languages.
![]() Gather customer metrics by reviewing searches to identify what your customers look for the most.
Gather customer metrics by reviewing searches to identify what your customers look for the most.
![]() Improve employee productivity by helping them find information more quickly.
Improve employee productivity by helping them find information more quickly.
Novell QuickFinder can be installed as an optional component during the OES NetWare installation, or it can be installed after the fact through iManager or the graphical server console.
To install QuickFinder using iManager, complete the following steps:
1. Insert the NetWare 6.5 SP3 CD 1 (Operating System) into your workstation.
2. Launch iManager and open the Install and Upgrade link in the Navigation frame.
3. Select Install NetWare 6.5 Products, and then click Remote Product Install in the Content frame.
4. At the Target Server screen, select the server to which you want to install QuickFinder and click Next. Authenticate as an Admin user for your eDirectory tree and click OK.
5. At the components screen, click Clear All and select only QuickFinder Server. Click Next.
6. At the Summary screen, click Copy Files. You will be prompted to insert the NetWare 6.5 SP3 CD 2 (Products). After the QuickFinder files are copied, click Close to complete the installation.
When the installation is complete, restart the OES NetWare server where QuickFinder is installed.
Before you get started creating and managing search sites, you should understand the basics of web searches. Web searches are driven by the idea of a search site. By definition, a search site is a collection of one or more indexes and their related configuration files. A typical search site consists of the following:
![]() Indexes—Indexes are at the heart of a search site. An index is an optimized binary file that contains keywords found in documents hosted on a web or file server. Indexes are used by QuickFinder to return search results to users.
Indexes—Indexes are at the heart of a search site. An index is an optimized binary file that contains keywords found in documents hosted on a web or file server. Indexes are used by QuickFinder to return search results to users.
Note
When you install QuickFinder, some of your server’s content is automatically indexed and appears on the default search form as the “QuickFinder Server” and “Doc Root” indexes.
![]() Log files—A log file keeps record of search statistics and performance of the search site.
Log files—A log file keeps record of search statistics and performance of the search site.
![]() Search and print templates—These are templates that become populated with the results of a search and then are displayed to the user. Depending on which templates are used, the level of detail displayed in search and print results varies.
Search and print templates—These are templates that become populated with the results of a search and then are displayed to the user. Depending on which templates are used, the level of detail displayed in search and print results varies.
![]() Scheduled events—Index management, such as updating or regenerating, can be automated to occur at specific intervals using the Scheduling feature.
Scheduled events—Index management, such as updating or regenerating, can be automated to occur at specific intervals using the Scheduling feature.
![]() Themes—A theme instantly adds a common look and feel to your search page, search and print results pages, and response and error message pages.
Themes—A theme instantly adds a common look and feel to your search page, search and print results pages, and response and error message pages.
After you start QuickFinder, you can open the search page using your web browser and perform a search against the content that has been automatically indexed. To test Novell QuickFinder using the default search page, do the following:
1. Point your browser to the default search page at http://<server DNS name of IP address>/qfsearch/SearchServlet. Remember that the URL is case sensitive. For example:
http://prv-serv1.quills.com/qfsearch/SearchServlet
2. Type NetWare in the search field and click Search.
The results of this search will be collected from the newly created QuickFinder index.
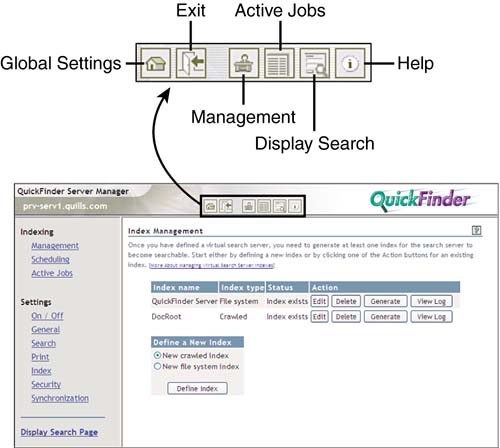
When QuickFinder is installed, you can manage it through QuickFinder Server Manager. Open QuickFinder Server Manager by pointing your browser to the following URL: https:// <server DNS name or IP address> /qfsearch/admin/—for example, http://prv-serv1.quills.com/qfsearch/admin.
This will open the Index Management page, as shown in Figure 14.4.
Note
You can set up access to QuickFinder Server Manager in iManager. Open QuickFinder Server Management in the Navigation frame and select Display QuickFinder Servers. In the Content frame, specify a name for the QuickFinder server you will manage and specify the appropriate QuickFinder URL, as described above; then click Add.
To access QuickFinder Server Manager, click Manage next to the QuickFinder server that you want to manage.
There are four primary tasks associated with configuring and managing QuickFinder:
![]() Creating a search site
Creating a search site
![]() Creating and managing indexes
Creating and managing indexes
![]() Generating indexes
Generating indexes
![]() Scheduling index events
Scheduling index events
Each of these is described in the following sections.
Using QuickFinder Server Manager, you can create and configure search sites, also called virtual search servers, and then begin adding indexes to them. To create a new search site, do the following:
1. Click Global Settings in the Header frame to open the Global Settings page, as shown in Figure 14.5.
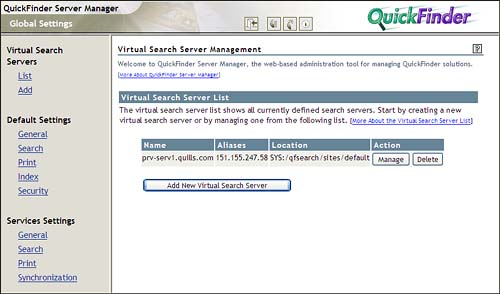
2. Open the Add Virtual Search Server page. There are three ways to do this: click Add in the Header frame, select Add from the Navigation frame under the Virtual Search Server heading, or click Add New Virtual Search Server in the Content frame.
3. Provide the required information and click Add.
The following fields are provided on the Add page:
![]() Name—This field is required; specify a name for the new search site. This is typically the DNS or domain name of your server. When QuickFinder receives a query, it must determine which of the available search sites it should use to handle the request. There are two ways to do this:
Name—This field is required; specify a name for the new search site. This is typically the DNS or domain name of your server. When QuickFinder receives a query, it must determine which of the available search sites it should use to handle the request. There are two ways to do this:
![]() Match the domain name in the search query with a search site name in QuickFinder.
Match the domain name in the search query with a search site name in QuickFinder.
![]() Use the
Use the SITE=searchsitename query parameter to find matching search site names.
![]() Aliases—Specify a secondary name for the search site. This is typically the IP address of your server. An alias name typically follows one of two conventions:
Aliases—Specify a secondary name for the search site. This is typically the IP address of your server. An alias name typically follows one of two conventions:
![]() An IP address could be used either in the domain name portion of a URL or be included in a search query using the
An IP address could be used either in the domain name portion of a URL or be included in a search query using the &site query parameter. Using an IP address in place of a domain name to select a search site works only in a hardware virtual server configuration where each search site has its own unique IP address. For more information on virtual web servers, see the discussion on Apache Web Server earlier in this chapter.
![]() You can also use any other numeric or textual value that can be passed as the value of the
You can also use any other numeric or textual value that can be passed as the value of the &site query parameter.
![]() Location—Specify the path where you want the index and configuration files to be stored. If this field is left blank, QuickFinder will store the search site files in
Location—Specify the path where you want the index and configuration files to be stored. If this field is left blank, QuickFinder will store the search site files in SYS:NSEARCHSITES<NAME>, where <NAME> is the name you have assigned to this search site. The location can be set to any volume on the server where QuickFinder is installed, but not on other servers.
QuickFinder supports two types of indexes:
![]() Crawled—Follows hypertext links until it reaches a dead end. QuickFinder can crawl one or more websites, specific areas of a website, or specific URLs, all the way down to specific filenames.
Crawled—Follows hypertext links until it reaches a dead end. QuickFinder can crawl one or more websites, specific areas of a website, or specific URLs, all the way down to specific filenames.
![]() File system—Indexes content on a file server. QuickFinder can index one or more paths on multiple volumes, including Storage Area Network (SAN) systems.
File system—Indexes content on a file server. QuickFinder can index one or more paths on multiple volumes, including Storage Area Network (SAN) systems.
There are two forms you can use to create each type of index: the standard form and the advanced form. The standard form is discussed here. For information about the advanced form, see the OES online documentation.
QuickFinder can search across multiple indexes within a single search site, but cannot search across multiple search sites.
To create a new crawled index, complete the following steps from QuickFinder Server Manager:
1. In the Define a New Index box, select New Crawled Index and click Define Index.
2. In the Define Crawled Index screen, provide the required information and click Apply Settings:
![]() Index name—Specify a name for the new index. The name can be a word, phrase, or numeric value. If you are going to have a large number of indexes, you should use a naming scheme so that you can effectively manage your indexes. Keep in mind that the index name will be visible to users, so you might want to choose a name that will mean something to them.
Index name—Specify a name for the new index. The name can be a word, phrase, or numeric value. If you are going to have a large number of indexes, you should use a naming scheme so that you can effectively manage your indexes. Keep in mind that the index name will be visible to users, so you might want to choose a name that will mean something to them.
![]() URL of website—Specify the URL of the website you want to index. You can enter a URL by itself or include a path down to a specific file level. The standard index form includes two URL fields. Click Add more URLs to specify more than two URLs to be indexed.
URL of website—Specify the URL of the website you want to index. You can enter a URL by itself or include a path down to a specific file level. The standard index form includes two URL fields. Click Add more URLs to specify more than two URLs to be indexed.
To create a new file system index, complete the following steps in QuickFinder Server Manager:
1. In the Define a New Index box, select New File System Index and click Define Index.
2. In the Define File System Index screen, provide the required information and click Apply Settings:
![]() Index name—Specify a name for the new index. The name can be a word, phrase, or numeric value. If you are going to have a large number of indexes, you should use a naming scheme so that you can effectively manage your indexes. Keep in mind that the index name will be visible to users, so you might want to choose a name that will mean something to them.
Index name—Specify a name for the new index. The name can be a word, phrase, or numeric value. If you are going to have a large number of indexes, you should use a naming scheme so that you can effectively manage your indexes. Keep in mind that the index name will be visible to users, so you might want to choose a name that will mean something to them.
![]() Server path to be indexed—Specify the absolute path to the folder containing the information that you want indexed—for example,
Server path to be indexed—Specify the absolute path to the folder containing the information that you want indexed—for example, SYS:MARKETINGCOLLATERAL.
![]() Corresponding URL prefix—Specify the URL that should be used by the search results page to access the individual files. This corresponds to a document directory (Document Root) that has been defined on the web server. For more information on document directories, see the discussion on Apache Web Server in Chapter 13, “OES Web Foundations.”
Corresponding URL prefix—Specify the URL that should be used by the search results page to access the individual files. This corresponds to a document directory (Document Root) that has been defined on the web server. For more information on document directories, see the discussion on Apache Web Server in Chapter 13, “OES Web Foundations.”
You can specify multiple paths for a single index by clicking Add More Paths.
When you define an index, you must generate it before it can be used for searching. This is the actual process of examining website content or web server files to gather keywords, titles, and descriptions and place them in the index file.
To generate a newly defined index, click Generate next to the specific index that you want to generate. This will open the Active Jobs screen, from which you will see the status of the current indexing jobs. If there is no current index job, the status page will read No indexing jobs are currently running or defined. To cancel the current indexing jobs, click Cancel in the Action column.
QuickFinder can automatically update your indexes on specific dates and times by scheduling events. To configure an automatic generation event, complete the following steps in QuickFinder Server Manager:
3. Select Scheduling in the Navigation frame and click Add Event.
4. At the Schedule a New Event screen, provide the required information and click Apply Settings:
![]() Dates, days of week, and time—Specify the month, days, days of the week, or time (in hours and minutes) when you want QuickFinder to run the event. You can use the Ctrl and Shift keys to select multiple dates and times.
Dates, days of week, and time—Specify the month, days, days of the week, or time (in hours and minutes) when you want QuickFinder to run the event. You can use the Ctrl and Shift keys to select multiple dates and times.
![]() Operation—Select the type of operation you want performed on your indexes. Update will add any new content from the website or file system to the index file. Optimize will remove unnecessary content and make the index file smaller and faster. Regenerate replaces the existing index with a new one.
Operation—Select the type of operation you want performed on your indexes. Update will add any new content from the website or file system to the index file. Optimize will remove unnecessary content and make the index file smaller and faster. Regenerate replaces the existing index with a new one.
![]() Perform operations on—Determine whether you want the chosen operation performed on all indexes (collections) in the search site or only on specified indexes. If you have large indexes, it might be best to create multiple events to update indexes at different times.
Perform operations on—Determine whether you want the chosen operation performed on all indexes (collections) in the search site or only on specified indexes. If you have large indexes, it might be best to create multiple events to update indexes at different times.
After the schedule is configured, the index will be automatically updated at the frequency specified in the schedule.
Services settings give the QuickFinder administrator global control over the search services provided by Novell QuickFinder, including the capability to completely disable searching. These pages also control overall performance of the QuickFinder.
Services settings are available from the Global Settings page, as shown in Figure 14.6, organized under the Services Settings heading in the Navigation frame. There are four categories of services settings available for QuickFinder Server.
General service settings define error log and site list settings for all search sites. The General Services Settings page is shown in Figure 14.6:
![]() Product Update Settings—This section enables you to receive notifications of updates to QuickFinder software automatically as they become available.
Product Update Settings—This section enables you to receive notifications of updates to QuickFinder software automatically as they become available.
![]() Administrator Authentication Settings—This section enables you to enable/disable authentication and secure communications for QuickFinder Server Manager.
Administrator Authentication Settings—This section enables you to enable/disable authentication and secure communications for QuickFinder Server Manager.
![]() Error Log Settings—The following settings enable you to configure the error log on QuickFinder:
Error Log Settings—The following settings enable you to configure the error log on QuickFinder:
![]() Log Errors To—Select where you want log results displayed. You can choose to log errors to a file, to the console, or both. Click the View Log button to see the error log directly from QuickFinder Server Manager.
Log Errors To—Select where you want log results displayed. You can choose to log errors to a file, to the console, or both. Click the View Log button to see the error log directly from QuickFinder Server Manager.
![]() New Log When Services Load—When set to Yes, this option starts a new log file each time you restart the QuickFinder.
New Log When Services Load—When set to Yes, this option starts a new log file each time you restart the QuickFinder.
![]() Maximum Log Size (Bytes)—Limit the size of the log file to the size you specify (in bytes).
Maximum Log Size (Bytes)—Limit the size of the log file to the size you specify (in bytes).
![]() Email Settings—These settings enable you to set up email notifications for errors that occur on QuickFinder:
Email Settings—These settings enable you to set up email notifications for errors that occur on QuickFinder:
![]() Enable Email Services—Enables/disables email notifications for QuickFinder. Note that this is a global setting that affects all search sites configured in QuickFinder.
Enable Email Services—Enables/disables email notifications for QuickFinder. Note that this is a global setting that affects all search sites configured in QuickFinder.
![]() Outgoing SMTP Hostname—Specify the DNS name of the outgoing SMTP mail server.
Outgoing SMTP Hostname—Specify the DNS name of the outgoing SMTP mail server.
![]() Outgoing SMTP Port #—Specify the port to which the SMTP mail server is listening. Default: port
Outgoing SMTP Port #—Specify the port to which the SMTP mail server is listening. Default: port 25.
![]() Outgoing SMTP User ID (conditional)—If the SMTP server requires authentication, specify a valid user ID for use by QuickFinder here.
Outgoing SMTP User ID (conditional)—If the SMTP server requires authentication, specify a valid user ID for use by QuickFinder here.
![]() Outgoing SMTP Password (conditional)—If the SMTP server requires authentication, provide the password associated with the user ID provided for use by QuickFinder.
Outgoing SMTP Password (conditional)—If the SMTP server requires authentication, provide the password associated with the user ID provided for use by QuickFinder.
![]() Server Management Settings—The following settings define some general characteristics of the QuickFinder:
Server Management Settings—The following settings define some general characteristics of the QuickFinder:
![]() Maximum Number of Active Index Jobs—Limits the number of indexing jobs that can run at the same time. Default is 5.
Maximum Number of Active Index Jobs—Limits the number of indexing jobs that can run at the same time. Default is 5.
![]() Default Location of Virtual Search Servers—Specifies the path to where you want all search site files to be stored, including index and configuration files. Changing this setting won’t move existing sites to a new location, but all new search sites will be placed here.
Default Location of Virtual Search Servers—Specifies the path to where you want all search site files to be stored, including index and configuration files. Changing this setting won’t move existing sites to a new location, but all new search sites will be placed here.
![]() Detect Manual Search Server Changes—When set to Yes, this option directs QuickFinder to reload configuration files that are modified manually, instead of using QuickFinder Server Manager.
Detect Manual Search Server Changes—When set to Yes, this option directs QuickFinder to reload configuration files that are modified manually, instead of using QuickFinder Server Manager.
![]() Seconds Between Checking for Changes—Specifies how often QuickFinder will look for manually modified configuration files, in seconds.
Seconds Between Checking for Changes—Specifies how often QuickFinder will look for manually modified configuration files, in seconds.
![]() Detect Template Changes—When set to Yes, this option directs QuickFinder to check automatically for modifications to search or print, or error templates used by QuickFinder.
Detect Template Changes—When set to Yes, this option directs QuickFinder to check automatically for modifications to search or print, or error templates used by QuickFinder.
![]() Seconds Between Checking for Template Changes—Specifies how often QuickFinder should reload search, print, results, and error templates, in seconds. Any changes to templates will be recognized within the time period specified here.
Seconds Between Checking for Template Changes—Specifies how often QuickFinder should reload search, print, results, and error templates, in seconds. Any changes to templates will be recognized within the time period specified here.
When you are done making changes, click Apply Settings.
Search service settings enable you to turn search capabilities on or off and manage debugging and statistics settings. The Search service settings are shown in Figure 14.7 and include the following:
![]() General Search Settings—These settings enable you to enable/disable the primary search features of QuickFinder:
General Search Settings—These settings enable you to enable/disable the primary search features of QuickFinder:
![]() Enable Search Service—This option enables search services for all search sites on the QuickFinder.
Enable Search Service—This option enables search services for all search sites on the QuickFinder.
![]() Enable Highlighter Service—This option configures QuickFinder to highlight instances of the search term or phrase within the searched documents.
Enable Highlighter Service—This option configures QuickFinder to highlight instances of the search term or phrase within the searched documents.
![]() Debug Settings—These settings enable you to keep a log of all searches and query results going to all search sites. Typically, this option is used only when troubleshooting a problem with a search because the log file can grow very quickly:
Debug Settings—These settings enable you to keep a log of all searches and query results going to all search sites. Typically, this option is used only when troubleshooting a problem with a search because the log file can grow very quickly:
![]() Enable Search Debugging—Enables/disables debugging of searches.
Enable Search Debugging—Enables/disables debugging of searches.
![]() Log Debug Messages To—Specifies whether debug messages should be logged to a file, to the server console, or to both. Server console messages are viewable from the Tomcat servlet container console screen.
Log Debug Messages To—Specifies whether debug messages should be logged to a file, to the server console, or to both. Server console messages are viewable from the Tomcat servlet container console screen.
![]() New Log When Servlet Loads—Specifying Yes will restart the debug file whenever QuickFinder is restarted.
New Log When Servlet Loads—Specifying Yes will restart the debug file whenever QuickFinder is restarted.
![]() Maximum Log Size (Bytes)—Specifies the size of the debug file, in bytes.
Maximum Log Size (Bytes)—Specifies the size of the debug file, in bytes.
![]() Statistics Settings—Search statistics can provide you with information that can help you optimize QuickFinder over time to improve search performance:
Statistics Settings—Search statistics can provide you with information that can help you optimize QuickFinder over time to improve search performance:
![]() Enable Search Statistics Logging—When set to Yes, this setting generates an updated log file containing statistics about searches performed against all search sites on your QuickFinder.
Enable Search Statistics Logging—When set to Yes, this setting generates an updated log file containing statistics about searches performed against all search sites on your QuickFinder.
![]() Seconds Between Statistics Updates—Specifies the time, in seconds, between updates of the statistics log file.
Seconds Between Statistics Updates—Specifies the time, in seconds, between updates of the statistics log file.
![]() Log Statistics To—Specifies whether statistics log messages should be logged to a file, to the server console, or both. Server console messages are viewable from the Tomcat servlet container console screen.
Log Statistics To—Specifies whether statistics log messages should be logged to a file, to the server console, or both. Server console messages are viewable from the Tomcat servlet container console screen.
![]() Maximum Log Size (Bytes)—Specifies the size of the statistics log file, in bytes.
Maximum Log Size (Bytes)—Specifies the size of the statistics log file, in bytes.
![]() New Log When Servlet Loads—Specifying Yes will restart the statistics log file whenever QuickFinder is restarted.
New Log When Servlet Loads—Specifying Yes will restart the statistics log file whenever QuickFinder is restarted.
![]() Log Error If Search Time Exceeds (Seconds)—Specifies the timeout, in seconds, before QuickFinder should record the current search as exceeding the specified time limit on the statistics display.
Log Error If Search Time Exceeds (Seconds)—Specifies the timeout, in seconds, before QuickFinder should record the current search as exceeding the specified time limit on the statistics display.
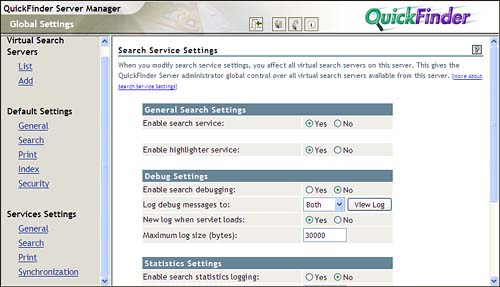
When you are done making changes, click Apply Settings.
This page manages Print services and has the same options and parameters described in the Search section. Click Apply Settings to save any changes you make to this page.
QuickFinder Synchronization enables you to manage multiple QuickFinder instances from a single administration interface. Changes made to one server are automatically replicated to the other servers in the cluster. You can also synchronize QuickFinder files across multiple QuickFinder instances, including generated indexes, configuration settings, and search results templates. For more information on using QuickFinder Synchronization, see the OES online documentation.
The default site settings define characteristics for search sites that are created on QuickFinder. Changes to the parameters defined on these pages will be automatically applied to any new search sites that are created, unless overridden through the use of the Advanced Index Definition form.
In this way, you can manage your search sites by exception, rather than by having to define every setting for every site manually when it is created.
Default settings are available from the Global Settings page, as shown in Figure 14.6, organized under the Default Settings heading in the Navigation frame. There are five categories of default site settings, which are detailed in the following sections.
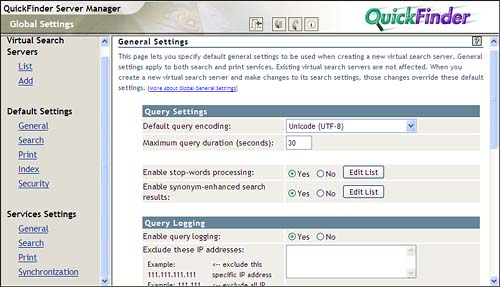
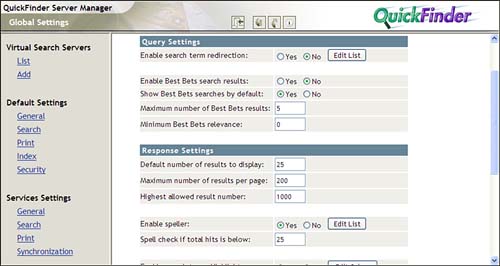
General settings enable you to manage query, response, and error log settings for all newly created search sites. The general default site settings are shown in Figure 14.8 and include the following:
![]() Query Settings—This section enables you to configure general query parameters:
Query Settings—This section enables you to configure general query parameters:
![]() Default Query Encoding—Specifies an encoding that represents the character set encoding that most of your user queries will use. Default is UTF-8.
Default Query Encoding—Specifies an encoding that represents the character set encoding that most of your user queries will use. Default is UTF-8.
![]() Maximum Query Duration (Seconds)—Specifies the maximum duration of any query, in seconds. Any query that reaches this limit will terminate whether or not the query has actually finished. Default is 30 seconds. This option helps you protect server resources from malicious rogue searches, which are intended to slow site performance by consuming server resources.
Maximum Query Duration (Seconds)—Specifies the maximum duration of any query, in seconds. Any query that reaches this limit will terminate whether or not the query has actually finished. Default is 30 seconds. This option helps you protect server resources from malicious rogue searches, which are intended to slow site performance by consuming server resources.
![]() Enable Stop-Words Processing—This option instructs QuickFinder to ignore insignificant search words (stop words), such as articles, conjunctions, or prepositions. A list of common stop words is configured by default, but you can modify the list by clicking Edit List.
Enable Stop-Words Processing—This option instructs QuickFinder to ignore insignificant search words (stop words), such as articles, conjunctions, or prepositions. A list of common stop words is configured by default, but you can modify the list by clicking Edit List.
![]() Enable Synonym-Enhanced Search Results—This option enables search users to expand their search results to include synonyms of the original search terms. This is kind of like doing a Thesaurus search that can help uncover related information using similar, but not exact, words to those being searched for. You can modify the synonym list by clicking Edit List.
Enable Synonym-Enhanced Search Results—This option enables search users to expand their search results to include synonyms of the original search terms. This is kind of like doing a Thesaurus search that can help uncover related information using similar, but not exact, words to those being searched for. You can modify the synonym list by clicking Edit List.
![]() Query Logging—This section enables you to configure a query log to track how QuickFinder is being used:
Query Logging—This section enables you to configure a query log to track how QuickFinder is being used:
![]() Enable Query Logging—Enables/disables query logging, which captures information about user queries, including total number of searches performed (for the current logging period); top 100 search terms; load statistics; and information about queries that resulted in a Not Found error message. This information can be used to optimize the configuration of your search service to improve performance.
Enable Query Logging—Enables/disables query logging, which captures information about user queries, including total number of searches performed (for the current logging period); top 100 search terms; load statistics; and information about queries that resulted in a Not Found error message. This information can be used to optimize the configuration of your search service to improve performance.
![]() Exclude These IP Addresses—Enables you to specify those IP addresses to exclude from the query log. Separate each address by a space or hard return. This enables you to exclude internal addresses, for example, so you can focus your logs on external search requests.
Exclude These IP Addresses—Enables you to specify those IP addresses to exclude from the query log. Separate each address by a space or hard return. This enables you to exclude internal addresses, for example, so you can focus your logs on external search requests.
![]() Log Period—Enables you to specify the length of the log period. At the end of each log period, QuickFinder will start a new log file and automatically generate a report from the old log file.
Log Period—Enables you to specify the length of the log period. At the end of each log period, QuickFinder will start a new log file and automatically generate a report from the old log file.
![]() E-mail Log Reports—Enables you to specify the email addresses where you want new log reports sent. Separate multiple addresses by a space or hard return. This option will not appear if email services are disabled on your QuickFinder Server. Email services configuration is available from the Global Settings page. Under Services Settings, select General and look for the E-mail Settings section.
E-mail Log Reports—Enables you to specify the email addresses where you want new log reports sent. Separate multiple addresses by a space or hard return. This option will not appear if email services are disabled on your QuickFinder Server. Email services configuration is available from the Global Settings page. Under Services Settings, select General and look for the E-mail Settings section.
![]() Available Log Reports—Enables you to view previously generated log reports. To do so, select the report you want to view and then click View Report.
Available Log Reports—Enables you to view previously generated log reports. To do so, select the report you want to view and then click View Report.
![]() Template to Use When Generating Reports—QuickFinder provides a default log template,
Template to Use When Generating Reports—QuickFinder provides a default log template, ReportTemplate.html, to format logs. You can replace the default template with one of your choosing by specifying the filename in this field. You can also specify ExportTemplate.xml if you want to export the log file to an external log analyzing tool.
![]() Response Settings—This section enables you to configure a query log to track who is using QuickFinder:
Response Settings—This section enables you to configure a query log to track who is using QuickFinder:
![]() Default Encoding for Response Pages—Specifies the encoding QuickFinder will use when responding to user queries with Search and Print Results templates and Error and Response Messages templates. Default is Unicode (UTF-8).
Default Encoding for Response Pages—Specifies the encoding QuickFinder will use when responding to user queries with Search and Print Results templates and Error and Response Messages templates. Default is Unicode (UTF-8).
![]() Refuse Queries If Potential Hits Exceed—Specifies the maximum effective size of a search for QuickFinder. Use this field to cancel the processing of search results that might take a long time to complete because a large number of hits are being returned. Users should modify their queries in this case.
Refuse Queries If Potential Hits Exceed—Specifies the maximum effective size of a search for QuickFinder. Use this field to cancel the processing of search results that might take a long time to complete because a large number of hits are being returned. Users should modify their queries in this case.
![]() Error Log Settings—This section enables you to configure QuickFinder’s error log:
Error Log Settings—This section enables you to configure QuickFinder’s error log:
![]() Maximum Log Size (Bytes)—Specifies the maximum size, in bytes, to which QuickFinder will allow the log file to grow. This protects your server hard drive resources, particularly on a busy search server.
Maximum Log Size (Bytes)—Specifies the maximum size, in bytes, to which QuickFinder will allow the log file to grow. This protects your server hard drive resources, particularly on a busy search server.
When you are done making changes, click Apply Settings.
Search default site settings enable you to turn search capabilities on or off and manage debugging and statistics settings. The Default search settings are shown in Figure 14.9 and include the following:
![]() Query Settings—These options enable you to configure some additional features to improve search performance and usability:
Query Settings—These options enable you to configure some additional features to improve search performance and usability:
![]() Enable Search Term Redirection—Enables you to set up common search terms to go to a specific URL. For example, the term programming might take a user straight to your Developer web site.
Enable Search Term Redirection—Enables you to set up common search terms to go to a specific URL. For example, the term programming might take a user straight to your Developer web site.
![]() Enable Best Bets Search Results—Enables/disables Best Bets. Best Bets are common search destinations that can be displayed in addition to a user’s specific results. They are generated from a special index just for that purpose.
Enable Best Bets Search Results—Enables/disables Best Bets. Best Bets are common search destinations that can be displayed in addition to a user’s specific results. They are generated from a special index just for that purpose.
![]() Show Best Bets Searches by Default—Enables/disables showing Best Bets by default.
Show Best Bets Searches by Default—Enables/disables showing Best Bets by default.
![]() Maximum Number of Best Bets Results—Specifies the number of Best Bets results to display.
Maximum Number of Best Bets Results—Specifies the number of Best Bets results to display.
![]() Minimum Best Bets relevance—Enables you to set a minimum relevance value for Best Bets hits. Documents below this value will not be shown on the Best Bets display.
Minimum Best Bets relevance—Enables you to set a minimum relevance value for Best Bets hits. Documents below this value will not be shown on the Best Bets display.
![]() Response Settings—These options configure the default format for replying to a search request:
Response Settings—These options configure the default format for replying to a search request:
![]() Default Number of Results to Display—Specifies the number of search results that will be displayed on each search results page.
Default Number of Results to Display—Specifies the number of search results that will be displayed on each search results page.
![]() Maximum Number of Results Per Page—Sets a limit on the number of results allowed on any results page.
Maximum Number of Results Per Page—Sets a limit on the number of results allowed on any results page.
![]() Highest Allowed Result Number—Specifies the maximum number of results that will be returned for any query.
Highest Allowed Result Number—Specifies the maximum number of results that will be returned for any query.
![]() Enable Speller—Enables/disables automatic spell checking on search terms.
Enable Speller—Enables/disables automatic spell checking on search terms.
![]() Spell check if total hits is below—Sets the spell checking threshold. QuickFinder’s speller automatically detects common errors in users’ search terms and suggests alternative spellings if a user query doesn’t produce at least the number of hits specified in this field.
Spell check if total hits is below—Sets the spell checking threshold. QuickFinder’s speller automatically detects common errors in users’ search terms and suggests alternative spellings if a user query doesn’t produce at least the number of hits specified in this field.
![]() Enable Search Terms Highlighter—Specifies whether the search term highlighter is a default option for search sites configured on this QuickFinder.
Enable Search Terms Highlighter—Specifies whether the search term highlighter is a default option for search sites configured on this QuickFinder.
![]() Template Settings—These options set basic information about the template used by QuickFinder:
Template Settings—These options set basic information about the template used by QuickFinder:
![]() Templates Directory—Specifies the location of the QuickFinder templates files. The default path is
Templates Directory—Specifies the location of the QuickFinder templates files. The default path is SYS:NsearchTemplates.
![]() Default Encoding for Templates—Specifies the character set in which your templates are written. This is a default value that will be used with templates that do not specify a specific encoding.
Default Encoding for Templates—Specifies the character set in which your templates are written. This is a default value that will be used with templates that do not specify a specific encoding.
![]() Default Search Page Template—Specifies the name of the search page template file you want to use.
Default Search Page Template—Specifies the name of the search page template file you want to use.
![]() Default Search Results Template—Specifies the name of the search results template file you want to use.
Default Search Results Template—Specifies the name of the search results template file you want to use.
![]() Default Highlighter Template—Specifies the name of the highlighter template file you want to use.
Default Highlighter Template—Specifies the name of the highlighter template file you want to use.
![]() Template to Use If No Results Returned—Specifies the name of the template file to be used if no results are found.
Template to Use If No Results Returned—Specifies the name of the template file to be used if no results are found.
![]() Template to Use If Error Occurs—Specifies the name of the template file to be used if there are errors while processing a query.
Template to Use If Error Occurs—Specifies the name of the template file to be used if there are errors while processing a query.
When you are done making changes, click Apply Settings.
The default print settings enable you to manage print results templates and parameters that affect result printing. The Print Settings page is shown in Figure 14.10 and includes the following settings:
![]() Print Result Settings—These options enable you to configure some basic print settings for the QuickFinder environment:
Print Result Settings—These options enable you to configure some basic print settings for the QuickFinder environment:
![]() Default Number of Results to Print—Specifies the number of print results that you want displayed on each print results page.
Default Number of Results to Print—Specifies the number of print results that you want displayed on each print results page.
![]() Maximum Number of Results to Print—Sets a limit on the number of results allowed on any results page.
Maximum Number of Results to Print—Sets a limit on the number of results allowed on any results page.
![]() Highest Allowed Result Number—Specifies the maximum number of results that will be returned for any query.
Highest Allowed Result Number—Specifies the maximum number of results that will be returned for any query.
![]() Maximum Print Job Size (Bytes)—Specifies the largest allowable print job size, in bytes. Any request for a print job larger than this value will receive an error message.
Maximum Print Job Size (Bytes)—Specifies the largest allowable print job size, in bytes. Any request for a print job larger than this value will receive an error message.
![]() Print Job Size Warning (Bytes)—When a print job exceeds the specified size, in bytes, QuickFinder will send a warning message to the user via the
Print Job Size Warning (Bytes)—When a print job exceeds the specified size, in bytes, QuickFinder will send a warning message to the user via the ResponseMessageTemplate.html file. It then prompts the user to confirm the print job before continuing.
![]() Template Settings—These settings provide the same type of information described previously in the section on Search settings.
Template Settings—These settings provide the same type of information described previously in the section on Search settings.
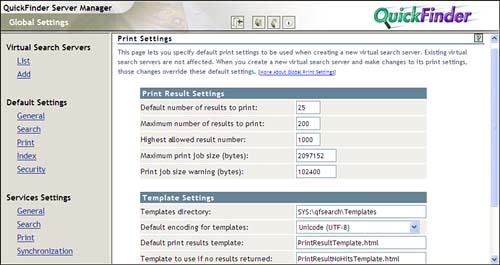
When you are done making changes, click Apply Settings.
The index default site settings make the process of creating indexes easier by enabling you to configure common default settings. The Index default site settings are shown in Figure 14.11 and include the following:
![]() General Settings—These options define the basic default features for indexes used by QuickFinder:
General Settings—These options define the basic default features for indexes used by QuickFinder:
![]() Index Type—Specifies the default index as either Crawled or File System.
Index Type—Specifies the default index as either Crawled or File System.
![]() Obey Robots.txt Exclusions When Crawling—Enable this option to have QuickFinder obey instructions in a Robots file. The
Obey Robots.txt Exclusions When Crawling—Enable this option to have QuickFinder obey instructions in a Robots file. The Robots.txt file enables a website administrator to specify URLs that should not be indexed by a search engine.
![]() Crawl Dynamic URLs (URLs Containing ’?’ ??? mh)—Enable this option if you want QuickFinder to crawl and index dynamically generated web pages as well as standard static web pages. Indexes are sometimes less effective with dynamic pages because the content can change at any time.
Crawl Dynamic URLs (URLs Containing ’?’ ??? mh)—Enable this option if you want QuickFinder to crawl and index dynamically generated web pages as well as standard static web pages. Indexes are sometimes less effective with dynamic pages because the content can change at any time.
![]() URLs Are Case Sensitive—Check this box if you want QuickFinder to distinguish between URLs that are different only in character case. Leaving this unchecked can help indexing duplicate information that comes from URLs that use different cases but point to the same information.
URLs Are Case Sensitive—Check this box if you want QuickFinder to distinguish between URLs that are different only in character case. Leaving this unchecked can help indexing duplicate information that comes from URLs that use different cases but point to the same information.
![]() Maximum Index Depth (Number of URL Hops or Sub-Directories from the Starting Point)—Specifies the maximum number of hypertext links from the starting URL that QuickFinder will follow before it stops indexing.
Maximum Index Depth (Number of URL Hops or Sub-Directories from the Starting Point)—Specifies the maximum number of hypertext links from the starting URL that QuickFinder will follow before it stops indexing.
![]() Maximum depth of off-site URLs (Number of hops away from defined web sites to crawl)—When QuickFinder encounters an external link as it is indexing a website, this option enables you to specify the number of hops away from the original site to pursue before it stops indexing.
Maximum depth of off-site URLs (Number of hops away from defined web sites to crawl)—When QuickFinder encounters an external link as it is indexing a website, this option enables you to specify the number of hops away from the original site to pursue before it stops indexing.
![]() Maximum File Size to Index (Bytes)—Specifies the largest file, in bytes, that QuickFinder will index.
Maximum File Size to Index (Bytes)—Specifies the largest file, in bytes, that QuickFinder will index.
![]() Maximum Time to Download a URL (Seconds)—Specifies the maximum time, in seconds, that QuickFinder will attempt to download a URL before it bypasses indexing of that URL.
Maximum Time to Download a URL (Seconds)—Specifies the maximum time, in seconds, that QuickFinder will attempt to download a URL before it bypasses indexing of that URL.
![]() Delay Between URL Requests (Milliseconds)—Specifies the amount of time QuickFinder should pause between requests for URLs that it is trying to index.
Delay Between URL Requests (Milliseconds)—Specifies the amount of time QuickFinder should pause between requests for URLs that it is trying to index.
![]() Encoding (If Not in META Tags)—Specifies the encoding to be used when indexing files that do not contain an encoding specification. Usually, HTML files will specify their encoding with a Content-Type META tag.
Encoding (If Not in META Tags)—Specifies the encoding to be used when indexing files that do not contain an encoding specification. Usually, HTML files will specify their encoding with a Content-Type META tag.
![]() Synchronization Settings—Enable this option if you want this index to be copied to other QuickFinder instances in the synchronization cluster.
Synchronization Settings—Enable this option if you want this index to be copied to other QuickFinder instances in the synchronization cluster.
![]() Rights-Based Search Results—These options enable you to restrict the ability to search sites with sensitive information. If users have rights to the restricted directory, they can perform a search against that data. If not, their request is denied:
Rights-Based Search Results—These options enable you to restrict the ability to search sites with sensitive information. If users have rights to the restricted directory, they can perform a search against that data. If not, their request is denied:
![]() Authorization Checking—To enable rights-based searches, select By Index and specify the file to be used in verifying user access. Make sure you assign the appropriate user rights to that file. For more information on NetWare file rights, see Chapter 7, “Users and Network Security.”
Authorization Checking—To enable rights-based searches, select By Index and specify the file to be used in verifying user access. Make sure you assign the appropriate user rights to that file. For more information on NetWare file rights, see Chapter 7, “Users and Network Security.”
![]() Unauthorized Hits Filtered By—Specify how unauthorized search requests are handled. Selecting Engine performs the index search, but will prevent users from seeing any of the restricted results without first logging in. Selecting Template will force users to log in before the index search will be performed.
Unauthorized Hits Filtered By—Specify how unauthorized search requests are handled. Selecting Engine performs the index search, but will prevent users from seeing any of the restricted results without first logging in. Selecting Template will force users to log in before the index search will be performed.
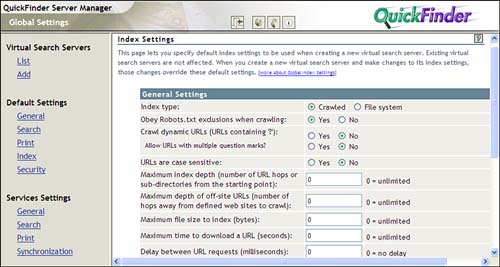
When you are done making changes, click Apply Settings.
Default security settings manage access to indexed content by requiring users to authenticate to a server before seeing rights-protected search results. The security default site settings are shown in Figure 14.12 and include the following:
![]() Rights-Based Search Results—These options enable you to configure search results based on the rights granted to the user who is performing the search:
Rights-Based Search Results—These options enable you to configure search results based on the rights granted to the user who is performing the search:
![]() Default Search Contexts—Specify default context(s) for QuickFinder to search for user information. This way, users have to provide only their common name and not their fully qualified User ID.
Default Search Contexts—Specify default context(s) for QuickFinder to search for user information. This way, users have to provide only their common name and not their fully qualified User ID.
![]() Check Authorization by Directory—Enabling this option lets QuickFinder speed up the authorization process by allowing a user who has rights to any file in a directory access to all files in that directory. This way, each file doesn’t have to be authorized separately.
Check Authorization by Directory—Enabling this option lets QuickFinder speed up the authorization process by allowing a user who has rights to any file in a directory access to all files in that directory. This way, each file doesn’t have to be authorized separately.
![]() Authentication Realm String—Defines the responsible authentication system accepted by QuickFinder. By default, QuickFinder will perform authentication itself, but you can set the Apache server authentication realm string in this field so users who authenticate to NetWare Enterprise web server won’t have to authenticate again when using QuickFinder to search and access protected information.
Authentication Realm String—Defines the responsible authentication system accepted by QuickFinder. By default, QuickFinder will perform authentication itself, but you can set the Apache server authentication realm string in this field so users who authenticate to NetWare Enterprise web server won’t have to authenticate again when using QuickFinder to search and access protected information.
![]() Connection Settings—These options provide additional security to web searches:
Connection Settings—These options provide additional security to web searches:
![]() Require HTTPS—Select Yes if you want to protect usernames and passwords via SSL as they are sent across the network or Internet.
Require HTTPS—Select Yes if you want to protect usernames and passwords via SSL as they are sent across the network or Internet.
![]() Auto-Logout Time (Minutes)—Specifies the amount of time, in minutes, that users can be idle before they are logged out of QuickFinder.
Auto-Logout Time (Minutes)—Specifies the amount of time, in minutes, that users can be idle before they are logged out of QuickFinder.

When you are done making changes, click Apply Settings.
Novell eGuide is a “white pages” application that provides a simple browser-based interface from which your employees can search through your LDAP directory (such as eDirectory) for all the people, places, and things they may need to locate.
eGuide may look like a standard address book, but it is completely platform and application independent. It can be accessed by any authorized user via a standard web browser.
You can use eGuide to search multiple LDAP data sources at the same time. This means that you can provide a unified view of data from disparate LDAP sources.
eGuide is also capable of launching secondary applications depending on the type of search a user runs. For example, When users find the people they are looking for, eGuide enables them to launch whatever type of communication fits their current needs—email, instant messaging, and even video conferencing.
Novell eGuide can be installed as an optional component during the OES NetWare installation, or it can be installed after the fact through iManager or the graphical server console.
To install eGuide using iManager, complete the following steps:
1. Insert the NetWare 6.5 SP3 CD 1 (Operating System) into your workstation.
2. Launch iManager and open Install and Upgrade in the Navigation frame.
3. Select Install NetWare 6.5 Products, and then click Remote Product Install in the Content frame.
4. At the Target Server screen, select the server to which you want to install eGuide and click Next. Authenticate as an Admin user for your eDirectory tree and click OK.
5. At the components screen, click Clear All and select only eGuide. Click Next.
6. At the Summary screen, click Copy Files. You will be prompted to insert the NetWare 6.5 SP3 CD 2 (Products). After the eGuide files are copied, click Close to complete the installation.
When the installation is complete, you are ready to configure eGuide for your particular environment.
Because eGuide is an LDAP client, it targets data and uses data from eDirectory and other LDAP-compliant data sources. To configure eGuide you must identify the LDAP data source and specify how eGuide will access it. For more information on configuring LDAP with eDirectory, see Chapter 6, “Novell eDirectory.”
There are three things you should know about your LDAP server configuration prior to configuring eGuide:
![]() Does it support Anonymous bind? Anonymous bind is an LDAP connection that does not contain a username or password. With eDirectory, an Anonymous bind provides access rights as
Does it support Anonymous bind? Anonymous bind is an LDAP connection that does not contain a username or password. With eDirectory, an Anonymous bind provides access rights as [Public]. Because [Public] cannot browse object attributes, this is typically too restrictive for eGuide use. However, you can grant [Public] restricted attribute browse rights, suitable for the basic eGuide searches you want to allow in this case. For information on granting eDirectory rights, see Chapter 7.
Warning
Granting rights to [Public] will, because of inheritance rules, grant those same rights to all eDirectory objects. This can have unintended consequences. A better solution is a Proxy user, described next.
![]() Does it provide a Proxy user? A Proxy user is a predefined user object, configured explicitly to provide the privileges required for an anonymous bind. With eDirectory, a Proxy user gives you the flexibility to offer an anonymous connection without potentially causing security problems by changing
Does it provide a Proxy user? A Proxy user is a predefined user object, configured explicitly to provide the privileges required for an anonymous bind. With eDirectory, a Proxy user gives you the flexibility to offer an anonymous connection without potentially causing security problems by changing [Public]. For more information on configuring a Proxy user, see Chapter 6.
![]() Does it use Transport Layer Security (TLS)? You need to know how the LDAP server handles secure connections. eDirectory 8.7 uses TLS, an open source Secure Socket Layer (SSL) implementation, to secure LDAP connections. For more information on configuring TLS with OES NetWare, see Chapter 6. If the LDAP server is configured to use a secure connection, you must enable eGuide to also use a secure connection.
Does it use Transport Layer Security (TLS)? You need to know how the LDAP server handles secure connections. eDirectory 8.7 uses TLS, an open source Secure Socket Layer (SSL) implementation, to secure LDAP connections. For more information on configuring TLS with OES NetWare, see Chapter 6. If the LDAP server is configured to use a secure connection, you must enable eGuide to also use a secure connection.
Beyond the LDAP information noted, users can authenticate using their own eDirectory user object. In this case, each user views objects and attributes through eGuide based upon the effective rights associated with their user object. For more information on configuring and calculating effective rights in eDirectory, see Chapter 7.
With this LDAP information in mind you can move forward with the configuration of eGuide.
Before using eGuide for the first time, you must run the Quick Setup Wizard. To do so, complete the following steps:
1. Open the eGuide Administration Utility by appending the eGuide path (/eGuide/admin/index.html) to the IP address or DNS name of the web server where eGuide was installed. For example:
https://www.quills.com/eGuide/admin/index.html
2. Click Quick Setup in the Navigation frame.
3. From the Welcome screen, click Next.
4. From the LDAP Data Source screen (see Figure 14.13), provide the required information and click Next:
![]() Display Name—Specify a descriptive name for the LDAP server that will be used by eGuide.
Display Name—Specify a descriptive name for the LDAP server that will be used by eGuide.
![]() Host name—Specify the DNS name, or IP address, of the LDAP server hosting the data source.
Host name—Specify the DNS name, or IP address, of the LDAP server hosting the data source.
![]() Port—Specify the port for LDAP communications. The default LDAP port is
Port—Specify the port for LDAP communications. The default LDAP port is 389 and should work unless you have changed the LDAP port on your LDAP server for some reason.
![]() Enable SSL—Select Enable SSL to instruct eGuide to communicate with the LDAP server through a secure TLS connection.
Enable SSL—Select Enable SSL to instruct eGuide to communicate with the LDAP server through a secure TLS connection.
![]() Secure port—Specify the port for secure LDAP communications. The default LDAP port is
Secure port—Specify the port for secure LDAP communications. The default LDAP port is 636 and should work unless you have changed the port on your LDAP server for some reason.
Note
TLS imposes a significant performance impact. If eGuide and eDirectory are both running on servers in the same secure domain, you might consider disabling TLS to get better performance.
5. (Optional) At the Authentication Proxy Credentials screen (see Figure 14.14), provide the required information and click Next:
![]() Authentication search root—Specify the location in the LDAP tree where eGuide should start looking to authenticate users attempting to use the eGuide service.
Authentication search root—Specify the location in the LDAP tree where eGuide should start looking to authenticate users attempting to use the eGuide service.
![]() Use Anonymous—Specifies that eGuide should use an Anonymous bind to perform its LDAP searches. This is not recommended.
Use Anonymous—Specifies that eGuide should use an Anonymous bind to perform its LDAP searches. This is not recommended.
![]() Authentication user name—Specifies the LDAP object name that eGuide should use to authenticate and perform its LDAP searches. You must use the full LDAP naming convention—for example,
Authentication user name—Specifies the LDAP object name that eGuide should use to authenticate and perform its LDAP searches. You must use the full LDAP naming convention—for example, cn=user,ou=provo,o-quills.
![]() Authentication password—Specifies the password for the LDAP object that eGuide uses to authenticate and perform its LDAP searches. This will typically be a proxy account configured with rights sufficient for eGuide to do its job.
Authentication password—Specifies the password for the LDAP object that eGuide uses to authenticate and perform its LDAP searches. This will typically be a proxy account configured with rights sufficient for eGuide to do its job.
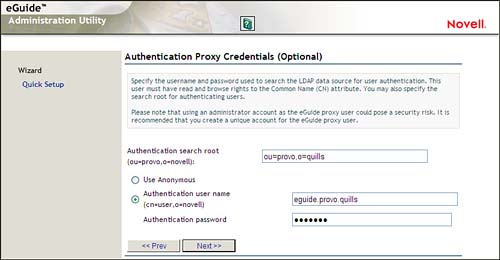
6. In the Administration Roles screen, specify all, or a portion, of the user object that will administer eGuide and click Search.
7. Select the administrative object in the Available pane and click the right arrow to move it to the Selected pane, and click Next.
8. Click Finished to complete the Quick Setup.
When the initial configuration is complete, you can use the eGuide Administration Utility to further configure and customize eGuide. However, further configuration is typically not required to begin to use eGuide. For more information on additional eGuide configuration, see the OES online documentation.
After eGuide is configured, accessing it to perform LDAP searches is simple. Open the eGuide search utility by appending eGuide to the IP address or DNS name of the web server where eGuide was installed. For example:
https://www.quills.com/eGuide
You will be required to authenticate using your regular eDirectory username and password. Upon successful authentication you will see the eGuide search page, as shown in Figure 14.15.
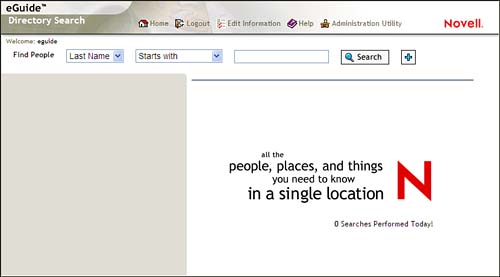
From this page you can search for any user objects to which you have rights, as defined in eDirectory.
OES NetWare includes several other pieces to the web services puzzle, including MySQL database, OpenSSH, and scripting support through Perl and PHP. Although an in-depth discussion of these utilities is beyond the scope of this book, a brief introduction to these services and their capabilities is in order.
MySQL is an open source SQL (Structured Query Language) database. It is easy to install and use, but offers exceptional power, security, and scalability. In fact, because of its small size and speed, it is an ideal platform for delivering database capabilities to your websites—and because it’s an open source application, and free with OES NetWare, the potential return on investment (ROI) doesn’t get much better.
MySQL runs on a wide variety of operating systems other than NetWare, making it ideal for today’s heterogeneous network environments. You don’t have to learn different database systems just because you have different platforms. MySQL platforms include, in addition to NetWare, Microsoft Windows NT/2000, Linux, Sun Solaris, IBM AIX, FreeBSD, OS/2, and others.
MySQL can be installed during the OES NetWare installation or anytime thereafter through iManager or the GUI server console.
OpenSSH is an open source encryption service that has been integrated with OES NetWare. It leverages the Novell International Cryptographic Infrastructure (NICI) to provide a secure shell suitable for both administrators and users who need to access their NetWare servers in a way that provides secure access and data transmission.
For example, network admins can use OpenSSH to copy files to and from any server in their networks. Users can securely access and copy files to and from their home directories or any other directory to which they have rights. OpenSSH makes all of this possible without using a web browser or any NetWare-specific client.
To do this, OpenSSH provides secure versions of several common file transfer protocols that use unencrypted transmission channels and clear text passwords that pose a significant security risk. OpenSSH offers SFTP to replace FTP, SSH to replace Telnet and Rlogin, and SCP to replace RCP. There are several SSH-compatible client utilities that you can choose from, including PuTTy, RedHat Linux OpenSSH clients, Absolute Telnet, and MindTerm, to name a few.
OpenSSH can be installed during the OES NetWare installation or anytime thereafter through iManager or the GUI server console. Novell recommends that you install Apache Web Server on your OES NetWare server prior to installing OpenSSH.
Common Gateway Interface (CGI) scripting is the most common way for a web server to interact with users. It provides the capability to create dynamic content and increase the sophistication and functionality of your web pages.
In addition to the web application, scripting is also a valuable tool for automating network administrative functions and parsing and generating reports based on network activities. Because of this, Novell offers multiple scripting languages with OES NetWare, with the goal of not making you learn yet another coding method to get your job done.
The most commonly recognized of Novell’s scripting languages, outside of the NetWare world, are Perl (Practical Extraction and Report Language) and PHP (Hypertext Preprocessor).
Perl is an open source language that was originally created specifically to process text. Because of this, it is particularly good at text parsing and report generation. It is also very good at web page generation and task automation.
PHP is a server-side HTML-embedded scripting language. It can be used to create dynamic web pages, collect form data, and receive cookie information. It can also be used for talking to other services through protocols such as IMAP, SNMP, and HTTP. PHP supports a wide range of web servers and databases, but it is most commonly used with Apache Web Server and MySQL. This makes it a natural choice for the OES NetWare web services environment.
Both Perl and PHP support for OES NetWare is provided in the Novell Developer Kit (NDK) that is included with OES NetWare. For more information on the NDK, see the OES NetWare online documentation, and visit http://developer.novell.com/ndk.