![]() Two Novell Clients are available: one for Windows 9x and one for Windows XP/2000. Novell Client files may be downloaded from http://download.novell.com and installed directly, or copied to any convenient location, such as a network server, for installation by any client with existing network access.
Two Novell Clients are available: one for Windows 9x and one for Windows XP/2000. Novell Client files may be downloaded from http://download.novell.com and installed directly, or copied to any convenient location, such as a network server, for installation by any client with existing network access.
![]() Use the Novell Client Upgrade Agent to check periodically for updated client files. When found, the Upgrade Agent automatically starts the client upgrade routine.
Use the Novell Client Upgrade Agent to check periodically for updated client files. When found, the Upgrade Agent automatically starts the client upgrade routine.
![]() If you are upgrading multiple existing Novell or Microsoft clients for OES NetWare, you can use the Automatic Client Upgrade (ACU) feature to automate this process. Place ACU commands in a profile or container login script to detect whether the client software needs to be installed, and then the ACU updates the workstation automatically, if necessary, when the user logs in.
If you are upgrading multiple existing Novell or Microsoft clients for OES NetWare, you can use the Automatic Client Upgrade (ACU) feature to automate this process. Place ACU commands in a profile or container login script to detect whether the client software needs to be installed, and then the ACU updates the workstation automatically, if necessary, when the user logs in.
![]() To install the Novell Client from a web server, copy the client files to the web server and use the WriteIP utility to create a
To install the Novell Client from a web server, copy the client files to the web server and use the WriteIP utility to create a SETUPIP executable that will download the Novell Client install files from the web server and launch the client install routine.
![]() After the Novell Client is installed, you can configure it by using the Novell client property pages. Right-click on the red N icon in the system tray and select Novell Client Properties.
After the Novell Client is installed, you can configure it by using the Novell client property pages. Right-click on the red N icon in the system tray and select Novell Client Properties.
![]() To configure the login for a Novell client user, create a login script. Login scripts can be associated with container, profile, and user objects. A login script can control what happens when a user logs into your Novell network. For information and syntax on login scripts, see Appendix B, “NetWare Login Scripts.”
To configure the login for a Novell client user, create a login script. Login scripts can be associated with container, profile, and user objects. A login script can control what happens when a user logs into your Novell network. For information and syntax on login scripts, see Appendix B, “NetWare Login Scripts.”
![]() The NetIdentity agent, available only with the Novell client for Windows XP/2000, provides single sign-on across all Novell services that use eDirectory authentication.
The NetIdentity agent, available only with the Novell client for Windows XP/2000, provides single sign-on across all Novell services that use eDirectory authentication.
![]() In order to use NetIdentity, the first service with which a user authenticates must be NetIdentity-enabled.
In order to use NetIdentity, the first service with which a user authenticates must be NetIdentity-enabled.
![]() Install the NetIdentity agent from the NetIdentity directory that is created when you extract the Novell Client.
Install the NetIdentity agent from the NetIdentity directory that is created when you extract the Novell Client.
![]() The Novell International Cryptographic Infrastructure (NICI) Client v2.6 ships with OES NetWare. The NICI client () provides cryptographic services to all client-side applications and services, including Deployment Manager, Native File Access, Novell Modular Authentication Service (NMAS), and Certificate Server.
The Novell International Cryptographic Infrastructure (NICI) Client v2.6 ships with OES NetWare. The NICI client () provides cryptographic services to all client-side applications and services, including Deployment Manager, Native File Access, Novell Modular Authentication Service (NMAS), and Certificate Server.
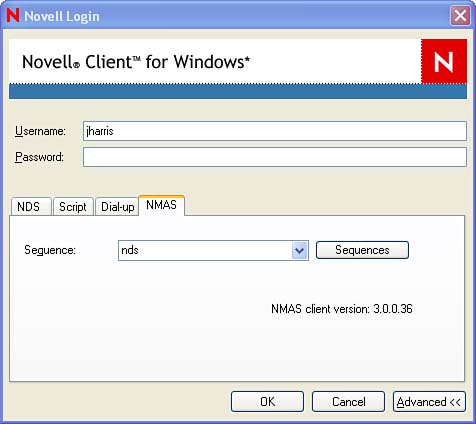
![]() Novell Modular Authentication Services (NMAS) enable you to supplement or replace the traditional Novell password authentication mechanism with alternative mechanisms, such as smart cards, tokens, and biometrics.
Novell Modular Authentication Services (NMAS) enable you to supplement or replace the traditional Novell password authentication mechanism with alternative mechanisms, such as smart cards, tokens, and biometrics.
![]() The NMAS client provides a framework within which authentication methods can be configured and integrated with Novell eDirectory to provide a flexible and seamless authentication process.
The NMAS client provides a framework within which authentication methods can be configured and integrated with Novell eDirectory to provide a flexible and seamless authentication process.
![]() The NMAS client can be installed from the Novell Clients CD-ROM.
The NMAS client can be installed from the Novell Clients CD-ROM.
![]() Native File Access supports Windows CIFS, Apple AFP, and Unix/Linux NFS.
Native File Access supports Windows CIFS, Apple AFP, and Unix/Linux NFS.
![]() Native File Access is a core service of OES NetWare, and is installed automatically during the OES NetWare installation.
Native File Access is a core service of OES NetWare, and is installed automatically during the OES NetWare installation.
![]() Novell frequently updates its client software.
Novell frequently updates its client software.
![]() Check on Novell’s Support Website’s software download page at http://download.novell.com/ for the latest versions of the NetWare clients.
Check on Novell’s Support Website’s software download page at http://download.novell.com/ for the latest versions of the NetWare clients.
On a NetWare network, workstations traditionally use special Novell client software to access NetWare servers. (Workstations are often called clients because they request services from the network.) This client software enables the workstation to communicate with the network. However, NetWare OES continues Novell’s steady move away from a monolithic client, and toward clientless services and small service-specific clients. Web-based management, iFolder, iPrint, and Native File Access are just a few ways that NetWare OES enables you to move your network in this direction.
This doesn’t mean the Novell client is no longer necessary. The Novell client is still required for advanced authentication options and many administrative tasks associated with NetWare and Novell eDirectory. So, although you might not automatically install the Novell client on every workstation, you will still want to keep it around for several aspects of your network’s operation.
This chapter explains how to install and configure the traditional Novell client software. It also describes how to use the legacy ACU feature to simplify the process of upgrading numerous workstations to the latest OES NetWare client software and how to remove the client software, should that become necessary.
Note
Novell no longer offers a client for DOS or Windows 3.1x. Similarly, the NetWare client for Macintosh, available alternatively through Novell and third-party partners, is no longer available. However, OES NetWare supports Mac users through Native File Access, described later in this chapter.
In addition to the traditional Novell client software, Novell offers other modular client pieces with OES NetWare. These include the NICI client, the NMAS client, and the NetIdentity client. This chapter presents overviews and installation procedures for these client pieces. This chapter also discusses Novell’s Native File Access, a clientless file access option for OES NetWare that can eliminate the need for the traditional NetWare client for some network users.
The Novell client installation program automatically copies all necessary NetWare files to the workstation and edits any configuration files that require modification. To have full administrative capabilities on the NetWare network, you must use the Novell client.
You can choose one of three methods for installing the Novell client on your workstation:
![]() Download and install the Novell Client from http://download.novell.com. Periodically, Novell releases updated clients with new features, so the client files on the Internet may be newer than those versions described here. It’s a good idea to check this location occasionally for updates.
Download and install the Novell Client from http://download.novell.com. Periodically, Novell releases updated clients with new features, so the client files on the Internet may be newer than those versions described here. It’s a good idea to check this location occasionally for updates.
![]() Install the Novell client from a web server.
Install the Novell client from a web server.
![]() Upgrade existing workstations with the Novell Client Update Agent.
Upgrade existing workstations with the Novell Client Update Agent.
Novell offers a Novell Client for Windows XP/2000 (currently v4.91) and for Windows 9x (currently v3.4). The installation procedure for both versions is identical, so you can use the installation, configuration, and removal instructions regardless of the version of Windows you are running.
For either platform, if you are installing a new client, you need an Internet connection to download the Novell client install files for the first time. If you’re upgrading an existing workstation that already has a connection to the network, you can run the installation program from a network directory instead.
To install the Novell client software on a Windows workstation, complete the following steps:
Note
You can use the following procedure whether you’re installing a new network workstation or upgrading an existing one. If you are upgrading an existing workstation, the installation program will detect existing settings (such as the protocol used, the network board, and optional features) and use those same settings as the default settings for the upgraded workstation.
1. (Conditional) If necessary, install a network board in the workstation according to the manufacturer’s documentation and connect the workstation to the network. It’s a good idea to record the board’s configuration settings, such as its interrupt and port address.
2. (Optional) If you are planning to upgrade a workstation and want to run the installation program from the network, create a directory called CLIENT under SYS:PUBLIC, and extract the contents of the Novell Client Zip file to the newly created network directory.
Note
You can create the CLIENT directory on any NetWare volume, but make sure users have Read and File Scan rights to the folder so that they can locate the installation files. For more information on file system rights, see Chapter 7, “Users and Network Security.”
3. Run SETUPNW.EXE (Windows XP/2000) or SETUP.EXE (Windows 9x).
4. Specify either Typical or Custom installation and click Install. If you select Custom, continue with step 8. If you choose the Typical installation, skip to step 13. The Typical installation configures the Novell client as follows:
![]() The Typical installs only the Novell client files, the NICI client, and the NMAS client. If you want to install optional components such as NDPS, Novell Workstation Manager, and ZENworks Application Launcher, use the Custom installation.
The Typical installs only the Novell client files, the NICI client, and the NMAS client. If you want to install optional components such as NDPS, Novell Workstation Manager, and ZENworks Application Launcher, use the Custom installation.
![]() Both IP and IPX protocols
Both IP and IPX protocols
![]() Directory-based authentication (eDirectory)
Directory-based authentication (eDirectory)
5. Select the client components you want to install and click Next. If the installation program detects that any of these options are already installed on this workstation, those options will be checked.
6. Select the additional products you want to install and click Next:
![]() Novell Modular Authentication Services (NMAS)—The NMAS client provides advanced authentication options to the standard Novell client. The NMAS client is discussed later in this chapter.
Novell Modular Authentication Services (NMAS)—The NMAS client provides advanced authentication options to the standard Novell client. The NMAS client is discussed later in this chapter.
![]() NetIdentity Agent—The NetIdentity agent automates authentication to popular Novell services. NetIdentity is discussed later in this chapter.
NetIdentity Agent—The NetIdentity agent automates authentication to popular Novell services. NetIdentity is discussed later in this chapter.
7. Choose the network protocol(s) to support and click Next:
![]() IP only—Installs only the IP protocol. The workstation will be able to communicate only with IP servers and will not be able to communicate with IPX servers.
IP only—Installs only the IP protocol. The workstation will be able to communicate only with IP servers and will not be able to communicate with IPX servers.
![]() IP with IPX Compatibility—Installs the IP protocol, but enables the workstation to communicate with IPX networks if the servers have IPX compatibility mode and a migration agent installed.
IP with IPX Compatibility—Installs the IP protocol, but enables the workstation to communicate with IPX networks if the servers have IPX compatibility mode and a migration agent installed.
![]() IP and IPX—Installs both protocols, enabling the workstation to communicate with either type of server.
IP and IPX—Installs both protocols, enabling the workstation to communicate with either type of server.
![]() IPX—Installs only the IPX protocol, enabling the workstation to communicate with IPX servers, but not directly with IP servers.
IPX—Installs only the IPX protocol, enabling the workstation to communicate with IPX servers, but not directly with IP servers.
8. Choose NDS and click Next. Choose a Bindery connection only if NetWare 3 is the primary server environment.
9. (Conditional) If you selected Workstation Manager as a component to install, enter the eDirectory tree to be used by Workstation Manager and click Next.
10. Click Finish to complete the installation. The installation program will automatically detect and load most LAN drivers for common network adapters. If it cannot detect your network board, it will prompt you to select one. You need to specify the location of the driver your network adapter requires.
11. At the Installation Complete screen, click Reboot to restart the workstation and load the Novell client.
When the workstation reboots, it automatically connects to the network and presents you with a login screen.
To remove the Novell client software from a Windows workstation, use the Network control panel. The Novell client uninstall will remove all client components from the workstation, but it will leave behind a minimal footprint in the Windows Registry. That way, if you reinstall the client at a later time, the installation program can automatically load the same settings that were used previously.
To remove the Novell client from Windows XP/2000, complete the following steps:
1. Open the Network control panel by right-clicking My Network Places and selecting Properties.
2. Right-click Local Area Connection and then select Properties.
3. Select the Novell Client for Windows entry from the list of installed network services and click Uninstall.
4. Click Yes to confirm your decision.
5. Reboot the workstation to complete the client removal.
To remove the Novell client from Windows 9x, complete the following steps:
1. Open the Network Control Panel applet by selecting Start, Settings, Control Panel and then selecting Network. Alternatively, you can access this utility by right-clicking Network Neighborhood, Properties.
2. Select Novell NetWare Client from the list of installed network services and click Remove.
3. Click Yes to confirm your decision.
4. Reboot the workstation to complete the client removal.
Note
You can also remove the client from the Control Panel by selecting the Add/Remove Programs option, selecting Novell Client for Windows, and then clicking Remove. You will still have to reboot to complete the removal of the client software.
After the has rebooted, the removal of the Novell client is complete.
You can now set up a Novell client installation from any web server by completing the following steps:
1. Copy the complete WINNT or WIN95 directory structure to the location you want on the web server. This structure is created when you extract the Novell client files from the Zip file downloaded from http://download.novell.com. You can place the files on up to five web servers to provide faster access.
2. Run WRITEIP.EXE. Using the WriteIP utility, you can create a small executable called SETUPIP that downloads the Novell client install files from a web server IP address and launches the Novell client install routine. There are versions for both Windows 9x and Windows XP/2000, and for all supported Novell client languages:
![]() Windows XP/2000—
Windows XP/2000—WRITEIP.EXE is located in WINNTi386admin.
![]() Windows 9x—
Windows 9x—WRITEIP.EXE is located in WIN95IBM_<lan>ADMIN where <lan> is one of the languages supported by the Novell client.
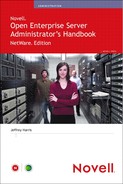
3. In the WriteIP utility (see Figure 3.1), provide the necessary information and click OK:
![]() Specify the IP address(es) or DNS name(s) of the web server(s) that host the Novell client files, and the full path to the client files—for example:
Specify the IP address(es) or DNS name(s) of the web server(s) that host the Novell client files, and the full path to the client files—for example:
http://www.quills.com/nwclient
Web servers will be checked in the order listed until a connection is made.
![]() Select Choose IP Address at Random to help balance the load of the Novell client downloads across all participating web servers.
Select Choose IP Address at Random to help balance the load of the Novell client downloads across all participating web servers.
![]() Specify download options for the client installation. Files can be downloaded to a temporary or a specific directory.
Specify download options for the client installation. Files can be downloaded to a temporary or a specific directory.
Figure 3.1. The WriteIP utility is used for creating a setup application for installing the Novell client from a web server.
Unchecking Delete Install Files After Install Is Complete will leave the Novell client installation files on the workstation after the installation is complete.
Download Only New and Updated Files limits the download to only those files newer than what the user already has, thereby reducing the size of the download.
Allow User to Change the Download Directory enables the user to specify the copy location of the Novell client files and change the default location.
![]() Specify the client install launch options. The Service Pack Install option enables you to add service pack files to the web installation as Novell releases them. Both the new client software and any service pack software are downloaded and will be installed if needed.
Specify the client install launch options. The Service Pack Install option enables you to add service pack files to the web installation as Novell releases them. Both the new client software and any service pack software are downloaded and will be installed if needed.
Automatic Client Upgrade permits the client install to run only if the Novell client software being installed is a later version than the one currently installed on the workstation.
![]() Specify an unattend configuration file to automate the installation routine fully. For more information on creating this file, see the section “Novell Client Install Manager,” later in this chapter.
Specify an unattend configuration file to automate the installation routine fully. For more information on creating this file, see the section “Novell Client Install Manager,” later in this chapter.
SETUPIP.EXE will be created based on the options you have selected. You can then distribute SETUPIP.EXE from a corporate website, through email, or by whatever method is most convenient.
When a user launches SETUPIP.EXE, the Novell client software will be downloaded from the specified web server, and the client installation routine will run.
There are a couple of options for upgrading workstations with existing Novell client installations. You have the option of automatically checking for updates and running fully or partially automated upgrade routines for your users, depending on their needs.
The Novell client platform-specific installation utilities each read a configuration file to install and configure the various properties of the client properly. This file is stored in the same folder as the installation utility and provides information such as where to copy drivers during installation and the most recent version number. This configuration file is configurable through the Novell Client Install Manager (NCIMan).
Note
For Windows 9x workstations, options that were previously stored in NWSETUP.INI or were made available from the command line in previous versions of Novell client are now configured through NCIMan.
To create or modify a configuration file with NCIMan, complete the following steps:
1. Copy the complete WINNT or WIN95 directory structure to the server from which users will access the client files. This structure is created when you extract the Novell client files from the Zip file downloaded from http://download.novell.com.
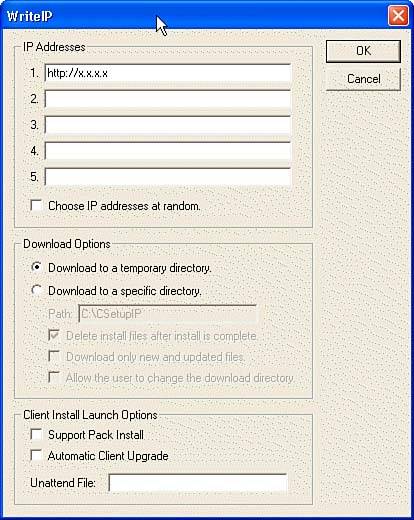
2. Launch Novell Client Install Manager (see Figure 3.2):
![]() Windows XP/2000—
Windows XP/2000—NCIMAN.EXE is located in WINNTi386admin.
![]() Windows 9x—
Windows 9x—NCIMAN.EXE is located in WIN95IBM_<lan>ADMIN where <lan> is one of the languages supported by the Novell client.
3. Click the New button.
4. Specify the platform for which you are creating a configuration file and click OK.
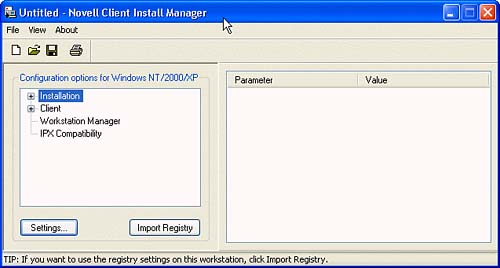
5. Double-click Installation in the left pane. Make your installation option choices and click OK. Each of the installation pages contains a list of the configurable parameters for the various Novell client components (see Figure 3.3).
Any installation options different than the default selections will be listed in the right pane of NCIMan.
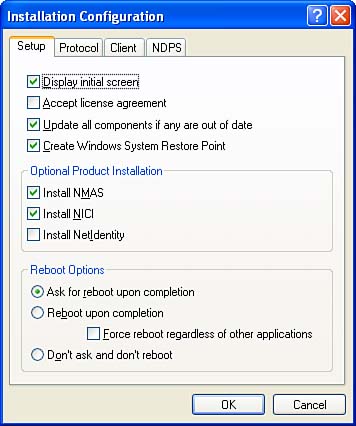
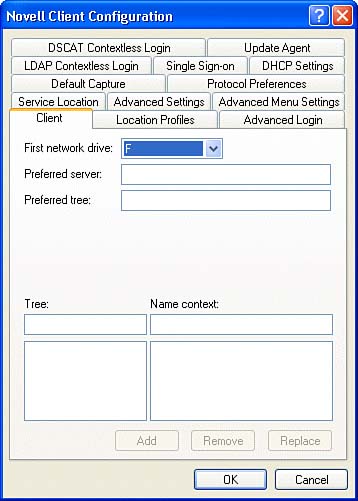
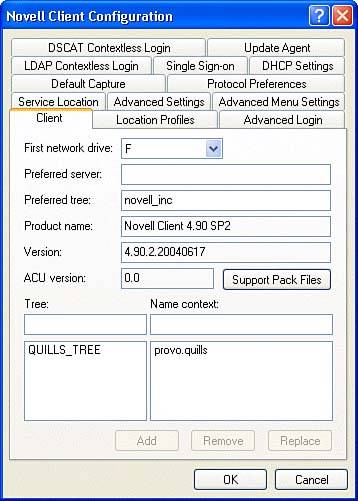
6. Double-click Client in the left pane to open the Client tab in the Installation Configuration (see Figure 3.4). From this page you can configure how, or whether, each client component will be installed.
Note
If you have previously installed the Novell client with all the installation and client property options you want, NCIMan can read that information from the Windows Registry if you select Import Registry from the main NCIMan screen.
7. After you have selected all the installation and configuration options you want, click the Save button. You can save the configuration file with any name you want. Make sure you save the file in the same directory as the SETUP.EXE (Windows 9x) or SETUPNW.EXE (Windows XP/2000) file that will run to install the client:
![]() Windows 9x—
Windows 9x—win95ibm_language
![]() Windows NT/XP/2000—
Windows NT/XP/2000—winnti386
After the configuration file has been saved, it can be used as the Unattend file for performing an unattended client installation or upgrade. This option can be used with web server installations, the Novell Client Upgrade Agent, and Automatic Client Upgrades, all discussed previously in this chapter.
The Novell Client Upgrade Agent simplifies client upgrades by enabling you to schedule periodic checks for updated client software. The Upgrade Agent will query a specified location for a newer Novell client. If one is found, the install routine will start automatically.
To configure the Novell Client Upgrade Agent, complete the following steps:
1. Create an unattended configuration file with the NCIMan, as discussed previously in this chapter.
2. To configure the Upgrade Agent, right-click the Novell N icon in the system tray and select Novell Client Properties.
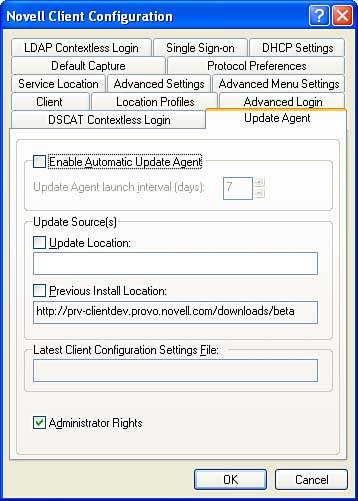
3. Select the Update Agent tab (see Figure 3.5).
Figure 3.5. Novell Client Update Agent configuration options, available from Novell Client Properties.
4. Configure the Update Agent and click OK when you’re finished:
![]() Select Enable Automatic Update Agent and specify the launch interval, which defines how often, in days, the Update Agent will check for updated client files.
Select Enable Automatic Update Agent and specify the launch interval, which defines how often, in days, the Update Agent will check for updated client files.
![]() Specify the source location for the Novell client upgrade files. You can use the previously defined location, specify a new file location, or specify a web page for the client download if you have created one (see the section “Installing from a Web Server,” previously in this chapter).
Specify the source location for the Novell client upgrade files. You can use the previously defined location, specify a new file location, or specify a web page for the client download if you have created one (see the section “Installing from a Web Server,” previously in this chapter).
![]() Specify the location and name of the Unattend file if one has been created. For more information on unattended configuration files, see the section “Novell Client Install Manager,” earlier in this chapter.
Specify the location and name of the Unattend file if one has been created. For more information on unattended configuration files, see the section “Novell Client Install Manager,” earlier in this chapter.
![]() (Optional) Select Suppress Update Prompt to perform the update without prompting the users.
(Optional) Select Suppress Update Prompt to perform the update without prompting the users.
![]() (Optional) Select Support Pack Update to have the Update Agent check for client support packs in addition to full software updates.
(Optional) Select Support Pack Update to have the Update Agent check for client support packs in addition to full software updates.
![]() (Optional) Select Administrator Rights to grant the client install administrator rights, which are required to install the client, even if the user who is logged in is not an administrator on the workstation. This option is checked by default.
(Optional) Select Administrator Rights to grant the client install administrator rights, which are required to install the client, even if the user who is logged in is not an administrator on the workstation. This option is checked by default.
After these steps are completed, you can use the Novell Client Update Agent to query for and update Novell client software automatically on your workstations. When enabled, Update Agent can also be run manually by right-clicking the Novell N in the Windows system tray and selecting Update Novell Client.
Although the Client Upgrade Agent has largely replaced this functionality, Novell still offers the ACU feature to automate the upgrade of multiple existing workstations to the latest Novell client. With the ACU, you place ACU commands in a container login script to detect whether the client software needs to be installed, and then the ACU updates the workstation automatically, if necessary, when the user logs in. For more information on login scripts, see Appendix B.
The ACU feature works best in situations when your workstations have similar configurations, because you define a common set of instructions for updating all the workstations in the same way.
To use the ACU process to upgrade a workstation to the Novell client, complete the following steps:
1. Copy the complete WINNT or WIN95 directory structure to the server from which users will access the client files. This structure is created when you extract the Novell client files from the Zip file downloaded from http://download.novell.com.
Note
You can create the CLIENT directory on any NetWare volume, but make sure users have Read and File Scan rights to the folder so that they can locate the installation files. For more information on file system rights, see Chapter 7.
2. (Conditional) If you want to create an install routine that doesn’t require any user input, use NCIMan to create an UNATTEND.TXT file, as discussed previously in this chapter. Save the UNATTEND.TXT file in the same directory from which users will run SETUP.EXE or SETUPNW.EXE to install the new Novell client. If you use a platform-specific configuration file to configure the Novell client and you are using ACU.EXE, you must change the [UNATTENDFILE] option to Yes in the ACU.INI file, found in the WINNTi386 directory.
3. Use iManager to add the following to the container login script for those users whom you want to receive the updated client. These commands support both Windows 9x and Windows XP/2000 clients:
IF OS = "WINNT" THEN
@\SERVERNAMEVOLNAME...SETUPNW.EXE /ACU /u:UNATTEND.TXT
END
IF OS = "WIN95" THEN
@\SERVERNAMEVOLNAME...SETUP.EXE /ACU /u:UNATTEND.TXT
END
Tip
For Windows 9x workstations only, you can back up the old client configuration instead of just replacing it with the new client software. To do this, add the option /RB (for rollback) to the end of this command. This option will copy the current software configuration to NOVELLCLIENT32NWBACKUP. If this does not work, you can also use ROLLBACK.EXE to accomplish the same thing.
4. When the login script executes during a user login, the appropriate setup program will check the Windows Registry on the destination workstation to see exactly which version of the client is currently running. The setup routine will run only if the workstation’s Registry indicates a Novell client version older than the version to be installed.
Tip
If you need to reinstall the same client version on a workstation, you can use NCIMan to modify the Major or Minor INTERNAL version of the client so that it looks to the setup routine as if the client is newer than that previously installed. The version setting is stored in the UNATTEND.TXT file.
The next time the users in the group log in, their workstations will be upgraded automatically to the new Novell client. For more information on ACU options, see the Novell online documentation.
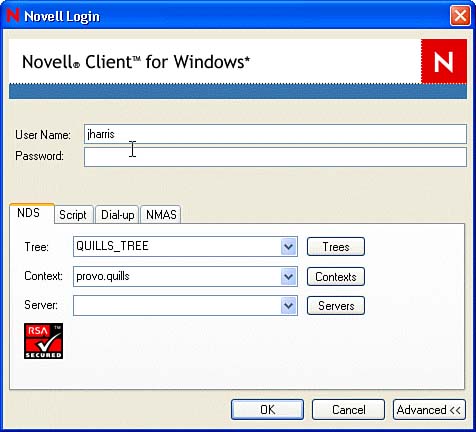
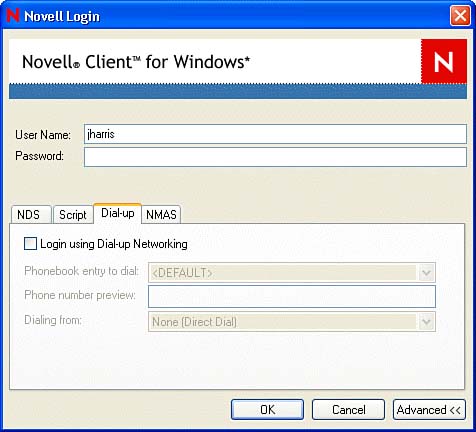
After the Novell client has been installed, you can view and set login options from the Novell Login by clicking the Advanced button, as shown in Figure 3.6.
Note
The Windows tab, not shown in Figure 3.6, is available only prior to logging in to Windows. From this tab, you can specify the Windows username and workstation name that will be used by the Novell client to log you transparently in to the workstation as part of the NetWare login process.
The NDS tab, as shown in Figure 3.6, enables you to specify the eDirectory tree, name context, and server to use during login. All users should specify their eDirectory tree and name context. A server is not generally required, but must be specified when connecting to a NetWare 3 server or when you are trying to log in to a specific server.
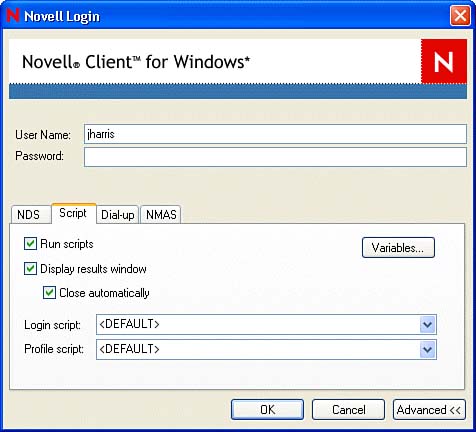
The Script tab (see Figure 3.7) is used to manage the execution of login scripts. It enables you to specify whether to run scripts, whether to display the login results window (and close it automatically), and which profile and user login scripts to execute. The Variables button enables you to specify values for any script variables that might be included in the login scripts.
The Dial-up tab (see Figure 3.8) is used only when a user is connecting to the network via a modem connection. It enables you to configure a client to dial in to the network automatically whenever a user attempts to log in. The Dial-up tab taps into the Windows Dial-Up Networking information. You can select a dialing entry from the Windows phone book and a Windows dialing location profile. This option is used only rarely.
After you have installed the Novell client software, you can configure the client software by modifying its properties. The client properties enable you to specify information such as login preferences, protocol settings, default capture settings, and so on. To open the client property pages, right-click the red N icon in the system tray and click Novell Client Properties (see Figure 3.10).
There are several configuration pages available in Novell client properties (for detailed information on Novell client property pages, see Appendix A, “Novell Client Properties”):
![]() Client—The Client page enables you to define basic login preferences, similar to the NDS tab in the Novell Login screen.
Client—The Client page enables you to define basic login preferences, similar to the NDS tab in the Novell Login screen.
![]() Location Profiles—Location Profiles enable you to save a specific login configuration so that users don’t have to enter login information manually. Location profiles are especially powerful for users who log in from multiple locations (such as the office, home, laptop, and so on).
Location Profiles—Location Profiles enable you to save a specific login configuration so that users don’t have to enter login information manually. Location profiles are especially powerful for users who log in from multiple locations (such as the office, home, laptop, and so on).
![]() Advanced Login—Advanced Login options enable you to hide certain aspects of the Novell Login screen to prevent users from making changes.
Advanced Login—Advanced Login options enable you to hide certain aspects of the Novell Login screen to prevent users from making changes.
![]() Service Location—The Service Location page is used to configure the client for the use of Service Location Protocol (SLP). You can specify where and how the client will request network services. For more information on SLP, see the OES NetWare documentation.
Service Location—The Service Location page is used to configure the client for the use of Service Location Protocol (SLP). You can specify where and how the client will request network services. For more information on SLP, see the OES NetWare documentation.
![]() Advanced Settings—Advanced Settings enable you to configure a host of network communications details. For more information on the Advanced settings options, see Appendix A.
Advanced Settings—Advanced Settings enable you to configure a host of network communications details. For more information on the Advanced settings options, see Appendix A.
![]() Advanced Menu Settings—Advanced Menu Settings gives you full control over the client network environment, including which network resources are available and how they are offered to the network user.
Advanced Menu Settings—Advanced Menu Settings gives you full control over the client network environment, including which network resources are available and how they are offered to the network user.
![]() Default Capture—Default Capture enables you to configure a user’s NetWare print jobs.
Default Capture—Default Capture enables you to configure a user’s NetWare print jobs.
![]() Protocol Preferences—Protocol Preferences enable you to define the usage order for network protocols and name resolution protocols. The listed protocols are used in the order specified.
Protocol Preferences—Protocol Preferences enable you to define the usage order for network protocols and name resolution protocols. The listed protocols are used in the order specified.
![]() LDAP Contextless Login—LDAP Contextless Login enables contextless login without requiring the support of a catalog on the back end. When a user authenticates, LDAP is used to search the entire eDirectory tree, or trees, for the specified username. If a username is found, the login process will continue based on the tree and context information associated with that user. If the same username exists in multiple contexts, the user is prompted to select the correct user.
LDAP Contextless Login—LDAP Contextless Login enables contextless login without requiring the support of a catalog on the back end. When a user authenticates, LDAP is used to search the entire eDirectory tree, or trees, for the specified username. If a username is found, the login process will continue based on the tree and context information associated with that user. If the same username exists in multiple contexts, the user is prompted to select the correct user.
![]() (Conditional) Single Sign-on—Novell client for Windows XP/2000 adds the Single Sign-on tab. This enables you to store the workstation-specific password in eDirectory so that it can be automatically presented as part of an NMAS or single sign-on authentication, if available.
(Conditional) Single Sign-on—Novell client for Windows XP/2000 adds the Single Sign-on tab. This enables you to store the workstation-specific password in eDirectory so that it can be automatically presented as part of an NMAS or single sign-on authentication, if available.
![]() (Conditional) DHCP Settings—Novell client for Windows XP/2000 adds the DHCP settings to configure the client DHCP environment.
(Conditional) DHCP Settings—Novell client for Windows XP/2000 adds the DHCP settings to configure the client DHCP environment.
![]() DSCAT Contextless Login—DSCAT Contextless Login specifies the use of an eDirectory catalog for login. This enables users to authenticate using their common name only, rather than having to remember their entire name context. LDAP contextless login is recommended over this option.
DSCAT Contextless Login—DSCAT Contextless Login specifies the use of an eDirectory catalog for login. This enables users to authenticate using their common name only, rather than having to remember their entire name context. LDAP contextless login is recommended over this option.
![]() Update Agent—Update Agent configures Novell Client Upgrade Agent options, as discussed earlier in this chapter.
Update Agent—Update Agent configures Novell Client Upgrade Agent options, as discussed earlier in this chapter.
With these client pages you have granular control over the operation of the Novell client.
The NetIdentity agent leverages what is known as the XTier framework used with NetStorage, Apache, and Tomcat services to provide single sign-on across all Novell services that use eDirectory authentication. The only caveat to this is that the first service with which a user authenticates must be NetIdentity-enabled. The list of NetIdentity-enabled services includes the following:
![]() Novell client (v3.4x for Windows 9x, and v4.9x for Windows XP/2000)
Novell client (v3.4x for Windows 9x, and v4.9x for Windows XP/2000)
![]() iFolder 2.x
iFolder 2.x
![]() iPrint
iPrint
![]() NetStorage
NetStorage
![]() Novell Portal Services
Novell Portal Services
After you have authenticated with one of these services, accessing any other service, such as iManager, that uses eDirectory authentication will prompt a transparent, background authentication so that you aren’t required to reenter your authentication information.
To enable NetIdentity-based single sign-on to Novell services, complete the following tasks:
![]() Make sure that the XTier framework is installed on all OES NetWare servers to which users will authenticate.
Make sure that the XTier framework is installed on all OES NetWare servers to which users will authenticate.
![]() Install the NetIdentity Agent on the workstation where you want NetIdentity services enabled.
Install the NetIdentity Agent on the workstation where you want NetIdentity services enabled.
The XTier framework is installed automatically when you install NetStorage, Apache, and Tomcat services. It cannot be selected and installed separately, so if you want to use NetIdentity, install one or more of these services on your OES NetWare server prior to continuing. If you are unsure whether XTier is installed on a given server, point your browser to the following URL:
http://<server IP or DNS name>/oneNet/xtier-login
If XTier is installed you will see an authentication dialog box, indicating that the server can recognize credentials passed by NetIdentity.
To install the NetIdentity Agent, complete the following steps:
1. Locate the
etidentity folder created when the Novell client files are extracted from the Zip file downloaded from http://download.novell.com. For example, for Novell client for Windows XP/2000, the NetIdentity folder is located in WINNTi386.
2. Run SETUP.EXE, located in the
etidentity folder. For the Novell client for Windows 98/95 the setup utility is NISETUP.EXE.
3. Select the Installation language and click OK.
4. At the InstallShield welcome screen click Next, and then click Install to start the installation routine.
5. When the installation completes, click Finish.
When installed, NetIdentity will provide single sign-on to all Novell services that authenticate through eDirectory.
In addition to the traditional Novell client, there are other clients available with OES NetWare:
![]() NICI client
NICI client
![]() NMAS client
NMAS client
In addition to these clients, there are a few others that are installed automatically with their respective product software. Each of these clients will be discussed as part of its product overview in other chapters throughout this book.
The NICI is the modular foundation for all crypto-services offered in Novell products and services. The NICI client provides cryptographic services to client-side applications and services. The NICI client has received FIPS 140-1 (Level 1) certification, which is as good as it gets for client-based cryptographic services. For more information on NICI and other OES NetWare security services, see Chapter 7.
The NICI client is included with the Novell client download, available from http://download.novell.com. The following OES NetWare services rely upon the NICI client:
![]() Deployment Manager
Deployment Manager
![]() Novell Nsure Audit
Novell Nsure Audit
![]() Native File Access
Native File Access
![]() Novell Modular Authentication Service
Novell Modular Authentication Service
![]() Novell Certificate Server
Novell Certificate Server
![]() ConsoleOne (when installed on a local workstation)
ConsoleOne (when installed on a local workstation)
The NICI client is installed automatically as part of the Novell client installation process, discussed previously. With the Novell client for Windows XP/2000, it can also be installed separately by completing the following steps:
1. Locate the
ici folder created when the Novell client files are extracted from the Zip file downloaded from http://download.novell.com. For example, for Novell client for Windows XP/2000, the NICI folder is located in WINNTi386.
2. Launch WCNICIU0.EXE from the
ici folder.
3. At the NICI client Welcome screen, click Next.
4. At the License Agreement screen, click Yes.
5. At the Setup Complete screen, click Finish.
This completes the installation of the NICI client.
NMAS enables you to supplement or replace the traditional Novell password authentication mechanism with alternative mechanisms such as smart cards, tokens, and biometrics. OES NetWare includes the NMAS Starter Pack, which offers two alternative authentication methods. NMAS Enterprise Edition, which is sold as an add-on product, adds support for many third-party authentication methods, multifactor authentication, and graded authentication.
The NMAS client provides a framework within which authentication methods can be configured and integrated with Novell eDirectory to provide a flexible and seamless authentication process. For more information on NMAS, see Chapter 7.
The NMAS client is typically installed as part of the Novell client installation. However, with the Novell client for Windows XP/2000 you can also install the NMAS client after the fact. To do so, complete the following steps:
1. The latest version of the Novell client and the NICI client are required for installation of the NMAS client. Make sure they are installed prior to installing the NMAS client.
2. Locate the
masclient folder created when the Novell client files are extracted from the Zip file downloaded from http://download.novell.com.
3. Launch CLIENTSETUP.EXE from the
masclient folder.
4. At the NMAS client Welcome screen, click Next. The installation routine will review the versions of the Novell client and NICI client to make sure that all prerequisites have been met.
5. At the License Agreement screen, click Yes.
6. At the Setup Complete screen, click Finish.
7. Click OK to finish the installation. Note that you will have to restart the workstation for the NMAS client installation to be complete.
When the workstation reboots, you will see the new NMAS login screen. For more information on configuring and using NMAS login methods, see Chapter 7.
Novell Native File Access (NFA) enables Macintosh, Windows, and Unix workstations to access and store files on NetWare servers without installing the Novell client. NFA is installed by default as part of the basic OES NetWare server installation process and provides instant network access. Just plug in the network cable, start the computer, and you’ve got access to servers on your network.
NFA enables client workstations to access the OES NetWare file system using the same protocols they use internally to perform local file operations, such as copy, delete, move, save, and open. Windows workstations perform these tasks using the Common Internet File System (CIFS) protocol, Macintosh workstations use the AppleTalk Filing Protocol (AFP), and Unix/Linux computers use the Network File System (NFS) protocol. This not only eliminates the overhead of a special network client, but also enables users to perform network tasks using the same familiar tools that they use to work on their local drives.
To manage Native File Access, there must be at least one administrative workstation with the following characteristics:
![]() Windows 9x running Novell client for Windows 9x version 3.21.0 or later or Windows XP/2000 Novell client for Windows XP/2000 version 4.80 or later.
Windows 9x running Novell client for Windows 9x version 3.21.0 or later or Windows XP/2000 Novell client for Windows XP/2000 version 4.80 or later.
![]() NICI client version 1.5.7 or later—The NICI client is required to perform password administration using ConsoleOne.
NICI client version 1.5.7 or later—The NICI client is required to perform password administration using ConsoleOne.
To access NetWare servers running NFA, computers must be connected to the network and running one of the following operating systems:
![]() Mac OS version 8.1 or later—Mac OS X.
Mac OS version 8.1 or later—Mac OS X.
![]() Windows 9x, Windows NT v4, Windows XP/2000—Windows computers must be running Client for Microsoft Networks, which is a standard Windows networking component. It can be installed by choosing Add, Client from the Local Area Connection Properties page.
Windows 9x, Windows NT v4, Windows XP/2000—Windows computers must be running Client for Microsoft Networks, which is a standard Windows networking component. It can be installed by choosing Add, Client from the Local Area Connection Properties page.
![]() Any version of UNIX or Linux that supports NFS v2 or NFS v3.
Any version of UNIX or Linux that supports NFS v2 or NFS v3.
Simple passwords are used to support the local Windows, Macintosh, and NFS password models, which in some cases don’t support password encryption. Thus, to prevent the eDirectory password from becoming compromised, Novell created a secondary password suitable for use in these nontraditional situations. To create a simple password for a user, complete the following steps:
Note
If the simple password is different than the eDirectory password, the user enters the simple password when accessing the network with native protocols and enters the eDirectory password when logging in with the Novell client software.
OES NetWare includes a universal password option that manages simple passwords and synchronizes them with the traditional NetWare password. When enabled, the universal password eliminates the need to manage simple passwords separately. For more information on universal passwords, see Chapter 7.
1. Launch iManager, open the eDirectory Administration link, and select Modify Object. For more information on iManager, see Chapter 4 “OES Management Tools.”
2. Click the View Objects button and browse to the object for which you want to change the Simple Password.
3. Click the object and select Modify Object.
4. Select the NMAS Login Methods tab and click the Simple Password link.
5. Make the Simple Password modifications and click OK. You can create, change, or remove the simple password.
After it’s created, the simple password will be used by services such as Native File Access and LDAP authentication that cannot be integrated with the native eDirectory-based authentication option provided by OES NetWare. Simple passwords are required for these services to function, and removing the simple password may prevent them from using services that rely on it.
With NFA installed and passwords configured, nothing else is necessary to enable Windows users to access the NetWare file system. They can use Windows Explorer to browse and search for files through Network Neighborhood or My Network Places. They can map network drives to their defined share point and assign it a drive letter. Because access to NetWare files is handled by CIFS, Windows users can copy, delete, move, save, and open network files as they can with any Windows-based drive resource.
You can stop and start the CIFS service on the OES NetWare server by typing CIFSSTOP at the server console or from a remote server connection. Similarly, typing CIFSSTRT starts the CIFS service on a given OES NetWare server.
A context search file enables Windows users to log in to the network without specifying their full context. The contexts listed in the context search file will be searched when no context is provided or the object cannot be found in the provided context. If user objects with the same name exist in different contexts, authentication to each user object will be attempted until one succeeds with the user-provided password.
The context search file is stored in the SYS:ETC directory of the NetWare server on which NFA is running. To modify a context search file, complete the following steps:
1. Open the CTXS.CFG file with any text editor.
2. Enter each context to be searched during authentication, with each context on its own line.
3. Resave the file in the SYS:ETC directory.
4. At the server console, enter CIFSSTOP and then CIFSSTRT to reload the CIFS service with the new context search file.
When restarted, NFA will be able to use the context search file entries you have provided.
You can use ConsoleOne to configure file access for CIFS users. For more information on ConsoleOne, see Chapter 4. Three CIFS configuration pages are available by completing the following steps:
1. Launch ConsoleOne and browse to the appropriate OES NetWare server in the left pane.
2. Right-click the Server object and select Properties.
3. Click the CIFS tab and select one of the three CIFS available pages: Config, Attach, or Shares.
4. Enter the parameters in the fields provided.
5. Click OK to save your settings and exit.
The following parameter fields appear on the CIFS Config Page:
![]() Server Name—Server Name enables you to specify a name, as it will appear in Network Neighborhood, for the CIFS server. It can be a maximum of 15 characters long and must be different from the actual NetWare server name.
Server Name—Server Name enables you to specify a name, as it will appear in Network Neighborhood, for the CIFS server. It can be a maximum of 15 characters long and must be different from the actual NetWare server name.
![]() Comment—Comment enables you to provide a description of the server resource for CIFS users that will be available when viewing resource details in Network Neighborhood.
Comment—Comment enables you to provide a description of the server resource for CIFS users that will be available when viewing resource details in Network Neighborhood.
![]() WINS Address—WINS Address specifies the address of the WINS server that should be used to locate the Primary Domain Controller (PDC). This is necessary if the PDC is on a different IP subnet than the NetWare server running NFA.
WINS Address—WINS Address specifies the address of the WINS server that should be used to locate the Primary Domain Controller (PDC). This is necessary if the PDC is on a different IP subnet than the NetWare server running NFA.
![]() Unicode—Unicode enables international character support.
Unicode—Unicode enables international character support.
![]() OpLocks (Opportunistic Locking)—Oplocks improves file access performance using the CIFS protocol.
OpLocks (Opportunistic Locking)—Oplocks improves file access performance using the CIFS protocol.
![]() Authentication Mode—Authentication Mode specifies the authentication method used to authenticate CIFS users.
Authentication Mode—Authentication Mode specifies the authentication method used to authenticate CIFS users.
![]() Domain—If the users are members of a Windows domain, you can have the Windows domain controller perform the authentication. In this instance, the domain and workstation username and password must match.
Domain—If the users are members of a Windows domain, you can have the Windows domain controller perform the authentication. In this instance, the domain and workstation username and password must match.
![]() Local—If the users are members of a Windows workgroup, you can have the NFA server perform the authentication. In this instance, the NetWare and workstation username and password must match.
Local—If the users are members of a Windows workgroup, you can have the NFA server perform the authentication. In this instance, the NetWare and workstation username and password must match.
![]() Authentication Workgroup Name—Authentication Workgroup Name specifies the name of the Windows domain, or workgroup, to which the NFA server will belong.
Authentication Workgroup Name—Authentication Workgroup Name specifies the name of the Windows domain, or workgroup, to which the NFA server will belong.
![]() Primary Domain Controller Name—Primary Domain Controller Name specifies the name of the PDC server and is necessary only if the PDC is on a different subnet. This option will override WINS or DNS.
Primary Domain Controller Name—Primary Domain Controller Name specifies the name of the PDC server and is necessary only if the PDC is on a different subnet. This option will override WINS or DNS.
![]() Primary Domain Controller Address—Primary Domain Controller Address specifies the static IP address of the PDC server and is necessary only if the PDC is on a different subnet. This option will override WINS or DNS.
Primary Domain Controller Address—Primary Domain Controller Address specifies the static IP address of the PDC server and is necessary only if the PDC is on a different subnet. This option will override WINS or DNS.
The Attach page enables you to specify the IP addresses to which you want to bind the CIFS protocol. By default, CIFS will be bound to all IP addresses on the NetWare server on which NFA is running.
The Shares page enables you to specify volumes or directories as Windows share points that will be directly accessible from Network Neighborhood. If no share points are defined, all mounted volumes will be listed by default:
![]() Name—Name specifies a name for the share point, as it will be seen in Network Neighborhood.
Name—Name specifies a name for the share point, as it will be seen in Network Neighborhood.
![]() Path—Path specifies the full path to the share point. This will appear as the root, or starting point, for the share. The path must end with a backslash (
Path—Path specifies the full path to the share point. This will appear as the root, or starting point, for the share. The path must end with a backslash ().
![]() Comment—Comment enables you to provide a description of the share point for CIFS users that will be available when viewing resource details in Network Neighborhood.
Comment—Comment enables you to provide a description of the share point for CIFS users that will be available when viewing resource details in Network Neighborhood.
![]() Maximum Number of Connections—Maximum Number of Connections specifies the maximum number of simultaneous connections allowed to the share point.
Maximum Number of Connections—Maximum Number of Connections specifies the maximum number of simultaneous connections allowed to the share point.
With NFA installed and passwords configured, nothing else is necessary to allow Mac users to access the NetWare file system. They can use Chooser or the Go menu to access network files and even create aliases. Because access to NetWare files is handled by AFP, Mac users can copy, delete, move, save, and open network files as they can with any local drive resource.
You can stop and start the AFP service on the OES NetWare server by typing AFPSTOP at the server console or from a remote server connection. Similarly, typing AFPSTRT starts the AFP service on a given OES NetWare server.
If the user object for Mac users is not in the same container as the server they are trying to access, a context search file enables them to log in to the network without specifying their full context. The contexts listed in the context search file will be searched when no context is provided or the object cannot be found in the provided context. This is important because the Mac allows 31 characters for the username. If the full eDirectory context and username is longer than this, you must use a search list so users can access the NetWare server.
If user objects with the same name exist in different contexts, the first one in the context search list will be used. For this reason, it is advisable to have globally unique usernames when using this type of service.
The context search file is stored in the SYS:ETC directory of the NetWare server on which NFA is running. To modify a context search file, complete the following steps:
1. Open the CTXS.CFG file with any text editor.
2. Enter each context to be searched during authentication, with each context on its own line.
3. Resave the file in the SYS:ETC directory.
When restarted, NFA will be able to use the context search file entries you have provided.
You can also rename NetWare volumes so that they appear with a different name in the Mac Chooser. To rename a volume for Mac users, complete the following steps:
1. Create a file named AFPVOL.CFG in the SYS:ETC directory of the NetWare server on which NFA is running.
2. For each volume you want to rename, enter the current name of the volume and, in quotes, the new Mac name of the volume. For example:
prv-serv1.sys "SYS volume"
3. Save the file.
Mac users will access the NetWare volume through the name you have specified, rather than the formal name syntax typically used to denote NetWare volumes.
Mac users use the Chooser to access files and directories as needed. They can also create an alias on the desktop that will be maintained after rebooting:
1. In Mac OS 8 or 9, click the Apple menu and select Chooser, AppleTalk, Server IP Address. In Mac OS X, click Go, Connect to Server.
2. Specify the IP address or DNS name of the NetWare server and click Connect.
3. When prompted, specify a valid eDirectory username and password, and then click Connect.
4. Select a volume to be mounted on the desktop. You now have access to the files on the specified volume. However, these settings are not saved after rebooting the Mac. If you want to create a perpetual link to the volume, you can create an alias.
When these steps are completed, Mac users will have access to files and directories on a NetWare volume.
Native NFS file access requires a few more steps before a Unix/Linux client can use it. There are several terms you should be familiar with if you have not worked with NFS previously and are implementing NFA for NFS:
![]() NFS server—NFS server software is installed as part of the NFA installation. It enables NFS clients to access a NetWare file system as if it were a local directory on the Unix/Linux workstation. Any client that supports the NFS protocol can also access NetWare files using the NFS server.
NFS server—NFS server software is installed as part of the NFA installation. It enables NFS clients to access a NetWare file system as if it were a local directory on the Unix/Linux workstation. Any client that supports the NFS protocol can also access NetWare files using the NFS server.
![]() File system export—Before Unix/Linux users can access the NetWare file system it must be made available to the NFS client. This process is called exporting the file system. During the export, you can define who should access the information and how it is accessed.
File system export—Before Unix/Linux users can access the NetWare file system it must be made available to the NFS client. This process is called exporting the file system. During the export, you can define who should access the information and how it is accessed.
![]() File system mount—After the NetWare file system has been exported, an NFS client can import it into its local file system. When imported, the specified portion of the NetWare file system will be available as though it were part of the local Unix/Linux file system.
File system mount—After the NetWare file system has been exported, an NFS client can import it into its local file system. When imported, the specified portion of the NetWare file system will be available as though it were part of the local Unix/Linux file system.
![]() Network Information Service (NIS)—NFA also permits a NetWare server to function as an NIS server. This is not required for native file access but is a useful additional service for Unix/Linux clients. NIS is a widely used “Yellow Pages” for the Unix/Linux environment. Similar to eDirectory, NIS servers act as central repositories for common information about users, groups, and hosts that reside on the network. With NIS server software loaded, eDirectory can function as a NIS repository and can respond to NIS requests from any NIS client.
Network Information Service (NIS)—NFA also permits a NetWare server to function as an NIS server. This is not required for native file access but is a useful additional service for Unix/Linux clients. NIS is a widely used “Yellow Pages” for the Unix/Linux environment. Similar to eDirectory, NIS servers act as central repositories for common information about users, groups, and hosts that reside on the network. With NIS server software loaded, eDirectory can function as a NIS repository and can respond to NIS requests from any NIS client.
NFA’s NFS support is installed and started as part of the OES NetWare installation. You can stop and start the NFS service from the server console by typing NFSSTOP. Similarly, typing NFSSTART starts the NFS service on a given OES NetWare server. You can also stop and start the NFS server from iManager by clicking the NFS link under File Protocols. This will open the management page for the NFS server. For more information on iManager, see Chapter 4.
When NFA is installed, it extends the eDirectory schema to support new NFS objects. There are four new objects that you will see after installing NFA for NFS:
![]()
NFSAdmin—The NFSAdmin object is a group object installed at the eDirectory tree root that gives you access to the exported file structures that will be made available to NFS users.
![]()
NFAUUser—The NFAUUser object is installed in the server context and is used to provide a link between NetWare and the root user on a Unix/Linux client. This link is used internally for managing data flow between the two systems.
![]()
NFAUWorld—The NFAUWorld group object is installed in the server context and provides Unix rights to other Unix users when they access an exported NFS path. To do this, the effective rights of the NFAUWorld object are converted into Unix rwx rights. Restrict the effective rights of the NFAUWorld object to prevent these NFS users from getting too much access to the NetWare file system.
![]()
NISSERV_<servername>—The NIS server object is installed in the server context for those who might want to use Novell eDirectory as an NIS data repository. It is not used for NFS file access. For more information on NIS services, see the NetWare online documentation.
To export part of the OES NetWare file system for use by NFS clients, complete the following steps:
1. Launch iManager and log in as a user with administrative rights. iManager provides a gadget for managing NFS connections. For more information on iManager, see Chapter 4.
2. In the left pane, expand the File Protocols link and select NFS.
3. Specify, or browse to, the server running NFS services. Click the Export button to open the Export Options screen (see Figure 3.11).
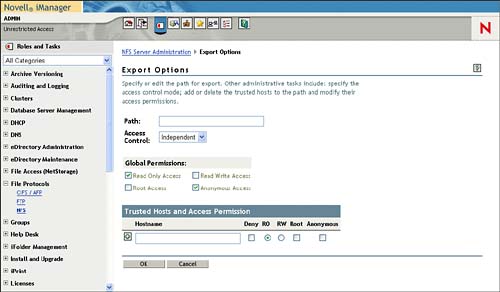
4. In the Path field, enter the path to be exported. Use forward slashes (/) to separate directories. For example, to export the DATA: volume, you enter /data.
5. In the Access Control field, specify either Independent or NetWare mode. Independent mode means that NetWare and NFS rights will be managed separately. NetWare mode means that rights will be managed from NetWare and mapped to NFS accordingly. For more information on access control modes, see the OES online documentation.
6. Use Global Permissions to specify those permissions that will be granted to all trusted hostnames.
7. In the Trusted Host and Access Permission table, specify the NFS host that you want to make a trusted host for the exported path. Then specify the rights granted to the export host:
![]() Deny—Deny prevents access to the host.
Deny—Deny prevents access to the host.
![]() RO—(Default) RO grants read-only access to the host.
RO—(Default) RO grants read-only access to the host.
![]() RW—RW grants read-write access to the host.
RW—RW grants read-write access to the host.
![]() Root—Root grants root, or supervisory, access to the host.
Root—Root grants root, or supervisory, access to the host.
![]() Anonymous—Anonymous grants generic access to the exported directory through the Unix user
Anonymous—Anonymous grants generic access to the exported directory through the Unix user NOBODY and group NOGROUP.
8. Click the plus symbol (+) next to the hostname to add the host to the trusted host list. This updates the etc/exports file on the server and refreshes the NFS server. When you specify access permissions, the default permissions given in the All row are unchecked.
After it’s created, the newly exported directory will show up in the Exported Paths list on the NFS Server Administration screen. By selecting an exported path from the Exported Paths list, you can see the current path configuration and modify that configuration by clicking Edit.
After an OES NetWare directory has been exported for NFS clients, it is imported into a remote file system for access. Unix systems use the mount command to accomplish this. To mount an exported directory on a Unix/Linux system, complete the following steps:
1. Use the mkdir command to create a directory that will hold the OES NetWare NFS export—for example: mkdir NWOESFiles.
2. Use the mount command to link the new directory to the OES NetWare export—for example: mount <server identifier>:/data/linux /NWOESFiles.
Warning
The server identifier is the IP address or DNS name of the OES NetWare server on which you created the NFS Export. Make sure to use both the colon and forward slash between the server identifier and the volume name. The target import directory must be an absolute path from NFS root and is separated from the source path by a space.
For more information on the Unix/Linux mount command, refer to your system’s man pages.