
![]() Install the Identity Manager engine from the Identity Manager Bundle Edition CD-ROM at the OES NetWare graphical console.
Install the Identity Manager engine from the Identity Manager Bundle Edition CD-ROM at the OES NetWare graphical console.
![]() Install Identity Manager drivers and management plug-ins (for iManager) from the Identity Manager Bundle Edition CD-ROM at the Application server or workstation destination.
Install Identity Manager drivers and management plug-ins (for iManager) from the Identity Manager Bundle Edition CD-ROM at the Application server or workstation destination.
Originally released in the fall of 2001 as DirXML, Identity Manager has become an award-winning and groundbreaking tool for integrating the diverse systems in today’s modern networks. OES NetWare includes a fully functional version of Identity Manager suitable for linking some of today’s most common directory systems into a cohesive whole.
Derived from Nsure Identity Manager 2, Identity Manager Bundle Edition enables you bidirectionally to synchronize data and passwords between Novell eDirectory, Microsoft Active Directory, and Microsoft Windows NT domains.
Identity Manager Bundle Edition enables you to link your disparate network data sources using Novell eDirectory as the central repository for sharing data, as shown in Figure 9.1.
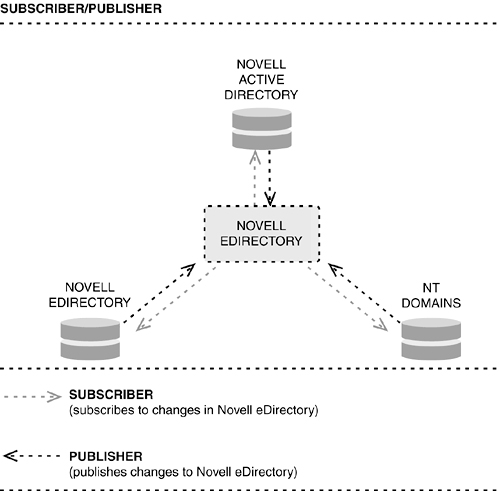
The Identity Manager architecture is comprised of several components that work together to achieve effective data and password synchronization:
![]() Identity Manager Engine—Running on OES NetWare, the Identity Manager engine functions as the communications hub that provides data and password synchronization between your central eDirectory tree and any participating external systems. The Identity Manager engine uses Extensible Markup Language (XML) to create object models of any data event. It then applies a set of rules to determine if, and how, the data modifications are sent to participating systems. The centralized Identity Manager engine makes sure that data events are processed consistently throughout your network environment.
Identity Manager Engine—Running on OES NetWare, the Identity Manager engine functions as the communications hub that provides data and password synchronization between your central eDirectory tree and any participating external systems. The Identity Manager engine uses Extensible Markup Language (XML) to create object models of any data event. It then applies a set of rules to determine if, and how, the data modifications are sent to participating systems. The centralized Identity Manager engine makes sure that data events are processed consistently throughout your network environment.
![]() Identity Manager Drivers—Customized to each system that will participate in Identity Manager synchronization, the Identity Manager drivers act as communications “spokes,” or channels between your central eDirectory tree and any participating external systems. Identity Manager drivers are configured to subscribe to data changes made in the central eDirectory tree, and they publish data changes that occur locally to the central eDirectory tree. This publish/subscribe model gives you complete control over the nature and direction of data synchronization.
Identity Manager Drivers—Customized to each system that will participate in Identity Manager synchronization, the Identity Manager drivers act as communications “spokes,” or channels between your central eDirectory tree and any participating external systems. Identity Manager drivers are configured to subscribe to data changes made in the central eDirectory tree, and they publish data changes that occur locally to the central eDirectory tree. This publish/subscribe model gives you complete control over the nature and direction of data synchronization.
Note
To simplify configuration, Identity Manager Bundle Edition provides configuration files that you can import into a driver during installation to automatically set up driver rules, filters, and transformation documents that dictate what data from this system should be exchanged with other systems, and how this data should be exchanged.
![]() Filters—Filters specify which objects and attributes can be shared between the central eDirectory tree and a given target system. Each Identity Manager driver supports two sets of filters. The Subscriber filter determines the objects and attributes that are shared from eDirectory to the target system. The Publisher filter determines the objects and attributes that are shared from the target system to eDirectory. A list of default attribute mappings for Active Directory and NT domain drivers is provided in Table 9.1.
Filters—Filters specify which objects and attributes can be shared between the central eDirectory tree and a given target system. Each Identity Manager driver supports two sets of filters. The Subscriber filter determines the objects and attributes that are shared from eDirectory to the target system. The Publisher filter determines the objects and attributes that are shared from the target system to eDirectory. A list of default attribute mappings for Active Directory and NT domain drivers is provided in Table 9.1.
Table 9.1. Default Attribute Mappings in Identity Manager Bundle Edition
|
EDIRECTORY OBJECT ATTRIBUTES |
ACTIVE DIRECTORY |
NT DOMAINS |
||
|---|---|---|---|---|
|
User |
User |
User |
||
|
CN |
User userprincipalName |
Name |
||
|
Description |
description |
Comment |
||
|
Identity Manager It connects |
SAMAccountName |
NT4AccountName |
||
|
to ADAliasName |
||||
|
ADAliasName |
||||
|
Facsimile Telephone Number |
facsimileTelephoneNumber |
|||
|
Full Name |
displayName |
FullName |
||
|
Given Name |
givenName |
|||
|
Group Membership |
memberOf |
|||
|
Login Disabled |
userAccountControl |
Logon Disabled |
||
|
nadLoginName |
nadLoginName |
nadLoginName |
||
|
Owner |
managedBy |
|||
|
Password Allow Change |
PasswordChange |
|||
|
Password Required |
PasswordRequired |
|||
|
Physical Delivery Office |
||||
|
I |
||||
|
Postal Code |
postalCode |
|||
|
Post Office Box |
postOfficeBox |
|||
|
S |
St |
|||
|
SA |
streetAddress |
|||
|
See Also |
seeAlso |
|||
|
Surname |
Sn |
|||
|
Telephone Number |
telephoneNumber |
|||
|
Title |
title |
|||
|
Unique ID |
mailNickname |
|||
|
Group |
Group |
|||
|
CN |
cn |
|||
|
Member |
member |
|||
|
Organizational Unit |
Organizational Unit |
|||
|
OU |
ou |
|||
![]() Rules—Rules are used to specify requirements for the management of object creation, matching, and placement that take place as part of a data synchronization event. For example, a Creation rule might specify that any user object created through a synchronization event must first have certain attributes defined, such as Surname and Email address.
Rules—Rules are used to specify requirements for the management of object creation, matching, and placement that take place as part of a data synchronization event. For example, a Creation rule might specify that any user object created through a synchronization event must first have certain attributes defined, such as Surname and Email address.
![]() Style Sheets—Style Sheets use Extensible Stylesheet Language Transformations (XSLT) documents to transform XML events and data as needed to suit the needs of the various Identity Manager[nd]integrated systems. For example, XSLT can be used to transform data received from one system into a format consumable by another system to which the data must be synchronized. You will likely not have to work with XSLT directly because it is built in the background by the Identity Manager graphical configuration tool.
Style Sheets—Style Sheets use Extensible Stylesheet Language Transformations (XSLT) documents to transform XML events and data as needed to suit the needs of the various Identity Manager[nd]integrated systems. For example, XSLT can be used to transform data received from one system into a format consumable by another system to which the data must be synchronized. You will likely not have to work with XSLT directly because it is built in the background by the Identity Manager graphical configuration tool.
![]() Password Synchronization Filters and Agents—PasswordSync filters capture changes to passwords and pass these changes to PasswordSync agents over secure channels. PasswordSync integrates with Identity Manager drivers to determine how password changes should be applied across systems. For example, changing the password for
Password Synchronization Filters and Agents—PasswordSync filters capture changes to passwords and pass these changes to PasswordSync agents over secure channels. PasswordSync integrates with Identity Manager drivers to determine how password changes should be applied across systems. For example, changing the password for JHARRIS in an NT domain could mean the new password should be sent to JLHARRIS.PROVO.QUILLS.COM in the eDirectory environment.
![]() Remote Loader Service—The Remote Loader Service is a communications mechanism whereby the Identity Manager engine and central eDirectory tree can effectively communicate with an Identity Manager driver that is actually loaded and running on a separate server. For example, the Identity Manager engine leverages the Remote Loader Service to communicate with the Identity Manager driver for Active Directory, which is loaded on a Windows 2000 Active Directory server.
Remote Loader Service—The Remote Loader Service is a communications mechanism whereby the Identity Manager engine and central eDirectory tree can effectively communicate with an Identity Manager driver that is actually loaded and running on a separate server. For example, the Identity Manager engine leverages the Remote Loader Service to communicate with the Identity Manager driver for Active Directory, which is loaded on a Windows 2000 Active Directory server.
Identity Manager Starter Pack components are installed on those servers that will participate in the data synchronization process. iManager components must also be installed on your iManager server if it is different from the server running the Identity Manager engine. To install the Identity Manager engine on your OES NetWare server, complete the following steps:
1. At the OES NetWare server where you want to install Identity Manager, insert the Identity Manager Bundle Edition CD-ROM.
2. From the GUI server console, click the Novell button and select Install.
3. At the Installed Products screen, click Add.
4. At the Source Path screen, browse to the Identity Manager Bundle Edition CD-ROM, select NWPRODUCT.NI, and then click OK twice.
5. At the Product Installation page, click Next.
6. At the License Agreement screen, select the appropriate language to view the license agreement. After you have reviewed the agreement, click I Accept.
7. On the two Overview pages, review the information on where Identity Manager software can be installed and click Next.
8. On the Components page, select the Identity Manager components you want to install and click Next. Remember that Identity Manager drivers and management components can be installed on separate servers from the Identity Manager engine.
9. On the Drivers page, select the Identity Manager drivers you want to install and click Next. Typically, you will be installing only the eDirectory Identity Manager driver for now. All other drivers are product-specific and require those products to be present.
10. On the Schema Extension page, provide the user ID and password of a user with administrative rights to the root of your eDirectory tree and then click Next.
11. On the Components page, specify whether you want to install preconfigured Identity Manager drivers, if applicable, and the iManager administrative plug-ins for Identity Manager, and then click Next. You can mouse over each option to get a description of it.
12. On the Components page, specify whether you want to install Nsure Audit components or Application components, and then click Next. You can mouse over each option to get a description of it.
13. On the Installation Summary page, review your installation selections and click Finish. At this point, eDirectory will be shut down so that the schema extensions can be applied, and the file copy will occur.
14. At the Installation Complete screen, click Close.
15. On the Installation Complete page, click Close. Reboot your OES NetWare server to complete the installation.
When your server restarts, you will see new Identity Manager options in iManager’s Navigation frame: Identity Manager Management and Identity Manager Planning. These will be used for configuring the actual data synchronization process, described later in this chapter.
With the Identity Manager engine installed, you are ready to start configuring your Identity Manager environment. The first step in doing this is to make sure that the Remote Loader is installed on any systems that will use it. For both Active Directory and NT domain synchronization, the Identity Manager driver and Remote Loader must be installed on an appropriate Domain Controller. The Domain Controller should have the following characteristics:
![]() Active Directory—Domain Controller running Windows 2000 Server with Support Pack 1 and Internet Explorer 5.5 or later
Active Directory—Domain Controller running Windows 2000 Server with Support Pack 1 and Internet Explorer 5.5 or later
![]() NT Domain—Primary Domain Controller (PDC) running Windows NT 4 with Service Pack 6a or later
NT Domain—Primary Domain Controller (PDC) running Windows NT 4 with Service Pack 6a or later
To install Remote Loader and Identity Manager driver on a Windows 2000 server running Active Directory, complete the following steps. For more information on performing the same type of installation on an NT 4 server, see the OES NetWare online documentation.
1. At the Windows 2000 server that will host the driver, insert the Identity Manager Bundle Edition CD-ROM. After a few moments, the Identity Manager Bundle Edition Installation screen will appear. Click Next.
2. At the License Agreement screen, select the appropriate language to view the license agreement. After you have reviewed the agreement, click I Accept.
3. On the Components screen, select Identity Manager Remote Loader and Drivers and click Next.
4. At the Location screen, specify the path to which the Remote Loader will be installed and click Next. It is usually best to just accept the default path.
5. At the Select Drivers for Remote Loader Install screen, select Identity Manager Remote Loader Service and Identity Manager Driver for Active Directory, and then click Next.
6. Review the information on the Installation Summary screen and click Finish. You will see a warning about LDAP conflicts. Click OK to close the message box.
7. At the Create Shortcut screen, click Yes. This will create a shortcut on your Windows desktop to the Remote Loader Configuration wizard.
8. At the Installation Complete screen, click Close.
9. Launch the Identity Manager Remote Loader Configuration Wizard. At the Welcome page, click Next.
10. At the Command Port screen, click Next. This is the port that will be used by this instance of the remote loader to listen for Identity Manager activity. Novell recommends keeping the default port.
11. At the Configuration File screen, click Next. This is the name and location of the log file that will be used to record Remote Loader configuration options.
12. At the Identity Manager Driver screen, select Native and make sure that ADDRIVER.DLL is listed in the drop-down list. Click Next.
13. At the Connection to Identity Manager screen, provide the required information and click Next:
![]() Port—Specify the port that Remote Loader will use to listen for the Identity Manager engine. Novell recommends keeping the default port.
Port—Specify the port that Remote Loader will use to listen for the Identity Manager engine. Novell recommends keeping the default port.
![]() Address—Specify the IP address that Remote Loader will use to communicate with the Identity Manager engine.
Address—Specify the IP address that Remote Loader will use to communicate with the Identity Manager engine.
![]() Use SSL—Check the Use SSL box if you want secure communications between the Identity Manager engine and Remote Loader. You will have to provide the self-signed certificate from the Identity Manager server to use SSL. For more information on using SSL, see the OES NetWare online documentation.
Use SSL—Check the Use SSL box if you want secure communications between the Identity Manager engine and Remote Loader. You will have to provide the self-signed certificate from the Identity Manager server to use SSL. For more information on using SSL, see the OES NetWare online documentation.
14. At the Tracing screen, specify the level of tracking data that you want recorded, specify the location of the trace file, and click Next. You will likely want to set up tracing while installing and configuring your driver. However, when it’s configured, you will probably want to set the trace level to 0 to prevent the log file from growing to fill your entire hard drive over time:
![]() Level 0—No information display or tracking
Level 0—No information display or tracking
![]() Level 1—Displays general informational messages about processing
Level 1—Displays general informational messages about processing
![]() Level 2—Displays messages from level 1 plus the XML documents that are passed between the engine and driver
Level 2—Displays messages from level 1 plus the XML documents that are passed between the engine and driver
![]() Level 3—Displays messages from level 2 plus documents sent and received between the Remote Loader and the Identity Manager engine
Level 3—Displays messages from level 2 plus documents sent and received between the Remote Loader and the Identity Manager engine
![]() Level 4—Displays messages from level 3 plus information about the connection between the Remote Loader and the Identity Manager engine
Level 4—Displays messages from level 3 plus information about the connection between the Remote Loader and the Identity Manager engine
15. At the Install as a Service screen, check Mark Install the Remote Loader Instance as a Service and click Next. Doing this lets Remote Loader continue to run even after you have logged out of the Windows system.
16. At the Passwords screen, specify the password you want to set for access to Remote Loader and the Driver object and click Next.
17. At the Summary screen, review your configuration settings and click Finish. When prompted, click Yes to start the Remote Loader service.
With Remote Loader configured, Identity Manager will now be able to synchronize data between your central eDirectory tree and your secondary Active Directory environment. Data is mapped from one directory structure to the other as discussed previously (see Table 9.1). The Remote Loader trace screen will show you the communication activities between the two directory environments.
Each eDirectory tree that you want to synchronize with Identity Manager must have an Identity Manager driver installed and configured on a replica server of the secondary eDirectory tree. The first Identity Manager driver for eDirectory was installed as part of the Identity Manager engine installation, described previously. The Identity Manager driver installation for eDirectory will vary based on the version of NetWare that the host server is running. Identity Manager supports the following NetWare versions:
![]() NetWare 5.1 SP6 or later
NetWare 5.1 SP6 or later
![]() NetWare 6.0 SP3 or later
NetWare 6.0 SP3 or later
![]() NetWare 6.5
NetWare 6.5
For more information on installing the Identity Manager driver in a secondary eDirectory tree, see the OES online documentation.
Now that all the Identity Manager components are in place, you can do the actual Identity Manager driver configuration. This is done through the iManager plug-ins for Identity Manager that were installed previously. You can also use ConsoleOne to do the Identity Manager configuration.
To simplify the configuration process, you can import the preconfigured driver settings that you have copied to your systems as part of the Identity Manager installation process, described previously. To import a preconfigured Identity Manager driver, complete the following steps:
1. Launch iManager from the server where the Identity Manager plug-ins have been installed.
2. Open the Identity Manager Management link in the Navigation frame and click Import Drivers.
3. Select the radio button next to In a New Driver Set and click Next.
4. Provide the required information and click Next:
![]() Name—Provide a name for the driver set.
Name—Provide a name for the driver set.
![]() Context—Specify the context in which you want the driver set object to be created.
Context—Specify the context in which you want the driver set object to be created.
![]() Server—Specify the server object on which Identity Manager is installed.
Server—Specify the server object on which Identity Manager is installed.
![]() Create a new partition on this driver set—Selecting this option will create a new directory partition in which Identity Manager data will be stored, where it can be isolated from the rest of the day-to-day eDirectory activity. Novell recommends that you configure Identity Manager in this way.
Create a new partition on this driver set—Selecting this option will create a new directory partition in which Identity Manager data will be stored, where it can be isolated from the rest of the day-to-day eDirectory activity. Novell recommends that you configure Identity Manager in this way.
5. Select the specific driver configuration file you want to import and click Next. You can select multiple drivers.
6. Provide the required information to configure the driver and click Next. If you have selected multiple drivers, you will fill out the appropriate configuration information for each driver. For more information on the specific information requested by each driver type, see the OES NetWare online documentation.
7. Provide the required information to configure administrative rights for the Identity Manager driver and click Next:
![]() Click Define Security Equivalence, add Admin, and click OK. This grants the Identity Manager driver security equivalence to Admin in eDirectory so that sufficient rights are granted the driver to perform its synchronization operations.
Click Define Security Equivalence, add Admin, and click OK. This grants the Identity Manager driver security equivalence to Admin in eDirectory so that sufficient rights are granted the driver to perform its synchronization operations.
![]() Click Exclude Administrative Roles, add Admin, and click Next. You should add any objects with administrative roles to this list to avoid problems with similar objects that may exist in other directories. Typically, administrative roles are specific to a given directory tree and don’t need to be synchronized.
Click Exclude Administrative Roles, add Admin, and click Next. You should add any objects with administrative roles to this list to avoid problems with similar objects that may exist in other directories. Typically, administrative roles are specific to a given directory tree and don’t need to be synchronized.
8. At the Summary screen, click Finish. You can also click Finish with Overview if you want to view a synopsis of the driver’s settings.
With the Identity Manager driver configured, you will see a new driver set in the Identity Manager Overview screen. From here you can enable the driver and then perform synchronization tests to make sure the driver is functioning properly. You can use the driver’s trace screen to monitor activities as well as the Trace options in iMonitor. For advanced settings and detailed information on Identity Manager driver configuration, see the OES NetWare online documentation.
In addition to the synchronization of data between disparate systems such as eDirectory, Active Directory, and NT domains, Identity Manager Bundle Edition also enables you to synchronize passwords between these systems. Identity Manager Password Synchronization for Windows, known as PasswordSync, enables passwords to be synchronized transparently and securely between eDirectory and the Active Directory/NT domains for which you have Identity Manager drivers configured.
PasswordSync uses filters and agents to capture changes to passwords and securely pass those changes to included systems. Identity Manager is capable of understanding object mappings across systems so that each user object is associated with the proper object in every other system. Because of this, synchronizing passwords across the systems becomes much easier.
The specifics of how PasswordSync is installed depends on the systems involved. For example, because Microsoft clients forward password change requests to their respective Domain Controllers for processing, PasswordSync Filters are installed on all Domain Controllers in Active Directory and NT environments. On the other hand, because Novell clients never send passwords across the network, PasswordSync filters for eDirectory are installed on the client workstation and are part of the Novell clients that ship with OES NetWare.
Unfortunately, because password synchronization with Identity Manager relies on PasswordSync filters and agents communicating the changes throughout the environment, if a password is synchronized through an unsupported mechanism, the synchronization will not occur. One example of this is an LDAP client such as Novell eGuide. Using an LDAP client to change your eDirectory password will not be synchronized to your Active Directory and/or NT Domain environments because the PasswordSync filters are never involved in the process. Similarly, if a password is changed from a non-Windows environment, the change will not be synchronized.
Bottom line here: Use Password Sync if you can be confident that password changes will occur only in one of the Windows methods supported by PasswordSync—for example:
![]() Workstation running the Novell client
Workstation running the Novell client
![]() Workstation not running the Novell client
Workstation not running the Novell client
![]() Windows server or workstation running Microsoft Management Console
Windows server or workstation running Microsoft Management Console
![]() Windows workstation or server running ConsoleOne
Windows workstation or server running ConsoleOne
![]() Workstation or server running Novell iManager
Workstation or server running Novell iManager
For more information on configuring and using PasswordSync, see the OES NetWare online documentation.