

✓ | How to develop interactive queries. |
✓ | How to customize the appearance of a data grid. |
✓ | How to receive and respond to sort events from a data grid. |
✓ | How to use query string variables to link from one Web page to another. |
Information retrieval is the payback activity in most database systems. Data entry is tedious, expensive, and of little benefit in itself. The only reason people enter data is that there’s payback from getting it back out.
Information retrieval on the Web is almost always interactive. In simple terms, this means the Web visitor enters criteria and receives matching data as a result. There are two reasons for this approach:
Most databases are too large to display in their entirety on a single Web page.
Even if the size of the Web page weren’t an issue, human beings have difficulty comprehending very much data at once.
This chapter presents two Web pages that accept criteria from the visitor and display corresponding results. In the first, the visitor uses the selcat.aspx user control from the last chapter to specify category criteria. The query results display a list of matching ads.
Clicking one of these ads will link to the second page, which displays further information about the given ad. The second Web page has no user interface of its own; it receives the ID of a specific ad from the query string portion of its URL. This isn’t the sort of user interface you’d expect a Web visitor to appreciate, but it’s perfect for linking items in one set of query results to further queries.
The next figure shows the first query page this chapter will develop. The banner and the three drop-down lists should be familiar from the previous chapter. When the Web visitor clicks the Search button, the Web page returns a list of current ads in the given category.
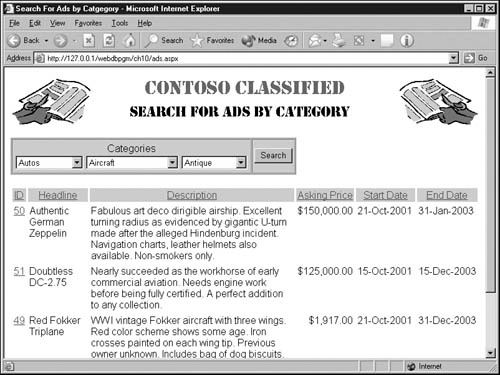
In addition to searching by category, this page also searches by date. It won’t report ads with a start date that’s in the future or an end date that’s in the past.
Clicking the column headings sorts the result set on the corresponding field—that is, on ID, Headline, Description, Asking Price, Start Date, or End Date. Clicking any ad’s ID number sends the Web visitor to another Web page that displays more detailed information about the ad.
It’s fairly easy to guess that this Web page displays the banner.ascx and selcat.ascx user controls from the previous chapter. When the visitor clicks the Search button, the Web page constructs a SQL statement that retrieves ads in the given category and presents them in the default sequence (sorted by the headline field). Clicking a column heading performs the same query, except that the SQL statement will have a different ORDER BY clause.
More surprising is that a data grid control performs the data display in this Web page. Previous examples that used the data grid control made much simpler use of it; they certainly didn’t have formatted, clickable column headings, custom-formatted data fields, or hyperlinks. To provide these features, the Web page sets the following data grid properties:
BorderWidth sets the HTML table’s border width. As you might have surmised, the data grid control uses an HTML table to display its results. All the normal attributes of an HTML table are therefore available as data grid properties. The only exception is the HTML attribute class, which you must specify through the data grid’s CssClass property.
CellSpacing sets the spacing between borders of adjacent HTML table cells.
CellPadding sets the HTML table spacing between cell contents and cell borders.
AutoGenerateColumns controls whether the data grid should automatically create an output column, headed by the field name, for each field in its data source. The default is True, which creates such columns. This example specifies False and creates its own columns.
AllowSorting controls whether the data grid’s column headings should be hyperlinks that specify an alternate sorting sequence. The default is False, which doesn’t create such hyperlinks.
onSortCommand specifies the name of an event handler that runs whenever the visitor clicks a sortable column heading.
The options AllowSorting and onSortCommand work together and probably don’t do what you expect. Suppose the following:
You specify AllowSorting="True".
You also specify onSortCommand="someEventHandler".
The visitor displays some query results and then clicks a column heading.
In these circumstances, ASP.NET runs the event handler you specified and passes it a SortExpression string that corresponds to the clicked column.
That’s it. ASP.NET doesn’t automatically re-sort the data. You must supply code that sorts the records in the data grid’s data source and then reloads the data grid (using its DataBind method).
Fortunately, sorting the data source is usually quite easy. If it’s a data view, you can just change its Sort property. If it’s a data reader, you can just rerun the same query using a different ORDER BY clause.
To define your own data grid columns, you must
Code a pair of <datagrid> and </datagrid> tags, taking care to specify AutoGenerateColumns="False".
Within these tags, code a pair of <columns> and </columns> tags.
Within the <columns> and </columns> tags, code a pair of tags (or a single tag with a closing slash) for each column. The tag names correspond to the column types in the following table.
DataGrid Column Types | |
|---|---|
Column Type | Description |
BoundColumn | Displays a column bound to a field in a data source. The field value appears as text. This is the default column type. |
ButtonColumn | Displays a command button for each row in the column. This is useful if you want each row of the data grid to contain an Add button, a Remove button, or the like. |
EditColumn | Displays a column that contains editing commands for each item in the column. |
HyperLinkColumn | Displays a hyperlink for each row in the column. This type of column binds to two different data fields: one that specifies a value to display and another that specifies a hyperlink location. |
TemplateColumn | Formats each column item in accordance with a template you supply. |
The next example uses only the column types BoundColumn and HyperLinkColumn.
If you ever decide to try the ButtonColumn type, you should understand event bubbling. This means that each button in the whole data grid will activate the same event handler. That event handler receives a DataGridCommandEventArgs object that identifies which control raised the event, and also provides a CommandArgument string that you can preload with whatever data you want.
For more information about event bubbling, refer to Chapter 4. For an example that uses event bubbling (although with a Repeater object), refer to Chapter 8.
An EditColumn displays Edit, Update, and Cancel buttons for each data row in the grid. When a Web visitor clicks a row’s Edit button, all data values in that row appear within text boxes rather than as normal text. The visitor can overtype any of these values and then click Update to apply the changes or Cancel to disregard them. You, however, must specify and write event handlers that perform the actual updates, deselect the row, and reload the data grid with new values.
A TemplateColumn displays whatever you put between a pair of <TemplateColumn> and </TemplateColumn> tags. In theory, this can be any mixture of ordinary text, data binding expressions, and code render blocks, but in practice, you’re somewhat on your own here. If you find yourself using TemplateColumns a lot, the Repeater control might be worth another look.
The BoundColumn, ButtonColumn, and HyperLinkColumn types all have formatting properties that control the presentation of data values. The specific properties for each type appear in the following table:
Data Formatting Properties for DataGrid Column | ||
|---|---|---|
Column Type | Property | Affected Display Item |
BoundColumn | DataFormatString | Output text |
ButtonColumn | DataTextFormatString | Button caption text |
HyperLinkColumn | DataNavigateUrlFormatString DataTextFormatString | Hyperlink URL Hyperlink text |
Use of these properties is optional. If you don’t provide a data format string for a particular column, the grid converts any nonstring values to strings by using the default ToString method. If you do provide a data format string, its content appears "as is" in the output, except for any portion you enclose in braces. Inside the braces you must code the index of the column’s data value (which is always zero), a colon, and a format code. Here’s an example:
DataFormatString="The value is <b>{0:D2}</b>."The format code D2 requests decimal formatting with two decimal places. The number of decimal places is optional. The table on the next page shows the most common numeric formatting codes.
Format Code | Display Format |
|---|---|
C | Currency |
D | Decimal |
E | Scientific (exponential) |
F | Fixed |
G | General |
N | Number |
X | Hexadecimal |
These few codes, however, only scratch the surface of the formatting available for various data types. In date values, the format string {0:d-MMM-yyy} displays the date as the day of the month, the three-character month name, and the four-digit year—for example, 15-FEB-2003. (Yes, you specify yyy to get a four-digit year.) For more information about formatting codes, search the MSDN Web site (msdn.microsoft.com/library) for the term Framework Format Specifiers Providers.
Each column type, as well as the data grid control itself, has a rich assortment of properties and methods. For more information, search the MSDN Web site (msdn.microsoft.com/library) for the term Framework DataGridColumn Base Class.
The graphic in Appendix shows a Web page that queries the ads table in the classified.mdb database. Two of its elements should be familiar from the last chapter: The banner.ascx user control provides the page banner, and the selcat.aspx user control provides the category selector.
When the visitor clicks the Search button, the page queries the ads table for current records that match the selected category. (A current record, in this sense, has a start date in the past and an end date in the future.) The query returns the records in order by headline, and a data grid control displays them in, of course, the same order.
Notice, however, that the column headings are hyperlinks. Clicking any of these hyperlinks sorts the query results on that column. The ID column consists of hyperlinks as well; these jump to another page that displays more detailed information about the ad.
If you’d rather look at the finished code than enter it yourself, open the ads.aspx page in the ch10 folder you installed from the companion CD. Otherwise, proceed as follows:
Create a new, empty Web page. This page should contain the usual <html>, <head>, and <body> tags as well as their usual closing tags. Apply any page-level formatting you want. For example, the sample results include the following statement, which links to a shared cascading style sheet file named normal.css.
<link rel="stylesheet" type="text/css" href="../normal.css">
In the <head> section, insert a set of <title> and </title> tags and between them, enter the text Search for Ads by Category.
Add five declarations to the top of the page:
The first should be a typical @ Page declaration.
The second and third should be @ Register directives for the banner.ascx and selcat.aspx user controls.
Because the page will access a Microsoft Access database, the last two declarations should import the System.Data and System.Data.OleDb namespaces.
Add a code declaration block as well. The top of the page should now look like this:
<%@ Page Language="vb" Debug="True" Explicit="True"%>
<%@ Register TagPrefix="webdbpgm" TagName="selcat"
             src="selcat.ascx" %>
<%@ Register TagPrefix="webdbpgm" TagName="banner"
             src="banner.ascx" %>
<%@ Import Namespace="System.Data" %>
<%@ Import NameSpace="System.Data.OleDb" %>
<script runat="server">
</script>
<html>
<head>
<link rel="stylesheet" type="text/css" href="../normal.css">
<title>Search for Ads by Category</title>
</head>
In the <body> section, add a tag that displays the banner.ascx user control. This requires the line of code shown on the next page in blue.
<body>
<webdbpgm:banner id="banner" runat="server" />
</body>
Immediately after the code you just entered, define a Web form. These statements are probably familiar by now, but here they are.
<form method="post" runat="server">
</form>
Inside the Web form, define an HTML table with two columns, one row, and a gray background. Feel free to copy the colors shown below or use your own.
<table bgcolor="#CCCCCC"
    bordercolorlight="#999999" bordercolordark="#666666"
    border="1" cellspacing="1" cellpadding="3">
  <tr>
    <td><!-- code from steps 7 and 8 will go here --></td>
    <td><!-- Code from step 9 will go here --></td>
  </tr>
</table>
Inside the first of these table cells, code another HTML table with one column and two rows. Don’t specify any colors or borders.
Center the top cell in the table you just created and enter the text Categories. Then, in the bottom cell, add a tag that displays the selcat.ascx user control. The code for the nested table should now look like this. All of this code replaces the first comment in step 6.
<table border="0" cellspacing="1">
  <tr>
  <td align="center">Categories</td>
  </tr>
  <tr>
    <td><webdbpgm:selcat id="catctl" runat="server" /></td>
  </tr>
</table>
Inside the last cell of the outer table, add a Button Web server control named btnSub that displays the word Search. Specify an onClick event handler of btnSub_Click. This code replaces the second comment in step 6.
<asp:button type="submit" id="btnSub"
     text="Search" onclick="btnSub_Click"
     runat="server" />
This procedure will create the btnSub_Click subroutine you specified as the event handler for the Search button in step 9 of the previous procedure. When the visitor clicks that button, this event handler will query the database for records matching the current criteria and bind the results into a DataGrid object. To begin, proceed as follows:
Define the btnSub_Click event hander inside the code declaration block you created in the previous procedure. Have this subroutine call another named RunQueryAndBind and pass an empty string as an argument.
<script runat="server">
Sub btnSub_Click(sender As Object, e As EventArgs)
  RunQueryAndBind("")
End Sub
</script>
The RunQueryAndBind subroutine will run under two circumstances. The first is the current circumstance: when the visitor clicks the Search button. The second is when the visitor clicks one of the column heading hyperlinks. The argument specifies the field on which to sort the query results; an empty string signifies the default sort order.
Define the RunQueryAndBind subroutine immediately after the code you added in the previous step.
End Sub
Sub RunQueryAndBind (astrSortField As String)
End Sub
</script>
Note that this subroutine receives a string argument named astrSortField. This will specify how to sort the query results.
Declare the following four variables within the RunQueryAndBind subroutine:
Dim strSQL As String
Dim conClasf As OleDbConnection
Dim cmdAds As OleDbCommand
Dim rdrAds As OleDbDataReader
Here’s what these variables do:
The strSQL variable will contain a SQL statement.
The conClasf variable will provide a connection to the classified.mdb database.
The cmdAds variable will point to a command object for accessing the ads table.
The rdrAds variable will point to a data reader that retrieves data from the ads table.
After these declarations, code statements that create, open, and close an OleDbConnection object for the classified.mdb database:
conClasf = New OleDbConnection( _
          "Provider=Microsoft.Jet.OLEDB.4.0;" & _
          "Data Source=" & _
           Server.MapPath("classified.mdb") & ";")
conClasf.Open()
' Code to run database query will go here.
conClasf.Close
Create a SQL statement that retrieves the adid, headline, description, askingprice, startdate, and enddate fields from the ads table. In addition:
Select only those records having a catid value that’s equal to the visitor’s current selection in the selcat.ascx user control. The line that does this appears in blue in the following code. Recall that in the previous procedure you named this control catctl. Recall as well that when, in the previous chapter, you coded this user control, you gave it a property named catlistid that returns the ID of the current combination of categories.
Select only those records that have a start date in the past and an end date in the future.
Here’s the required code for an Access database. It replaces the comment in the previous step.
strSQL = "SELECT adid, " & _
                "headline, " & _
                "description, " & _
                "askingprice, " & _
                "startdate, " & _
                "enddate " & _
           "FROM ads " & _
          "WHERE (catid = " & catctl.catlistid & ") " & _
            "AND (startdate <= #" & Today() & "#) " & _
            "AND (enddate   >= #" & Today() & "#) "
For a SQL Server or Oracle database, you would surround the date values with apostrophes rather than pound signs.
The current subroutine receives an argument named astrSortField, which specifies how to sort the query results. If this argument is empty, extend the SQL statement with an ORDER BY clause that sorts the results by headline and adid. If the argument equals adid, sort by adid. If the argument equals anything else, sort by the field named in the argument and then by adid. Put these statements after the code from the previous step:
Select Case lcase(astrSortField)
  Case ""
    strSQL &= "ORDER BY headline, adid "
  Case "adid"
    strSQL &= "ORDER BY adid "
  Case else
    strSQL &= "ORDER BY " & astrSortField & ", adid "
End Select
Next, code four statements that
Use the SQL statement in strSQL and the database connection in conClasf to create an OleDbCommand object named cmdAds.
Use this command object to create a data reader named rdrAds.
Assign this data reader as the data source of a data grid named grdAds.
Tell this data grid to load the data from the data source.
Here are the four statements you’ll need:
cmdAds = New OleDbCommand(strSQL, conClasf)
rdrAds = cmdAds.ExecuteReader
GrdAds.DataSource = rdrAds
GrdAds.DataBind()
These statements complete the RunQueryAndBind subroutine.
As you might have noticed, the data grid in this example isn’t a plain HTML table. This isn’t terribly difficult to achieve, but it does take some extra work. To begin, proceed as follows.
Add the following statements just before the end of the Web form you created in the first procedure.
<asp:DataGrid id="GrdAds" runat="server"
              borderwidth="0" cellspacing="3"
              cellpadding="2"
              AutoGenerateColumns="False"
              AllowSorting="True"
              onSortCommand="SortGrid">
<headerstyle cssclass="thd" />
<columns>
</columns>
</asp:DataGrid>
</form>
Within the <asp:DataGrid> tag:
The borderwidth, cellspacing, and cellpadding attributes serve the same purpose as ordinary HTML table attributes.
The AutoGenerateColumns attribute tells the data grid not to automatically create a display column for each field in the data source.
The AllowSorting attribute tells the data grid to display the column headings as hyperlinks.
The onSortCommand attribute specifies an event handler the data grid should run whenever the visitor clicks a hyperlinked column heading. This event handler will receive a so-called SortExpression value that corresponds to the column the visitor clicked.
The cssclass attribute in the <headerstyle> tag specifies a cascading style sheet (CSS) class to use when formatting cells in the grid’s heading. This setting is strictly for appearance. The normal.css file mentioned in step 1 on page 369 defines this class.
The <columns> and </columns> tags mark the beginning and end of a group of tags that will define each column in the grid. The next few steps will explain how to define these columns.
Because the data grid should display six columns of data, and because AutoGenerateColumns="False" is in effect for the entire data grid, you must now add six column definitions between the <columns> and </columns> tags you added in the previous step. The first of these is for the ID column, which displays a hyperlink and is therefore an <asp:HyperLinkColumn> tag. Here it is, in blue:
<columns>
<asp:HyperLinkColumn HeaderText="ID"
     DataTextField="adid"
     DataNavigateUrlField="adid"
     DataNavigateUrlFormatString="ad-dtl.aspx?id={0}"
     SortExpression="adid"
     ItemStyle-HorizontalAlign="right"
     ItemStyle-VerticalAlign="top" />
</columns>
This tag has quite a few attributes, but they’re not so bad if you consider them one at a time:
HeaderText specifies the text for the column heading.
DataTextField specifies the name of the data field to display, as it appears in the grid’s data source.
DataNavigateUrlField specifies the name of the data field that supplies the hyperlink location.
DataNavigateUrlFormatString specifies formatting for the hyperlink location. In this case, the formatting consists of the constant ad-dtl.aspx?id= followed by the value that the DataNavigateUrlField property retrieves from the data source. Note that the data format string {0} doesn’t specify a formatting code. This means that the data value itself appears unchanged.
The string ad-dtl.aspx?id= links to the page in the next example. This page will expect to receive an adid by means of the query string. The URL ad-dtl.aspx?id=50, for example, will display classified ad number 50.
SortExpression specifies the value that the onSortCommand event handler will receive if the visitor clicks the heading for this column. (In step 1, you specified that the SortGrid subroutine will handle this event.)
ItemStyle-HorizontalAlign positions the output value left to right within the column. In essence, this property adds an align= attribute to each table cell that displays values for this column.
ItemStyle-VerticalAlign positions the output value top to bottom by adding valign= attributes to each cell in the column.
After the code you just entered, add a column tag that displays the headline field. Because this and all subsequent columns simply display data from the data source, they’re all <asp:BoundColumn> tags. Here’s the code:
<asp:BoundColumn HeaderText="Headline"
     DataField="headline"
     SortExpression="headline"
     ItemStyle-VerticalAlign="top" />
The DataField property specifies which field from the data source to display. For explanations of the remaining attributes, refer to the previous step.
Next, define a column for the description field. This follows the pattern of the previous column (and step) exactly.
<asp:BoundColumn HeaderText="Description"
     DataField="description"
     SortExpression="description"
     ItemStyle-VerticalAlign="top" />
The next column displays the askingprice field, which you should display as currency and align to the right. The lines in blue take care of these details.
<asp:BoundColumn HeaderText="Asking Price"
     DataField="askingprice"
     DataFormatString="{0:c}"
     SortExpression="askingprice"
     ItemStyle-HorizontalAlign="right"
     ItemStyle-VerticalAlign="top" />
The column that displays the startdate field is next. This uses the same attributes as the askingprice column, except that the DataFormatString attribute provides date rather than monetary formatting. The ItemStyle-Wrap attribute on the last line tells the browser not to narrow the column by inserting line breaks.
<asp:BoundColumn HeaderText="Start Date"
     DataField="startdate"
     DataFormatString="{0:d-MMM-yyy}"
     ItemStyle-HorizontalAlign="right"
     SortExpression="startdate"
     ItemStyle-VerticalAlign="top"
     ItemStyle-Wrap="false" />
The final column tag is a near duplicate of the previous one. The only difference is that it displays the enddate field rather than the startdate field.
<asp:BoundColumn HeaderText="End Date"
     DataField="enddate"
     DataFormatString="{0:d-MMM-yyy}"
     ItemStyle-HorizontalAlign="right"
     SortExpression="enddate"
     ItemStyle-VerticalAlign="top"
     ItemStyle-Wrap="false" />
At this point there’s just one nagging detail: the SortGrid subroutine you specified in step 1 of the previous procedure is still missing. This is the event handler that will run when the visitor clicks a column heading to sort on that column. To create this subroutine, add the code shown in blue after the end of the btnSub_Click subroutine and before the RunQueryAndBind subroutine.
End Sub
Sub SortGrid(source As Object,
             e As DataGridSortCommandEventArgs)
  RunQueryAndBind(e.SortExpression)
End Sub
Sub RunQueryAndBind (astrSortField As string)
Note that this event handler receives a special event argument of type DataGridSortCommandEventArgs. The SortExpression property of this argument contains whatever you specified in the SortExpression property of the column the Web visitor clicked. By clever arrangement (some would claim conspiracy) in coding the column tags, this will always be the field name that needs to appear in the ORDER BY clause in the SQL statement in the RunQueryAndBind subroutine. Therefore, to re-sort the grid, the SortGrid subroutine needs only to call the RunQueryAndBind subroutine, passing it the e.SortExpression value as an argument. The RunQueryAndBind subroutine will query the database, get the results in the desired sequence, and bind the new results into the grid. Don’t you love it when a plan comes together?
To enjoy the experience of a fully operational query page (or perhaps to discover your mistakes) proceed as follows:
Save the page into a folder that’s accessible via your Web server, giving it a file name of ads.aspx.
Copy the banner.ascx and selcat.ascx files you created in the previous chapter into the same folder where you just saved the ads.aspx file. (Alternatively, in the @ Register directives from step 3, add URL paths to the src attributes so that they point correctly to those files.)
Load the ads.aspx page into your browser, taking care to specify an HTTP URL and not an ordinary file location. The page should display the categories but no items. To display the items, you must select a combination of categories and then click the Search button.
In the sample database, most of the category combinations have no ads. The following categories, however, do contain data:
Autos
Aircraft
Antique
Autos
Cars
Midsize
Autos
Commercial Vehicles
Limousines
Autos
SUVs
Compact
Miscellaneous
Computers
Desktop
Miscellaneous
Computers
Palmtop
This completes all the procedure steps for this exercise. Here’s the complete code listing:
<%@ Page Language="vb" Debug="true" Explicit="True"%>
<%@ Register TagPrefix="webdbpgm" TagName="selcat"
             src="selcat.ascx" %>
<%@ Register TagPrefix="webdbpgm" TagName="banner"
             src="banner.ascx" %>
<%@ Import Namespace="System.Data" %>
<%@ Import NameSpace="System.Data.OleDb" %>
<script runat="server">
Sub btnSub_Click(sender As Object, e As EventArgs)
  RunQueryAndBind("")
End Sub
'
---------------------
Sub SortGrid(source As Object, _
              e As DataGridSortCommandEventArgs)
  RunQueryAndBind(e.SortExpression)
End Sub
'
---------------------
Sub RunQueryAndBind (astrSortField As string)
  Dim strSQL As String
  Dim conClasf As OleDbConnection
  Dim cmdAds As OleDbCommand
  Dim rdrAds As OleDbDataReader

  conClasf = New OleDbConnection( _
            "Provider=Microsoft.Jet.OLEDB.4.0;" & _
            "Data Source=" & _
             Server.MapPath("classified.mdb") & ";")
  conClasf.Open()
  strSQL = "SELECT adid, " & _
                  "headline, " & _
                  "description, " & _
                  "askingprice, " & _
                  "startdate, " & _
                  "enddate " & _
             "FROM ads " & _
            "WHERE (catid = " & catctl.catlistid & ") " & _
              "AND (startdate <= #" & Today() & "#) " & _
              "AND (enddate   >= #" & Today() & "#) "
  Select Case lcase(astrSortField)
    Case ""
      strSQL &= "ORDER BY headline, adid "
    Case "adid"
      strSQL &= "ORDER BY adid "
    Case else
      strSQL &= "ORDER BY " & astrSortField & ", adid "
  End Select
  cmdAds = New OleDbCommand(strSQL, conClasf)
  rdrAds = cmdAds.ExecuteReader
  grdAds.DataSource = rdrAds
  grdAds.DataBind()
  conClasf.Close
End Sub
' ----------------------------------------
</script>
<html>
<head>
<link rel="stylesheet" type="text/css" href="../normal.css">
<title>Search for Ads by Category</title>
</head>
<body>
<webdbpgm:banner id="banner" runat="server" />
<form method="post" runat="server">
  <table bgcolor="#CCCCCC"
      bordercolorlight="#999999" bordercolordark="#666666"
      border="1" cellspacing="1" cellpadding="3">
    <tr>
      <td>
      <table border="0" cellspacing="1">
        <tr>
          <td align="center">Categories</td>
        </tr>
        <tr>
          <td>
          <webdbpgm:selcat id="catctl" runat="server" /></td>
        </tr>
      </table>
      </td>
      <td><asp:button type="submit" text="Search"
           id="btnSub" onclick="btnSub_Click"
           runat="server" /></td>
    </tr>
  </table>
<asp:DataGrid id="grdAds" runat="server"
               borderwidth="0" cellspacing="3"
               cellpadding="2"
               AutoGenerateColumns="False"
               allowsorting="true"
               onSortCommand="SortGrid">
<headerstyle cssclass="thd" />
<columns>
<asp:HyperLinkColumn HeaderText="ID"
     DataTextField="adid"
     DataNavigateUrlField="adid"
     DataNavigateUrlFormatString="ad-dtl.aspx?id={0}"
     SortExpression="adid"
     ItemStyle-HorizontalAlign="right"
     ItemStyle-VerticalAlign="top" />
<asp:BoundColumn HeaderText="Headline"
     DataField="headline"
     SortExpression="headline"
     ItemStyle-VerticalAlign="top" />
<asp:BoundColumn HeaderText="Description"
     DataField="description"
     SortExpression="description"
     ItemStyle-VerticalAlign="top" />
<asp:BoundColumn HeaderText="Asking Price"
     DataField="askingprice"
     DataFormatString="{0:c}"
     SortExpression="askingprice"
     ItemStyle-HorizontalAlign="right"
     ItemStyle-VerticalAlign="top" />
<asp:BoundColumn HeaderText="Start Date"
     DataField="startdate"
     DataFormatString="{0:d-MMM-yyy}"
     ItemStyle-HorizontalAlign="right"
     SortExpression="startdate"
     ItemStyle-VerticalAlign="top"
     ItemStyle-Wrap="false" />
<asp:BoundColumn HeaderText="End Date"
     DataField="enddate"
     DataFormatString="{0:d-MMM-yyy}"
     ItemStyle-HorizontalAlign="right"
     SortExpression="enddate"
     ItemStyle-VerticalAlign="top"
     ItemStyle-Wrap="false" />
</columns>
</asp:DataGrid>
</form>
</body>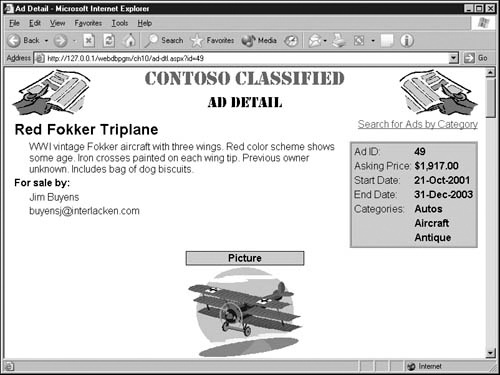
</html>The procedure in this section will create a page named ad-dtl.aspx that works with the ads.aspx page you developed in the previous procedure. As you might recall, clicking any classified ad ID in that page links to ad-dtl.aspx?id=nn, where nn is the ID number of a specific ad. The graphic on the next page shows of the finished ad-dtl.aspx page.
If you’d rather look at the finished code than enter it yourself, open the ad-dtl.aspx page in the ch10 folder you installed from the companion CD. Otherwise, proceed as follows:
Open a new, empty Web page, add the usual structural tags, and title the page Ad Detail. Format the page however you want.
To display the page banner, add the following tag immediately after the <body> tag:
<webdbpgm:banner runat="server" />
Lay out the Web page any way you want, but add the following tags somewhere in the <body> section. Each tag will display the corresponding field from the database.
<asp:literal id="litHeadline" runat="server" />
<asp:literal id="litDescription" runat="server" />
<asp:literal id="litLastName" runat="server" />
<asp:literal id="litMemberid" runat="server" />
<asp:literal id="litAdid" runat="server" />
<asp:literal id="litAskingPrice" runat="server" />
<asp:literal id="litStartdate" runat="server" />
<asp:literal id="litEnddate" runat="server" />
<asp:literal id="litCatname1" runat="server" />
<asp:literal id="litCatname2" runat="server" />
<asp:literal id="litCatname3" runat="server" />
If your page layout contains any titles or other elements that shouldn’t be visible if the specified ad isn’t available, code them with id, visible="false", and runat="server" attributes. The sample file contains two of these: a table named tblDetails and a span named spnForSaleBy.
To review the page layout for the sample Web page, open the ad-dtl.aspx page in the ch10 folder you installed from the companion CD.
Somewhere in your page layout, code a one-column, two-row HTML table. The cell in the top row should contain the word Picture, and the cell in the bottom row should contain an <img> tag. The src URL in the <img> tag doesn’t matter, but code the <table> and <img> tags with the ASP.NET attributes shown in blue.
<table align="center" id="tblPicname"
       visible="false" runat="server">
  <tr>
    <th>Picture</th>
  </tr>
  <tr>
    <td><img src="../images.trans5x5.gif"
         id="imgPicname" runat="server" /></td>
  </tr>
</table>
Add the following declarations at the top of the page. They include a standard @ Page directive, the @ Import directives for reading a non–SQL Server database, and the @ Register directive for the banner.ascx user control.
<%@ Page Language="vb" Debug="true" Explicit="True"%>
<%@ Import Namespace="System.Data" %>
<%@ Import NameSpace="System.Data.OleDb" %>
<%@ Register TagPrefix="webdbpgm" TagName="banner"
             src="banner.ascx" %>
If the banner.ascx file doesn’t reside in the folder where you plan to save the ad-dtl.aspx page, either copy it there or code the necessary URL path in the src= attribute of the @ Register directive.
Immediately after the code you just entered, add a code declaration block. Within that, define a Page_Load subroutine.
<script runat="server">
Sub Page_Load (sender As Object, e As EventArgs)
' Code to retrieve and display ad info will go here.
End Sub
</script>
Replace the comment in step 6 with the following variable declarations. The first three are for reading the database and should be familiar. The strAdId variable will contain the ID number from the query string, and the strSQL variable will contain a SQL statement.
Dim conClasf As OleDbConnection
Dim cmdAd As OleDbCommand
Dim rdrAd As OleDbDataReader
Dim strAdId As String
Dim strSQL As String
As in classic ASP, the expression Request.QueryString("id") will contain the value of the query string variable named id. Retrieve this value and store it in the strAdId variable. Then, if the variable contains an empty string or isn’t numeric, display an error message and exit the subroutine. Add these statements after the code from the previous step.
strAdId = Request.QueryString("id")
If strAdId = "" Then
  litHeadline.Text = "No Ad ID specified."
  Exit Sub
End If
If Not IsNumeric(strAdId) Then
  litHeadline.Text = "Ad ID '" & strAdId & _
                    "' isn't numeric."
  Exit Sub
End If
Note that this code takes the lazy way out; it uses the litHeadline Web server control to display any error messages. If this offends your sense of order, just define and use another literal control named, for example, litErrMsg.
Create, open, and close a connection to the classified.mdb database. This is old stuff.
conClasf = New OleDbConnection( _
          "Provider=Microsoft.Jet.OLEDB.4.0;" & _
          "Data Source=" & _
           Server.MapPath("classified.mdb") & ";")
conClasf.Open
' Code to run database query will go here.
conClasf.Close
Construct a SQL statement that retrieves the requested ads record. This SQL statement should also retrieve
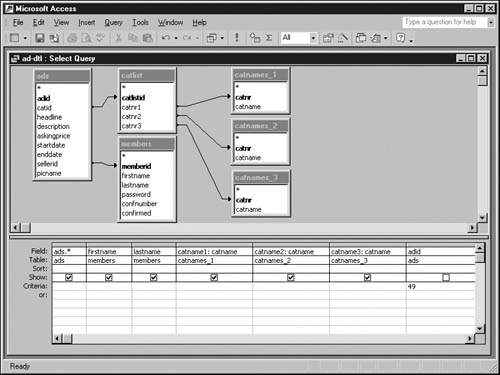
The firstname and lastname fields from the record in the members table that has the same memberid value as the memberid field in the current ads record.
The record from the catlist table that has the same catlistid value as the catid field in the current ads record.
The catname fields from three records in the catnames table that have the same catnr values as the catnr1, catnr2, and catnr3 fields in the current catlist record.
Here’s the required code, which should replace the comment in the previous step. The graphic that follows on the next page illustrates the structure of this query as displayed in Microsoft Access.
strSQL = "SELECT ads.*, " & _
                "members.firstname, " & _
                "members.lastname, " & _
                "catnames_1.catname as catname1, " & _
                "catnames_2.catname as catname2, " & _
                "catnames_3.catname as catname3 " & _
           "FROM ((((ads " & _
      "LEFT JOIN catlist " & _
             "ON ads.catid = catlist.catlistid) " & _
      "LEFT JOIN catnames AS catnames_1 " & _
             "ON catlist.catnr1 = catnames_1.catnr) " & _
      "LEFT JOIN catnames AS catnames_2 " & _
             "ON catlist.catnr2 = catnames_2.catnr) " & _
      "LEFT JOIN catnames AS catnames_3 " & _
             "ON catlist.catnr3 = catnames_3.catnr) " & _
      "LEFT JOIN members " & _
             "ON ads.memberid = members.memberid " & _
          "WHERE (ads.adid = " & strAdId & ") "
Note that because the SQL statement uses the catnames table in three different contexts, the code in blue gives the table a different name in each context.
Note also that the SQL statement returns the catname field in three different contexts (corresponding to the three category levels). Lines 4 through 6 assign different result set names to each occurrence.
This SQL statement has a lot of LEFT JOIN operators. Reading these can be a chore until you realize that
The first LEFT JOIN produces a result set by joining the catlist table to the ads table.
The second LEFT JOIN produces a second result set by joining the catnames table (as catnames_1) to the first result set.
The third LEFT JOIN produces a third result set by joining the catnames table (as catnames_2) to the second result set.
This process continues through each remaining LEFT JOIN.
Finally, notice that the WHERE clause in the last line specifies that the adid field in the ads table must equal the value in the strAdId variable. There’s no need for an ORDER BY clause, because there can only be one record with this given adid number.
Create an OleDbCommand object using the SQL statement you just constructed and the database connection from step 9. Then, use this command object to open a data reader. Finally, while you’re thinking of it, close the data reader and dispose of the command object.
cmdAd = New OleDbCommand(strSQL, conClasf)
rdrAd = cmdAd.ExecuteReader
'   Code to retrieve database field values will go here.
rdrAd.Close
cmdAd.Dispose
Attempt to retrieve one record from the data reader. If this returns True, display the database information as the next step will describe. Otherwise, send a not found message to the visitor. This code replaces the comment in the previous step.
rdrAd = cmdAd.ExecuteReader
If rdrAd.Read Then
' Code to display database values will go here.
Else
  litHeadline.Text = "Ad ID '" & strAdId & "' not found"
End If
rdrAd.Close
If attempting to read a record from the data reader returns True, copy the field values from the data reader to the Literal Web server controls you defined in step 3. The following code should replace the comment in step 12:
litAdid.Text = rdrAd.Item("adid")
litHeadline.Text = rdrAd.Item("headline")
litDescription.Text = rdrAd.Item("description")
litAskingPrice.Text = _
    FormatCurrency(rdrAd.Item("askingprice"))
litStartdate.Text = Format(rdrAd.Item("startdate"), _
                           "dd-MMM-yyyy")
litEnddate.Text = Format(rdrAd.Item("enddate"), _
                         "dd-MMM-yyyy")
litMemberid.Text = rdrAd.Item("memberid")
litLastName.Text = rdrAd.Item("firstname") & " " & _
                   rdrAd.Item("lastname")
litCatname1.Text = rdrAd.Item("catname1")
litCatname2.Text = rdrAd.Item("catname2")
litCatname3.Text = rdrAd.Item("catname3")
Note that this code uses the Visual Basic FormatCurrency function to format the askingprice field, and the Visual Basic Format function to format the startdate and enddate fields. Note as well that the litLastName control displays the firstname field, a space, and the lastname field.
The ads table also contains a picname field that, if not empty, contains the name of a picture file. If this field contains data, replace the src attribute of the <img> tag you defined in step 4 with the name of the picture and any path prefix that might be necessary. The path, in this case, is pix/. This code follows the code you added in the previous step:
If rdrAd.Item("picname") <> "" Then
  imgPicname.Src = "pix/" & rdrAd.Item("picname")
  tblPicName.Visible = True
End If
The third statement in the preceding code makes the table that contains the <img> tag visible. Step 4 initialized the table as invisible, so the heading wouldn’t appear unless a picture turned out to be available.
Finally, don’t forget to undo any visible="False" attributes you coded on page elements that shouldn’t appear if the specified ad is unavailable. This requires code such as the following:
tblDetails.Visible = True
spnForSaleBy.Visible = True
Save the page into the same folder where you stored the ads.aspx file earlier in this chapter. Give it a file name of ad-dtl.aspx.
Display the ads.aspx page as you did in the previous procedure. Search for an ad and then click its ID number. This should link to the ad-dtl.aspx page and display more information about the ad you clicked.
The program listing for this Web page appears below. The HTML code for this example is quite ordinary, but if you want to look at it, open the ad-dtl.aspx page in the ch10 folder you installed from the companion CD.
<%@ Page Language="vb" Debug="true" Explicit="True"%>
<%@ Import Namespace="System.Data" %>
<%@ Import NameSpace="System.Data.OleDb" %>
<%@ Register TagPrefix="webdbpgm" TagName="banner"
             src="banner.ascx" %>
<script runat="server">
Sub Page_Load (sender As Object, e As EventArgs)
  Dim conClasf As OleDbConnection
  Dim cmdAd As OleDbCommand
  Dim rdrAd As OleDbDataReader
  Dim strAdId As String
  Dim strSQL As String
  strAdId = Request.QueryString("id")
  If strAdId = "" Then
    litHeadline.Text = "No Ad ID specified."
    Exit Sub
  End If
  If Not IsNumeric(strAdId) Then
    litHeadline.Text = "Ad ID '" & strAdId & _
                     "' isn't numeric."
    Exit Sub
  End If

  conClasf = New OleDbConnection( _
            "Provider=Microsoft.Jet.OLEDB.4.0;" & _
            "Data Source=" & _
             Server.MapPath("classified.mdb") ";")
  conClasf.Open

  strSQL = "SELECT ads.*, " & _
                  "members.firstname, " & _
                  "members.lastname, " & _
                  "catnames_1.catname as catname1, " & _
                  "catnames_2.catname as catname2, " & _
                  "catnames_3.catname as catname3 " & _
             "FROM ((((ads " & _
        "LEFT JOIN catlist " & _
               "ON ads.catid = catlist.catlistid) " & _
        "LEFT JOIN catnames AS catnames_1 " & _
               "ON catlist.catnr1 = catnames_1.catnr) " & _
        "LEFT JOIN catnames AS catnames_2 " & _
               "ON catlist.catnr2 = catnames_2.catnr) " & _
        "LEFT JOIN catnames AS catnames_3 " & _
               "ON catlist.catnr3 = catnames_3.catnr) " & _
        "LEFT JOIN members " & _
               "ON ads.memberid = members.memberid " & _
            "WHERE (ads.adid = " & strAdId & ") "
  cmdAd = New OleDbCommand(strSQL, conClasf)
  rdrAd = cmdAd.ExecuteReader
  If rdrAd.Read Then
    litAdid.Text = rdrAd.Item("adid")
    litHeadline.Text = rdrAd.Item("headline")
    litDescription.Text = rdrAd.Item("description")
    litAskingPrice.Text = _
        FormatCurrency(rdrAd.Item("askingprice"))
    litStartdate.Text = Format(rdrAd.Item("startdate"), _
                               "dd-MMM-yyyy")
    litEnddate.Text = Format(rdrAd.Item("enddate"), _
                             "dd-MMM-yyyy")
    litMemberid.Text = rdrAd.Item("memberid")
    litLastName.Text = rdrAd.Item("firstname") & " " & _
                       rdrAd.Item("lastname")
    litCatname1.Text = rdrAd.Item("catname1")
    litCatname2.Text = rdrAd.Item("catname2")
    litCatname3.Text = rdrAd.Item("catname3")
    If rdrAd.Item("picname") <> "" Then
      imgPicname.Src = "pix/" & rdrAd.Item("picname")
      tblPicName.Visible = True
    End If
    tblDetails.Visible = True
    spnForSaleBy.Visible = True
  Else
    litHeadline.Text = "Ad ID '" & strAdId & "' not found"
  End If
  rdrAd.Close
  cmdAd.Dispose
  conClasf.Close
End Sub
</script>This chapter showed how to create Web pages that interactively query a database. Along the way, it also showed how to customize the appearance of a data grid and how to use results from one query to trigger another.
The next chapter will explain how to identify your Web visitors and how to retain information about your application or your visitors without using the ViewState mechanism.