Remote procedure calls (RPC) have been a backbone communications mechanism since the early days of Microsoft Windows NT 3.1 (way back in 1993). There are two main variants on RPC: DCE (Distributed Computing Environment) RPC and ONC (Open Network Computing) RPC. Both are open standards, and both are implemented on several platforms. DCE RPC is the version Microsoft platforms use, although many ONC RPC applications also run on Windows platforms. DCE RPC is sometimes called Microsoft RPC, and ONC RPC is sometimes called Sun RPC. In the remainder of this chapter, RPC will refer to Microsoft’s implementation of DCE RPC, although some of the concepts apply to both types of RPC.
A large number of applications written for Windows NT and beyond rely heavily on the RPC infrastructure. Because security is all about strengthening every aspect of a system, it’s imperative that your RPC applications be robust and secure from attack. This chapter also covers Distributed COM (DCOM) applications and ActiveX controls, primarily because RPC is a technology used by DCOM, which is the mechanism by which COM applications communicate, and ActiveX controls are a specific type of COM technology.
Keeping in mind that we should learn from past mistakes when designing and building secure applications, let’s look at three RPC security vulnerabilities fixed by Microsoft. The first attack occurs when an attacker sends invalid data to the Local Security Authority (LSA), which causes the LSA to hang. On the surface, the bug looks like an API issue; however, the problem occurs because the LsaLookupSids API forwards malformed data to the LSA over RPC. You can read more about this in the "Malformed Security Identifier Request" vulnerability Microsoft Security Bulletin at http://www.microsoft.com/technet/security/bulletin/ms99-057.asp.
The second attack relates to sending garbage to port 135 on a computer running Windows NT 3.51 or Windows NT 4. Doing so causes the RPC server listening on this port to spin the CPU up to 100 percent, essentially denying access to the server to users. The most common way to perform this attack is to connect to port 135 by using a telnet client, type in more than 10 random characters, and disconnect. You can read more about this bug in the Microsoft Knowledge Base article titled "Telnet to Port 135 Causes 100 Percent CPU Usage" at http://support.microsoft.com/support/kb/articles/Q162/5/67.asp.
Finally, a Microsoft Security Bulletin released in July 2001, "Malformed RPC Request Can Cause Service Failure," relates to RPC server stubs—I’ll explain these shortly—not performing appropriate validation before passing requests to various services, thereby potentially enabling denial of service (DoS) attacks. You can read this bulletin at http://www.microsoft.com/technet/security/bulletin/ms01-041.asp.
The purpose of this section is to explain key concepts and terminology of the RPC world. If you understand RPC, feel free to move on to the "Secure RPC Best Practices" section. However, you might find it a worthwhile exercise to read this section first—RPC can be somewhat daunting at first.
RPC is a communication mechanism that allows a client and a server application to communicate with each other through function calls sent from the client to the server. The client thinks it’s calling a client-side function, but the function is sent by the RPC runtime to the server, which performs the function and returns any results to the client.
Note
RPC is primarily a C and C++ technology. Although it includes wrappers for other languages, frankly, if you’re considering using RPC from other languages such as Perl, Microsoft JScript, or Microsoft Visual Basic, you should simply use COM and DCOM.
The RPC functionality built into Microsoft Windows is based on Open Software Foundation RPC (OSF RPC) and thus offers interoperability with other operating systems, such as Unix and Apple.
The majority of system services in Windows—including the Print Spooler, Event Log, Remote Registry, and Secondary Logon—use RPC to some degree, as do hundreds of third-party applications from independent software vendors. Also, many applications communicate locally using a local version of RPC, named LRPC.
Creating an RPC application can be a little confusing at first. It helps if you design an application from the outset to use RPC, rather than attempting to retrofit RPC functionality later. When creating the RPC application, you create the following files:
The client code
The server code
An interface definition language file (.IDL file)
Optionally, an application configuration file (.ACF file)
The client code is normal C or C++. It calls various functions, some RPC configuration functions, some local functions, and other remote RPC functions. The server code also has RPC startup code; however, most important, it contains the real functions that are called by the RPC clients. The IDL file is incredibly important. It defines the remote interface function signatures—that is, the function name, arguments, and return values—and allows the developer to group the functions in easy-to- manage interfaces. The ACF file allows you to customize your application’s RPC capabilities but does not change the network representation of the data.
Compiling the RPC application involves the following stages:
Compile the IDL and ACF files by using Midl.exe. This creates three files: the server stub code, the client stub code, and a header file.
Compile the client code and the client stub code. Note that the client code also includes the header file created during step 1.
Link the client code with the appropriate RPC run-time library, usually Rpcrt4.lib.
Compile the server code and the server stub code. Note that the server code also includes the header file created during step 1.
Link the server code with the appropriate RPC run-time library, usually Rpcrt4.lib.
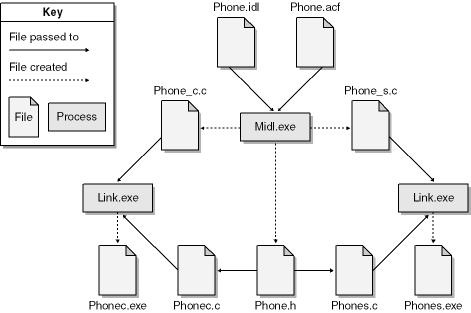
That’s it! Let’s look at an example. Assume your application (a phonelike application) is to be named Phone, the client code is contained in a C source file named Phonec.c, the server code is in Phones.c, and the IDL and ACF files are Phone.idl and Phone.acf, respectively. When you compile Phone.idl using Midl.exe, the compiler creates three files: a header file, Phone.h, and the client and server stubs, Phone_c.c and Phone_s.c. Next you compile Phonec.c and Phone_c.c and link with Rpcrt4.lib to create the client code, Phonec.exe. You then compile Phones.c and Phone_s.c and link with Rpcrt4.lib to create the server code, Phones.exe. Figure 16-1 outlines the process.
It’s really not as complex as it looks! The Phone application is available with the book’s sample files in the folder Secureco2Chapter 16RPC folder.
When the client application communicates with the server application, the client calls the client stub code, which in turn marshals the data to send to the server. Marshalling involves packing function information and function arguments in such a way that any appropriate RPC server, on any platform, can read the client request. Once the client request is made, the data travels from the client to the server, where the server stub code unpacks the data and forwards the request to the server code. The server then does the work, and any return data is marshaled back to the client.
RPC applications communicate using various network transport protocols, such as named pipes and TCP/IP-based sockets. The good news is that as an application developer, you do not need to understand much about the network protocols themselves—the work is left to RPC.
To communicate with a server, the client must bind with it, which involves building a binding handle from a binding string. This string is composed of several parts. The first is the protocol sequence, which specifies which network protocol will be used. Each protocol has a specific name. Table 16-1 outlines some of the most commonly used protocol sequences.
Table 16-1. Example Protocol Sequences
|
Protocol Sequence |
Comments |
|---|---|
|
ncacn_np |
Named pipes |
|
ncalrpc |
Local interprocess communication, not remotable |
|
ncacn_ip_tcp |
TCP/IP |
After the protocol sequence comes the server address, which is usually the name of the server in a format understood by the protocol sequence. Following that is the endpoint, which specifies the particular network resource on the host that should be used. Last come the options, which are rarely used. The resulting string is then used to connect, or bind, to the server. Also, a function exists that will build the string for you, RpcStringBindingCompose. For example, this binding string— ncacn_np:northwindtraders[\pipe\phone]—is created by the following code:
LPBYTE pszUuid             = (LPBYTE)NULL;
LPBYTE pszProtocolSequence = (LPBYTE)"ncacn_np";
LPBYTE pszNetworkAddress   = (LPBYTE)"northwindtraders";
LPBYTE pszEndpoint         = (LPBYTE)"\pipe\phone";
LPBYTE pszOptions          = (LPBYTE)NULL;
LPBYTE pszStringBinding    = (LPBYTE)NULL;

RPC_STATUS status = RpcStringBindingCompose(pszUuid,
                                            pszProtocolSequence,
                                            pszNetworkAddress,
                                            pszEndpoint,
                                            pszOptions,
                                            &pszStringBinding);
Once the client software has created a binding handle, it’s ready to start calling RPC functions.
Technically, RPC is stateless—when a user connects to the RPC server, it does not maintain data for that client. However, some applications require the server program to maintain state information between client calls; hence, the server must keep the state information for each client. This is achieved through the use of context handles, which are opaque data structures passed to the client by the server. On each request, the client sends the context handle to the server. The concept is similar to Web-based cookies.
You might have noticed that RPC uses two main kinds of handles: binding handles and context handles. A binding handle is used to identify the logical connection between a client and a server. It’s similar, in principle, to a file handle. A context handle allows the server to maintain state for the client between function calls.
This section outlines a series of general security best practices, which are based on experience and are highly encouraged. The potential security threats to RPC include the following:
DoS threats when an attacker sends malformed data to an RPC endpoint and the RPC server does not properly handle the bad data and fails.
Information disclosure threats as data travels from the client to the server and back unprotected and an attacker uses a packet sniffer to view the data.
Data-tampering threats as an attacker intercepts unprotected on-the-wire data and modifies it.
Using the practices covered in this section will help mitigate these threats.
The /robust Microsoft Interface Definition Language (MIDL) compiler switch was added to Windows 2000 to add more run-time checking to data as it arrives at the RPC server marshaler. This improves the stability of the server by rejecting more malformed packets than in previous versions of RPC. This is important: any malformed packet is rejected by the RPC marshaling engine.
If your application runs on Windows 2000 and later, you should definitely enable this compiler option. There’s no need to change the client or server code. The only downside is that this new feature works only on Windows 2000 and later. If you also target Windows NT 4 as an RPC server, you’ll need to create two versions of the server: one for Windows NT 4 and one for Windows 2000 and later. Using the option is simple: just add /robust to the MIDL command line.
Note
The gains from using the /robust switch are so great that you should go through the effort of creating two server binaries if you support down-level server platforms, such as Windows NT 4. It truly is worth the work.
You can use the [range] attribute in an IDL file to modify the meaning of sensitive parameters or fields, such as those used for size or length. For example, IDL allows the developer to describe the size of a data blob:
void Message([in] long lo,
             [in] long hi,
             [size_is(lo, hi)] char **ppData);
In theory, an attacker could set lo and hi to define an out-of-bounds range that could cause the server or client to fail. You can help reduce the probability of such an attack by using the [range] attribute. In the following example, lo and hi are restricted to be between the values 0 and 1023, which means that the size of the data pointed to by ppData can be no larger than 1023 bytes:
void Message([in, range(0,1023)] long lo,
              [in, range(0,1023)] long hi,
              [size_is(lo, hi)] char **ppData);
Note that you must use the /robust compiler option when you compile your IDL file to generate the stub code that will perform these checks. Without the /robust switch, the MIDL compiler ignores this attribute. It’s also worth noting in this example that it’s up to the server software to determine that hi is greater than or equal to lo.
You can mitigate many DoS attacks simply by requiring clients to authenticate themselves. Imagine the following scenario: A server exists that accepts data from clients. The server can operate in one of two modes. It can accept data from anyone without authentication, in which case all data transmitted by the client is anonymous. Or it can require that all users authenticate themselves before the server accepts any data; any nonauthenticated data is rejected. In the second mode, the server not only requires client authentication, it also logs the information in an audit log. Which scenario is more prone to denial of service attacks? That’s right—the anonymous scenario because there’s no recourse against the attacker, who is anonymous. Obviously, if an attacker knows that his identity must be divulged, he will be less likely to attempt attacks! So require authenticated connections in your RPC server-based applications.
You need to make changes to both the client and the server to support such authentication. The client sets up the security configuration, and the server can check the settings to determine whether the configuration is good enough, which will depend on the threats to the system. For example, you might require more security options if your application provides access to highly sensitive data. I’ll discuss the options momentarily.
A strategy often used by RPC clients who want to add security rather than build it in from the outset is to allow the server to accept both types of connections for a grace period while the clients get upgraded. After that, the plug is pulled on the unauthenticated connections. Of course, the more secure route is to add security capabilities from the outset.
At the client, your application should call RpcBindingSetAuthInfo to set the authentication, privacy, and tamper detection policy. The following is an example from our earlier phone application:
status = RpcBindingSetAuthInfo(
    phone_Handle,
    szSPN,      //  For Kerberos support, use the server’s SPN.
    RPC_C_AUTHN_LEVEL_PKT_PRIVACY,
    RPC_C_AUTHN_GSS_NEGOTIATE,
    NULL,
    0);
The second argument, szSPN, specifies the service principal name (SPN), which I’ll discuss in detail later. The third argument, AuthnLevel, is set to RPC_C_AUTHN_LEVEL_PKT_PRIVACY, which means that the data sent between the client and the server is authenticated, encrypted, and integrity-checked. Table 16-2 outlines the possible RPC-supported security setting levels.
Table 16-2. RPC Security Setting Levels
|
Setting |
Value |
Comments |
|---|---|---|
|
RPC_C_AUTHN_LEVEL_DEFAULT |
0 |
Uses the default setting for the authentication service. Personally, I don’t use this because you don’t always know what the setting may be. Perhaps I’ve been doing this security stuff for too long, but I’d rather know what I’m getting! Currently, the default for RPC applications is RPC_C_AUTHN_LEVEL_CONNECT. |
|
RPC_C_AUTHN_LEVEL_NONE |
1 |
No authentication. Not recommended. |
|
RPC_C_AUTHN_LEVEL_CONNECT |
2 |
Authentication is performed when the client first connects to the server. |
|
RPC_C_AUTHN_LEVEL_CALL |
3 |
Authentication is performed at the start of each RPC call. Note that this setting is automatically upgraded to RPC_C_AUTHN_LEVEL_PKT if the protocol sequence is connection-based. Connection-based protocols start with ncacn. |
|
RPC_C_AUTHN_LEVEL_PKT |
4 |
Authentication is performed to make sure that all data is from the expected sender. |
|
RPC_C_AUTHN_LEVEL_PKT_INTEGRITY |
5 |
Same as RPC_C_AUTHN_LEVEL_PKT and also determines whether the data has been tampered with. |
|
RPC_C_AUTHN_LEVEL_PKT_PRIVACY |
6 |
Same as RPC_C_AUTHN_LEVEL _PKT_INTEGRITY, and the data is encrypted. |
Note
Some would argue that the argument name AuthnLevel is somewhat misleading because the argument controls not only authentication but also integrity and privacy.
To summarize what happens at the client, the client calls RpcBindingSetAuthInfo, which places the client identity information in the binding handle that’s passed to the server as the first parameter in remote procedure calls.
To determine an appropriate level of security for the server, you set an authentication handler for the server and, when the client connects, analyze the client connection settings to determine whether the client meets the security quality bar for your application.
You set the authentication mechanism by using RpcServerRegisterAuthInfo:
status = RpcServerRegisterAuthInfo(
    szSPN,
    RPC_C_AUTHN_GSS_NEGOTIATE,
    NULL,
    NULL);
From a Windows authentication perspective, the second argument, AuthnSvc, is critical because it determines how the client is to be authenticated. The most common setting is RPC_C_AUTHN_GSS_WINNT, which will use NTLM authentication to authenticate the client. However, in a Windows 2000 environment and later, it is highly recommended that you instead use RPC_C_AUTHN_GSS_NEGOTIATE, which will use either NTLM or Kerberos automatically.
There is another option, RPC_C_AUTHN_GSS_KERBEROS, but RPC_C_AUTHN_GSS_NEGOTIATE gives your application a little more leeway in that it will still work on down-level platforms such as Windows NT 4. Of course, that means that an attacker also has more leeway because she can force the use of the less secure NTLM authentication protocol.
Servers extract the client authentication information from the client binding handle by calling RpcBindingInqAuthClient in the remote procedure. This will identify the authentication service used—NTLM or Kerberos, for example—and the authentication level desired, such as none, packet authentication, privacy, and so on.
Here’s an example of the code:
//RPC server function with security checks inline.
void Message(handle_t hPhone, unsigned char *szMsg) {
    RPC_AUTHZ_HANDLE hPrivs;
    DWORD dwAuthn;

    RPC_STATUS status = RpcBindingInqAuthClient(
        hPhone,
        &hPrivs,
        NULL,
        &dwAuthn,
        NULL,
        NULL);

    if (status != RPC_S_OK) {
        printf("RpcBindingInqAuthClient returned: 0x%x
", status);
        RpcRaiseException(ERROR_ACCESS_DENIED);
    }

    //Now check the authentication level.
    //We require at least packet-level authentication.
        if (dwAuthn < RPC_C_AUTHN_LEVEL_PKT) {
        printf("Client attempted weak authentication.
");
        RpcRaiseException(ERROR_ACCESS_DENIED);
    }

    if (RpcImpersonateClient(hIfPhone) != RPC_S_OK) {
        printf("Impersonation failed.
");
        RpcRaiseException(ERROR_ACCESS_DENIED);
    }

    char szName[128+1];
    DWORD dwNameLen = 128;
    if (!GetUserName(szName, &dwNameLen))
        lstrcpy(szName, "Unknown user");

    printf("The message is: %s
"
           "%s is using authentication level %d
",
           szMsg, szName, dwAuthn);

    RpcRevertToSelf();
}
A number of things are going on here. The Message function is the remote function call from the sample phone application. First the code determines what authentication level is used by calling RpcBindingInqAuthClient and querying the AuthnLevel value. If the function fails or AuthnLevel is less than our security minimum, the call fails and the server raises an access denied exception, which will be caught by the client. Next the code impersonates the caller and determines the username. Finally, after displaying the appropriate message, the call reverts to the process identity.
Note also that the return values from all impersonation functions are checked in this book. In versions of Windows prior to Microsoft Windows .NET Server 2003, it was uncommon for these functions to fail; usually they failed only when the system was low on memory or because of a setting on the application that prevented impersonation. However, Windows .NET Server 2003 introduces a new privilege—Impersonate A Client After Authentication—that might make it more common for such failures to occur if the process account does not have this privilege.
The szSPN parameter used in the RpcBindingSetAuthInfo call specifies the principal name of the server, which allows Kerberos to work. Remember that Kerberos authenticates the client and the server—referred to as mutual authentication—and NLTM authenticates the client only. Server authentication provides protection from server spoofing. The szSPN parameter can be NULL if you do not want Kerberos support.
You configure this parameter by calling DsMakeSPN at the client. The function is defined in Ntdsapi.h, and you need to link with Ntdsapi.dll. The following code fragment shows how to use this function:
DWORD cbSPN = MAX_PATH;
char szSPN[MAX_PATH + 1];
status = DsMakeSpn("ldap",
                   "blake-laptop.northwindtraders.com",
                   NULL,
                   0,
                   NULL,
                   &cbSPN,
                   szSPN);
The server application must also make sure it is using the same name:
LPBYTE szSPN = NULL;
status = RpcServerInqDefaultPrincName(
            RPC_C_AUTHN_GSS_NEGOTIATE,
            &szSPN);
if (status != RPC_S_OK)
    ErrorHandler(status);

//Register server authentication information.
status = RpcServerRegisterAuthInfo(
                     szSPN,
                     RPC_C_AUTHN_GSS_NEGOTIATE,
                     0, 0);
if (status != RPC_S_OK)
    ErrorHandler(status);
⋮
if (szSPN)
    RpcStringFree(&szSPN);
Generally, the first question that comes to everyone’s mind relates to performance. What are the performance implications of running RPC servers that require authentication? A sample RPC application named RPCSvc ships with the Microsoft Platform SDK; it was designed specifically to test the performance characteristics of various RPC settings. I ran this application on two computers. The client was running Windows XP Professional, and the server had a 550-MHz CPU and 256 MB of RAM and was running Windows .NET Server 2003. The test consisted of calling a single remote function that passed a 100-byte buffer to the server 1000 times. Table 16-3 shows the results of averaging three test runs using named pipes and TCP/IP.
Table 16-3. Performance Characteristics of Various RPC Settings
|
AuthnLevel |
Using ncacn_np |
Using ncacn_ip_tcp |
|---|---|---|
|
RPC_C_AUTHN_LEVEL_NONE |
1926 milliseconds (ms) |
1051 ms |
|
RPC_C_AUTHN_LEVEL_CONNECT |
2023 ms |
1146 ms |
|
RPC_C_AUTHN_LEVEL_PKT_PRIVACY |
2044 ms |
1160 ms |
As you can see, the performance impact of requiring authentication is not large. It’s on the order of 10 percent degradation. However, you get a great deal of security benefit for such little trade-off. Notice that the performance impact of going from RPC_C_AUTHN_LEVEL _CONNECT to RPC_C_AUTHN_LEVEL_PKT_PRIVACY is minimal. If your application is using RPC_C_AUTHN_LEVEL_CONNECT, you really ought to use RPC_C_AUTHN_LEVEL _PKT_PRIVACY, which is our next topic.
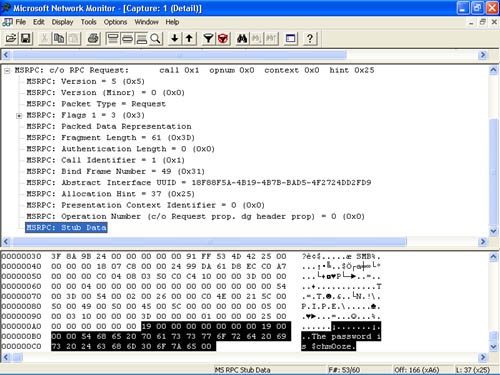
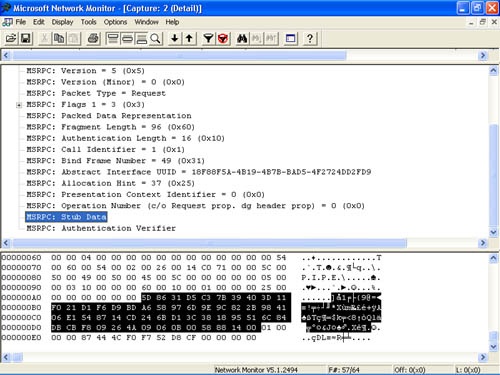
If you perform authenticated RPC calls, why not go to the next level and opt for packet privacy and integrity also? It’s almost free! In January 2000, I performed a security review early in the design phase of a major new Microsoft application, and I suggested that the team use packet privacy and integrity for all their administration communications using RPC. At first the team was wary of the performance impact, but after evaluating the setting—it’s just a flag change in RpcBindingSetAuthInfo, after all—they decided to go with the more secure configuration. About six months before the product shipped, a well-respected security consulting company performed an audit of the application and its source code. In the findings they made a note that made me smile: "We spent a great deal of time attempting to break the administration communications channel, with no success. When so many companies fail to protect such sensitive data adequately, we applaud the team for using secured RPC and DCOM."
Figure 16-2 shows the effect of using RPC with the RPC_C_AUTHN_LEVEL_NONE option, and Figure 16-3 shows the effect of using RPC with the RPC_C_AUTHN_LEVEL_PKT_PRIVACY option.
Use strict context handles if you don’t need to share context handles between interfaces. Not using them opens the door for some easy DoS attacks, which I will explain shortly. Normally, when a call to an interface method generates a context handle, that handle becomes freely available to any other interface. When you use the [strict_context_handle] attribute in the ACF file, you guarantee that the methods in that interface will accept only context handles that were created by a method from the same interface.
Here’s an example of some dangerous code that does not enforce strict context handles. The first code is from the IDL file, which defines one RPC application using two interfaces, one to manage printers and the other to manage files.
interface PrinterOperations {
    typedef context_handle void *PRINTER_CONTEXT;
    void OpenPrinter([in, out] PRINTER_CONTEXT *ctx);
    void UsePrinter([in] PRINTER_CONTEXT ctx);
    void ClosePrinter([in, out] PRINTER_CONTEXT *ctx);
}
interface FileOperations {
    typedef context_handle void *FILE_CONTEXT;
    void OpenFile([in, out] FILE_CONTEXT *ctx);
    void UseFile([in] FILE_CONTEXT ctx);
    void CloseFile([in, out] FILE_CONTEXT *ctx)
}
And here’s a portion of the associated RPC server C++ code:
void OpenPrinter(PRINTER_CONTEXT *ctx) {
    //Create an instance of the printer manipulation object.
    *ctx = new CPrinterManipulator();
    if (*ctx == NULL)
        RpcRaiseException(ERROR_NOT_ENOUGH_MEMORY);

    //Perform printer open operations.
    ⋮
}

void UseFile(FILE_CONTEXT ctx) {
    //Get the user’s file manipulator instance.
    CFileManipulator cFile = (CFileManipulator*)ctx;

    //Perform file operations.
    ⋮
}
This is perfectly valid RPC server code, but it does include a subtle security vulnerability. If an attacker can send a printer context to the file interface, he will probably crash the RPC server process because the call to CFileManipulator cFile = (CFileManipulator*)ctx will cause an access violation. The following malicious client code achieves this:
void *ctxAttacker;
OpenPrinter(&ctxAttacker);
UseFile(ctxAttacker);
The last function call, UseFile(ctxAttacker), is not sending a FILE_CONTEXT to UseFile—it’s really a PRINTER_CONTEXT.
To mitigate this, change the ACF file to include strict_context_handle:
[explicit_handle, strict_context_handle]
interface PrinterOperations{}
interface FileOperations{}
This will force the RPC runtime to verify that any context handle passed to PrinterOperations was created by PrinterOperations and that any context handle passed to FileOperations was created by FileOperations.
Don’t use context handles as a substitute for access checks. It’s possible for an attacker to steal a context handle in rare situations and reuse the handle while posing as a different user, even if the attacker doesn’t understand the contents of the handle or of the RPC data. This is especially true if the data is unencrypted. The probability of successful attack goes down substantially when you use encrypted messages, but it is still not negligible.
Some products check access when they open a context handle, and they assume all calls on the same context handle come under the same identity. Depending on what your server does with context handles, this might or might not be a security problem, but it’s generally a Very Bad Thing to do. If your code performs access checks, you should always check access just prior to the secured operation, regardless of the value of the information held in the context handle.
RPC tries to guarantee that the context handle comes from the same network session, which depends on whether the network transport can guarantee the identity of sessions, but it doesn’t guarantee that the context handle comes from the same security session. Therefore, RPC is susceptible to hijacking.
Note
In essence, the vulnerability that RPC doesn’t guarantee that context handles come from the same security session is an example of a time-of-check, time-of-use problem, in which a developer checks that a situation is valid and later assumes the condition is still true, when in fact the condition might have changed. In this example, the user is validated when the context handle is set up, and then no more checks are performed in other functions that use the handle because you assume the handle is valid and not being used by a malicious user.
Technically, dealing with NULL context handles is a robustness issue, but it could be a DoS threat to your application if you do not plan for this scenario. It is possible for a context handle to point to NULL, like so:
void MyFunc(..., /* [in] [out] */ CONTEXT_HANDLE_TYPE *hCtx) {}Although hCtx will not be NULL, *hCtx might be NULL, so if your code attempts to use *hCtx, the application might fail. RPC checks that any context handle passed in to your functions was previously allocated by the server, but NULL is a special case and it will always be let through.
Take a look at the following sample code fragment:
short OpenFileByID(handle_t hBinding,
                   PPCONTEXT_HANDLE_TYPE pphCtx,
                   short sDeviceID) {
    short sErr = 0;
    HANDLE hFile = NULL;
    *pphCtx = NULL;

    if (RpcImpersonateClient(hBinding) == RPC_S_OK) {
        hFile = OpenIDFile(sDeviceID);
        if (hFile == INVALID_HANDLE_VALUE) {
            sErr = -1;
        } else {
            //Allocate server- based context memory for the client.
            FILE_ID *pFid = midl_user_allocate(sizeof ( FILE_ID));
            if (pFid) {
                pFid->hFile = hFile;
                *pphCtx = (PCONTEXT_HANDLE_TYPE)pFid;
            } else {
                 sErr = ERROR_NOT_ENOUGH_MEMORY;
            }
        }
        RpcRevertToSelf();
    }
    return sErr;
}

short ReadFileByID(handle_t hBinding, PCONTEXT_HANDLE_TYPE phCtx) {
    FILE_ID *pFid;
    short sErr = 0;
    if (RpcImpersonateClient(hBinding) == RPC_S_OK) {
        pFid = (FILE_ID *)phCtx;
        ReadFileFromID(phCtx->hFile,...);
        RpcRevertToSelf();
    } else {
        sErr = -1;
    }
    return sErr;
}

short CloseFileByID(handle_t hBinding, PPCONTEXT_HANDLE_TYPE pphCtx) {
    FILE_ID *pFid = (FILE_ID *)*pphCtx;
    pFid->hFile = NULL;
    midl_user_free(pFid);
    *pphCtx = NULL;
    return 0;
}
This code allows a user to open a file by using the file’s identifier by calling the remote OpenFileByID function. If the file access is successful, the function allocates some dynamic memory and stores data about the file in the allocated memory. The context handle then points to the allocated memory. However, if the call to RpcImpersonateClient or OpenIDFile fails, *pphCtx is NULL. If the user later calls CloseFileByID or ReadFileByID, the service will fail as it attempts to dereference the NULL data.
Your RPC server code should always check that the context handle is pointing to a memory location other than NULL before attempting to use it:
if (*pphCtx == NULL) {
    // Attempting to use a NULL context handle.
}Apply this rule to all networking technologies, not just to RPC. Making RPC calls from a highly privileged process to a less privileged process is dangerous because the caller might be able to impersonate you, the highly privileged caller, which can lead to an elevation of privilege attack if the client is a malicious client. If your RPC server must run with elevated privileges and you must call a peer, opt for an anonymous connection or support only Identify security semantics. This is achieved using the RpcBindingSetAuthInfoEx function, like so:
//Specify quality of service parameters.
RPC_SECURITY_QOS qosSec;
qosSec.Version = RPC_C_SECURITY_QOS_VERSION;
qosSec.Capabilities = RPC_C_QOS_CAPABILITIES_DEFAULT;
qosSec.IdentityTracking = RPC_C_QOS_IDENTITY_STATIC;
qosSec.ImpersonationType = RPC_C_IMP_LEVEL_IDENTIFY;
status = RpcBindingSetAuthInfoEx(..., &qosSec);
ImpersonationType has four options: RPC_C_IMP_LEVEL_ANONYMOUS, which does not allow the recipient to know the identity of the caller; RPC_C_IMP_LEVEL_IDENTIFY, which allows the recipient to know the caller’s identity; and RPC_C_IMP_LEVEL_IMPERSONATE and RPC_C_IMP_LEVEL_DELEGATE, which allow the recipient to know the caller’s identity and act on the caller’s behalf.
The preferred way to secure your RPC server functions is to use security callback functions. This is achieved by using RpcServerRegisterIf2 or RpcServerRegisterIfEx rather than RpcServerRegisterIf when you perform RPC startup functions in the RPC server, and by setting the last argument to point to a function that is called by the RPC runtime to determine whether the client is allowed to call functions on this interface.
The following example code allows a client to connect only if it is using a connection secured using RPC_C_AUTHN_LEVEL_PKT or better:
/*
  Phones.cpp
*/
⋮
//Security callback function is automatically called when
//any RPC server function is called.
RPC_STATUS RPC_ENTRY SecurityCallBack(RPC_IF_HANDLE idIF, void *ctx) {

    RPC_AUTHZ_HANDLE hPrivs;
    DWORD dwAuthn;

    RPC_STATUS status = RpcBindingInqAuthClient(
        ctx,
        &hPrivs,
        NULL,
        &dwAuthn,
        NULL,
        NULL);

    if (status != RPC_S_OK) {
        printf("RpcBindingInqAuthClient returned: 0x%x n", status);
        return ERROR_ACCESS_DENIED;
    }

    //Now check the authentication level.
    //We require at least packet-level authentication.
    if (dwAuthn < RPC_C_AUTHN_LEVEL_PKT) {
        printf("Attempt by client to use weak authentication.
");
        return ERROR_ACCESS_DENIED;
    }

    return RPC_S_OK;
}
⋮
void main() {
⋮
    status = RpcServerRegisterIfEx(phone_v1_0_s_ifspec,
                                   NULL,
                                   NULL,
                                   0,
                                   RPC_C_LISTEN_MAX_CALLS_DEFAULT,
                                   SecurityCallBack);
⋮
}
Note
Some versions of MSDN and the Platform SDK incorrectly document the function signature to the security callback function as function(RPC_IF_ID *interface, void *context). It should be function(RPC_IF_HANDLE *interface, void *context).
You can also set a flag, RPC_IF_ALLOW_SECURE_ONLY, on the call to RpcServerRegisterIfEx and RpcServerRegisterIf2 to allow only secured connections. The flag limits connections to clients that use a security level higher than RPC_C_AUTHN_LEVEL_NONE. Clients that fail the RPC_IF_ALLOW_SECURE_ONLY test receive an RPC_S_ACCESS_DENIED error. This is an important optimization. If you do not set this flag but you allow only authenticated connections, the RPC runtime will still pass the client request to your application for processing, where it will be promptly denied access by your code. Setting this flag will force the RPC runtime to reject the request before your code has to deal with it. Also, for Windows NT 4 and Windows 2000, specifying this flag allows clients to use a NULL, or anonymous, session. On Windows XP, such clients are not allowed.
It is preferable to use RPC_IF_ALLOW_SECURE_ONLY flag for interface security—rather than using a security descriptor in a call to RpcServerUseProtSeq— for two reasons. First, security descriptors are used only when you use named pipes or local RPC as a transport. The security descriptor is ineffective if you use TCP/IP as a transport. Second, all endpoints are reachable on all interfaces, and that’s the next topic.
As you might be aware, RPC is network protocol–agnostic. Any RPC server can be reached by any supported networking protocol. The side effect of this doesn’t affect many people, but you should be aware of it.
If your RPC server resides in a process with other RPC servers—for example, a single service hosting multiple RPC servers—all applications listen on all selected protocols. For example, if three RPC servers exist in a single process—RPC1 using named pipes and Local RPC (LRPC), RPC2 using sockets, and RPC3 using only LRPC—all three servers will accept traffic from all three protocols (named pipes, LRPC, and sockets). Figure 16-4 outlines this.
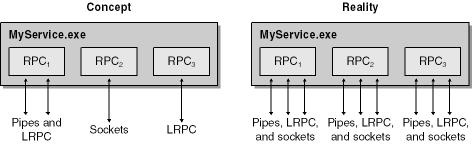
If you thought you were safe listening on, say, LRPC only, you’re incorrect because the other servers in the process are listening on named pipes or sockets, and therefore so is your RPC server application!
If you want to verify that the client request is made using a specific network protocol, you can use the RpcBindingToStringBinding function and then look for the protocol sequence by using RpcStringBindingParse. Here’s a code sample to demonstrate the process—in this case, the code will determine whether the context is using LRPC:
/*
  Phones.cpp
*/
⋮
BOOL IsLRPC(void *ctx) {
    BOOL fIsLRPC = FALSE;
    LPBYTE pBinding = NULL;

    if (RpcBindingToStringBinding(ctx, &pBinding) == RPC_S_OK) {

        LPBYTE pProtSeq = NULL;
        //We’re interested only in the protocol sequence
        //so that we can use NULL for all other parameters.
        if (RpcStringBindingParse(pBinding,
                                  NULL,
                                  &pProtSeq,
                                  NULL,
                                  NULL,
                                  NULL) == RPC_S_OK) {
            printf("Using %s
", pProtSeq);

            //Check that the client request
            //was made using LRPC.
            if (lstrcmpi((LPCTSTR)pProtSeq, "ncalrpc") == 0)
                fIsLRPC = TRUE;

            if (pProtSeq)
                RpcStringFree(&pProtSeq);
        }

        if (pBinding)
            RpcStringFree(&pBinding);
    }

    return flsLRPC;
}
⋮Adding an annotation for your endpoint is not a security issue—it’s simply a good idea! When you create your RPC endpoint, call RpcEpRegister to define an annotation for the endpoint. This will make debugging easier because endpoint analysis tools, such as RPCDump.exe in the Windows 2000 Resource Kit, will show what the endpoint is used for. The following code shows how to do this:
RPC_BINDING_VECTOR *pBindings = NULL;
if (RpcServerInqBindings(&pBindings) == RPC_S_OK) {
    if (RpcEpRegister(phone_v1_0_s_ifspec,
                      pBindings,
                      NULL,
                      "The Phone Application") == RPC_S_OK) {
        //Cool! Annotation added!
    }
}
I added this recommendation simply because I’ve spent so much time trying to work out specific RPC endpoints, until finally the RPC guys told me about this function call.
Use the mainstream protocol sequences, such as ncacn_ip_tcp, ncacn_np, and ncalrpc. As the most popular protocol sequences, they receive the most rigorous testing by all application vendors.
Note
Sometimes your RPC client or server will fail and GetLastError or the function itself will return the error status code. If you’re like me, you forget what the error codes mean, with the exception of Error 5 – Access Denied! However, help is at hand. At the command prompt, you can enter net helpmsg nnnn, where nnnn is the error number in decimal, and the operating system will give you the textual version of the error.
DCOM is really just a wrapper over RPC that allows COM to operate across a network, so the preceding section on RPC security gives you the foundation for many of the concepts presented here. In addition to the problems of impersonation level and authentication level, DCOM adds launch permissions, access permissions, and the problem of the user context that the object will use. To add to the fun, there are at least three ways to do just about anything concerning security. Let’s get started!
A good place to start is by opening the Dcomcnfg.exe application. On a system running Windows NT 4 or Windows 2000, you’ll get the Distributed COM Configuration Properties dialog box, and on a system running Windows XP or later, a Microsoft Management Console (MMC) snap-in will show up, allowing you to look at both COM+ applications and DCOM objects. Figure 16-5 shows the Default Properties tab of the Distributed COM Configuration Properties dialog box in Windows 2000.
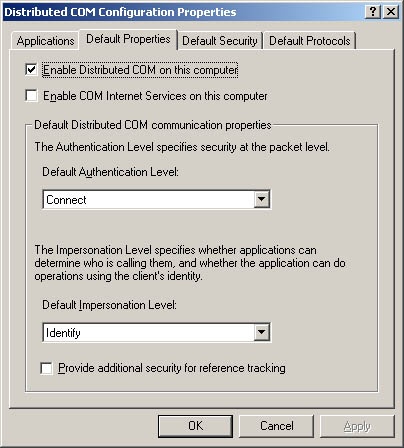
First, you’ve got a choice whether to turn DCOM on or off for the entire system. This represents a fairly large hammer: be careful when using it, or things might break unexpectedly. If you turn DCOM off, there’s not much point to the rest of this chapter, so I’ll assume you’ve left it on. Next, you have the option of enabling COM Internet Services. COM Internet Services enable RPC over HTTP, turning your Web server into an RPC and DCOM provider. I wouldn’t enable this option without doing some thinking about what management interfaces might also be made available over HTTP. Finally, the default authentication and impersonation levels are specified. These settings map exactly to the options you have available for RPC. The default authentication level is Connect, or RPC_C_AUTHN_CONNECT. The default impersonation level is Identify, which is the same as RPC_C_IMP_LEVEL_IDENTIFY.
The last item on the Default Properties tab is labeled Provide Additional Security For Reference Tracking. A little COM background is needed here: when an object is opened, you call IUnknown::AddRef, and when you’re done with an object, you should call IUnknown::Release. Once an object has been released as many times as it has had IUnknown::AddRef called, the object decides it isn’t needed any longer and unloads itself. Unfortunately, COM doesn’t bother to check by default whether the caller is from the same process, so if a poorly written client or an attacker calls IUnknown::Release enough times, the object is unloaded, thus creating user astonishment, not to mention denial of service. If you enable additional security for reference tracking, you can avoid this problem, but be warned that you will also incur some overhead. If you’re adding an application to someone’s system, it might be rude to change the settings for all the other applications, so you should set the reference tracking security in the CoInitializeSecurity function by passing in the EOAC_SECURE_REFS value to the dwCapabilities argument.
The Default Security tab specifies default access, launch, and configuration permissions. Access permissions control the users who can access a currently running object, launch permissions control the users who can start an object that isn’t currently running, and configuration permissions determine who can edit configuration information. Configuration information is especially sensitive because a DCOM application can be configured to run as the currently logged on user. Be aware that any user who can modify DCOM configuration can take action on the part of any other interactive user. The default settings allow only members of the Administrators and Power Users group to modify configuration settings. Unlike Windows NT, Windows 2000 Power Users should be thought of as Admins-Lite. It isn’t a good idea to loosen these permissions from the default values, and if you’d like to tighten them, take care that you don’t cause older applications to fail. A good test is to see whether an ordinary user can accomplish his tasks—if he can, you can either reduce the Power Users permissions or consider just running all the users as an ordinary user.
The Default Protocols tab first became available in Windows NT 4, service pack 4, and allows you to regulate which protocols DCOM applications can use. In addition to being able to regulate protocols, you can also specify ranges of ports that can be used by the TCP or User Datagram Protocol (UDP) transports, known as Connection-Oriented TCP/IP and Datagram UDP/IP in the user interface. If you need to use DCOM across a firewall, being able to specify a specific port for an application or range of ports will make the firewall administrator a lot happier, and using TCP allows a firewall to regulate whether a connection can be created in one direction but not the other.
You can specify all the settings that are available for the entire system on an application basis. This can be accomplished by double-clicking an application on the Applications Tab of the Distributed COM Configuration Properties dialog box, or you can edit the registry directly by looking up the object ID in HKey_Local_MachineSoftwareClassesAppId. Note that if an application hosts more than one object, you’ll have to apply the same settings for all the objects an application hosts. Depending on the permissions needed by the individual objects, you might end up having to apply permissions that are the least common denominator for all the objects hosted by the application. You can then try to impose different security settings on each object by using programmatic security, but this can get complicated and is prone to error. A good rule to use in this situation is that if two objects have very different security requirements, you should put them in two different applications or DLLs. In addition to the items that can be set for the entire system, an individual DCOM application can be configured to run under different user contexts. This is an important topic, and I’ll cover it in depth in the next section. Finally, you can configure an individual object to use a specific port if either TCP or UDP is picked as a protocol. The ability to perform complicated transactions by using DCOM, coupled with the ability to run the transaction over only TCP port 135 and a specific port, makes it a better option than opening up a firewall completely between two systems. Note that datagram protocols are not supported starting with Windows 2000.
Some DCOM settings can be set only at the application level in the registry. Any setting that has to be set prior to application launch can’t be set by the application itself. Specifically, launch permission, endpoint information, and user context must all be set in the registry.
Like a service, a DCOM object can run under a number of different user contexts. Your options are to impersonate the calling user; to run as the interactive user; to run as SYSTEM, which is available only to DCOM servers implemented as a service; and to run as a specific user. Unlike most of the people writing about DCOM security, I [David] have both a hacker’s perspective and a security administrator’s perspective. It’s been my job both to break into things and to try to determine how to stop people from getting into things they should not here at Microsoft. The choices you make can have a huge impact on overall network security. Let’s look at our various options, all of which have benefits and drawbacks.
If a DCOM server executes as the calling user, security considerations are fairly simple. No user credentials get stored anywhere, and any actions performed can be checked against access controls normally. One major drawback is that prior to Windows 2000, it wasn’t possible for one system to delegate calls to another system. If your DCOM object needs to access resources off the local host and you need to support Windows NT 4.0, running as the launching user won’t work. Even if you’re supporting only Windows 2000 and later, your security administrators should be cautious about flagging your system as trusted for delegation. Additionally, performance issues exist because each instance of your object that’s running under a different user context will require a different window station, the object that hosts a desktop. See the Platform SDK documentation for more details.
Running as the interactive user is the most dangerous possible way to run a DCOM object, and I do not recommend it unless you’re trying to write a debugging tool. First, if no one is logged on, the DCOM object won’t run, and if the user logs off while you’re running, the application dies. Second, it is a privilege-escalation attack waiting to happen. A number of API calls and other methods are available to determine when a user is logged on to the console of a computer. It would be fairly trivial to poll the system, wait for the administrator to log on, and then fire up the DCOM object and wreak mayhem. If you feel you absolutely must write a DCOM object that runs as the interactive user, make sure you notify the logged on user when the application starts, severely restrict the users who can launch and access the object, and be careful about the methods you expose.
DCOM objects that run as a service have the option of running as the local system account or, in Windows XP and later, the less-privileged network service account. Local system is the most powerful account on the system and can modify the operating system in any way. Network service isn’t as powerful, but several services normally run under this context, so you still need to be careful. Be extremely careful with the interfaces you expose, and be prepared to impersonate the client to perform access checks. When your DCOM application is a SYSTEM service, make sure that the impersonation level—on all the proxies it uses—is Identify. Otherwise, your callees will elevate privilege. By default, DCOM impersonation level is Identify, but programmers routinely call CoInitializeSecurity or proxy security APIs and change it to Impersonate.
More Information
You should also be aware of the impersonation privilege added to Windows .NET Server. Refer to Chapter 7, for information regarding this new privilege.
Running as a specific user is the way that Microsoft Transaction Server normally runs objects, and doing so has some nice benefits. If the user has domain scope, the object can take actions on other systems on behalf of the calling user. You’ll also create a maximum of one window station per object, not one window station per caller. Any user account used for a DCOM object requires the Log On As A Batch Job privilege. If you assign the user by using Dcomcnfg.exe, it will grant the correct rights for you, but if you set it up in your application, be sure you grant your user the correct privileges. Be careful that domain policies don’t overwrite the privileges you need.
The downside is worth thinking about. When a DCOM object runs as a particular user, the user account is recorded in the registry. No big deal—the password is safe, right? For some value of safe, yes: it takes an administrator to run a tool that can dump the private data from the LSA. Now consider the case in which you’ve rolled out your application to over 3000 systems and the user account is an administrator on each of those systems. You now have 3000 computers that are each single points of catastrophic failure from a security standpoint for the entire group of 3000. Let’s say that you’ve got a crack team of system admins who can maintain these systems such that they have 99.9 percent reliability from a security standpoint. Only on one day in 1000 days can any one system be completely compromised. Your overall chances of having the system of 3000 computers secure is given by (0.999)3000, which is approximately 5 in 100. So on only 18 days out of an average year, the hackers are going to be thwarted. If you have something less than a crack team of administrators, your odds are far worse.
One way to manage this risk is for your DCOM object to run under a nonprivileged user. Even so, if the system is supposed to access highly confidential data, such as human resources information, just obtaining the user credentials might be enough to be considered a problem. A second strategy is to reduce the number of systems running your object—a set of 20 computers might be something you can really keep secure. A third approach would be to use different users for different groups of systems. That way a compromise of one group won’t inevitably lead to the compromise of all the systems. If your object needs to run as a very high-level user to do its job, consider using a different account—preferably a local user account—on each system. The current Systems Management Server (SMS) client service takes this approach, and from a hacker’s standpoint, it’s boring. You compromise the system, obtain admin access, and then dump the secrets only to obtain the same level of access you already have. That’s no fun! If you’re a system administrator, I can assure you that if the hackers are having fun, you certainly are not going to have fun. Finally, Windows XP and Windows .NET Server can use the new LocalService and NetworkService accounts. These accounts don’t require password management and don’t have elevated privileges on the system.
DCOM also allows you to make security settings both at the server and at the client in your code. This can be accomplished by calling CoInitializeSecurity on either the server or the client side, and the client can also call IClientSecurity::SetBlanket to change the security settings for just one interface. COM seems to have its own language for many features, and the collection of security settings is known as the blanket. Let’s review the parameters passed to CoInitializeSecurity:
HRESULT CoInitializeSecurity(
    PSECURITY_DESCRIPTOR pVoid,   //Points to security descriptor
    LONG cAuthSvc,                //Count of entries in asAuthSvc
    SOLE_AUTHENTICATION_SERVICE * asAuthSvc,
                                  //Array of names to register
    void * pReserved1,            //Reserved for future use
    DWORD dwAuthnLevel,           //The default authentication level
                                  //for proxies
    DWORD dwImpLevel,             //The default impersonation level
                                  //for proxies
    SOLE_AUTHENTICATION_LIST * pAuthList,
                                  //Authentication information for
                                  //each authentication service
    DWORD dwCapabilities,         //Additional client and/or
                                  //server- side capabilities
    void * pReserved3             //Reserved for future use
);
The first parameter is the security descriptor. It can actually be used several different ways—it can point to an actual security descriptor, an application ID (AppID), or an IAccessControl object. The call knows which you’ve passed by a flag set in the dwCapabilities argument. If you set it to an AppID, it will then take the information from the registry and ignore the remainder of the arguments. This determines who can access the object, and, once set by the server, the security descriptor can’t be changed. This parameter doesn’t apply to a client and can be NULL. The Platform SDK says in the fine print that if a server sets it to NULL, all access checking is disabled, even though we might still authenticate, depending on the dwAuthnLevel parameter. Do not do this.
Next, you get to choose an authentication service. Most applications should let the operating system figure this one out, and you’d pass -1 to the cAuthSvc parameter. Skip ahead to the dwAuthnLevel parameter—this is where you’d set the required authentication level. As described in the "Performance of Different Security Settings" section, if you set the parameter to RPC_C_AUTHN_LEVEL_PKT_PRIVACY, the performance loss is small and the security gain is high. It’s almost always a good idea to require packet privacy. When the client and the server negotiate the security settings, the highest level required by either the client or the server will be the end result.
The impersonation level isn’t negotiated but is specified by the client. It makes sense that the client should be allowed to tell the server what actions are allowed with the client’s credentials. There’s one interesting way that the client and server can switch roles, so it’s a good idea for the server to set this flag—it could end up becoming a client! As recommended earlier, specify RPC_C_IMP_LEVEL_IDENTIFY or RPC_C_IMP_LEVEL_ANONYMOUS unless you’re sure your application requires a higher-level impersonation value.
The dwCapabilities argument has several interesting values that could be useful. Both EOAC_STATIC_CLOAKING and EOAC_DYNAMIC_CLOAKING are used to enable cloaking on systems running Windows 2000 and later. Cloaking allows an intermediate object to access a lower-level object as the caller. If you’re impersonating a caller, it’s often best to access other objects under the context of the calling user; otherwise, you might be giving them access to some resources they shouldn’t have available. You use EOAC_SECURE_REFS to keep malicious users from releasing objects that belong to other users. Note that this flag is incompatible with anonymous authentication.
As of Windows 2000, a new flag, EOAC_NO_CUSTOM_MARSHAL, can be specified. Specifying this flag contributes to better server security when using DCOM because it reduces the chances of executing arbitrary DLLs. EOAC_NO_CUSTOM_MARSHAL unmarshals CLSIDs implemented only in Ole32.dll and Component Services. A CLSID is a globally unique number that identifies a COM object. DCOM marshals references to objects by constructing object references (OBJREFs) that contain CLSIDs. CLSIDs are vulnerable to security attacks during unmarshaling because arbitrary DLLs can be loaded. Processes that have declared EOAC_NO_CUSTOM_MARSHAL in their security capabilities by calling CoInitializeSecurity can also use CLSIDs that implement CATID_Marshaler.
EOAC_DISABLE_AAA causes any activation in which a server process would be launched under the caller’s identity (activate-as-activator) to fail with E_ACCESSDENIED. This value, which can be specified only in a call to CoInitializeSecurity, allows an application that runs under a privileged account (such as the local system account) to prevent its identity from being used to launch untrusted components. It can be used with systems running Windows 2000 and later.
If you’d like to play with the various settings and see how they work together, I’ve created a DCOM security test application—see the DCOM_Security project with the book’s sample files in the Secureco2Chapter 16DCOM_Security folder for the full source. First I created a fairly generic DCOM server by using Microsoft Visual C++ 6’s Active Template Library (ATL) COM AppWizard, and then I added the ISecurityExample interface, which implements the GetServerBlanket method shown here:
STDMETHODIMP CSecurityExample::GetServerBlanket(DWORD * AuthNSvc,
                                                DWORD * AuthZSvc,
                                                DWORD * AuthLevel,
                                                DWORD * ImpLevel)
{
    IServerSecurity* pServerSecurity;
    OLECHAR* PriName;

    if(CoGetCallContext(IID_IServerSecurity,
                        (void**)&pServerSecurity) == S_OK)
    {
        HRESULT hr;

        hr = pServerSecurity->QueryBlanket(AuthNSvc,
                                           AuthZSvc,
                                           &PriName,
                                           AuthLevel,
                                           ImpLevel,
                                           NULL,
                                           NULL);

        if(hr == S_OK)
        {
            CoTaskMemFree(PriName);
        }

        return hr;
    }
    else
        return E_NOINTERFACE;

}
As you can see, this is fairly simple code—you just get the context of the current thread and query the blanket by using an IServerSecurity object. Once you obtain the results, pass them back to the client. The TestClient client queries the current client-side security settings, prints them, uses IClientSecurity::SetBlanket to require packet privacy on this interface, and then queries GetServerBlanket on the server. Here’s a look at the results:
Initial client security settings:

Client Security Information:
Snego security support provider
No authorization
Principal name: DAVENETdavid
Auth level = Connect
Impersonation level = Identify

Set auth level to Packet Privacy

Server Security Information:
Snego security support provider
No authorization
Auth level = Packet privacy
Impersonation level = Anonymous
Once you install and build the demonstration projects, copy both TestClient.exe and DCOM_Security.exe to another system. Register DCOM_Security.exe with the operating system by invoking it with DCOM_Security.exe /regserver. Be careful how you type it because the application built by the wizard won’t tell you whether the registration succeeded. With just a little work, you can incorporate this test code into your own application to see exactly how your security settings are working. But be careful: you won’t get a valid test by running the client and the server on the same system.
DCOM has an interesting approach to handling asynchronous calls, although in Windows 2000 and later genuine asynchronous calls are supported. It allows a client to tell a server to call it back on a specified interface when a call completes. This is done by implementing a connectable object. Connection points are covered in detail in several books—one good one is Inside Distributed COM (Microsoft Press, 1998), by Guy Eddon and Henry Eddon—and you’re best off consulting one of these for full details. The interesting aspect from a security standpoint is that the server has now become the client. If the server doesn’t properly set its security blanket to prevent full impersonation, the client can escalate privilege. Imagine the following series of events with a server running under the local system account that normally impersonates a client. The client first advises the server of its sink and asks the server to complete a long call. When the server is done, the client accepts the call to its sink, impersonates the server, and proceeds to manipulate the operating system! I’ve browsed three different books on DCOM while researching this problem, and only one of them even mentioned that connectable objects can be a security problem. If you’re implementing a server that supports connectable objects, be careful to avoid this pitfall.
Another way that this problem can occur is if one of your methods accepts an interface pointer (that is, a pointer to another COM/DCOM object). You also have to think about this problem if you call IDispatch::Invoke from inside your object. If someone could have tampered with the target object or, worse yet, you’re invoking arbitrary objects, they might elevate privilege by impersonating you.
Developed at Microsoft, the Component Object Model (COM) is a highly popular programming language–agnostic object technology used by thousands of developers to support code reuse. All COM components communicate using interfaces, and all COM components must support the most basic of interfaces, IUnknown.
An ActiveX control is a COM object that supports the IUnknown interface and is self-registering. Some support the IDispatch interface to allow high-level languages, such as Visual Basic and Perl, and scripting languages, such as VBScript and JScript, to communicate easily with the component by using a process called automation. ActiveX controls have become a popular architecture for developing programmable software components for use in different COM containers, including software development tools and end user productivity tools such as Web browsers and e-mail clients.
Incorrectly designed or poorly written ActiveX controls can cause serious security problems in two container types, Web browsers and e-mail clients, because Web pages can invoke ActiveX controls by using HTML or a scripting language and e-mail applications can often display HTML-formatted text, which means that e-mail messages can also invoke ActiveX controls, depending on the security settings your mail reader applies. Outlook 2002 (part of Microsoft Office XP) does not invoke ActiveX controls in e-mail by default, nor does Outlook Express in Windows .NET Server 2003 and Windows XP.
If a vulnerability exists in an ActiveX control, the issue is exacerbated if the user is not warned that the HTML page—or e-mail containing an HTML page—is about to invoke the vulnerable ActiveX control.
For an HTML page—either in a Web browser or in an e-mail client—to invoke an ActiveX control without notifying the user that it’s doing so requires that certain security policy settings be in place. Most notably, if the code is marked as safe for initialization (SFI) or safe for scripting (SFS), the host application might not warn the user that the code is about to be used in a potentially unsafe manner.
When a control is instantiated, or initialized, it can open local or remote data through various COM IPersist interfaces. This is a potential security problem because the data can come from an untrusted source. Controls that guarantee no security problems when any persistent initialization data is loaded, regardless of the data source, are deemed safe for initialization.
Safe for scripting means the control author has determined that it’s safe to invoke the control from script because the control has no capabilities that could lead to security problems. Even if a control is safe when used by users, it is not necessarily safe when automated by an untrusted script or Web page. For example, Microsoft Excel is a trusted tool from a reputable source, but a malicious script can use its automation features to delete files and create viruses.
I will enumerate the capabilities that make a control unsafe for initialization and scripting shortly.
Important
ActiveX controls are executable programs and, as such, can be digitally signed using a technology called Authenticode. Although code signing can guarantee the identity of the control author and guarantee that the control has not been tampered with, it does not guarantee that the code is free from errors and security vulnerabilities.
Let me give an example of a control that is not safe for scripting. In May 2001, I performed a security review for a Web site that required users of the site to install the ActiveX control hosted on the site. The first question I asked was whether the control was safe for scripting. The developer of the control informed me it was. So I asked if the control had methods that access resources, such as files, on the user’s computer. It turned out that the control had a method called Print, which allowed the control to print a file, any file, to any printer! With this in mind, I informed the developer that the control was not safe for scripting because when a user browses to my malicious Web site, I can print any document on his hard disk on my printer and the user won’t know the document was printed!
If you wonder how this all happens, remember that any ActiveX control loaded on a computer can be used by any Web site unless you take steps to prevent it from being loaded. The vulnerability above exists because a malicious Web site invokes the ActiveX control from within one of its Web pages and then calls the Print method to print a sensitive document on a printer owned by the attacker.
Look at some past examples, in which signed ActiveX controls, written by well-meaning and capable developers, have led to serious security vulnerabilities. Examples include "Outlook View Control Exposes Unsafe Functionality" at http://www.microsoft.com/technet/security/bulletin/MS01-038.asp, "Active Setup Control Vulnerability" at http://www.microsoft.com/technet/security/bulletin/MS99-048.asp, and "Office HTML Script and IE Script Vulnerabilities" at http://www.microsoft.com/technet/security/bulletin/MS00-049.asp.
Important
A control does not need to be intentionally hostile to be a danger—in fact, very few hostile controls exist. The real danger is legitimate controls repurposed by attackers using vulnerabilities in the control.
If you want to mark a control as SFI or SFS, refer to http://msdn.microsoft.com and search for safe for scripting. But read the next section before doing so!
The first rule of safe for initialization and scripting is this:
Your control is not safe for initialization or safe for scripting!
Next you need to determine what makes your control safe for both categories. If you find any functionality that harbors potential insecurities, the control must remain marked as unsafe. If in doubt, do not mark it as safe for scripting.
Important
It’s important that you do not mark your control as safe for either category and then look for insecure functions to invalidate the belief that the control is safe. If you do this, you will often miss an undocumented or poorly documented unsafe function and leave your users vulnerable to attack.
The process for determining whether a control is safe is quite simple: list all the control’s events, methods, and properties. So long as each event, method, or property exposed by the control performs none of the following, it can be deemed safe for scripting:
Accesses any information on the local computer or network, such as registry settings or files
Discloses private information, such as private keys, passwords, and documents
Modifies or deletes information on the local computer or network
Crashes the host application
Consumes excessive time or resources, such as memory and disk space
Executes potentially damaging system calls, including executing files
If any of these are true, the control cannot be marked as SFS. A quick and useful method is to look at all the names looking for verbs, taking special notice of function names such as RunCode, PrintDoc, EraseFile, Shell, Call, Write, Read, and so on.
Note that simply reading a file or registry key is not necessarily a security problem. However, if an attacker can set the name of the resource and the data in that resource can be sent to the attacker, that is indeed a problem.
Another option is to implement IObjectSafety. This allows a container application (typically Internet Explorer) to query your object and determine whether it’s safe for scripting or initialization. You can also make more complex decisions about whether you want to enable this functionality.
You should also test every method and property for buffer overruns, as discussed in Chapter 19.
Irrespective of whether you mark a control safe for scripting, you might want to allow the control to be scripted only when invoked from a specific restricted domain. For example, you might restrict your ActiveX control so that it can be used only when called from a Web page that is part of the northwindtraders.com domain. You can achieve this by following these steps in your control:
Implement an IObjectWithSite interface, which has a SetSite method that’s called by the container, such as Internet Explorer, to get a pointer to the container’s IUnknown interface. (You’ll need to include Ocidl.h in your code.) IObjectWithSite provides a simple way to support communication between a control and the container.
Next use the following pseudocode to get the site name:
pUnk->QueryInterface(IID_IServiceProvider, &pSP);
pSP->QueryService(IID_IWebBrowser2, &pWB);
pWB->getLocationURL(bstrURL);
Finally, the code should determine whether the value in bstrURL represents a trusted URL. This requires some careful thought. A common mistake is to check whether northwindtraders.com, or whatever the expected server is, exists in the server name. But this can be defeated by creating a server name like www.northwindtraders.com.foo.com! Therefore, you should perform a search by calling the InternetCrackUrl function, exported from Wininet.dll, to get the host name from the URL—it’s the lpUrlComponent->lpszHostName variable—and performing a rightmost search on the string.
The following code outlines how to achieve the last step:
/*
  InternetCrackURL.cpp
*/
BOOL IsValidDomain(char *szURL, char *szValidDomain,
                       BOOL fRequireHTTPS) {
    URL_COMPONENTS urlComp;
    ZeroMemory(&urlComp, sizeof(urlComp));
    urlComp.dwStructSize = sizeof(urlComp);

    // Only interested in the hostname
    char szHostName[128];
    urlComp.lpszHostName = szHostName;
    urlComp.dwHostNameLength = sizeof(szHostName);

    BOOL fRet = InternetCrackUrl(szURL, 0, 0, &urlComp) ;

    if (fRet==FALSE) {
        printf("InternetCrackURL failed - > %d", GetLastError());
        return FALSE;
    }

    //Check for HTTPS if HTTPS is required.
    if (fRequireHTTPS && urlComp.nScheme != INTERNET_SCHEME_HTTPS)
        return FALSE;


    //Quick ’n’ dirty rightmost case-sensitive search
    int cbHostName = lstrlen(szHostName);
    int cbValid = lstrlen(szValidDomain);
    int cbSize = (cbHostName > cbValid) ? cbValid : cbHostName;
    for (int i=1; i <= cbSize; i++)
        if (szHostName[cbHostName -  i] != szValidDomain[cbValid - i])
            return FALSE;

    return TRUE;
}

void main() {
    char *szURL="https://www.northwindtraders.com/foo/default.html";
    char *szValidDomain = "northwindtraders.com";
    BOOL fRequireHTTPS = TRUE;

    if (IsValidDomain(szURL, szValidDomain, TRUE)) {
        printf("Cool, %s is in a valid domain.", szURL) ;
    }
}
This code is also available on the companion CD in the folder Secureco2Chapter 16InternetCrackURL. If the call to IsValidDomain fails, your control should fail to load because the control is being invoked in a Web page from an untrusted domain—in this case, a domain other than northwindtraders.com.
Note that you can find more information regarding all of the COM interfaces and functions described in this section at http://msdn.microsoft.com, and a Knowledge Base article, "HOWTO: Tie ActiveX Controls to a Specific Domain," at http://support.microsoft.com/support/kb/articles/Q196/0/61.ASP includes ATL code to limit domain usage.
SiteLock, a C++ ATL template library, was developed during the Windows and Office security pushes in early 2002 to make it much easier to bind ActiveX controls to Web sites and to restrict how the controls operated. The SiteLock template enables an ActiveX developer to restrict access so that the control is deemed safe only in a predetermined list of domains, limiting the ability of attackers to reuse the control for malicious purposes. Developers can also use the SiteLock template to create a control that behaves differently in different domains. The template consolidates domain checking into a single, shared library that makes an ActiveX control much more secure and makes problems much easier to fix when they are found.
Note
The SiteLock code is now publicly available at http://msdn.microsoft.com/downloads/samples/internet/components/sitelock/default.asp.
Suppose that all your best efforts have failed and you’ve shipped an ActiveX control that has a security bug. You might think that shipping a new one would take care of the problem—you’ve thought wrong, especially if the user has chosen to always trust ActiveX controls signed by you. A malicious Web site could invoke your old control that it provides to the user, and now your user has been hacked. Here’s how you solve this problem. In the HKLMSoftwareMicrosoftInternet Explorer registry key, locate the ActiveX Compatability subkey. Under that key will be a number of controls listed by CLSID (class id). To kill your control, take its CLSID represented as a string, use it to create a new subkey (if it isn’t already present), and then set a REG_DWORD value named "Compatibility Flags" to 0x00000400. That’s all there is to it. I’d recommend making all new versions of your control set this bit for all previous versions so that a user who is installing your control for the first time is protected from your previous mistakes. For more information, see Knowledge Base article Q240797.
DCOM and ActiveX share a common base with RPC; often, skills you learn in RPC can be carried over into the other technologies. If we had to sum up the critical security best practices for RPC, DCOM, and ActiveX, they would be these: For RPC, compile with the /robust MIDL switch and don’t run as SYSTEM. For DCOM, don’t run as SYSTEM. And for ActiveX, don’t mark the control safe for scripting unless it really is, and consider using SiteLock.