“The loftier the building, the deeper must the foundation be laid.” | ||
| --Thomas Kempis | ||
The most recent version of Mac OS is a multitasking, multithreaded, multiuser, and multiprocessing operating system. Yesterday, Macintosh users were using a relatively simplistic system, while today they are using a powerful UNIX-based operating system that may become a prime target for attackers. The security knowledge of an average Mac user is currently very limited; the historical security of the Mac OS operating system and the focus on ease of use conspire to make it so.
Mac OS X contains many security features, but without an understanding of what those features are, and how to put them in place, users can quickly leave themselves open to attack. This book is about understanding the risks, as well as the procedures and tools to reduce those risks.
We begin with an overview of the risks, why these risks are real, and what technologies exist to address those risks. Finally, we explore the basics of the UNIX security model as it applies to Mac OS X. The material covered in this chapter provides a basis to aid in the understanding of the remainder of the material covered in this book. Those with strong UNIX backgrounds might be tempted to skip over this chapter; however, many peculiarities of Mac OS X are covered, so you are encouraged to stick around.
Security is not something that you achieve by following a sequence of steps, or by keeping up to date with patches. It does not make sense to say only that an operating system is secure, just like you would not simply say, “Bob is protected.” Bob is protected from what? A goat falling on his head? The meaning of security varies from person to person and it varies depending on the situation. To describe an operating system or a piece of software as “secure” requires an understanding of the context.
Security means applying a policy or plan specifying what elements in your environment are important, and how those elements will be protected. Your policy may be a formal written document or an implicit set of guidelines that you follow.
Also, certain aspects of security will be important to some more than others. Mac OS X is being deployed into many different environments, with different usage models. Your environment might be a single computer for home use. It might be a lab environment, or a cluster of Xserve boxes.
Therefore, before jumping into the details of commands and configuration files, it is necessary to understand the nature of certain risks, the ideas behind reducing those risks, and what tools are available for doing so.
Mac OS X is in a unique position. The operating system has many cosmetic and behavioral similarities to previous versions of Mac OS; however, underneath the hood it is a full bore UNIX system. As a result, the user base is a collection of disparate technical backgrounds and computing cultures. The risks involved vary significantly from system to system.
A common mistake made with respect to computer security is an underestimation of the potential for disaster. Some question whether people would go through (seemingly) so much trouble to attack a system. Still, others are ignorant of the nature of many of those attacks. The fact is, attacks do occur. Malicious users are willing to spend the time and energy, as unreal as it might seem.
Another concept that is not always apparent is that the mind behind an attack is not always one of brilliant technical prowess. Once the details of vulnerabilities are made known, the recipe for execution can often be packaged and inflicted with little effort. An attacker might not even understand the details of the attack. On more than one occasion we have been witness to attacks of this nature whereby the intrusion was obviously executed by a party who did not really know what they were doing—yet the intrusion was somewhat successful.
Complete security of an operating system is not obtainable. It makes no sense to say that an installation of Mac OS X is completely “secure.” Given enough time and resources, the security of that installation can be compromised. Never assume a system is completely immune to a compromise in security.
Computers do not get tired or bored. They can be made to spend all day scanning network traffic, looking for vulnerable aspects of systems, or to just wait for you to make a mistake. It only takes one mistake, and the consequences of that mistake can be realized in seconds.
The motivations behind attacks on computers really don’t stray much from those of the real world. People steal money. People spray graffiti on walls. People impersonate others for personal gain. When thought of in this manner, it is not hard to realize the motivations behind some of these computer attacks.
Destructive attacks primarily seek to destroy digital property, and disrupt services. The denial of service attacks that took place against the Yahoo! and Amazon servers in early 2000 are good examples of this.
Many security applications serve to protect the privacy of information. Email, file transfers, remote logins, instant messaging, and web browsing, are all common applications susceptible to eavesdropping.
With the popularity of online banking, monetary theft is a definite risk. Account management software can leave sensitive financial information on hard disks; the usage of online account management and bill payment systems needs to be secured and verified.
Still, other attacks make use of compromised hosts as a means to gain access to another, bigger target. University networks and Internet service providers can be targeted simply to gain access to other connected networks or resources. Therefore, just using these types of systems makes you a target.
What is done after a host is compromised can vary as well. Well-thought-out attacks often attempt to stay under the radar and gather information, such as passwords. Attacks perpetrated by those who really don’t know what they are doing often lead to random acts of mischief.
Most attacks occur as a result of placing your computer(s) on a network. The security of a system does involve more than network security, but in most cases, this is where the majority of the threats begin. One key distinction with Mac OS X is that the networking infrastructure is based on that of the 4.4BSD UNIX operating system. This is good because the BSD system is mature and is considered robust by many. However, this now brings with it a variety of security concerns. Because of its importance, this issue is addressed throughout the book.
There is more to reducing security risks than just throwing cryptography at them. The encryption technologies and tools currently at the disposal of the Mac OS X user are awesome, but the importance of knowing how to apply those technologies should not be minimized. The key to effectively reducing a security risk involves having an understanding of how the tools involved attempt to solve the problem. For example, certain encryption algorithms are considered more resilient to brute force attacks based on current trends in computing power. More than likely, it is not sufficient to simply say you are encrypting data. This is not to say that you must understand the details of the encryption algorithm, but that the limitations and peculiarities of the tools used are very important.
Understanding the technology is really more a matter of adopting a mindset, not just a mapping of tools to situations or problems. For example, using the Telnet program to log in to a remote machine is often considered unwise, primarily, because your password (and more) is sent unencrypted over the network. This issue can be addressed by using a replacement for Telnet. The Secure Shell program (SSH) encrypts the communication between the two computers. Simply knowing to use SSH instead of Telnet is fine, but isn’t the most important aspect of this example. When learning of new vulnerabilities and risks, make a note of what the crux of the issue is first; the tools used to solve the problem will follow. As a result, taking this approach helps you understand and solve other security issues, whether you are an average user or an administrator.
Each chapter in this book highlights the underlying nature of the various topics, as opposed to just exposing the problems and solutions.
With the rise in awareness toward computer security, the tools that serve to address the problems are finding their way onto the desktops of many systems. This includes secure replacements for common applications, to toolkits that contain strong cryptography. Mac OS X is no exception. The tools and the security architecture that reside on Mac OS X show that security is important to Apple. Understanding and effectively taking advantage of those tools, however, is left to users and administrators.
Due to the importance of network security, many of the built-in security features of Mac OS X serve to address this topic. Stopping malicious activity at this level is very important to maintaining a safe environment. After an attacker has gained access to a host, it is simply a matter of time before he elevates his privileges or gains root access.
Firewalls serve to filter data coming in and out of the attached networks on a computer. Mac OS X comes installed with a firewall called ipfw. This firewall can even be configured through the graphical interface. However, out of the box, it is not as effective as it could be. Details about firewalls are covered in Chapter 8, “Network Services.”
Another network security tool installed with Mac OS X is OpenSSL. OpenSSL is a popular toolkit used to secure TCP-based network communications. It includes a multipurpose cryptographic library and a secure transport library that enables developers to secure network applications. It also includes a set of command line utilities for the rest of us. Use of the OpenSSL command line is covered in Chapter 4, “What Is This UNIX Thing?”
Wireless networks are becoming popular, and are not uncommon on laptops with Mac OS X installed. There are certain protocols that exist to address wireless security; however, they are not without their limitations and problems. This and other issues related to wireless security are covered in Chapter 8.
Virtual Private Networking (VPN) allows for the secure communication between networks over an untrusted medium, such as the Internet. It also allows for secure remote access to a network. Mac OS X has the capability to do secure host-to-host communications, as well as participate as a remote access client. The VPN capabilities of Mac OS X are explored in Chapter 8.
File encryption enables users to maintain the confidentiality of the contents of their files. Having the capability to encrypt files can be useful in the case of theft, network penetration, or just as a precautionary measure when using a multiuser machine. Mac OS X allows for file encryption through the use of the Disk Copy.app, which can create a secure encrypted file system. This application is covered in Chapter 3, “Mac OS X Client General Security Practices.” The Keychain Access.app allows for the encrypted storage of passwords for applications and web sites. Details of the Keychain Access.app are covered in Chapter 5, “User Applications.”
In the unfortunate case of a compromised host, there are tools that can be used to determine how the compromise was achieved, and what damage was done. Mac OS X has system logs that can be used to pinpoint malicious activity. File integrity applications can be used to determine what files have been modified, if any. Still, more specific tools such as TASK can be used to play the forensics expert to a digital crime scene. Although Mac OS X does not come with any real forensics tools, an explanation of where to obtain some and how to use them effectively are covered in Chapter 12, “Forensics.”
Darwin is an open-source UNIX operating system built from the 4.4BSD distribution and FreeBSD 3.2. This makes up the foundation of the operating system, including the drivers, the kernel, and the command line applications. Darwin does not include any of the graphical components to Mac OS X such as the Quartz or Aqua interfaces.
Apple created the open-source Darwin project in the spring of 1999. The goal was to release the source code of the core of the operating system to the development community. This way, the implementation could be reviewed and improved by more than just Apple engineers. The debate over whether open-source software is beneficial is ongoing; however, Mac OS X is certainly benefiting from the architecture it shares with other open-source operating systems. Detection and resolution of security vulnerabilities is one benefit.
Mac OS X is built on top of Darwin. Throughout this book many of the concepts that are covered apply to standalone Darwin systems as well. When Darwin is specifically mentioned, this includes only the components released by Apple under the Darwin Project.
More information about Darwin and how it relates to Mac OS X can be found on Apple’s open-source development site:
Throughout this book (including this chapter) many references and examples use command line applications. To be effective in understanding some of the concepts discussed, you will have to get your hands dirty with the command line interface. The application Terminal.app (see Figure 1.1) obtains a command line interface. This application is located in /Applications/Utilities/Terminal.app.
When you launch this application, you are presented with a prompt that allows you to enter commands to be executed by the operating system. Multiple instances of the terminal application can be opened simultaneously. Detailed information about the Terminal.app is given in Chapter 4. There are many commands, and discussing them all is outside the focus of this book. Refer to the book UNIX for Mac OS X by Dave Taylor and Jerry Peek (O’Reilly & Associates) for a good introduction to many UNIX commands. Also, the web site www.osxfaq.com contains many introductory articles and tutorials on the UNIX command line found on Mac OS X.
The command line interface also has a help system, man pages. To get help about a particular command, the syntax is man command. Replace command with the name of the command you need help with. In addition, you can search for keywords in the man pages by using man -k keyword. This provides a list of commands that match that keyword.
Under the hood, Mac OS X is a full-fledged UNIX operating system. UNIX was originally designed as a programming environment, with no real focus on security. Over time, efforts have been made to address security concerns, but the reality is that the UNIX security model is a trusting one enforced mainly by applying security to files. Every file is owned by a specific user. Every application runs as a specific user. This section covers the basics of users and groups. Detailed information about file permissions will be covered in Chapter 4.
Similar to other flavors of UNIX, Mac OS X implements a simple user/group model where users and groups are each represented by an integer, known as a user identifier (UID) and group identifier (GID). The UID and GID are what the operating system uses for identification purposes, and in turn, to enforce access control. UID and GID values are stored as 32-bit integers on Mac OS X with a maximum UID value of 2,147,483,647. Users and groups are also assigned names, but they are more for convenience purposes.
UID assignments do not have to be unique, but in most cases they are. If multiple user accounts share the same UID, there is no distinction between their owned files. Likewise, if two groups share the same GID, there is no real distinction between those groups (other than possibly their name). If a duplicate identifier is found, it should certainly be investigated.
Users are members of one or more groups. Each user has a primary group to which they belong. You can view the groups that you are currently a member of with the groups command:
bash-2.05a$ groups
staff admin
bash-2.05a$
This user is a member of the staff and admin groups. The primary group for this user is the staff group, but this cannot be determined from the preceding output. For more detailed information, use the BSD id command:
bash-2.05a$ id
uid=501(brian) gid=20(staff) groups=20(staff), 80(admin)
This command is more forthcoming with information and can be quite handy. The names as well as the ID values associated with the user are displayed. Additionally, the primary group for the user is revealed. This command optionally accepts a username as an argument so you can see this same information for a specific user—for example:
bash-2.05a$ id root
uid=0(root) gid=0(wheel) groups=0(wheel) 1(daemon) 2(kmem) 3(sys)
4(tty) 5(operator) 20(staff) 31(guest) 80(admin)
In the UNIX world, there are typically two types of users: normal users and root. Out of the box, Mac OS X sets up a root user and a single admin user who is capable of root privileges.
Without a doubt, the most important account on the system is the root user (UID 0), because the root user can do almost anything. This is the account that is used to handle logins, load and unload kernel extensions, control devices, and manage the file system and network, among other system level functions. This account is also referred to as “System” in the Finder. Due to the potential for disaster, this account is not to be used as a regular account, even by administrators.
To reduce the risk of compromise, you should adhere to a policy of least privilege. Ideally, this leaves only a single account with administrative privileges. Administrative tasks are accomplished by temporarily elevating this account to root privileges (with the sudo command). Apple endorses this policy by making the root account on Mac OS X disabled by default. That is, it is not possible to log in as root from the login window. Note that there are still ways root access can be obtained; more on this in Chapter 4. The user created during the installation is considered an admin user. This user is in the admin group, and therefore given sudo capabilities. The details and risks surrounding sudo will also be covered in Chapter 4.
By default, the root account is disabled and does not have a password. Immediately upon installation, the root account should be initialized. This involves enabling the account (see Figure 1.2), setting root’s password (see Figure 1.3), and then disabling the account again (see Figure 1.4). This can all be done with the NetInfo Manager application (/Applications/Utilities/NetInfo Manager.app).

After launching NetInfo Manager, you must authenticate with an admin username and password.
Now the root account is disabled and nobody can log in to the system as root. Also, the root password is now set and (hopefully) known only to an administrator.
With Mac OS X Server, the root account is enabled by default so, obviously, the preceding process does not apply. The main point is that all steps should be taken to prevent logins into the root account by disabling it.
The user that was created during the installation is considered an administrator. What this means, specifically, is that this user is granted sudo abilities and membership to the admin group. The only other members of this group are the root user and possibly other admin users. Membership to this group enables the administrator to view log files and install programs under the /Applications directory. All other users have only read and execute permissions to the applications directory. That is, they are unable to save, modify, or delete any of the files.
On Mac OS X Server, the user created during the installation is also an admin user. However, the password given during the creation of that administrative account is also the initial password of the root account. That is, the root account has a password and is enabled. Likewise, it is recommended that the root password be changed so that it is not the same as the admin account, and then disabled.
By default, all members of the admin group are given sudo access. In keeping with the spirit of only allowing access as needed, it is recommended that the sudo privileges be allowed only to a single admin user. However, because all administrative users on Mac OS X are granted sudo access by default, changing this takes some modification of system files. The details surrounding the enforcement of this policy are also covered in Chapter 4.
When users are created through the Accounts pane of the System Preferences application, UIDs are automatically generated starting at 501. On most UNIX systems, lower UID values are reserved for system use. On Mac OS X, this is the case for all UID values below 100. These system accounts are used for various purposes and vary with each type of UNIX distribution. The basic idea is that system level applications need to be given privileges to perform their service, and nothing more. A user is created for each service and is usually designated the owner of files related to that service.
Table 1.1 lists the system accounts that are installed with Mac OS X. Some of these accounts are not created; for example, the mmuser account is created only after the Macintosh Managemnet Server is initialized.
Table 1.1. Special System Users
UID | SHORT NAME | DESCRIPTION |
|---|---|---|
–17 | mmuser | Manages the Macintosh Management Server (Mac OS X Server only). |
–2 | nobody | An unprivileged account with no home directory or file ownership. |
0 | root | The user with highest privileges, the super-user. |
1 | daemon | Manages certain system services with limited privileges. |
25 | smmsp | The user that runs the sendmail processes. |
70 | www | The user that runs the Apache web server processes. |
74 | mysql | The user that runs the MySQL database server processes. |
75 | sshd | The user that runs the secure shell server processes. |
98 | ftp | The user assigned to anonymous incoming ftp users. |
99 | unknown | Used for unknown volumes. |
Just as there are special user accounts for system use, there are system groups used to limit certain resources to a particular set of users. This also makes it possible to allow other users on the system to have access to files related to a specific system service.
Table 1.2 lists the system groups that are installed with Mac OS X. Some of the groups in the table are legacy UNIX groups that are not really used.
Table 1.2. Special System Groups
GID | NAME | DESCRIPTION |
|---|---|---|
–2 | nobody | Used for various system services. |
–1 | nogroup | Used for various system services. |
0 | wheel | The primary group for root. |
1 | daemon | Used for certain system services with limited privileges. |
2 | kmem | Used for kernel memory, for example, /dev/mem and /dev/kmem. |
3 | sys | Not used. |
4 | tty | Used for managing files associated with remote logins and certain applications. |
5 | operator | Not used. |
6 | The group for managing mail files. | |
7 | bin | A legacy group for owning binary files. |
20 | staff | The primary group for all normal users. |
25 | smmsp | The group that runs the sendmail processes. |
31 | guest | An Unprivileged user that owns no files. |
45 | utmp | Not used. |
66 | uucp | A group for handling uucp transactions. |
68 | dialer | The group used for managing modems. |
69 | network | Not used. |
70 | www | The group that runs the Apache web server processes. |
74 | mysql | The group that runs the MySQL database server processes. |
75 | sshd | The user that runs the secure shell server processes. |
80 | admin | Used for managing admin users. By default, this group is given |
99 | unknown |
So far, this chapter has covered the basic concepts of the user/group model particular to Mac OS X. Now, we will take a look at how these users and groups are managed. Most UNIX systems make use of flat files to store information about users, groups, networks, and other resources. Files such as /etc/passwd, /etc/group, and /etc/hosts contain line entries of users, groups, and network names. Mac OS X does the same by using an organized directory structure called NetInfo. NetInfo is a remnant of the NeXTStep operating system, where Mac OS X has its roots. In addition to managing users and groups, NetInfo also manages resources such as devices, networks, services, and filesystem shares.
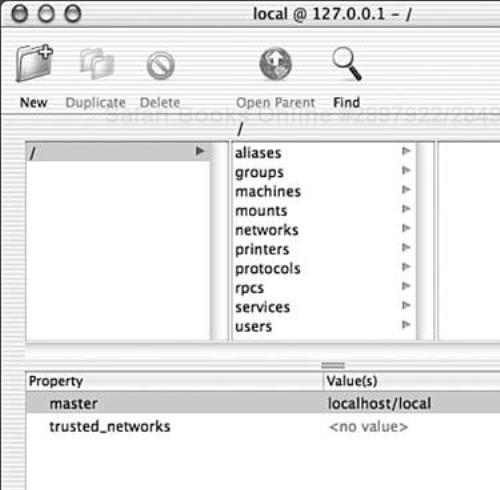
With a few adjustments, the traditional flat files can be used for user and group management. However, Mac OS X is set up to use NetInfo by default. NetInfo has a GUI-based management application—NetInfo Manager.app (see Figure 1.5). The interface organizes the information similar to a file system, with “/” as the top level of the domain.
Securing the management of users and groups when using flat files is fairly straightforward. The files in question are set up in such a way that normal users do not have direct write privileges. In most cases, these files serve to manage users local to the system. NetInfo is quite different.
NetInfo was designed to interact and share information with other NetInfo databases in a hierarchical fashion across a network. Thus, instead of a local file being queried for login credentials, the query is now sent to a distributed database, possibly over a network. In turn, the infrastructure for channeling these types of requests prevails in many of the applications and system services. The capability to deal with users and groups across a network of machines is handy, but it is also overkill for the casual user. For example, NetInfo is useful in the context of a university lab of Mac OS X machines, but the average home user will probably never know of or care about the capabilities of NetInfo.
Although Mac OS X installations are not always part of a greater NetInfo network, a local NetInfo domain still serves requests in similar fashion. Let’s examine some risks involved in using NetInfo, and steps you can take to reduce those risks.
One of the issues with NetInfo that has raised a great deal of concern is the capability for normal users to read the encrypted password values of other users, including the root password. Normally password shadowing prevents such attacks by preventing normal users from having read access to the encrypted passwords. However, the nidump command line application gives any local user the capability to read this information from a local NetInfo database. For example, this example prints the list of users and their attributes, including the encrypted passwords:
bash-2.05a$ nidump passwd /
nobody:*:-2:-2::0:0:Unprivileged User:/dev/null:/dev/null
root:*uN59qX0Z5X5Pc:0:0::0:0:System Administrator:/var/root:/bin/tcsh

daemon:*:1:1::0:0:System Services:/var/root:/dev/null
unknown:*:99:99::0:0:Unknown User:/dev/null:/dev/null
smmsp:*:25:25::0:0:Sendmail User:/private/etc/mail:/dev/null
www:*:70:70::0:0:World Wide Web Server:/Library/WebServer:/dev/null
mysql:*:74:74::0:0:MySQL Server:/dev/null:/dev/null
sshd:*:75:75::0:0:sshd Privilege separation:/var/empty:/dev/null
bob:FMw7rHeeS3Sjo:501:20::0:0:Bob Smith:/Users/brian:/bin/tcsh
bash-2.05a$
A malicious user can then take the portion that represents the encrypted password, and try to decrypt it. The attack is a brute force attack, but nonetheless effective. For example, the following demonstrates dumping the user information from NetInfo using nidump, then running John the Ripper to crack some obviously weak passwords:
bash-2.05a$ nidump passwd . > /tmp/pw.dump
bash-2.05a$ ./john /tmp/pw.dump
Loaded 2 passwords with 2 different salts (Standard DES [24/32 4K])
password      (bob)
cheese       (root)
guesses: 2 time: 0:00:00:00 100% (2) c/s: 3142 trying: ginger -
gizmo
The risk here is different depending on the nature of the system. For example, a multiuser system in an office environment probably warrants more concern than a student lugging around an iBook for school papers. In any case, the fact that users have the capability to compile and run UNIX software, such as password crackers, is representative of the risks of which users coming from a Macintosh background now need to be aware.
There is no sure solution to the NetInfo password problem that exists with the current implementation of NetInfo. This is unfortunate. However, steps can be taken to reduce the risks involved.
Begin with passwords. Do not use weak passwords! This is the most effective way to combat this problem. Given the nature of the attack, words found in the dictionary can be cracked faster than you can utter your password. The preceding example took less than a second. Use passwords with numbers and multiple symbols within the first eight characters.
Change the permissions of the command line NetInfo applications such that normal users do not have any access rights for the files. The details for changing permissions on files in this manner are discussed in Chapter 4. The list of NetInfo related applications includes
/usr/bin/niutil/usr/bin/nicl/usr/bin/nidump/usr/bin/niload/usr/bin/nifind/usr/bin/nireport/usr/bin/nigrep/usr/sbin/nidomain
In addition, the NetInfo management application (NetInfo Manager.app) is run as root regardless of who actually launches the application. This is known as a Set User ID root application (SUID). It is recommended that the permissions be changed for this application as well. A detailed discussion of what SUID means, the dangers of SUID applications, and what files on Mac OS X are SUID are covered in Chapter 4.
Do not use important passwords that you use elsewhere. In the event that a password is compromised, you can bet your accounts on other systems will become immediate targets (for example, your mail server).
Do not reuse passwords. If you change your password, never go back to a password you used two passwords ago. This defeats the purpose of periodically changing your password and increases the risk of a compromise.
The problem is not with the “ni” applications or with the NetInfoManager.app in particular. The problem is that the local netinfo domain places limited access restrictions on the information it stores. It is important to understand that users can still copy over and run the “ni” applications, or even write their own applications to talk to the netinfo domain. See man netinfo(3) for more details. However, changing the permissions as suggested previously will not be in vain. If somebody wants to get into my house with a lock-picking kit, they can, yet I still lock my doors. Locking the doors is not a deterrent for all, but it is for some. The logic here applies.
Generally, read-access to NetInfo data is given to all local users, while write-access requires administrative privileges. Network access to the data is turned off by default. Also, the local NetInfo domain will not seek out other master NetInfo domains. This has also been turned off by default. Allowing access to the NetInfo domain from other hosts requires an administrator to explicitly add that host to an access control list. However, it is interesting to note that this was not always the case. Early versions of NeXTStep allowed even remote access to the NetInfo domain by default.
Another risk with NetInfo involves the use of a master NetInfo domain to manage a network of hosts and users. It is very apparent that the forefathers of this system were most concerned with providing a scalable directory service that was easy to set up and integrate into existing networks. Security, as it often does, took a back seat. All communications between NetInfo domains happens in clear text. This includes user authentications. For this reason, even Apple specifically recommends an alternative for managing authorization and authentication, such as a SSL/LDAP solution. Detailed information about NetInfo administration is covered in Chapter 10, “Directory Services.”
The first step toward securing Mac OS X starts with an understanding of the risks. Only then can you begin to effectively reduce those risks. The disparate user base of Mac OS X users makes this job even harder. Users and administrators must understand the root of the security issues and develop a security mindset as opposed to just knowing to use certain tools.
The power of its UNIX core makes Mac OS X very appealing to users as well as to attackers. Understanding the UNIX roots found in this operating system is key to being effective in the securing process. That being the case, an entire chapter is dedicated to this subject.
Out of the box, Mac OS X is not horribly insecure, but obviously there are holes to be plugged and issues to be addressed. In the remainder of this book, we will explore and resolve the critical issues needed to establish a secure computing environment, for users and administrators alike.