
In this chapter
The DOS Editor is a text processor, a kind of miniature word processor. It is the perfect tool for creating short text documents and editing text files. When you try the DOS Editor, you are in for a pleasant surprise. The Editor is so easy and intuitive to use that you will likely become a regular user.
The DOS Editor falls into a class of programs known as text editors. As the name implies, a text editor works with files that contain pure text (as opposed to binary files, which contain programming instructions or formatted data).
Following are some of the typical tasks for which the DOS Editor is ideally suited:
Creating, editing, and printing memos (and other text documents)
Creating or modifying various system configuration files, such as
AUTOEXEC.BATandCONFIG.SYSWriting and modifying batch files
→ For more information about batch files, see Chapter 16, “Understanding Batch Files,” p. 389.
Writing and saving
READMEfiles (Many computer users place aREADMEfile in a hard disk subdirectory, or on a floppy disk, to explain the contents of other files in the subdirectory or on the disk.)Creating and viewing files that are uploaded to or downloaded from electronic bulletin boards, such as CompuServe
Writing programs for programming language environments that don't include a resident editor
Be aware that document files produced by some word processors aren't pure text files. The files can contain special formatting or printer-control characters. Most word processors can import the pure text files created with the DOS Editor. The Editor, however, might not successfully import word processor document files that contain certain formatting characters.
The Editor is provided with DOS. It is invoked by the external command EDIT, which runs the program EDIT.COM. When you run the Editor, EDIT.COM calls on two other files: QBASIC.EXE and EDIT.HLP. Only QBASIC.EXE is required. EDIT.HLP contains the text of the help messages, but the Editor works without this file.
Having a bootable floppy disk with the DOS Editor on it can be very useful for troubleshooting computer problems. You can copy the Editor onto a floppy disk in two different ways, depending on the version of DOS you have.
→ To make a floppy disk bootable, see “Creating a Floppy Boot Disk,” p. 25.
If you are using DOS 6.x, you must copy the EDIT.COM, EDIT.HLP, and QBASIC.EXE files from the C:DOS directory to the floppy.
If you are using Windows 9x, you need to copy just the EDIT.COM and EDIT.HLP files from the WindowsCommands directory. You no longer need to copy the QBASIC.EXE file.
You can start the DOS Editor from the DOS Shell or from the command line. To start it, type the following at the DOS prompt and press Enter:
EDIT
A preliminary screen appears (see Figure 15.1).
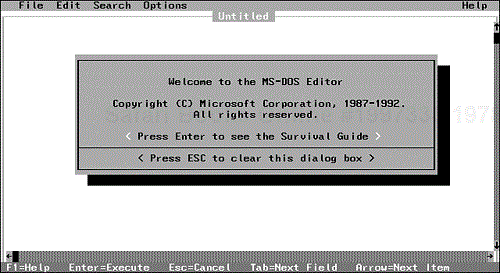
You now must press either Enter or Esc:
Enter activates the Survival Guide. (The Survival Guide provides help about using the DOS Editor.)
Esc clears the box in the center of the screen and prepares the Editor for working on a text file.
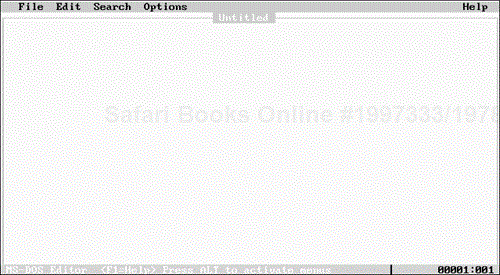
Press Esc. Now the DOS Editor screen is blank, and you can begin writing a text file. Your screen should look like the one shown in Figure 15.2.
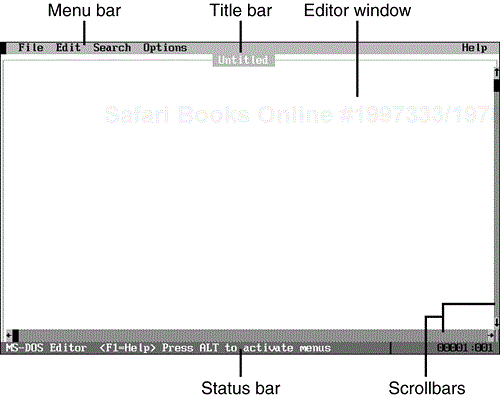
Take a moment to look at your screen (or refer to Figure 15.2). The screen consists of several elements:
The menu bar lists the available menus: File, Edit, Search, Options, and Help. The title bar contains the name of the text file being edited (it is now Untitled).
The status bar describes the current process and shows certain shortcut key options.
Scrollbars are a vertical strip along the right edge and a horizontal strip just above the status bar. You use the scrollbars with a mouse to move through the file. (Mouse techniques are described in the section “Using a Mouse” later in this chapter.)
The Editor window is the large area in which the text of your file appears. The cursor is the flashing underscore character that indicates where typed text will appear.
The DOS Editor provides several ways to perform most commands. The Editor has a user-friendly set of menus from which you can choose options. Many of these options require you to enter further information in an onscreen box known as a dialog box, discussed in “Understanding Dialog Boxes” later in the chapter.
The Editor enables you to execute many commands by pressing special shortcut keys. You also can use a mouse to execute commands.
The following sections describe how to use menus, dialog boxes, shortcut keys, and a mouse in the DOS Editor.
The DOS Editor menu system provides many editing commands. The menu bar contains the following options: File, Edit, Search, Options, and Help. Choosing any of these options displays a pull-down menu. The File option displays a menu that enables you to load, save, and print files. You use the Edit menu to cut and paste text. You can use the Search menu for finding and replacing specified text. The Options menu can be used to reconfigure environment options, and the Help menu provides access to online help.
To activate the menu bar, press Alt. The first letter of each menu name is highlighted. To open a menu, press the first letter of the menu name. To activate the File menu, for example, press Alt and then F (Alt+F). Similarly, press Alt+E to display the Edit menu, Alt+S to display the Search menu, Alt+O to display the Options menu, or Alt+H to display the Help menu.
Every time you open a main menu, the first command on the menu is highlighted. You can move this highlight to the other commands by pressing the up- or down-arrow key. As you move the highlight, notice that the status bar displays a brief description of the highlighted command.
On a menu, one letter of each command is highlighted. On most systems, the highlighted letter appears in high-intensity white. To execute a command, move the highlight to that command and press Enter, or press the key that corresponds to the highlighted letter.
Depending on which editing commands you have executed previously, some commands in a menu might not be available. In such a case, the menu shows the command name in a dull color (usually gray), and no highlighted letter appears in the name. If you try to execute an unavailable command, the DOS Editor sounds a beep and refuses to execute the command.
The Esc key is the “oops” key. Pressing Esc closes the menu system and returns you to the Editor.
In the pull-down menus, an ellipsis (…) following the name of a command indicates that a dialog box opens when you issue that command. (Sometimes, depending on the circumstances, a command without an ellipsis also opens a dialog box.)
When you execute a menu command, it can start immediately or, depending on the command and the current context, a dialog box might pop up. A dialog box means that the DOS Editor needs more information before it can carry out the command. If, for example, you execute the command to save a new file, the Editor first needs to know what name to give the file. A dialog box prompts you for the necessary information.
If you activate the Search menu, for example, and then choose Change, the DOS Editor displays the Change dialog box (see Figure 15.3).
The DOS Editor uses dialog boxes to get a variety of information. Sometimes you must type something, such as a filename or a search string in a text box. Sometimes you must choose from a list of options. At other times, you select from a series of command buttons.
→ For a discussion of dialog boxes, text boxes, option buttons, and command buttons, see Chapter 4, “Using the DOS Shell,” p. 57.
When a DOS Editor dialog box opens, the following three keys have special significance:
Tab moves the cursor from one area of the dialog box to the next area. After you specify information in one area, use Tab to move to the next area.
Esc aborts the menu option and returns you to the Editor. Use Esc when you change your mind and decide against issuing a particular command.
Enter is the “go ahead” key. Press it when all options in the dialog box are as you want them and you are ready to execute the command. You press Enter only once while you are working inside a dialog box. Use Tab, not Enter, to move the cursor from one area of the dialog box to the next area. (Be careful. Most people tend to press Enter after they type information, such as a filename. Remember that when you need to specify additional information inside the dialog box, press Tab, not Enter.)
In every dialog box, one command button is enclosed in highlighted angle brackets. The highlighted brackets identify the action that takes place when you press Enter.
To highlight the angle brackets of the command button you want, press Tab repeatedly. Be sure not to press Enter until you have specified everything satisfactorily.
For convenience, many commonly used DOS Editor menu commands have an associated shortcut key. Pressing this shortcut key while you are working with the Editor executes the command directly, bypassing the menu system. Table 15.1 provides a complete list of shortcut keys.
Table 15.1. DOS Editor Keyboard and Mouse Shortcuts
A mouse is an excellent pointing device for computer applications. The DOS Editor supports a mouse. You can execute menu commands and many editing tasks by using a mouse. If your system is mouseless, you can get along fine; if you have a mouse, try it and see what you think.
Note
The DOS Editor works with any Microsoft-compatible mouse and driver. If you have a mouse, you presumably know how to install and activate your mouse driver. Microsoft supplies a generic mouse driver as part of MS-DOS.
When the mouse is active, you see a special mouse cursor onscreen. The mouse cursor is a small rectangle, about the size of one text character, which moves as you move the mouse. Notice that the regular blinking cursor remains active. You can continue to use all the keyboard commands and features. Refer to Table 15.1 for a comprehensive list of mouse techniques.
The following are some additional mouse pointers:
To open a menu, click the menu name in the menu bar.
To execute a menu command, click the command name in the menu.
To set an option in a dialog box, click that option.
To abort a menu, click a location outside the menu.
To move the cursor in the file, click at the location you want.
To select text, drag the mouse cursor over the text. That is, move the mouse cursor to one end of the text you want to select; then press and hold down the mouse button while you move the mouse, across the text, to the other end of the text you want to select.
To activate the Editor window while a help screen is visible, click anywhere inside the Editor window.
To expand or shrink the Editor window while a help screen is visible, drag the title bar of the Editor window up or down.
To scroll the screen horizontally one character, click the left or right arrow at either end of the horizontal scrollbar.
To scroll the screen vertically one character, click the up or down arrow at either end of the vertical scrollbar.
To scroll text vertically to a specific position, move the mouse cursor to the scroll box (the inverse-video rectangle inside the vertical scrollbar). Then, drag the scroll box along the scrollbar to the desired position.
To scroll text one page at a time, click the vertical scrollbar somewhere between the scroll box and the top or bottom of the scrollbar.
To scroll horizontally several positions at once, click the horizontal scrollbar somewhere between the scroll box and the left or right end of the scrollbar.
To execute a dialog box action enclosed in angle brackets, click the name between the brackets.
To execute any keystroke action enclosed in angle brackets in the status bar, click the name inside the angle brackets.
Editing is a skill—almost an art. Some editing techniques are simple, others more complex. You can perform many editing tasks in more than one way. The following sections discuss the fundamental editing skills, which include moving the cursor, scrolling, and inserting and deleting text.
When you have text in the DOS Editor window, you can move the cursor around the text in several ways. The Editor provides two alternative cursor-movement interfaces:
Keypad interface—. The specialized IBM PC keys—the arrow keys, Ins, Del, and so on—govern most editing activities. To move the cursor up, for example, you use the up-arrow key.
Control-key interface—. Ctrl+key combinations can also be used for most editing activities. To move the cursor up, for example, you press Ctrl+E. This interface is used in the word processing program WordStar.
Generally, the DOS Editor accommodates both camps. Most editing techniques are available with both the keypad and Control-key (WordStar-style) sequences. A few techniques, however, can be performed with only one method. This chapter focuses on the keypad style. The Control-key combinations are mentioned only when required by a particular editing technique.
Table 15.2 summarizes the cursor-movement commands.
Table 15.2. Cursor-Movement Commands
| Effect | Keypad | Control-Key Style |
|---|---|---|
| Character left | Left arrow | Ctrl+S |
| Character right | Right arrow | Ctrl+D |
| Word left | Ctrl+left arrow | Ctrl+A |
| Word right | Ctrl+right arrow | Ctrl+F |
| Line up | Up arrow | Ctrl+E |
| Line down | Down arrow | Ctrl+X |
| First indentation level | Home | None |
| Beginning of line | None | Ctrl+Q, S |
| End of line | End | Ctrl+Q, D |
| Beginning of next line | Ctrl+Enter | Ctrl+J |
| Top of window | None | Ctrl+Q, E |
| Bottom of window | None | Ctrl+Q, X |
| Beginning of text | Ctrl+Home | Ctrl+Q, R |
| End of text | Ctrl+End | Ctrl+Q, C |
| Set marker | None | Ctrl+K, n (n equals 0–3) |
| Move to marker | None | Ctrl+Q, n (n equals 0–3) |
Look at the far-right end of the status bar, in the lower-right corner of the DOS Editor screen. You see two numbers, separated by a colon. The two numbers indicate the cursor's current location in your file. The first number is the current row; the second, the current column.
Use the arrow keys to move the cursor, and watch the numbers change. Press Num Lock; an uppercase N appears next to the location numbers to indicate that Num Lock is on. Press Num Lock a few more times to toggle the indicator on and off. Press Caps Lock; an uppercase C appears next to the location numbers, left of the N, to indicate that the Caps Lock key is on.
Scrolling is the movement of text inside the Editor window. When you scroll, you bring into view a portion of the file currently not visible in the Editor window. Scrolling, which can be horizontal as well as vertical, keeps the cursor at the same row and column number but moves the text in the window.
Table 15.3 summarizes the scrolling commands. For large-scale scrolling, you use the PgUp and PgDn keys. Try using these keys by themselves and with the Ctrl key.
You can insert text into an existing line. To do so, move the cursor to the position at which you want to insert text; then type the text you want to insert. As you type, text to the right of the cursor moves right to accommodate the inserted text. You can move off the line by using any of the cursor-movement keys. Do not press Enter to move off the line. Pressing Enter splits the line in two. If you want to replace, or overwrite, the text instead of inserting, press the Insert key. See the “Overtyping” section later in this chapter.
You can use one of the following two methods to delete a few characters from a line:
Move the cursor to the character you want to delete. Press the Del key. To delete consecutive characters, continue pressing Del.
Move the cursor to the character immediately to the right of the character you want to delete. Press the Backspace key.
Most people find the first method more natural. Try both methods and make your own choice.
Sometimes you need to split a line of text into two lines. To do so, move the cursor so that it is positioned under the character with which you want to begin the second line of text; then press Enter. The line splits in two, and the second half moves down to form a new line. Succeeding lines are pushed down to accommodate the new line.
Conversely, you can join two lines to form one line. To do so, position the cursor in the second line and press Home to move the cursor to the left end of the line. Then, press Backspace. The second line moves up to the right end of the first line. Lines beneath the split line move up one line.
To insert a blank line between two lines, move the cursor to column 1 in the lower of the two lines and then press Ctrl+N or Home (to move the cursor to the left end of the current line), and press Enter. Then, move the cursor up to the new blank line.
To delete an entire line, place the cursor anywhere on the line and press Ctrl+Y.
By default, the DOS Editor operates in Insert mode. If you type new text while the cursor is in the middle of a line, the Editor inserts that new text at the cursor location. If you prefer, you can choose Overtype mode, in which the new text replaces the former text.
To activate Overtype mode, press Insert. The cursor changes from a blinking line to a blinking box. The larger cursor signifies Overtype mode, in which any new character you type replaces the character at the cursor location.
Note
Depending on your keyboard, you might have a key marked either Ins or Insert. Both provide the insert function.
To return to standard Insert mode, press Insert again. The Insert key acts as a toggle switch that alternates between Insert and Overtype modes.
In addition to the basic editing techniques, the DOS Editor provides several special editing features. The following sections describe how to use the automatic indenting, tab, and place marker features.
When you type a line and press Enter, the cursor drops down one line but returns to the column where you began the preceding line. This feature is convenient when you want to type a series of indented lines.
For an example, type the following line and press Enter:
This line is not indented
The cursor moves to the beginning of the next line. Then press the spacebar three times to move the cursor to column 4 and type the following:
But this line is
Press Enter again. Note that the second time you press Enter, the cursor moves to the next row but remains indented at column 4. Now type this message and press Enter:
So is this one
The cursor remains indented.
Now press the left-arrow key until the cursor returns to column 1. Type the following and press Enter:
Back to no indentation
The short text block you typed looks like the following:
This line is not indented
    But this line is
    So is this one
Back to no indentation
By default, tab stops are set every eight spaces. When you press the Tab key, the cursor moves to the right to the next tab stop. All text to the right of the cursor moves right when you press Tab. Additional tabbing techniques follow:
To indent an existing line a full tab position, move the cursor to column 1 of the line and press Tab.
To remove leading spaces and move a line to the left, move the cursor anywhere on the line and then press Shift+Tab.
To indent or “unindent” an entire block of lines, select the lines by using one of the Shift keystrokes shown in Table 15.4. Then, press Tab to indent the entire block or press Shift+Tab to “unindent” the entire block.
To change the number of default tab stops, first select Display from the Options menu. In the resulting dialog box, press Tab several times to move the cursor to Tab Stops, type a new value for the number of characters per tab stop, and then press Enter to close the dialog box.
A place marker designates a specific location—a row and column—in your text. You can set as many as four place markers. After setting a place marker, you can move the cursor instantly from anywhere in the file to that marker's location. The markers are invisible; no character appears in the text to indicate a set marker.
You can set four markers: 0 through 3. To set a place marker, press and release Ctrl+K, and then press a number key from 0 to 3. This action associates the cursor's current position with the marker having the number whose key you pressed. To move the cursor to a previously set place marker, press and release Ctrl+Q, and then press the number of the marker (0 through 3).
You don't turn off markers; they are always set. You can reset them to a different location, but you cannot unset them. They are forgotten when you exit the program.
You can edit blocks of text as a single unit. Block editing requires that you understand two relevant concepts: selecting text and using the Clipboard, which temporarily stores a block of text in a reserved area of memory.
The following sections describe these techniques:
A block of selected text is always one contiguous group of characters. The block can be one character, a few characters, a line, several lines, a paragraph, or even an entire file. Selected text appears in reverse video.
Follow these steps to select a block of text:
Move the cursor to one end of the block.
While you hold down the Shift key, use the cursor-movement keys to highlight the block.
Table 15.4 lists the keys used for selecting text. In general, the keys you use to select text are the same as those you use to move the cursor, but you also press Shift when using them to select text.
Table 15.4. Selecting Text
| To Select | Use This Key Combination |
|---|---|
| Character left | Shift+left arrow |
| Character right | Shift+right arrow |
| To beginning of line | Shift+Home |
| To end of line | Shift+End |
| Current line | Shift+down arrow |
| Line above | Shift+up arrow |
| Word left | Shift+Ctrl+left arrow |
| Word right | Shift+Ctrl+right arrow |
| Screen up | Shift+PgUp |
| Screen down | Shift+PgDn |
| To beginning of text | Shift+Ctrl+Home |
| To end of text | Shift+Ctrl+End |
After you select (highlight) a block, you can deselect it by pressing any arrow key. (Do not use Shift, however; Shift expands or shrinks the selection.) The highlighting disappears, indicating that you have deselected the entire block.
The Clipboard is a text storage area in memory; it acts as a kind of halfway house for blocks of text. You can place a block of text into the Clipboard and later retrieve the block. The Clipboard has many uses. Its most common use is to cut and paste—to move or copy a block of text from one place in the file to another.
The Clipboard stores only one block of text at a time. When you place text in the Clipboard, the incoming text completely replaces the previous contents of the Clipboard. Changing the block of text in the Clipboard is always an all-or-nothing affair. You cannot add or subtract incrementally. Similarly, retrieval is all or nothing. You cannot move only part of the Clipboard's contents into your file.
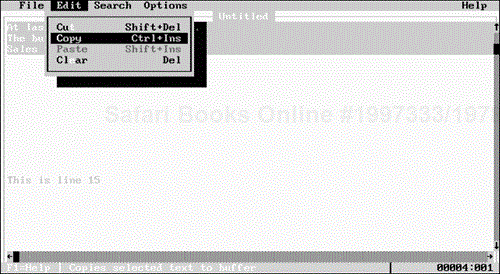
The DOS Editor supports four block-oriented editing techniques (see Table 15.5). You can access each technique by using the Edit menu or pressing the appropriate shortcut key. (Press Alt+E to activate the Edit menu.)
Table 15.5. Block-Editing Techniques
To select the first three lines of text in a file, for example, press Ctrl+Home to return the cursor to the beginning of the file. While you're holding down the Shift key, press the down-arrow key three times to select the first three lines of the file. They now appear in reverse video (highlighted).
After the three lines are selected, you can use one of the block-editing commands. To activate the Edit menu, press Alt+E. The DOS Editor displays the Edit menu shown in Figure 15.4. You can now use one of the menu commands.
Tip
You can use one of the shortcut keys to operate on the selected block, even without displaying the Edit menu.
When you perform copy operations, a copy of the selected text moves to the Clipboard but isn't deleted from the original location. If you perform a cut command, however, the DOS Editor removes the highlighted text from its original location and places it in the Clipboard.
After text has been copied or cut to the Clipboard, you can use the paste operation to copy the Clipboard's contents to a new location in the file. To do so, move the cursor to the desired target location and choose Paste from the Edit menu, or press Shift+Ins (the shortcut key for Paste). The Editor inserts a copy of the Clipboard text at the cursor's location.
Tip
The Clipboard still holds a copy of the pasted text. You can insert additional copies of the Clipboard text at other locations in the file by using the Edit menu or pressing Ctrl+C.
Pressing Del or choosing the Clear command from the Edit menu permanently deletes the selected text from the file without placing a copy of it in the Clipboard.
The Search menu offers several options for searching for and replacing text. These capabilities are most useful in long files.
From the Search menu, you can perform the following actions:
Find one or more occurrences of a designated text string
Replace one or more occurrences of a designated text string with a second text string
A text string is a sequence of one or more consecutive text characters. These characters can be letters, digits, punctuation, or special symbols—any characters you can type from the keyboard.
Finding or replacing text always involves a search string, which is simply the text string being searched for. A search string can be a single character or, more likely, a word or several consecutive characters.
You cannot search for a string that spans two or more lines. The search string is confined to a group of characters on a single line. You can place some conditions on the search string, however. You can specify, for example, that the search not discriminate between upper- and lowercase letters.
The search begins at the cursor's location and proceeds through the file. If the end of the file is reached before the search string is found, the search continues at the top of the file until the entire file has been traversed. Table 15.6 summarizes the three commands available from the Search menu.
To use the Find command, first activate the Search menu by pressing Alt+S. Your screen looks similar to Figure 15.5.
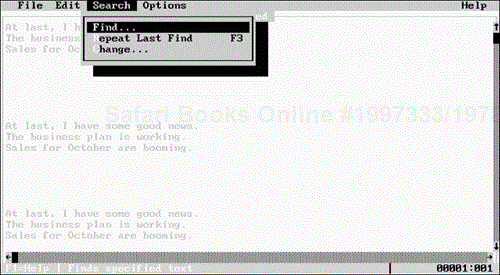
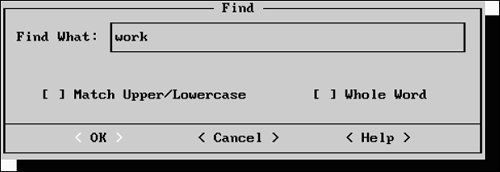
Choose Find. The Find dialog box opens, with the cursor on the Find What text box (see Figure 15.6). The word that is at the cursor's current location in the file (or the currently selected text) appears in the text box. If you want to search for this word, press Enter. Otherwise, type the correct search string and then press Enter. The DOS Editor locates the first occurrence of the search string in your file and selects (highlights) the text found.
→ For more information on using wildcards, see Chapter 5, “Understanding Files and Directories,” p. 99.
You can press F3 or choose Repeat Last Find from the Search menu. The Editor moves to the next occurrence of the search string (if any).
As you can see in Figure 15.6, you can use the following check boxes in the dialog box to place conditions on the search:
Match Upper/Lowercase—. If you select this check box, a successful search occurs only when the upper- and lowercase letters in the text exactly match those in the search string. If this option is not selected, upper- and lowercase letters are considered the same.
Whole Word—. If you select this option, the search string must exist as an independent word and cannot be embedded inside a larger word. The character that immediately precedes and immediately follows the search string must be a space, a punctuation character, or one of the special characters (such as <, *, or [).
In addition to just searching for text, you can use the DOS Editor to search for specific text and then replace it with other text.
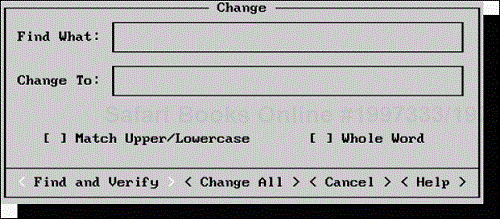
You activate the Search menu by pressing Alt+S. Then, choose the Change command. The Editor displays the Change dialog box (see Figure 15.7).
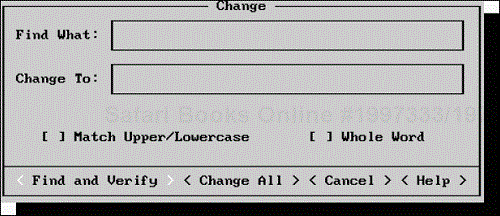
The first text box in the Change dialog box is labeled Find What. Type the text you want the Editor to find in this text box (the target text). The second text box is labeled Change To. Type the text you want entered. Figure 15.8 shows a completed Change dialog box.
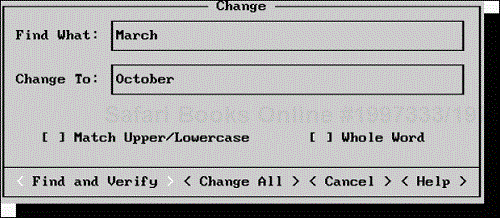
Figure 15.8. The first step in performing a search-and-replace operation is to fill in the Find What and Change To boxes.
This dialog box contains two check boxes: Match Upper/Lowercase and Whole Word. Refer to the preceding section for a discussion of these check boxes.
After you make the appropriate entries in the text boxes and select any desired check boxes, choose from among the following three command buttons:
Find and Verify—. Select this button to find each occurrence of the target string, one after another. (You specify the target string in the Find What dialog box.) As each occurrence of the target string is found, a second dialog box opens. This second box gives you the choice of making the substitution, skipping to the next occurrence, or canceling the remaining searches. Find and Verify is the default option, which you automatically choose by pressing Enter.
Change All—. This button changes all occurrences of the target string to the string specified in the Change To box. The changes occur all at once. A dialog box informs you when the substitutions are complete.
Cancel—. This button aborts the Change command, closing the dialog box without making any substitutions. This option is equivalent to pressing Esc.
After the DOS Editor finishes the search-and-replace operation, it displays a second dialog box, which contains the message Change complete. If no matching text can be found, the box displays the message Match not found. Choose the OK command button to return to the Editor window.
The DOS Editor includes many functions you can use to manage files. These functions, although primitive by the standards of today's full-blown word processors, enable you to perform the basics of file management. The following sections cover, in detail, the file- management operations you can perform using the DOS Editor.
The File menu is your command center for loading and saving files. Six commands are available on the File menu (see Figure 15.9).
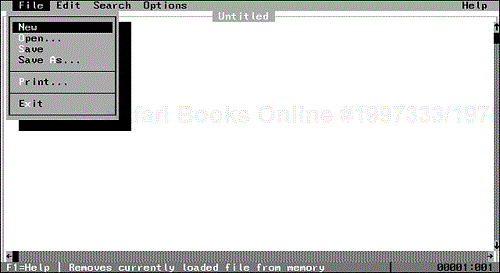
The following list explains the File menu commands:
New—. Clears the file currently in the DOS Editor. The result is a clean slate, as though you had just initialized the Editor. This command does not affect other copies of the file. If the file was saved on disk previously, for example, DOS does not erase the disk copy, only the working copy in the Editor.
Open—. Loads a file from disk into the DOS Editor environment. You can use this command to see a list of filenames in any directory.
Save As—. Saves the current file to disk after prompting you for the filename.
Print—. Prints all or part of the text in the DOS Editor environment.
Exit—. Ends the editing session and returns you to the DOS Shell or the command-line prompt.
Note
When you are working with files, keep in mind these maxims:
Until you name a file, the Editor displays the temporary name Untitled in the title bar.
When you save a file, the Editor adds the extension
TXTto the filename if you don't specify another extension.If you try to exit the Editor or open a new file without first saving a working file in the Editor, a dialog box opens to warn you.
When you save a file for the first time, you should specify two file attributes: the file path (the directory or disk on which to save the file) and the filename.
The DOS Editor stores files on disk in ASCII format. Such files are text files that most text editors and word processors can manipulate. You can view ASCII files directly from the DOS command line by using the TYPE command.
Follow these steps to save the current Untitled file with a new filename:
Choose Save As from the File menu. In the dialog box that opens, the current path is shown below the words
File Name(see Figure 15.10). A list box, below the label Dirs/Drives, lists the directories and disk drives available on your system.Type the new filename in the File Name box. You can specify any file extension as part of the filename. Typical file extensions for ASCII text files are
TXTandDOC.Press Enter to save the file.
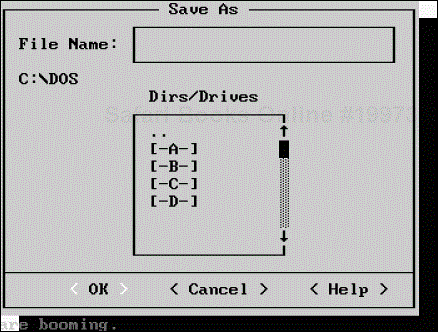
The DOS Editor saves the file to disk in the directory specified by the current path.
Save As is commonly used for storing a file the first time you create it and for saving a second version of a file in a different directory or with a name different from the first version. Assume that you are editing a file named MYWORK.TXT. After making a few changes, you decide to save the new version of the file under the name MEAGAIN.TXT. To do so, display the File menu and choose Save As. The DOS Editor displays the Save As dialog box.
The File Name text box contains the current filename, MYWORK.TXT. Type MEAGAIN.TXT and press Enter. The DOS Editor stores the file on disk as MEAGAIN.TXT, changing the name in the title bar accordingly. The file MYWORK.TXT remains stored on disk. Remember that if you continue editing the file onscreen, you are editing MEAGAIN.TXT (as indicated in the title bar), not MYWORK.TXT.
To store a file in a directory other than that specified by the current path, type the new directory path as part of the filename. If you type the filename MEMOSPLAN.BID, for example, the DOS Editor stores the file with the name PLAN.BID in the directory MEMOS. After you save the file, the name PLAN.BID appears in the title bar. The next time you issue the Save As command, the default directory path is specified in the dialog box as C:MEMOS. If you save a new file without including an explicit path, DOS saves the file in the C:MEMOS directory.
You can use this technique to save files on different disk drives. To save a file named MYFILE.TXT in the root directory of the disk in drive A, for example, type the filename as A:MYFILE.TXT.
You use Save to store a file you have already named. No dialog box appears. The current version of the file in the DOS Editor is saved to disk under the existing filename. As you edit a file, use Save periodically to update the file on disk.
Using Save on an unnamed (untitled) file has nearly the same effect as using Save As; the Editor opens a dialog box similar to that shown in Figure 15.10 so that you can enter a filename.
After text files are stored on disk, you can load a file into the DOS Editor by using the Open command. Because this command lists files in any directory, you also can use Open to search your directories for specific filenames. When you choose Open, the Open dialog box appears (see Figure 15.11).
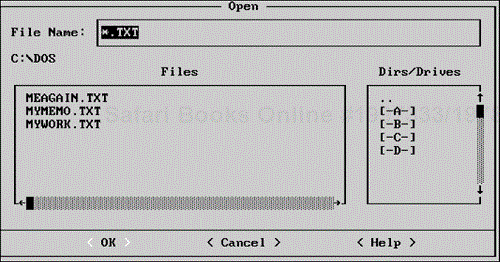
The Open dialog box contains a File Name text box. By default, this box contains *.TXT, the wildcard filename for all files with the extension TXT. The current directory path (C:DOS in Figure 15.11) appears below the File Name text box. In the File Name text box, type a filename, directory path, or name using the * and ? wildcard characters.
To change the default path, specify a path in the File Name text box and press Enter. Otherwise, the DOS Editor looks in the current directory for files with the extension TXT.
The Files list box contains the names of all files that satisfy the current directory, path, and filename specification. In Figure 15.11, the Files box shows all files that satisfy the path and filename specification C:DOS*.TXT.
The Dirs/Drives list box lists available directories and disks. You can move the cursor to the Dirs/Drives list box by pressing Tab repeatedly. Then, press the up- and down-arrow keys to move the highlight to one of the directories or drives listed in the box. Press Enter to change the default path.
To load a specific file into the DOS Editor, you can use the File Name box or Files box. To use the File Name box, type in the box the name of the specific file, including a path (or rely on the default path shown below the box). If you don't specify an extension, the Editor assumes the TXT extension. To load the file MYFILE.TXT, which is in the current directory, for example, type MYFILE and press Enter.
You also can select a filename from the Files list box if it contains the filename you want. First, press Tab to move the cursor to the Files list box. Then, use the arrow keys to highlight the target filename. Alternatively, you can press the first letter of the filename to move the highlight. When the name you want is highlighted, press Enter. The DOS Editor loads the file so that you can edit or view it.
You can load a file when you first start the DOS Editor. To do so, use the following syntax:
EDIT filename
filename is the name of the file you want to edit. Include the path if the file isn't in the current directory. To start the Editor with the file SALESMYFILE.TXT loaded, for example, type the following line:
EDIT SALESMYFILE.TXT
The following notes apply when you load a file when you start the DOS Editor:
The Editor does not assume the extension
TXTor any other extension if you don't specify an extension as part of the filename.The Editor initializes directly without taking the intermediate step of asking whether you want to see the help material in the onscreen Survival Guide.
If the Editor cannot locate the specified file, it assumes that you want to create a new file with that name. Accordingly, the Editor initializes with a fresh slate that includes your designated filename in the title bar. After you enter data into the file, you can save it directly by using the Save command. (You don't have to use Save As and specify the filename a second time.)
Use New when you want to stop work on one file and create a new file. If you haven't saved the old file, the DOS Editor opens a dialog box for confirmation. Otherwise, the old file is cleared, and the screen looks as though you had just initiated the Editor. You see a blank editing area with Untitled in the title bar.
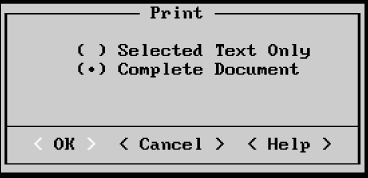
Your computer system probably includes a printer. Whether you have a dot-matrix, inkjet, or laser printer, follow these steps to print a copy of the file currently loaded in the Editor. You can print selected text or the complete file.
Activate the File menu.
Choose Print to open the Print dialog box (see Figure 15.12).
Choose one of the following option buttons:
Selected Text Only—. Prints only selected text, which appears in reverse video in the Editor. (Selecting text is explained earlier in this chapter.) This option is the default when a block of text is selected.
Complete Document—. Prints the entire file. This option is the default when no text is selected.
Press Enter to begin printing. Make sure that your printer is turned on and is online.
After you finish editing files, you might want to leave the DOS Editor. Just display the File menu and choose the Exit command. If the file already has been saved, the Editor returns to the DOS Shell or to the command line, depending on how you started the program.
If you try to quit without first saving the document you have been editing, the Editor opens a dialog box to ask whether you want to save the file. Choose Yes to save the file and exit the Editor. Choose No to exit from the Editor without saving any changes to the current file. Choose Cancel to close the dialog box and return to the Editor. To get help information about the dialog box, choose Help.
When you start the DOS Editor, four special parameter switches are available. These switches are listed in Table 15.7.
Table 15.7. Optional Switches for the EDIT Command
To display the maximum number of lines when starting the DOS Editor, for example, use the following command:
EDIT /H
You can specify a filename with one of the command options, as in the following example:
EDIT SALESMYFILE /H
Use the /B switch if you run the DOS Editor on a computer system with a color video adapter but a black-and-white monitor. At the DOS prompt, activate the Editor as follows:
EDIT /B
Colors on the DOS Editor screen are preset. You can customize most of these colors and other attributes from the Options menu by using the Display command. If you have a color system, you might want different colors for the foreground and background text. If you don't use a mouse with the Editor, you might want to remove the scrollbars.
To change screen colors in the DOS Editor, display the Options menu and choose Display. A dialog box similar to the one in Figure 15.13 opens.
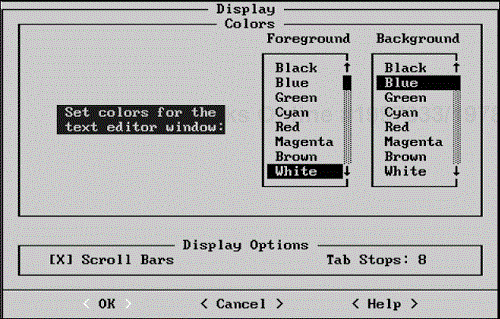
With the cursor on the Foreground box, you can select a new foreground text color by pressing the up- and down-arrow keys. The Foreground box cycles through the colors available with your video hardware. Notice that as you press the arrow keys, the text to the left of the dialog box (Set Colors for the Text Editor Window) shows the current foreground and background colors. Select a new foreground color by moving the highlight to the color you want. Don't press Enter yet. You have more selections to make before closing this dialog box.
Press Tab to move the cursor to the Background box. Select a new background color; the process is similar to the one you followed to select a new foreground color. Now press Enter to return to the Editor screen. The new colors should be in use.
If you don't use a mouse, you might want to consider removing the scrollbars from your screen. Many users think that the screen looks less cluttered without the scrollbars. To see which you prefer, try the following exercise:
Reopen the dialog box by displaying the Options menu and choosing Display.
Press Tab several times to move the cursor to the Scroll Bars check box. The
Xinside the brackets indicates that scrollbars are displayed.Press the spacebar or
Sto deselect the check box. Removing theXindicates that you want to deselect the display of scrollbars.Press Enter, and the scrollbars disappear (see Figure 15.14).
If you change one or more display options, the DOS Editor creates a file named QBASIC.INI and stores it in the directory containing the EDIT.COM and QBASIC.EXE files. (For most systems, this directory is DOS.) The QBASIC.INI file contains a record of the new screen configuration. When you later restart, the Editor uses QBASIC.INI to restore the screen with your customized settings.
Every time you start the Editor, it looks for QBASIC.INI in the default directory or in the directory chain established by the PATH statement in your AUTOEXEC.BAT file. If you restart from a different directory, be sure that the Editor has access to the QBASIC.INI file.
If you want to start the Editor with the original screen configuration, simply erase the QBASIC.INI file.
Note
The DOS Editor “borrows” the programming editor from the QBASIC.EXE file. Thus, the DOS Editor shares the editing environment found in the QBasic programming language. Similarly, the DOS Editor and QBasic share the initial configuration file (QBASIC.INI). Whether you run the DOS Editor or QBasic, the initial configuration is saved in the QBASIC.INI file.
The DOS Editor provides online help through the Help menu (see Figure 15.15). Help screens include information about menus and commands, shortcut keys, dialog boxes, keyboard actions, and even about the help system itself.
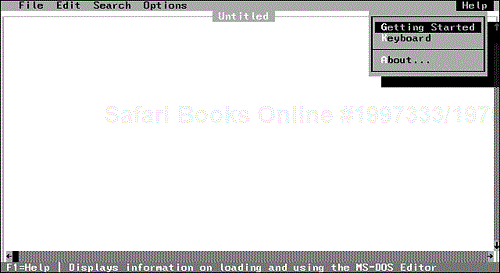
Three categories of information are available from the Help menu:
The following are general notes on using the Help system:
To move the cursor to the next help topic, press Tab. When the cursor is on the topic you want, press Enter to view the help screen.
To activate the Getting Started help menu at any time, press Shift+F1.
To close a help window and exit the help system, press Esc.
A help screen opens in a separate window. The title bar of this window shows the help topic on display. If you request help on the Save command from the File menu, for example, the title bar of the help window reads
HELP: Save command.The F1 key provides express help. To get help on any menu, command, or dialog box, press F1 when the cursor or highlight is on the desired item.
For help when an error message occurs, move the cursor to the Help option in the error message box and press Enter.
Sometime, at your leisure, consider browsing through all the help screens. To browse, press Shift+F1 and then press Ctrl+F1 repeatedly.
When help is active, a separate help window opens in addition to the Editor window. You can move the cursor between the help and Editor windows by pressing F6 (or Shift+F6).
When a help window and Editor window are open simultaneously, you can enlarge or reduce the size of the active window by pressing Alt+plus or Alt+minus. (Here, plus and minus refer to the + and – keys on the numeric keypad.)
To cut and paste text from a help screen into your file, first use the normal editing keys to select the text on the help screen. Copy the selected lines to the Clipboard. Press F6 to activate the Editor window and then, using the normal editing keys, paste the help text into your file. Now reactivate the help screen by pressing F6 again.
When the help system is active, as in all editing contexts, the status bar at the bottom of the screen displays useful keystrokes. If you want to execute a command shown enclosed in angle brackets, press the indicated keystroke or click the mouse when the mouse cursor is on the command name in the status bar.
The Editor keeps track of the last 20 help screens you have viewed. To cycle back through previously viewed screens, press Alt+F1.
When you start the Editor, the initial dialog box gives you the option of seeing the Survival Guide. If you press Enter to see the Guide, the help system is activated. A help screen displays information about getting started with the Editor and using the help system.
The Editor stores the text of the help screens in a file named
EDIT.HLP. To display any help screen, the Editor must have access to this file. The Editor searches forEDIT.HLPin the current directory or in directories specified by thePATHstatement of yourAUTOEXEC.BATfile. Normal DOS installation automatically places this file in the defaultDOSdirectory. If, for some reason,EDIT.HLPis located outside yourPATHspecifications, however, you can supply the Editor with the path toEDIT.HLPby choosing the Help Path command from the Options menu.