
Chapter 8. Reflexive Access Lists
Reflexive ACLs (RACLs) first were introduced in Cisco IOS 11.3. Unlike standard IP ACLs that can filter on Layer 3 information, and extended IP ACLs that can filter on Layers 3 and 4 information, RACLs can filter on Layers 3, 4, and 5 (session layer). This chapter focuses on using RACLs to implement a stateful firewall function on your router. As you will see, RACLs have many advantages, as well as limitations. Typically, RACLs are used when you do not have access to Context-based Access Control (CBAC), which provides a better stateful firewall function and has many more enhanced features than RACLs. CBAC is discussed in Chapter 9, “Context-Based Access Control.”
Overview of Reflexive ACLs
As discussed in Chapter 7, “Basic Access Lists,” you can use standard and, especially, extended ACLs to provide excellent packet-filtering capabilities, protecting you from all different kinds of attacks. Every perimeter router that I have configured or seen takes advantage of extended ACLs in filtering traffic. However, as I also pointed out in Chapter 7, these ACLs have certain limitations. The biggest limitation is that they are good for filtering unidirectional but not bidirectional, connections. As you recall, standard and extended ACLs do not keep track of the state of a connection; therefore, if someone inside sends traffic to the Internet, it is very hard to safely allow the returning traffic back into your network without opening a large hole on your perimeter router. In other words, a standard or extended ACL has static entries that always filter on the information that you have configured—with no exceptions.
RACLs were developed to deal with this issue. RACLs enable you to filter on session layer information. With this type of filtering, the Cisco IOS keeps track of the connections leaving your network and allows the returning traffic of these connections back in. By default, RACLs deny traffic that originates outside of your network and attempts to connect to internal resources. RACLs basically create temporary entries in your inbound filter whenever an internal device opens a session to the outside world. This temporary entry allows the returning traffic for this session back through the perimeter firewall router.
For example, assume that an internal user generates a Telnet connection to a remote device on the Internet, and this traffic passes through your perimeter router with RACLs configured on it. The Cisco IOS would permit the outgoing connection and add a temporary, dynamic entry to allow the returning Telnet traffic back to the internal user. However, the RACLs would not allow Internet users to Telnet to the internal user’s device unless you explicitly allowed this connection with an extended ACL entry.
Extended Versus Reflexive ACLs
To help you understand the advantages that RACLs provide over extended ACLs, this section compares the two different types of ACLs. As you recall from Chapter 7, extended IP ACLs can filter only on Layers 3 and 4 information, such as the IP protocol (IP, ICMP, TCP, UDP, and so on), source and destination IP addresses, IP protocol information (ICMP message types, TCP and UDP port numbers, TCP control flags, and so on), and other information related to the Layers 3 and 4 header fields.
How Extended ACLs Handle Returning ICMP Traffic
This section looks how you can deal with returning traffic for sessions from internal users when using extended IP ACLs. Refer to Figure 8-1 as an illustration of how ICMP traffic can be handled. In this example, the internal user pings an external server (200.1.1.1) using ICMP echo messages. Assume that this traffic is allowed out by the perimeter router. After the pings have been sent out of the network, and assuming that 200.1.1.1 replies to the echo requests, the echo replies make it back to the filtering router. To allow the ICMP replies back into the network, you would have to configure something like Example 8-1.
Example 8-1 Sample Extended ACL with ICMP
Router(config)# ip access-list extended perimeter-filter
Router(config-ext-nacl)# permit icmp any host 192.1.1.1 echo-reply
Router(config-ext-nacl)# deny ip any any
Router(config-ext-nacl)# exit
Router(config)# interface ethernet1
Router(config-if)# ip access-group perimeter-filter in

This example allows ICMP echo replies back to 192.1.1.1. A few problems arise with this solution, though:
• Because you do not know who 192.1.1.1 is pinging, you must allow all echo replies to return to this device (other devices besides 200.1.1.1).
• This filter statement is always active, so a hacker could implement a denial of service (DoS) spoofing attack against 192.1.1.1.
• This filter works only with one device: 192.1.1.1. If you want other internal devices to ping outside devices, you also must include them in the extended ACL.
As you can see from this example, using an extended IP ACL does not provide a very good solution. Probably the main problem of these three is the DoS attack that you open yourself to. If a hacker knows that ICMP echo replies are allowed to 192.1.1.1, he easily could orchestrate a Smurf attack through reflectors and overload your internal user’s PC. The Smurf attack is discussed in Chapter 7.
How Extended ACLs Handle Returning UDP Traffic
Now that you know the issues that extended ACLs have when dealing with ICMP and stateful processes, you can see how an extended ACL handles UDP connections. Consider the network shown in Figure 8-2 as an illustration of how to allow returning UDP traffic into this network. In this example, a user (192.1.1.1) performs a DNS query to an external DNS server (200.2.2.2).

In this example, an internal user performs a DNS query and expects a response back from 200.2.2.2. Because DNS queries use UDP, the user’s PC chooses a source port number greater than 1023 and a destination port number of 53. In the example, the random port number chosen was 10,000. To allow this traffic back into the network, you would have to configure the ACL as shown in Example 8-2.
Example 8-2 Sample Extended ACL with UDP DNS Connections
Router(config)# ip access-list extended perimeter-filter
Router(config-ext-nacl)# permit udp any eq 53 host 192.1.1.1 gt 1023
Router(config-ext-nacl)# deny ip any any
Router(config-ext-nacl)# exit
Router(config)# interface ethernet1
Router(config-if)# ip access-group perimeter-filter in
Here are some of the issues with the ACL configuration in Example 8-2:
• You probably do not know which DNS server or servers the internal user is using, so you must allow all DNS server replies back into your network.
• All port numbers greater than 1023 must be allowed because this is what the source device randomly chooses.
In this example, you have opened an even bigger hole in your firewall by allowing all UDP ports greater than 1023 to 192.1.1.1. Another problem with this ACL is that it solves (and not very well, at that) only DNS replies to 192.1.1.1. What about DNS replies (and other types of UDP traffic) to other internal devices? As you can see from this example, you would have to open ports greater than 1023 to all internal devices for the specific UDP applications that they will be accessing externally. Again, a hacker can take advantage of this with a tool such as Fraggle, creating a DoS attack (Fraggle was discussed in Chapter 7). Even if you lock down the source IP addresses that are allowed this access, a hacker easily can get around this with address spoofing.
How Extended ACLs Handle Returning TCP Traffic
When using an extended ACL to permit returning TCP traffic, you have more control on what returning traffic actually is allowed with the established keyword. As you recall from Chapter 7, the established keyword checks whether the ACK, FIN, PSH, RST, SYN, or URG TCP control flags are set. This typically indicates the return of traffic from an established session. Look at Figure 8-3 to see how returning TCP traffic is treated with an extended ACL.

In this example, I have configured the commands in Example 8-3 on the perimeter router.
Example 8-3 Sample Extended ACL Allowing TCP Connections
Router(config)# ip access-list extended perimeter-filter
Router(config-ext-nacl)# permit tcp any host 192.1.1.1 established
Router(config-ext-nacl)# deny ip any any
Router(config-ext-nacl)# exit
Router(config)# interface ethernet1
Router(config-if)# ip access-group perimeter-filter in
In this example, when the user establishes a Telnet connection to 200.3.3.3 and goes through the three-way handshake, the SYN/ACK from 200.3.3.3 is allowed back through the router because of the established ACL statement. Likewise, any traffic sent from 200.3.3.3 in response to the Telnet connection, such as sending or acknowledging the receipt of data, is also allowed through. Even the messages for the teardown of the TCP connection are allowed through.
However, even though this is more restrictive than the filters I previously showed you with ICMP and UDP in the last two sections, the established keyword does not look at session information for connections. In other words, it does not look to see if this traffic is part of an existing connection that originated from inside the network. Instead, any TCP segment that has the right TCP control flag or flags set is allowed through to 192.1.1.1. Again, a hacker can take advantage of this with a modified form of the TCP SYN flood attack. In this instance, the hacker might flood 192.1.1.1 with SYN/ACK messages, which the packet-filtering firewall would allow through.
How RACLs Handle Returning Traffic
As you saw in the previous three sections, you can use methods with extended IP ACLs to restrict traffic as it returns to your network. However, the solutions described in these sections open big security holes in your perimeter router firewall. Therefore, network administrators typically do not use extended IP ACLs to handle returning traffic (responses to requests that originated inside a network).
Cisco addressed this issue with the development of the RACL feature. Unlike extended IP ACLs, RACLs are aware of state information concerning a connection—at least, to a certain degree. In other words, a reflexive ACL can detect when a user initiates a connection to the outside world and can allow only returning traffic for that user’s connection. Unlike extended IP ACLs that can do this somewhat for TCP connections (with the established parameter), RACLs can do this with all IP protocols. Basically, RACLs are a stripped-down version of Cisco’s CBAC stateful firewall feature, which is part of the Cisco IOS Firewall feature set (discussed in Chapter 9).
RACLs perform a function similar to that of a true stateful firewall, like CBAC: Only when a session is initiated on the inside of your network is returning traffic allowed back in. RACLs accomplish this feat by using temporary ACL statements that are inserted into your extended ACL filter, which is applied on your router’s external interface. When the session ends or the temporary entry times out, it is removed from the external interface’s ACL configuration. This reduces your exposure to DoS attacks by a hacker. As you will see in the later section “Limitations of Reflexive ACLs,” RACLs do have limitations; however, they at least provide a solution that is much better than one that uses only extended ACLs.
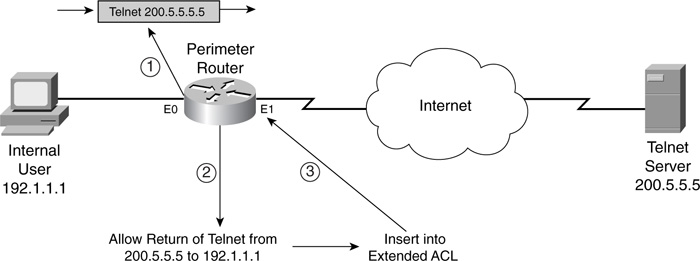
Now take a look at a basic example of how RACLs works. Figure 8-4 illustrates how the perimeter router treats a Telnet connection.

In this example, assume that RACLs already have been configured for the router and that the default behavior of the router is to drop any traffic that originates outside the router and that is trying to access internal resources. As you can see from Figure 8-4, the internal user (192.1.1.1) establishes an outbound Telnet connection to 200.4.4.4. When the router receives the packet, the Cisco IOS checks to see if a RACL has been configured, to determine whether returning traffic for this user’s connection should be allowed. If this is true, the Cisco IOS creates a temporary ACL entry on the inbound external interface (E1). This ACL entry allows only Telnet traffic from the server to the client (and only returning traffic, at that). When the user terminates this connection, or if it exceeds the idle timeout for the connection, the Cisco IOS removes the temporary RACL entry from the extended IP ACL. As you can see from this example, the temporary entry allows returning traffic for a specific period of time, which limits your exposure to DoS attacks.
As you saw in the previous three sections, extended IP ACLs have problems with allowing the return of replies. With TCP, you at least can have the Cisco IOS examine the TCP control flags, such as SYN, ACK, and others, to determine whether the traffic is part of an existing connection. However, extended ACLs do not have this option for ICMP or UDP traffic (or for other types of IP traffic, for that matter). Unlike TCP, these protocols do not indicate the state of the connection, so it is difficult, if not impossible, to determine whether the connection has just started, is in the middle of transmitting data, or is ending. Plus, even with the established keyword in a TCP extended ACL statement, the Cisco IOS does not look at whether this traffic is part of a connection that was initiated from inside your network; it looks at just whether fields in the segment header are marked appropriately.
Reflexive ACLs, however, do look at the source (origin) of the traffic. Only when a valid source originates traffic is a temporary ACL entry created, allowing the returning traffic only for this connection. In other words, the Cisco IOS looks at who establishes a session and uses this information to allow returning traffic for that specific connection. This gives you much tighter control over the type of traffic allowed back into your network, presenting a much smaller window in your filter that a hacker can take advantage of. Plus, RACLs actually build on the ACL technology of the Cisco IOS. In other words, they are an extension of extended ACLs: You can mix and match the two features to provide a more secure perimeter defense. By combining these two filtering features, you are much less susceptible to network attacks such as IP spoofing, DoS, and access attacks.
Reflexive ACLs in Action
As you saw in the previous section, RACLs create temporary holes in your router’s inbound ACL to allow returning traffic back into your network. This section discusses how RACLs perform in more detail.
Steps in Processing Traffic
RACLs require the use of two ACLs to function correctly. The first ACL is used to capture session information for outbound traffic. This information is placed in a special RACL and inserted into the inbound ACL you have applied to your router’s external interface. Figure 8-5 illustrates the use of the different ACLs.
The steps for RACL processing in Figure 8-5 are as follows:
1. The internal ACL examines traffic for outbound sessions. This is a named extended ACL.
2. A statement is added to the temporary named RACL (separate access list).
3. The RACL is inserted into a third named ACL applied inbound on the router’s external interface.
In this example, three ACLs are used.
When the session has been completed or timed out, the session entry in the RACL automatically is removed by the Cisco IOS.
Traffic Leaving the Network
You can break this down further. As traffic leaves your network, you have a named extended ACL that examines this traffic. This ACL can be applied inbound on an internal interface or outbound on the external interface. The latter method is more common because you need to apply it on only one interface. If you used the former method, you might have to create more than one ACL and apply them inbound on your internal interfaces.
In this “internal” ACL, you place statements that examine traffic for new sessions (with the reflect parameter). With these statements, you can control which connections you will build RACL entries for, where these entries will allow returning traffic back into your network. If you do not configure these statements, returning traffic is dropped, by default. This gives you much greater control over which internal users you want to access the external network and what type of connections they should be permitted. For example, you could set up your ACL statements to examine only HTTP connections, thus allowing only temporary RACL entries to be created for HTTP traffic.
Building the RACL
As traffic is leaving the network, if it matches a permit statement with a reflect parameter, a temporary entry is added to the RACL specified in the statement. For each permit/reflect statement you have, your router builds a separate RACL. A RACL entry is an inverted entry. Remember that these entries need to allow returning traffic back into the network; therefore, the source and destination information is flipped in the RACL statement.
For example, if a user (192.1.1.1) Telnets to 200.5.5.5, where the source port number is 11000, this RACL entry is created:
permit host 200.5.5.5 eq 23 host 192.1.1.1 eq 11000
As you can see in this example, this RACL entry has the source and destination information reversed, which includes both the address information and, because this is a TCP connection, the port information. Also note that any temporary RACL entries created contain the permit action, which makes sense because you want to allow the returning traffic for this session.
These are some of the characteristics of RACL entries:
• The action is always permit.
• The protocol of the packet, such as TCP, UDP, and ICMP, is placed in the RACL entry.
• The source and destination IP addresses are reversed in the RACL entry, to allow the return of this traffic.
• For TCP and UDP, the source and destination port numbers are switched, to allow the traffic to return from the destination device.
• For other protocols, such as ICMP and IGMP, the Cisco IOS can specify other protocol criteria, such as message types for ICMP.
Traffic Returning to the Network
To use RACLs to filter returning traffic, you must build an extended named ACL that filters traffic coming from the external network. This ACL is applied inbound on your external interface and commonly is called an external ACL.
In the external ACL, you put a placeholder (or reference) where your RACL or RACLs should be processed. Basically, you are nesting your RACL within an ACL. Whatever statement or statements exist in the RACL or RACLs logically are inserted into the specified place of your external ACL. When the Cisco IOS processes the external ACL and finds a RACL reference, it processes the statements in the RACL until it finds a match. If no match is found in the RACL, the Cisco IOS returns to the next external ACL statement after the RACL reference and continues to look for a match.
Note
It is important to point out that a RACL is slightly different than an ACL. With a RACL, there is no implicit deny statement at the end of the list. This is because RACL statements are inserted into the external ACL, which might have other statements below these inserted statements.
The insertion of your RACL references is done with the evaluate statement. Placement of these statements is important. For example, you might have the configuration in Example 8-4 for an external ACL.
Example 8-4 Example Extended ACL and RACL Placement
Router(config)# ip access-list extended inbound
Router(config-ext-nacl)# permit tcp any host 192.1.1.10 eq www
Router(config-ext-nacl)# deny ip any any
Router(config-ext-nacl)# exit
Router(config)# interface ethernet1
Router(config-if)# ip access-group inbound in
In Example 8-4, only web traffic is allowed to the internal web server (192.1.1.10); all other traffic is dropped.
To allow returning traffic into your network for sessions listed in your temporary RACLs, you need to put a placeholder in your external inbound ACL that specifies the use of the RACL statements. The location of the reference/placeholder is important.
Assume that you have a RACL with the following temporary statements:
permit host 200.5.5.5 eq 23 host 192.1.1.2 eq 10000
permit host 200.5.5.5 eq 23 host 192.1.1.1 eq 11000
In this example, two internal devices (192.1.1.2 and 192.1.1.1) have Telnetted to 200.5.5.5. If you put the RACL reference at the bottom of the external ACL, you actually would prevent the returning of their traffic because the deny ip any any statement would be processed first and would drop the returning traffic. Your RACL entries never would be processed because the packet would match this deny statement. In the previous example, you would need to put your RACL reference before any deny statement that might block it (this is accomplished with the evaluate statement). Example 8-5 shows a simple example for the code in Example 8-4.
Example 8-5 Example Showing RACL Placement
Router(config)# ip access-list extended inbound
Router(config-ext-nacl)# remark -> insert RACL reference or references here
Router(config-ext-nacl)# permit tcp any host 192.1.1.10 eq www
Router(config-ext-nacl)# deny ip any any
Router(config-ext-nacl)# exit
Router(config)# interface ethernet1
Router(config-if)# ip access-group inbound in
In this example, the RACL reference (indicated by a remark comment line and shaded) is placed at the beginning of the external ACL, guaranteeing that returning traffic will be allowed back through the router. This is a common placement for RACL references.
Caution
Take care that your security policies still are being enforced by the placement of your RACL references and ACL statements.
Removing RACL Entries
Entries in a RACL are temporary. They are removed from the RACL under two conditions:
• The session terminates.
• The entry in the RACL times out (is idle for a period of time).
When a session terminates, the Cisco IOS removes the temporary entry from the RACL. However, only TCP uses a well-defined mechanism by which the Cisco IOS can detect the end of a session. UDP, ICMP, and other protocols do not have this mechanism (they are connectionless). With TCP, the Cisco IOS looks for two FIN messages, and the temporary RACL entry is removed after 5 seconds. The 5-second waiting period is used to ensure that the TCP session is allowed enough time to close gracefully. If the Cisco IOS sees an RST message instead, this indicates an abrupt session closure, causing the Cisco IOS to immediately remove the session entry from the RACL.
Otherwise, for all other conditions for TCP and all other protocols, such as UDP and ICMP, the Cisco IOS monitors each session to see if the session is idle for a period of time. If the session is idle longer than the configured timeout value, the Cisco IOS automatically removes the session entry from the RACL.
Caution
The idle timer for all sessions defaults to 300 seconds (5 minutes). I highly recommend that you change the default for connectionless sessions, such as UDP and ICMP. In other words, you do not want a user’s DNS query or a ping to stay in the RACL for 5 minutes when the session typically is done in less than 5 or 10 seconds. For these protocols, I highly recommend that you tune it to an appropriate value, such as 30 or 60 seconds. By leaving it at 5 minutes, you are putting these devices at a much higher level of exposure to DoS and other types of attacks.
Note
As you can see from how the Cisco IOS processes RACLs, RACLs do not provide a stateful firewall solution; they provide something close to it, as I alluded to in the introduction and at the beginning of this chapter. CBAC, covered in Chapter 9, provides a more stateful solution than RACLs. However, if you do not want to or cannot afford to purchase the Cisco IOS Firewall feature set, which includes CBAC, RACLs are your next-best solution.
Limitations of Reflexive ACLs
RACLs have two main limitations:
• RACLs do not provide a complete stateful solution (the ending of a session for protocols such as UDP and ICMP is approximated by an idle timer).
• Not all applications work with RACLs.
Tip
RACLs were developed for smaller environments (a few dozen users) in which the Cisco IOS Firewall feature set’s cost (which includes CBAC) is deemed too much or is not necessary. However, RACLs are memory and process intensive. If you suspect that you are having performance problems, use the show processes memory and show processes cpu commands, and look for the RACL entry to see if this is your problem. (You can add the history parameter to the show processes cpu command, which displays a chart of the CPU processes, making it easier to spot CPU utilization problems.) However, if you have a large environment, steer away from RACLs and use CBAC, which is much more memory efficient.
Stateful Issues
You already know one of the limitations of RACLs: They are stateful only for TCP. With other TCP/IP protocols, RACLs use timeouts to remove idle sessions. Even with TCP traffic, there is a minor issue with returning traffic. For example, as you recall from Chapter 7, the extended ACL established keyword allows only TCP segments with certain control flags set, such as the ACK flag. The assumption here is that certain control flags indicate the return of traffic into the network. However, it does not restrict a RACL entry that the Cisco IOS creates for TCP sessions. This is a minor issue and probably will not cause a problem.
Even though this is a very minor issue, it does open you up to possible problems. For example, imagine that an internal host somehow was compromised. Your perimeter routers are using RACLs to prevent incoming traffic. A hacker knows about the use of RACLs and wants to gain access to the device he has hacked into, probably through a virus or worm spread through an e-mail attachment. To get around the RACLs, the hacker has the internal machine periodically open a TCP connection to his own PC. The hacker’s software then disconnects the session but does not go through the hand-shake process of tearing down the connection. The hacker’s software then starts up a Telnet process on the port just closed. In this situation, the RACL entry is still there until it times out. The hacker can take advantage of this by setting up a Telnet connection with the three-way TCP handshake to the internal device on the previously used port. From the Cisco IOS perspective, it looks like this is a continuation of the previous TCP connection; in reality, it is a new TCP connection, but with the same source and destination addresses and port numbers. The problem with the RACL implementation is that, for TCP, it does not examine the inbound TCP control flags to determine the direction of the flow of traffic.
This same issue can be applied to the other protocols. As long as the hacker can compromise an internal device, have that internal device initiate an outbound connection, and prematurely terminate the connection, the hacker can use the temporary RACL entry to gain access to the internal device. Therefore, even by using RACLs, you are exposing yourself, even in a limited way, to specific kinds of attacks.
Application Issues
The second problem with RACLs is that they do not work with all session layer applications. Examples of some of these applications include FTP and multimedia, such as RTSP, H.323, VoIP, and many others. With these applications more than one connection is involved in sharing information between the devices. Typically, the first connection is a control connection, and the second and subsequent connections are data, error, and synchronization connections. How these extra connections are set up is random: Sometimes the client sets them up, and other times the server sets them up. In some instances, the ports that the connections use are standardized; sometimes they fall within a range, and sometimes they are completely random.
Standard FTP Example
Unfortunately, RACLs have problems with these types of additional connections. This section looks at how FTP uses connections to illustrate this problem. Figure 8-6 displays the two types of modes that FTP supports: standard (active) and passive. With a standard connection, the FTP client chooses a random TCP port number greater than 1023 for the source and connects to port 21 on the server. This is called the control connection, and FTP commands are passed across this connection. As soon as the user wants to get data from the server or load data to the server, the client tells the server of the data exchange, as well as the port number to use to connect to on the client (higher than 1023). The server opens the data connection by connecting back to the client’s specified data port from its local data port (the source port is 20).

Next you will look at how this affects a router with RACLs, from two perspectives with standard FTP: with the client inside the network and the server outside, and then vice versa.
Client on the Inside
The first standard FTP example assumes that the FTP client is inside the network and that the server is outside. In this example, RACLs have been configured and the external extended ACL denies all inbound traffic by default. When the client initiates the port 21 connection to the server, a RACL entry is created to allow the returning traffic from the server for this connection. However, as soon as the client retrieves data from the server, and the server tries to open a connection back to the client, it fails. Unfortunately, the RACL entry and the extended external ACL do not allow this second connection. You could get around this problem by allowing any TCP source port 20 connection going to a destination port greater than 1023 into your network with an extended ACL entry, but this presents a security risk.
Client on the Outside
The second standard FTP example assumes that the FTP client is outside the network and that the server is inside. In this example, RACLs have been configured and the external extended ACL denies all inbound traffic, by default, with the exception of the external users trying to access the internal FTP server (TCP port 21). When the client initiates the port 21 connection to the server, the extended ACL permits the connection. When the client tries to upload or download data, the server sets up a connection back to the client; the Cisco IOS adds the RACL entry for this second connection (allowing the client to send traffic to the server on this connection). In this example, the client has no problems with bidirectionally communicating with the FTP server on a standard connection.
Passive FTP Example
With a passive connection, the FTP client chooses a random TCP port number greater than 1023 for the source port and connects to port 21 on the server. This is called the control connection, and commands are passed across this connection. As soon as the user wants to get data from the server or load data to the server, the client opens a new connection to the server from an unused random port greater than 1023. The server tells the client what destination port number to use (across the control connection), which is typically a random port number greater than 1023 that is not being used currently on the server.
Now you will look at how this affects a router with RACLs. I examine this from two perspectives with passive FTP, just as I did with standard FTP: with the client inside the network and the server outside, and then vice versa.
Client on the Inside
The first passive FTP example assumes that the FTP client is inside the network and that the server is outside. In this example, RACLs have been configured and the external extended ACL denies all inbound traffic, by default. When the client initiates the port 21 connection to the server, a RACL entry is created to allow the returning traffic from the server. When the client attempts to retrieve data from the server, the client opens up a second connection to the FTP server, which is successful (unlike with standard FTP). With passive FTP, the client initiates the second connection. When the Cisco IOS sees that the internal client is initiating a session, it adds the session information as a temporary ACL entry in the RACL, allowing the returning traffic from the server back into the network. In this example, there is no issue with passive FTP and RACLs.
Client on the Outside
The second passive FTP example assumes that the FTP client is outside the network and that the server is inside. In this example, RACLs have been configured and the external extended ACL denies all inbound traffic, by default, with the exception of the external users trying to access the internal FTP server (TCP port 21). When the client initiates the port 21 connection to the server, the extended ACL permits the connection. Then when the client tries to upload or download data, the client tries to establish the data connection to the server on the prenegotiated port numbers greater than 1023. Unfortunately, because RACLs build temporary entries for outbound traffic, and this is inbound traffic, the connection is not allowed.
Note
To get around the FTP access problem, you must use passive FTP for outbound client connections and standard FTP for inbound client connections. This creates a lot of confusion for users, so other solutions are preferred over using RACLs in this situation; these include the Cisco CBAC and the Cisco PIX firewall with the protocol-fixup feature.
Configuring Reflexive ACLs
Now that you have a better understanding of reflexive ACLs, their operation, and their limitations, this section discusses how to configure them on your Cisco IOS router. Configuring your router to use RACLs involves three steps:
Step 1 Create an internal named ACL that looks for new outbound sessions and creates your temporary RACLs.
Step 2 Create an external named ACL that uses the RACLs to examine returning traffic to your network.
Step 3 Activate the named ACLs on the appropriate interface or interfaces.
You must do three main things for your router to use RACLs. Some optional items, such as changing the idle timeout for sessions, also can be configured. The remainder of this section focuses on the configuration of RACLs on your router.
Note
It is important to point out that all ACLs used in this process are named extended ACLs—numbered ACLs and standard ACLs are not supported. Also, only TCP/IP supports reflexive ACLs; other protocols, such as IPX, do not support this feature.
Interface Selection
Typically, the configuration of RACLs is done on the perimeter router or firewall as traffic is entering and leaving your network. This can be a connection to the Internet or another network, such as a different company (extranet). One of the first things you need to decide is on what interface or interfaces you will be configuring your ACLs for RACLs. Take a look at two examples of where you can put your ACLs on your router’s interface(s).
Two-Interface Example
Figure 8-7 illustrates how to use RACLs in a router that has two interfaces. Remember that you must set up two ACLs: one that builds RACLs as traffic leaves the network, and one that uses the RACLs to allow returning traffic into the network. When examining traffic as it leaves the network, you can apply the internal ACL in one of two ways:
• Inbound on the internal interface (E0 in)
• Outbound on the external interface (E1 out)

For the external ACL, because you typically configure RACLs on a perimeter router/firewall, you will be applying it inbound on the external interface (E1 in).
In this example, the network has two policies: allow Internet traffic to the internal e-mail server, and allow users access to the Internet. To accomplish this, you need an ACL configuration like the following:
• Internal ACL (apply outbound on E1 or inbound on E0): Examine outbound traffic and build the RACL for new sessions.
• External ACL (apply inbound on E1):
— Reference the RACL to allow returning traffic.
— Allow Internet traffic to the e-mail server.
— Deny all other traffic.
Tip
The most common way to set up RACLs on a two-interface router is to apply the internal ACL on the router’s external interface in the outbound direction (E1 out), and to apply the external ACL on the external interface in the inbound direction (E1 in).
Three-Interface Example
Figure 8-8 illustrates how to use RACLs in a router that has three interfaces. This configuration is more difficult because of the policy rules defined by this company:
• The Internet should be capable of accessing the DMZ e-mail server.
• The Internet should be capable of accessing the DMZ DNS server.
• The Internet should be capable of accessing the DMZ web server.
• The Internet should not be capable of accessing the internal network.
• The internal e-mail server should be capable of accessing only the DMZ e-mail server, nothing else.
• The DMZ e-mail server should be capable of accessing the internal e-mail server to forward mail.
• Internal users should be able to access the Internet and receive replies.
• Internal users should not be able to access the DMZ e-mail server or any external e-mail servers.

To accomplish these policies, you need three ACLs:
• Internal ACL (apply inbound on E0):
— Allow the internal e-mail server to access the DMZ e-mail server.
— Deny internal users access to the DMZ e-mail server and other e-mail servers.
— Deny the internal e-mail server from accessing anything else.
— Examine outbound traffic and build the RACL for new sessions to the DMZ.
— Examine outbound traffic and build the RACL for new sessions to the Internet.
— Allow internal users to access all other services (DMZ and Internet).
• DMZ ACL (apply outbound on E0)—this restricts traffic from the DMZ to the internal network:
— Reference the internal-to-DMZ RACL to allow internal users to get their replies from the DMZ.
— Reference the internal-to-external RACL to allow internal users to get their replies from Internet resources.
— Allow the DMZ e-mail server to send e-mail to the internal server.
• External ACL (apply inbound on E1):
— Reference the internal-to-external RACL to allow internal users to get their replies from the Internet.
— Allow Internet users access to the DMZ e-mail server.
— Allow Internet users access to the DMZ DNS server for DNS queries.
— Allow Internet users access to the DNS web server.
As you can see from this list of policies, the setup of RACLs and ACLs is more difficult. One item that I want to point out is that I used two RACLs in this example:
• One for traffic from the internal segment to the Internet
• One for traffic from the internal segment to the DMZ segment
You actually could get away with using one RACL and reference the same RACL on interface E1 inbound and E0 outbound; however, this presents a security problem for the external interface. If a hacker knew which internal devices were constantly accessing the DMZ servers, he might be able to take advantage of this to try to spoof his way in through the RACL on the external interface; the same RACL is applied outbound on the internal interface. Therefore, I have created two RACLs. The first RACL allows traffic from the internal segment, when sent to the DMZ, to be returned to the internal segment. The second RACL is for traffic leaving the network and returning. By separating the sessions into the two locations that devices access, I am creating a more secure environment.
Configuration Commands
As mentioned at the beginning of this section, you need to configure two named ACLs: One builds the RACL or RACLs, and the other references them to allow returning traffic. You also need to activate them on your router’s interface or interfaces. Optionally, you can configure other things, such as the timeout for the idle RACL entries. The following three sections cover the configuration of these components.
Building the RACL
This section focuses on the ACL that you create to build the temporary entries in a RACL. This typically is done when traffic is leaving your network. You build an extended named ACL that restricts what traffic is allowed to leave your network. In this ACL, you specify which traffic you want the Cisco IOS to examine and create temporary ACL entries for. This is done by using a permit extended ACL statement that matches on the traffic that you want to have temporary entries created for. In this statement, you add the reflect parameter. This statement creates the temporary entries in the specified RACL. Here is the syntax to accomplish this:
Router(config)# ip access-list extended internal_ACL_name
Router(config-ext-nacl)# --permit or deny specific connections--
Router(config-ext-nacl)# permit protocol_name
source_address wildcard_mask [protocol_information] destination_address
wildcard_mask [protocol_information] reflect RACL_name [timeout #_of_seconds]
Router(config-ext-nacl)# --permit or deny other connections--
First, you need to create your extended named ACL with the ip access-list extended command.
Tip
When naming your ACL, I recommend using a descriptive name. With RACLs, I include either the placement location of the ACL, such as internal, or the direction of the traffic flow that is being filtered, such as internal-external.
Place your permit statement or statements that will match on traffic that you want to build RACL entries for within the ACL. For each of these permit statements, you must use the reflect keyword and the name of the RACL where the temporary entries will be placed. You also must specify the IP protocol that you want to create RACL entries for, as well as the source and destination: You can be as specific or permissive as you want.
Note
The permit/reflect statement serves two purposes. First, it builds temporary entries in the specified RACL. Second, it allows the specified traffic to flow through the interface. Remember that at the end of this extended ACL is an implicit deny statement.
Optionally, you can specify the idle timeout for these temporary RACL entries by using the keyword timeout followed by the timeout value in seconds. The default timeout is 300 seconds if you omit it. Valid timeout values are 0 to 2,147,483. Setting the value to 0 causes the entry to remain in the RACL list: I highly recommend that you do not do this because it creates a permanent security hole in your perimeter router. Likewise, I do not recommend setting values too high. For UDP and ICMP traffic, 30 to 60 seconds is a good value. However, you might have to tune this on an application-by-application basis. If this is the case, you need a separate permit/reflect statement for each unique idle setting. As an example, you might want to create a separate entry for DNS queries and set the timeout for these to a smaller value than other UDP traffic, such as 5 or 10 seconds.
It is important to point out that the specified RACL in your extended named ACL does not exist yet. The Cisco IOS dynamically creates it and puts entries in it based on packets matching these permit/reflect statements. Plus, you can use the same RACL name for multiple permit statements. This places these temporary entries in the same RACL. Typically, I use different RACL names to view the information more easily when troubleshooting, but this is not required.
Restrictive Settings
You can be as specific as you want when matching your outbound session connections. For example, if you want internal users to surf the Internet only with a web browser and allow DNS responses back, you can enter the commands in Example 8-6.
Example 8-6 Simple RACL Example
Router(config)# ip access-list extended internal-external
Router(config-ext-nacl)# remark --insert permit or deny specific connections--
Router(config-ext-nacl)# permit tcp any any eq 80 reflect web-only-RACL
Router(config-ext-nacl)# permit udp any any eq 53 reflect dns-only-RACL timeout 10
Router(config-ext-nacl)# remark --insert permit or deny other connections--
Example 8-6 instructs the Cisco IOS to create two RACLs that will maintain session information for outbound web connections (web-only-RACL) and DNS queries (dns-only-RACL). Also notice that I set the timeout for the DNS queries to 10 seconds.
Of course, I could have used the same RACL name and put all temporary entries in the same list, as in Example 8-7.
Example 8-7 Simple Combined RACL Example
Router(config)# ip access-list extended internal-external
Router(config-ext-nacl)# remark --insert permit or deny specific connections--
Router(config-ext-nacl)# permit tcp any any eq 80 reflect user-RACL
Router(config-ext-nacl)# permit udp any any eq 53 reflect users-RACL timeout 10
Router(config-ext-nacl)# remark --insert permit or deny other connections--
In Example 8-7, both the HTTP and DNS queries will be placed in the same RACL (user-RACL).
Permissive Settings
If you want to allow all of your internal users to access the Internet and get returning traffic, you could do something like in Example 8-8.
Example 8-8 One RACL for All Returning Traffic
Router(config)# ip access-list extended internal-external
Router(config-ext-nacl)# remark --permit or deny specific connections--
Router(config-ext-nacl)# permit ip any any reflect IP-all-RACL
Router(config-ext-nacl)# remark --permit or deny other connections--
In Example 8-8, all outbound IP traffic would create temporary entries in the reflexive ACL called IP-all-RACL. This is a good example of when troubleshooting might become difficult because many temporary entries would exist in this list. If I am allowing all outbound traffic, I typically use a different RACL for each type of traffic, as in Example 8-9.
Example 8-9 Multiple RACLs for Returning Traffic
Router(config)# ip access-list extended internal-external
Router(config-ext-nacl)# remark --permit or deny specific connections--
Router(config-ext-nacl)# permit tcp any any reflect tcp-racl
Router(config-ext-nacl)# permit udp any any reflect udp-racl timeout 30
Router(config-ext-nacl)# permit icmp any any reflect icmp-racl timeout 10
Router(config-ext-nacl)# remark --permit or deny other connections--
In Example 8-9, I have separated the TCP, UDP, and ICMP traffic into three RACLs: tcp-racl, udp-racl, and icmp-racl, respectively. Therefore, if I am having a problem with a particular protocol, it will be much easier to view my RACL entries by displaying just one particular RACL that contains one protocol than to display one RACL that contains every protocol.
Caution
Placement of the reflect statements is very important in the processing of the internal ACL. For example, if you do not want users to access a specific resource, make sure that this deny statement appears before the corresponding reflect statement. Likewise, if you want to create a RACL for certain types of traffic, make sure that no deny statement precedes the reflect statement that would drop this traffic.
Referencing the RACL
After building your internal extended named ACL, which creates your RACLs, you are ready to reference these temporary entries as traffic flows back into your network. This is done by building a second extended named ACL. In this named ACL, you use the evaluate statement to reference your RACLs that were created from the previous internal ACL. Use the following syntax to create your external ACL:
Router(config)# ip access-list extended external_ACL_name
Router(config-ext-nacl)# remark --permit or deny specific connections--
Router(config-ext-nacl)# evaluate RACL_name
Router(config-ext-nacl)# remark --permit or deny other connections--
Before you can actually execute the evaluate command, you must create the RACL reference with the permit/reflect command in your internal ACL. The name of the RACL in the evaluate command must match the name of the RACL that you used in the permit/reflect command in your internal ACL. If you created multiple RACLs in your internal ACL or ACLs, you must configure a separate evaluate command for each RACL.
Note
You do not actually create and put entries in the RACL; the Cisco IOS does this automatically. You need to reference the RACL only so that the Cisco IOS processes these entries as traffic returns into your network. Basically, the evaluate commands point to the entries in the RACL that the Cisco IOS should use when processing the external extended ACL.
Caution
As with the internal ACL, the placement of the evaluate statement in the external ACL does matter. When the Cisco IOS processes inbound packets, it examines the first entry in the external ACL. If it does not find a match, it proceeds to the next statement. If the statement is an evaluate statement, the Cisco IOS begins processing the first statement in the RACL. If no statements match in the RACL, the Cisco IOS returns to the external ACL and processes the next statement in the extended ACL.
Therefore, if you have a RACL that permits returning traffic, but you place the RACL’s evaluate statement after a deny statement that drops it, the traffic is dropped and the RACL never is processed. In this example, make sure that the evaluate statement for the RACL appears before the deny statement. Of course, you can use this to your advantage and prevent certain returning traffic by putting the deny statement before the evaluate command.
ACL Activation
After you have created your internal (permit/reflect) and external (evaluate) ACLs, you need to activate them by applying them to your router’s interface(s). For a two-interface router configuration, this typically is done with the following syntax on the external interface:
Router(config)# interface type port_#
Router(config-if)# ip access-group name_of_the_internal_ACL out
Router(config-if)# ip access-group name_of_the_external _ACL in
In this example, you apply both of these ACLs on the external interface of the router. In the “Reflexive ACL Examples” section later in this chapter, I go over the two-and three-interface router examples discussed earlier, including how to configure and activate the extended ACLs.
Optional Commands
By default, temporary RACL entries are removed from the RACL when they have been idle for more than 300 seconds. I already showed you how you can adjust this value on a RACL-by-RACL basis with the permit/reflect statement in the internal ACL. However, you also can adjust this globally with the following command:
Router(config)# ip reflexive-list timeout seconds
Valid timeout values are 0 to 2,147,483. Setting the value to 0 causes the entry to remain in the RACL list. Remember my previous warning about setting this value to 0 or to a large number. When you set this value, it affects all RACLs, excluding the ones for which you have configured specific timeout values.
Caution
Each temporary entry created in a RACL requires memory to store it. Therefore, you do not want to keep idle connections in there for a long period of time when they are not necessary. A good example of connections that are very brief are DNS queries, HTTP connections, and ICMP messages. I highly recommend that you set the timeout for these values to 60 seconds or less, even if this means creating extra reflect entries to accomplish this. For ICMP traffic and DNS queries, 10 seconds is sufficient; for HTTP connections, an idle time between 30–60 seconds is more appropriate.
RACL Verification
After you have configured and activated your extended ACLs, you can verify their operation with the show access-lists and show ip access-list commands. Example 8-10 shows an example of the output from the show access-lists command.
Example 8-10 Output from the show access-lists Command
Router# show access-lists
Extended IP access list inbound_access
deny icmp any any
evaluate tcpstuff
evaluate udpstuff
Extended IP access list outbound_access
permit tcp any any reflect tcpstuff
permit udp any any reflect udpstuff
Reflexive IP access list tcpstuff
permit tcp host 200.5.5.5 eq telnet host 192.1.1.1 eq 10638
(9 matches) (time left 294 seconds)
In Example 8-10 are two extended named ACLs. inbound_access is an external ACL that filters returning traffic with two RACLs, specified in the evaluate commands. outbound_access is an internal ACL that has two reflect statements that build two RACLs: one for TCP traffic and one for UDP traffic. At the bottom of the display is the RACL for the TCP traffic, called tcpstuff. This ACL currently has only one entry, which allows returning Telnet traffic from 200.5.5.5 to the internal client (192.1.1.1). Notice that that the output from this display does not include the udpstuff RACL; this is because no internal UDP traffic has been examined leaving this network.
Reflexive ACL Examples
Now that you have a basic understanding of the configuration of RACLs, this section shows you some examples that illustrate how to set up RACLs on a router. The following sections contain three examples of the use of RACLs.
Simple RACL Example
In this example (see Figure 8-7), all traffic that originates on the Internet should not be allowed. However, all TCP and UDP returning traffic from the Internet to the internal users should be allowed. Example 8-11 shows a simple RACL example.
Example 8-11 Simple RACL Example
Router(config)# ip access-list extended internal_ACL
Router(config-ext-nacl)# permit tcp any any reflect tcpstuff_RACL
Router(config-ext-nacl)# permit udp any any reflect udpstuff_RACL timeout 60
Router(config-ext-nacl)# exit
Router(config)# ip access-list extended external_ACL
Router(config-ext-nacl)# evaluate tcpstuff_RACL
Router(config-ext-nacl)# evaluate udpstuff_RACL
Router(config-ext-nacl)# deny ip any any
Router(config-ext-nacl)# exit
Router(config)# interface ethernet1
Router(config-if)# description This connects to the Internet
Router(config-if)# ip access-group internal_ACL out
Router(config-if)# ip access-group external_ACL in
In Example 8-11, the first extended ACL built, internal_ACL, looks for TCP and UDP sessions and puts these sessions into two RACLs: tcpstuff_RACL and udpstuff_RACL, respectively. This extended ACL is applied outbound on the external interface. The second extended ACL, external_ACL, evaluates traffic coming back in by using the two RACLs; all other traffic is dropped. Remember that placement of the evaluate statements is important. In this example, they are placed before the deny ip any any statement.
Note that you easily could have placed both TCP and UDP sessions in the same RACL; however, as I pointed out earlier in this chapter, I prefer to separate the traffic, to make troubleshooting easier. By breaking the sessions into separate RACLs, it is easier to view it with the show access-lists command (actually, you can view just a specific RACL’s entries by using the name of the RACL with this command).
Two-Interface RACL Example
In the “Two-Interface Example” section earlier in this chapter, I discussed an example of ACL placement and operation using Figure 8-7. In this example, I show you the actual configuration of this router with ACLs and RACLs.
Review the access policies discussed in the “Two-Interface Example” section. Example 8-12 shows the configuration to enforce these policies.
Example 8-12 Two-Interface Configuration Example
Router(config)# ip access-list extended internal_ACL
Router(config-ext-nacl)# permit tcp any any reflect tcp_RACL
Router(config-ext-nacl)# permit udp any any reflect udp_RACL timeout 30
Router(config-ext-nacl)# permit icmp any any reflect icmp_RACL timeout 10
Router(config-ext-nacl)# exit
Router(config)# ip access-list extended external_ACL
Router(config-ext-nacl)# evaluate tcp_RACL
Router(config-ext-nacl)# evaluate udp_RACL
Router(config-ext-nacl)# evaluate icmp_RACL
Router(config-ext-nacl)# permit tcp any host 192.1.1.1 eq 25
Router(config-ext-nacl)# deny ip any any
Router(config-ext-nacl)# exit
Router(config)# interface ethernet1
Router(config-if)# ip access-group internal_ACL out
Router(config-if)# ip access-group external_ACL in
Example 8-12 is very similar to Example 8-11. However, there are two minor differences. First, a temporary RACL is used to allow returning ICMP traffic into the network, where the timeout for this traffic has been reduced from 300 to 30 seconds. Second, external users are allowed access to the internal e-mail server.
Three-Interface RACL Example
In the “Three-Interface Example” section earlier in this chapter, I discussed an example of ACL placement and operation using Figure 8-8. In this example, I show you the actual configuration of this router with ACLs and RACLs. This example is more complex than the previous two.
Review the access policies discussed in the “Three-Interface Example” section. Example 8-13 shows the configuration to enforce these policies. The numbering on the right refers to the numbered explanation that follows Example 8-13.
Example 8-13 Three-Interface Configuration Example
Router(config)# ip access-list extended internal_ACL
Router(config-ext-nacl)# permit tcp host 192.1.1.1 (1)
host 192.1.2.1 eq 25 reflect DMZ_RACL
Router(config-ext-nacl)# deny tcp any any eq 25 (2)
Router(config-ext-nacl)# deny ip host 192.1.1.1 any (3)
Router(config-ext-nacl)# permit ip any 192.1.2.0 0.0.0.255 (4)
reflect DMZ_RACL
Router(config-ext-nacl)# permit ip any any (5)
Router(config-ext-nacl)# exit
Router(config)# ip access-list extended DMZ_ACL
Router(config-ext-nacl)# permit tcp host 192.1.2.1 (6)
host 192.1.1.1 eq 25
Router(config-ext-nacl)# evaluate DMZ_RACL (7)
Router(config-ext-nacl)# evaluate Internal_returns_RACL (8)
Router(config-ext-nacl)# exit
Router(config)# ip access-list exit_ACL
Router(config-ext-nacl)# permit tcp host 192.1.2.1 any eq 25 (9)
reflect DMZ_returns_RACL
Router(config-ext-nacl)# permit udp host 192.1.2.2 any eq 53 (10)
reflect DMZ_returns_RACL
Router(config-ext-nacl)# permit ip 192.1.1.0 0.0.0.255 any (11)
reflect Internal_returns_RACL
Router(config-ext-nacl)# permit tcp host 192.1.2.1 eq 25 any (12)
Router(config-ext-nacl)# permit udp host 192.1.2.2 eq 53 any
Router(config-ext-nacl)# permit tcp host 192.1.2.3 eq 80 any
Router(config-ext-nacl)# exit
Router(config)# ip access-list extended external_ACL
Router(config-ext-nacl)# permit tcp any host 192.1.2.1 eq 25 (13)
Router(config-ext-nacl)# permit udp any host 192.1.2.2 eq 53
Router(config-ext-nacl)# permit tcp any host 192.1.2.3 eq 80
Router(config-ext-nacl)# evaluate DMZ_returns_RACL (14)
Router(config-ext-nacl)# evaluate Internal_returns_RACL
Router(config-ext-nacl)# exit
Router(config)# interface ethernet0 (15)
Router(config-if)# description Internal Network
Router(config-if)# ip access-group internal_ACL in
Router(config-if)# ip access-group DMZ_ACL out
Router(config-if)# exit
Router(config)# interface ethernet2
Router(config-if)# description DMZ
Router(config-if)# exit
Router(config)# interface etherent1
Router(config-if)# description Internet
Router(config-if)# ip access-group exit_ACL out (16)
Router(config-if)# ip access-group external_ACL in
Router(config-if)# exit
Router(config)# ip reflexive-list timeout 120 (17)
The following is an explanation of the listing in Example 8-13. The numbers refer to the numbers that appear on the right side of Example 8-13:
1. This ACL is used to restrict traffic from leaving the internal segment. The first statement allows e-mail to be sent to the DMZ e-mail server, and allows the return of traffic through the DMZ_RACL.
2. This statement denies any internal machine from sending e-mail directly to the DMZ e-mail server—or any other e-mail server, for that matter.
3. This statement denies the internal e-mail server access to any other DMZ or external device.
4. This statement builds a RACL for traffic flowing from the internal segment to the DMZ. These temporary entries are placed in the DMZ_RACL along with the internal e-mail server’s connection to the DMZ’s e-mail server. For better security, you might want to break up this single ACL statement into multiple ones, based on protocol, and assign different timeout values for the protocols.
5. This statement allows all other traffic to the Internet from the internal segment.
6. The second named ACL is used to restrict traffic coming from the DMZ and Internet segments to the internal segment. The first statement allows the DMZ e-mail server to forward e-mail to the internal e-mail server.
7. The reference to DMZ_RACL allows the traffic that internal devices sent to the DMZ to return to them.
8. The reference to Internal_returns_RACL allows the traffic that internal devices sent to the Internet to return to them. (See Reference 11 in the Example 8-13).
9. This third ACL is to restrict traffic leaving the network. The first statement allows traffic originated by the DMZ e-mail server to be returned to it (DMZ_returns_RACL).
10. This statement allows DNS queries sent by the DMZ DNS server to the Internet to be returned to it (DMZ_returns_RACL).
11. This statement allows traffic sent by the internal users to be returned to them (Internal_returns_RACL).
12. The next three statements allow the responses of the DMZ servers to be forwarded to the Internet users.
13. This fourth named ACL is used to filter Internet traffic coming into this network. The first three statements allow the Internet to access the e-mail, DNS, and web servers.
14. The references to DMZ_returns_RACL and Internal_returns_RACL allow the traffic that internal devices sent to the Internet to return to them, as well as allows the traffic that the DMZ devices originate to be returned from the Internet. One interesting point to make about Internal_returns_RACL is that it is referenced in two named ACLs. This is necessary to allow the returning Internet traffic to flow through both the external ACL (applied inbound on E1) and the DMZ ACL (applied outbound on E0).
15. Ethernet0 is connected to the internal segment. It has two ACLs activated on it. internal_ACL is used to restrict traffic leaving this segment, as well as to build RACLs to allow returning traffic to it. DMZ_returns_RACL allows returning traffic from the DMZ to the internal segment. Ethernet2 is connected to the DMZ segment. Notice that no ACL is applied here; all policies are enforced by the two ACLs on the internal interface and the ACL on the external interface.
16. Ethernet1 is connected to the Internet. It has an ACL applied to it inbound (external_ACL) that restricts traffic into the DMZ and allows returning traffic to the internal users. It also has an ACL applied outbound (exit_ACL) that creates RACL entries and allows Internet queries to be forwarded from the DMZ segment.
17. The last statement in this configuration sets the timeout for all idle connections to 120 seconds. After 120 seconds, an idle connection is removed from the RACL.
Tip
One thing that I definitely recommend monitoring in this configuration is the RACL timeout and the amount of memory that these temporary entries require. If idle entries are causing memory problems, set up separate RACLs for HTTP, ICMP, and DNS query connections, setting the idle timeout for these to 60 seconds or less.
As you can see from this example, setting up a three-interface perimeter router firewall is not an easy task—and this was a very basic configuration. On top of this configuration, you also need to apply the other filtering recommendations discussed in Chapter 7, to provide further protection. You have your work cut out for you.
Summary
This chapter showed you the basics of configuring RACLs to allow the flow of traffic back into your network. RACLs have advantages over the established keyword in an extended ACL because RACL entries are temporary and disappear after either their idle timer expires or, if the connection uses TCP, the connection aborts or is gracefully terminated. RACLs should be used when CBAC is not available.
Next up is Chapter 9, which shows you how to use the Cisco CBAC feature of the Cisco IOS Firewall feature set to configure a stateful firewall function on your router. As you will see in this chapter, CBAC has many more features and functions than reflexive ACLs.