
Chapter 4. Disabling Unnecessary Services
This chapter discusses some of the different kinds of services that your router might or might not be running by default, what type of security impact they have, and how to disable them. Many of the services that I discuss here have security issues, each with its own level of risk. A hacker can use these services to his advantage by gathering information about your router, executing a denial of service (DoS) attack, or attempting to gain unauthorized access. Therefore, you need to disable all of the services on your perimeter router (or any router, for that matter) that you are not using or that are unnecessary.
I have divided chapter into three sections:
• How to disable global services
• How to disable interface services
• How to use the AutoSecure feature
The first two sections discuss how to disable services manually; the new AutoSecure security feature does this process for you dynamically.
Disabling Global Services
Depending on the Cisco IOS version that you are running, many services are enabled by default on your router. Some of these present security issues. This section covers the global services that might or might not be running on your router, and how to disable them.
Tip
I highly recommend that you manually or dynamically (with AutoSecure) disable all services that you are not using. I make this recommendation because Cisco has the habit of sometimes enabling or disabling a service automatically in a specific software release. Therefore, I take the more cautious approach and assume that the services are enabled. Plus, you never know what might happen when you upgrade your Cisco IOS. A previous service that was disabled by default might be enabled (by default) in the new release. By disabling these services manually or with AutoSecure, you are protecting yourself from this kind of issue. Never make any assumptions about what is or is not running on your router; always assume the worst-case scenario and disable all services that you are not using.
Cisco Discovery Protocol
The Cisco Discovery Protocol (CDP) is a Cisco-proprietary protocol used to share basic device information with another directly connected Cisco device. The media types supported include ATM, Ethernet, FDDI, frame relay, HDLC, PPP, and token ring. CDP messages are generated as multicasts and include the following information about your Cisco IOS device:
• The name of your Cisco IOS device (configured with the hostname command)
• The hardware platform of the Cisco IOS device, such as a 2600 series router or a 2950 switch
• The Cisco IOS software version running on your Cisco IOS device
• The hardware capabilities of your Cisco IOS device, such as routing, switching, or bridging
• The Layer 3 address of the device
• The interface from which the CDP multicast was sent
Example 4-1 shows some of the information that you can see from a neighboring device.
Example 4-1 CDP Neighbor Example
RouterB# show cdp neighbor detail
-------------------------
Device ID: RouterA
Entry address(es):
IP address: 192.168.1.250
Platform: cisco 4500, Capabilities: Router
Interface: Ethernet0/0, Port ID (outgoing port): Ethernet0/1
Holdtime : 127 sec
Version :
Cisco Internetwork Operating System Software
IOS (tm) 4500 Software (C4500-J-M), Version 11.3.10,
MAINTENANCE INTERIM SOFTWARE
Copyright (c) 1986-1997 by cisco Systems, Inc.
Compiled Mon 07-Apr-97 19:51 by dschwart
<--output omitted-->
As you can see in Example 4-1, the neighboring router, RouterA, has an IP address of 192.168.1.250, is a 4500, was advertising information from Ethernet0/1, and is running Cisco IOS 11.3.10. Normally, CDP is used to test data link layer (Layer 2) connections. If you are receiving CDP information from a neighboring Cisco device, you can be assured that at least Layer 2 is functioning correctly. If you are having Layer 3 connectivity problems, you can see your neighbor’s IP address without having to log into the neighbor.
However, a hacker can use CDP information during a reconnaissance attack. The likelihood of this is small because the hacker must be in the same broadcast domain to view the CDP multicast frame. Therefore, I highly recommend that you disable CDP completely on your perimeter router, or at least on the interfaces that connect to public networks, such as your ISP or other sites that you connect to that are not part of your company’s security umbrella.
I discuss how to disable CDP globally in this section, and I cover how to disable it on your interfaces later in the chapter. To globally disable CDP, use the configuration in Example 4-2.
Example 4-2 Globally Disabling CDP
Router# show cdp
Global CDP information:
Sending CDP packets every 60 seconds
Sending a holdtime value of 180 seconds
Sending CDPv2 advertisements is enabled
Router# configure terminal
Router(config)# no cdp run
Router(config)# exit
Router# show cdp
% CDP is not enabled
Router#
As you can see from this example, after you have disabled CDP with the no cdp run command, you will want to verify that it has been disabled with the show cdp command.
TCP and UDP Small Servers
TCP and UDP small servers are services running on ports 19 and lower on a device. All of the services are outdated: They were used a decade ago in UNIX environments to provide basic information such as the date and time (daytime, port 13), to test connectivity (echo, port 7), and to generate a stream of characters (chargen, port 19). Hackers sometimes can use these services to their advantage. For instance, if you have chargen (TCP or UDP 19) enabled on your device, a hacker could send a flood of traffic to this port, creating a DoS attack such as Fraggle. Basically, with chargen enabled, your device would process all this traffic, taking away CPU cycles from other processes, and then just discard the information.
Example 4-3 shows a connection being opened to a router with chargen enabled.
Example 4-3 Connecting to the Chargen Port
Router# telnet 192.168.1.254 chargen
Trying 192.168.1.254, 19 ... Open
!"#$%&'()*+,-./0123456789:;<=>?@ABCDEFGHIJKLMNOPQRSTUVWXYZ[]^_`abcdefg
!"#$%&'()*+,-./0123456789:;<=>?@ABCDEFGHIJKLMNOPQRSTUVWXYZ[]^_`abcdefgh
"#$%&'()*+,-./0123456789:;<=>?@ABCDEFGHIJKLMNOPQRSTUVWXYZ[]^_`abcdefghi
#$%&'()*+,-./0123456789:;<=>?@ABCDEFGHIJKLMNOPQRSTUVWXYZ[]^_`abcdefghij
<--output omitted-->
As you can see from Example 4-3, a string of characters is repeated continuously. Example 4-4 shows a sample of connecting to the time port.
Example 4-4 Connecting to the Time Port
Router# telnet 192.168.1.254 daytime
Trying 192.168.1.254, 13 ... Open
Wednesday, September 17, 2003 02:01:09-UTC
[Connection to 192.168.1.254 closed by foreign host]
Router#
To disable these services on your router, use the configuration in Example 4-5.
Example 4-5 Disabling Small Services
Router(config)# no service tcp-small-servers
Router(config)# no service udp-small-servers
Router(config)# exit
Router# telnet 192.168.1.254 daytime
Trying 192.168.1.254, 13 ...
% Connection refused by remote host
Router#
After you have disabled the services, make sure that you test your configuration as shown earlier.
Note
In most current versions of the Cisco IOS, TCP and UDP small servers are disabled. However, do not trust the Cisco IOS default behavior; hard-code these commands to ensure that they are disabled.
Finger
Finger is an old UNIX program to determine who is logged into a host. This was used many years ago to determine, without logging into a device, who was logged in. This was useful if you were at a remote site and wanted to see if someone was at his desk before you made a long-distance phone call (I used finger quite often for this purpose).
In today’s world, finger is basically a dead application because many other resources, including e-mail and instant-messenger products, can perform this function. Therefore, I recommend disabling this service to limit your exposure: You do not want hackers to know who, if anyone, is logged into your router or gain any valid user IDs for the system.
Example 4-6 shows a simple configuration of verifying that finger is enabled and how to disable it.
Example 4-6 Determining Whether Finger Is Enabled
Router# telnet 192.168.1.254 finger
Trying 192.168.1.254, 79 ... Open
Line User Host(s) Idle Location
0 con 0 192.168.1.254 00:00:00
* 6 vty 0 idle 00:00:00 192.168.1.254
Interface User Mode Idle Peer Address
[Connection to 192.168.1.254 closed by foreign host]
Router# configure terminal
Router(config)# no ip finger
Router(config)# no service finger
Router(config)# exit
Router#
Router# telnet 192.168.1.254 finger
Trying 192.168.1.254, 79 ...
% Connection refused by remote host
Router#
When executing a finger against a router, the router responds with the output from the show users command. To prevent responses, use the no ip finger command; this disables the finger server. On older Cisco IOS versions, the no service finger command was used. In newer versions of the Cisco IOS, both commands work.
Note
In most current versions of the Cisco IOS, finger is disabled. However, do not trust the Cisco IOS default behavior; hard-code these commands to ensure that finger is disabled.
IdentD
IdentD (the identification daemon) allows remote devices to query a TCP port for identification purposes. IdentD is defined in RFC 1413 and is an insecure protocol. Its purpose is to help identify a device that a remote device wants to connect to. It is a very simple protocol: A device sends a request to the Ident port (TCP 113), and the destination responds with its identification, such as a host or device name. Some applications, such as SMTP and FTP (at least some of them), use this to help provide some method of authentication.
Unfortunately, IdentD does not provide any real authentication function, and it is useful to a hacker since you can learn information from it. Plus, a hacker easily can spoof this, allowing him to send a bogus reply, for instance, when an e-mail server asks for the identity of the hacker’s device using IdentD. Because of these issues with IdentD, you should disable it on a Cisco router. There is no real reason for the router to be establishing a connection to a remote device that is using IdentD as an additional method of authentication verification; likewise, there is no reason for someone else trying to access the router’s IdentD process. To disable it, use the following command:
Router(config)# no ip identd
You can test it by Telnetting to port 113. In newer Cisco IOS versions, IdentD is disabled by default.
IP Source Routing
Sometimes when you are experiencing routing problems, you can take advantage of the IP source routing feature to help troubleshoot the problem. With IP source routing, you can place the actual route that a packet should take in the IP header. Routers then use this information to route the packet to the destination.
Unfortunately, a hacker can use this to his advantage. Figure 4-1 shows an illustration of a hacker using ingenuity to get into your network. In this example, when all devices on the Internet want to get into your network, they send traffic to you through your ISP. You have used a router/firewall to secure your Internet access. However, in this example, you do business with another company, and you want to have a private WAN connection between your two networks. In this example, your router for the private WAN connection is not protected as well as your other router connected to the Internet; you made the colossal mistake of assuming that your partner company was doing a good job in security. The hacker takes advantage of this by using IP source routing to have the Internet and Company A’s routers route his traffic through the less protected path, bypassing your main firewall.

As you can see from this example, source routing can create security issues for your network and, therefore, should be disabled on all your routers, including your perimeter router. To disable it, use the following command:
Router(config)# no ip source-route
You can test this by using the Cisco IOS extended ping command and placing source routing information in your ICMP messages. With this command, choose the extended commands option; then choose either strict or loose and enter your source routing information. Strict source routing has the intermediate routers use the exact path specified in the ICMP payload; loose source routing specifies recommended paths for intermediate routers, if these paths are available. Hackers commonly use strict source routing to use alternative, less secure paths into your network. Loose source routing can be used to learn about alternative paths and the layout of your network. To see the actual path that an ICMP packet took to the destination, use the record option (this is useful in troubleshooting).
FTP and TFTP
Your router can function as both an FTP server and a TFTP server. Many administrators use this function to allow a quick copy of a Cisco IOS image from one router to another. I highly recommend that you not use this feature because both FTP and TFTP are insecure protocols. With TFTP, there is no security; with FTP, there is only authentication through a username and password, which is susceptible to eavesdropping attacks. The only way to enable a TFTP server on a router is to specify which file in Flash you want external devices to access. Therefore, this service is disabled unless you explicitly configure it: Do not do so.
By default, the FTP server is disabled on Cisco routers. However, I still recommend executing the following command on your router, to be safe:
Router(config)# no ftp-server enable
Test this by using an FTP client from your PC, and try to establish a connection to your router. Using Microsoft’s standard FTP client, I get the following message after configuring the previous command:
C:> ftp 192.168.1.254
> ftp: connect: Connection refused
If you get any other type of message, you have not disabled FTP on your router successfully.
Tip
If you need to copy files to and from your router, I recommend that you use Secure Copy (SCP) instead. This is discussed in Chapter 5, “Authentication, Authorization, and Accounting.”
HTTP
Chapter 3, “Accessing a Router,” discussed how to secure HTTP connections to your router. However, I also cautioned against this because of the many things hackers have found that allow them to use web browser–based attacks to gain unauthorized access. You could use HTTP with secure socket layer (HTTPS), which provides better security, but your router still is functioning as a web server, which presents inherent security risks. Remember that managing your router through a web browser requires the user to enter a level-15 password.
The easiest way to test this is to use a web browser and try to access your router. From a router prompt, you also can test it by using the two commands in Example 4-7.
Example 4-7 Accessing a Router’s Web Server Through the Telnet Application
Router# telnet 192.168.1.254 80
Trying 192.168.1.254, 80 ... Open
Router# telnet 192.168.1.254 443
Trying 192.168.1.254, 80 ... Open
If you see the word “open” in either connection attempt, the HTTP and/or HTTPS service is running on your router. To disable both of these services, as well as verify that they have been disabled, perform the steps in Example 4-8.
Example 4-8 Disabling a Router’s Web Server Process
Router(config)# no ip http server
Router(config)# no ip http secure-server
Router(config)# end
Router# telnet 192.168.1.254 80
Trying 192.168.1.254, 80 ...
% Connection refused by remote host
Router# telnet 192.168.1.254 443
Trying 192.168.1.254, 443 ...
% Connection refused by remote host
Instead of using HTTP to manage your router remotely, use the following, in order of preference: VPN, SSH, or HTTPS.
SNMP
As I mentioned in the previous chapter, SNMP can be used to monitor and administer your Cisco devices remotely. However, SNMP has many security problems, especially in SNMP v1 and v2. To completely disable SNMP on your router, do the following three things:
• Remove the default community strings from your router’s configuration.
• Disable SNMP traps and the system shutdown feature.
• Disable the SNMP service.
To see whether any SNMP commands are configured on your router, execute the command in Example 4-9.
Example 4-9 Checking Whether SNMP Commands Exist on Your Router
Router# show running-config | include snmp
Building configuration...
snmp-server community public RO
snmp-server community private RW
Router#
For Cisco IOS 12.0 and earlier, the include parameter will not work, so you must view the configuration and carefully look for snmp-server commands. Example 4-10 shows the configuration that you should use to disable SNMP completely.
Example 4-10 Disabling SNMP on Your Router
Router(config)# no snmp-server community public RO
Router(config)# no snmp-server community private RW
Router(config)#
Router(config)# no snmp-server enable traps
Router(config)# no snmp-server system-shutdown
Router(config)# no snmp-server trap-auth
Router(config)#
Router(config)# no snmp-server
The first two commands remove the read-only and read-write community strings. Note that the names of the community strings might be different in your configuration. The next three commands disable SNMP traps, system shutdowns, and authentication traps through SNMP. The last command disables the SNMP service on the router. After you have disabled SNMP, use the show snmp command to verify your configuration, as displayed in Example 4-11.
Example 4-11 Verifying that SNMP Is Disabled
Router# show snmp
%SNMP agent not enabled
Router#
In this example, SNMP has been disabled successfully.
Name Resolution
Everyone with an Internet connection uses the Domain Name System (DNS) to resolve fully qualified domain names (FQDN) to IP addresses. This is especially important for Internet-based applications. Cisco routers also support name resolution with DNS, as well as static, or manual, resolution.
If you router is using DNS to resolve names, you will see something similar to Example 4-12 in your configuration.
Example 4-12 Using DNS to Resolve Names
Router(config)# hostname santa
santa(config)# ip domain-name claus.gov
santa(config)# ip name-server 200.1.1.1 202.1.1.1
santa(config)# ip domain-lookup
As you can see in this example, the router has a name of santa and a domain name of claus.gov. Two name servers are defined, and DNS is enabled (ip domain-lookup). You can use the show hosts command to view your resolved names.
Because DNS has no security mechanisms built into it, it is susceptible to session-hijacking attacks, in which a hacker sends a fake reply before the destination DNS server can respond. If your router gets two responses back, it typically ignores the second one. Therefore, if the hacker’s fake response is received first, your hacker is now one step further in implementing his attack. If you are concerned about this, either make sure that the router has a secure path to the DNS server or do not use DNS; instead, use manual resolution. With manual resolution, you disable DNS and then statically define any common host names that you use on your router with the ip host command. To prevent the router from generating DNS queries either to specifically configured DNS servers (ip name-server) or as a local broadcast (when DNS servers were not configured), use the configuration in Example 4-13.
Example 4-13 Disabling DNS on Your Router
Router# telnet www.quizware.com 80
Translating "www.cisco.com"...domain server (255.255.255.255)
Translating "www.cisco.com"...domain server (255.255.255.255)
Translating "www.cisco.com"...domain server (255.255.255.255)
% Unknown command or computer name, or unable to find computer address
Router# configure terminal
Router(config)# no ip domain-lookup
Router(config)# end
Router# telnet www.cisco.com 80
Translating "www.cisco.com"
% Unknown command or computer name, or unable to find computer address
Router#
In Example 4-13, DNS resolution was enabled, but no DNS servers were configured. Therefore, the router used local broadcasts to resolve the name to an address. After DNS resolution was disabled with the no ip domain-lookup command, the router immediately responded with the “% Unknown command” message, indicating that no resolution was available.
Note
Some router configurations, such as SSH and VPN, require the router to have a host and a domain name; however, the router does not require these for DNS resolution to function correctly.
BootP
BootP is an old protocol that was used to assign addressing information to a diskless workstation and, in many cases, load the operating system on the device. In the 1980s and even the early 1990s, the use of diskless workstations was popular because of cost. Most workstations were UNIX based and cost prohibitive, and the same was true of PCs. To overcome the cost burden, many companies deployed diskless workstations. The term diskless workstation describes what it is—a device without a hard drive, but with all of the other components, such as a monitor, CPU, RAM, a NIC, and so on.
The diskless workstation used the BootP protocol to dynamically acquire an IP address, and, in some instances, its operating system. This is sent as a local broadcast to UDP port 67 (the same as DHCP). To accomplish this, a BootP server had to be configured to assign the IP addressing information as well as any requested files. After the diskless workstation booted up, it accessed a workstation or server to run applications. An X-terminal is an example of a diskless workstation.
Cisco routers can function as BootP servers, offering files in Flash memory to requesting devices. BootP should be disabled on your router for these three reasons:
• No one really uses it anymore.
• No authentication mechanism is built into it. Anyone can request things from the router, and the router will reply with whatever is configured on it.
• It is susceptible to DoS attacks by a hacker.
To disable BootP, use the following configuration:
Router(config)# no ip bootp server
DHCP
The Dynamic Host Configuration Protocol (DHCP) commonly is used in networks today. It allows a device to acquire all of its IP addressing information from a server, including its IP address, subnet mask, domain name, DNS server addresses, WINS server addresses, TFTP server addresses, and other information. Cisco routers can function as both DHCP clients and DHCP servers.
Caution
When using a Cisco router as a perimeter router, the only time you should set it up as a DHCP client is if you are connecting it to an ISP through a DSL or cable modem and your ISP is using DHCP to assign you addressing information. Otherwise, you never should set up your router as a DHCP client; a hacker easily can masquerade as a DHCP server and send your router false information. This can lead to DoS and routing attacks.
Likewise, the only time your router should function as a DHCP server is when you use your router in a SOHO environment, where it is basically the only device in the small network that can assign addresses to PCs. If you do this, make sure that you filter port UDP port 67 on your router’s external interface; this blocks both DHCP and BootP requests from external people.
In many Cisco IOS versions, the DHCP server is enabled by default. If you do not use this on the router, disable it with the following configuration:
Router(config)# no service dhcp
This prevents the router from acting as a DHCP server or relay agent.
PAD
A packet assembler/disassembler (PAD) is used in X.25 networks to provide reliable connections between remote sites. In today’s networks, X.25 has lost a lot of market presence to other protocols, such as frame relay, ATM, ISDN, and even Ethernet in providers’ WAN and MAN networks.
However, PAD does serve a useful function to a hacker. Assuming that the hacker can gain control of a directly connected device to the router, and if the router is running the PAD service, it will accept PAD connections from anyone. This give the hacker a foothold into your router, where he can use other attacks to gain EXEC access. To disable this service, use the following command:
Router(config)# no service pad
Configuration Autoloading
When Cisco routers boot up, they go through various stages of testing, finding the Cisco IOS, and finding a configuration file before you are presented with a CLI prompt. When the router is booting up, it typically goes through five steps:
1. The router loads and executes POST, found in ROM, and tests the hardware components of the router, such as its memory and interfaces.
2. The router loads and executes the bootstrap program.
3. The bootstrap program finds and loads a Cisco IOS image. These images can come from Flash, a TFTP server, or ROM.
4. When the Cisco IOS is loaded, it finds and executes a configuration file: The configuration file is stored in NVRAM, but if this is empty, the System Configuration dialog box is started, or the router can use TFTP to acquire a configuration file.
5. The user finally is presented with the CLI EXEC prompt.
When finding a Cisco IOS image, assuming that there are no boot system commands in NVRAM, the router looks for the first valid Cisco IOS image in Flash. If there are no Cisco IOS images in Flash, the router performs a TFTP boot, or network boot; it sends out a local broadcast asking for an operating system file from a TFTP server. If this fails, the router loads the Cisco IOS image in ROM (some routers do not support this third option).
Booting a Cisco IOS image from a TFTP server is not a recommended solution for many reasons, including these:
• For larger images, it is a very slow process to load the image.
• You have no control over which interfaces the router sends the broadcast out; it does it to all active interfaces.
• A hacker can take advantage of this process and send his own Cisco IOS image, one with security weaknesses, to the router—or, he can send an invalid image, preventing the router from booting.
Because TFTP is used for this process, there is no security to protect the load process. Therefore, you should not allow your router to use this function. To prevent this, use the following configuration:
Router(config)# no boot network
After the Cisco IOS image has loaded, the router goes out and finds a configuration file. If there is no configuration file in NVRAM, the router can use the System Configuration dialog box to create one, or use the network configuration option: using TFTP broadcasts to find one. As with finding a Cisco IOS image with a TFTP server, this has security risks:
• If your configuration file comes from a TFTP server, it is sent across the network in clear text.
• A hacker could act as a TFTP server and send his own configuration file to your router, giving him open access to your network.
Therefore, you should disable this feature by using the following command:
Router(config)# no service config
Disabling Interface Services
Now that you have disabled all global services that are insecure or that are not necessary, you are ready to proceed to disabling unnecessary or undesirable services on your router’s interfaces. This section covers the basics about disabling insecure services on your router’s interfaces.
Caution
Subinterfaces, loopback interfaces, and null interfaces are considered physical interfaces on the router, so a lot of the things I discuss here also should be done on these interfaces. It is better to be safe than really sorry.
CDP on Insecure Interfaces
As I mentioned at the beginning of this chapter, CDP typically is used as a troubleshooting tool. However, a hacker can use this information in a reconnaissance attack to learn more information about your router. Therefore, if you do not globally disable CDP, you at least should disable CDP on insecure interfaces. Insecure interfaces are basically any interface that is not connected to your internal network:
• An insecure interface is connected to a public network, such as the Internet
• It is connected to a different private network (some other company).
• It is connected to a private WAN to a remote office.
To disable CDP on an interface, use the following configuration:
Router(config)# interface type [slot_#/]port_#
Router(config-if)# no cdp enable
After you have disabled CDP on your router’s interface(s), you can verify it by using the show cdp interface command. You should not see the disabled interfaces in the output of this command.
Proxy ARP
IP devices use the Address Resolution Protocol (ARP) to resolve Layer 3 addresses to Layer 2 (MAC) addresses. This allows devices to communicate with each other at Layer 2, like Ethernet. Typically, ARP is used to help devices communicate with each other on the same segment, subnet, or broadcast domain (virtual LAN, or VLAN).
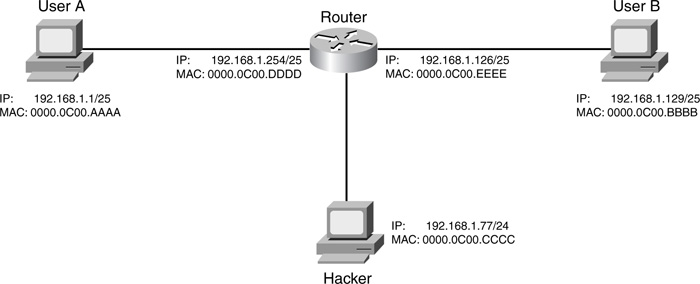
Cisco routers can function as a proxy, giving a requesting device a MAC address of the router. This typically happens when the device is confused about the destination. The device thinks that the destination is on the same segment, but, in reality, the device is in a different subnet. Figure 4-2 illustrates how proxy ARP works, as defined in RFC 1027.

In this example, the network administrator is breaking up a Class C segment (192.168.1.0/24) into two physically separate segments: 192.168.1.0/25 and 192.168.1.128/25. You will notice that the router has been configured correctly for both of these subnets. However, you now have an addressing issue for User A and User B. Both of these devices assume that they are on the same physical segment because of their subnet mask: /24. As an example, if User A wants to get to 192.168.1.129, it assumes that this address is on the same segment and performs an ARP for 192.168.1.129. Obviously, the destination is not on the same segment, so User B cannot respond with a reply. Two solutions exist for this problem:
• Readdress the clients with the correct addressing information (good solution).
• Have the router use proxy ARP (not a very good solution).
Of course, readdressing the network might not be a simple task, so the administrator in this example decided to have the router use proxy ARP. With proxy ARP, the router responds on behalf of User B; however, instead of sending User B’s MAC address to User A, it sends its own address: 0000.0C00.DDDD. User A then encapsulates its IP packet with a source of 192.168.1.1 and a destination of 192.168.1.129 in a frame with a destination MAC address of the router. When the router receives the frame, it processes it because it matches its NIC’s MAC address; then it examines its routing table and routes the packet correctly. Basically, proxy ARP is a poor man’s version of routing: It allows devices to talk to each other across subnet boundaries.
Given the example in Figure 4-2, however, there are problems with using proxy ARP. Assume that you have gone through and readdressed the network correctly, as shown in Figure 4-3. The administrator has set up filtering to allow traffic between the two 192.168.1.0/24 subnets, but to deny other types of traffic. An ingenious hacker has found out that the interface on the router that he is connected to supports proxy ARP. The hacker wants to execute a DoS attack against User B. The hacker takes advantage of proxy ARP by configuring an address from 192.168.1.0/25 (192.168.1.77) and pings User B. With proxy ARP enabled, the router responds with its own MAC address. The hacker then executes his DoS attack by flooding User B. The router’s filtering rules allow this traffic and forward it to User B. Assuming that these were ICMP messages, User B attempts to respond by sending them to 192.168.1.77. The router receives the responses, looks at its routing table, and determines that the packets need to go to the segment where User A is. The router does one of two things at this point: either sends the responses back to the hacker (not likely because the routing information points to a different interface), or uses ARP to get the MAC address of 192.168.1.77 on User A’s segment, does not get a response, and responds to each ICMP message to User B with a host unreachable message.
By default, Cisco routers perform proxy ARP on all their interfaces with IP addresses configured on them. I can understand why Cisco initially did this 10 years ago in the infancy of networking with TCP/IP, but this makes no sense today. Therefore, I highly recommend that you disable proxy ARP on your router’s interfaces. Use the following command to do this:
Router(config)# interface type [slot_#/]port_#
Router(config-if)# no ip proxy-arp
Note
There is one instance where you do not want to disable proxy ARP: when your router is terminating IPSec remote access VPN connections. In this instance, the router will have to respond to a local ARP from a local device when the local device wants to access the remote access client across the VPN connection. In this instance, leave proxy ARP enabled on the router’s internal interface(s).
Remember to repeat the no ip proxy-arp command on each interface. To verify your configuration, use the show ip interface command. In Example 4-14, proxy ARP has been disabled on the router’s fastethernet0 interface.
Example 4-14 Verifying That Proxy ARP Is Disabled
Router# show ip interface
FastEthernet0 is up, line protocol is up
Internet address is 192.168.1.254/24
Broadcast address is 255.255.255.255
Address determined by non-volatile memory
MTU is 1500 bytes
Helper address is not set
Directed broadcast forwarding is disabled
Outgoing access list is not set
Inbound access list is not set
Proxy ARP is disabled
<--output omitted-->
Directed Broadcasts
A directed broadcast is a broadcast specific to a network. Each network or subnet has three types of addresses: a network number, host addresses, and a broadcast address, called a directed broadcast. Unlike local broadcasts, directed broadcasts are routable. Some old DoS attacks used this by flooding a specific network or subnet with directed broadcasts, typically in a spoofing attack in which the hacker replaced his own IP address with one of the devices in the subnet in the source address field of the packet header. The Smurf attack does this through the use of ICMP packets.
No application really uses the directed broadcast function, so it is highly recommended that you prevent the router from forwarding directed broadcasts by configuring the following on its interfaces:
Router(config)# interface type [slot_#/]port_#
Router(config-if)# no ip directed-broadcast
Remember to repeat the no ip directed-broadcast command on each interface. To verify your configuration, use the show ip interface command. In Example 4-15, directed broadcasts have been disabled on the router’s fastethernet0 interface.
Example 4-15 Verifying that Forwarding of Directed Broadcasts Is Disabled
Router# show ip interface
FastEthernet0 is up, line protocol is up
Internet address is 192.168.1.254/24
Broadcast address is 255.255.255.255
Address determined by non-volatile memory
MTU is 1500 bytes
Helper address is not set
Directed broadcast forwarding is disabled
<--output omitted-->
ICMP Messages
A hacker can use three types of ICMP messages to create either a DoS attack or a reconnaissance attack:
• ICMP unreachables
• ICMP redirects
• ICMP mask replies
The following three sections discuss how these ICMP messages are used, how a hacker can exploit them, and how you can disable them on your routers’ interfaces.
ICMP Unreachables
By default, if a Cisco router receives a nonbroadcast packet to itself with an unknown protocol, or if the router receives a packet that the router cannot forward to its destination because the host or network is not reachable, the router automatically generates an ICMP unreachable message. A hacker can use this information in two ways:
• This information tells the hacker what is not reachable in the network.
• The hacker can use a DoS attack to cause the router to respond to the ICMP unreachable messages. An intelligent hacker changes the source address in the packet to a destination that it wants to attack. This is a form of the Smurf attack.
To prevent the router from responding with ICMP unreachable messages, use this configuration on each of your router’s interfaces:
Router(config)# interface type [slot_#/]port_#
Router(config-if)# no ip unreachable
Remember to repeat the no ip unreachable command on each interface. To verify your configuration, use the show ip interface command. In Example 4-16, ICMP unreachables have been disabled on the router’s fastethernet0 interface.
Example 4-16 Verifying that ICMP Unreachables Is Disabled
Router# show ip interface fastethernet0
FastEthernet0 is up, line protocol is up
Internet address is 192.168.1.254/24
Broadcast address is 255.255.255.255
Address determined by non-volatile memory
MTU is 1500 bytes
Helper address is not set
Directed broadcast forwarding is disabled
Outgoing access list is not set
Inbound access list is not set
Proxy ARP is enabled
Local Proxy ARP is disabled
Security level is default
Split horizon is enabled
ICMP redirects are never sent
ICMP unreachables are never sent
ICMP mask replies are never sent
<--output omitted-->
ICMP Redirects
ICMP redirects are used to help devices intelligently find a destination. The example shown in Figure 4-4 illustrates how ICMP redirects work. In this example, User A is using Router A as a default gateway. All of User A’s traffic leaving the subnet is forwarded to Router A. User A then sends some traffic to User B. When Router A receives the traffic, it realizes that Router B, on the same segment, actually has a better path. Router A thus sends an ICMP redirect message to User A, basically telling User A that Router B should be used for this particular destination. Basically, Router A is sharing routing information with User A. User A then uses Router B to reach User B.

However, hackers can take advantage of this process by corrupting a device’s routing table, creating a DoS attack. For example, assume that the hacker in Figure 4-4 sends ICMP redirect messages to User A concerning User B’s network. In the hacker’s packet, the hacker gives an imaginary router address—say, Router D—to User A. When User A tries to send traffic to User B, it forwards its traffic to Router D, the imaginary router, thus preventing the traffic from reaching User B. A more intelligent hacker would have User A forward traffic to Router C, where the hacker is connected. Of course, for Router C to forward that traffic to the hacker’s PC, the hacker first would have to corrupt Router C’s routing table in a routing attack.
Cisco routers can prevent the router from generating ICMP redirect messages. To prevent the router from generating ICMP redirect messages, use this configuration on each of your router’s interfaces:
Router(config)# interface type [slot_#/]port_#
Router(config-if)# no ip redirect
Remember to repeat the no ip redirect command on each interface. To verify your configuration, use the show ip interface command. In Example 4-17, ICMP redirects have been disabled on the router’s fastethernet0 interface.
Example 4-17 Verifying that ICMP Redirects Are Disabled
Router# show ip interface
FastEthernet0 is up, line protocol is up
Internet address is 192.168.1.254/24
Broadcast address is 255.255.255.255
Address determined by non-volatile memory
MTU is 1500 bytes
Helper address is not set
Directed broadcast forwarding is disabled
Outgoing access list is not set
Inbound access list is not set
Proxy ARP is enabled
Local Proxy ARP is disabled
Security level is default
Split horizon is enabled
ICMP redirects are never sent
ICMP unreachables are never sent
ICMP mask replies are never sent
<--output omitted-->
ICMP Mask Replies
ICMP supports a mask request message that allows devices on a segment to learn about what the subnet mask is for the segment if this has not been configured on them. Any device, including a router, can generate an ICMP mask reply message. Hackers can use this for two purposes:
• First, it tells the hacker what the range of addresses are on the subnet.
• Second, it tells the hacker the directed broadcast for the subnet, which allows the hacker to use a DoS directed broadcast attack using a modified form of Smurf.
In some cases, the hacker can learn the identity of the device, such as what operating system it is running, with ICMP mask reply messages. For example, Sun systems respond to a mask reply that is fragmented across two ICMP packets. If a hacker gets a reply to this request, he has just found a Sun device and can start using his Sun hacking tools to exploit holes in the SunOS/Solaris operating system of this device.
ICMP mask requests and replies were meant for a local segment and should not be forwarded to other segments. Firewalls should filter them, and routers should ignore these requests; in today’s world, every device on the segment either is hard-coded with a subnet mask or learns it through DHCP. To prevent the router from sending ICMP mask reply messages, use this configuration on each of your router’s interfaces:
Router(config)# interface type [slot_#/]port_#
Router(config-if)# no ip mask-reply
Remember to repeat the no ip mask-reply command on each interface. To verify your configuration, use the show ip interface command. In Example 4-18, ICMP mask replies have been disabled on the router’s fastethernet0 interface.
Example 4-18 Verifying that ICMP Mask Reply Messages Are Disabled
Router# show ip interface
FastEthernet0 is up, line protocol is up
Internet address is 192.168.1.254/24
Broadcast address is 255.255.255.255
Address determined by non-volatile memory
MTU is 1500 bytes
Helper address is not set
Directed broadcast forwarding is disabled
Outgoing access list is not set
Inbound access list is not set
Proxy ARP is enabled
Local Proxy ARP is disabled
Security level is default
Split horizon is enabled
ICMP redirects are never sent
ICMP unreachables are never sent
ICMP mask replies are never sent
<--output omitted-->
Maintenance Operation Protocol
The Maintenance Operation Protocol (MOP), popular in older Digital Equipment Corporation (DEC) equipment, is used for maintenance services such as these:
• Uploading or downloading of system software
• Remote testing
• Problem troubleshooting
Cisco routers can use this to load a Cisco IOS image from a MOP server, assuming that MOP is enabled. This process is a carryover from more than a decade ago, but many routers still have MOP enabled, by default, on their interfaces. To prevent a DoS MOP attack from occurring, disable MOP on your interfaces:
Router(config)# interface type [slot_#/]port_#
Router(config-if)# no mop enable
Remember to repeat the no mop enable command on each interface.
VTYs
Even though VTYs are not interfaces, this is an appropriate place to discuss them. By default, VTYs allow all types of remote access, such as Telnet, SSH, and others. For your VTYs, you will want to restrict access to your VTYs to only Telnet (not recommended) and SSH (recommended). To restrict the router’s VTYs to only Telnet access, use this configuration:
Router(config)# line vty 0 4
Router(config-line)# transport input telnet
Router(config-line)# transport output telnet
To restrict the router’s VTYs to only SSH access (I recommend this approach over the previous one), use this configuration:
Router(config)# line vty 0 4
Router(config-line)# transport input ssh
Router(config-line)# transport output ssh
The transport command restricts VTY access into and out of the router. By specifying one particular access method, such as SSH, you are preventing anyone else from using another method. Therefore, if you want to let remote administrators use only SSH (but not Telnet), use the previous configuration. Use the show line vty command to verify your configuration, as shown in Example 4-19.
Example 4-19 Verifying the Configuration of the Router’s VTYs
Bullmastiff# show line vty 0
Tty Typ Tx/Rx A Modem Roty AccO AccI Uses Noise Overruns Int
6 VTY - - - - - 2 0 0/0 -
Line 6, Location: "", Type: ""
Length: 24 lines, Width: 80 columns
Baud rate (TX/RX) is 9600/9600
<--output omitted-->
DNS resolution in show commands is enabled
Full user help is disabled
Allowed input transports are ssh.
Allowed output transports are ssh.
Preferred transport is telnet.
No output characters are padded
No special data dispatching characters
Bullmastiff#
Bullmastiff# telnet 192.168.1.254
Trying 192.168.1.254 ...
% Connection refused by remote host
Bullmastiff# ssh -l richard 192.168.1.254
Password: cisco
Bullmastiff#
Notice in Example 4-19 that only SSH connections are allowed. I then tested this by trying to Telnet to the router itself, which was refused. I then used SSH to access the router and was successful.
You will want to put one more security measure in place, to ensure that a DoS attack against your VTYs does not tie them up and prevent remote access by a valid administrator. The following two commands help somewhat with this process:
Router(config)# service tcp-keepalives-in
Router(config)# service tcp-keepalives-out
With these two commands, the router monitors network TCP connections to and from the router by generating keepalives for connections such as Telnet and SSH. The advantage that these commands provide is that if a Telnet connection is abnormally aborted, for instance, the keepalive function detects this and removes the bad connection, allowing other devices to use the VTY line. This feature is disabled by default, and I recommend that you enable it.
Unused Interfaces
As a last precaution, disabling unused interfaces creates a more secure environment than when leaving them up and opening them to hacking attempts. You should use the shutdown command on all interfaces that you are not currently using, like this:
Router(config)# interface type [slot_#/]port_#
Router(config-if)# shutdown
Remember to repeat the shutdown command on each interface that you are not using. To verify your configuration, use the show ip interface brief command. In Example 4-20, ethernet0 has been disabled manually.
Example 4-20 Verifying that Unused Interfaces Are Disabled
Router# show ip interface brief
Interface IP-Address OK? Method Status Protocol
Ethernet0 unassigned YES NVRAM administratively down down
FastEthernet0 192.168.1.254 YES NVRAM up up
Manual Configuration Example of Disabling Services on a Perimeter Router
To reinforce all the services that you manually should disable on your perimeter router, take a look at an example. In this example, assume that the router has only two interfaces: Ethernet0 and Ethernet1. Example 4-21 shows the router’s configuration to manually disable insecure and unnecessary services.
Example 4-21 How to Disable Insecure and Unnecessary Services
Router(config)# no cdp run
Router(config)# no service tcp-small-servers
Router(config)# no service udp-small-servers
Router(config)# no ip finger
Router(config)# no ip identd
Router(config)# no service finger
Router(config)# no ip source-route
Router(config)# no ftp-server enable
Router(config)# no ip http server
Router(config)# no ip http secure-server
Router(config)# no snmp-server community public RO
Router(config)# no snmp-server community private RW
Router(config)# no snmp-server enable traps
Router(config)# no snmp-server system-shutdown
Router(config)# no snmp-server trap-auth
Router(config)# no snmp-server
Router(config)# no ip domain-lookup
Router(config)# no ip bootp server
Router(config)# no service dhcp
Router(config)# no service pad
Router(config)# no boot network
Router(config)# no service config
Router(config)# interface ethernet 0
Router(config-if)# no ip proxy-arp
Router(config-if)# no ip directed-broadcast
Router(config-if)# no ip unreachable
Router(config-if)# no ip redirect
Router(config-if)# no ip mask-reply
Router(config-if)# exit
Router(config)# interface ethernet 1
Router(config-if)# no ip proxy-arp
Router(config-if)# no ip directed-broadcast
Router(config-if)# no ip unreachable
Router(config-if)# no ip redirect
Router(config-if)# no ip mask-reply
Router(config-if)# exit
Router(config)# service tcp-keepalives-in
Router(config)# service tcp-keepalives-out
Router(config)# username admin1 privilege 15 secret geekboy
Router(config)# hostname Bullmastiff
Bullmastiff(config)# ip domain-name quizware.com
Bullmastiff(config)# crypto key generate rsa
Bullmastiff(config)# line vty 0 4
Bullmastiff(config-line)# login local
Bullmastiff(config-line)# transport input ssh
Bullmastiff(config-line)# transport output ssh
Notice that the bottom part of this configuration restricts access to and from the router through SSH.
AutoSecure
AutoSecure is a new security feature in Cisco IOS 12.2(18)S and 12.3(1). Up to this point in the chapter, you have had to manually disable services to protect your router. This is okay if you understand the Cisco IOS configuration process and are familiar with all the things that you must disable and why you should disable them.
However, for a novice administrator, this becomes a difficult task. AutoSecure removes the complexity by using a simple script that asks basic questions about the use of the router, and then creates a configuration file that will be used to secure the router. This is very similar to the use of the System Configuration dialog script that some administrators use to put a basic configuration on their router. The difference between this and AutoSecure is that AutoSecure focuses only on security-related services.
The AutoSecure feature provides the following security functions:
• It disables all IP services that can be exploited by an attack.
• It enables IP services that can help you prevent attacks.
• It configures minimum password-length restrictions, preventing passwords such as cisco and admin from being configured.
• It generates syslog messages when the maximum number of unsuccessful authentication attempts has been exceeded.
On the surface, the use of AutoSecure sounds simple, but you need to understand how AutoSecure works, as well as its restrictions, before you use it.
Securing Planes
AutoSecure’s security focuses on two basic areas: management and forwarding. The next two sections cover these areas.
The Management Plane
AutoSecure can secure the management plane of your router by disabling global and interface services. Basically, everything I have discussed until this point of the chapter is included in the AutoSecure management plane, including securing access to the router and logging functions. Here is a list of the global services AutoSecure disables:
• BootP
• CDP
• Finger
• HTTP server
• IdentD protocol
• NTP (Network Time Protocol)
• PAD
• Source routing
• TCP small servers
• UDP small servers
NTP is the only service I have not discussed in this chapter. I discuss NTP in more depth in Chapter 18, “Logging Events.”
Here is a list of the interface services that AutoSecure disables:
• Directed broadcasts
• ICMP mask replies
• ICMP redirects
• ICMP unreachables
• MOP
• Proxy ARP
Note that if you need any of these services, like HTTP, you need to re-enable them manually after running AutoSecure.
Besides disabling the previous services, AutoSecure can enable certain services to increase your security, including the following:
• The service password-encryption command is executed, encrypting unencrypted passwords. This command is covered in Chapter 3.
• The service tcp-keepalives-in and service tcp-keepalives-out commands are executed to remove abnormally terminated TCP connections.
• Secure Copy (SCP) is set up in tandem with SSH to provide secure access to and from the router.
• For all lines, the login and password commands are configured.
• For VTY connections, only Telnet and SSH are allowed through the transport input and transport output commands.
• If AAA is not set up, AutoSecure can create a local authentication database with usernames and passwords, to give you more control over router access.
• A login text banner is created, if one does not already exist.
• SNMP is disabled (if not needed), and community strings that are configured with either public or private are removed.
• Logging on the console port and the internal buffer is enabled, sequence numbers and time stamps are added to all logging and debug messages, and trap logging levels are set to debug (logging is discussed in Chapter 18).
From this long list of services that are disabled and enabled, you can see that AutoSecure performs a lot of tasks for you from a simple menu-driven script.
The Forwarding Plane
AutoSecure also can secure the forwarding plane of your Cisco router. This is a marketing term used to describe how AutoSecure will configure security features that affect traffic flowing through your router. Here are some of the things that AutoSecure configures for the forwarding plane:
• For routers that support Context-based Access Control (CBAC), AutoSecure enables this stateful firewall feature on your external interface. CBAC is discussed in Chapter 9, “Context-Based Access Control.”
• AutoSecure implements antispoofing by blocking reserved addresses defined by the IANA. This is done by creating an extended access list. These reserved addresses can be examined at http://www.iana.org/assignments/ipv4-address-space. Note that these addresses are subject to change, so you should compare AutoSecure’s list of ACL statements with those in the previous URL. Extended ACLs are discussed in Chapter 7, “Basic Access Lists.”
• Private IP address spaces defined in RFC 1918 from external sources are blocked.
• CEF is enabled on CEF-supported routers, which helps the router perform better when DoS attacks such as TCP SYN flood attacks are occurring.
• Unicast Reverse Path Forwarding is implemented to help prevent packet spoofing. This feature is covered in Chapter 15, “Routing Protocol Protection.”
• TCP Intercept is configured, if available, to reduce the impact of DoS attacks on your internal resources. TCP Intercept is covered in Chapter 17, “DoS Protection.”
For those features that need to be implemented on your perimeter router’s public interface, such as CBAC and extended ACLs, AutoSecure prompts you for the necessary configuration information.
Caution
AutoSecure does not guarantee that it completely secures your router. It is actually a good tool to use when you originally are setting up your router to put a base security configuration on it. However, you will want to implement the many other features in this book to completely secure your router and the traffic behind your router, especially if your router is functioning as a perimeter router or firewall solution.
AutoSecure Configuration
Now that you have a basic understanding of what AutoSecure can do for you, let us discuss how you use this script and how to verify its security configuration. You probably will perform three basic tasks:
• Execute the AutoSecure script.
• Verify the script’s secured configuration.
• Use optional commands to increase your security solution.
Caution
Before you begin the AutoSecure script to automatically secure your router, make sure that you back up its current configuration to an SCP server. When the script completes, your old configuration is gone. I discuss the use of SCP in Chapter 5.
Starting up AutoSecure
AutoSecure is meant to be run on a router with a base, or initial configuration. If you have a router that already has a configuration on it, with many security features enabled, some features of AutoSecure might not be enabled because of configuration conflictions or restrictions. Therefore, follow these steps to ensure the proper operation of AutoSecure:
Step 1 Either put a very basic configuration on your router or use the System Configuration dialog with the setup privileged EXEC command.
Step 2 Use AutoSecure.
Step 3 Complete the configuration of your router, including the implementation of other security features.
To start up AutoSecure, you use the privileged EXEC auto secure command, shown here:
Router(config)# auto secure [management | forwarding] [no-interact]
These are the options that you can enter:
• No options—AutoSecure secures both the management and forwarding planes, prompting you for the necessary information.
• management—AutoSecure performs security configurations for only the management plane, prompting you for the necessary information.
• forwarding—AutoSecure performs security configurations for only the forwarding plane, prompting you for the necessary information.
For all three of these configuration options, if you include the no-interact parameter, the router uses all the defaults for parameters and does not prompt you for any information.
Note
The AutoSecure script functions basically the same as the System Configuration dialog box. As you are going through the script, the script prompts you for specific information. Information in brackets ([]) is default values and is accepted when you press the Enter key on an empty line. There is no method of returning to a question if you answer it incorrectly; in this case, abort the script with Ctrl-c.
Going Through a Sample Script
To help you understand how to interact with the AutoSecure script, this section goes through an example. This example uses a 1720 router with an internal FastEthernet0 interface and an external Ethernet0 interface. The 1720 has the Cisco IOS Firewall feature set installed. Example 4-22 shows the script configuring both the management and forwarding planes. An explanation of the most important lines follows.
Example 4-22 How to Use AutoSecure
Router# auto secure
--- AutoSecure Configuration ---
*** AutoSecure configuration enhances the security of
the router but it will not make the router absolutely secure
from all security attacks ***
All the configuration done as part of AutoSecure will be
shown here. For more details of why and how this configuration
is useful, and any possible side effects, please refer to Cisco
documentation of AutoSecure.
At any prompt you may enter '?' for help.
Use ctrl-c to abort this session at any prompt.
If this device is being managed by a network management station,
AutoSecure configuration may block network management traffic.
Continue with AutoSecure? [no]: yes (1)
Gathering information about the router for AutoSecure
Is this router connected to internet? [no]: yes (2)
Interface IP-Address OK? Method Status Protocol
Ethernet0 unassigned YES NVRAM administratively down down
FastEthernet0 192.168.1.254 YES NVRAM up up
Enter the interface name that is facing internet: Ethernet0
Securing Management plane services.. (3)
Disabling service finger
Disabling service pad
Disabling udp & tcp small servers
Enabling service password encryption
Enabling service tcp-keepalives-in
Enabling service tcp-keepalives-out
Disabling the cdp protocol
Disabling the bootp server
Disabling the http server
Disabling the finger service
Disabling source routing
Disabling gratuitous arp
Here is a sample Security Banner to be shown
at every access to device. Modify it to suit your
enterprise requirements.
Authorized Access only
This system is the property of So-&-So-Enterprise.
UNAUTHORIZED ACCESS TO THIS DEVICE IS PROHIBITED.
You must have explicit permission to access this
device. All activities performed on this device
are logged and violations of this policy result
in disciplinary action.
Enter the security banner {Put the banner between (4)
k and k, where k is any character}:
+
This system is the property of the Deal Group, Inc.
Unauthorized access to this device is prohibited.
You must have explicit permission to access this
device. All activities performed on this device are
logged and violations of this policy result in
disciplinary, civil, and criminal action.
+
Enable secret is either not configured or (5)
is same as enable password
Enter the new enable secret: ciscocisco
Enable password is not configured or its length
is less than minimum no. of characters configured
Enter the new enable password: sanfransanfran
Configuration of local user database (6)
Enter the username: richard
Enter the password: EmilyAlina
Configuring aaa local authentication
Configuring console, Aux and vty lines for
local authentication, exec-timeout, transport
Configure SSH server? [yes]: yes (7)
Enter the hostname: Bullmastiff
Enter the domain-name: quizware.com
Configuring interface specific AutoSecure services (8)
Disabling the following ip services on all interfaces:
no ip redirects
no ip proxy-arp
no ip unreachables
no ip directed-broadcast
no ip mask-reply
Securing Forwarding plane services.. (9)
Enabling CEF (it might have more memory requirements on some
low-end platforms)
Configuring the named acls for Ingress filtering
autosec_iana_reserved_block: This block may subject to (10)
change by iana and for updated list visit
www.iana.org/assignments/ipv4-address-space.
1/8, 2/8, 5/8, 7/8, 23/8, 27/8, 31/8, 36/8, 37/8, 39/8,
41/8, 42/8, 49/8, 50/8, 58/8, 59/8, 60/8, 70/8, 71/8,
72/8, 73/8, 74/8, 75/8, 76/8, 77/8, 78/8, 79/8, 83/8,
84/8, 85/8, 86/8, 87/8, 88/8, 89/8, 90/8, 91/8, 92/8, 93/8,
94/8, 95/8, 96/8, 97/8, 98/8, 99/8, 100/8, 101/8, 102/8,
103/8, 104/8, 105/8, 106/8, 107/8, 108/8, 109/8, 110/8,
111/8, 112/8, 113/8, 114/8, 115/8, 116/8, 117/8, 118/8,
119/8, 120/8, 121/8, 122/8, 123/8, 124/8, 125/8, 126/8,
197/8, 201/8
autosec_private_block: (11)
10/8, 172.16/12, 192.168/16
autosec_complete_block: This is union of above two and (12)
the addresses of source multicast, class E addresses
and addresses that are prohibited for use as source.
source multicast (224/4), class E(240/4), 0/8, 169.254/16,
192.0.2/24, 127/8.
Configuring Ingress filtering replaces the existing
acl on external interfaces, if any, with ingress
filtering acl.
Configure Ingress filtering on edge interfaces? [yes]: yes (13)
[1] Apply autosec_iana_reserved_block acl on all edge interfaces
[2] Apply autosec_private_block acl on all edge interfaces
[3] Apply autosec_complete_bogon acl on all edge interfaces
Enter your selection [3]: 3 (14)
Enabling unicast rpf on all interfaces connected to internet
Configure CBAC Firewall feature? [yes/no]: yes (15)
This is the configuration generated: (16)
no service finger
no service pad
no service udp-small-servers
no service tcp-small-servers
service password-encryption
service tcp-keepalives-in
service tcp-keepalives-out
no cdp run
no ip bootp server
no ip http server
no ip finger
no ip source-route
no ip gratuitous-arps
banner +
This system is the property of the Deal Group, Inc.
Unauthorized access to this device is prohibited.
You must have explicit permission to access this
device. All activities performed on this device are
logged and violations of this policy result in
disciplinary, civil, and criminal action.
+
security passwords min-length 6
security authentication failure rate 10 log
enable secret 5 $1$1q95$10TM0DLUhsUo.C37dF2WZ/
enable password 7 021505550D140E2F5F4F071F17161C
username richard password 7 03175A050C0032495D08170F18010E
aaa new-model
aaa authentication login local_auth local
line console 0
login authentication local_auth
exec-timeout 5 0
transport output telnet
line aux 0
login authentication local_auth
exec-timeout 10 0
transport output telnet
line vty 0 4
login authentication local_auth
transport input telnet
hostname Bullmastiff
ip domain-name quizware.com
crypto key generate rsa general-keys modulus 1024
ip ssh time-out 60
ip ssh authentication-retries 2
line vty 0 4
transport input ssh telnet
service timestamps debug datetime localtime show-timezone msec
service timestamps log datetime localtime show-timezone msec
logging facility local2
logging trap debugging
service sequence-numbers
logging console critical
logging buffered
int Ethernet0
no ip redirects
no ip proxy-arp
no ip unreachables
no ip directed-broadcast
no ip mask-reply
int FastEthernet0
no ip redirects
no ip proxy-arp
no ip unreachables
no ip directed-broadcast
no ip mask-reply
ip cef
ip access-list extended autosec_iana_reserved_block
deny ip 1.0.0.0 0.255.255.255 any
deny ip 2.0.0.0 0.255.255.255 any
deny ip 5.0.0.0 0.255.255.255 any
deny ip 7.0.0.0 0.255.255.255 any
deny ip 23.0.0.0 0.255.255.255 any
deny ip 27.0.0.0 0.255.255.255 any
deny ip 31.0.0.0 0.255.255.255 any
deny ip 36.0.0.0 0.255.255.255 any
deny ip 37.0.0.0 0.255.255.255 any
deny ip 39.0.0.0 0.255.255.255 any
deny ip 41.0.0.0 0.255.255.255 any
deny ip 42.0.0.0 0.255.255.255 any
deny ip 49.0.0.0 0.255.255.255 any
deny ip 50.0.0.0 0.255.255.255 any
deny ip 58.0.0.0 0.255.255.255 any
deny ip 59.0.0.0 0.255.255.255 any
deny ip 60.0.0.0 0.255.255.255 any
deny ip 70.0.0.0 0.255.255.255 any
deny ip 71.0.0.0 0.255.255.255 any
deny ip 72.0.0.0 0.255.255.255 any
deny ip 73.0.0.0 0.255.255.255 any
deny ip 74.0.0.0 0.255.255.255 any
deny ip 75.0.0.0 0.255.255.255 any
deny ip 76.0.0.0 0.255.255.255 any
deny ip 77.0.0.0 0.255.255.255 any
deny ip 78.0.0.0 0.255.255.255 any
deny ip 79.0.0.0 0.255.255.255 any
deny ip 83.0.0.0 0.255.255.255 any
deny ip 84.0.0.0 0.255.255.255 any
deny ip 85.0.0.0 0.255.255.255 any
deny ip 86.0.0.0 0.255.255.255 any
deny ip 87.0.0.0 0.255.255.255 any
deny ip 88.0.0.0 0.255.255.255 any
deny ip 89.0.0.0 0.255.255.255 any
deny ip 90.0.0.0 0.255.255.255 any
deny ip 91.0.0.0 0.255.255.255 any
deny ip 92.0.0.0 0.255.255.255 any
deny ip 93.0.0.0 0.255.255.255 any
deny ip 94.0.0.0 0.255.255.255 any
deny ip 95.0.0.0 0.255.255.255 any
deny ip 96.0.0.0 0.255.255.255 any
deny ip 97.0.0.0 0.255.255.255 any
deny ip 98.0.0.0 0.255.255.255 any
deny ip 99.0.0.0 0.255.255.255 any
deny ip 100.0.0.0 0.255.255.255 any
deny ip 101.0.0.0 0.255.255.255 any
deny ip 102.0.0.0 0.255.255.255 any
deny ip 103.0.0.0 0.255.255.255 any
deny ip 104.0.0.0 0.255.255.255 any
deny ip 105.0.0.0 0.255.255.255 any
deny ip 106.0.0.0 0.255.255.255 any
deny ip 107.0.0.0 0.255.255.255 any
deny ip 108.0.0.0 0.255.255.255 any
deny ip 109.0.0.0 0.255.255.255 any
deny ip 110.0.0.0 0.255.255.255 any
deny ip 111.0.0.0 0.255.255.255 any
deny ip 112.0.0.0 0.255.255.255 any
deny ip 113.0.0.0 0.255.255.255 any
deny ip 114.0.0.0 0.255.255.255 any
deny ip 115.0.0.0 0.255.255.255 any
deny ip 116.0.0.0 0.255.255.255 any
deny ip 117.0.0.0 0.255.255.255 any
deny ip 118.0.0.0 0.255.255.255 any
deny ip 119.0.0.0 0.255.255.255 any
deny ip 120.0.0.0 0.255.255.255 any
deny ip 121.0.0.0 0.255.255.255 any
deny ip 122.0.0.0 0.255.255.255 any
deny ip 123.0.0.0 0.255.255.255 any
deny ip 124.0.0.0 0.255.255.255 any
deny ip 125.0.0.0 0.255.255.255 any
deny ip 126.0.0.0 0.255.255.255 any
deny ip 197.0.0.0 0.255.255.255 any
deny ip 201.0.0.0 0.255.255.255 any
permit ip any any
remark This acl might not be up to date. Visit
www.iana.org/assignments/ipv4-address-space
for update list
exit
ip access-list extended autosec_private_block
deny ip 10.0.0.0 0.255.255.255 any
deny ip 172.16.0.0 0.15.255.255 any
deny ip 192.168.0.0 0.0.255.255 any
permit ip any any
exit
ip access-list extended autosec_complete_bogon
deny ip 1.0.0.0 0.255.255.255 any
deny ip 2.0.0.0 0.255.255.255 any
deny ip 5.0.0.0 0.255.255.255 any
deny ip 7.0.0.0 0.255.255.255 any
deny ip 23.0.0.0 0.255.255.255 any
deny ip 27.0.0.0 0.255.255.255 any
deny ip 31.0.0.0 0.255.255.255 any
deny ip 36.0.0.0 0.255.255.255 any
deny ip 37.0.0.0 0.255.255.255 any
deny ip 39.0.0.0 0.255.255.255 any
deny ip 41.0.0.0 0.255.255.255 any
deny ip 42.0.0.0 0.255.255.255 any
deny ip 49.0.0.0 0.255.255.255 any
deny ip 50.0.0.0 0.255.255.255 any
deny ip 58.0.0.0 0.255.255.255 any
deny ip 59.0.0.0 0.255.255.255 any
deny ip 60.0.0.0 0.255.255.255 any
deny ip 70.0.0.0 0.255.255.255 any
deny ip 71.0.0.0 0.255.255.255 any
deny ip 72.0.0.0 0.255.255.255 any
deny ip 73.0.0.0 0.255.255.255 any
deny ip 74.0.0.0 0.255.255.255 any
deny ip 75.0.0.0 0.255.255.255 any
deny ip 76.0.0.0 0.255.255.255 any
deny ip 77.0.0.0 0.255.255.255 any
deny ip 78.0.0.0 0.255.255.255 any
deny ip 79.0.0.0 0.255.255.255 any
deny ip 83.0.0.0 0.255.255.255 any
deny ip 84.0.0.0 0.255.255.255 any
deny ip 85.0.0.0 0.255.255.255 any
deny ip 86.0.0.0 0.255.255.255 any
deny ip 87.0.0.0 0.255.255.255 any
deny ip 88.0.0.0 0.255.255.255 any
deny ip 89.0.0.0 0.255.255.255 any
deny ip 90.0.0.0 0.255.255.255 any
deny ip 91.0.0.0 0.255.255.255 any
deny ip 92.0.0.0 0.255.255.255 any
deny ip 93.0.0.0 0.255.255.255 any
deny ip 94.0.0.0 0.255.255.255 any
deny ip 95.0.0.0 0.255.255.255 any
deny ip 96.0.0.0 0.255.255.255 any
deny ip 97.0.0.0 0.255.255.255 any
deny ip 98.0.0.0 0.255.255.255 any
deny ip 99.0.0.0 0.255.255.255 any
deny ip 100.0.0.0 0.255.255.255 any
deny ip 101.0.0.0 0.255.255.255 any
deny ip 102.0.0.0 0.255.255.255 any
deny ip 103.0.0.0 0.255.255.255 any
deny ip 104.0.0.0 0.255.255.255 any
deny ip 105.0.0.0 0.255.255.255 any
deny ip 106.0.0.0 0.255.255.255 any
deny ip 107.0.0.0 0.255.255.255 any
deny ip 108.0.0.0 0.255.255.255 any
deny ip 109.0.0.0 0.255.255.255 any
deny ip 110.0.0.0 0.255.255.255 any
deny ip 111.0.0.0 0.255.255.255 any
deny ip 112.0.0.0 0.255.255.255 any
deny ip 113.0.0.0 0.255.255.255 any
deny ip 114.0.0.0 0.255.255.255 any
deny ip 115.0.0.0 0.255.255.255 any
deny ip 116.0.0.0 0.255.255.255 any
deny ip 117.0.0.0 0.255.255.255 any
deny ip 118.0.0.0 0.255.255.255 any
deny ip 119.0.0.0 0.255.255.255 any
deny ip 120.0.0.0 0.255.255.255 any
deny ip 121.0.0.0 0.255.255.255 any
deny ip 122.0.0.0 0.255.255.255 any
deny ip 123.0.0.0 0.255.255.255 any
deny ip 124.0.0.0 0.255.255.255 any
deny ip 125.0.0.0 0.255.255.255 any
deny ip 126.0.0.0 0.255.255.255 any
deny ip 197.0.0.0 0.255.255.255 any
deny ip 201.0.0.0 0.255.255.255 any
deny ip 10.0.0.0 0.255.255.255 any
deny ip 172.16.0.0 0.15.255.255 any
deny ip 192.168.0.0 0.0.255.255 any
deny ip 224.0.0.0 15.255.255.255 any
deny ip 240.0.0.0 15.255.255.255 any
deny ip 0.0.0.0 0.255.255.255 any
deny ip 169.254.0.0 0.0.255.255 any
deny ip 192.0.2.0 0.0.0.255 any
deny ip 127.0.0.0 0.255.255.255 any
permit ip any any
remark This acl might not be up to date.
Visit www.iana.org/assignments/ipv4-address-space
for update list
exit
interface Ethernet0
ip access-group autosec_complete_bogon in
exit
ip access-list extended 100
permit udp any any eq bootpc
interface Ethernet0
ip verify unicast source reachable-via rx 100
exit
ip inspect audit-trail
ip inspect dns-timeout 7
ip inspect tcp idle-time 14400
ip inspect udp idle-time 1800
ip inspect name autosec_inspect cuseeme timeout 3600
ip inspect name autosec_inspect ftp timeout 3600
ip inspect name autosec_inspect http timeout 3600
ip inspect name autosec_inspect rcmd timeout 3600
ip inspect name autosec_inspect realaudio timeout 3600
ip inspect name autosec_inspect smtp timeout 3600
ip inspect name autosec_inspect tftp timeout 30
ip inspect name autosec_inspect udp timeout 15
ip inspect name autosec_inspect tcp timeout 3600
ip access-list extended autosec_firewall_acl
permit udp any any eq bootpc
deny ip any any
interface Ethernet0
ip inspect autosec_inspect out
!
end
Apply this configuration to running-config? [yes]: yes (17)
Applying the config generated to running-config
The name for the keys will be: Bullmastiff.quizware.com
% The key modulus size is 1024 bits
% Generating 1024 bit RSA keys ...[OK]
Bullmastiff#
The following list explains the output from the script in Example 4-22. The numbers on the right side of Example 4-22 correspond to the numbers in the following list:
1. At the beginning of the script, you are given the instructions and then asked to continue; the default is no.
2. If the router is connected to the Internet, answer the question yes; you then are shown a list of interfaces and are asked which interface is connected to the Internet. In this example, I entered Ethernet0. If this is an internal router, just answer no to the question.
3. After answering the public interface question, the AutoSecure script displays which global management services it is disabling.
4. A sample login banner is displayed, and you are given the opportunity to configure your own. This is similar to using the banner motd command, in which you need a beginning and ending delimiter character. In this example, I used + as the delimiting character.
5. You must enter an encrypted privileged EXEC password (enable secret) if one is not configured or if it matches the clear-text privileged EXEC password (enable password). You also must enter a clear-text privileged EXEC password.
6. Next, you are asked to configure one entry in your router’s local authentication database, which is used for both console and remote access. In this example, I created an account called richard.
7. If you want to use SSH, answer yes to this question. If you answer yes, you must enter a hostname and a domain name so that the Cisco IOS can generate an RSA for the SSH encryption keys.
8. Now that the global management services are completed, you are taken into the interface-specific management services. Here you can see which services automatically are disabled. You do not have to answer any questions here.
9. When the router completes the management services, it moves on to the forwarding services. If the router supports CEF, this is enabled.
10. The first filter set up is to block source addresses defined by the IANA. Note that the addresses that the Cisco IOS uses in AutoSecure might not be the most current; therefore, you periodically should check with IANA’s web site to verify the Cisco IOS configuration.
11. The second filter includes private IP source addresses defined in RFC 1918.
12. The third filter combines the first two filters and adds source multicast addresses, Class E addresses, and 169.254.0.0/24, 0.0.0.0/8, 192.0.2.0/24, and 127.0.0.0/8.
13. Next, you are asked if you want to use one of the three filters in steps 10, 11, or 12 to be applied inbound on the Internet (public) interface.
14. If you answer yes to step 13, you are asked which filter you want to apply to the interface. If the interface is not connected directly to the Internet and you are using public addresses, choose 1. However, you will want to go back into the configuration later and add the addresses from Step 12. If you are connected to the Internet, choose option 3.
15. After unicast reverse path forwarding is enabled, you are asked if you want to configure CBAC on your router. This happens only if you have installed the Cisco IOS Firewall feature set on your router. This sets up a stateful firewall for allowing returning traffic for outbound connections.
16. You now have answered all of the questions for the AutoSecure configuration process. The script displays the actual Cisco IOS commands that it will execute. Examine these closely to make sure that this is the configuration that you want.
17. In the last step you are asked if you want to implement this configuration. Answer yes to do so. When you answer yes, if you chose to enable SSH, the Cisco IOS generates RSA encryption keys.
This completes the AutoSecure configuration script. As you can see, this is a lot easier than manually configuring all of these commands individually.
Note
I have not discussed many features here that AutoSecure configures for you, including CBAC, CEF, ACLs, and others. These are covered in later chapters in much more depth.
Verifying AutoSecure’s Configuration
When you have implemented AutoSecure, you can view the commands that AutoSecure generated with the following command:
Router# show auto secure config
This is the same display shown in Step 16 of the previous demonstration. Note that to execute the show auto secure config command, you must be in privileged EXEC mode.
Using Additional Commands
Two additional commands are a part of AutoSecure:
Router(config)# security passwords min-length length
Router(config)# security authentication failure rate #_of_failures log
The security passwords min-length command specifies the minimum length that passwords must be; this allows you to ensure that passwords are not short, making them more secure and preventing common passwords such as cisco and admin. The default is a minimum length of six characters. If you do not configure a password of the minimum required length, you will see a message like the one in Example 4-23.
Example 4-23 AutoSecure Can Force Passwords to Be a Minimum Length
Bullmastiff(config)# username natalie secret cisco
% Password too short - must be at least 6 characters.
Password configuration failed
The security authentication failure rate command specifies the maximum number of failed authentication attempts before the router stops any subsequent authentication requests; the router pauses for 15 seconds and then processes new authentication requests. The default threshold for this command is 10 attempts. This is a very useful command in preventing brute force password-guessing attacks.
Summary
This chapter showed you how to disable both global and interface services that can cause security problems for your network, including reconnaissance, DoS, and access attacks. The first part of the chapter discussed how to do this manually; the second part discussed how to do this dynamically with the AutoSecure configuration script. AutoSecure disables insecure services and also secures traffic as it passes through your router. It does this by enabling services such as CBAC, extended ACLs, CEF, and others.
Next up is Chapter 5, which shows you how to centralize your AAA functions on your router by using an external security server.