
Chapter 10. Filtering Web and Application Traffic
In Chapter 9, “Context-Based Access Control,” I discussed how you can use the Cisco CBAC, a feature of the Cisco IOS Firewall feature set, to implement a stateful firewall. This chapter picks up where Chapter 9 left off and focuses on filtering of web and application traffic. As you recall from Chapter 9, one of the features of CBAC is the capability to filter Java applets. This chapter starts by covering how this is done with CBAC. It then expands coverage of HTTP connections by discussing how you can filter web connections using N2H2 and Websense web content filtering servers. This last part of the chapter discusses the Cisco Network-Based Application Recognition (NBAR) feature. NBAR typically is used to implement Quality of Service (QoS). However, this extremely powerful tool also can be used to monitor and filter traffic.
Java Applets
Java applets are scripts that allow a web designer to implement many useful web server features. Java is very popular because of its platform independence: Java applets can be made and run on any machine that supports Java. Given its widespread use and usefulness, however, it has been the target of hackers. With older implementations of Java, hackers successfully downloaded rogue Java code to a user’s desktop, allowing the hacker to take control. Sometimes the hacker planted a Trojan horse or worm to control the user’s desktop remotely. In other instances, the hacker maliciously deleted user files or erased the entire disk drive.
Java Inspection
Some form of control is necessary to prevent hackers from attacking desktops using Java. Java blocking, or filtering, is the capability to selectively filter Java applets downloaded through HTTP connections. A few solutions are available to you:
• CBAC inspection
• URL filtering
• HTTP proxies
The first solution, CBAC inspection, is the simplest to implement. When configured for Java filtering, CBAC inspection monitors HTTP connections for embedded Java applets. CBAC allows applets from only a list of allowed sites; for all other websites, CBAC blocks the download of the applets. Configuration of friendly and unfriendly Java sites is done with a simple standard ACL. Java inspection gives you more control over the sites that your users access, as well as the content that they can see from Java-enabled sites.
Caution
CBAC can inspect Java applets in only open HTTP connections. It cannot inspect Java applets if they have been compressed into a different format, such as .zip or .tar files; if they have been encrypted; or if they have been downloaded through FTP, gopher, or a nonstandard HTTP port that has not been mapped by PAM.
Java Blocking
Chapter 9 briefly covered how CBAC can inspect HTTP traffic and how to configure it. This section expands on how to set up Java filtering with CBAC. Filtering of Java applets is done with HTTP inspection. Use the following command to enable Java applet inspection:
Router(config)# ip inspect name inspection_name http
[java-list standard_ACL_#] [alert {on | off}] [audit-trail {on | off}]
[timeout seconds]
For Java inspection, use a protocol of http, and then create a standard IP ACL and reference this ACL in the ip inspect name command. The java-list parameter specifies the standard IP ACL to use for filtering of applets.
Caution
CBAC inspection of Java applets is CPU intensive for the router. Therefore, you should use this feature only if absolutely necessary. My recommendation is to filter all traffic from the website or network that has known malicious Java applets. This can be done with a simple extended ACL statement or statements, which is much less taxing on your router. However, if you need to download web content from a site but you do not trust its Java applets, be forewarned about the burden that you will be placing on your router when CBAC inspects for Java applets.
Java Blocking Example
Take a look at a simple example of setting up CBAC for Java inspection (see Figure 10-1). The administrator at this site found that a new virus was floating around the internal network. After some investigation, the administrator learned that the virus was infiltrating his users’ PCs through Java applets from one commonly used web service provider (200.1.1.0/24). Unfortunately, the administrator could not block all HTTP traffic from this site because his internal users needed legitimate access to these web servers. After contacting this web service company about the problem and not getting much help, the administrator decided to use CBAC Java inspection to prevent applets from being downloaded from this site and spreading the virus to his users’ computers.

This example focuses only on the Java-blocking component of CBAC. Note that you still need to complete the rest of the configuration based on this company’s specific policies. Example 10-1 shows the stripped-down configuration for Java applet filtering.
Example 10-1 Using CBAC to Filter Java Applets
Router(config)# ip access-list extended EXTERNAL-ACL
Router(config-ext-nacl)# ! <--add other ACL policy statements-->
Router(config-ext-nacl)# deny ip any any
Router(config-ext-nacl)# exit
Router(config)# ip access-list standard JAVA-ACL
Router(config-std-nacl)# deny 200.1.1.0 0.0.0.255
Router(config-std-nacl)# permit any
Router(config-std-nacl)# exit
Router(config)# ip inspect name CBAC-EXAMPLE http java-list JAVA-ACL
Router(config)# ! <--add other CBAC inspection statements-->
Router(config)# interface ethernet0
Router(config-if)# ip access-group EXTERNAL-ACL in
Router(config-if)# ip inspect CBAC-EXAMPLE out
In this example, the external ACL filters traffic entering the internal network. Note that I put a place marker where this company will add its ACL statements to implement its specific policies. Below this is a standard named ACL that denies traffic from 200.1.1.0/24 but permits everything else. I have included only one statement in the inspection rules for CBAC, but I added a placeholder for the other CBAC inspection statements needed for implementing a stateful firewall based on this company’s policies. Notice that the inspection rule filters Java applets based on the standard ACL, JAVA-ACL, which will deny applets from 200.1.1.0/24 only.
After you have enabled this feature, test it by trying to access web pages from the offending site that uses Java applets. When you do this, CBAC filters the applet and you should see the following alert message (assuming that you have not disabled alerts) on your router’s console:
%FW-4-HTTP_JAVA_BLOCK: JAVA applet is blocked from
(200.1.1.5:80) to (192.1.1.22:45323).
As you can see from this output, CBAC is blocking applets from the 200.1.1.0/24 network.
Note
Java blocking with CBAC is not a scalable solution because it requires you to list which sites are “friendly” or “unfriendly.” Typically, you should use this feature to block Java applets from known malicious sites or networks; otherwise, you should use another solution, such as an HTTP proxy or URL filtering with an external policy server. I discuss the latter option in the next section.
URL Filtering
As of Cisco IOS 12.2(11)YU and 12.2(15)T, the Cisco IOS supports URL filtering. One of the problems of using extended ACLs or even CBAC inspection with Java blocking is that your router filters traffic only based on what is in either the ACL or the inspection statement. As an example, imagine that you want to prevent users from accessing pornography, gambling, and peer-to-peer file-sharing sites. Theoretically, you could do this with extended ACLs; however, you would have to know about the IP address of every web page (not just every website). Unfortunately, you cannot screen web pages with normal extended ACLs—only Layer 4 and lower information. Even if you decide to block all pages from these web servers, you easily would have tens of thousands of ACL entries to create and maintain.
Because of these issues, ACLs typically are not used to implement these kinds of policies. Instead, a content-filtering server is used. Cisco currently supports server products from N2H2 (Sentian) and Websense to perform this filtering process. Actually, the content-filtering servers contain the access policies, and your Cisco router uses these external policies to enforce URL access from your users.
Note
This section focuses only on how the router accesses and enforces policies stored on an external N2H2 or Websense server. How to install, implement, and maintain these external servers is beyond the scope of this book. For more information on N2H2 products, visit http://www.n2h2.com. For more information about Websense products, visit http://www.websense.com.
Operation of URL Filtering
To help you understand how URL filtering works, take a look at a simple example. The network shown in Figure 10-2 illustrates how URL filtering works.

In this example, an internal user sends an HTTP request to download information from an external web server. Here are the steps that occur through the HTTP request and response process, with reference to the numbering in Figure 10-2:
1. The user sends the request, and the router examines it.
2. The router forwards the request to the external server.
3. The router also forwards the request to the content-filtering server to determine whether the access is allowed. Basically, Steps 2 and 3 are occurring almost simultaneously.
4. When the content-filtering server receives the lookup request, it examines its internal database policies to determine the action that the router should take. It then sends the policy action to the router.
5. The response from the content-filtering server typically arrives before the external web server has a chance to return the content that the user was asking for. However, if the external data is returned before the router receives the policy action in Step 4, the router can buffer the returning external web data.
6. The router implements the policy action from the content server: permit or deny the URL data. If the action is to deny the user access, the content-filtering server actually passes back a redirection URL to the user that directs the user to a URL location on the content-filtering server. The URL contains a message about inappropriate use of the type of content the user was trying to download.
One of the interesting things about this process is that the router allows the initial HTTP request to exit the network instead of first verifying the user’s access. This allows the router, in most cases, to receive a response from the content-filtering server before the HTTP reply comes back from the external web server. This produces no noticeable delay in the user’s HTTP connection.
Caution
I want to stress that URL filtering places a very high burden on your router’s processing. Therefore, you should be careful about implementing this on your router. For example, using a low-end router for this process to handle hundreds of internal users might kill your router. In addition, a small delay is added to each connection when verification occurs between the router and the content-filtering server. Choosing the right router platform for URL filtering, as well as the appropriate network design, will make the difference between a solution that provides excellent control over URL access and one that creates connectivity problems for your users.
Advantages and Limitations of URL Filtering
The next two sections cover the advantages and limitations of using a content-filtering server. Obviously, you have much more control over your users’ URL access; however, there are downsides to URL filtering.
Advantages of URL Filtering
URL filtering provides many advantages and offers a robust security solution for your network, including the following advantages:
• With a content-filtering server, you more easily can implement your policies based on types of access, such as sports, pornography, gaming, politics, gambling, religion, and other groupings of information. However, you still can define your own access rules and restrictions on a per-host (or per-user) basis.
• Automatic updates can be downloaded to the content servers for new sites that belong to specified categories, as well as the removal of dead links that no longer function. This removes a lot of the management overhead of having to do this process manually.
• You can keep a detailed log on your Websense or N2H2 content server of who is accessing what resources. This is important for accountability when it comes time to identify rule breakers and develop statistics on the type of user web access.
• You can define policies on a per-host or a per-user basis, providing more control over access policies.
• You can define multiple content-filtering servers on your router to provide for redundancy. In this situation, one content-filtering server is defined as the primary, and your router sends all traffic to it. If the primary server is not reachable or is down, your router can use a configured secondary server. If all servers go down, you have the option of either allowing or preventing all HTTP traffic to the router.
• To speed up lookup requests, the router supports an IP cache table that contains a list of IP addresses of web servers that are allowed access by all internal users. You also can define exclusive domains: These are domain names that always should be allowed access by your users, such as http://www.cisco.com, http://www.quizware.com, or http://www.boson.com. With the exclusive domain option, you can use wildcard names or enter domain names with partial URL references.
• The Cisco IOS can buffer up to 200 simultaneous HTTP requests, to reduce the likelihood of dropping HTTP connections because of response-time issues between the router and the content-filtering server.
Restrictions of URL Filtering
This section covers the URL filtering restrictions of N2H2 and Websense. You must use only one product: The Cisco IOS does not support both products simultaneously. N2H2 and Websense have the following restrictions:
• You can specify multiple N2H2 or Websense servers for redundancy. However, the Cisco IOS actively uses only one server.
• The setup of URL filtering works with only one content-filtering product: either Websense or N2H2. Cisco does not support the use of both products simultaneously on routers.
• Only TCP is supported for the connection between the router and the N2H2 server (Websense supports both TCP and UDP).
Both N2H2 and Websense support user-based policies based on a user’s authentication information, such as a username and password. Normally, this is done with a proxy method to the content-filtering server. However, with the router handling the HTTP access, the Cisco IOS does not retrieve the username from the client. Therefore, by default, the router supports only host (IP address) and global filtering.
Although the Cisco IOS does not support user authentication, Websense and N2H2 do. With both implementations of user authentication, either Microsoft’s internal authentication or LDAP is used. Because the router does not support user authentication, these content-filtering products handle this issue in one of two methods:
• When the user initially logs into the Microsoft Windows domain, an installed Websense or N2H2 agent automatically associates users to their IP addresses, which the content-filtering server then can use for filtering requests received from the router.
• The first point has two problems: It requires a user to log out gracefully to keep track of who is using a particular IP address, and it works only with Microsoft Windows. Therefore, a second option is to have the user directly access the N2H2 or Websense server through a web browser connection to authenticate. Alternatively, the first time a user accesses an external web server, the content-filtering server causes the router to redirect the client to the content-filtering server to authenticate first.
URL Filtering Implementation
Setting up URL filtering is a straightforward process. However, you might want to set up or enable configuration options. This section deals with how to set up your router to interact with Websense and N2H2 content-filtering server products. As you will see in this section, CBAC, which performs application layer inspection, is required to perform URL filtering.
Note
If you are migrating from one product to another, such as Websense to N2H2 or vice versa, you must remove your configuration component for the old content-filtering server and then add the new one. In other words, the Cisco IOS cannot support both content-filtering products simultaneously.
Content Server Location
One of the first items that you need to deal with in web content filtering on a router is the location of your new content-filtering server: Where should you place this device in your network? One main concern with the router and URL filtering is the response time between the content-filtering server and the router.
As you recall from the “Operation of URL Filtering” section, the router forwards the user’s request to the external web server and then sends an access request to the content server. If the external web server’s reply comes back to the router before the policy action from the content-filtering server, the router buffers the external server’s reply, which introduces delay into the traffic stream and puts an additional burden on the router. The more late responses that your router receives from the content-filtering server, the more of an impact this will have on your throughput.
Therefore, the recommended network design is to put the content server in the same subnet as one of the router’s interfaces. However, the more devices that are in the subnet, the more competition there is between these devices when sending traffic through the router on the same interface. Therefore, you need to ensure that there is enough bandwidth between the router and the content-filtering server to handle the communication traffic. In a worst-case situation, you might need a dedicated connection on the router to the filtering server. Figure 10-2 shows an example of connecting the content-filtering server to the same subnet as the router.
URL Filtering Setup
After you have installed the content-filtering software on its server and connected it to the network, you are ready to configure your router to interact with it. The following paragraphs explain the commands that you use to configure your router to use the content-filtering server.
CBAC Inspection
To set up inspection of URLs, you need to configure CBAC for HTTP inspection. This is required to perform URL filtering. Here is the CBAC command:
Router(config)# ip inspect name inspection_name http urlfilter
[java-list ACL_#_or_name]
[alert {on | off}] [audit-trail {on | off}] [timeout seconds]
Note that you must specify the keyword urlfilter to enable content filtering for HTTP connections. If you omit this keyword, HTTP inspection is done with Java filtering. The rest of the parameters were discussed in Chapter 9.
Tip
I highly recommended that you specify an ACL to limit the scope of Java or URL filtering. If you do not, your router will have to examine all HTTP connection requests, which is CPU intensive. If you need to inspect all HTTP traffic, make sure that you have purchased the right router model to handle this load.
Server Location
After you enable inspection for HTTP traffic, you must specify the type and location of the content-filtering server. This is required for the router to perform URL filtering. Use this command to specify this information:
Router(config)# ip urlfilter server vendor
{websense | n2h2} IP_address [port port-number] [timeout seconds]
[retransmit number]
The ip urlfilter server vendor command specifies how to connect to the content-filtering server. The first parameter that you must specify is what product your content-filtering server is running: websense or n2h2. Following this is the server’s IP address. The remaining four parameters are optional. For an N2H2 server, the default port number is 4005; Websense uses 15,868. If you change the port number during the server installation, you need to reflect that change with the port parameter. Following this is the timeout value for the server connection. This is the amount of time that the router waits for a response from the content-filtering server; if no response is seen within this time limit, the router uses a second server, if configured. The default timeout is 5 seconds. The router also retransmits requests when a response does not arrive from the server. The default number of retransmissions is 2, but this can be changed with the retransmit parameter.
You can enter multiple servers, but the first one that you enter becomes the primary server. Therefore, the order of your server entries is important.
URL Cache Size
CBAC uses a URL-filtering cache to store the destination IP addresses of web servers that users are and are not allowed to reach. The more entries the cache can store, the fewer lookups CBAC must perform for the content-filtering server. The default number of entries is 5000, but this can be changed with the following command:
Router(config)# ip urlfilter cache #_of_entries
The number of entries can range from 0 to 2,147,483,647. Even though you can create very large cache sizes, you must have the appropriate amount of RAM on your router to store this information. You also must configure your content-filtering server to support this option. As this writing, only Websense supports this option.
URL Cache Clearing
The URL cache is cleared in a few ways:
• Every 12 hours, the cache is cleared.
• If the cache reaches 80 percent capacity, the Cisco IOS begins to remove idle entries in the cache at 1-minute intervals until the URL cache capacity falls below 80 percent. A connection is considered idle if it has not been used in the last 10 minutes.
• When doing a cache lookup, CBAC removes all entries that have been idle for more than an hour.
• All entries that have elapsed (based on the content server’s configuration) are removed. This is often greater than 15 hours. Therefore, the 12-hour cache clearing typically removes these entries before they have elapsed.
To clear the URL cache table manually, use the following command:
Router# clear ip urlfilter cache {IP_address | all}
You can clear all entries in the cache with the all parameter, or you can clear only entries with the specified destination IP address.
Caution
Whenever you make a policy change on the URL content-filtering server, it does not cause the URL cache on the router to be cleared. This can cause policy problems if the content server says to deny certain kinds of traffic, but the router’s cache allows it. Therefore, any time that you make policy changes on the content-filtering server, you should log into your router(s) and manually clear the URL cache.
Exclusive Domains
As mentioned in the “Operation of URL Filtering” section, URL filtering places an additional burden on your router, especially if the router constantly must send lookup requests to the content-filtering server. You can reduce the number of lookups in two ways:
• Create a larger cache size.
• Use exclusive domains.
Exclusive domains enable you to define local filtering rules on the router. In this situation, the router first looks at its cache to see if there is a match, then it looks at the locally listed domains, and then it sends a request to the content-filtering server if nothing is found locally on the router. This configuration is very useful for listing sites that always or never should be allowed (and these sites never change). Commonly used sites should be listed. For example, if your network administrators constantly access the Cisco website, include this as a permit action in your exclusive domain configuration.
This is the command to define an exclusive domain:
Router(config)# ip urlfilter exclusive-domain
{permit | deny} domain_name
You can specify two actions: permit or deny. When specifying a domain name, you can be specific by specifying the fully qualified domain name, such as www.quizware.com; a partial domain name, such as .quizware.com; or a fully qualified domain name and a partial URL, such as www.quizware.com/dealgroup. You can list as many domain entries as you want. Example 10-2 shows a simple example of defining two domains that always should be allowed and one that always should be denied.
Example 10-2 Setting Up Exclusive Domains for URL Filtering
Router(config)# ip urlfilter exclusive-domain permit .cisco.com
Router(config)# ip urlfilter exclusive-domain permit .quizware.com
Router(config)# ip urlfilter exclusive-domain deny .sex.com
Tip
If you are experiencing performance problems on your router with URL filtering, look closely at the statistics on your content-filtering server to see which sites constantly are denied or permitted. For these sites, define exclusive domain configurations on the router, thereby reducing the number of lookups to the content-filtering server that the router must perform. I did this once for a customer whose router performance slowed to a crawl when implementing URL filtering. After using this feature, the company hardly noticed the difference in throughput when using the content-filtering server for additional lookups.
Lost Server Connection
Sometimes the Cisco IOS will not be capable of contacting your content-filtering server to authorize users’ HTTP connections. For example, you might have to reboot your server because of system patches that you have applied to it. In this situation, the Cisco IOS can take one of two actions concerning HTTP traffic during this blackout period:
• Drop all traffic until the connection between the router and the URL content filter server is restored.
• Permit all traffic until the connection between the router and the URL content filter server is restored.
The default is to drop all traffic. This can be changed with the following command:
Router(config)# ip urlfilter allowmode [on | off]
on specifies that connection requests should be permitted when the router cannot reach the content-filtering server. off specifies that the connections should be dropped.
Whenever your router loses contact with the content-filtering server, an alert message is displayed, along with the status of the allow mode that the router will use. In this example, the router drops traffic until the connection between the router and server is re-established:
%URLF-3-ALLOW_MODE: Connection to all URL filter servers are down
and ALLOW MODE if OFF
Maximum Requests
The Cisco IOS temporarily holds up to 1000 pending URL requests. These are requests that the Cisco IOS has sent to the content server and is waiting for a response for. When this limit is reached, new user connection requests are dropped, causing the user’s web browser to perform a retransmission. To change the number of pending requests that the Cisco IOS will store, use this command:
Router(config)# ip urlfilter max-request #_of_requests
The number of requests that you can specify ranges from 1 to 2,147,483,647.
Note
The larger you make this number, the more memory your router needs to store pending requests. Therefore, you should tune this by increasing the maximum number of pending requests in small increments so that it does not have a detrimental effect on the router’s memory and processing.
Maximum Responses
As mentioned in the “Operation of URL Filtering” section, a router might receive the returning HTTP traffic from the external server before it receives the policy reply from the content-filtering server. In this situation, the router can buffer the HTTP response while waiting for the reply from the filtering server. However, by default, the router buffers only 200 connection responses. This can be changed with this command:
Router(config)# ip urlfilter max-resp-pak #_of_responses
The number of responses the Cisco IOS can buffer ranges from 0 to 20,000.
Note
If you specify 0 as the number of responses that the Cisco IOS stores, the Cisco IOS drops all HTTP server responses received before the authorization reply from the content-filtering server. Be careful about making this value too large because it uses additional memory and requires additional processing on the router to handle the extra buffered packets. Therefore, as in the last section, I recommend that you increase this number in small increments to avoid a detrimental effect on your router.
Alerts
URL-filtering alerts are enabled by default. These alerts display messages when the content-filtering server is not reachable, when all servers are not reachable, or when a URL lookup exceeded the timeout value. Alerts can be disabled or re-enabled with the following command:
Router(config)# [no] ip urlfilter alert
Example 10-3 shows some common alert messages that the Cisco IOS might display.
Example 10-3 Examining Cisco IOS Alerts for URL Filtering
%URLF-3-SERVER_DOWN:Connection to the URL filter server (1)
192.1.2.2 is down
%URLF-3-ALLOW_MODE:Connection to all URL filter servers (2)
are down and ALLOW MODE is OFF
%URLF-5-SERVER_UP:Connection to an URL filter server (3)
192.1.2.2 is made, the system is returning
from ALLOW MODE
%URLF-4-URL_TOO_LONG:URL too long (more than 3072 bytes), (4)
possibly a fake packet?
%URLF-4-MAX_REQ:The number of pending request exceeds the (5)
maximum limit <1000>
The following is an explanation of these messages, with reference to the numbering on the right side of Example 10-3:
1. In this message, the router has lost contact with the content-filtering server (192.1.2.2). If you have configured a secondary server, the router establishes contact with it.
2. If the primary (or secondary) servers fails and no other content-filtering server is available, you will see this message. The router goes into an allow mode, in which all HTTP connections either are allowed or are denied.
3. If CBAC inspection for HTTP has entered the allow mode and then successfully restores connectivity to a content-filtering server, you will see this message.
4. If a URL exceeds 3072 bytes, CBAC generates an alarm indicating that the URL request is being dropped. In most instances, this is a hacker attack trying to gain unauthorized access to your web server by exploiting a bug in the web-application software.
5. If the number of pending URL requests sent to the content-filtering server exceeds the maximum-defined threshold, you will see this message. In this instance, the router drops the user’s HTTP connection request.
Many other alert messages exist, but these are the most common ones.
Audits
As with CBAC audits, audits for URL filtering are disabled by default. Enabling audits allows you to log information such as who is making an HTTP connection request and what web server is trying to be accessed. To enable auditing, use the following command:
Router(config)# [no] ip urlfilter audit-trail
Example 10-4 shows some common auditing messages that you will see with auditing enabled.
Example 10-4 Examining IDS Audits for URL Filtering
%URLF-6-URL_ALLOWED:Access allowed for URL (1)
http://www.quizware.com; client 192.1.1.12:32828
server 200.1.1.1:80
%URLF-6-SITE_ALLOWED:Client 192.1.1.12:32834 accessed (2)
server 200.1.1.1:80
%URLF-6-URL_BLOCKED:Access denied URL http://www.sex.com; (3)
client 192.1.1.12:32983 server 209.81.7.93:80
%URLF-4-SITE-BLOCKED: Access denied for the site (4)
`www.gambling.com'; client 12.54.192.6:34557
server 207.139.179.17:80
The following is an explanation of these messages, with reference to the numbering on the right side of Example 10-4:
1. In this message, a client (192.1.1.12) was allowed access to a web server (200.5.5.5). If the destination is not found in the router’s local cache, the URL of the user’s access is displayed. Only the first 300 bytes of the URL reference are displayed in the message.
2. In this message, a client (192.1.1.12) was allowed access to a web server (200.5.5.1). Unlike the previous message, in this example, the destination was listed in the router’s local URL cache, so it did not display the user’s URL reference. This reduced overhead on the router.
3. In this message, a client (192.1.1.12) was blocked from accessing a restricted site (www.sex.com). Notice that the URL reference was listed, indicating that this was the first time for accessing this destination.
4. The fourth message is similar to the third one. The main difference is that the message in the third statement was the result of the router getting back a block action from the content-filtering server, whereas the fourth message is the result of the configuration of an exclusive domain on the router. Exclusive domains enable you to specify local policies on the router that define which site(s) are allowed, reducing the overhead of having to contact the content-filtering server.
Your content-filtering server also has logging capabilities. However, remember that a router caches information about allowing or denying a user’s HTTP request, and it uses this information to filter subsequent requests. For this type of filtering, the content-filtering server will not be capable of capturing any logging information of additional connection requests that the router permits or drops, based on the lookups that the router does against its local cache. Therefore, if you want to see every URL-filtering action, you should enable auditing on your router and should forward this information to an external syslog server or the content-filtering server. Be forewarned that this will add an additional burden on your router. More important, you need a lot of disk space if your users generate a lot of HTTP connection requests. Also make sure that your router has the necessary processing power to handle this audit function.
Logging
By default, any log messages generated by CBAC URL filtering are displayed on the console or sent to the router’s local buffer or a syslog server, if you have configured these last two options. Another option is to forward these messages to your content-filtering server. This feature enables you to keep all your URL filtering log messages in one location for easy access and monitoring. As I mentioned in the last tip, a content-filtering server does not see log messages for matches that the router finds in its local cache. With this option, you can forward your log messages to the content-filtering server when the router finds a response in the cache. This provides a record of all transactions for users’ HTTP connections. This option is disabled by default but can be enabled with the following command:
Router(config)# ip urlfilter urlf-server-log
CBAC Activation
After you have set up your inspection rules for CBAC, specified the location and type of the URL content-filtering server, and tuned URL filtering, you are ready to activate your CBAC inspection process on your router’s interface. This is done with the following configuration:
Router(config)# interface type [slot_#]port_#
Router(config-if)# ip inspect inspection_name {in | out}
This configuration was discussed in Chapter 9. When you have activated the inspection group on your router’s interface, CBAC begins inspecting URL requests.
URL Filtering Verification
When you have set up and activated URL inspection of HTTP traffic, you can monitor it with various show and debug commands. The following two sections cover the use of these monitoring and troubleshooting commands.
• show ip urlfilter cache—Displays the destination IP addresses in the router’s URL cache
• show ip urlfilter config—Displays the URL filter configuration on the router, including the size of the cache, the maximum number of pending requests allowed, the maximum number of buffered packets while waiting for a content server’s response, the type of server and its address(es), and other configuration information
• show ip urlfilter statistics—Displays URL inspection statistics, including the number of requests sent to and received from the content-filtering server, the number of pending and failed requests, and the number of blocked connections
Take a look at some sample output of these commands. Example 10-5 shows sample output from the show ip urlfilter cache command.
Example 10-5 Using the show ip urlfilter cache Command
Router# show ip urlfilter cache
Maximum number of entries allowed: 5000
Number of entries cached: 4
IP addresses cached ....
200.1.1.1
200.1.1.2
200.2.2.1
200.3.3.3
The default number of entries allowed in the cache is 5000, which can be seen in Example 10-5. The number of entries in the cache is 4, which is followed by the actual IP addresses of the web servers that your users are trying to access.
Example 10-6 shows sample output from the show ip urlfilter config command.
Example 10-6 Using the show ip urlfilter config Command
Router# show ip urlfilter config
URL filter is ENABLED
Primary Websense server configurations
===========================
Websense server IP address: 192.1.2.1
Websense server port: 15868
Websense retransmit time out: 5 (seconds)
Websense number of retransmit:2
Secondary Websense server configurations:
==============================
None.
Other configurations
===============
Allow mode: OFF
System Alert: ON
Log message on the router: OFF
Log message on URL filter server:ON
Maximum number of cache entries :5000
Cache timeout :12 (hours)
Maximum number of packet buffers:200
Maximum outstanding requests:1000
Here you can see the URL filtering configuration on the router. This router is using a Websense server (192.1.2.1) to perform URL filtering. You also can see that this configuration is using the default values, such as 1000 outstanding requests and 200 buffered HTTP responses.
Example 10-7 shows sample output from the show ip urlfilter statistics command.
Example 10-7 Using the show ip urlfilter statistics Command
Router# show ip urlfilter statistics
URL filtering statistics
================
Current requests count:30
Current packet buffer count(in use): 12
Current cache entry count: 800
Maxever request count: 1000
Maxever packet buffer count:200
Maxever cache entry count:5000
Total requests sent to URL Filter Server: 38565
Total responses received from URL Filter Server: 38350
Total requests allowed: 38120
Total requests blocked: 238
This display has a lot of useful information. The Current Requests Count displays the number of requests (30) that the router has sent to the server and is waiting for a response for. The Current Packet Buffer Count displays the number of HTTP server replies (12) that the router has buffered while waiting for a response from the content-filtering server. The Current Cache Entry Count displays the current number of destination IP addresses (800) that the Cisco IOS has cached in the URL cache table. The Maxever lines display peak values that the system has seen since last powerup. These values typically are used to assist in choosing an appropriate value for the ip urlfilter cache, ip urlfilter packets, and ip urlfilter maxrequest configuration commands.
For instance, the maximum number of simultaneous HTTP authorization requests that the router will handle is 1000. Below these three lines are some totals: the total number of requests that the router has forwarded to the content server for authorization (38,565), the number of responses that the router has received from the content-filtering server (38,350), the number of times the content-filtering server allowed HTTP connections (38,120), and the number of times it denied them (238).
The show ip urlfilter statistics command is a very useful troubleshooting command. Use this command to verify the configuration of your URL filtering. For example, if your packet buffer count is constantly around 180, increase the default buffer size to around 250 with the ip urlfilter max-resp-pak command. Likewise, if there is a huge difference between the number of requests that the router sent to the content-filtering server and the number received, track down the problem: Examine the router to make sure that it is not overloaded, examine the content-filtering server to make sure that it is not overloaded, and check the network connection between the router and server to make sure that there is no bandwidth issue (if it is a direct connection between the two devices, make sure that the connection is configured correctly, with the correct speed and full-duplex operation).
debug Commands
You can use three debug commands for more detailed troubleshooting of URL-filtering functions:
• debug ip urlfilter events—Displays URL-filtering events, such as when a timer event is reached, connection events, and queuing events
• debug ip urlfilter detailed—Displays detailed information about the events that the debug ip urlfilter events command displays
• debug ip urlfilter function-trace—Displays the functions called by the Cisco IOS when performing URL filtering
URL Filtering Example
Now that you have a basic understanding of URL content filtering, take a look at an example of setting this up on your router. Figure 10-3 illustrates this example.

Example 10-8 shows a URL filtering configuration for this network.
Example 10-8 Simple Configuration of URL Filtering on a Router
Router(config)# ip inspect name RULES http urlfilter (1)
Router(config)# ip inspect name RULES ftp
Router(config)# ip inspect name RULES smtp
Router(config)# ip inspect name RULES tcp
Router(config)# ip inspect name RULES udp
Router(config)# ip urlfilter server vendor websense 192.1.2.2 (2)
Router(config)# ip urlfilter cache 7000 (3)
Router(config)# ip urlfilter max-request 1500 (4)
Router(config)# ip urlfilter max-resp-pack 300 (5)
Router(config)# ip urlfilter exclusive-domain permit .cisco.com (6)
Router(config)# ip urlfilter exclusive-domain permit www.quizware.com
Router(config)# ip urlfilter exclusive-domain deny .msn.com
Router(config)# ip urlfilter exclusive-domain deny .aol.com
Router(config)# ip urlfilter audit-trail (7)
Router(config)# ip urlfilter alert
Router(config)# ip urlfilter urlf-server-log
Router(config)# ip access-list extended external_ACL
Router(config-ext-nacl)# ! <--enter ACL policies here-->
Router(config-ext-nacl)# deny ip any any
Router(config-ext-nacl)# exit
Router(config)# interface Ethernet1
Router(config-if)# ip inspect RULES out (8)
Router(config-if)# ip access-group external_ACL in
The following is an explanation of the configuration in Example 10-8, with reference to the numbering on the right side:
1. The first inspection rule in the RULES group specifies inspection for HTTP URL connections.
2. This statement specifies that the content-filtering server is running Websense. Notice that this server is connected directly to the router, providing low latency for requests and replies.
3. This statement increases the default URL cache size from 5000 to 7000. Remember that you should be careful about increasing this value: make sure that you evaluate your router’s RAM and processing before increasing URL-filtering performance variables.
4. This statement increases the maximum number of requests from 1000 to 1500; this controls the number of pending requests that the Cisco IOS holds while waiting for responses from the Websense server.
5. This statement increases the maximum number of responses from web servers from 200 to 300 packets.
6. The next four statements set up exclusive domain filtering: All access to all of the Cisco website and www.quizware.com is permitted, and any access to Microsoft’s MSN and AOL domain names is denied.
7. The next three commands enable auditing and alerts, and forwarding of URL log messages to the Websense server.
8. The inspection rule (RULES) is enabled on the external interface.
I have added some optional parameters to tune this configuration to work better for this specific network. The only required configurations are Steps 1, 2, and 8.
Network-Based Application Recognition
Network-Based Application Recognition (NBAR) was introduced in Cisco IOS 12.0(5)XE2. NBAR normally is used to implement QoS functions on a router. It ensures that critical applications receive the necessary bandwidth to function correctly. QoS parameters that NBAR can use when setting up QoS for a connection include bandwidth, delay, jitter, and packet loss. This is accomplished by identifying applications or connections and associating them with a class. The Cisco IOS then can use these classes to implement QoS.
Components of QoS
QoS includes the following six components:
• Classification
• Marking
• Congestion management
• Congestion avoidance
• Link-efficiency mechanisms
• Policy and shaping
Classification is used to separate different kinds of traffic into distinct groups. When dealing with QoS, like kinds of traffic typically are grouped together. For example, all voice connections would be placed in a voice classification group, all video applications would be placed in a video classification group, and so on. The traffic is marked based on the classification. For example, if the traffic was Layer 3 traffic, the (Type of Service [ToS]) field in the IP packet header is used to contain the packet’s classification or grouping. This is done through the IP Precedence or DSCP method of marking.
When they are marked, this router and other devices beyond this router can use the marking to manage congestion (typically through the use of queuing), avoiding congestion (by dropping low-priority traffic), compressing traffic, and shaping traffic (by enqueuing traffic and sending it out at a constant pace). Obviously, there is a lot more going on with QoS than the brief description I have given.
NBAR and Classification
Classification is the first step in implementing QoS. NBAR can be used to implement classification. NBAR is a Cisco IOS classification engine that inspects packets and classifies them based on their application type. This can be something as simple as examining the TCP or UDP port numbers in the transport header of a segment, or it can as complex as examining information in HTML headers or web content. Basically, NBAR can inspect traffic from Layers 3 through 7. This inspection can look for the following types of information:
• TCP and UDP port numbers in the transport-layer segment header
• Dynamic TCP and UDP port numbers assigned for additional connections for an application, such as FTP (similar to the inspection process that CBAC uses when examining applications that open additional connections)
• Subport information, which is information contained in the application layer data, such as application commands or data types
• Layer 3 IP protocols (other than TCP and UDP)
Classification of traffic with NBAR can be done dynamically or manually. NBAR supports the Protocol Discovery feature, which allows NBAR to discover automatically application protocols that enter or leave an interface. This feature also maintains per-protocol statistics, such as the number of input and output packets and bytes, bit rates, and other statistical information. With manual classification, you define the traffic types that NBAR should examine.
After NBAR has identified an application, the appropriate classification can take place, marking the packet header with the corresponding IP Precedence or DSCP value.
Classification Process
Before I discuss how NBAR can be used for traffic filtering instead of QoS, I need to discuss how NBAR is used to classify traffic. As I already have mentioned, NBAR enables you to classify traffic from information found in Layers 3 through 7 of the OSI reference model. The first step in setting up NBAR is to create classes for traffic that you want NBAR to inspect. You can have NBAR examine many things, such as the application type, specific addresses for connections, data in a connection, and the length of a packet. Based on your matching criteria, NBAR places matching traffic into your specified class (or grouping).
When you have created your classification rules, you create a policy that marks the traffic. For IP traffic, you use IP Precedence to group (classify) the traffic. The IP Precedence standard (and DSCP) uses the bits in the ToS field in an IP packet to classify the traffic. Both of these functions are performed on the ingress interface (as traffic enters your router).
Then you define what action(s) will occur for marked traffic when it leaves a specific egress interface(s) on your router. Normally, with QoS, this affects how the packet is queued up before it is transmitted out the interface. However, you can define other policies for this traffic, such as limiting its bandwidth or even dropping the traffic, based on the classification, of course.
Figure 10-4 illustrates this process.

The following steps occur, with reference to the numbering in Figure 10-4:
1. In this example, an external user generates an HTTP query to a web server located on the internal network.
2. The router receives this traffic on its external interface. If an inbound ACL is applied on the external interface, the router processes the ACL.
3. Assuming that the ACL permits the packet, the router uses NBAR to classify and mark the packet. This classification is done in the ingress direction of the external interface. In this case, you need an NBAR classification for HTTP traffic. For QoS purposes, you could classify all HTTP traffic into one grouping; however, if this was for security purposes, you might be looking for specific commands, filenames, or other data in the HTML query request to mark it, such as with a worm, a virus, or a Trojan horse attack. When used for security purposes, you would configure NBAR to drop unwanted or dangerous traffic. If the traffic does not match any of the classification rules, it is not marked (it is not dangerous).
4. After NBAR processes the traffic, it is routed to the egress interface. In this example, this is E0. The router then processes any QoS actions on the packet. I use the term QoS loosely here because the Cisco IOS can take many actions when dealing with the packet, such as queuing it up with an appropriate queuing mechanism, shaping it, policing it, and even dropping it. For security purposes, you want to drop the marked traffic and, possibly log the transaction. If the traffic is not marked, it is treated normally. Finally, if there is an egress ACL on the router’s interface, this affects what traffic can exit it.
A few important things must be pointed out about NBAR and classification:
• When the Cisco IOS marks the packets’ ToS field with the IP Precedence or DSCP value, this remains in the packet as long as the packet is being routed to the destination (unless another router modifies the ToS value).
• For NBAR to process traffic, the traffic must be seen by two interfaces on your router: The ingress interface classifies and marks the traffic, and the egress interface enforces policies concerning the markings.
• You can apply NBAR classification, marking, and policing in more than one direction of the router. For example, in Figure 10-4, you could set up two different policies: one for traffic entering the network (from E1 to E0) and one for traffic leaving the network (E0 to E1), giving you a lot of flexibility in enforcing security policies.
NBAR and Traffic Filtering
As I mentioned at the beginning of this section, NBAR normally is used to implement QoS policies; however, it easily can be adapted to enforce security policies. You can enforce three basic actions with NBAR when using it for security functions:
• Filter traffic—With a filtering policy, NBAR uses an ACL to drop traffic on the egress interface. This requires an extended IP ACL to look for the ToS value marked in the IP header of the packet.
• Reroute traffic—With a routing policy, NBAR uses route maps to match on marked traffic to determine how it should be routed. In the case of a security function, you typically route the packet to a null interface on the router, causing the router to drop the packet (I discuss this further in Chapter 15, “Routing Protocol Protection”).
• Log actions—You can have the router log the filtering action when it drops marked traffic
In this chapter, I focus on the first and third actions. Chapter 15 covers the second option.
Supported Protocols and Applications
NBAR supports the inspection and classification of many different protocols and applications. However, only TCP/IP protocols and applications are supported; protocols such as IPX, AppleTalk, and others are not supported. Table 10-1 lists the TCP/IP protocols that NBAR can classify. Table 10-2 lists the supported applications with static TCP and UDP port numbers. Table 10-3 lists the supported applications with dynamically assigned port numbers. These are applications that use a well-known port number for the control or management connection, but open other connections to deliver information, as FTP does with its data-transfer connection.
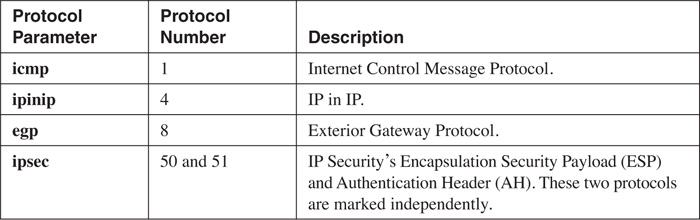
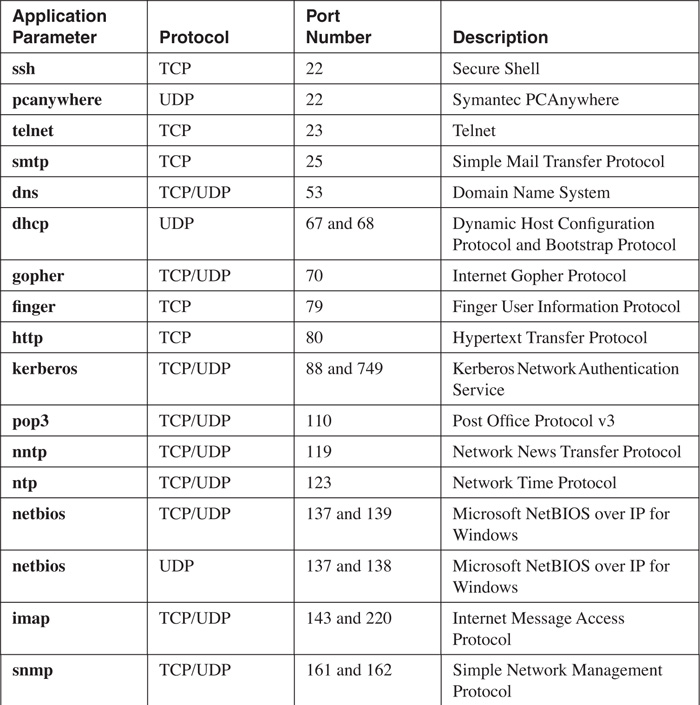
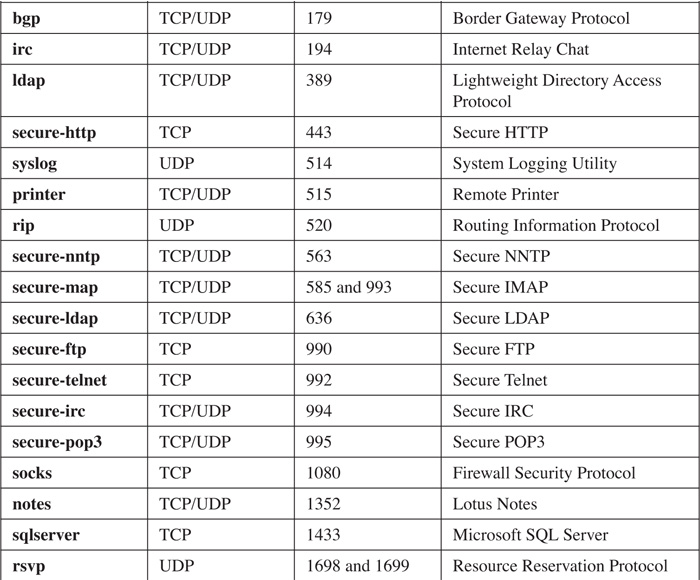

Table 10-2 Supported Static Port Numbers

The protocols and applications listed in Tables 10-1, 10-2, and 10-3 steadily have been added to NBAR since its inception. Therefore, to have NBAR classify a specific kind of traffic, you might have to either upgrade your Cisco IOS image or load a Packet Description Language Module (PDLM). A PDLM is a specialized module that you can have your Cisco IOS load from Flash to use with NBAR. One nice feature of PDLMs is that they do not require you to upgrade your Cisco IOS or reboot your router. Instead, the Cisco IOS calls them, when needed, from Flash memory. To download PDLMs, visit http://www.cisco.com/pcgi-bin/tablebuild.pl/pdlm; you need a CCO account to do this. Note that PDLMs are a temporary solution to upgrading your Cisco IOS. The newest Cisco IOS images have the necessary inspection function for NBAR built into them and, therefore, do not need PDLMs.
NBAR Restrictions and Limitations
NBAR requires the use of Cisco Express Forwarding. Therefore, only routers that support CEF can support NBAR. Even here, Cisco has not ported NBAR to all of its router platforms. As of this writing, here is a list of routers that support NBAR: 1700, 2600, 3600, 3700, 7100 and 7100 UBR, 7200 and 7200 UBR, 7500 with VIP, and the Catalyst 6500 with the FlexWAN module.
NBAR also has other restrictions, including the following:
• The router cannot examine traffic if the router is either the source or the destination of the traffic.
• The router cannot examine information in subsequent fragments of a packet; it can examine only the first fragment of a packet.
• It can examine only the first 400 bytes of a packet payload.
• It does not support examination of pipelined persistent HTTP requests.
• It cannot examine encrypted traffic, such as HTTPS or IPSec (with IPSec, if the tunnel is terminated on the router but the router is not the endpoint of the traffic, the router can examine the unencrypted traffic using NBAR).
• It can examine only TCP/IP traffic processed by CEF, which excludes IP multicast traffic.
• It cannot examine more than 24 concurrent URLs, hosts, or MIME type matches.
• It is not supported on logical interfaces, such as tunnels or Fast EtherChannels (dialer interfaces are supported in Cisco IOS 12.2[4]T).
• With the 7500 series of routers, the router’s processor requires a minimum of 64 MB of RAM.
Note
NBAR requires approximately 150 bytes of RAM for each connection that it inspects. To simplify the process for the Cisco IOS, when NBAR is enabled, the Cisco IOS automatically allocates 1 MB of RAM, which supports up to 5000 connections, to NBAR. The Cisco IOS periodically checks the memory usage. If more memory is required, the Cisco IOS dynamically assigns from 200 to 400 kB of RAM for additional connections. If you decide to use NBAR, you first should determine the number of connections that your router will need to support for examination and then make sure that your router has enough memory to hold the connection information.
Basic NBAR Configuration
NBAR is fairly simple to set up. The basic configuration requires you to enable CEF, monitor applications, and classify traffic. You need to perform the following steps:
Step 1 Enable CEF (required).
Step 2 Specify nonstandard ports (optional).
Step 3 Classify traffic (required).
Step 4 Download and install PDLMs (optional).
Step 5 Define a traffic policy (required).
Step 6 Activate the traffic policy on an interface (required).
Step 7 Filter the marked traffic on the opposite interface (required).
The following sections cover the basics of setting up NBAR for traffic filtering.
Step 1: Enable CEF
Before you can use NBAR, your router needs to have CEF enabled. On some routers and switches, this is the default; however, on other devices, you must enable it manually. You use one of two commands to enable (or disable) CEF. For routers that do not support distributed CEF, such as the 1700 or 2600 series, use the following command:
Router(config)# ip cef
For routers that support distributed CEF (dCEF), such as the 7500 series with VIP modules, use the following command:
Router(config)# ip cef distributed
You also can disable CEF on an interface-by-interface basis by using this configuration:
Router(config)# interface type [slot_#/]port_#
Router(config)# no ip route-cache cef
Tip
Use the show ip cef command to verify that CEF has been enabled on your router.
Note
The operation and additional configuration of CEF is beyond the scope of this book. For more information about CEF, visit http://www.cisco.com/en/US/products/sw/iosswrel/ps1835/products_configuration_guide_chapter09186a00800ca7cc.html.
Step 2: Specify Nonstandard Ports
Tables 10-2 and 10-3 list the applications that NBAR examines, by default. However, NBAR assumes that these applications run on a specific port number, such as HTTP on port 80. NBAR does not, by default, examine nonstandard ports for applications. Just as with CBAC inspection and PAM, you can tell NBAR to examine applications that are on nonstandard ports. Use the following command to specify an additional port(s) for an application:
Router(config)# ip nbar port-map application_name [tcp | udp] port_#
Application names can be found in Tables 10-2 and 10-3. If you do not specify a transport layer protocol, it defaults to the ones listed in Tables 10-2 and 10-3. With one command, you can list up to 16 additional port numbers; just list the port numbers on the same command line, but put a space between each port number. Here is a simple example of configuring NBAR to examine for HTTP:
Router(config)# ip nbar port-map http tcp 80 8080 8090
In this example, I am having NBAR examine these three TCP port numbers for HTTP application information.
Note
The ip nbar port-map command specifies exactly what port numbers should be examined. Therefore, as with the previous example, if you want to add ports, include the previously examined ports as well as the additional ports that you want NBAR to examine. This command is optional: If all your applications run on the standard port numbers, the configuration of this command is not necessary.
In Cisco IOS 12.3(4)T, Cisco added the User-Defined Custom Application Classification feature to NBAR, which enables you to inspect the payload of packets for string patterns starting at a specified offset. This then can be associated with the ip nbar port-map command or the match protocol command (discussed in the next section). Here is the syntax for the configuration of this feature:
Router(config)# ip nbar port-map custom name payload_byte_offset
[{ascii string_value | decimal number | hex hexadecimal_value}]
{source | destination} {tcp | udp} [range] port_#_or_#s
You first must give the custom NBAR inspection configuration a unique name. Following this is the offset in the packet payload for the Cisco IOS to begin its inspection. After this you need to specify the type of value to look for: ascii indicates a specified string, such as cisco; decimal indicates a decimal number; and hex indicates a hexadecimal value, such as 0x60. Following the type of value, you need to specify the port information. The source and destination parameters specify whether the port examined is the source or destination port; this is followed by the protocol (tcp or udp) and the actual port or range of ports. Here is a simple example to illustrate the NBAR custom protocol configuration:
Router(config)# ip nbar port-map custom NewEmailAttack 40
ascii addressbook destination tcp 25
In this example, I have created a custom NBAR inspection rule. This is useful if you are a target to a new type of attack and no patch is out yet to defeat it. In this example, a new e-mail attack has been discovered. In this attack, in the 40th byte of the packet payload is the string addressbook. By using this tool, you easily can look for specific values in the packet payload and then use NBAR to filter these packets.
To view your newly assigned port mappings, use the show ip nbar port-map command, as displayed in Example 10-9.
Example 10-9 Using the show ip nbar port-map Command
Router# show ip nbar port-map
<--output omitted-->
port-map gnutella tcp 6346 6347 6348 6349 6355 5634
port-map gopher udp 70
port-map gopher tcp 70
port-map http tcp 80 8080 8090
port-map imap udp 143 220
port-map imap tcp 143 220
port-map irc udp 194
port-map irc tcp 194
<--output omitted-->
Step 3: Classify Traffic
The next step required to set up NBAR is to define a group classification. This classification tells NBAR which protocols and applications should be inspected. The class-map command is used to group your NBAR classifications:
Router(config)# class-map [match-all | match-any] class_map_name
Router(config-cmap)#
The class-map command takes you into a subconfiguration mode in which you specify the traffic that should be associated with this classification. When creating the classification, you optionally can specify the match-all or match-any parameters. The match-all parameter specifies that the traffic entering the router must match all of the classifications in the class map for the Cisco IOS to consider it a match. The match-any parameter specifies that the traffic has to match only one of the conditions within the class map. If you omit this parameter, it defaults to match-all. Following this parameter is the name of the class map. This name can be up to 40 alphanumeric characters in length.
As you can see from the class-map syntax, you are taken into a subconfiguration mode in which you specify your conditions for matching of traffic (Router(config-cmap)), specifying what traffic should be associated with this class map. Within the class map, you use the match command to specify what traffic should be included for NBAR examination. One of the nice features of the match command is that it enables you to match on all different kinds of things in a packet. Here is a list of some of the more common parameters used:
• access-group—Specifies an ACL, where matches on permit entries in the ACL are included.
• class-map—Specifies another class map to embed within this class map.
• packet—Specifies a specific packet length that should be included in the examination. (I discuss how you can use this to detect certain kinds of DoS attacks in Chapter 17, “DoS Protection.”)
• protocol—Specifies the protocol that NBAR should examine. With some protocols, you can include data information, such as text that the user sends in the application request. This is the most common parameter used with NBAR for security functions.
In this chapter, I focus only on the match protocol class map command. The syntax of this command is as follows:
Router(config-cmap)# match protocol protocol_name [protocol_options]
With this command, you must specify the name of the protocol or application that will be included with NBAR examination; these names can be found in Tables 10-1, 10-2, and 10-3. For certain protocols, you also can include parameter options. If you created a custom NBAR inspection rule, specify the custom name for the protocol_name. In this chapter, I focus on just two uses of the match protocol command: using NBAR to filter P2P programs and HTML information.
P2P Programs
As I mentioned in Chapter 7, “Basic Access Lists,” filtering P2P programs can be very difficult with the use of ACLs, especially because ACLs look at static configuration rules. One advantage of NBAR is that it performs a similar process to CBAC: It can examine the information that is transmitted across a connection, including information that would be used to set up additional connections. NBAR supports this facility for many P2P programs. You can specify a handful of match commands to look for P2P programs: match protocol fasttrack, match protocol gnutella, match protocol napster, and match protocol kazaa2.
Take a look at the fasttrack option first:
Router(config-cmap)# match protocol fasttrack
Router(config-cmap)# match protocol fasttrack
file-transfer regular_expression
The first command matches on all FastTrack-related P2P programs, which includes Kazaa, Grokster, and older versions of Morpheus. This command can be used to classify and mark traffic as it leaves your network, allowing your external outbound ACL to drop this traffic. The second command enables you look for P2P connections that contain a specific string in the P2P request.
Here is the syntax to match on Gnutella P2P programs:
Router(config-cmap)# match protocol gnutella
Router(config-cmap)# match protocol gnutella
file-transfer regular_expression
The P2P applications that this command can match on include BearShare, Gnewtellium, Gnucleus, Gtk-Gnutella, JTella, LimeWire, newer versions of Morpheus, Mutella, Phex, Qtella, Swapper, XoloX, and XCache.
When specifying the string, you can enter regular expressions. Table 10-4 lists some of the more common regular expressions used. These expressions can be used as a wildcard to match on a string of alphanumeric characters that appear in a character string in the application layer data.

A few examples illustrate regular expression matching. In this example, I am matching on all Gnutella traffic:
Router(config-cmap)# match protocol gnutella file-transfer "*"
In this example, I am matching on any Gnutella traffic that references an MPEG file:
Router(config-cmap)# match protocol gnutella file-transfer "*.mpeg"
To match on Napster traffic, use the following command:
Router(config-cmap)# match protocol napster [non-std]
The non-std parameter enables you to look for nonstandard Napster port connections. For Kazaa P2P traffic, use the following command:
Router(config-cmap)# match protocol kazaa2
HTTP Traffic
With NBAR, you can match on HTTP traffic by URL, host name, or MIME type. This is done with the following command:
Router(config-cmap)# match protocol http [url URL_string |
host hostname_string | mime MIME_type]
You can use the url keyword to match on a full or partial URL in an HTTP request. Take a look at a simple example:
Router(config-cmap)# match protocol http url */home/ind*
In this example, any URL that contains /home/ind in it would be considered a match.
Here is an example of matching on a host name:
Router(config-cmap)# match protocol http host www.quizware.com
In this example, if the URL contains www.quizware.com, the packet is considered matched. You can match on partial host names, just like URLs:
Router(config-cmap)# match protocol http host *quizware*
In this example, any host name with quizware in it would be considered a match.
Finally, you can match on a MIME type. MIME types are used to categorize the type of data, such as a text file, an image file, a video file, and so on. HTML uses these quite extensively to provide presentation layer functions. MIME codes are embedded within HTML text to help the web browser determine how the information should be displayed. With NBAR, you can match on the MIME types, as in this example:
Router(config-cmap)# match protocol http mime *jpeg
In this example, any MIME type ending in “jpeg” is considered a match. For a list of MIME types, visit ftp://ftp.isi.edu/in-notes/iana/assignments/media-types/media-types.
Step 4: Download PDLMs
When examining certain applications or protocols, you need the correct version of the Cisco IOS that contains the necessary NBAR code. However, if your router does not have the latest or necessary version of the Cisco IOS, you still might be able to use NBAR for the specific application, as long as Cisco has a corresponding PDLM file for it.
PDLMs are small executable code modules used by NBAR. See the “Supported Protocols and Applications” section to find out what PDLM files Cisco supports and where you can download them. The main advantage of using a PDLM is that you do not have to upgrade your Cisco IOS to use the specific NBAR examination feature: Just download the appropriate PDLM file to Flash and then reference it for use by NBAR. In this instance, no reloading of your router is required.
To use a PDLM, you must reference it so that NBAR knows of its existence. Use this command to make the appropriate reference:
Router(config)# ip nbar pdlm [location://]PDLM_name
In this example, specify the PDLM name. If the PDLM is not in the primary Flash partition, you must specify the optional location.
For example, if you want to examine traffic for Fasttrack applications, but your Cisco IOS version did not support this for NBAR, you could download this PDLM from Cisco into your router’s Flash and reference it with the following command:
Router(config)# ip nbar pdlm flash://fasttrack.pdlm
To see which PDLMs you have enabled on your router, use the show ip nbar pdlm command.
Step 5: Define a Traffic Policy
After you have created your class map, you need to assign your policy to it. If you were using NBAR to implement QoS, you would be assigning your QoS policies to the classified traffic. However, because you are dealing with security, you will want to mark the offending packets that you have classified. This is done with a policy. Creating a policy is a three-step process:
Step 1 Define the policy’s name.
Step 2 Associate your class map with the policy.
Step 3 Mark the packets that are matched by the class map.
To perform these three steps, use the following configuration:
Router(config)# policy-map policy_map_name
Router(config-pmap)# class class_map_name
Router(config-pmap-c)# set [ip] dscp value
The last line can be substituted with the following if you prefer to filter on precedence instead of DSCP (for security filtering, this is a matter of personal preference):
Router(config-pmap-c)# set [ip] precedence value
The policy map name must be unique among all policies and can contain a maximum of 40 alphanumeric characters. When you execute the policy-map command, you enter into a subconfiguration mode.
Within the policy map, you include the name of the class map that you created in Step 3 with the class-map command. When you execute this command, you enter into a subsubconfiguration mode. Commands that you enter here affect only the specific class map name that you entered.
In this example, you mark the packets that you want to drop, using either DSCP or IP Precedence. For the DSCP or IP Precedence value, make sure that it is greater than 0. This information is placed in the ToS field of the IP header (by default, this field is 0); therefore, any number greater than 0 indicates that you have marked it. If you will use DSCP to handle the marking, use the set [ip] dscp command; if you will use IP Precedence to handle the marking, use the set [ip] precedence command. It does not matter which of the two commands that you use. Depending on which one you specify, in Step 7, you filter on the appropriate value in your ACL. One other thing to point out is that, as of Cisco IOS 12.2(13)T, you do not need to specify the ip keyword in these two set commands. Previous Cisco IOS versions required this keyword.
Note
A policy map can contain references to multiple class maps; however, your policy map cannot reference more than 64 class maps.
Step 6: Activate the Traffic Policy
After you have set up your policies to mark unwanted or malicious traffic, you need to activate your traffic policies on your router. This is done on one of the router’s interfaces. How you want to filter traffic affects the interface that you want to activate NBAR inspection on.
For example, assume that you are worried about the Code Red Worm being downloaded through an HTTP back door on your web servers. In this example, you would apply your policies inbound on the external interface. You then would create an ACL that you would apply outbound on your router’s internal interface(s) to filter the marked traffic.
However, you also might be concerned about your internal users accessing the P2P program. In this instance, you would create a second policy and apply it inbound on your internal interface. You then would create an ACL that you would apply outbound on your router’s external interface(s) to filter the marked traffic.
To associate a policy map with your router’s interface, use the following command:
Router(config)# interface type [slot_#]port_#
Router(config-if)# service-policy input policy_map_name
You must reference with the service-policy Interface command whatever name you specified for your policy map with the policy-map command. For QoS purposes, you could specify the direction as either inbound (input) or outbound (output). However, because you are using NBAR to filter traffic, you apply the policy inbound on the ingress interface and then apply a filtering ACL outbound on the egress interface.
Step 7: Filter Marked Traffic
Now that you have finished setting up and activating your policies, the last step is to set up a filter that will drop the traffic that NBAR marked. If you used DSCP for marking, your ACL statement would use the following syntax:
Router(config)# ip access-list extended ACL_name
Router(config-ext-nacl)# <--filtering commands-->
Router(config-ext-nacl)# deny ip any any dscp value [log]
Router(config-ext-nacl)# <--filtering commands-->
Note that you can use either a named or a numbered ACL, but you might be restricted to named ACLs if you are using reflexive ACLs. For the DSCP value, enter the value that you specified in the set dscp command in your policy map.
If you used IP Precedence for marking, your ACL statement would use the following syntax:
Router(config)# ip access-list extended ACL_name
Router(config-ext-nacl)# <--filtering commands-->
Router(config-ext-nacl)# deny ip any any precedence value [log]
Router(config-ext-nacl)# <--filtering commands-->
For the precedence value, enter the value that you specified in the set precedence command in your policy map.
The last thing that you need to do is activate your ACL; this is done on the opposite interface than where you activated your NBAR policies, and it is applied in the outbound direction.
Router(config)# interface type [slot_#]port_#
Router(config-if)# ip access-group ACL_name out
This completes your configuration.
Note
Remember that, with NBAR policy filtering, the traffic must enter the router on an ingress interface, must be marked (tagged) on this interface, must be forwarded to an egress interface, and must be filtered with an outbound filter on this interface.
NBAR Verification
You can use various commands to verify the configuration and operation of NBAR on your router. Most of the commands are show commands, but you can use debug in a limited manner to troubleshoot your NBAR configuration.
Class Maps
To view your class map(s), use this command:
Router# show class-map [class_map_name]
This command displays your class map configuration. Example 10-10 shows sample output of the show class-map command.
Example 10-10 Using the show class-map Command
Router# show class-map
Class Map match-any class-default (id 0)
Match any
Class Map match-any http-attack (id 1)
Match protocol http url "*default.ida*"
Match protocol http url "*root.exe*"
Match protocol http url "*cmd.exe*"
In this example, there are two class maps. The class map called class-default is a catchall class map that the Cisco IOS creates the first time that you create a class map. The second class map, called http-attack, is one that I created. Notice that it is looking for any of the three items in a URL reference.
Policy Maps
To see your policy maps, use the show policy-map command:
Router# show policy-map [policy_map_name] [interface]
Example 10-11 shows sample output of the show policy-map command.
Example 10-11 Using the show policy-map Command
Router# show policy-map
Policy Map mark-attack
Class http-attack
set dscp 1
In this example, there is only one policy on the router, called mark-attack. In this example, the class map of http-attack is included, and any traffic that matches the conditions in the class map has the traffic marked with a DSCP value of 1.
You can include an optional interface parameter with this command. This parameter displays what policy maps are activated on which interfaces, as well as statistics for this traffic. Example 10-12 shows sample output of the show policy-map interface command.
Example 10-12 Using the show policy-map Command with the interface Parameter
Router# show policy-map interface
FastEthernet0 (1)
Service-policy input: mark-attack (2)
Class-map: http-attack (match-any) (3)
19 packets, 7520 bytes
5 minute offered rate 0 bps, drop rate 0 bps
Match: protocol http url "*default.ida*"
0 packets, 0 bytes
5 minute rate 0 bps
Match: protocol http url "*root.exe*" (4)
6 packets, 2490 bytes
5 minute rate 0 bps
Match: protocol http url "*cmd.exe*" (5)
13 packets, 5030 bytes
5 minute rate 0 bps
QoS Set
dscp 1
Packets marked 19 (6)
Class-map: class-default (match-any) (7)
101 packets, 12914 bytes
5 minute offered rate 0 bps, drop rate 0 bps
Match: any
The following are some important points about Example 10-12, with reference to the numbering on the right side of the example:
1. This output deals only with interface Fastethernet0.
2. On this interface, the mark-attack policy has been activated.
3. The mark-attack policy contains two class maps. The first class map is http-attack. Three match rules exist in this class map.
4. This is the second match rule in the class map called http-attack. Notice that six packets (totaling 2490 bytes) have matched on this statement.
5. This is the third match rule in the class map. Thirteen packets (totaling 5030 bytes) have matched this statement.
6. This is the action assigned to matches for the class map called http-attack in the mark-attack policy. In this instance, the DSCP is set to 1 in the IP packet headers. In this example, 19 packets were marked.
7. This is the default class map that the Cisco IOS automatically creates. One nice feature here is that it gives you some basic statistical information about all traffic entering the interface.
Traffic Flow and NBAR
You can get more detailed information about the operation of NBAR with filtering by using a combination of debug, show, and clear commands. For example, you might see that NBAR is filtering traffic, but you want to know the actual mechanics of this filtering. To do this, you first need to enable debug for NBAR:
Router# debug ip nbar trace #_of_buffers
The number of buffers affects how much simultaneous traffic the router can capture. This can be from 50 to 1000.
Unusual to this command is that the output is not displayed on the console. Instead, you must use a show command to view it:
Router# show ip nbar trace
Example 10-13 shows sample output of the show ip nbar trace command.
Example 10-13 Using the show ip nbar trace Command
Router# show ip nbar trace
Session selected due to match on : Protocol Match (http)
Session contains the following flows :
192.168.1.100:3381 <--> 192.168.2.2:80(tcp)
Trace[1 ]: A -> B [HTTP-u-url:3] (<< offset = 70) Bound (384+32 >
384)
Trace[2 ]: B -> A [HTTP-u-client:3]
Trace[3 ]: A -> B [HTTP-u-url:3] (<< offset = 50) Bound (320+32 >
320)
Trace[4 ]: A -> B [HTTP-u-url:3] (<< offset = 50) (search )
(search '/?([^
]*cmd[.]exe)/?([^
]*root[.]exe)/?
([^
]*default[.]ida)') (add C0A80164D350000 HTTP-u-known
-server->HTTP-u-known-flow) (add C0A80202500000 TCP->
HTTP-u-known-server) (add C0A80164D350000 TCP->HTTP-u-known
-client)
<--outut omitted-->
IP EndPoints:
A : 192.168.1.100:3381/tcp
B : 192.168.2.2:80/tcp
In this example, 192.168.1.100 made an HTML request to 192.168.2.2. Notice that in the third trace there was a match on one of the conditions in the class map statement.
Finally, you can clear the information in the buffers with the clear ip nbar trace command.
Caution
Be forewarned that the debug ip nbar trace command is CPU intensive. I recommend using this command to troubleshoot only a flawed NBAR configuration and then immediately disabling it.
NBAR Examples
Now that you have a basic understanding of what NBAR is and how to configure it, take a look at some nifty examples of how you can use NBAR to filter dangerous or unnecessary traffic. Next, you will look at three examples of using NBAR to filter traffic:
• Code Red worm
• Nimda virus/worm
• P2P program usage
The following sections go over these three examples.
NBAR and Code Red
On July 19, 2001, the Code Red worm infiltrated more than 350,000 computers in less than 13 hours. During the peak of its performance, Code Red was infiltrating about 2000 computers per minute. In this instance, a hacker found a coding weakness in Microsoft’s Internet Information Server (IIS) versions 4 and 5. The hacker found a URL buffer overflow bug that allowed him to send an HTTP GET request to overflow the buffer, which then allowed him to execute arbitrary code on the web server. When the hole was discovered, the worm copied itself into memory and then attempted to infect other IIS web servers.
About Code Red and Code Red II
Two variations of the Code Red worm were found. In the first variation, a bug in the worm caused it to try to reaffect the same computers constantly. The random-number generator used to target new IP addresses was broken, and the code did not try to detect whether the target machine already was infected.
A different worm by the name of Code Red II found a similar hole in IIS, but only on Windows 2000 computers. Where Code Red I mainly attacked English systems, the Code Red II worm attacked Chinese systems. One of the unique things about the Code Red II worm is that, after a period of time, it intercepted port 80 inbound connections to the IIS server and displayed this message: “Welcome to http://www.worm.com!, Hacked By Chinese!” This was basically a redirect message: The worm did not modify any actual web server files.
What Should I Do?
You should do a few things when dealing with the Code Red I and II worms. Obviously, one of the first things you want to do is to find all IIS servers in your network and download the patch available on the Microsoft website. This sounds somewhat easy, but many products install and use IIS to perform functions other than web browsing, such as remote management and reporting. Even when you patch the servers, the patch prevents the Code Red from only a further infection: The Code Red worm still could be trying to access your network.
Even if you have a firewall in your network, it might not be capable of preventing a Code Red attack. Remember that firewalls typically operate at Layers 3, 4, and sometimes 5. Many firewalls do not have the capability to perform application layer filtering. Therefore, if you are using only extended ACLs to block traffic, and you have an internal IIS server, you are susceptible to attack. Your extended ACL probably is allowing the TCP port 80 connection to the web server.
Using NBAR
With the limitation of ACL filtering, the Cisco IOS has another tool that you can use to prevent the Code Red worm from entering (or leaving) your network: NBAR. NBAR can examine HTTP content and make filtering decisions on it. To understand how Code Red works, you need to take a look at your IIS files. Use the network shown in Figure 10-5 as an example.
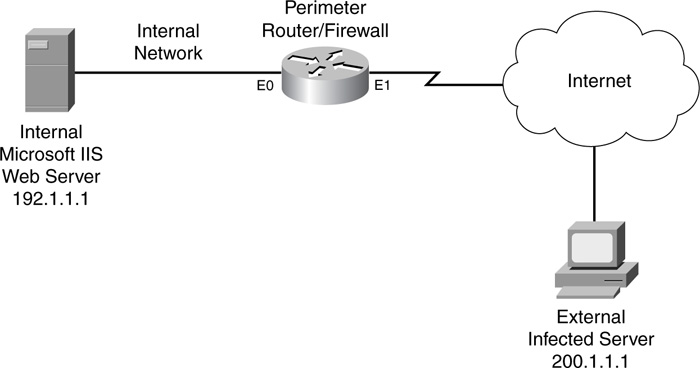
Example 10-14 shows a Code Red entry on the internal server (192.1.1.1).
Example 10-14 Code Red I Log Entry on the Internal 192.1.1.1 Server
2001-08-01 15:42:13 200.1.1.1 - 192.1.1.1 80 GET /default.ida
NNNNNNNNNNNNNNNNNNNNNNNNNNNNNNNNNNNNNNNNNNNNNNNNNNNNNNNNNNNNNNNNNNNNN
NNNNNNNNNNNNNNNNNNNNNNNNNNNNNNNNNNNNNNNNNNNNNNNNNNNNNNNNNNNNNNNNNNNNN
NNNNNNNNNNNNNNNNNNNNNNNNNNNNNNNNNNNNNNNNNNNNNNNNNNNNNNNNNNNNNNNNNNNNN
NNNNNNNNNNNNNNNNN%u9090%u6858%ucbd3%u7801%u9090%u6858%ucbd3%u7801%u90
90%u6858%ucbd3%u7801%u9090%u9090%u8190%u00c3%u0003%u8b00%u531b%u53ff%
u0078%u0000%u00=a 403
Code Red II is very similar in its footmark, as shown in Example 10-15.
Example 10-15 Code Red II Log Entry on the Internal 192.1.1.1 Server
2001-08-01 18:52:31 200.1.1.1 - 192.1.1.1 80 GET /default.ida XXXXXXXXXXX
XXXXXXXXXXXXXXXXXXXXXXXXXXXXXXXXXXXXXXXXXXXXXXXXXXXXXXXXXXXXXXXXXXXXXXXXX
XXXXXXXXXXXXXXXXXXXXXXXXXXXXXXXXXXXXXXXXXXXXXXXXXXXXXXXXXXXXXXXXXXXXXXXXX
XXXXXXXXXXXXXXXXXXXXXXXXXXXXXXXXXXXXXXXXXXXXXXXXXXXXXXXXXXXXXXXXXXX%u9090
%u6858%ucbd3%u7801%u9090%u6858%ucbd3%u7801%u9090%u6858%ucbd3%u7801%u9090%
u9090%u8190%u00c3%u0003%u8b00%u531b%u53ff%u0078%u0000%u00=a 403 -
Notice that, in both examples, the infected system (200.1.1.1) tries to use the buffer overflow by sending a long URL to 192.1.1.1. One interesting thing about both attacks is that both URL requests contain default.ida in the URL request. In some other minor variations of the Code Red worm, the filename is followed by an .ida extension.
Another interesting thing about Code Red is that it tries to execute the root.exe and cmd.exe files on the IIS server. Therefore, because all of this information is in a URL request on TCP port 80, you easily can detect these kinds of attacks with NBAR.
Code Red Configuration Example
Take a look at an example configuration to filter Code Red I and II. This configuration uses the network shown in Figure 10-5. Example 10-16 displays a simple example of a coding configuration to prevent Code Red (both versions) from entering this network.
Example 10-16 Using NBAR to Detect Code Red Attacks
Router(config)# class-map match-any code-red-attacks
Router(config-cmap)# match protocol http url "*.ida*"
Router(config-cmap)# match protocol http url "*cmd.exe*"
Router(config-cmap)# match protocol http url "*root.exe*"
Router(config-cmap)# exit
Router(config)# policy-map mark-code-red
Router(config-pmap)# class code-red-attacks
Router(config-pmap-c)# set ip dscp 1
Router(config-pmac-c)# exit
Router(config)# interface ethernet1
Router(config-if)# service-policy input mark-code-red
Router(config-if)# exit
Router(config)# ip access-list extended block-code-red
Router(config-ext-nacl)# deny ip any any dscp 1 log
Router(config-ext-nacl)# permit ip any any
Router(config-ext-nacl)# exit
Router(config)# interface ethernet0
Router(config-if)# ip access-group block-code-red out
This example focuses only on the filtering of Code Red. Obviously, you will want to set up ingress filtering on the external interface. At the beginning of the configuration, a class map called code-red-attacks is created, where the default.ida, cmd.exe, and root.exe strings are looked for in HTTP URL requests—any of these can trigger a match. A policy map called mark-code-red specifies that, for the class map code-red-attacks, matching traffic should be marked with a DSCP value of 1. This policy then is activated on ethernet1 (external interface) in the ingress direction. An ACL is created that drops and logs DSCP 1 marked traffic as packets flow out of the internal interface (ethernet0) in the egress direction.
Note
You also can use NBAR with policy-based routing (PBR) to filter the Code Red worm. I discuss how to do this in Chapter 15.
NBAR and Nimda
Nimda is a hybrid form of an attack: It has characteristics of both a virus and a worm. It spread using the following mechanisms:
• When an uneducated user clicked on an e-mail attachment (virus). In some e-mail clients, it ran automatically.
• Using a back door in Microsoft IIS to gain access to the web server.
When Nimda infects a machine, it installs itself and actively finds other machines to infect. It appends JavaScript commands to all locally stored HTML files on the device, including IIS servers. Any person who later attempts to download these pages cause the worm to execute on the machine automatically. As with Code Red, Nimda was not malicious in nature—that is, it did not destroy contents of a machine it infected. However, when Nimda affects a machine, it installs its own SMTP engine to mass-mail itself to other devices and attempts to use TFTP to load files on unaffected systems.
What Should I Do?
Combating Nimda is actually more difficult than combating Code Red, given that Nimda attacks from different directions: e-mail attachments, downloaded JavaScripts, and bugs in IIS. Therefore, you have your work cut out for you when dealing with this hybrid worm/virus. First, you should make sure that antivirus software is running on every desktop and that they all have the most recent virus-detection files to detect and eradicate Nimda. For your SMTP server, add rules to block the attachments readme.exe and Admin.dll. The JavaScript problem was found in Internet Explorer (IE) 5.0 and 5.01. If you are running either of these versions, apply Service Pack 2 to IE. You also can use NBAR to prevent HTML attacks against your internal IIS servers.
Nimda Configuration Example
Take a look at an example configuration to filter Nimda attacks against IIS web servers. This configuration uses the network shown previously in Figure 10-5. Example 10-17 shows the use of NBAR to drop packets related to the Nimda attack.
Example 10-17 Using NBAR to Detect Nimda Attacks
Router(config)# class-map match-any nimda-attacks
Router(config-cmap)# match protocol http url "*.ida*"
Router(config-cmap)# match protocol http url "*cmd.exe*"
Router(config-cmap)# match protocol http url "*root.exe*"
Router(config-cmap)# match protocol http url "*readme.eml*"
Router(config-cmap)# exit
Router(config)# policy-map mark-nimda
Router(config-pmap)# class nimda-attacks
Router(config-pmap-c)# set ip dscp 1
Router(config-pmac-c)# exit
Router(config)# interface ethernet1
Router(config-if)# service-policy input mark-nimda
Router(config-if)# exit
Router(config)# ip access-list extended block-nimda
Router(config-ext-nacl)# deny ip any any dscp 1 log
Router(config-ext-nacl)# permit ip any any
Router(config-ext-nacl)# exit
Router(config)# interface ethernet0
Router(config-if)# ip access-group block-nimda out
Actually, this example builds upon the Code Red example. The only addition to this configuration is the matching on *readme.eml* in the nimda-attacks class map.
Tip
As you can see from these last two examples—Code Red and Nimda—you can use NBAR to filter many kinds of HTTP-based attacks. I recommend its use to defeat different kinds of virus, worm, and Trojan horse attacks against web servers. With the custom feature introduced in Cisco IOS 12.3(4)T, you can create your own custom NBAR inspections to examine attacks against other services, such as POP3 and SMTP, as well as others.
NBAR and P2P Programs
As I mentioned earlier in Chapter 7, it sometimes can be almost impossible to filter P2P program use by your users, especially for users who are determined to break policies to download and share content. For these users, you can use NBAR to help combat the usage of these programs. If you are concerned about internal users accessing outside file-sharing servers or setting up their own small servers, you can use NBAR to detect the use of these programs, mark the packets, and use an ACL to filter the packets.
Refer back to the network shown previously in Figure 10-5 for how to filter P2P programs with NBAR. Example 10-18 shows a sample configuration that focuses only on the P2P filtering with NBAR.
Example 10-18 Using NBAR to Block P2P Programs
Router(config)# class-map match-any P2P-usage
Router(config-cmap)# match protocol gnutella
Router(config-cmap)# match protocol gnutella file-transfer "*"
Router(config-cmap)# match protocol fasttrack
Router(config-cmap)# match protocol fasttrack file-transfer "*"
Router(config-cmap)# match napster non-std
Router(config-cmap)# match kazaa2
Router(config-cmap)# match protocol socks
Router(config-cmap)# exit
Router(config)# policy-map mark-P2P
Router(config-pmap)# class P2P-usage
Router(config-pmap-c)# set ip dscp 2
Router(config-pmac-c)# exit
Router(config)# ip access-list extended block-P2P
Router(config-ext-nacl)# deny ip any any dscp 2 log
Router(config-ext-nacl)# ! <--other ACL statements-->
Router(config-ext-nacl)# permit ip any any
Router(config-ext-nacl)# exit
Router(config)# interface ethernet1
Router(config-if)# service-policy input mark-P2P
Router(config-if)# ip access-group block-P2P out
Router(config-if)# exit
Router(config)# interface ethernet0
Router(config-if)# service-policy input mark-P2P
Router(config-if)# ip access-group block-P2P out
As you can see from this example, setting up NBAR P2P filtering is simple. First, set up two sets of match statements to examine Fasttrack, Gnutella, Napster, and Kazaa P2P applications. Second, mark these using either IP Precedence or DSCP. Notice that I used a DSCP value of 2.
Tip
Normally, if I am blocking different kinds of things with NBAR, I use different DSCP or Precedence values and different ACL statements so that I can more easily log what I am filtering. For example, I might use a DSCP value of 1 for worms and a DSCP value 2 for P2P programs.
Notice that I have applied the policies inbound on both interfaces, and ACLs outbound on both of these interfaces. Obviously, you need to configure more on this router to secure it, but these statements pertain to just the P2P filtering process.
One important item that I want to point out about this P2P configuration example is that I also am blocking SOCKS traffic. SOCKS commonly is used to tunnel information through HTTP. Therefore, an ingenious user in your network could use SOCKS to tunnel P2P programs through TCP port 80 and easily get around any ACL filtering of NBAR P2P filtering statements on your router. Previously, SOCKS was used to protect a computer’s resources. Today other methods, such as commercial-based firewalls, are used. Therefore, tunneling information through TCP port 80 seems very suspicious to me, and I typically block it. Note that you also can do this with an ACL statement instead of using NBAR. If you want to see how SOCKS can be used to tunnel P2P and other information, visit http://www.http-tunnel.com/HT_Products_HTTPTunnelClient.asp.
Summary
This chapter showed you the basics of filtering URL and application layer information. With CBAC, you can perform very basic Java filtering on connections. The main limitation of this feature is that you can filter applets only based on source IP addresses in packets. Therefore, a better approach to this problem is to use a content-filtering server that allows for better implementation of URL-filtering policies. Cisco supports both Websense and N2H2 products to provide URL content filtering.
For specific kinds of attacks that use HTTP, or for P2P programs, you can use NBAR as an additional tool to filter this traffic. NBAR can be very useful in not just filtering these attacks, but also providing statistical information about the number of attacks (or use).
Next up is Part V, “Address Translation and Firewalls,” which shows you how to configure address translation on your Cisco IOS perimeter router/firewall, as well as discusses the issues related to address translation.