One of the most important features of any Windows desktop application is its graphical user interface. As such, it is important that your application windows be well organized and intuitive. In this chapter you will learn about the fundamental building blocks of Windows application GUIs. This will include learning how to create different types of windows and to work with different types of interface controls like buttons, textboxes, and comboboxes. You will learn how to link interface controls to program code through the development of event handlers. You will also learn how to programmatically interact with interface controls and to set properties like color and font type and to enable and disable access to controls. On top of all this, you will learn how to create your next game, the BASIC Crazy 8 Ball game.
Specifically, you will learn
About the different types of application windows supported by Just BASIC
How to open and close windows and to set different windows properties such as color and font type
How to programmatically generate different interface controls
How to set up control event handlers
How to work with FreeForm-J in order to design GUIs
This chapter’s game project is the BASIC Crazy 8 Ball game. This game emulates the children’s crazy 8 ball toy by displaying random answers to player questions. The creation of this game will require that you design a graphical user interface that consists of multiple windows using button, statictext, and textbox controls. In addition to gaining experience in developing GUIs, the development of this game will also introduce you to event-driven programming, in which program code is associated with individual windows and controls and executed based on the manner in which the player interacts with the game.
When first started, the BASIC Crazy 8 Ball game displays a window that includes a welcome message and two button controls, as shown in Figure 3.1. If the player clicks on the Quit button, the game ends. If the player clicks on the OK button, game play continues.
To ask the game a question, the player types her question in the textbox field that is provided and clicks on the Ask button, as shown in Figure 3.2.
The player must enter a question in order for the game to generate an answer. If the player clicks on the Ask button without typing in anything, an error message will be displayed, as demonstrated in Figure 3.3.

To play the game, the player asks the game a series of questions that must be worded in such a way as to work with yes/no-styled answers, as demonstrated in Figure 3.4.
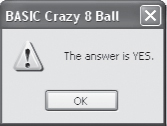
In response to each question, the game will display a randomly generated answer of YES, NO, or MAYBE, as demonstrated in Figure 3.5.
As you have already seen, Just BASIC automatically adds a text window to every new application, as demonstrated in Figure 3.6. Once displayed, your application can write text to this window using print commands and collect user data using the input command.
As Figure 3.6 shows, this window offers programmers an abundance of built-in features that provide the basis upon which a text-based Windows desktop application can be built. With no work on your part, Just BASIC automatically generates a text window that can be resized, maximized, minimized, and closed. The File and Edit menus come with all of the menu commands that you would expect from any Windows application, including Open, Save, Cut, Copy, and Paste. This functionality enables the user to open, display, modify, and save the contents of any text file. However, not all Windows applications are text based. Most are GUI based. Therefore, if desired, you can suppress the display of the mainwin by adding the nomainwin command to the beginning of your Just BASIC applications.
If necessary, you can specify the initial size of mainwin by specifying the number of columns and rows using the mainwin statement, which has the following syntax.
mainwin Columns RowsColumns is a place holder representing the number of columns the window should have and Rows is a place holder representing the height of the window in terms of the number of rows displayed.
Using the above command, you can instruct Just BASIC to modify the default size of the mainwin window by adding a statement similar to the following to the beginning of any Just BASIC application.
mainwin 40 20
Once opened, you work with the mainwin window by sending it commands. One commonly used command is the print command, which, as you have seen, can be used to display text on mainwin.
Hint

The syntax of the print statement is outlined below. It consists of the keyword print followed by an optional reference to a handle, which when specified identifies the window or control to which the print command is directed. Next comes an optional comma, which is then followed by one or more expressions representing the text to be displayed. If more than one expression is provided, semicolons are used to separate them and the text strings are displayed one after another.
print #handle, expression1 ; expression2 ; expression3...
The print command has many uses. In addition to displaying text on text windows and on interface controls that accept text, it can be used to send commands to windows and controls in order to control their actions. In the following example, a text string is displayed on an application mainwin window.
print "Welcome to my Just BASIC application!"
Other commands that you can use when working with mainwin include input and cls. The input command is used to prompt the user to provide input and the cls command is used to clear out the window’s display area.
Hint
The syntax of the input command is outlined here:
input #handle "string"; variablename
It consists of the keyword input followed by an optional reference to a window name and a string that is to be displayed. The display string is followed by a semicolon and then the name of a variable, which will be used to temporarily store the input provided by the user.
In the following example, the input command is used to display a prompt asking the user to enter her name. Since there is no explicit reference to a particular window, the prompt will be displayed on the application’s mainwin window.
input "What is your name? "; username$
Modern programming languages, such as Visual BASIC and C++, support desktop application development through windows-based applications. These applications generate graphical user interfaces, which display information and interact with users through controls displayed on application windows. Examples of window controls include buttons, textboxes, checkboxes, and listboxes.
Just BASIC is no different. Just BASIC provides programmers with the ability to generate different types of windows as well as to populate those windows with an assortment of interface controls.
Different operating systems support different types of application windows, each of which is designed to suit a specific purpose or situation. Just BASIC supports four types of windows, as shown in Table 3.1. Just BASIC applications may consist of any number of these windows.
Table 3.1. Window Types Supported by Just BASIC
Window | Description |
|---|---|
window | A regular window as used in most applications. This type of window can contain interface controls and supports optional features such as resizing and menus. |
text | A window designed specifically for the purpose of displaying text. Text windows always display a menu bar containing File and Edit menus but cannot contain other controls. |
graphics | A window designed to display graphics and sprite animation. Only limited support is included for controls. Window resizing is optional. |
dialog | Special popup windows that are designed to collect user information. These windows can contain other controls but cannot display menus. |
Hint
Each of these types of windows can be commonly found on applications that run on Microsoft, Linux, and UNIX operating systems. Other operating systems, such as Mac OS X, support additional types of windows not found elsewhere. For example, Mac OS X supports sheet windows, from which another attached window is displayed using animation that makes it look as if the additional window drops down from the parent window’s title bar. Mac OS X also supports drawer windows in which a child window is displayed using animation that makes it look like the window is sliding out from underneath its parent window.
You saw an example of how to work with various dialog windows back in Chapter 1, “Introduction to Programming,” when you created the Knock Knock Joke game. In Chapter 2, “Creating Programs with Just BASIC,” you learned how to work with text windows in order to tell the Legend of Mighty Molly. In this chapter, you will learn how to work with the window window in order to build desktop applications that interact with users through controls. A graphics window, such as the one shown in Figure 3.7, can be used to spice up applications by displaying interesting backgrounds. Graphics windows also provide the foundation upon which animation is performed. Later, in Chapter 9, “Working with Sound and Graphics,” you will learn more about the graphics window.
Most applications make use of regular windows. An example of a regular window is provided in Figure 3.8. These windows can contain any number of interface controls. By default a regular window contains a title bar and control buttons located in the upper-right corner that allow you to minimize, maximize, and close the window. Regular windows can also be resized.
Text windows are highly specialized windows. Text windows cannot contain other controls. They can only be used to display and collect text data and also allow text to be modified and saved. The mainwin window, supplied as part of every Just BASIC application, is an example of a text window.
Graphics windows are another special form of window designed to display graphic images and to support the execution of sprites. Although some controls are capable of working on graphics windows, they are not intended for this purpose.
Hint
A sprite is an image that is integrated into a larger background scene and forms the basis of computer animation.
Dialog windows are provided by Just BASIC for the purpose of interacting with users. Dialog windows, also referred to as popup dialogs, can optionally be set up to run as application modal. An application modal window is a window that prevents other application windows from being accessed while it is open. When this is the case, no other application windows can be accessed until the dialog window has been closed. Dialog windows are therefore useful in situations where you require information from the user that must be collected before the application can continue running.
Like most programming languages, Just BASIC supports a number of different types of dialog windows. These variations are listed and explained here:
Notice. Displays a text string message and waits for the user to click on OK.
Confirm. Displays a text string message and waits for the user to click on either Yes or No.
Prompt. Displays a text string message and waits for the user to type in a response before clicking on OK (or alternatively on Cancel).
Filedialog. Displays a dialog window that allows the user to either specify a file to be opened or the name and location of a file to be saved.
You will learn more about dialog windows, including how to generate them and use them to collect user input, later in this chapter.
Just BASIC supports a number of variations of each of the windows listed in Table 3.1. For example, an application using a text window can open it in window or in full screen mode. Alternatively, a text window may be generated so that it does or does not support scroll bars. Alterations to application windows are specified using style suffixes. A list of these suffixes is supplied in Table 3.2.
Table 3.2. Window Style Suffixes Supported by Just BASIC
Suffix | Description |
|---|---|
| Opens a window in full screen |
| Opens a window without a frame, preventing it from being resized |
| Prevents the display of window scroll bars |
| Inserts an inset text editor |
| Prevents other application windows from being accessed while the window is open |
Not all windows support all of the different variations shown in Table 3.2. In some cases, Just BASIC allows programmers to combine two or more suffixes together. Table 3.3 provides a listing of the various combinations of features supported by each window type.
Table 3.3. Style Suffixes Supported by Different Windows
Window | Supported Suffix |
|---|---|
window |
|
text |
|
| |
| |
graphics |
|
| |
| |
| |
dialog |
|
| |
| |
| |
|
Hint
Over the years, most Windows users have become accustomed to having Windows applications look and act a certain way. Failure to provide applications that look and feel intuitive can lead to disappointment. Therefore, it is important that programmers give serious attention to the development of their application’s user interface. A programmer might build the world’s best application only to find that no one wants to use it because its user interface is hard to figure out. One way of approaching this challenge is to spend a little time studying how the user interfaces of popular applications have been constructed. Another option is to check out the User Interface Design and Development page at http://msdn2.microsoft.com/en-us/library/aa286531.aspx.
With the exception of the mainwin window, you must explicitly open any other window that you want to add to your Just BASIC applications. To display a new application window, you must use the open command. The syntax of the open command is outlined here:
open device for purpose as #handle [LEN = n]
device is a parameter representing the resources to be opened. When used to open a window, you supply a caption to be displayed in the window’s title bar as this parameter. purpose is a parameter that represents the type of window to be opened (text, window, graphics, or dialog) and #handle is a parameter that specifies a handler (or reference) by which the windows can be identified. Handle names must begin with the # character and can only be made up of letters and numbers. Special characters and blank spaces are not allowed.
Hint
The open command is very versatile. It can be used to communicate with hardware devices and to open a file or application window. In this chapter, I’ll limit discussion of this command to just the opening of application windows.
An example of how to use the open command to open a new application window is shown here:
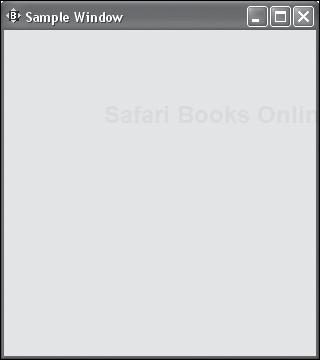
open "Sample Window" for window as #main
When you open a window, you must specify its type (window, text, graphics, dialog). Here, a new application window is displayed. The text string "Sample Window" is displayed in its title bar. The window has been opened as a regular window and has been assigned a handle of #main.
As with any programming language, you must remember to add programming logic to your application to close any open resources, including windows, before allowing the applications to terminate. In the case of open windows, this means using the close command, which has the following syntax.
close #handle#handle identifies the handle of a previously opened window. Thus the following statement could be used to close a window named #main.
close #main
To get a better understanding of how to work with and control application windows, consider the following example.
nomainwin

open "Sample Window" for text as #main

print #main, "Welcome to my Just BASIC application."
print #main, "!trapclose [terminate]"

wait

[terminate]

   close #main
   end
In this small Just BASIC program, the display of the default text window has been suppressed. Next, a new text window is opened and assigned a handle of #main. The next statement uses the print command to display a text string on the window. The statement after that uses the print statement in a totally new way. This time the print statement has been used to pass a command, instead of a text string, to the window. Just BASIC knows that a command is being passed because the text enclosed inside the double quotation marks begins with the ! character. The word that follows the ! command is trapclose. This instructs Just BASIC that whenever the window receives instruction to close, such as when the user clicks on the Close button in the upper-right corner of the text window, to jump to the location within the program code labeled [terminate].
Trap
You must precede any command passed to a window or interface control with the ! character if that window or control accepts text. For example, windows of type text and interface controls like the button and textbox controls, discussed later in this chapter, display text that is passed to them using the print command, unless that text is preceded by the ! character, in which case Just BASIC interprets the string passed by the print statement as a command that must be executed. If, on the other hand, the window or control that you are working with does not display text, which would be the case with a window of type window or a control like the bmpbutton_control, including the ! character is optional. However, rather than using the ! in some situations and not in others, I recommend that you use it anytime you want to use the print command to pass a command to a control or window.
The code statement that follows the [terminate] label, also referred to as a switch label, is the event handler for the window’s close event. An event is an action generally initiated by the user. In order for applications to communicate with the users, there must be a way of linking or associating program code with different parts of the user interface. For example, when the user clicks on a given button control, certain code statements should be executed; when a different button is clicked, a different set of code statements should be executed. This connection between interface controls and application code statements is established by defining event handlers.
Events occur when the user does something such as clicking on a button control, keying data into a textbox control, or closing an open window. Like other programming languages, Just BASIC provides programmers with a means of defining specific programming logic and associating it with specific events. Different types of events are associated with different types of windows and controls. Button controls, for example, recognize click events. Windows, on the other hand, recognize close events. Other controls respond to other types of events.
One way to set up a window or interface control to work with an event is to add a label to it as part of its definition. If the event for the window or interface control occurs, the program will jump to the location within the program where that label has been placed and execute any program statements that it finds. In the case of the previous example, this meant jumping to the [terminate] switch label and executing the close and end commands. This ensures that any time the user closes the application window, Just BASIC makes sure that the application terminates cleanly by closing any open resources; in this case this is the window itself.
Hint
Event programming can also be implemented using functions in place of labels. You will learn how this is accomplished in Chapter 7, “Improving Program Organization with Functions and Subroutines.”
By default, Just BASIC determines the initial size of application windows. In addition, if not otherwise specified, Microsoft Windows determines the initial location where windows are displayed. However, by setting any combination of the following four special variables, you can specify the size and initial display location for any application window.
WindowWidth. Sets the width of the window in pixels.UpperLeftX. Specifies the location of the upper-left corner of the window in relation to the left side of the display area.UpperLeftY. Specifies the location of the upper-left corner of the window in relation to the top of the display area.
To see an example of how you might set these variables to control the display of an application window, consider the following example.
nomainwin

UpperLeftX = 1
UpperLeftY = 1

WindowWidth = 200
WindowHeight = 200

open "Sample Window" for window as #main

wait
Here, a window of type window is opened that is 200 pixels wide by 200 pixels tall. When initially opened, there is just one pixel between the top and left-hand side of the window and the edge of the display area.
Hint
A pixel (picture element) is the smallest addressable area that can be written to on the screen or window. Computer displays are measured in terms of the number of pixels displayed.
Trick
Just BASIC provides programmers with access to two special variables that retrieve the current height and width of the display area. These variables are named DisplayWidth and DisplayHeight and you can use them when calculating the desired value of WindowWidth and WindowHeight. For example, you might create a window that fills most but not all of the display area, as demonstrated here:
nomainwin

UpperLeftX = 1
UpperLeftY = 1
WindowWidth = DisplayWidth - 200
WindowHeight = DisplayHeight - 200

open " Sample Window" for window as #main

wait
Note that you must set the size of an application window prior to opening it.
Like most programming languages, Just BASIC applications by default assign colors consistent with the Windows operating system’s currently assigned color scheme. However, if you prefer, you can also change the foreground and background colors used in the display of application windows by setting the value of the BackgroundColor$ and ForegroundColor$ special variables.
Hint
Foreground color refers to the color used to display text, and background color refers to the color of the window’s background on which controls and text are displayed. The background color setting also affects the display of the groupbox, statictext, radiobutton, and checkbox controls.
Just BASIC provides you with the ability to set the value of both the BackgroundColor$ and ForegroundColor$ special variables to any of the following colors.
black
blue
brown
buttonface (represents the current default color scheme)
cyan
dark blue
dark cyan
dark gray
dark green
dark pink
dark red
green
light gray (same as pale gray)
pale gray (same as light gray)
pink
red
white
yellow
To get a better understanding of how the specification of the BackgroundColor$ and ForegroundColor$ special variables affects the display of application windows, consider the following example.
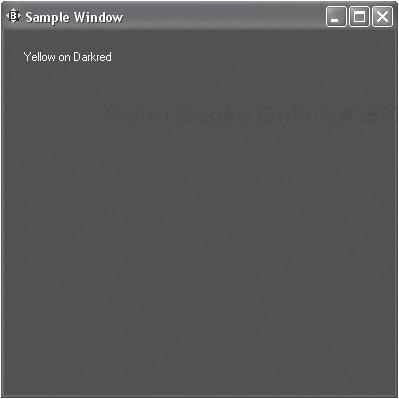
nomainwin

WindowWidth = 400
WindowHeight = 400

BackgroundColor$ = "darkred"
ForegroundColor$ = "yellow"

statictext #main.static, "Yellow on Darkred", 20, 20, 100, 50

open "Sample Window" for window as #main

wait
Here, a window that is 400 pixels wide by 400 pixels high is displayed with a dark red background and any text that is displayed appears in yellow. Figure 3.9 shows the window in black and white.
Just BASIC also gives you control over the type and size of the text font used to display text strings on windows. In addition, Just BASIC also gives you control over other font properties, including:
Bold
Italic
Strikeout
Underscore
Setting the font type and size for a window, by default, affects all text displayed on that window, including the font type and size of text displayed on window controls. Font size and type can be configured using the syntax outlined here:
print #handle, "font fonttype pointsize [italic, bold, strikeout, underscore]"
Using this syntax, font type is specified by supplying a value in place of fonttype and font size is specified using point size. You may also include any of four optional modifiers that affect font appearance. For example, the following statement will establish a font type of Arial font size 14.
nomainwin

statictext #main.static, "Font demo", 20, 20, 200, 50
open "Sample Window" for window as #main
print #main, "font Arial 14'

wait
Similarly, this next example will establish a font type of Courier New with a font size of 24 using bold.
nomainwin

statictext #main.static, "Font demo", 20, 20, 200, 50
open "Sample Window" for window as #main
print #main, "font Courier_New 24 bold"

wait
Hint
When specifying a font type whose name consists of multiple words, use the _ character to substitute for blank space when keying in the font name. For example, instead of Times New Roman you must type Times_New_Roman. If the font you specify is not installed on the computer, Just BASIC will select the closest available match.
Most desktop application user interfaces consist of a collection of different interface controls like buttons and text boxes. As the following list shows, Just BASIC provides programmers with the ability to add a number of different graphical interface controls to application windows.
button
bmpbutton
checkbox
radiobutton
statictext
textbox
texteditor
listbox
combobox
groupbox
graphicsbox
By adding instances of these types of controls to application windows, you can create complex application GUIs. Each control has its own particular syntax that you must use when adding the code required to generate an instance of the control on an application window. Alternatively, you can use the FreeForm-J program, supplied with Just BASIC, to visually design your application windows and then generate the required code statements needed to re-create the window’s user interface for you.
Hint
As impressive as the list of controls provided by Just BASIC is, the collection of controls is small in comparison to the list of controls provided by many other programming languages. For example, programming languages like Microsoft C++ and Borland C-Builder supply programmers with access to dozens of different controls. Examples of controls not supplied by Just BASIC include progress bar, HTML Viewer, database, and toolbar controls.
Desktop applications are made up of windows that display data and interact with users through the use of controls placed on top of those windows. Just BASIC includes a number of predefined interface controls. Each of these controls is designed to provide a different type of functionality to your applications. A brief overview of these controls and their functionality is provided in the sections that follow. As you work your way through the sample game applications presented in this book, you will get a chance to see working examples of a number of these controls.
The button control is used to display a graphical button that users can click to send a command to a program. Button controls display a text string and are used by clicking on them. Buttons can be programmatically added to windows using the following syntax.
button #handle.ext, "caption", [label | subroutine] , corner, x, y [, width, height]handle must refer to the handle of the window on which the control will be displayed and .ext is an optional extension that is used to uniquely identify the control, allowing it to be programmatically referenced later in the program. caption represents the button control’s caption. label and subroutine are mutually exclusive and optional, meaning that you can supply one or neither but never both. When supplied, Just BASIC will jump to the specified label or subroutine and begin executing its code statements. You will learn more about how to work with labels later in this chapter and will learn how to work with subroutines in Chapter 7. corner specifies the corner of the window used to anchor the button control. Possible choices include UL, UR, LL, or LR. x and y specify the location of the button, in pixels, relative to the specified corner, and width and height are optional parameters that specify the dimensions of the button (in pixels). If omitted, Just BASIC will make the button just large enough to display its caption text.
Hint
UL refers to the upper-left corner of the window. UR refers to the upper-right corner of the window. LL refers to the lower-left corner of the window and LR refers to the lower-right corner of the window.
Button controls are typically used to send commands to applications. For example, the following code statements generate a window that displays a button control with a caption of Exit.
nomainwin

button #main.button1, "Exit", [terminate], UL, 130, 150, 60,
40
open "Sample Window" for window as #main

wait

[terminate]
  notice "Thanks for using my application!"
  close #main
  end
When executed, this program displays a window with a button control that is 20 pixels wide by 40 pixels tall, roughly in the center of the window, as shown in Figure 3.10. When clicked, the button control’s click event executes. As a result, the program jumps to the [terminate] label and executes the code that follows that label, which in this example, displays a popup window thanking the user for using the application before closing the window and terminating the program’s execution.
The bmpbutton control is similar to the button control, the only difference being that the bmpbutton control displays an image instead of a text string. Bmpbuttons provide users with the ability to execute a program command. Bmpbuttons can be programmatically added to windows using the following syntax.
bmpbutton #handle.ext, filename, [label | subroutine], corner, x, yAs you can see, the syntax for the bmpbutton control is very similar to that of the button control. The only differences are that you cannot specify a display string and you must supply the full or relative path of the bitmap image file to be displayed. You cannot set the width and height of bmpbutton controls either. The size of a bmpbutton control is determined by the size of the image itself.
The following example is a modified copy of the previous example, replacing the button control with a bmpbutton control.
nomainwin

bmpbutton #main.button1, "bmpxoutbttn.bmp", [terminate],
UL, 140, 150
open "Sample Window" for window as #main

wait

[terminate]
  notice "Thanks for using my application!"
  close #main
  end
As you can see, the location of the bmpbutton control is specified as "bmpxoutbttn.bmp". This is an example of a relative path specification in which the location of a file is specified based on its location to the current working directory. In this example, the location of the xoutbttn.bmp bitmap image was found by looking in a subdirectory of the current working directory named bmp for the image file. When executed, this example displays the window containing the bmpbutton shown in Figure 3.11.
The checkbox control is used to give the user a choice between either of two options. Checkboxes include a text string that describes their function or value and can be set to either of two states: set or reset (cleared). When set, a checkbox control displays a square filled with a graphic checkmark. When cleared, a checkbox is displayed as an empty square. Checkboxes are often used to collect user preferences or to enable or disable certain application functions. You can add a checkbox to an application window using the following syntax.
checkbox #handle.ext, "caption", setHandler, resetHandler, x, y, width, heightAs you can see, the syntax for the checkbox control is very similar to that of the button control. The only differences between the two controls are that you can specify two event handlers that will be executed when the user sets or clears the checkbox control and that the width and height parameters are required.
To better understand how to work with the checkbox control, take a look at the following example. Here a window is opened that contains a checkbox and a button control. Clicking on the button control when it is in a cleared state causes the execution of the code statements located under the [set] switch label. When this occurs a popup dialog is displayed that identifies the status of the checkbox control as being equal to set. Clicking on the button control when it is in a set state causes the execution of the code statements located under the [reset] switch label. When this occurs a popup dialog is displayed that identifies the status of the checkbox control as being equal to reset.
Hint
Note the use of the goto command as the last statement under the [set] and [reset] switch labels. The goto command tells Just BASIC to jump to the specified switch label and execute any statements found there. In most computer programming languages, use of the goto command is considered to be a poor programming practice. Instead, most programming languages use functions and subroutines in order to group together collections of code statements that can be called upon to execute and, once done, return back to the code statement that called on them. Just BASIC also supports the use of functions and subroutines. However, the goto command is also commonly used as evidenced in Just BASIC’s online help documentation. I cover the use of labels in this chapter for both their historical value and because of Just BASIC’s support for them. However, starting with the next chapter, I will rely exclusively on subroutines and functions in place of labels and will provide you with a detailed discussion of both in Chapter 7.
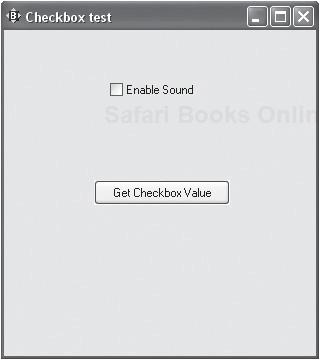
nomainwin

checkbox #main.checkbox1, "Enable Sound", [set], [reset], 106, 50, 130, 20
button #main, "Get Checkbox Value", [get_checkbox_value], UL, 90, 150
open "Checkbox test" for window as #main
print #main, "trapclose [terminate]"

[pause]
  wait

[set]
  print #main.checkbox1, "set"
  goto [pause]

[reset]
  print #main.checkbox1, "reset"
  goto [pause]

[get_checkbox_value]
  print #main.checkbox1, "value? cbstate$"
  notice "The checkbox control is currently set to "; cbstate$
  goto [pause]

[terminate]
  close #main
  end
When executed, this example displays the window shown in Figure 3.12. When clicked, a popup dialog is displayed that identifies the current state of the checkbox control (set or reset).
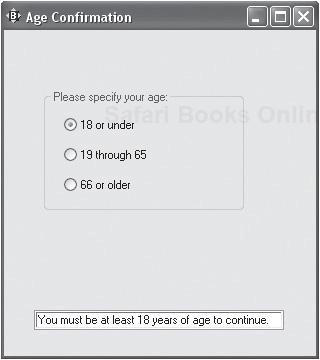
The radiobutton control is used in groups of two or more as a means of providing users with mutually exclusive choices. Radiobutton controls display a text label just to the right of the control. When selected, a radiobutton control’s circular image is filled in and all other radiobutton controls are cleared.
Trick
All radiobutton controls that are placed on a window are automatically treated as a group, allowing only one radiobutton control to be selected at a time. However, by placing radiobutton controls inside separate groupbox controls, you can define a separate set of radiobutton controls.
You can add a radiobutton to an application window using the following syntax.
radiobutton #handle.ext, "caption", setHandler, resetHandler, x, y, width, heightAs you can see, the syntax for the radiobutton control is exactly the same as that used by the checkbox control. To better understand how to work with the radiobutton control, take a look at the following example. Here a window is opened that contains three radiobutton controls.
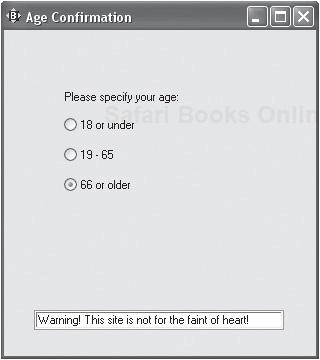
nomainwin

statictext #main.statictext "Please specify your age:", 60, 60, 120, 20
radiobutton #main.low, "17 or under", [warning], [nil], 60, 85, 130, 20
radiobutton #main.medium, "18 - 65", [reminder], [nil], 60, 115, 130, 20
radiobutton #main.high, "66 or older", [disclaim], [nil], 60, 145, 130, 20
textbox #main.textbox, 30, 280, 250, 20

open "Age Confirmation" for window as #main
print #main, "trapclose [terminate]"
print #main.low, "set"

[warning]
  #main.textbox, "You must be at least 18 years of age to continue."
  wait

[reminder]
  #main.textbox, "Please have your credit card ready to proceed."
  wait

[disclaim]
  #main.textbox, "Warning! This site is not for the faint of heart!"
  wait

[nil]
  wait

[terminate]
  close #main
  end
When executed, this example displays the window shown in Figure 3.13. Each time a different radiobutton control is selected, the message displayed in the textbox control is updated.
As with the checkbox control, Just BASIC lets you retrieve a radiobutton control’s value (set or reset), as demonstrated here:
print #main.low, "value? rbstate$"Here, the value of the radiobutton control with a handle of #main.low is retrieved and assigned to a variable named rbstate$.
A statictext control is used to display a text string on a window. Statictext controls are typically used to display descriptive information about other controls and to provide users with instructions and other helpful information. You can add a statictext control to an application window using the following syntax:
statictext #handle.ext, "caption", x, y, width, heightAs you can see, the syntax for the statictext control is straightforward. To better understand how to work with the statictext control, take a look at the following example. Here a window is opened that displays the opening line of a story using the statictext control.
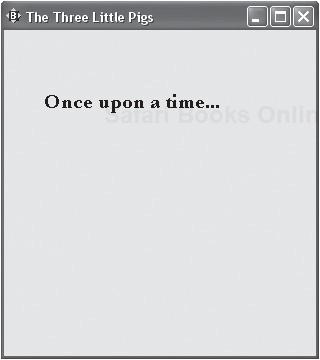
nomainwin

statictext #main.Statictext "Once upon a time...", 40, 60, 210, 30
open "The Three Little Pigs" for window as #main
print #main, "font Garamond 16 bold"

wait

[terminate]
  close #main
  end
When executed, this example displays the window shown in Figure 3.14.
The textbox control is a single-line input field that can be used to collect small amounts of text input provided by the user. The textbox control can also be used to display text. You can add a textbox control to an application window using the following syntax.
textbox #handle.ext, x, y, width, heightTo see how to add an instance of the textbox control to a window, take a look at the following example.
nomainwin

statictext #main.statictext "Please type your name:", 20, 30, 110, 30
textbox #main.Textbox, 20, 60, 200, 20

open "Textbox Control Demo" for window as #main

print #main, "trapclose [terminate]"

wait

[terminate]
  close #main
  end
Here, a textbox control that is 200 pixels long and 20 pixels high has been added to an application window, as demonstrated in Figure 3.15.

When executed, the user will be able to type text into the textbox control. You can program-matically retrieve any text keyed by the user into a textbox control using the following syntax.
print #handle.ext, "!contents? input$";
Here, the text entered by the user is stored in a variable named input$.
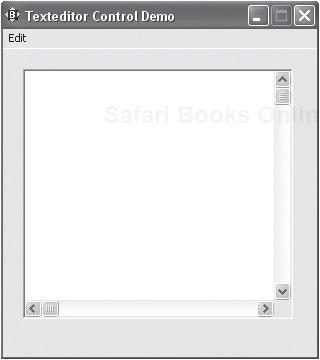
The texteditor control provides a multi-line text field that can be used to display text or to collect text input by the user. Using the texteditor control, programmers can create text-editing applications like Windows Notepad or FreeForm-J.
Scroll bars located on the right side and bottom of the texteditor control allow users to edit text that exceeds the visible display area of the control. The texteditor control allows text to be displayed in different fonts and sizes. It also supports numerous text-editing capabilities such as the ability to copy, cut, and paste a selected portion of text as well as the ability to select all displayed text.
You can add a texteditor control to an application window using the following syntax.
texteditor #handle.ext, x, y, width, heightTo see an example of how to add an instance of the texteditor control to a window, take a look at the following example.
nomainwin

texteditor #main.texteditor, 20, 20, 270, 250

open "Texteditor Control Demo" for window_nf as #main

print #main, "trapclose [terminate]"

wait

[terminate]
  close #main
  end
Here, a texteditor control that is 270 pixels long and 250 pixels high has been added to an application window, as demonstrated in Figure 3.16.
When executed, the user will be able to type text into the texteditor control. You can pro-grammatically retrieve any text keyed by the user into a texteditor control using the following syntax.
print #handle.ext, "!contents? input$";
As with the textbox control, this statement will take any text entered by the user and assign it to a variable named input$.
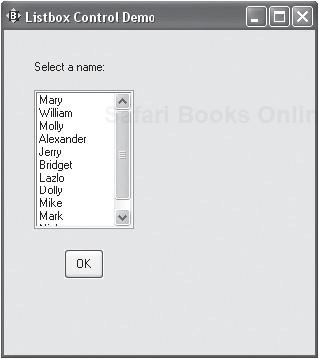
The listbox control is used to display a list of items from which the user can make a selection. Once selected, you can navigate the list of items using the keyboard’s up and down keys. If the list of items stored in the listbox is greater than that what can be displayed, scrollbars are automatically added to the listbox control. You can add a listbox control to an application window using the following syntax.
listbox #handle.ext, array$(), [label | subroutine], x, y, width, height
The listbox control is populated by associating it with an array through the array$() parameter. To better understand how to work with the listbox control, take a look at the following example.
nomainwin

names$(0) = "Mary"
names$(1) = "William"
names$(2) = "Molly"
names$(3) = "Alexander"
names$(4) = "Jerry"
names$(5) = "Bridget"
names$(6) = "Lazlo"
names$(7) = "Dolly"
names$(8) = "Mike"
names$(9) = "Mark"
names$(10) = "Nick"

statictext #main.statictext "Select a name:", 30, 30, 80, 20
listbox #main.listbox, names$(), [doubleclick], 30, 60, 100, 140
button #main.button, "OK", [displaychoice], UL, 60, 220, 40, 30
open "Listbox Control Demo" for window as #main
print #main, "trapclose [terminate]"

wait

[doubleclick]
  wait

[displaychoice]
  print #main.listbox, "selection? selected$"
  notice "You selected: "; selected$

[terminate]
  close #main
  end
Hint
This example creates an array, which is an indexed list of values, and uses it to populate the contents of the listbox control. You will learn all about arrays in Chapter 4, “Working with Variables and Arrays.”
When executed, this previous example displays the window shown in Figure 3.17.
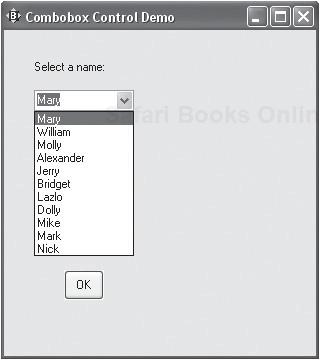
The combobox control includes features provided by the listbox and textbox controls. The combobox control is used to present users with a list of options from which to select, similar to a listbox control. Alternatively, users can type in their own entry, similar to a textbox control. Comboboxes are often used when space is limited and there is insufficient room available to display both listbox and textbox controls. You can add a combobox control to an application window using the following syntax.
combobox #handle.ext, array$(), [label | subroutine], x, y, width, height
The combobox control is populated by associating an array with it. To get a better understanding of how to create and populate a combobox control with items, take a look at the following sample program.
nomainwin

names$(0) = "Mary"
names$(1) = "William"
names$(2) = "Molly"
names$(3) = "Alexander"
names$(4) = "Jerry"
names$(5) = "Bridget"
names$(6) = "Lazlo"
names$(7) = "Dolly"
names$(8) = "Mike"
names$(9) = "Mark"
names$(10) = "Nick"

statictext #main.statictext "Select a name:", 30, 30, 80, 20
combobox #main.combobox, names$(), [select], 30, 60, 100, 140
button #main.button, "OK", [displaychoice], UL, 60, 240, 40, 30

open "Combobox Control Demo" for window as #main

print #main, "trapclose [terminate]"

wait

[select]
  wait

[displaychoice]
  print #main.combobox, "selection? selected$"
  notice "You selected: "; selected$

[terminate]
  close #main
  end
When executed, this example displays a window with a combobox and a button control. Clicking on the combobox control’s down arrow displays a list of items, as shown in Figure 3.18.
The groupbox control is used to group controls together on a window. A groupbox control consists of a box with a label displayed in the upper-left corner. Groupbox controls can be used to visually organize other controls. However, groupbox controls are typically used to group radiobutton controls, allowing different groups of radiobutton controls to operate independently of each other.
You can add a groupbox control to an application window using the following syntax.
groupbox #handle.ext, "caption", x, y, width, heightAs you can see, the syntax for the groupbox control is straightforward. To better understand how to work with the groupbox control, take a look at the following example.
nomainwin

groupbox #main, "Please specify your age:", 40, 60, 200, 120

radiobutton #main.low, "17 or under", [warning], [nil], 60, 85, 130, 20
radiobutton #main.medium, "18 through 65", [reminder], [nil], 60, 115, 130, 20
radiobutton #main.high, "66 or older", [disclaimer], [nil], 60, 145, 130, 20
textbox #main.textbox, 30, 280, 250, 20

open "Age Confirmation" for window as #main
print #main, "trapclose [terminate]"
print #main.low, "set"

[warning]
  #main.textbox, "You must be at least 18 years of age to continue."
  wait

[reminder]
  #main.textbox, "Please have your credit card ready to proceed."
  wait

[disclaimer]
  #main.textbox, "Warning! This site is not for the faint of heart!"
  wait

[nil]
  wait

[terminate]
  close #main
  end
This example is identical to the example presented earlier when the radiobutton control was introduced, the only difference being that instead of preceding the list of radiobutton controls with a statictext control, the controls are organized and presented inside a groupbox control, as shown in Figure 3.19. As such, each of these three radiobutton control functions is part of a group. Any other radiobutton control that might be added to the application window outside of the groupbox control will be treated as being part of a separate group.
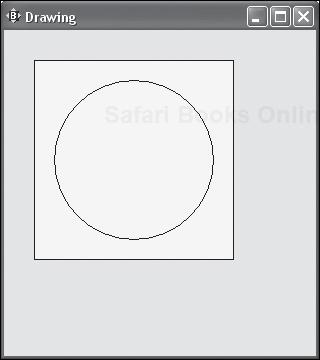
The graphicbox control provides programmers with the ability to display bitmap images. Alternatively, the graphicbox control also allows programmers to draw shapes such as squares and circles and text characters.
You can add a graphicbox control to an application window using the following syntax.
graphicbox #handle.ext, x, y, width, heightAs you can see, the syntax for the graphicbox control is straightforward. Once added, you can use it to display graphics and draw graphic shapes using graphics commands. To better understand how to work with the graphicbox control, take a look at the following example.
nomainwin

graphicbox #handle.gbox, 30, 30, 200, 200
open "Drawing" for window as #handle

print #handle.gbox, "home"       'center the pen
print #handle.gbox, "down"       'ready to draw

print #handle.gbox, "fill yellow"   'fill the graphics area yellow
print #handle.gbox, "circle 80"  'draw a circle
print #handle.gbox, "flush"      'make the graphics stick

wait
In this example, a graphicbox control is added to a window that is 200 pixels wide by 200 pixels high. A series of print commands is then executed that locate the center of the control, prepare it for drawing, fill in the background color with yellow, and then draw a circle with a radius of 80 pixels, as shown in Figure 3.20. Finally, the flush command is executed, ensuring that the image is not overwritten in the event the window is covered or temporarily minimized. You will learn more about graphics commands later in Chapter 9, “Working with Sound and Graphics.”
When the user clicks on an interface control, such as a textbox control, that control is said to have focus. This means that any keyboard input will be sent to the control. Therefore a textbox or texteditor control with focus will accept as input any text keyed in by the user. Likewise, a control such as a button control that has focus will respond if the user presses the Enter key, which is equivalent to clicking on the control using the mouse. You can program-matically assign focus to a given control using the setfocus command, as demonstrated here:
print #main.textbox1, "!setfocus"
Here, focus is set to a textbox control whose handle is #main.textbox1 on a window whose handle is #main. Since the textbox control accepts text input, you must precede the setfocus command with the ! character in order to prevent the command from being displayed as a string in the control instead of being executed.
If necessary, you can control the availability of a control by enabling and disabling it during program execution. A disabled control is visible on the application window but is grayed out and cannot be accessed. For example, you might want to disable a control that is used to save a file until a file has been opened by the application. Once opened, you could enable the control and when the file is closed, you might want to again disable the control.
To disable a control, all you have to do is pass the disable command to it, as demonstrated here:
print #main.button1 "!disable"
Here, a button control is disabled. The button control accepts text input passed to it from the print command as its caption. Adding the ! character to the beginning of the disable command instructs Just BASIC to instead execute the disable command. As you might guess, you can enable any control using the enable command, as demonstrated here:
Print #main.button1 "!enable"
Earlier in the chapter you learned how to use the font command to specify the font type and size for an application window and its controls. Just BASIC allows you to override this font setting on a control by control basis. For example, you can specify that the font used for a given control has its own unique font type and size. This is accomplished using the print command to send the font command to a specific control by referencing that control’s handler, as demonstrated here:
print #main.button, "!font Arial 14"
Here, the button control’s font type has been set to Arial size 14. This statement only sets the font type and size for the specified control and has no effect on the rest of the window or on any other controls.
Earlier in the chapter you also learned how to set a window’s background and foreground colors by modifying the value of the BackgroundColor$ and ForegroundColor$ special variables. If you want, you can change the background color assigned to the textbox, combobox, listbox, and texteditor controls by assigning a color to the following special variables.
ComboboxColor$ListboxColor$TextboxColor$TexteditorColor$
For example, the following statement will set the background color of any textbox controls to yellow (regardless of what the window’s background color may be set to).
TextboxColor$ = "yellow"
textbox #main.textbox1, 30, 30, 50, 50
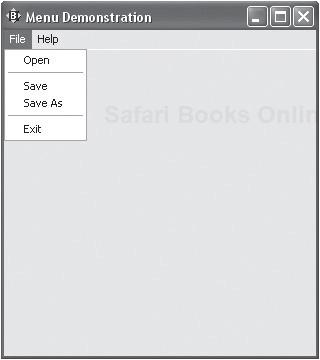
Menus are dropdown lists located at the top of the window, just underneath the window’s title bar. Menus consist of menu items. The user interacts with menus by clicking on them and then selecting the appropriate menu item, which in turn sends a command to the application. Menus are defined using the menu command, which has the following syntax.
menu #handle, "title", "menuitem1", [label | subroutine], [|], _
  ["menuitem2", [ label | subroutine] ]
title sets the name of the menu (File, View, Settings, Help, etc.). menuitem specifies the name of a menu item (Open, Save, Close, Exit, etc.). You may add as many menu items as necessary to a menu. You may also include an optional | character in between menu items in order to insert a separator line. A separator line helps to visually organize related groups of menu items.
Hint
In Just BASIC, menus are added to application windows programmatically via code statements. Other programming languages like Visual Basic and REALbasic provide programmers with the option of creating application menus visually. For example, Visual Basic provides an interface control that facilitates the addition of application menus.
You can set up accelerator keys for menus and menu items by inserting the & character at the appropriate location in the title or menuitem name. When inserted, the character following the & character becomes the menu or menu item’s accelerator key. Accelerator keys are easily identified when the application is run because they are underlined. Accelerator keys are activated by holding down the Alt key and then pressing the specified accelerator key (for example Alt+P to print or Alt+S to save). Using accelerator keys, users can access menus and menu items using only the keyboard.
Just like window interface controls, you must define any menus prior to opening the windows that will contain them. To get a better understanding of how to add menus to your Just BASIC applications, consider the following example.
nomainwin

menu #main, "&File", "&Open", [openfile], |, "&Save", [savefile], _
  "&Save As", [saveas], |, "&Exit", [terminate]

menu #main, "&Help", "App&lication Help", [apphelp], |, "&About My Application", _

  [aboutapp]

open "Menu Demonstration" for Window as #main

wait
Hint
In order to create desktop applications that will meet the needs and expectations of today’s users, your Windows applications need to follow certain standards. In regard to menus, this means using familiar titles when naming menus (File, View, Help, etc.). Users also expect to have the option of using accelerator keys. You should also take care to follow standard conventions when assigning accelerator keys to menus and menu items. Otherwise, users will become confused. For example, the accelerator key for File menu items like Open should be the letter O, whereas the accelerator key for the Help menu is always the letter H.
Here, two menus have been added to the window, File and Help. The File menu has been assigned an accelerator key of Alt+F and the Help menu has an accelerator key of Alt+H. The File menu contains four menu items, each of which has been configured to call upon a different label, and the Help menu contains two menu items. If executed, the previous example would produce the menus shown in Figure 3.21.
Hint
Any windows to which you add a textbox or texteditor control automatically inherit an Edit menu. By default, the Edit menu will appear to the right of any other menus that you may have added to a window. If you want, you may specify the location of the Edit menu using the menu command, as demonstrated here:
menu #main, "&File", "&Open", [openfile]

menu #main, "edit"

menu #main, "&Help", #App&lication Help", [apphelp]
You must specify the menu command for the Edit menu exactly as shown above. Do not include the & character or attempt to specify or modify the contents of the Edit menu; otherwise, things will not work properly.
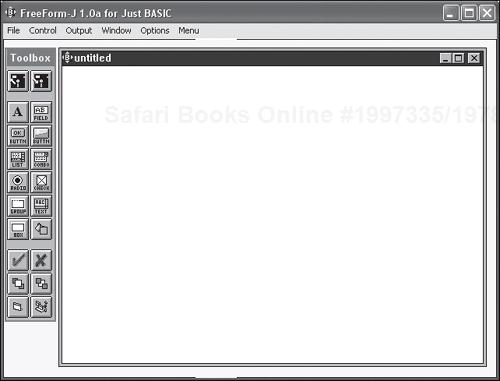
FreeForm-J is a Just BASIC application supplied as part of Just BASIC’s distribution package. FreeForm-J is a program that assists Just BASIC programmers in visually designing graphical user interfaces. It allows programmers to add instances of controls to a window and then move and resize them and modify their properties. FreeForm-J also facilitates the creation of menus and can be used to specify a window’s title bar, type, and handle and color scheme. Once you have used FreeForm-J to design an application window, you can instruct FreeForm-J to generate the program code required to regenerate the window for you. You can then copy and paste this code into your Just BASIC application.
Most modern Windows programming languages that support desktop application development provide a RAD window development capability, allowing programmers to design application windows using pre-built controls that are dragged and dropped onto windows. For example, REALbasic provides programmers with an assortment of controls that can be dragged and dropped onto the application windows and then rearranged and resized as necessary, as demonstrated in Figure 3.22.
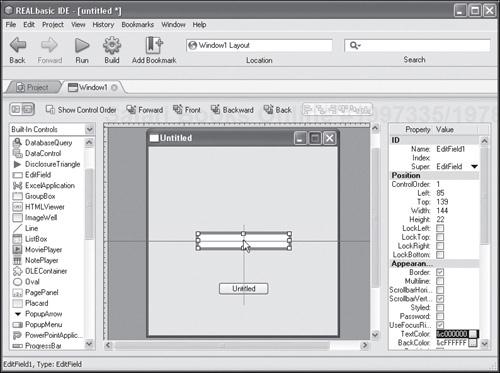
Figure 3.22. REALbasic assists programmers by providing alignment indicators that automatically appear as programmers use drag and drop to build application windows.
To start FreeForm-J, click on Just BASIC’s Run menu and select the FreeForm-J GUI Editor menu item. FreeForm-J automatically opens a new blank application window when you start, as demonstrated in Figure 3.23.
To design an application window using FreeForm-J, you click on an image representing a Just BASIC control from the Toolbox pane. In response, FreeForm-J places an instance of that control on the application window and opens a property window that displays a list of properties associated with that control, as demonstrated in Figure 3.24. In some cases, such as when a button control is added, you are first prompted to provide some additional information such as the name of the caption to be displayed on the control.
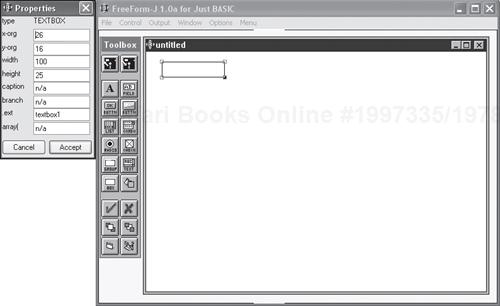
Once added, you can make changes to a control. For example, using the resize button handlers that appear when you click on the control, you can change the size of the control. You can drag the control to a different location on the window. You can also modify the control by making changes to the text fields displayed in the control’s Properties window.
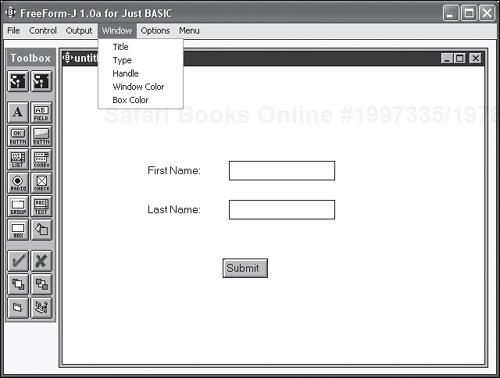
You can set the window’s title bar string or change the window’s type, handle, and color scheme by opening FreeForm-J’s Window menu and selecting the appropriate menu option, as shown in Figure 3.25. Each of the menu items opens a popup window that lets you specify the appropriate window setting.
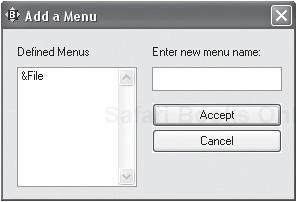
FreeForm-J also assists programmers in developing application menus. To do so, just click on the Add a Menu option on FreeForm-J’s Menu menu. In response, the Add a Menu window is displayed. To add a menu to the application window, enter a name for it in the Enter New Menu Name field and click on Accept. You may include the & character in order to assign an accelerator key to the menu, as demonstrated in Figure 3.26.
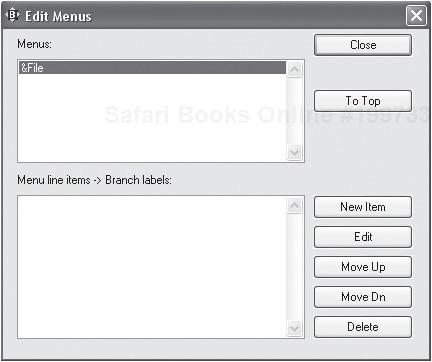
You may add as many menus as you want to the application window. Once you have finished adding all the menus needed on the application window, you can edit each menu in order to assign its menu items. This is done by clicking on the Edit Menus option located on the Menu menu. This opens the Edit Menus window, as shown in Figure 3.27.
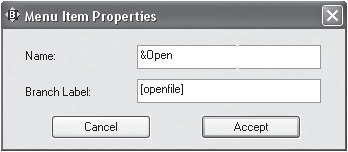
To edit a menu, select it from the list of menus that you have added to the window and then click on the New Item button. This opens the Menu Item properties window, which prompts you to supply a name and label for the menu item, as demonstrated in Figure 3.28.
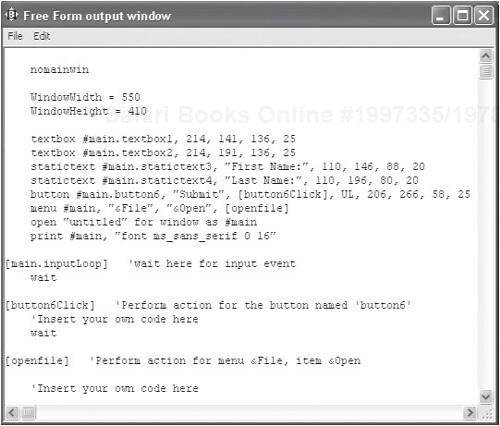
Once you have completed the design of your new application window, you can tell FreeForm-J to generate the code statements required to programmatically regenerate the window for you by clicking on the Output menu and selecting either the Produce Code or Produce Code + Outline menu items. Selecting the Produce Code menu item instructs FreeForm-J to generate and display the source code required to re-create the application window, as demonstrated in Figure 3.29.

Figure 3.29. Instructing FreeForm-J to provide you with the program code required to regenerate the newly designed application window.
Selecting the Produce Code + Outline menu item instructs FreeForm-J to not only provide the program code required to regenerate the application window but to also include labels as part of the program code, as demonstrated in Figure 3.30.
Once you have designed an application window, have everything looking like you want it to, and have generated the program code required to regenerate it, you can copy the program code and paste it into your Just BASIC application. This saves you the time and effort required to otherwise programmatically develop the source code to create the application window yourself.
It is not always necessary to add new windows to your Just BASIC applications in order to interact with the user. Like many programming languages, such as Visual Basic and VBScript, Just BASIC provides programmers with access to a number of pre-built dialogs that can be used to communicate with users and to collect small amounts of information. These dialogs include:
Notice
Confirm
Prompt
Filedialog
By taking advantage of these dialog windows, you can reduce the number of windows needed by your application and simplify your program code.
The notice command is used to display popup dialogs that display a text string and an OK button. Programmers can use this dialog to display small amounts of information and to pause program execution until the user closes the dialog. To display a Notice dialog, you use the notice command, which has the following syntax.
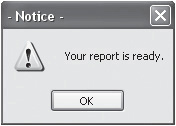
notice "string"To see the notice command in action, look at the following example.
notice "Your report is ready."
When executed, this statement produces the popup dialog shown in Figure 3.31.
Trick
If you insert the carriage return character (chr$(13)) between two strings, as demonstrated below, you can display a message in the title bar of a Notice dialog.
notice "Reminder!" + chr$(13) + "Your report is ready."
In this example, the string "Reminder!" will be displayed in the Notice dialog’s title bar and the second string will be displayed as a message inside the dialog. If you add three or more carriage return character separated strings to a notice command, Just Basic will display the first string in the dialog’s title bar and the rest of the strings will be displayed as a multi-line message. You can also use the carriage return character to display title bar messages and to display multi-line messages when working with the confirm and prompt commands.
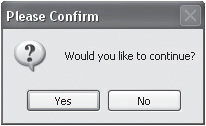
The Confirm dialog is similar to the Notice dialog. However, the Confirm dialog displays two buttons, Yes and No, allowing programmers to display a question and to collect either of two answers. The Confirm dialog is generated using the confirm command, which has the following syntax.
confirm "string"; response$
To see the confirm command in action, look at the following example.
confirm "Would you like to continue?"; response$
When executed, this statement produces the popup dialog shown in Figure 3.32.
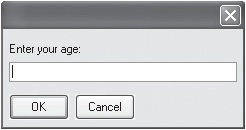
The Prompt dialog is used to display a popup dialog that prompts the user to enter a small amount of text. The Prompt dialog displays two buttons, OK and Cancel. The Prompt dialog is generated using the prompt command, which has the following syntax.
prompt "string"; response$
response$ is used to collect the user’s input. If the user clicks on the Cancel button without entering any input, an empty string ("") is returned. If you assign a value to the response$ variable prior to displaying a Prompt dialog, the value of response$ is displayed as the default response inside the popup dialog, allowing the user to accept this value by clicking on the OK button.
To see the prompt command in action, look at the following example.
prompt "Enter your age:"; response$
When executed, this statement produces the popup dialog shown in Figure 3.33.
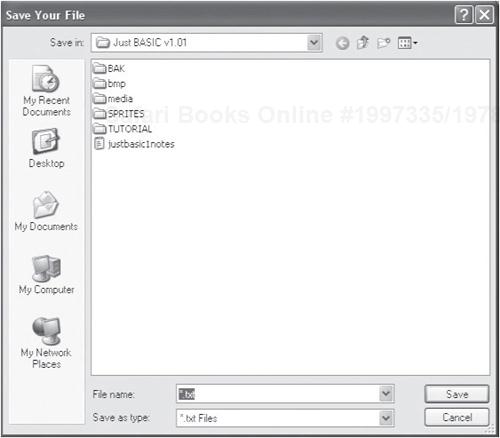
The Filedialog dialog is used to display the Windows Common Filedialog window. This window lets you navigate the Windows file system in order to either locate a file or to specify the name and location where a file should be saved. The Filedialog dialog is generated using the filedialog command, which has the following syntax.
filedialog "title", "template", response$
title represents a string to be displayed in the dialog’s title bar. template is a string that identifies the type of file to be opened. For example, specifying "*.txt" will tell the application to only show files with a .txt file extension. You can set the dialog to display more than one file type by setting template equal to two or more file extensions separated by semicolons ("*.txt; *.doc; *.wtf"). response$ represents the name of a variable to be used to store the full file and path name of the file.
The following example demonstrates how to use the Filedialog window to allow the user to select a file to be opened.
filedialog "Select a File to Open", "*.txt", filename$
When executed, this statement produces the popup dialog shown in Figure 3.34.

If you include the word “save” somewhere in the string representing the title bar message, the save style of the dialog will be displayed instead, as demonstrated below.
filedialog "Save Your File", "*.txt", filename$
When executed, this statement produces the popup dialog shown in Figure 3.35.
Okay, let’s turn attention back to the development of this chapter’s game project, the BASIC Crazy 8 Ball game. The development of this game will give you firsthand experience with GUI development. Rather than develop the game’s GUI windows using FreeForm-J, the instructions provided focus on the programmatic development of those windows. This approach will help provide you with a better understanding of the programming logic required to build application interfaces. Later, once you feel you have a good understanding of the mechanics involved in GUI development, you can take advantage of FreeForm-J if you want to speed up window development.
The design of the BASIC Crazy 8 Ball game will follow the same patterns used in previous chapters to develop chapter projects. The BASIC Crazy 8 Ball game will be created in seven steps, as outlined here:
Create a new BASIC file and document its purpose.
Display the game’s opening welcome screen.
Initiate game play.
Close the game if the user decides not to play.
Collect the player’s question.
Generate an answer.
Close the game when the player finishes asking questions.
The first step in the creation of the BASIC Crazy 8 Ball game is to create a new BASIC file and add the following statements to it in order to provide a little information about the game and its author.
' *************************************************************************
'
' Script Name: Crazy8Ball.bas (The BASIC Crazy 8 Ball Game)
' Version:     1.0
' Author:      Jerry Lee Ford, Jr.
' Date:        March 1, 2007
'
' Description: This Just BASIC game imitates a Crazy 8 fortune telling
'              ball
'
' *************************************************************************
The next step in the development of the game is to display a window that welcomes the player to the game and prompts the player to begin game play. This is achieved by adding the following statements to the end of the program file.
nomainwin   'Suppress the display of the default text window

WindowWidth = 500  'Set the width of all application windows to 500 pixels
WindowHeight = 400

BackgroundColor$ = "Black"   'Set the window's background color to black
ForegroundColor$ = "Yellow"  'Set the window's background color to yellow

'Use variables to store text strings displayed in the window
IntroMsg1$ = "W E L C O M E   T O   T H E   C R A Z Y   8 B A L L"
IntroMsg2$ = "F O R T U N E   T E L L I N G   G A M E"
IntroMsg3$ = "Copyright 2007"
IntroMsg4$ = "Jerry Lee Ford, Jr,"

'Define the format of statictext controls displayed on the window
statictext #main.statictext, IntroMsg1$, 120, 50, 300, 14
statictext #main.statictext, IntroMsg2$, 147, 80, 300, 14
statictext #main.statictext, IntroMsg3$, 210, 160, 300, 14
statictext #main.statictext, IntroMsg4$, 204, 190, 300, 14

'Define the format of button controls displayed on the window
button #main.button "  Play  ", [PrepareGame], UL, 174, 300
button #main.button "  Quit  ", [CloseMain], UL, 260, 300

'Open the window with no frame and a handle of #main
open "BASIC Crazy 8 Ball" for window_nf as #main

'Pause the application to wait for the player's instruction
Wait
As you can see, the first statement executes the nomainwin command in order to prevent the display of the mainwin window. The next two statements set the value of WindowWidth and WindowHeight to 500 and 400 respectively, thus determining the size of the application window. Next, the values of BackgroundColor$ and ForegroundColor$ are set to black and yellow, respectively. The next set of statements assigns text strings to a series of variables, which are used in the four statements that follow. These statements add statictext controls to the window in order to display the text that introduces the game to the player. The two statements that follow add two button controls to the window, one labeled Play and the other labeled Quit. When the application is run, clicking on the Play button will execute the code statements located after the [PrepareGame] label, and clicking on the Quit button will execute the code statements located after the [CloseMain] label. The next statement displays the application window using the open command. Finally, the last statement executes the wait command, pausing the application in order to wait for the player to click on one of the button controls.
The next step in the development of the BASIC Crazy 8 Ball game is to add the code statements associated with the [PrepareGame] label, shown next, to the end of the program.
'This static handle is executed when the player clicks on the button
'control labeled Play located on the #main window. It closes the
'#main window and initiates game play by switching to the [PlayGame]
'static handler
[PrepareGame]

  close #main   'Close the #main window
  goto [PlayGame]   'Switch to the [PlayGame] static handler
The code statements located under the [PrepareGame] label execute when the player clicks on the button control labeled Play. The first statement closes the opening window using the close command, passing it the window’s handle. The second statement uses the goto command to execute the code statements associated with the [PlayGame] label.
Now it is time to add the code statements for the [CloseMain] label, which are shown next, to the end of the program file. These statements are responsible for terminating the application in the event the player clicks on the button control labeled Quit.
'This static handle is executed when the player clicks on the button
'control labeled Quit. It closes the #main window and then terminates
'the execution of the game
[CloseMain]

  close #main
  end
The first statement closes the application window and the second statement executes the end command, which stops the application’s execution.
When executed, the code statements that follow the [PlayGame] label are responsible for displaying an application window that collects the player’s question.
'When executed, this static handler displays a window that collects the
'player's question.
[PlayGame]

  BackgroundColor$ = "White"    'Set the window's background color to white
  ForegroundColor$ = "Black"    'Set the window's foreground color to black

  'Use variables to store text strings displayed in the window
  Instructions1$ = "Type your question in the entry field provided below"
  Instructions2$ = "and click on the Ask button to have your fortune told!"

  'Define the format of statictext controls displayed on the window
  statictext #play.statictext, Instructions1$, 120, 50, 300, 14
  statictext #play.statictext, Instructions2$, 116, 80, 300, 14
  'Define the format of button controls displayed on the window
  button #play.button "  Ask   ", [AskQuestion], UL, 174, 300
  button #play.button "  Quit  ", [ClosePlay], UL, 260, 300
  textbox #play.textbox 30, 140, 430, 25

  'Open the window with no frame and a handle of #play
  open "BASIC Crazy 8 Ball" for window_nf as #play

  'Set focus to the textbox control
   print #play.textbox, "!setfocus"

   'Pause the application to wait for the player's instruction
   wait
The first two statements set the background and foreground color of the new window. The next two statements assign a text string to two variables. Two statictext controls are then added to the window, displaying the values assigned to Instructions1$ and Instructions2$. Next, two button controls labeled Ask and Quit are added to the window. When clicked, the button control labeled Ask will cause statement execution to jump to the [AskQuestion] label. Likewise, if the button control labeled Quit is clicked, the statement following the [ClosePlay] label is executed.
Next, a textbox control is added to collect the player’s input. Finally, the open command is used to display the application window, focus is assigned to the textbox control, and the wait command is executed, pausing the application until the player does something.
Next, let’s add the code statements associated with the [AskQuestion] label, shown next, to the end of the BASIC file. These statements are responsible for generating and displaying an answer to the player’s question.
'This static handler is called from the #play window when the player clicks
'on the Ask button. Its job is to process the player's input and respond
'appropriately.
[AskQuestion]

  'Retrieve the text string stored in the textbox control
  print #play.textbox, "!contents?"
  'Assign the text string to a variable named question$
  input #play.textbox, question$
  close #play     'Close the #play window

  'Displays an error message in the event the player did not enter anything
  if question$ = "" then

    'Display an error message in a popup dialog
     notice "BASIC Crazy 8 Ball" + chr$(13) + _
      "Error: You forgot to type a question!"

     'Switch back to the [PlayGame] handle to allow the player to ask a new
     'question
     goto [PlayGame]

  else  'Generate a random answer to the player's question

    'Use the rnd() function to retrieve a random number between 1 and 3 and
    'assign the result to a variable named RandomNumber
    RandomNumber = int(rnd(1)*3) + 1

    'Select an answer based on the value assigned to the RandomNumber
    'variable
    if RandomNumber = 1 then answer$ = "YES"
    if RandomNumber = 2 then answer$ = "MAYBE"
    if RandomNumber = 3 then answer$ = "NO"

    'Display the answer to the player's question in a popup dialog
    notice "BASIC Crazy 8 Ball" + chr$(13) + "The answer is " + _
      answer$ + "."

    'Switch back to the [PlayGame] handle to allow the player to ask a new
    'question
    goto [PlayGame]

  end if
The first statement following the [AskQuestion] label retrieves the contents of the textbox control and the statement that follows places a copy of the data that is retrieved into a variable named question$. Next, the window containing the player’s question is closed. The rest of the code statements located under this label are wrapped inside if...then...else code blocks. The if...then...else statements are used to implement conditional logic, which you will learn about in Chapter 5, “Making Decisions with Conditional Logic.” The logic contained in these statements first checks to see if the player keyed in a question before clicking on the Ask button, displaying an error message if this is the case. Assuming that the player provided input, a random number between 1 and 3 is generated and based on the number that is selected, a value of YES, MAYBE, or NO is selected and displayed as the answer to the player’s question.
Hint
In order to generate the game’s random number, two built-in Just BASIC functions are used, int() and rnd(). A function is a collection of code statements that can be called on and executed as a unit. The int() function takes a number as input and returns an integer. The rnd() function returns a random number between 0 and 1. Therefore, the statement
RandomNumber = int(rnd(1)*3) + 1
uses the rnd() function to generate a number between 0 and 1, multiplies that number by 3, and then adds 1. Then end result is a number between 1.0 and 3.99. This value is then processed by the int() function, resulting in a value of 1, 2, or 3. This value is then assigned to the RandomNumber variable.
The notice command is used to display messages in a popup dialog window. In addition, the goto command is used to jump the program back to the [PlayGame] label, thus preparing the game to redisplay the #play window, allowing the player to ask another question.
The final set of statements to be added to the end of the BASIC file are those associated with the [ClosePlay] label. These statements are shown here:
'This static handle is executed when the player clicks on the button
'control labeled Quit. It closes the #play window and then terminates
'the execution of the game
[ClosePlay]

  close #play
  end
When called, these statements close the application window and then terminate application execution by running the end command.
That’s it. Assuming that you have not made any typos when keying in the source code for the game, everything should be ready. So go ahead and run the game a few times to see if everything works as expected. When testing the game, make sure that you try every feature by taking the time to click on every control and window button. Also, try submitting a question without actually typing anything in to make sure that the game correctly informs you that an error has occurred.
In this chapter you learned how to create graphical user interfaces for Windows applications. This included learning how to create different types of application windows as well as how to add different interface controls, such as button and textbox controls, to application windows. You learned how to implement event-driven programming in order to associate specific code statements with specific windows and interface controls. You learned how to set window and control properties such as font size and type and foreground and background color. On top of all this, you also learned how to work with FreeForm-J in order to visually create graphical user interfaces and to generate source code that goes along with them.
Before moving on to Chapter 4, why don’t you set aside some time to improve the BASIC Crazy 8 Ball game by tackling the following list of challenges.