
Chapter 2
Setting the Scene
• Creating a JavaFX project in NetBeans
• Creating a Stage and a Scene
• Running a JavaFX application
In this chapter you will learn how to set up a new JavaFX project in NetBeans. JavaFX projects can be confusing for beginners, and sorting through some of that confusion will help you follow the rest of this book. This chapter walks you through, step by step, the process of creating your first project, adding a Stage to the project, adding a Scene to the Stage, and running the application.
Creating a New JavaFX Project
If you have not already, open your copy of NetBeans 6.9. You will create a new JavaFX project for this chapter using NetBeans.
NOTE
You will use the project created in this section throughout this book. As you progress through the book, you will continue to add script files for the examples in each chapter.
With your NetBeans IDE open, click File | New Project (or press ctrl-shift-n), as seen in Figure 2-1.
Selecting New Project will open the New Project Wizard. Notice that the New Project Wizard contains multiple project categories. This is because NetBeans is used for more than just JavaFX development. However, the Categories option JavaFX and the Projects option JavaFX Script Application should both be pre-selected for you, as seen in Figure 2-2. Accept these defaults and click Next. If these options are not selected, choose them now.
The next step in the wizard is the Name and Location step. NetBeans is looking for a name for you project. Name your project JavaFXForBeginners. This is a good, descriptive name for your project that will make it easy to identify.
Finally, unselect the last option (Create Main File) in the Name and Location step. If this option is selected, NetBeans will create your first script file for you. However, NetBeans will add some basic setup code that you want to add yourself this time. Therefore, you will be creating this file separately.
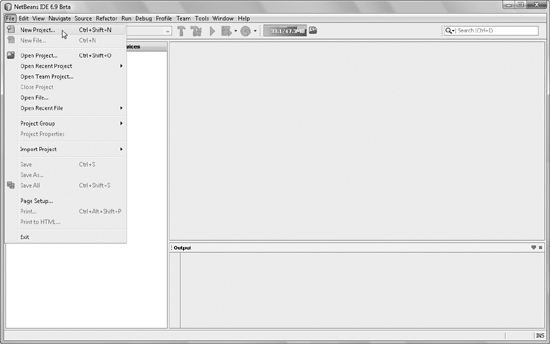
Figure 2-1 Creating a new project
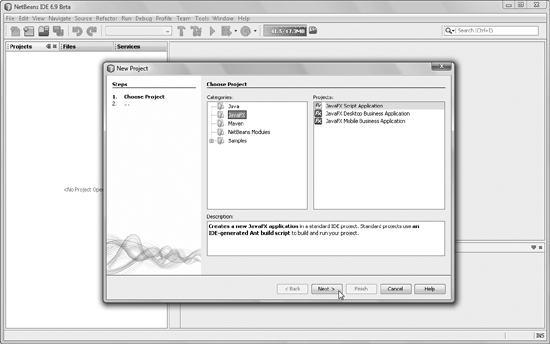
Figure 2-2 New Project Wizard selection window
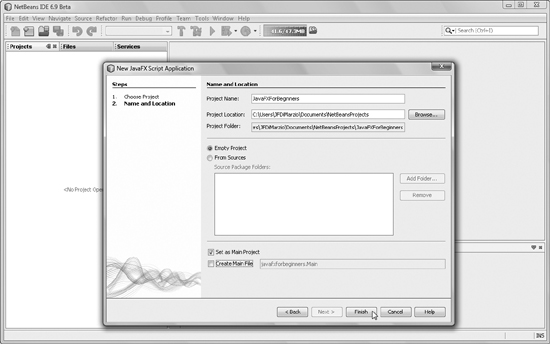
Figure 2-3 Name and Location step
Feel free to accept all the other defaults in this step. Your Name and Location step should appear as shown in Figure 2-3.
Click the Finish button to create your empty project. In the following section you will add a package and a script to your project.
The Empty JavaFX Project
Once your new project is created, the New Project Wizard will return you to the NetBeans IDE, as shown in Figure 2-4. On the left side of the screen is a Projects explorer frame. Your JavaFXForBeginners project will be displayed in this frame.
Click the plus sign next to the Source Packages folder. The Source Packages folder will contain the packages for your project.
A Java package is a full collection of classes (or in this case, JavaFX scripts) that are all related. All the files in a package will be compiled together into a JAR (Java Archive) file and can be referenced in other projects. If you have worked with another platform such as Silverlight or .NET, you can think of a Java package as equivalent to a namespace.
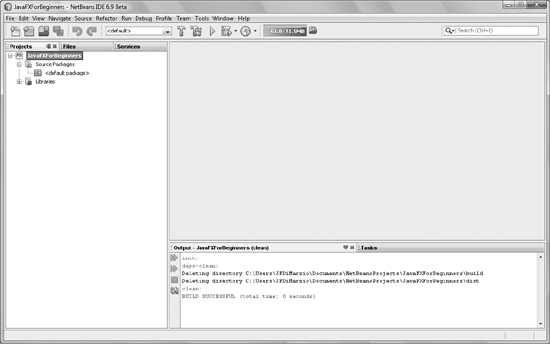
Figure 2-4 NetBeans IDE with a new project
For example, if you were building a set of Java classes that calculate the area of a shape, you could build them into a specific “area calculator” package. This namespace, and all the classes in it, could then be compiled into a JAR file. You could then use that JAR file in any project where you want to be able to calculate area by simply including that JAR file and referencing the namespace.
Packages have a naming convention you will need to adhere to in JavaFX. A package is named using a hierarchical domain structure that represents you as a developer. Much like a website URL in reverse, the namespace name should begin with the top-level domain followed by the related domain names. For this project we will use the following package:
com.jfdimarzio.javafxforbeginners
This namespace represents the beginners level of my JavaFX instruction (my name is jfdimarzio). Of course, you should feel free to use a namespace that represents you.
If you choose to use a package name that better represents you, rather than the example (com.jfdimarzio.javafxforbeginners) I will be using in this book, you will need to remember it whenever I refer to the package in new projects.
TIP
By convention, all Java namespace and project names should be lowercase. For more information about Java naming conventions, visit http://java.sun.com/docs/codeconv/html/CodeConventions.doc8.html.
If you examine the Source Packages folder of the JavaFXForBeginners project, you will see that you do not yet have a package for your source files (as denoted by the <default package> placeholder). Create a new package using the Java naming convention.
To create a new package, right-click the project name in the Projects frame and then select New | Java Package…from the context menu, as shown in Figure 2-5.
NOTE
The order of your menu items may differ from those in Figure 2-5.
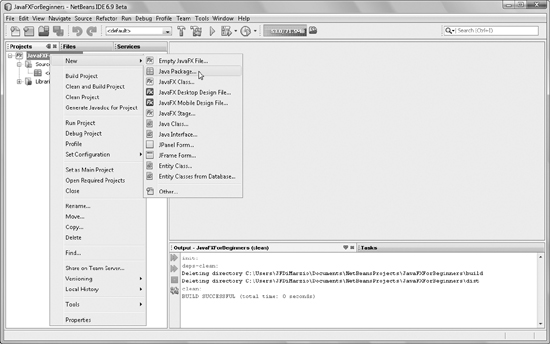
Figure 2-5 The Project context menu
NetBeans will give you a default package name of newpackage. You will type over this default package name with com.jfdimarzio.javafxforbeginners. You can accept the other default values and click the Finish button to create your package.
You will find that the <default package> placeholder in your project has now become the com.jfdimarzio.javafxforbeginners package. All the files you place in this package will be compiled into the com.jfdimarzio.javafxforbeginners JAR. This is the correct behavior for what you want to achieve.
With your new package created, it is time to add your first script file.
Adding Working Files to Your Project
Having looked at your newly created project and package, you may be wondering where you begin typing your code. For example, if you were writing a document or memo, you would likely type into a text document file (.txt or .docx). If you were creating a spreadsheet in Microsoft Office, you would type into an Excel file (.xlsx). To create a JavaFX application, you need to type into a JavaFX script file. JavaFX script files have a file extension of .fx.
Take a look at the com.jfdimarzio.javafxforbeginners package; you will be able to quickly determine that, in fact, there are no JavaFX script files for you to begin writing your code. You need to add a file to your package to begin coding. Right-click your package to bring up the context menu. Click New | Empty JavaFX File. . . to add an .fx file to your package. Name the file Chapter 1 and click the Finish button.
NetBeans has just created your first working script file. The file will be open and displayed in the center of the IDE, as shown in Figure 2-6.
NOTE
Your screen may differ slightly from that in Figure 2-6.
Your new JavaFX script file should be open in the main panel of the NetBeans IDE. In the following sections, you will take a quick tour of the features available to you in NetBeans as well as the new script file, and you will compile your first JavaFX application.
Exploring the Empty Project in NetBeans
You should now have a shell of a JavaFX project open in your NetBeans IDE. Your NetBeans JavaFX project should look like Figure 2-6. You might think that an empty project would not be that interesting, and for the most part you are right. However, there are some features and areas of the IDE that you should become familiar with before you begin coding.
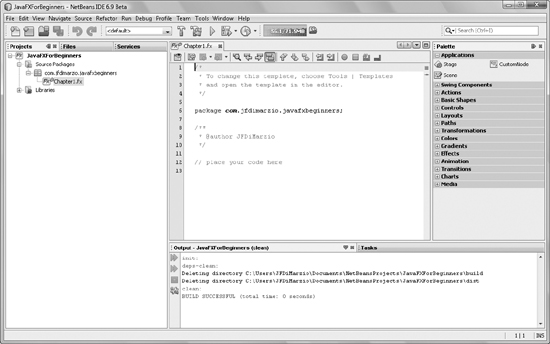
Figure 2-6 Your first script file
For much of your development work in JavaFX, you will be focusing on two areas of the NetBeans IDE. The left side of the NetBeans IDE shows a trio of tabs, labeled Projects, Files, Services. This set of explorers, shown in Figure 2-7, will be your main mechanism for navigating through your projects.
It is not uncommon for projects to start off very small and end up using many files—from code to images and configurations. The explorers help you keep track of these files. They also allow you to move quickly between files, letting you easily work on different files as needed.
One great feature of these explorers in NetBeans is that they allow you to work with multiple projects at the same time. If you have two projects open in the same IDE, you can easily work with them simultaneously without worrying about closing or opening them. This becomes a very handy tool the more you begin to work in NetBeans.
The second area you will become very familiar with by the end of this chapter is the Palette section. The Palette, pictured in Figure 2-8, is located on the right side of the NetBeans IDE, opposite the explorers. The Palette contains collapsible tabs of code snippets. You will find yourself using these snippets throughout your code, and extensively throughout the early chapters of this book.
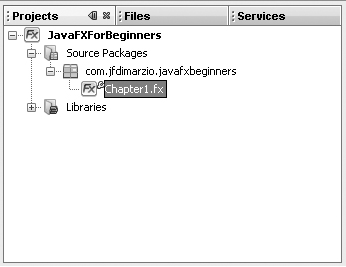
Figure 2-7 Projects, Files, and Services explorers
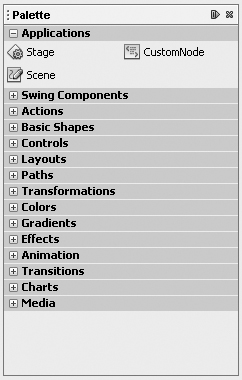
A snippet, like those found in the Palette, is a prewritten, reusable piece of code. That is, a snippet is very much like a one of those “fill-in-the-missing-word” comics. In other words, it is a small section of code with a few pieces of key information left for you to provide. These snippets make it extremely easy for anyone to pick up JavaFX for the first time and produce some very functional applications with minimal effort.
The snippets provided for JavaFX are separated logically by function and fall into 15 major categories:
• Applications
• Swing Components
• Actions
• Basic Shapes
• Controls
• Layouts
• Paths
• Transformations
• Colors
• Gradients
• Effects
• Animation
• Transitions
• Charts
• Media
As you progress through this book, you will be introduced to many of the snippets in the Palette. They provide a simple foundation for many of the projects covered in the following chapters. Take some time out to expand each of the Palette categories and explore the snippets included for you.
Working with the Script File
This section walks you through the empty script file you created in the last section. Believe it or not, even though you didn’t write a single line of code, there is a lot you can learn from an “empty” file.
Right now, your file will look similar to this:
/*
 * To change this template, choose Tools | Templates
 * and open the template in the editor.
 */

package com.jfdimarzio.javafxforbeginners;

/**
 * @author JFDiMarzio
 */

// place your code here
The following sections explain the layout and purpose of this empty script file.
The Comments
The first four lines of code in your “empty” JavaFX Script file are the beginning comments. Comments are not lines of code. In fact, comments are ignored by the compiler. So why bother using them? Comments are added to a file to explain the purpose of the code within the file. They are solely for the benefit of people reading the script files, not the compiler.
NOTE
Comments can be divided into two types: multiline and single line. Different characters are used to note each.
The beginning comments that have been added to your file read as follows:
 /*
 * To change this template, choose Tools | Templates
 * and open the template in the editor.
 */
By Java coding standards, your beginning comments should include the class’s name, version, and creation/modification dates, as well as any copyright information you may want to include.
Take a look at the first two and the last two characters of the comments that were added to your file. The first two characters are /* and the last two characters are */. All your multiline comments must begin and end with these characters, respectively. All the other asterisks you see in the comments are added purely for embellishment and readability.
Typically, comments are added to explain the purpose of a script file as a whole, or possibly larger sections of code. For example, place your cursor at the end of the comment line where your name appears and press the ENTER key. Highlight the template comments that were added to your file and replace them with the following:
 /*
 * Chapter1.fx
 *
 * v1.0 - J. F. DiMarzio
 *
 * 5/1/2010 - created
 *
 * Sample JavaFX script from Chapter 1 of ′JavaFX
 * A Beginner′s Guide′
 */
You have just added some standard Java beginning comments to your script file. These comments describe your file as being version 1.0 of the file named Chapter1.fx. The creation date and a short description (in place of the copyright notice) close out the comments.
In the next section, you will learn about the package statement.
The package Statement
You should have noticed that the “empty” script file is not very empty. The truth is that NetBeans handles some basic coding necessities for you. After the beginning comments is the following line:
package com.jfdimarzio.javafxforbeginners;
This line, while having very little direct impact on your code, can teach you some key points about programming in Java. The core purpose of this line is to tell the compiler that all the code under this line belongs to the com.jfdimarzio.javafxforbeginners package. The package declaration must be at the top of the script file.
This line of code has three important components you should be aware of. The first word of the line, “package,” is a Java keyword. Keywords are special commands that have a predefined meaning to the Java compiler. They are also known as “reserved.” As such, they cannot be used elsewhere in your code as variable names or anything other than their predefined purpose. The keyword package tells the compiler that anything following the keyword is the name of the package.
The name of your package follows the package keyword (in this case, com.jfdimarzio .javafxforbeginners). Because the purpose of the keyword is to tell the compiler that everything after it is the name of the package, the compiler needs to know where the end of the filename should be. Otherwise, by definition, the compiler would think all the code in the file was the package name. Therefore, Java has a special character set aside as a delimiter: the semicolon (;). The delimiter tells the compiler when it has reached the end of a specific line of code. Although there are very specific exceptions to this rule, you will need to end your lines of code with a semicolon to let the compiler know you have finished a command. If you do not use a semicolon where one is expected, the compiler will give you an error when you attempt to compile.
TIP
Compiling is the process where your code is converted from human-readable text to computer-understandable applications.
The package statement is followed by two more comments. The first, a multiline comment, identifies you as the author of the file. The second is a single-line code that tells you where to begin placing your code.
Notice that single-line comments being with // rather than /*. Also, because they are only on one line, there is no need to close them. As such, anything on that line will be considered a comment.
In the final sections of this chapter, you will begin to add your first lines of code to the Chapter 1 script file.
Your First Stage
Most JavaFX nodes go on a Stage. The naming of this node, as the Stage, is very apropos. Think of the Stage as the foundation for the rest of your script’s objects. Just as with a dramatic production, the action happens on a stage—and JavaFX is no exception. All of your action is going to take place on a Stage.
Inserting the Stage Snippet
To add a Stage to your script, focus on the Palette area to the right of the NetBeans IDE. In the Palette area, expand the Applications accordion tab if it is not already expanded. You will see three application snippets you can add to your script: the Stage, CustomNode, and Scene nodes.
NOTE
Delete the single-line placeholder comments before adding a Stage to your file.
Click the Stage and drag it to your script file where the placeholder comments used to be. This will insert a Stage in your script.
Notice that NetBeans has inserted two sections of code into your file. The first section is above your “author” comment. This section of code contains two import statements:
import javafx.stage.Stage;
import javafx.scene.Scene;
The import keyword is another Java keyword that tells the compiler to go to the packages listed and import all the code into this script file. Therefore, in this example, the compiler will get all the code in the javafx.stage.Stage and javafx.scene.Scene packages and place it in this file.
The second section of code that NetBeans added to your file is the Stage node. This section of code creates an empty Stage in your script. Right now, the Stage does not do anything, but it will compile and display an empty window. Your script file now looks like this:
/*
 * Chapter1.fx
 *
 * v1.0 - J. F. DiMarzio
 *
 * 5/1/2010 - created
 *
 * Sample JavaFX script from Chapter 1 of ′JavaFX
 * A Beginner′s Guide′
 */

package com.jfdimarzio.javafxforbeginners;

import javafx.stage.Stage;
import javafx.scene.Scene;

/**
 * @author JFDiMarzio
 */
Stage{
      title : ″MyApp″
      onClose: function () { }
      scene: Scene{
           width: 200
           height: 200
           content: [ ]
      }
}
To understand what the code of the Stage does, you must learn some basic JavaFX coding and syntax. The following section explains the basics of JavaFX.
A JavaFX Script Primer
Now that you have some code in your script file, you can take some time out to look at how JavaFX script is written (that is, its syntax). If you have any previous Java or even JavaScript experience, you may be surprised to see that JavaFX Script differs from both these languages slightly.
Each element in the JavaFX script is designated by the type name of the node, followed by a set of curly braces. To create a Stage, here is the code required to designate the Stage element:
Stage{ }
All the attributes or parameters associated with the Stage are placed between the curly braces in a pattern known as name-value pairs.
Name-Value Pairs
Name-value pairs, as the wording suggests, are elements of code written out as the name of the attribute or parameter followed by the value assigned to that attribute. For example, the title of your application, in name-value pair syntax, is written out as follows:
title : "MyApp"
Change the title of your Stage to JavaFXExamples.
You will find as you create more-involved JavaFX scripts that the value of a name-value pair does not have to be as simple as a string (“JavaFXExamples”). In fact, your Stage already contains one complex value.
The Stage has a required attribute called “scene.” The value expected for the scene variable is a Scene element. Look after the title name-value pair in your Stage code and you will see the following name-value pair:
scene: Scene{
       width: 200
       height: 200
       content:[]
}
In this example, the value for scene is a Scene element. The Scene element has its own name-value pairs for width, height, and content.
Next, you will use a Run Configuration to compile and run your JavaFX script.
Compiling Your JavaFX Script
To compile your JavaFX script and run it, press the F6 key. You can also click the large green arrow in the NetBeans menu bar. Either of these methods will compile your script into an executable application.
Your script will compile and run based on the selected Run Configuration. The result will be displayed as a separate window.
NOTE
Currently you only have one Run Configuration: <default>. As you progress through the book, you will create others.
In this case, your first JavaFX script will produce a very exciting empty window (shown in Figure 2-9).
In the next chapter, you will create a Hello World application.
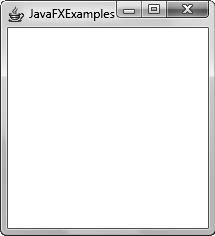
Figure 2-9 Your first compiled JavaFX script
 Chapter 2 Self Test
1. What is the name of the frame where all your projects are listed?
2. What is the name of the wizard used to create a new JavaFX project?
3. What is another name for a namespace?
4. Which panel of the NetBeans IDE lets you navigate through code samples?
5. True or false? The Snippets panel contains predefine pieces of reusable code.
6. What file extension is assigned to JavaFX Script files?
7. What type of word is “package” in the JavaFX script?
8. True or false? Every line of your script must end with a period.
9. What are the beginning and ending characters for comments?
10. What type of variable or attribute is the following?
title: ″MyApp″