
Chapter 13
Using JavaFX Layouts
• Arranging nodes in a Scene
• Using the HBox
• Nested layouts
Throughout this book you have learned how to create and use nodes. At its core, JavaFX would not be very interesting without the ability to place these nodes on the screen. Nodes need to be placed logically on the screen for any user interface (UI) to be intuitive and usable.
To this point in the book, you have manually placed nodes within the content of a Scene. Then, using the x and y coordinates of the desired position, you have moved those nodes around to put them in a logical place. However, manually moving nodes around the screen can be a tedious task and ultimately take away from the time needed to develop functionality.
JavaFX provides a handful of very useful tools to help you organize the placement of nodes on the screen. Layouts can automatically organize your nodes into predefined patterns that will give your applications a professional look and a higher degree of usability.
In this chapter you learn how to use layouts to organize the various nodes. The first layout you learn about is the HBox.
Before you begin, create a new, empty JavaFX script named Chapter13.fx. The script should look like this:
/*
 * Chapter13.fx
 *
 * v1.0 - J. F. DiMarzio
 *
 * 6/23/2010 – created
 *
 * Using JavaFX Layouts
 *
 */
package com.jfdimarzio.javafxforbeginners;

import javafx.stage.Stage;
import javafx.scene.Scene;
import javafx.scene.layout.HBox;
import javafx.scene.control.TextBox;
import javafx.scene.control.Button;

/**
 * @author JFDiMarzio
 */
The HBox
The HBox is a horizontal layout you can use to place relatively positioned nodes on the screen. That is, the HBox layout organizes your nodes next to each other horizontally. To demonstrate this, let’s create a Scene with a TextBox and a Button, as follows:
TextBox {
                text: "SampleText"
                columns: 12
                selectOnFocus: true
            } Button {
                text: "Button"
                action: function () {
                }
            }
Your full script should now look like this:
/*
 * Chapter13.fx
 *
 * v1.0 - J. F. DiMarzio
 *
 * 6/23/2010 – created
 *
 * Using JavaFX Layouts
 *
 */
package com.jfdimarzio.javafxforbeginners;

import javafx.stage.Stage;
import javafx.scene.Scene;
import javafx.scene.control.TextBox;
import javafx.scene.control.Button;

/**
 * @author JFDiMarzio
 */
Stage {
    title: "UsingLayouts"
    onClose: function () {
     }
     scene: Scene {
         width: 200
         height: 200
         content: [TextBox {
                text: "SampleText"
                columns: 12
                selectOnFocus: true
            } Button {
                text: "Button"
                action: function () {
                }
            }
        ]
     }
}
Compile and run this script. You can see that if you do not modify the layout of the nodes, they will simply appear jumbled together, as shown in Figure 13-1.
The layout of these nodes is very discordant and does not lend itself to a very usable design. Let’s use the HBox layout to organize these nodes on the screen. The HBox belongs to the javafx.scene.layout package. You must import this package before you add the HBox to your Scene.
TIP
Remove the TextBox and Button from the last example now. You will re-add them soon, but this time as the content of the HBox.
import javafx.scene.layout.HBox;
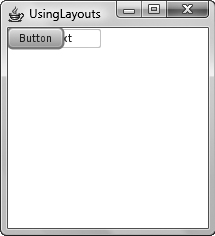
Figure 13-1 Nodes without a layout
After you have imported the correct package, add the HBox to your Scene:
Stage {
    title: "UsingLayouts"
    onClose: function () {
     }
     scene: Scene {
         width: 200
         height: 200
         content: [HBox {
                content: []
            }
        ]
     }
}
Right now, the only property of the HBox you will be concerned with is the content property. You add all the nodes you want the HBox to organize to the content property of the HBox. The HBox will place all the nodes horizontally within its content.
Add a TextBox and a Button to the content property of the HBox, as follows:
HBox {
                 content: [TextBox {
                        text: "SampleText"
                        columns: 12
                        selectOnFocus: true
                    } Button {
                        text: "Button"
                        action: function () {
                        }
                    }
                ]
            }
Notice that you are still not setting the x and y coordinate positions of the TextBox and the Button. Under normal circumstances, this would result in the nodes being placed on top of each other. However, the HBox takes care of the placement for you and arranges the nodes neatly next to each other. The full code for your script should appear as follows:
 /*
  * Chapter13.fx
  *
  * v1.0 - J. F. DiMarzio
  *
  * 6/23/2010 – created
  *
  * Using JavaFX Layouts
  *
  */
package com.jfdimarzio.javafxforbeginners;

import javafx.stage.Stage;
import javafx.scene.Scene;
import javafx.scene.layout.HBox;
import javafx.scene.control.TextBox;
import javafx.scene.control.Button;

/**
 * @author JFDiMarzio
 */
Stage {
     title: "UsingLayouts"
    onClose: function () {
     }
     scene: Scene {
         width: 200
         height: 200
         content: [HBox {
                content: [TextBox {
                        text: "SampleText"
                        columns: 12
                        selectOnFocus: true
                    } Button {
                        text: "Button"
                        action: function () {
                         }
                     }
                ]
            }
        ]
     }
}
Compile this script and run it. Your node will appear as shown in Figure 13-2.
The HBox layout is simple to use and does not require any parameters to be set to give you great results. It is very easy to line up and organize your nodes using this tool.
Keep in mind that all the layouts in JavaFX, including the HBox, inherit from Node. This means that events such as onKey* and onMouse* can be used in layouts. Also, you can apply effects to layouts as well, thus giving you a large array of customization options. For more information about using events or effects in nodes, refer to the earlier chapters of this book.
In the next section you use the VBox to organize your nodes vertically rather than horizontally.
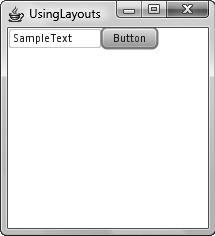
Figure 13-2 Nodes placed using an HBox
The VBox
The VBox is a JavaFX layout that organizes your nodes vertically rather than horizontally like the HBox does. The VBox can be particularly useful in creating forms and other applications where information is generally used in a top-down manner.
Import the javafx.scene.layout.VBox package to use the VBox layout:
import javafx.scene.layout.VBox;
The VBox is easy to implement. Add a VBox control to your Scene as shown in the following code sample:
Scene {
        width: 200
        height: 200
        content: [VBox {
                content: [
                ]
            }
        ]
    }
Using the same TextBox and Button you used in the previous section’s example, let’s create a VBox layout. The finished script should look like this:
/*
 * Chapter13.fx
 *
 * v1.0 - J. F. DiMarzio
 *
 * 6/23/2010 – created
 *
 * Using JavaFX Layouts
 *
 */
package com.jfdimarzio.javafxforbeginners;

import javafx.stage.Stage;
import javafx.scene.Scene;
import javafx.scene.layout.VBox;
import javafx.scene.control.TextBox;
import javafx.scene.control.Button;

/**
 * @author JFDiMarzio
 */
Stage {
     title: "UsingLayouts"
     onClose: function () {
     }
     scene: Scene {
         width: 200
         height: 200
         content: [VBox {
                content: [TextBox {
                        text: "SampleText"
                        columns: 12
                        selectOnFocus: true
                    } Button {
                        text: "Button"
                        action: function () {
                         }
                     }
                ]
            }
        ]
     }
}
Compile and run this script. In the previous section, you used the HBox to organize nodes in a horizontal line. Using the VBox in this script, you can see that the same two nodes now fall under each other vertically. Figure 13-3 shows this result.
Again, this example shows just how easy it is to use a layout in JavaFX to organize your nodes. In the next section you combine what you have learned so far about layouts to create a nested layout.
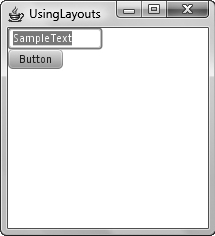
Figure 13-3 Organizing nodes using VBox
Nested Layouts
One of the more flexible aspects of layouts is that they can be nested. That is to say, you can place layouts within each other. You can create some very useful UIs by combining two or more existing layouts.
In the previous sections you looked at two very specific layouts. The HBox only organizes nodes horizontally across a Scene, whereas a VBox only organizes your nodes vertically down a Scene. The reason JavaFX can offer two otherwise limiting layouts and still be versatile is because these layouts can be nested within each other to create a more dynamic organization of nodes.
For example, let’s say you want to create a Scene that has a TextBox followed by a Button horizontally. Then, directly under those nodes you want to have another TextBox followed by another Button. This is easily handled by nesting two HBox elements within a VBox.
The VBox organizes nodes vertically. In this case, you want to have two “groups” of nodes arranged vertically. You will have two HBox elements inside the VBox to represent the two horizontal groupings of nodes that are to be stacked on top of each other. Confused? Don’t worry, this all will become much clearer to you after seeing the code.
To begin, create your VBox as follows:
 VBox {
      content: [
          ]
       }
Within your VBox, create two separate HBox instances, like this:
VBox {
                content: [HBox {
                        content: [
                         ]
                     }
                     HBox {
                         content: [
                         ]
                     }
                ]
           }
These HBox instances give you a place to put the nodes you want to stack. Let’s put one TextBox and one Button in each HBox:
VBox {
                content: [HBox {
                         content: [TextBox {
                                 text: "SampleText1"
                                 columns: 12
                                 selectOnFocus: true
                             } Button {
                                 text: "Button1"
                                 action: function () {
                                 }
                             }
                         ]
                     }
                    HBox {
                         content: [TextBox {
                                 text: "SampleText2"
                                 columns: 12
                                 selectOnFocus: true
                             } Button {
                                 text: "Button2"
                                 action: function () {
                                 }
                             }
                         ]
                     }
                ]
           }
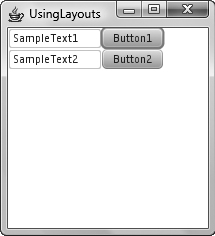
That’s really all you need to do to nest two different layouts within each other. This process is not limited to just two layouts. Multiple layouts can be nested within each other to produce a more varied layout of nodes. The finished script file for this example produces a columned effect of two TextBox and two Button elements. Here is the full script:
/*
 * Chapter13.fx
 *
 * v1.0 - J. F. DiMarzio
 *
 * 6/23/2010 – created
 *
 * Using JavaFX Layouts
 *
 */
package com.jfdimarzio.javafxforbeginners;

import javafx.stage.Stage;
import javafx.scene.Scene;
import javafx.scene.layout.VBox;
import javafx.scene.layout.HBox;
import javafx.scene.control.TextBox;
import javafx.scene.control.Button;

/**
 * @author JFDiMarzio
 */
Stage {
     title: "UsingLayouts"
    onClose: function () {
    }
     scene: Scene {
         width: 200
        height: 200
         content: [VBox {
                content: [HBox {
                         content: [TextBox {
                                 text: "SampleText1"
                                 columns: 12
                                 selectOnFocus: true
                            } Button {
                                text: "Button1"
                                action: function () {
                                }
                            }
                         ]
                     }
                     HBox {
                         content: [TextBox {
                                 text: "SampleText2"
                                 columns: 12
                                 selectOnFocus: true
                            } Button {
                                text: "Button2"
                                action: function () {
                                }
                            }
                        ]
                    }
                ]
            }
        ]
    }
}
Compile and run this script. You will see the layout shown in Figure 13-4.
Now you can experiment with the ClipView, Flow, Stack, and Tile layouts. Try to nest these layouts to produce custom ones that are original and engaging.
Try This Using Other Layouts
Using the examples given in this chapter, create a JavaFX application that uses a Flow, Stack, or Tile layout to display three images. Notice how each layout will change the display of the images.
In the final chapter of this book, you learn about using CSS to add even more originality to your UI.
 Chapter 13 Self Test
1. What layout organizes your nodes horizontally across a Scene?
2. True or false? The HBox is located in the javafx.scene.HBox package.
3. What property holds the nodes for a layout to organize?
4. True or false? You must be sure to set the x and y coordinates of each node you place in a layout.
5. Can effects be applied to layouts?
6. What layout organizes nodes vertically down a Scene?
7. What is the name given to layouts that are combined to produce a new layout?
8. True or false? For layouts to be nested, one must inherit from the other.
9. True or false? Only two layouts can be nested.
10. Name four layouts other than the VBox and HBox.