
Chapter 14
Style Your JavaFX with CSS
• Adding CSS files to your packages
• Using CSS classes
• Accessing Node properties
In this chapter you learn how to use Cascading Style Sheets (CSS) to easily change the look and feel of your JavaFX applications. If you are not fully aware of what CSS is, this very quick refresher should help.
CSS is a styling language that allows you to separate the styling elements of an object from the object itself. Although CSS was created long before JavaFX, JavaFX includes the ability to use this styling language. In fact, the JavaFX CSS is based on the W3C version 2.1 CSS standard. That means you can create all your objects—or nodes in JavaFX—without any care for their placement, look, or feel. All you have to do is define the functionality of your nodes. Then, either in the style property of the nodes or in a separate file altogether, you can define styles that change the placement, look, and feel of your nodes.
An important feature of CSS you should note here is that all your CSS styles can be contained in a file separate from your script. Keeping your scripts and .css files separate allows you to change your styles—and even change the complete look and feel of your application—without needing to change or recompile your script. What does this mean to you? You can change the look and feel of an application you’ve designed by modifying the .css file, while leaving your application’s script untouched.
The remainder of this chapter teaches you how to leverage this very useful tool in your scripts. Before you begin, set up a new, empty JavaFX script named Chapter14.fx, as follows:
/*
 * Chapter14.fx
 *
 * v1.0 - J. F. DiMarzio
 *
 * 6/25/2010 – created
 *
 * Styling JavaFX with CSS
 *
 */
package com.jfdimarzio.javafxforbeginners;

/**
 * @author JFDiMarzio
 */
In the first section of this chapter, you learn how to add a style sheet to your JavaFX package for use in your script.
Adding a Style Sheet to Your Packages
Although you can add styles directly to your script file, this is not recommended and in essence defeats the purpose for being able to separate your styles from your scripts to begin with. Therefore, you are going to learn how to create a separate .css file, add it to your package, and create some usable styles.
The first step is to right-click your package name from the Projects view of NetBeans (on the left side of the IDE). Select New | Other from the context menu, as shown in Figure 14-1.
This opens the New File Wizard. In the wizard, you want to select Other from the Categories area and then Cascading Style Sheet from the File Types area, as shown in Figure 14-2.
Finally, click the Next button, name your file default, and then click the Finish button, as shown in Figure 14-3.
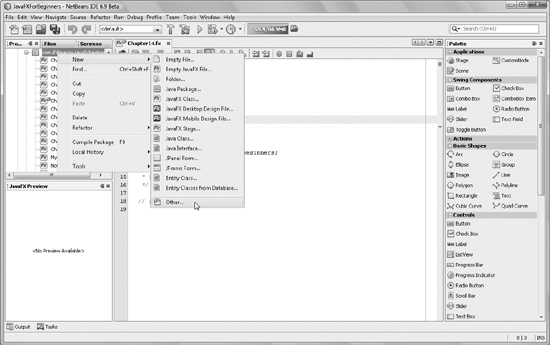
Figure 14-1 Select New | Other from the context menu
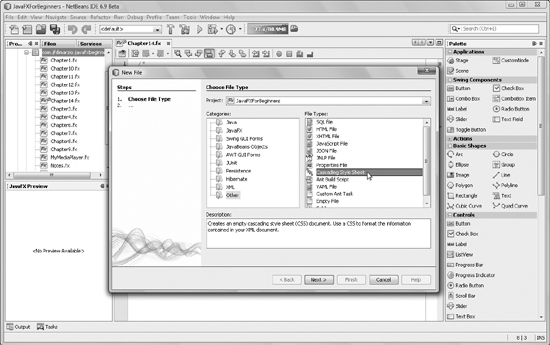
Figure 14-2 Choosing Cascading Style Sheet

Figure 14-3 Finalizing your file
You now have a file named default.css in your list of package files. If it is not open already, open your style sheet. It should appear as follows:
/*
    Document   : default
    Created on : Jul 31, 2010, 11:35:22 AM
    Author     : JFDiMarzio
    Description:
         Purpose of the stylesheet follows.
*/

/*
   TODO customize this sample style
   Syntax recommendation http://www.w3.org/TR/REC-CSS2/
*/
root{
    display:block;
}
Notice how the CSS file contains a comments section, much like your JavaFX script files. This comments section is followed by the styles. When you create a new style sheet using the New File Wizard, one style is automatically created for you. This style contains one selector and one declaration. This is a simple style that states that anything in the root is visible.
TIP
Keep in mind, the purpose of this chapter is not to teach you CSS as a language. Rather you are just learning how to use CSS in relationship to JavaFX. If you need more instruction on CSS and how to use CSS properties, try using one of the many online resources available before you proceed with this chapter.
With the style sheet created and inserted into the working package, you can focus on creating your first style. In the next section you create a style that can be applied to the Label nodes in a future JavaFX script.
Creating a Style
JavaFX will automatically recognize any CSS style class created with the name of a node. For example, if you wanted to create a CSS class that applies to all Label nodes, you would create a style class named .label. Let’s create a .label class now. You will use this class in your script later.
.label{
}
In this class, you change the Label node’s font color to red and the font to Courier 14 pt. You need to add the correct properties to the style class for changing the font and font color. Luckily, JavaFX also recognize CSS style properties that are written to directly access Node properties.
The Node property for changing the color of a font in a label is textFill. To access this property from the CSS, you need to add “-fx-” as a prefix and separate each word with a hyphen (-). Thus, the style declaration would look like this:
.label{
    -fx-text-fill: red;
}
This style states that any Label node will have its textFill property set to RED. Let’s create one more declaration for the Label node, and then you can apply this style sheet to a script.
To change the font of the Label node, use the –fx-font style, as follows:
.label{
    -fx-text-fill: red;
    -fx-font: bold 14pt "Courier";
}
In total, this style changes the font of all labels to a red, bold, 14-point Courier. The full CSS file should look like this:
/*
    Document   : default
    Created on : Jul 31, 2010, 11:35:22 AM
    Author     : JFDiMarzio
    Description:
         Purpose of the stylesheet follows.
*/

/*
   TODO customize this sample style
   Syntax recommendation http://www.w3.org/TR/REC-CSS2/
*/
root{
    display:block;
}

 .label{
    -fx-text-fill: red;
    -fx-font: bold 14pt "Courier";
}
In the next section you apply this full CSS file to a JavaFX script.
Using Your Styles
In the previous sections you learned how to create a separate CSS file. You then created a style within that CSS file to be applied to all Label nodes. Let’s now open Chapter14.fx and create a label that can use this new CSS file.
First, add a Stage and Scene to your file, as follows:
import javafx.stage.Stage;
import javafx.scene.Scene;

/**
 * @author JFDiMarzio
 */
Stage {
    title: "Using CSS Styles"
    onClose: function () {
     }
     scene: Scene {
         width: 300
         height: 200
         content: []
     }
}
To use the style sheet in this script, you need to apply it to the Scene. The Scene has a property called styleSheets. Notice that the name of the property is plural. This is because you can apply multiple style sheets to a single Scene.
Use the __DIR__ constant to indicate the location of the style sheet, as follows:
Stage {
    title: "Using CSS Styles"
    onClose: function () {
    }

    scene: Scene {
        stylesheets: ["{__DIR__}default.css"]
        width: 300
        height: 200
        content: []
     }
}
Now, simply add a Label node to the Scene’s content:
import javafx.scene.control.Label;
Stage {
    title: "Using CSS Styles"
    onClose: function () {
    }

    scene: Scene {
        stylesheets: ["{__DIR__}default.css"]
        width: 300
        height: 200
        content: [Label {
                text: "This is sample text to be styled."
            }
        ]
     }
}
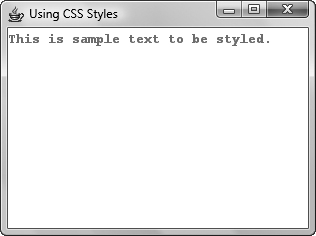
Figure 14-4 Label with style applied
Notice that within the script you are not modifying the Label node in any way. Normally this would result in a label with standard black font. However, because you applied the default.css file, the font will end up being red, bold, and Courier.
Compile and run this script. You will see a result like that shown in Figure 14-4.
In the final section of this chapter, you learn about creating style classes that can be applied independent of the node.
Creating Independent Style Classes
Open the default.css file once more. You are going to add a style class to this file that can be applied to any node, regardless of its type. That is, whereas you created a style previously that would only be applied to all labels, you will now create a style class that can be applied to any node you want.
Let’s create a class that rotates any node by 90 degrees. Add the following class to your default.css file:
.rotate{
    -fx-rotate:90;
}
Notice here that the Node property for rotating a node is called rotate. Therefore, the style sheet declaration for this is -fx-rotate. Your full default.css should now look like this:
/*
    Document   : default
    Created on : Jul 31, 2010, 11:35:22 AM
    Author     : JFDiMarzio
    Description:
        Purpose of the stylesheet follows.
*/

/*
   TODO customize this sample style
   Syntax recommendation http://www.w3.org/TR/REC-CSS2/
*/
root{
     display:block;
}

 .label{
    -fx-text-fill: red;
    -fx-font: bold 14pt "Courier";
}
.rotate{
     -fx-rotate:90;
}
Now you need to modify your Chapter14.fx script to use this new class. If it is not already open, open the Chapter14.fx script.
The .rotate class you just created is an independent class that you need to call specifically if you want to use it—unlike the .label class, which will inherently be applied to all labels. The styleClass property of a node allows you to specify a class within the current style sheet that you want to apply to the node. Modify the Label code in your Chapter14.fx script to include the styleClass property:
Stage {
    title: "Using CSS Styles"
    onClose: function () {
    }

    scene: Scene {
        stylesheets: ["{__DIR__}default.css"]
        width: 300
        height: 200
        content: [Label {
            styleClass:
                text: "This is sample text to be styled."
            }
        ]
     }
}
Assign the name of the class (rotate) to the styleClass property, as shown in the full script:
/*
 * Chapter14.fx
 *
 * v1.0 - J. F. DiMarzio
 *
 * 6/25/2010 – created
 *
 * Styling JavaFX with CSS
 *
 */
package com.jfdimarzio.javafxforbeginners;

import javafx.stage.Stage;
import javafx.scene.Scene;
import javafx.scene.control.Label;


/**
 * @author JFDiMarzio
 */
Stage {
    title: "Using CSS Styles"
    onClose: function () {
    }

    scene: Scene {
        stylesheets: ["{__DIR__}default.css"]
        width: 300
        height: 200
        content: [Label {
            styleClass: "rotate"
                text: "This is sample text to be styled."
            }
        ]
     }
}
Compile and run this script, with the new default.css. You will see a change in your label’s text, like that shown in Figure 14-5.
Take a good look at the outcome of running this script. There is a very important feature to note about using style sheets. Notice that the text, although it is now rotated by 90 degrees, is no longer red or 14-point bold Courier. This is because any style classes specifically assigned to a node using the styleClass property will override any style applied to the node as a whole. Therefore, the style declarations in the .label class are being overridden by those in the .rotate class. This means that only the style declarations from .rotate are being applied to the label. None of the style declarations from .label are being applied.
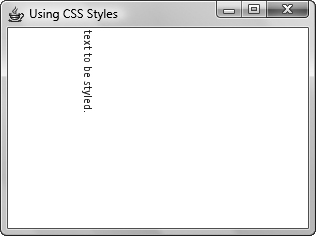
Figure 14-5 Label with the .rotate class
Try This Experimenting with Styles
Experiment with styles and nodes. Using the examples covered in this chapter, create a style class that changes the position or color of a node.
 Chapter 14 Self Test
1. What is Cascading Style Sheets (CSS)?
2. What file extension is used for Cascading Style Sheets?
3. What wizard helps you create and add a CSS to your package?
4. If you use the wizard to create your CSS, what class is added by default?
5. True or false? To create a CSS class that applies to all nodes of a certain type, the name of the class should be the name of the node type in lowercase.
6. What prefix is added to every Node property to call it from a CSS class?
7. What property of Scene will let you apply a style sheet to your script?
8. True or false? You can only add one style sheet to a Scene.
9. What Node property allows you to assign a specific CSS class to a node?
10. True or false? If you have a node with a node-applied CSS class and a styleClass property, the style in the styleClass will override that in the node-applied style.