
![]()
CHAPTER 6
Attacking a System
In this chapter you will learn about
• Understanding passwords, password attacks, and password-cracking techniques
• Understanding Microsoft Authentication mechanisms
• Identifying various password-cracking tools, keyloggers, and spyware technologies
• Understanding privilege escalation
• Describing file-hiding methods, alternate data streams, and evidence erasure
• Identifying rootkits
• Understanding basic Linux file structure, directories, and commands
• Describing installation, configuration, and compilation of a Linux kernel, kernel patches, and LKMs
• Understanding GCC compilation commands
• Listing vulnerabilities and password-cracking techniques in Linux
• Understanding password cracking in Linux
• Understanding Linux hardening methods
![]()
Have you ever seen the movie The Karate Kid? Not that horrible remake from 2010, but the original one, from 1984. In the movie, Mr. Miyagi, an old martial arts master working as a local handyman, takes a young outcast who is being bullied by a local gang under his wing. He agrees to teach him karate to defend himself and, once “Daniel-san” agrees to do everything the master commands, he is told to show up the next morning. When Daniel-san shows up, Miyagi has him wax cars, repeating a circular motion to the left and right. The next day he has him paint a fence. The day after, Daniel-san sands the floors.
About the time Daniel has had enough and decides Miyagi isn’t teaching him anything, he tells Miyagi he’s quitting, and that he feels like all he’s doing is chores for the old man. Miyagi stops him and demonstrates how all this repetitive motion, all this work he was doing, was actually training him for karate moves. The time he spent doing things that maybe didn’t seem so important turned out to be the fundamentals he needed to be successful, and eventually made Daniel-san into a karate champion. Well, dear reader, “Wax on, wax off.”
You’ve spent a lot of time reading about background information, and learning things that may not have seemed important up until now. All your learning thus far may not have seemed fun or sexy, but trust me, it was necessary. I know you’ve been chomping at the proverbial bit to start “real” hacking, and I applaud you for making your way thus far. This is the chapter where we start talking about actual system hacking—what to do once you’re at the machine’s front door. If you skipped ahead, go back and wax the cars in the first five chapters—you’re going to need it moving forward.
Windows System Hacking
Not too long ago, I spent a lot of my professional life at the front of a classroom, teaching all sorts of goodies. In one class, on network security basics, a very nice lady in the back row started questioning my time usage. She couldn’t figure out why I was spending so much time talking about Windows machines when she felt, almost religiously so, that Apple machines were so much better. I told her if I were teaching a class on portable music players, I’d spend my time on iPods, because they hold an incredible market share. If I were teaching on networking components, I’d surely spend my time on Cisco, whose market share at the time was ridiculous. But because I was teaching on computers and networks, I decide to stick with the operating system the overwhelming majority of users worldwide stick with—Windows. I didn’t get a good student critique from her, but my point was and still is valid.
As of October 2009, Microsoft Windows computers made up an astonishing 91 percent of the market share for client operating systems in use on the Internet. So if we were going to…oh, I don’t know…maybe write a chapter on password attacks, hacking into systems, and escalating privileges, I’d expect we’d spend the vast majority of our time on Microsoft Windows. You won’t be able to simply read this chapter and then automatically hack into every machine you see, but I promise by the time you’re done, you’ll know a lot more about it. Before we get to anything else, though, we should spend a little time talking about the cornerstone of today’s security—passwords.
Password Cracking
Security policy has always revolved around three things for the individual—something you are, something you have, and something you know. Some authentication measures use biometrics—fingerprints and such—to validate identity and grant access. Others use a token of some sort, such as a swipe badge or an ATM card, for authentication. But most security comes down to something you know, and that something is called a password. And before you get to cracking passwords, there are a few things you’ll need to know.
Passwords 101
A password’s strength is usually determined by two major functions—length and complexity. There’s an argument to be made either one is better than the other, but there’s no argument that both together—in one long and complex password—is the best. Password types basically are defined by what’s in them, and can be made up of letters, numbers, special characters, or some combination of all. Passwords containing all numbers (for example, 12345678) or all letters (for example, AbcdEFGH) are less secure than those containing a combination of letters and numbers (for example, 1234AbcD). If you put all three together (for example, C3h!sgr8), you’ve got the best you can get.
Complexity aside, the length of the password is just as important—perhaps even more so. Without a long, overly complicated discussion, let’s just apply a little deductive reasoning here: If a password cracker application has to only guess four characters, it’s going to take exponentially less time than trying to guess five, six, or seven characters. Assuming you use nothing but alphabetic characters, upper- and lowercase, every character you add to the password raises the possible combinations by an exponent of 52. Therefore, the longer your password, and the more possible variables you have for each character in it, the longer it will take a password-cracking application and therefore the more secure you’ll be.
 | NOTE It’s a proven fact that most people on a given network will make their passwords the exact length of the minimum required. If the network administrator sets the minimum at eight characters, over 95 percent of the passwords will be only eight characters—very helpful to the passwordcracking attacker. Of course, you’re always welcome to use more than the minimum. As a matter of fact, Microsoft Windows systems will support passwords up to 127 characters in length. |
Password Truth
Password complexity and length are important, don’t get me wrong, but in and of themselves, they don’t do much for real security. Yes, for your exam complexity is important, and length matters, but in reality, they can actually wind up making your network less secure if not implemented correctly. For example, suppose you require 17-character passwords that must contain lowercase letters, uppercase letters, numbers, and special characters, and must start with a number. How many of the users on your network are going to write that password down because they can’t remember it? How many will carelessly leave those written notes around, or even carry those notes with them in their wallets or purses? And, of course, how many of them will be calling in for password resets frequently, opening up a whole world of social-engineering possibilities?
Want some real advice from someone who has seen both sides of the fence? Stick with simpler passwords, but make the users change them more often. I’ll take a 12-character password made up of letters and numbers with a shelf life of only 20 days over a super-complex 12-character password good for 90 days any time. See, password cracking takes time. Even a simple password can take a long time to crack if it’s long enough, and it’s maddening to an attacker to finally crack one only to see the user has already updated to another password.
This definitely may not be conventional thinking, but it works well and I will defend it from the mountaintop. Educate users to create simpler, but longer passwords by using a password phrase. “I’m writing a CEH book” makes one heck of a strong password. “ImWriting@CEHBook!” is 18 characters long, meets most complexity requirements, and I’d bet would take most hackers longer to crack than it’s worth. Tell me I have to change it in 15 or 20 days and it’s even more challenging. For that matter, a password of “LetmeinthisStupidComputer” is even better—25 characters and even easier to remember, making it a pretty good choice indeed. See what I mean?
For the exam, stick with complexity and length, and stay away from using easy words in the password. In practice, make passwords easy to remember, but long, and change them very frequently.
EC-Council, in creating the CEH curriculum, has provided some essential tips on the creation of passwords. If you want to pass your exam, pay close attention to the following:
• The password must not contain any part of the user’s name. For example, a password of “MattIsGr@8!” wouldn’t work for the CEH exam, because you can clearly see my name there.
• The password must have a minimum of eight characters. Eight is okay. Nine is better. Seven? Not so good.
• The password must contain characters from at least three of the four major components of complexity—that is, special symbols (such as @&*#$), uppercase letters, lowercase letters, and numbers. U$e8Ch@rs contains all four, whereas use8chars uses only two.
Password Attacks
When it comes to actually attempting to crack passwords, four main attack types are defined within CEH. A passive online attack basically amounts to sniffing a wire in the hopes of either intercepting a password in clear text or attempting a replay or man-in-the-middle (MITM) attack. If a password is sent in clear text, such as in a Telnet session, the point is obvious. If it is sent hashed or encrypted, you can compare the value to a dictionary list or try a password cracker on the captured value. During the man-in-the-middle attack, the hacker will attempt to re-send the authentication request to the server for the client, effectively routing all traffic through the attacker’s machine. In a replay attack, however, the entire authentication process is captured and replayed at a later time—the client isn’t even part of the session.
In Plain Sight
We couldn’t get through a discussion on passwords without mentioning encoding and the risks it entails. If you’re a layer 1 (Physical layer) student like me, you know encoding as the method in which you convert a piece of information into another form or representation. For example, on a copper wire you might encode a slight tic upward in voltage as a “1,” with a slight tic downward as a “0.” On a fiber cable you may pick one light wavelength over another to play with bits. Well, step out of layer 1 for a second and apply this to encryption—or something that, at least, looks like it.
Base64 encoding is a method for taking binary code and representing it in an ASCII string. It’s most commonly used when there is a need to encode binary data that needs be stored or transferred over media—particularly media that likes ASCII data. And it can be very helpful with identifying information in an HTTP environment. Like, say, a user ID or perhaps even a password.
It’s great to have a good password policy, forcing your users to choose difficult, hard-to-crack passwords. It’s even better for your web apps to implement all sorts of fancy encryption to protect data transfer. But if your user IDs and passwords are Base64 encoded and stored on the side (maybe as a parameter in an HTTP form, or even in a GET or a URL), you might as well forget the rest of it. Base64 isn’t intended to be encryption, and there’s no real decryption effort needed to read it—just plug it into any Base64 “decode” engine and voilà! Its sole purpose is to compress and compact the string for inclusion, and as a side effect it comes out in a somewhat unreadable manner. In short, it might dissuade a casual observer, but not an attacker looking for a way in.
Some passive online password hacking we’ve already done—just check back in Chapter 4, during the sniffing discussion. Other types of passive online password hacking can be done using specifically designed tools. One old-time favorite is Cain and Abel—a Windows-based sniffer/password cracker. You can set Cain up to sniff network traffic and leave it alone. Come back the next day and all the clear-text passwords, along with any hashes, will be stolen and ready for you. You can then use Cain for some offline brute-force or dictionary attacks on the password hashes you can’t read. Let’s take a look at an example via Exercise 6-1.
Exercise 6-1: Using Cain and Abel to Sniff Passwords
You can re-create this attack by following the steps outlined here—just change out the site(s) you’re visiting. You can visit an FTP server (easy to download and install on a test system), websites, Telnet sessions on another machine, and more.
1. Download and install Cain and Abel, shown in Figure 6-1. Then open the program and click the Sniffer tab.
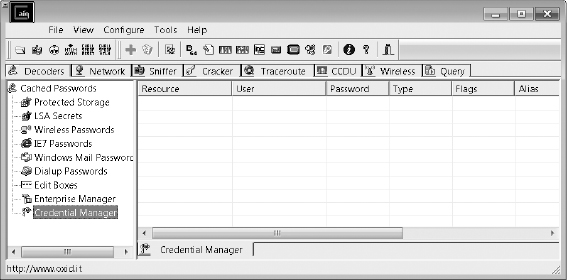
Figure 6-1 Cain
2. Click the Configure menu item and select the adapter you wish to sniff on, as shown in Figure 6-2. If you’re using wireless, check the Don’t Use Promiscuous Mode box at the bottom.
3. Click the Start Sniffing icon in the top left of the screen; then open a browser and head to a site requiring authentication, or start a Telnet, FTP, or MySQL login session. The more sites you hit and the more services you attempt to log on to, the more Cain will grab off the wire.

Figure 6-2 Configuration window for Cain sniffing

Figure 6-3 Passwords showing in Cain
4. After logging in to a few sites and services, close your browser and session(s) and then go back to Cain. Any passwords it picked up will show up on the left in bold. In Figure 6-3, you can see I grabbed an HTTP password in the clear (which I blurred out), along with a couple of other entries. Your display will most likely be different.
Any FTP, Telnet, or other password type Cain sees will be flagged and brought in for your perusal—even hashed or encrypted ones. Turn Cain on while you’re surfing around for a day. I bet you’ll be surprised what it picks up. And if you really want to see what a specific machine may be sending password-wise over the wire, try ARP poisoning with Cain (the button that looks like a radiation warning). The machine—or all of the machines if you spoof the default gateway MAC—will gladly send you everything!
Another technique you’ll probably want to know about and try is called sidejacking. It’s very helpful against those frustrating encrypted passwords and SSLs. The idea is to steal the cookies exchanged between two systems and ferret out which one to use as a replay-style attack. I suppose, technically, this isn’t a password attack, but it’s very apropos to our passive sniffing efforts. Two tools, Ferret and Hamster, are used to pull this off, and innumerable video tutorials on the Web show how easy these tools are to use.
Basically, you monitor the victim’s traffic using a sniffer and packet-capture tool (Ferret), and a file called Hamster.txt is created. After the victim has logged in to a site or two, you fire up Hamster as a proxy, and the cookies and authentication streams from the captured TXT file will be displayed. You simply click through them until one works—it’s that easy (of course, both machines must be on the same subnet). Installation of the tools can be a bit tricky, so be sure to check the help pages on the download site.
This can also be accomplished using a Firefox plug-in called Add N Edit Cookies (https://addons.mozilla.org/en-us/firefox/addon/add-n-edit-cookies/). If you have a couple of VMs to play with on your machine, try the following—you may be surprised at the results:
1. Clear your browser cache and then log in to just about any site you want.
2. Open Add N Edit Cookies. You’ll notice several variables appear, such as PHPSESSID if it’s PHP based, or three to four others if it’s ASP or some other platform.
3. Go to your second VM (or machine), open Firefox, and open Add N Edit Cookies. Copy and paste (or just re-create) all the content from the first VM. Be sure to set the timeout to something interesting (such as the year 2020).
4. Open the site you had gone to from the original VM. Voilà!
A surprising majority of sites use this method of session identification, and are just as easily “hacked.” For those that don’t, a combination of URL variables, HTTP GETs, and all sorts of other things will frustrate your efforts and cause you to try other methods—if this is, indeed, your goal. In practice, getting the session IDs from a website through XSS or other means can be tricky (Internet Explorer, for example, has done a really good job of locking down access to session cookies), but I believe this validates our discussions on physical security: If an attacker has uninterrupted physical access to the machine, it’s only a matter of time before the system is hacked, regardless of what security measures may already be in place. Internet Explorer plays with cookies differently, so there’s some trickiness involved, but this is an easy way to sidejack.
A few other tools of note are Ettercap, ScoopLM, and KerbCrack. Ettercap we’ve already mentioned earlier, but it warrants another few minutes of fame here. As with Cain, you can ARP poison and sniff with Ettercap and steal just about anything the machine sends out. Ettercap can also help out against pesky SSL encryption (which prevents an easy password sniff). Because Ettercap is very customizable, you can set it up as an SSL proxy and simply park between your target and any SSL site the victim is trying to visit. I watched this happen on my own banking account in our lab where we worked. My co-worker simply put himself (virtually) between my system and the SSL site, stole the session, applied an Ettercap filter to pull out gzip compression, and the encoded strings were there for the taking. The only indication anything was out of sorts, on the user’s side? A quick warning banner that the certificate needed looking at, which most people will click past without even thinking about it.
Speaking of SSL and its password-protecting madness, you should also check out sslsniff (www.thoughtcrime.org/software/sslsniff/). sslsniff was originally written to demonstrate and exploit IE’s vulnerability to a specific “basicConstraints” man-in-the-middle attack, but has proven useful for many other SSL hacks (Microsoft has since fixed the original vulnerability). It is designed to man in the middle “all SSL connections on a LAN and dynamically generate certificates for the domains that are being accessed on the fly. The new certificates are constructed in a certificate chain that is signed by any certificate that you provide.” Pretty good news for the budding pen tester, indeed.
| NOTE Thoughtcrime has all sorts of other tools that warrant attention—maybe not in the password-cracking section here, but definitely worth your while. Take some time and explore their other offerings. Some are very cool hacking tools, and some, such as GoogleSharing and fakeroute, are just plain fun. |
ScoopLM has a built-in password cracker and specifically looks for Windows authentication traffic on the wire to pull passwords from. KerbCrack also has a built-in sniffer and password cracker, specifically looking for port 88 Kerberos traffic.
| NOTE In addition to the info here and all the notes and such accompanying this book, don’t ignore the resources available to you on the Internet. Do a few searches for videos on “sniffing passwords” and any, or all, of the tools mentioned. And don’t discount the websites providing these tools—you can usually find forums and all sorts of stories and help. |
The second password attack type, active online, occurs when the attacker begins simply trying passwords—guessing them, for lack of a better word. Active online attacks take a much longer time than passive attacks, and are also much easier to detect. These attacks try to take advantage of bad passwords and security practices by individuals on a network. If you happen to have identified a dinosaur Windows NT or 2000 machine on your target network, you can bang away at the IPC$ share and guess all you want.
If you’re facing Windows XP and Windows 7 machines, the old “administrator” C$ share is still usually valid and, as always, you can’t lock out the true administrator account. You can try any variety of scripts available to run through usernames and passwords against this share—just keep in mind it’s noisy and you’re bound to get noticed. Decent network and systems administrators will change the local administrator account’s name to something else (such as admin, sysadmin, or admin1), so don’t be surprised if you wind up locking a few accounts out while trying to get to the real one.
Don’t forget the old “net” commands. The use of null sessions isn’t a lost art; you’ll probably see a couple questions on this topic, and a lot of it is very beneficial in determining how you set up your password-sniffing and active online attacks. Here are a few to remember from your enumeration time:
• net view /domain:domainname Shows all systems in the domain name provided
• net view \systemname Provides a list of open shares on the system named
• net use \targetipc$ "" /u: " Sets up a null session
Combined with tools such as the NetBIOS Auditing tool (NAT) and Legion, you can automate the testing of user IDs and passwords.
The other two attack types are offline and non-electronic. Offline attacks occur when the hacker steals a copy of the password file (remember our discussion on the SAM file earlier?) and works the cracking efforts on a separate system. These attacks usually require some form of physical access to the machine (not as hard as you’d like to believe in a lot of cases—trust me) where the attacker pulls the password file to removable media, then sneaks off to crack passwords at his leisure.
Password cracking offline can be done in one of three main ways—dictionary attack, hybrid attack, and brute-force attack. A dictionary attack is the easiest and by far the fastest attack available. This attack uses a list of passwords in a text file, which is then hashed by the same algorithm/process the original password was put through. The hashes are compared and, if a match is found, the password is cracked. Technically speaking, dictionary attacks are only supposed to work on words you’d find in a dictionary. They can work just as well on “complex” passwords too; however, the word list you use must have the exact match in it—you can’t get close, it must be exact. You can create your own dictionary file or simply download any of the thousands available on the Internet.
A hybrid attack is a step above the dictionary attack. In the hybrid attack, the cracking tool is smart enough to take words from a list and substitute numbers and symbols for alpha characters—perhaps a zero for an O, an @ for an a. Hybrid attacks may also append numbers and symbols to the end of dictionary file passwords—bet you’ve never simply added a “1234” to the end of a password before, huh? By doing so, you stand a better chance of cracking passwords in a complex environment.
| NOTE Password cracking can also be sped up using “rainbow tables.” The amount of time it takes a cracker to work is dramatically increased by having to generate all these hashes over and over again. A rainbow table does all this computation ahead of time, hashing every combination and creating huge files of hashes for comparison. |
The last type is called a brute-force attack, and it’s exactly what it sounds like. In a brute-force attack, every conceivable combination of letters, numbers, and special characters is compared against the hash to determine a match. Obviously, this is very time consuming, chewing up a lot of computation cycles and making this the longest of the three methods. However, it is your best option on complex passwords, and there is no arguing its effectiveness—given enough time, every password can be cracked using brute force. Granted, we could be talking about years here—maybe even hundreds of years—but it’s always 100 percent effective over time.
If you cut down the number of characters the cracker has to work with, and reduce the number of variations available, you can dramatically reduce that time span. For example, if you’re in a network and you know the minimum password length is eight characters, then there’s no point in having your cracker go through all the variations of seven characters or less. Additionally, if you’ve got a pretty good idea the user doesn’t like all special characters and prefers to stick with the “Fab Four” (!, @, #, and $), there’s no sense in having your cracker try combinations that include characters such as &,*, and (.
For example—and to stick with a tool we’ve already been talking about—Cain is fairly good at cracking Windows passwords, given enough time and processing cycles. For this demonstration, I created a local account on my system and gave it a (purposefully) short, four character password: P@s5. Firing up Cain, I clicked the Cracker menu choice, clicked the LM&NTLM Hashes option on the left, then clicked the big blue plus sign (+) at the top. Once all my accounts and associated passwords were dumped (simulating a hacker who had snuck in and taken them without my knowledge), I clicked my new user, cut down the number of possible characters for Cain to try (instead of all alphanumeric and special characters, I cut it down to 10, simply to speed up the process), and started the cracking. Forty-six minutes later, almost on the button, the password was cracked.
Of course, multiple tools are available for password cracking. Cain, KerbCrack, and Legion have already been mentioned. Another is John the Ripper—one of the more “famous” tools available. John is a Linux tool that can crack Unix, Windows NT, and Kerberos passwords. You can also download some add-ons that allow John to crack other passwords types (MySQL, for instance). LC5, the next generation of the old L0phtcrack tool, does an excellent job on a variety of passwords. Regardless of the tool, remember that dictionary attacks are fastest, and brute force takes the longest.
| EXAM TIP Passwords on Windows systems are found in the SAM file, located in c:windowssystem32config (you might also be able to pull one from the c:windows epair folder). Passwords for Linux are found in /etc/shadow. | |
Finally, there is one other method of lifting passwords we need to cover. If implemented correctly, it works with 100 percent accuracy and always grabs passwords in clear text, thus requiring no time at all to crack them. It’s also relatively easy to do and requires almost no technical knowledge at all.
Keylogging is the process of using a hardware device or software application to capture the keystrokes a user types. Using this method, it really doesn’t matter what authentication method you’re using, or whether you’re salting a hash or not—the keystrokes are captured as they are typed, regardless of what they’re being typed for. Keyloggers can be hardware devices—usually small devices connected between the keyboard cable and the computer—or software applications installed and running in the background. In either case, keyloggers are an exceptionally powerful and productive method for scoring big hits on your target. Most users have no means to even realize a software application is running in the background, and most people rarely, if ever, look behind their computers to check for a hardware device. When was the last time you checked yours?
| EXAM TIP This should go without saying, but I’ll say it anyway: Software keyloggers are easy to spot with antivirus and other scanning options, whereas hardware keyloggers are almost impossible to detect. |
The last password attack type, non-electronic, is so powerful and so productive I’m going to devote an entire chapter to it later on. Social engineering takes on many different forms and is by far the best hacking method ever devised by humankind. When it comes to passwords, the absolute best way to get one is just to ask the user for it. Phrased the right way, when the user believes you to be someone from the IT department or a security agent, asking users flat out for their passwords will work about 50 percent of the time. Another productive method is shoulder surfing—that is, looking over the user’s shoulder to watch the keystrokes. Refer to Chapter 7 for more information on this little jewel and other ridiculously easy social engineering efforts to discover passwords.
Windows Hashing
I can almost hear a few of you asking the question, “Why does he keep talking about cracking a hash? Aren’t we supposed to be cracking passwords?” Well, yes and no. See, passwords aren’t ever stored in their original state—they’re encrypted, for obvious reasons. If a bad guy comes along and steals your password file, you don’t want them sitting there in clear text. So, most operating system providers will only store the hash of a password locally.
With Windows machines, this hashing thing has a long history. Back in the days when people rewound movies after watching them (those of you who remember the VHS vs. Beta debate are nodding here at the reference), Windows 2000 and Windows NT–type machines used something called LAN Manager, and then NT LAN Manager, to hash passwords. LM hashing would first take the password and convert everything to uppercase. Then, if the password was less than 14 characters, it would add blank spaces to get it to 14. Then the new, all-uppercase, 14-character password would be split into two seven-character strings. These strings would be hashed separately, then both hashes would be combined for the output.
| NOTE LM Authentication (DES) was used with Windows 95/98 machines. NTLM (DES and MD$) was used with Windows NT machines until SP3. NTLM v2 (MD5) was used after that. Kerberos came about with Windows 2000. All are still important to know and try, because many systems keep the authentication mechanisms around for backward-compatibility reasons. |
Obviously, this makes things easier for a hacker. How so, you may be asking? Well, if a password is seven characters or less (or only uses one or two character spaces in the second portion), this significantly reduces the amount of time required to crack the rest of it—due to the fact that the LM hash value of seven blank characters will always be the same (AAD3B435B51404EE). For example, consider a password of M@tt123. The entire LM hash might look like this when we steal it: 9FAF6B755DC38E12AAD3B-435B51404EE. Because we know how the hash is created, we can split it in half to work on each side separately: 9FAF6B755DC38E12 is the first half, and AAD3B435B51404EE is the second. The first half we put through a cracker and get to work. The second, though, is easily recognizable as the hash value of seven blank characters! This tells us the password is seven characters or less, and greatly reduces the amount of time the cracking software will need to break the password.
| NOTE Steps an administrator can take to reduce the risk in regard to password theft and cracking are fairly common sense. Never leave default passwords in place after installs, follow naming rules with passwords (no personal names, pet names, birthdates, and so on), require longer passwords, and change them often. Additionally, constantly and consistently check every account with credentials higher than that of a normal user, and be very, very careful with accounts that have “permanent” passwords. If it’s not going to be changed, it better be one heck of a good password. Lastly, remember that keeping an eye on event logs can be helpful in tracking down failed attempts at password guessing. |
Of course, finding an easy-to-crack NTLM hash on your target system won’t be easy. You’ll first have to steal it, usually via physical access with a bootable CD or maybe even through a copy found on a backup tape. Even after it has been obtained, though, the addition of salting (discussed in Chapter 2 earlier) and the use of better methods for authentication (NTLMv2 and Kerberos, if you sniff the hash value) make life for a password cracker pretty tough. Most administrators are wising up and forcing users into longer passwords with shorter timeframes in which to keep them. Not to mention Windows has gotten much better at password security in the past decade or so. LM authentication has six different levels available now (0 is the Windows XP default, and 2 is the Windows 2003 default) and Kerberos transports the passwords much more securely than previously. Remember, though, you’re not hunting the healthy—you’re looking for the weak and overlooked.
Speaking of the healthy, we’ll need a second or two here to discuss Kerberos authentication and passwords in “modern” Windows networking. Kerberos makes use of both symmetric and asymmetric encryption technologies to securely transmit passwords and keys across a network. The entire process is made up of a Key Distribution Center (KDC), an Authentication Service (AS), a Ticket Granting Service (TGS), and the Ticket Granting Ticket (TGT).
A basic Kerberos exchange follows a few easy, but very secure steps. The client first asks the KDC (which holds the AS and TGS) for a ticket, which will be used to authenticate throughout the network. This request is in clear text. The server will respond with a secret key, which is hashed by the password copy kept on the server (in Active Directory). This is known as the TGT. If the client can decrypt the message (and it should since it knows the password), the TGT is sent back to the server requesting a TGS service ticket. The server responds with the service ticket, and the client is allowed to log on and access network resources.
You’ll note that, once again, the password itself is never sent. Instead, a hash value of the password, encrypted with a secret key known only by both parties and good only for that session, is all that’s sent. This doesn’t mean the password is unbreakable, it just means it’s going to take a lot of time and effort. KerbSniff and KerbCrack are options, but be prepared—it’s a long, grueling process.
Escalating Privileges and Maintaining Stealth
The only real problem with user IDs and password hacking is that, once you crack one, you’re stuck with the privilege level of the user. Aside from that, assuming you do gain access, how can you continue to maintain that access while staying under cover? If the user account is not an administrator, or doesn’t have access to interesting shares, then you’re not much better off than you were before, and if you are so noisy in your attack, it won’t do you much good anyway. Well, remember the five stages of hacking from way back in Chapter 1? During that discussion, there was a little Exam Tip for you about escalation of privileges—the bridge between gaining access and maintaining access. In this section, we’ll go over some of the basics on escalating your current privilege level to something a little more fun, as well as some methods you can apply to keep your hacking efforts a little quieter.
Privilege Escalation
Unfortunately, escalating the privilege of an account you’ve hacked isn’t a very easy thing to do—unless the system you’re on isn’t fully patched. Quite obviously, operating systems put in all sorts of roadblocks to prevent you from doing so. However, as you’ve no doubt noticed, operating systems aren’t released with 100 percent of all security holes plugged. Rather, it’s quite the opposite, and security patches are released with frequency to address holes, bugs, and flaws discovered “in the wild.” In just one week during the writing of this chapter alone, Microsoft released 15 patches addressing a wide variety of issues—some of which involved the escalation of privileges.
Basically you have four real hopes for obtaining administrator (root) privileges on a machine. The first is to crack the password of an administrator or root account, which should be your primary aim (at least as far as the CEH exam is concerned) and makes the rest of this section moot. The second is to take advantage of a vulnerability found in the OS, or in an application, that will allow you access as a privileged user. Remember way back in Chapter 3 about the importance of paying attention to vulnerability websites? This is where that pays off. In addition to running vulnerability scanners (such as Nessus) to find holes, you should be well aware of what to already look for before the scanner gets the results back to you.
| NOTE Cracking a password in the real world of penetration testing isn’t really the point at all. Getting access to the data or services, or achieving whatever generic goal you have, is the point. If this goal involves having administrative privileges, so be it. If not, don’t sit there hammering away at an admin password because you believe it to be the “Holy Grail.” Get what you came for and get out, as quickly and stealthily as you can. |
For example, in December of 2009, both Java and Adobe had some very serious flaws in their applications that allowed attackers to run code at a privileged level. This information spread quickly and resulted in hacking and DoS attacks rising rather significantly until the fix actions came out. Once again, it’s not something magic or overly technically complicated you’re attempting to do here—you’re just taking advantage of unpatched security flaws in the system. The goal is to run code—whatever code you choose—at whatever level is necessary to accomplish your intent. Sometimes this means running at an administrative level regardless of your current user level, which requires escalation and a little bit of noisiness, and sometimes it doesn’t. Again, in the real world, don’t lose sight of the end goal in an effort to accomplish something you read in a book.
The third method is to use a tool that will hopefully provide you the access you’re looking for. One such tool, Metasploit, is an entire hacking suite in one and is a great exploit-testing tool (in other words, it’s about a heck of a lot more than privilege escalation and will be discussed more as this book continues). You basically enter the IP address and port number of the target you’re aiming at, choose an exploit, and add a payload—Metasploit does the rest. I find the web front end easier to use (see Figure 6-4) but some purists will tell you it’s always command line or nothing.
Metasploit has a free version and a pay-for version, known as Metasploit Pro. The framework you can download for free works perfectly well, but the Pro version, although expensive, is simply unbelievable. To say Metasploit is an important player in the pen testing/hacking realm is akin to saying Mount Everest is “kind of” tall. It’s a very powerful pen testing suite that warrants more attention than I have room for in this book. Visit the website (www.metasploit.com) and learn more about this opportunity for yourself. There are tons of help pages, communities, a blog board, and more, to provide assistance. Trust me—you’ll need them.

Figure 6-4 Metasploit’s main window
Sometimes Free Is Even Better!
Some of you—my tech editor included—are losing your collective minds because a $5,000 GUI front end for using Metasploit seems just a little on the ridiculous side. I agree, especially when there’s a free alternative that may be just as good.
The happy folks at Armitage (http://fastandeasyhacking.com/) have done a great job putting together a GUI front end for Metasploit that is, in a word, awesome. There are manuals, videos, and screenshots aplenty to help you along, and the information is truly incredible. The developer states on the site that Armitage was developed because there are too many security professionals who don’t know how to use Metasploit, and felt Metasploit could use a “non-commercial GUI organized around the hacking process.” Again, from the site: “Armitage exists to help security professionals better understand the hacking process and appreciate what’s possible with the powerful Metasploit framework. Security professionals who understand hacking will make better decisions to protect you and your information.”

I highly recommend you go check it out. You won’t see it mentioned on your exam—at least I don’t think you will—but it’s definitely worth checking out for your job. You won’t be disappointed.
Other tools are definitely worth mentioning here. CANVAS and Core Impact are two other all-in-one packages (Core Impact is a complete pen testing toolset that is insanely expensive). Other tools used for privilege escalation (which, by the way, may or may not work depending on your OS and the level at which it is patched) are billybastard.c (useful on Windows 2003 and Windows XP machines) and GetAd (Windows XP). Older tools for “dinosaur” Windows 2000 and Windows NT devices you may find are GetAdmin and HK.exe.
Finally, the last method available may actually seem like cheating to you, because it’s so ridiculously easy you might not have even thought about it. What if you just asked the current user to run an application for you? Then you don’t need to bother with hacking and all that pesky technology at all. This type of social engineering will be discussed in greater detail in Chapter 7, but it’s undeniably productive. You can simply put executable code in an e-mail and ask the user to click it—more often than not, they will! Craft a PDF file to take advantage of a known Adobe flaw on an unpatched system and send it to them—most of the time, they’ll click and open it! This is by far the easiest method available and, probably, will wind up being your most effective over time. Stay tuned to learn more.
Stealth: Before, During, and After
So you’ve spent your time examining potential targets, mapping out open ports, scanning for vulnerabilities, and prepping for an attack. After a few tries you successfully steal a password and find yourself sitting on the machine, logged on and ready to go. Now that you’re there, you have to be aware of all the attention that will be focused on your actions. Is the security administrator on the ball? Do they actively monitor the event logs on a regular basis? Is there a Host-based Intrusion Detection System (HIDS) on the machine? How can you get information from it quietly and unnoticed? Scary thoughts, huh?
Stealth in hacking truly comes down to patience—spend enough time, move slowly enough, and chances are better than not you’ll go unnoticed. Lose patience and try to upload every groovy file you see on the machine and you’ll quickly find yourself firewalled off and trapped. But there’s also stealth involved in hiding files, covering your tracks, and maintaining access on the machine.
One really great way to hide files on Windows machines is through the use of alternate data streams (ADS) in the form of NTFS (New Technology File System) file streaming. ADS is a feature of the Windows-native NTFS to ensure compatibility with Apple file systems (called HFS). ADS has been around ever since the Windows NT days and has held on all the way through to current Windows releases: NTFS streaming still works on Windows 7 machines, believe it or not.
NTFS file steaming allows you to hide virtually any file behind any other file, rendering it invisible to directory searches. The file can be a text file, to remind you of steps to take when you return to the target, or even an executable file you can run at your leisure later on. To see this in action, let’s run a little exercise.
| NOTE It’s noteworthy to point out here that every forensics kit on Earth checks for ADS at this point. Additionally, in modern versions of Windows, an executable that’s run inside of a .txt file, for instance, will show up in the Task Manager as part of the parent. EC-Council writes this generically for the exam, and we’ve tried to stay true to that; however, there are some times when reality and the test collide so awkwardly we simply can’t stay silent about it. |
Exercise 6-2: NTFS File Streaming
In the first part of this exercise, you want to hide the contents of a file named want-tohide.txt. To do this, you’re going to hide it behind a normal file that anyone browsing the directory would see. In the second part, you’ll hide an executable behind a file. Here is the first set of steps to follow:
1. Create a folder called C:FStream. Copy notepad.exe into the folder.
2. Create a text file (normal.txt) in the folder. Add some text to it—doesn’t matter what—and then save the file. Create a second text file (wanttohide.txt), add text to it, and then save.
3. Open a command prompt and navigate to the C:FStream folder. Type dir to show the contents. You should now have notepad.exe, normal.txt, and wanttohide.txt in the folder.
4. In the command prompt, enter type wanttohide.txt > original.txt:hidden. txt. This creates a copy of wanttohide.txt into a file called hidden.txt behind normal.txt.
5. Delete wanttohide.txt from the C:FStream folder. Now anyone browsing will only see notepad.exe and normal.txt.
6. From the command prompt, enter start c: est ormla.txt:hidden.txt. Voilà! Notepad opens and the contents of the text file are displayed.
Now let’s try an executable file:
1. In the C:FStream folder, create another text file named second.txt.
2. Open a command prompt and navigate to the folder. Enter the command type notepad.exe > second.txt:notepad.exe. This creates a hidden copy of notepad.exe behind the text file second.txt.
3. Delete notepad.exe from C: est. Type dir at the command prompt and verify that no more executables are visible in the folder.
4. Enter start c: estsecond.txt:notepad.exe at the command prompt. Huzzah! You’ve just opened a hidden executable!
| NOTE You can hide any file type behind any other file type using this method. Spreadsheets, slides, documents, and even image files will work too. |
If you’re a concerned security professional wondering how to protect against this insidious built-in Windows “feature,” relax, all is not lost. Several applications, such as LNS and Sfind, are created specifically to hunt down ADS. Additionally, Windows Vista has a groovy little addition to the directory command (dir /r) that will display all file streams in the directory. Lastly, copying files to and from a FAT partition blows away any residual file streams in the directory.
Although it’s not 100 percent certain to work, because most security professionals know to look for it, we can’t neglect to bring up the attributes of the files themselves and how they can be used to disguise their location. One of these attributes—hidden—does not display the file during file searches of folder browsing (unless the admin changes the view to force all hidden files to show). In Windows, you can hide a file by right-clicking, choosing Properties, and checking the Hidden attribute check box. Of course, to satisfy you command-line junkies who hate the very thought of using anything GUI, you can also do this by issuing the attrib command:
attrib +h filename
Another file-hiding technique we’ve already hit on back in Chapter 2 is steganography. Sure, we could discuss encryption as a hiding technique here as well, but encrypting a file still leaves it visible—steganography hides it in plain sight. For example, if you’ve gained access to a machine and you want to ferret out sensitive data files, wouldn’t it be a great idea to hide them in JPG files of the basketball game and e-mail them to your buddy? Anyone monitoring the line would see nothing but a friendly sports conversation. Tools for hiding files of all sorts in regular image or other files are ImageHide, Snow, Mp3Stego, Blindside, S-tools, wbStego, and Stealth. Refer back to Chapter 2 if you’ve forgotten most of our steganography discussion (and invest in some ginkgo biloba to address your short-term memory issues).
In addition to hiding files for further manipulation/use on the machine, covering your tracks while stomping around in someone else’s virtual play yard is also a cornerstone of success. The first thing that normally comes to mind for any hacker is the everpresent event log, and when it comes to Windows systems there are a few details you should know up front. First, you’ll need to comb over three main logs to cover your tracks—the application, system, and security logs.
The application log holds entries specifically related to the applications themselves, and only entries programmed by the developers get in. For example, if an application tries to access a file and the file has been corrupted or moved, the developer may have an error logged to mark that. The system log registers system events, such as drivers failing and startup/shutdown times. The security log records the juicy stuff—login attempts, access and activities regarding resources, and so on. To edit auditing (the security log won’t record a thing unless you tell it to), you must have administrative privileges on the machine. Depending on what you’re trying to do to the machine, one or all of these may need scrubbing. The security log, obviously, will be of primary concern, but don’t neglect your tracks in the others.
Many times a new hacker will simply attempt to delete the log altogether. This, however, does little to cover your tracks. As a matter of fact, it usually sends a giant blaring signal to anyone monitoring log files that someone is messing around on the system. Why? Because anyone monitoring an event log will tell you it is never empty. If they’re looking at it scrolling by the day before your attack, then come back the next day and see only 10 entries, someone’s going into panic mode.
A far better plan is to take your time (a familiar refrain is building around this, can’t you see?) and be selective in your event log editing. Some people will automatically go to the jugular and turn auditing off altogether, run their activities, then turn it back on. Sure, your efforts won’t be logged in the first place, but isn’t a giant hole in the log just as big an indicator as error events themselves? Why not go in, first, and just edit what is actually being audited. If possible, only turn off auditing on the things you’ll be hitting—items such as failed resource access, failed logins, and so on. Then, go visit the log and get rid of those items noting your presence and activities. And don’t forget to get rid of the security event log showing where you edited the audit log.
| NOTE Another tip for hiding tracks in regard to log files is to not even bother trying to hide your efforts, but rather simply corrupt the log file after you’re done. Files corrupt all the time and, often, a security manager may not even bother to try to rebuild a corrupted version—assuming “stuff happens.” |
One last note on log files and, I promise, I’ll stop talking about them: Did you know security administrators can move the default location of the log files? By default, everyone knows to look in %systemroot%System32Config to find the logs—each will have an .evt extension. However, updating the individual file entries in the appropriate registry key (HKEY_LOCAL_MACHINESYSTEMCurrentControlSetServicesEventLog) allows you to place them wherever you’d like. If you’ve gained access to a system and the logs aren’t where they’re supposed to be, you can bet you’re in for a tough day—the security admin may already have eyes on you.
A few tools are available for taking care of event log issues. In Control Panel | Administrative Tools | Local Security Policy, you can set up and change the audit policy for the system. The top-level settings are found under Local Policies | Audit Policy. Other settings of note are found in the Advanced Audit Policy Configuration at the bottom of the listings under Security Settings. Other tools of note include, but are not limited to, elsave, WinZapper, and Evidence Eliminator. Lastly, Auditpol (shown in Figure 6-5) is a tool included in the old Windows NT Resource Kit that may be useful on older systems. You can use it to disable event logs on other machines. The following should do the trick:
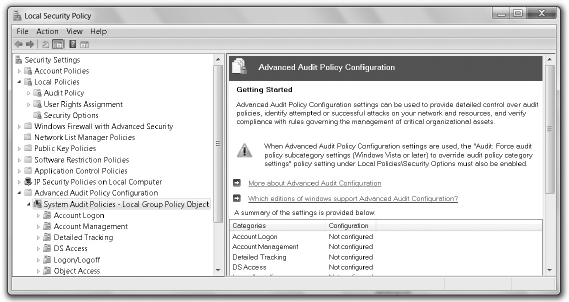
Figure 6-5 Windows Audit Policy
c:auditpol \targetIPaddress /disable
Rootkits
Finally, no discussion on system hacking and maintaining stealth/access on the machine can be complete without bringing up rootkits. A rootkit is a collection of software put in place by an attacker that is designed to obscure system compromise. In other words, if a system has a properly introduced rootkit installed, the user and security monitors won’t even know anything is wrong. Rootkits are designed to provide backdoors for the attacker to use later on and include measures to remove and hide evidence of any activity. Per the CEH objectives, there are three types of rootkits:
• Application level As the name implies, these rootkits are directed to replace valid application files with Trojan binaries. These kits work inside an application and can use an assortment of means to change the application’s behavior, user rights level, and actions.
• Kernel level These rootkits attack the boot sectors and kernel level of the operating systems themselves, replacing kernel code with backdoor code. These are by far the most dangerous and are difficult to detect and remove.
• Library level These rootkits basically make use of system-level calls to hide their existence.
Originally, rootkits started in the Linux realm and had two big flavors. In one setup, the rootkit replaced all sorts of actual binaries to hide processes. These were easily detectable, though, due to size—tools such as Tripwire could easily point out the existence of the rootkit. Later on, they evolved to being loaded as a drive or kernel extension—via something called a Loadable Kernel Module (LKM). Early rootkits in the Linux world included Adorm, Flea, and T0rm. Tools for helping discover rootkits already installed on a machine include chkrootkit and Rootkit Hunter.
When it comes to Windows system hacking, passwords are definitely the key, but obviously there are many other avenues to travel. In later chapters we’ll cover looking at some of them. For now, keep your eye on the SAM file, get some good practice in with online and offline attack tools, and practice covering your tracks.
The Most Successful Rootkit You’ve Never Heard Of
If you’ve started implementing what has been written so far in this book, then you’re already monitoring vulnerability and malware boards for news. And you already know about my topic here. Rootkits are hardly new—they’ve been around since LKMs reared their heads in the early Unix days—and it’s not like they don’t get media coverage: Sony’s famous foray into rootkits in 2005 with their proprietary BMG CD software generated howls of protest worldwide and backfired quickly on them. But the rapid worldwide spread of the ubiquitous TDSS rootkit seems to be the best rootkit you’ve never heard of.
Starting in 2008, TDSS has become to malware promoters and writers what Linux was to the open source community. The rootkit has been “improved” and added to in multiple variations to make it the preeminent threat for casual, “drive-by” infection vectors. In 2009, an estimated 3 million systems were infected and effectively controlled by the TDSS rootkit. That number has since grown exponentially, and has spawned a worldwide effort at defeating and removing the rootkit.
TDSS has spread by peer-to-peer networks, by crack and keygen websites, and through various ad streams and social networking tie-ins that take advantage of any number of Java, Adobe, and other vulnerabilities users simply forget to patch. The kit initially needs administrator privileges to run; however, open vulnerabilities often allow that escalation and, in many cases, the user will simply voluntarily give permission, ignoring any pesky warning or error messages.
Once installed, this kit is virtually invisible. Sure, some antivirus programs will display a warning or two about it, and may even tell you flat out you’re infected. However, most can’t do a thing about it—once it’s installed, you’re cooked. Removal of the kit is possible using a few tools available on the Net, but be careful—many of the fixes are worse than the infection. Your best option is to simply reload the system.
This example just goes to show the threat is real, pervasive, and going on right now. Maybe word about TDSS has made it your way and maybe it hasn’t. But if the machine you’re on is beaconing to an “.ru” server about your clicks and links through Google and Yahoo!, you’re probably a TDSS bot and don’t even know it.
| NOTE Rootkits are exponentially more complicated than your typical malware application and reflect significant sophistication. If your company detects a customized rootkit and thinks they were targeted, it’s time to get the FBI involved. And to truly scare the wits out of you, check out what a truly sophisticated rootkit can do: http://en.wikipedia.org/wiki/Blue_ Pill_(malware). |
Linux Hacking
The first section of this chapter started by letting you know the vast majority of machines you’ll see in your testing will be Microsoft Windows boxes. However, no one cannot possibly write a book on computing—much less a book on hacking techniques, for goodness’ sake—without including a discussion on the most popular, powerful operating system you may never have heard of. Not just because you may find a box or two you want to try to hack into, but also because the OS provides such a great platform for launching attacks. Linux comes in more flavors than your local ice cream shop can come up with and is largely available for free. People from around the world have openly and freely contributed to it and have developed many Windows-like offerings, as well as very powerful servers. In this section, we’ll cover some of the basics you’ll need to know with Linux and discuss just a few options you may have in hardening the box.
Linux Essentials
If you’ve spent any time in networking or computing over the past 20 years or so, I’m sure you’ve heard the Linux zealots screaming at you about how great and powerful their operating system is. Although I’d love to sit here and debunk them (mainly because it’s just so much fun to rile them up), it actually is a great OS. Linux never had the ease of use Windows provided early on, and lost market share because of it. However, the OS has come a long way, and more than a few point-and-click Linux GUIs are available. Although we won’t discuss all the versions here, I highly recommend you download a few ISOs and burn some bootable disks—you’ll be amazed how easy to use some of the GUI versions have gotten.
| NOTE Red Hat is one of the better known and most prevalent Linux “distros,” but it’s certainly not the only one. Ubuntu, Gentoo, SuSe, Fedora, and a thousand others are just as easy to use and just as powerful. Many have great GUI front ends, and some look surprisingly a lot like their Windows counterparts. A link to watch for all the crazy variants out there is http://distrowatch.com. You can get a good feel for which ones are most popular, which ones aren’t, and what advantages they can offer you. |
File System and Basic Commands
Any discussion on an OS has to start with the basics, and you can’t get more basic than the file system. The Linux file system isn’t that far removed from the NTFS layout you’re already familiar with in Windows—it’s just a little different. Linux starts with a root directory just as Windows does. The Windows root is (usually) C:. The Linux root is just a slash (/). It also has folders holding specific information for specific purposes, just like Windows. The basic file structure for Linux is shown in Figure 6-6, and here’s a list of the important folders you’ll need to know:
• / A forward slash represents the root directory.
• /bin The bin directory holds all sorts of basic Linux commands (a lot like the C:WindowsSystem32 folder in Windows).
• /dev This folder contains the pointer locations to the various storage and input/output systems you will need to mount if you want to use them—such as optical drives and additional hard drives or partitions. Note: Everything in Linux is a file. Everything.
• /etc The etc folder contains all the administration files and passwords. Both the password and shadow files are found here.
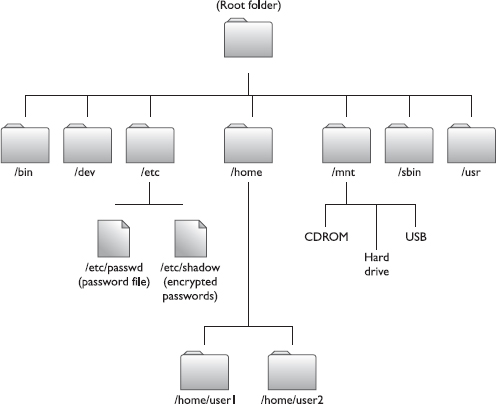
Figure 6-6 Linux file structure
• /home This folder holds the user home directories.
• /mnt This folder holds the access locations you’ve actually mounted.
• /sbin Another folder of great importance, the system binaries folder holds more administrative commands and is the repository for most of the routines Linux runs (known as daemons).
• /usr Amazingly enough, the usr folder holds almost all of the information, commands, and files unique to the users.
When you log in to the command line in a Linux environment, you will start in your assigned directory and can move around simply by using the cd (change directory) command. You’ll need to, of course, define the path you wish to use, so it’s very important to know where you are. Many terminal sessions display the path just to the left; however, if you’re unsure, type pwd to see where you are and navigate from there. Other basic Linux commands of note can be found in Table 6-1.
| EXAM TIP When it comes to Linux essentials on the exam, know the important folder locations and the basic commands—especially the chmod command and how to equate the user rights to their numeric equivalents. | |
| Command | Description |
| cat | Displays the contents of a file |
| cp | Copy |
| ifconfig | Much like ipconfig in Windows, this command is used to display network configuration information about your NIC. |
| kill | Kills a running process. (You must specify the process ID number.) |
| ls | Displays the contents of a folder. The -l option provides the most information about the folder contents. |
| man | Displays the “manual” page for a command (much like a help file) |
| passwd | Used to change your password |
| ps | Process status command. Using the -ef option will show all processes running on the system. |
| rm | Removes files. The command rm-r also recursively removes all directories and subdirectories on the path, and provides no wanring when deleting a write-protected file. |
| su | Allows you to perform functions as another user. The sudo command version allows you to run programs with “super user” (root) privileges. |
| adduser | Adds a user to the system |
Table 6-1 Linux Commands | |
Security on files and folders is managed through your user account, your user’s group membership, and three security options that can be assigned to each for any resource: read, write, and execute. These security rights can only be assigned by the owner of the object. Typing the command ls -l will display the current security settings for the contents of the directory you’re in, which will appear like this:
drwxr-xr-x 2 user1 users 33654 Feb 18 10:23 direc1
-rw-r--r-- 1 user1 users 4108 Feb 17 09:14 file1
The first column displays what the object is (the letter d indicates a folder, and blank indicates a file) along with the assigned permissions, which are listed as rwxr-wxrwx. The read, write, and execute options are displayed for user, group, and all others, respectively. For example, the file named “file1” has read and write assigned for the user, read-only for the group, and read-only for all others. The owner of the resources is also listed (user1), along with the assigned group (users).
These permissions are assigned via the chmod command and the use of the binary equivalent for each rwx group: Read is equivalent to 4, write is 2, and execute is 1. For example, the following command would set the permissions for file1 to “r--rw-r--”:
chmod 464 file1
Opening things up for everyone, giving all permissions to everyone, would look like this:
chmod 777 file1
Obviously, knowing how to change permissions on a file or folder is an important little nugget for an ethical hacker.
Another important Linux fundamental deals with users, groups, and the management of each. Just as Windows has accounts created for specific purposes and with specific rights, Linux has built-in accounts for the management of the system. The most important of these user accounts is called root, and is the administrative control of the system. All users and groups are organized via a unique user ID (UID) and a group ID (GUID). Information for both can be found within the /etc/passwd file. Running a cat command on the file displays lines that look like this:
root:x:0:0:root:/root:/bin/bash
bin:x:1:1:bin:/bin:
… ****** removed to save space ******
matt:x:500:500:Matt:/home/mat:/bin/csh
user2:x:501:501:User2:/home/us1:/bin/pop
Among other items in the file, you’ll find the users are listed. Root—the administrative “god” account of the system, and the one you’re trying to get to—is listed first, with its UID and GID set to 0. User “matt” is the first user created on this system (UID and GID are set to 500), and “user2” is the second (UID and GID set to 501). Immediately following the username is the password. Notice, in this case, the password is listed simply as “x,” indicating the use of something called the shadow file.
Passwords in Linux
Passwords in Linux can be stored in one of two places. The first you’ve already met—the passwd file. If this is your chosen password storage location, all passwords will be displayed in clear text to anyone who has read privileges to the file. If you choose to use the shadow file, however, the passwords are stored, and displayed, encrypted. Lastly, and of special note to you, a budding ethical hacker: The shadow file is only accessible by root.
| NOTE Finding a non-shadowed system in the real world is just about impossible. The passwd file and the shadow file are covered here for purely academic purposes (in other words, they’re on the test), and not because you’ll get lucky out on the job. For the most part, every “nix” system you run into will be shadowed, just so you’re aware. |
Just as with Windows, pulling the passwords offline and working on them with a cracker is your best bet for system “owning.” John the Ripper—a tool introduced earlier—works wonderfully well on Linux shadow files. The passwords contained within are actually hashes that, usually, have a salt assigned (also covered earlier). John will run through brute-force hashing and tackle the salt(s) for you. It may take a while, but trust me—John will get it eventually.
| NOTE More than a few Linux distributions are made explicitly for hacking. These distros normally have many hacking tools—such as John and Metasploit versions—built in. Backtrack, Phlack, and Auditor are just a few examples. |
Exercise 6-3: Using John the Ripper
You can run this on virtually any installation of Linux you download. The instructions are purposefully generic so they’ll work with nearly anything—whichever you like best. It’s probably easier if you download a version with John already built in—such as Auditor or Backtrack—but you’re welcome to run it on a test system with a full install. Here are the steps to follow:
1. Boot into your Linux installation and open a terminal window (commandline interface).
2. Create two users with the adduser command:
adduser testusr1 -d /home/users/testusr1
adduser testusr2 -d /home/users/testusr2
3. Set their passwords:
passwd testusr1 pass
passwd testusr2 P@ss
4. Start John the Ripper and point it to the shadow file. In this example, I’m changing to the directory and running the command directly. Depending on your version, some distros will have a direct link for John, or a tools directory for you to access it from. (Hint: You may want to copy the shadow and passwd files into the john directory. You can do this with the cp command: cp /etc/shadow /etc/john/shadow. If you do so, you won’t need to specify a complete path to the shadow file in the following john command.)
cd /etc/john
./john /etc/shadow
5. As John gets to work, you can press the ENTER key to see how it’s doing (the current password guess will be displayed). It probably won’t take very long, but you’ll soon see the passwords cracked and displayed. Obviously, the password containing the special character will (or should) take longer to guess.
Cracked passwords will also be stored in a file named john.pot. This file will append every time you run John and it finds a password, and can be viewed anytime using the cat command.
Linux Install Fundamentals
Now that you know a few of the fundamentals of using the Linux command structure and basic password hacking in the OS, it’s also important for you to understand some Linux installation fundamentals. One of the reasons for the explosive growth of Windows as the OS of choice is the ease with which things can be added and removed from the OS. Linux isn’t necessarily difficult to work with, but it’s not nearly as easy either.
The simplest and easiest way to get a Linux installation is to simply download an ISO file and burn it to disk, or use an application (such as UNetbootin from www.sourceforge.net) to drop an image on a USB for you. With either the disk or the USB drive, you can boot into a Linux distribution with little problem. Figure 6-7 shows a few of the available distributions. Occasionally, though, whether you have a specific hardware need, a new piece of software to test, or you’re simply masochistic in nature, you may want to compile a Linux kernel yourself. Assuming you are totally insane and want to do this on your own (I’m 20 years in the business and haven’t seen the need to do so), you’ll need to use a couple more commands and follow a lot more steps than this simple exposé on Linux has time for. What we’ll do here is concentrate on what you’ll need for the exam by looking at what you’ll need to compile and configure an application within Linux.
First off, most install files will come in the form of a tar file—which is basically a zipped file (a tar file itself isn’t compressed at all, it simply creates an index archive). gzip is the application most commonly used with a tar file to unzip to the raw files. After looking for the ubiquitous README file to learn what you’ll need for the install, you’ll need three commands to compile any program in Linux: ./configure, make, and make install.

Figure 6-7 Linux distributions
| EXAM TIP You won’t see a lot of questions on the exam regarding installation of Linux apps or kernel modules. You won’t be asked specifics on how to compile code, but you will need to know the basic commands and the compiler name (GCC). | |
Lastly, if you happen to download an application in its raw form—maybe a C++ write-up or something like it—you’ll need to compile it to a recognizable form for the OS. Linux comes with a built-in compiler called GNU Compiler Collection (GCC). GCC can compile and execute from several languages, such as C, C++, and Fortran. For example, if you had a C++ source file (sample.cpp) and wanted to compile it in Linux, the command might look something like this:
g++ sample.cpp newapp.exe
A source file in C could be compiled the same way—just change the initial command:
gcc sample.c newapp.exe
One final note on install necessities for your exam deals not with installing the OS, but with adding functionality. Linux kernel modules were invented early on to provide some modularity to the operating system. The thought was, “Why force the entire OS to be rewritten and reinstalled when we can simply add modules at the kernel level?” Admittedly, the idea was great and made the evolution and improvement of Linux skyrocket; however, it isn’t without its problems.
| NOTE The command to load a particular LKM is modprobe LKM_name. |
As we discussed earlier, rootkits came about because of the LKM idea. Just as with many other seemingly great ideas in networking and computing, when put to the wrong use or in the wrong hands, it becomes deadly. Because of this, you’ll need to be very, very careful when installing LKMs in your Linux load.
This section wasn’t about making you a Linux expert; it was all about introducing you to the bare-bones basics you’ll need to be successful on the exam, as well as for entering the career field. As with everything else we’ve discussed thus far, practice with a live system is your best option. Download a few distributions and practice—you won’t regret it.
Hardening a Linux Machine
Now that you know a little about the fundamentals, we need to spend just a few paragraphs on what an administrator can do to harden the box—to protect it against hacking. Shockingly enough, most of this stuff will probably seem like common sense to you. However, we need to cover it here because you will definitely see some of this on your exam.
Ensuring the server is located in a physically secured location, with restricted access to the actual machine, should be a no-brainer. If you’re struggling with that a little bit, consider how easy it is (on many Linux distributions) to change or delete the root password given physical access to the machine. For example, here’s a new term you may not see on the exam, but you’d better come to grips with: single-user mode. Single-user mode was developed to allow multiuser operating systems to boot into a single “superuser” account, for emergency purposes: things such as maintenance tasks, network services, and—ahem—lost root passwords.
Entering single-user mode is reliant on being physically located at the machine, and is different from one operating system to another. Mac OS X, for example, allows single user by pressing CONTROL-S at power up, whereas Unix/Linux boxes may require the use of GRUB (Grand Unified Bootloader) to alter the boot. On some “nix” boxes, simply typing linux single at the lilo prompt at bootup is all you’ll need. To figure it out for your own flavor, just use your friend and mine, Google, and do your own Internet search: There are more than a few tutorials and documents out there for you to take advantage of.
Also, be aware that physical access to a Linux machine may allow the attacker to use a Linux bootable disk, which of course starts you in root mode without a password. As root you can then do whatever you like, including altering passwords for the root account itself, or maybe creating an account for your own use or installing a backdoor. Or maybe you just open the shadow file and delete the root password altogether.
There are, of course, a few other obvious steps you can take, such as ensuring good password policy. Another obvious choice goes to your OS selection in the first place. None of the other steps and tools mentioned here will do you a lot of good if you install LKMs from anywhere, helter-skelter, or choose a bogus distribution in the first place. After you’ve installed a good, solid, trusted OS, be sure to follow that up with any security patching you find necessary.
Additionally, when it comes to your OS, be sure to turn off anything you’re not using. Services such as FTP, TFTP, and Finger don’t need to run unless you absolutely need them for a specific purpose. Remote access services such as rlogin, Telnet, and ssh definitely require careful thought for maintaining their access. Most remote access and services are kicked off in the /etc/inittab folder or from various boot scripts—if you don’t absolutely need them, ditch them.
When it comes to user accounts and passwords, root is obviously the one you most want to protect. Although assigning a good password and changing it frequently is good practice, be sure to restrict the use of the su command as well. Remember that it is used to switch users (and sudo can be used to switch to root access), so restricting its use to a single group is always good policy. You can also restrict where root can log on from, and requiring that access locally will prevent remote users from hacking it. Passwords are best protected through use of the shadow file, as previously discussed. Just don’t forget to change them frequently.
Another hardening step you can take on a Linux box is the same one you may have taken with any Windows box: Install an HIDS. In addition to many other issues we’ve already discussed, you can also use Tripwire, an application for performing integrity checks on important files. Tripwire may not protect against an attack, but it will certainly do a good job of letting you know of major changes to the box you may have otherwise missed.
Log file monitoring is also important on Linux boxes. Although a lot of the GUI versions of Linux have the same functionality as the Windows Event Viewer, you can also access the log files via the command line in /var/log. The last logged-on account has everything recorded in the /var/log/lastlog file—run a cat command on it and you’ll see everything the user was up to.
| NOTE You can find a good list of available vulnerability scanners at http://sectools.org/vuln-scanners.html. |
Finally, it’s always good practice to run a vulnerability scanner against your machine—Linux, Windows, or any other. Tons of tools are set up for vulnerability and security scanning. Some are very specific to certain types of scans. For example, Stackguard and Libsafe are program code scanners, whereas N-Stealth, Nikto, and AppDetective look specifically at applications themselves. Others are made to look at the entirety of the system. Vulnerability scanners aren’t foolproof: They rely on signatures just like anything else and, from time to time, miss something and allow a false positive as a result. Some tools available for vulnerability scanning are listed here:
• Nessus Nessus, shown in Figure 6-8, is very well known and has an excellent reputation. It used to be freely available as an open source product. An older version of Nessus is NeWT (Nessus Windows Technology). Nessus can be used to run a vulnerability scan across your entire subnet or can be aimed at a single machine.
• Retina A commercial vulnerability assessment scanner by eEye, Retina is used widely in DoD networks, mostly a GUI interface. Retina runs natively on a Windows machine and can scan subnets or individual systems.
• Core Impact Much more than a simple vulnerability scanner, Core Impact is a point-and-shoot comprehensive penetration testing product. It’s very expensive, but is used widely within the federal government and by many commercial pen test teams.
• SAINT Much like Nessus, SAINT used to be open source but is now a commercial entity. SAINT runs natively on Unix.
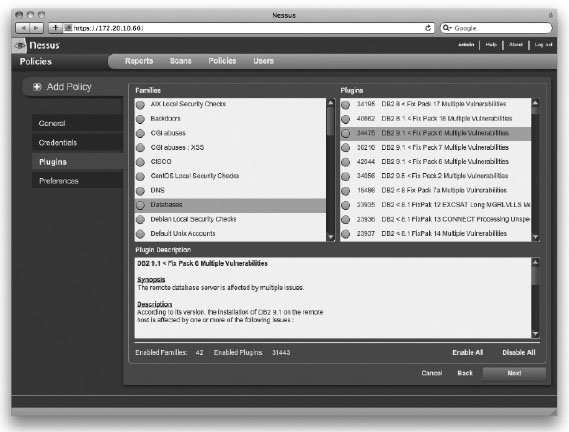
Figure 6-8 Nessus vulnerability scanner
As stated before, you probably won’t come across a whole bunch of Linux machines on your target subnet. Generally speaking, Linux will make up less than 5 percent of your targets. The good news, though, is that Linux machines are almost always really important, so hacking into them, or making use of them otherwise, is a high priority. Learn the basics, practice the installation of various tools and modules, and monitor the hardening techniques your adversaries will be using—it will pay off come pen test time.
Chapter Review
Authentication to any system can rely on three things: something you are (biometrics, such as fingerprints), something you have (a token or card of some sort), and something you know (a password). A password’s strength is determined by two major functions—length and complexity. Password types are defined by what’s in them, and can be made up of letters, numbers, special characters, or some combination of all three. In general, passwords must not contain any part of the user’s name, must have a minimum of eight characters, and must contain characters from at least three of the four major components of complexity (special symbols, uppercase letters, lowercase letters, and numbers).
There are four types of password attacks. A passive online attack involves sniffing a wire in the hopes of intercepting a password in clear text or attempting a replay or manin-the-middle attack. Sidejacking is another attack that’s similar and is used against encrypted passwords and SSL by stealing cookies exchanged between two systems and replaying them. Cain, Ettercap, ScoopLM, and KerbCrack(KerbSniff) are examples of tools that accomplish this.
An active online attack occurs when the attacker begins simply guessing passwords. Active online attacks take much longer than passive attacks, and are also much easier to detect. These attacks try to take advantage of bad passwords and security practices by individuals on a network.
Offline attacks occur when the hacker steals a copy of the password file and works the cracking efforts on a separate system. These attacks usually require some form of physical access to the machine, where the attacker pulls the password file to removable media. Password cracking offline can be done in one of three major ways: dictionary attacks, hybrid attacks, and brute-force attacks.
A dictionary attack is the easiest and uses a list of passwords in a text file, which is then hashed by the same algorithm/process the original password was put through. This can also be sped up using “rainbow tables.” A hybrid attack is a step above the dictionary attack. In a hybrid attack, the cracking tool takes words from a list and substitutes numbers and symbols for alphabetic characters. Hybrid attacks may also append numbers and symbols to the ends of dictionary file passwords. Brute-force attacks attempt every conceivable combination of letters, numbers, and special characters, comparing them against the hash to determine a match. This process is very time consuming, chewing up a lot of computation cycles and making this the longest of the three methods. Cain, KerbCrack, Legion, and John the Ripper are examples of bruteforce password-cracking tools.
Keylogging is the process of using a hardware device or software application to capture the keystrokes a user types. With this method, keystrokes are captured as they are typed, regardless of what they’re being typed for. Keyloggers can be hardware devices—usually small devices connected between the keyboard cable and the computer—or software applications installed and running in the background.
Non-electronic attacks involve social-engineering attempts, which can take on many different forms. This is perhaps the most effective and easiest method available. Productive methods include shoulder surfing and phishing.
Windows systems store passwords in hashed format. LM hashing, an older method, converts all password characters to uppercase, appends the remainder with blank spaces to reach 14 characters, and then splits the password and hashes both sides separately. The LM hash value of seven blank characters will always be the same (AAD3B-435B51404EE). LM authentication (DES) was used with Windows 95/98 machines. NTLM (DES and MD$) was used with Windows NT machines until SP3. NTLM v2 (MD5) was used after that. Kerberos came about with Windows 2000.
Escalation of privileges is the bridge between gaining access and maintaining access, and usually falls into four main options for obtaining administrator (root) privileges on a machine. The first is to crack the password of an administrator or root account. The second is to take advantage of a vulnerability found in the OS, or in an application, that will allow you access as a privileged user. The third method is to use a tool that, hopefully, provides you the results you’re looking for. The last method involves more social engineering—such as putting executable code in an e-mail and asking the user to click it. This is the easiest method available and probably will wind up being your most effective over time.
Stealth in hacking truly comes down to patience—spend enough time, move slowly enough, and chances are better than not you’ll go unnoticed. Hiding files in Windows (pre–Windows 7) can be done through the use of alternate data streams (ADS) in the form of NTFS file streaming. Editing a log file, not deleting it, is also a great method for hiding your tracks.
A rootkit is a collection of software put in place by an attacker that is designed to obscure system compromise. Rootkits are designed to provide backdoors for the attacker to use later on, and can be placed at the application level, kernel level, or library level.
Linux is a very powerful OS that can be used for several purposes. Red Hat is probably the best known and most prevalent Linux distribution—other examples are Ubuntu, Gentoo, SuSe, and Fedora. Hacking specific distributions include Backtrack and Auditor.
The Linux file system starts with a root directory just as Windows does. The Windows root is usually C:, and the Linux root is just a slash (/). It also has folders holding specific information for specific purposes (/etc, for example). Security on files and folders is managed through your user account, your user’s group membership, and three security options that can be assigned to each for any resource: read, write, and execute. These permissions are assigned via the chmod command and the use of the binary equivalent for each rwx group: Read is equivalent to 4, write is 2, and execute is 1. For example, the following command applies all permissions to everyone for the file:
chmod 777 file1
All users and groups are organized via a unique user ID (UID) and group ID (GUID). Information for both can be found within the /etc/passwd file. Passwords in Linux can be stored in the passwd file or in the shadow file, the latter of which encrypts the stored passwords. The passwords contained within are actually hashes that, usually, have a salt assigned. John the Ripper will run through brute-force hashing and tackle the salt(s).
Most install files will come in the form of a tar ball file—which is basically a zipped file. gzip is the application most commonly used with a tar ball to unzip to the raw files. The tar files themselves aren’t compressed, they just provide indexing. A README file will show important information on the install. You need three commands to compile any program in Linux: ./configure, make, and make install. Compiling raw programs to a recognizable form for the OS can be done using the GNU Compiler Collection (GCC). GCC can compile and execute from several languages, such as C, C++, and Fortran.
Linux kernel modules (LKMs) were invented early on to provide some modularity to the operating system. LKMs allow functionality without forcing the entire OS to be rewritten and reinstalled. The command to load an LKM is
modprobe LKM_name
Hardening a Linux machine includes physical location, file, and user account security steps. Nessus, Retina, Core Impact, and SAINT are all examples of vulnerability scanners to assist in pointing out potential problems with a Linux install.
Questions
1 A security professional employs the tools LNS and Sfind during a monthly sweep. What is being searched for?
A. Unauthorized LDAP access
B. Linux kernel modules
C. NFTS file streams
D. Steganographic images
2. Which of the following would be considered an active online password attack?
A. Guessing passwords against an IPC$ share
B. Sniffing subnet traffic to intercept a password
C. Running John the Ripper on a stolen copy of the SAM
D. Sending a specially crafted PDF to a user for that user to open
3. Which of the following would be considered a passive online password attack?
A. Guessing passwords against an IPC$ share
B. Sniffing subnet traffic to intercept a password
C. Running John the Ripper on a stolen copy of the SAM
D. Sending a specially crafted PDF to a user for that user to open
4. You have successfully acquired a copy of the password hashes from a Windows XP box. In previous enumerations, you’ve discovered the network policy requires complex passwords of at least eight characters. Which of the following offline password attacks would be best suited to discovering the true passwords?
A. Brute force
B. Dictionary
C. Hybrid
D. Keylogging
5. You decide to hide a few files from casual browsing on a Windows XP box. Which command will successfully engage the hidden attribute on file.txt?
A. attrib -hidden file.txt
B. attrib file.txt +hidden
C. attrib +h file.txt
D. attrib file.txt -h
6. While pen testing a client, you discover that LM hashing, with no salting, is still engaged for backward compatibility on most systems. One stolen password hash reads 9FAF6B755DC38E12AAD3B435B51404EE. Is this user following good password procedures?
A. Yes, the hash shows a 14-character, complex password.
B. No, the hash shows a 14-character password; however, it is not complex.
C. No, the hash reveals a seven-character-or-less password has been used.
D. It is impossible to determine simply by looking at the hash.
7. You receive a tar file of installation code for an application. You unzip the file using gzip. Which commands will you need to use for the installation? (Choose all that apply.)
A. ./configure
B. make
C. make install
D. None of the above
8. Which Linux folder holds the password and shadow files?
A. /bin
B. /etc
C. /sbin
D. /sec
9. You suspect a rogue process is running in the background of your Linux installation. Which command will display all processes running on the system?
A. ls -l
B. ifconfig
C. cp -all
D. ps -ef
10. Which of the following is not a good option to follow in hardening a Linux system?
A. Ensure the server is in an open and easily accessible location.
B. Eliminate all unnecessary services and processes on the system.
C. Periodically review the /var/log/lastlog file.
D. Ensure all default passwords are changed and replaced with complex versions.
11 . You have successfully acquired a passwd file. The entry for root is displayed here:
root:x:0:0:root:/root:/bin/bash
Which of the following is true regarding the root entry?
A. The root account has no password set.
B. The root account has a password set, but it is shadowed.
C. It is impossible to tell from this entry whether or not the root account has a password.
D. The root account password is root.
12. You wish to assign all privileges to the user, only read and write to the group, and only read access for all others for file1. Which command will accomplish this?
A. chmod 421 file1
B. chmod 124 file1
C. chmod 764 file1
D. chmod 467 file1
Answers
1. C. LNS and Sfind are both used to discover hidden files in ADS (NTFS file streaming).
2. A. Active online attacks revolve around guessing passwords. If you have an IPC$ share or the old C$ share, the Windows Administrator account cannot be locked out, so guessing passwords via brute force is sometimes beneficial.
3. B. Passive online attacks simply involve stealing passwords passed in clear text, or copying the entire password exchange in the hopes of pulling off a reply or man-in-the-middle attack.
4. A. A brute-force attack takes the longest amount of time, but because you know complex passwords are being used, this is your only option. A dictionary or hybrid attack may be worth running, if you know the users’ propensities and habits in poor password choices, but brute force is the only way to try all combinations. Keylogging would have been a great choice before cracking things offline.
5. C. The proper syntax for assigning the hidden attribute to a file with the attrib command is attrib +h filename.
6. C. LM hashes pad a password with blank spaces to reach 14 characters, split it into two seven-character sections, and then hash both separately. Because the LM hash of seven blank characters is always AAD3B435B51404EE, you can tell from the hash that the user has only used seven or fewer characters in the password. Because CEH has recommended that a password be a minimum of eight characters, be complex, and expire after 30 days, the user is not following good policy.
7. A, B, and C. Many Linux applications come in the form of a tar file with README and CONFIGURE files to guide you through the installation. Most require the ./configure, make, and make install commands for the installation.
8. B. The “etc” folder holds administrative files as well as the password and shadow files.
9. D. The ps -ef command displays all processes running on the system.
10. A. Physical security is very important, regardless of operating system.
11. B. The second field in the entry, an x, indicates a shadowed password.
12. C. Read is equivalent to 4, write is 2, and execute is 1. To assign all privileges to the user, you use a 7. Read and write privileges to the group is a 6, and read-only to all others is a 4. Therefore, the syntax is as follows:
chmod 764 file1