1. Getting Started with Lightroom 3
Introduction
Adobe Photoshop Lightroom is both a powerful image catalog management application and a high-quality image processor. The various modules available in Lightroom enable you to to organize, edit, and output your digital photos in the easiest way possible.
Although its interface structure may resemble that of a browser application such as Adobe Bridge, Lightroom can actually do much more. Although a browser application is meant for navigating through your system and managing project assets (including photographs), Lightroom focuses solely on working with photographs alone, and only those that have been imported into a catalog database.
In addition to catalog management, Lightroom also enables you to apply develop settings to your photos and raw image captures. One of the benefits to editing photos in Lightroom is that you don’t have to leave the application to do so. Both Bridge and the Photoshop Elements Organizer application (Win) require that you launch a separate application (Photoshop, Elements, or Camera Raw) to apply image edits.
With this first chapter, you learn how to launch Lightroom, choose some important preview, import, and backup preference settings, and then begin importing images into a catalog. You also learn how to work with multiple catalogs, and how to use Lightroom’s Auto Import feature, which can be especially helpful when conducting a tethered photoshoot.
Launching Lightroom 3
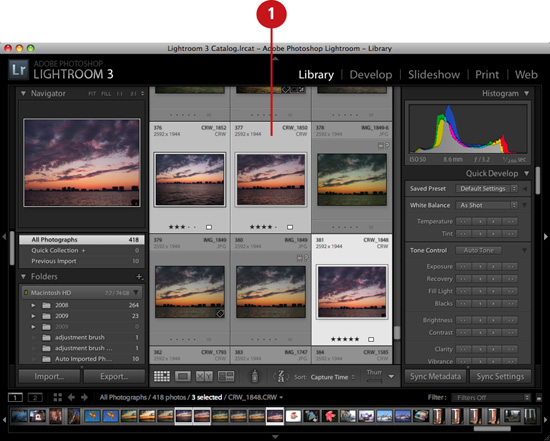
When you first launch the application, Lightroom displays the Library module with the Module Picker (top), Filmstrip (bottom), and left and right Module Panels visible. Unless you chose to update an existing Lightroom or Adobe Photoshop Elements catalog that was already on your system disk, the Content area of the Library module should appear empty.
Start Lightroom 3 in Windows XP or Vista
![]() Click the Start button on the taskbar.
Click the Start button on the taskbar.
![]() Point to All Programs.
Point to All Programs.
![]() Click Adobe Lightroom 3.
Click Adobe Lightroom 3.
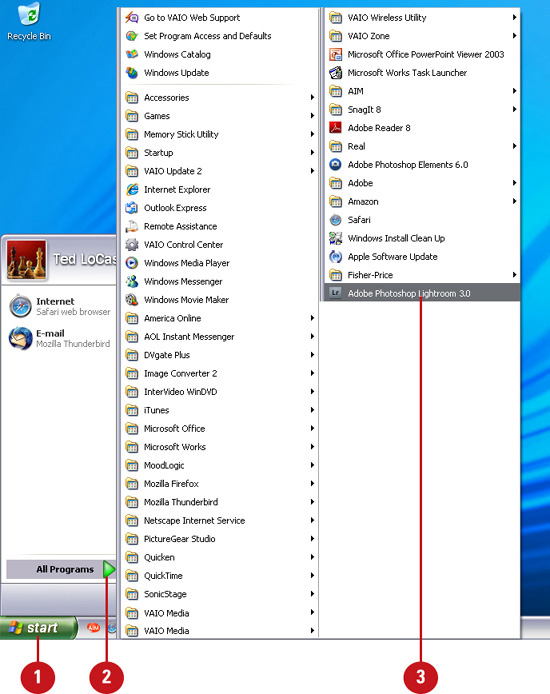
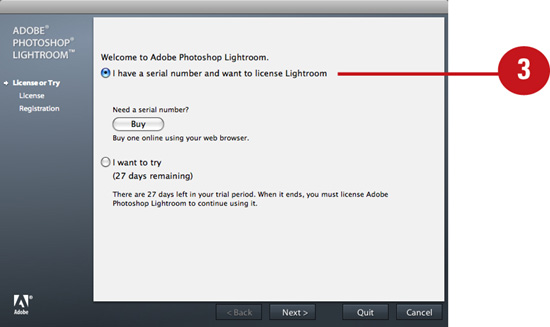
![]() If you haven’t done so already, choose to enter your serial number and click Next.
If you haven’t done so already, choose to enter your serial number and click Next.

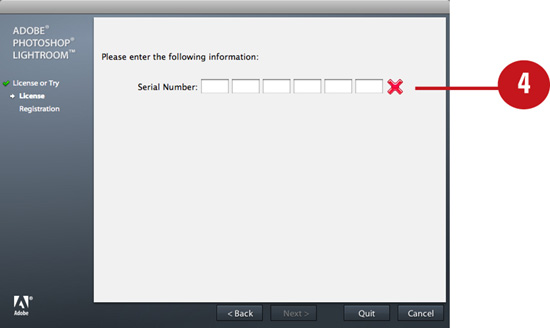
![]() Enter your serial number in the fields provided and click Next.
Enter your serial number in the fields provided and click Next.
Important
If you have Adobe Photoshop Elements or a previous version of Lightroom installed on your system, then the Create New Lightroom Catalog dialog box appears the first time you launch Lightroom 3. You can use the controls in this dialog box to update an existing Elements or Lightroom catalog or create a new catalog.
After you install the application using the install wizard, the Lightroom 3 interface appears with the Library module displayed.
Start Lightroom 3 in Mac OS X
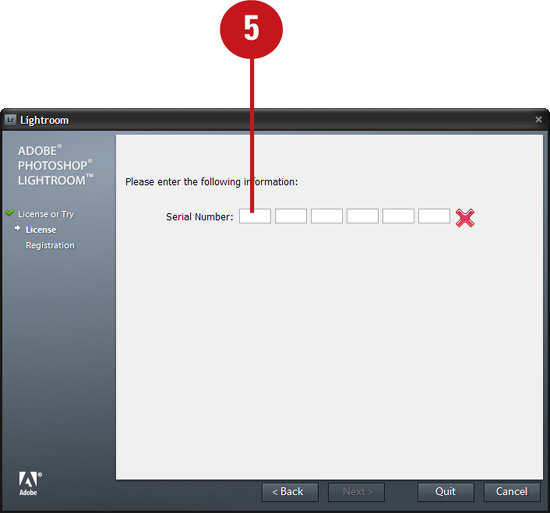
![]() Choose Applications from the Go menu.
Choose Applications from the Go menu.
![]() In the Finder window that appears, select the Adobe Lightroom 3 icon and double-click.
In the Finder window that appears, select the Adobe Lightroom 3 icon and double-click.

![]() If you haven’t done so already, choose to enter your serial number and click Next.
If you haven’t done so already, choose to enter your serial number and click Next.
![]() Enter your serial number in the fields provided and click Next.
Enter your serial number in the fields provided and click Next.
Important
If you have a previous version of Lightroom installed on your system, then the Create New Lightroom Catalog dialog box appears the first time you launch Lightroom 3. You can use the controls in this dialog box to update an existing Lightroom catalog or create a new catalog.
After you install the application using the install wizard, the Lightroom 3 interface appears with the Library module displayed.
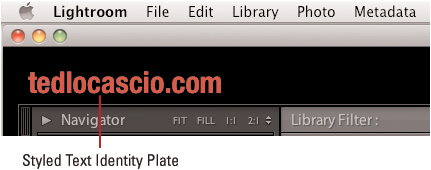
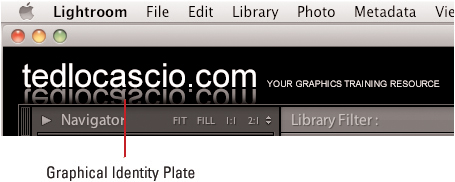
Customizing the Identity Plate
The Identity Plate is displayed in the upper-left corner of the Lightroom interface and is positioned in a retractable top panel called the Module Picker. By default, the standard Lightroom logo is displayed in the Identity Plate; however, you can replace it with custom text, or an image logo of your own. The Identity Plate Editor also enables you to choose different fonts, styles, point sizes, and colors for the module buttons displayed in the upper-right corner of the interface.
Create a styled text Identity Plate
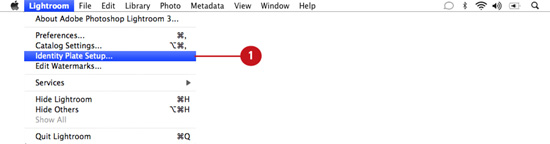
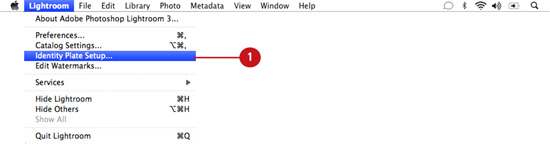
![]() Under the Lightroom menu (Mac) or the Edit menu (Win), choose Identity Plate Setup.
Under the Lightroom menu (Mac) or the Edit menu (Win), choose Identity Plate Setup.
![]() In the Identity Plate Editor dialog box that appears, check the Enable Identity Plate option. Doing so displays the new Identity Plate in the interface.
In the Identity Plate Editor dialog box that appears, check the Enable Identity Plate option. Doing so displays the new Identity Plate in the interface.
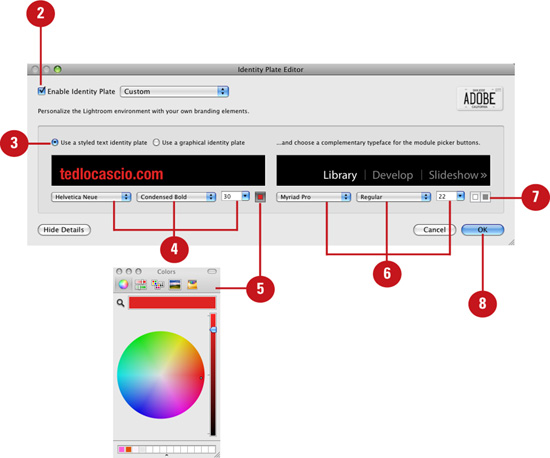
![]() Enable the Use a Styled Text Identity Plate option and enter some text in the field below.
Enable the Use a Styled Text Identity Plate option and enter some text in the field below.
![]() Highlight the preview text with the cursor. From the drop-down lists positioned below the text preview, choose a font, style, and point size.
Highlight the preview text with the cursor. From the drop-down lists positioned below the text preview, choose a font, style, and point size.
![]() Click the color swatch icon to launch the system Color Picker and choose a different color for the Identity Plate text.
Click the color swatch icon to launch the system Color Picker and choose a different color for the Identity Plate text.
![]() From the drop-down lists positioned below the modular picker buttons preview, choose a complementary font, style, and point size for the button text.
From the drop-down lists positioned below the modular picker buttons preview, choose a complementary font, style, and point size for the button text.
![]() Click the color swatch icons to launch the system Color Picker and choose different colors for the selected and nonselected states of the buttons.
Click the color swatch icons to launch the system Color Picker and choose different colors for the selected and nonselected states of the buttons.
![]() Click OK to apply the Identity Plate.
Click OK to apply the Identity Plate.
Place a graphical Identity Plate
![]() Under the Lightroom menu (Mac) or the Edit menu (Win), choose Identity Plate Setup.
Under the Lightroom menu (Mac) or the Edit menu (Win), choose Identity Plate Setup.
![]() In the Identity Plate Editor dialog box that appears, check the Enable Identity Plate option. Doing so displays the new Identity Plate in the interface.
In the Identity Plate Editor dialog box that appears, check the Enable Identity Plate option. Doing so displays the new Identity Plate in the interface.
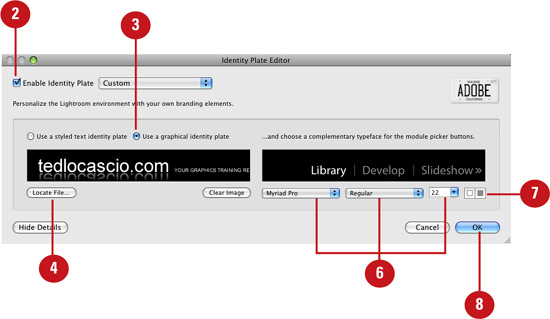
![]() Enable the Use a Graphical Identity Plate option.
Enable the Use a Graphical Identity Plate option.
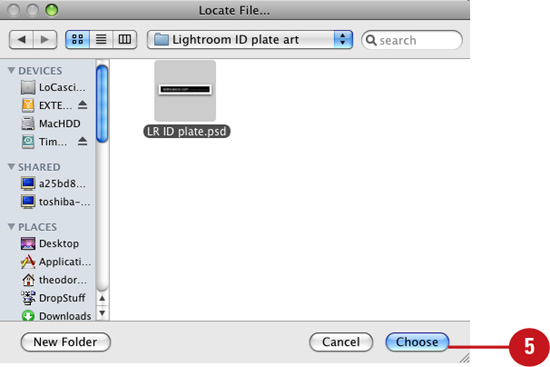
![]() Click the Locate File button located under the preview area.
Click the Locate File button located under the preview area.
![]() In the Locate File dialog box that appears, browse to the file on your system and click Choose. You can also drag and drop, or copy and paste the image into the preview area.
In the Locate File dialog box that appears, browse to the file on your system and click Choose. You can also drag and drop, or copy and paste the image into the preview area.
Important
The graphical Identity Plate image can contain transparency but should be no more than 57 pixels in height. You can place a JPEG, GIF, PNG, or TIFF. If you use the Mac version of Lightroom, you can also place a PSD.
![]() From the drop-down lists positioned below the modular picker buttons preview, choose a complementary font, style, and point size for the button text.
From the drop-down lists positioned below the modular picker buttons preview, choose a complementary font, style, and point size for the button text.
![]() Click the color swatch icons to launch the system Color Picker and choose different colors for the selected and nonselected states of the buttons.
Click the color swatch icons to launch the system Color Picker and choose different colors for the selected and nonselected states of the buttons.
![]() Click OK to apply the Identity Plate.
Click OK to apply the Identity Plate.
Creating a New Catalog
When you install Lightroom 3, a new catalog is automatically created for you. Although it is much easier to manage all your photos from within a single catalog, there are situations where you may want to create more than one. For example, you may want to create separate catalogs for personal photos and professional work, or create separate catalogs for different Lightroom users who share the same computer.
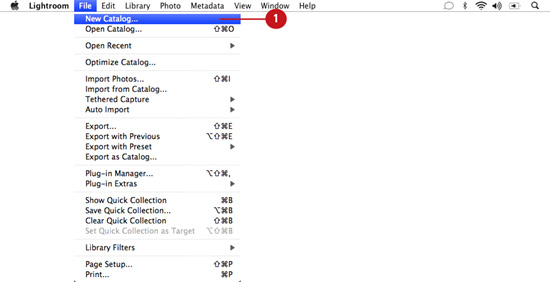
Choose the New Catalog command
![]() Under the File menu, choose New Catalog.
Under the File menu, choose New Catalog.
![]() In the Create Folder with New Catalog dialog box, enter a name for the catalog in the Save As field.
In the Create Folder with New Catalog dialog box, enter a name for the catalog in the Save As field.
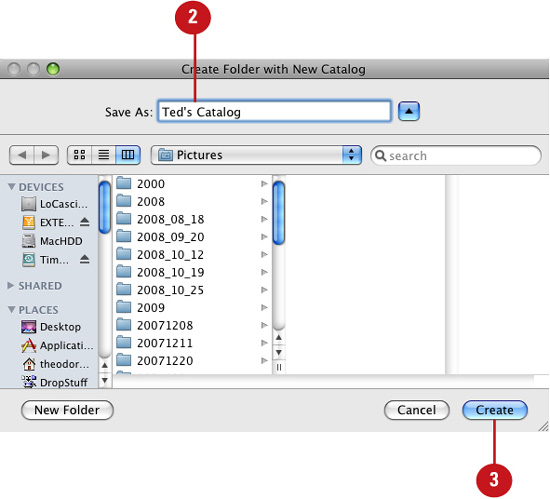
![]() Choose a save location for the new catalog folder on your system and click Create. The default save location is username/Pictures (Mac OS X) or usernameMy DocumentsMy Pictures (Windows).
Choose a save location for the new catalog folder on your system and click Create. The default save location is username/Pictures (Mac OS X) or usernameMy DocumentsMy Pictures (Windows).
Lightroom automatically closes the current catalog and relaunches to open the new empty catalog.
Opening an Existing Catalog
The current catalog always remains displayed in Lightroom, even after you close and relaunch the application. However, Lightroom can display only one catalog at a time. Therefore, any time you open a different catalog, Lightroom must relaunch itself. To remind you of this, Lightroom displays a relaunch warning dialog box every time you open a new catalog.
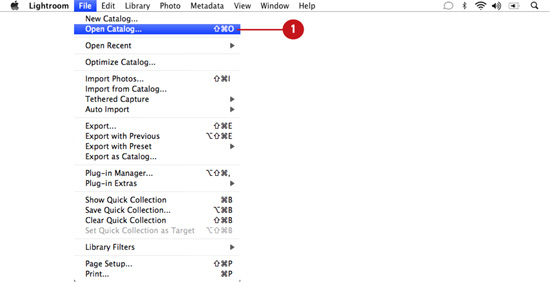
Choose the Open Catalog command
![]() Under the File menu, choose Open Catalog.
Under the File menu, choose Open Catalog.
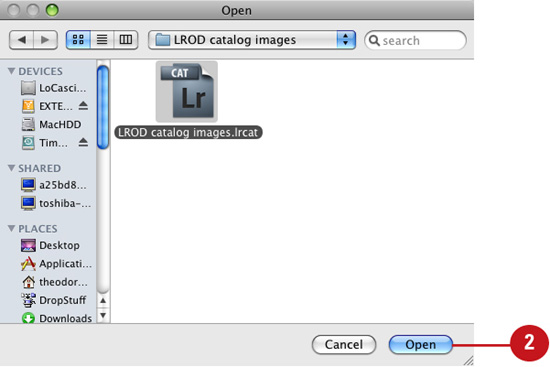
![]() Lightroom displays the Open dialog box (Mac) or the Open Catalog dialog box (Win). Navigate to the catalog (.lrcat) file on your system and click Open.
Lightroom displays the Open dialog box (Mac) or the Open Catalog dialog box (Win). Navigate to the catalog (.lrcat) file on your system and click Open.
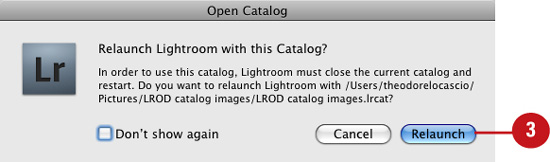
![]() Lightroom displays the Open Catalog warning dialog box. Click Relaunch to close the current catalog and relaunch Lightroom with the new catalog displayed.
Lightroom displays the Open Catalog warning dialog box. Click Relaunch to close the current catalog and relaunch Lightroom with the new catalog displayed.
Timesaver
Click the Don’t Show Again option in the Open Catalog dialog box to bypass the relaunch warning every time you open a catalog.
Lightroom closes the current catalog and relaunches to open the new empty catalog.
Choosing Backup Settings
It’s always a good idea to back up your library data regularly to an external hard drive, just in case your master hard disk should ever fail, or your catalogs should ever become corrupt. The General panel of the Catalog Settings dialog box contains a backup preference, which enables you to choose how often you would like to perform a scheduled backup.
Select a backup option from the Catalog Settings dialog box
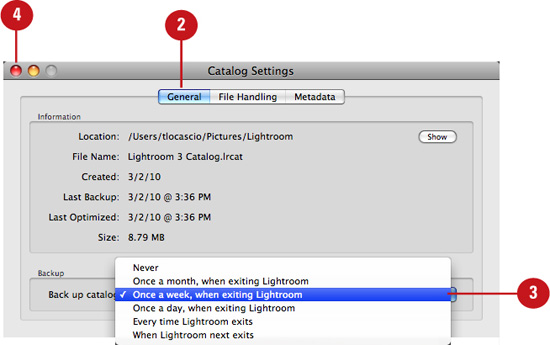
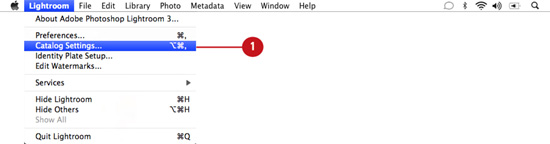
![]() Under the Lightroom menu (Mac) or the Edit menu (Win), choose Catalog Settings.
Under the Lightroom menu (Mac) or the Edit menu (Win), choose Catalog Settings.

Timesaver
Press Cmd+Option+comma (Mac) or Ctrl+Alt+comma (Win) to display the Catalog Settings dialog box quickly.
![]() In the Catalog Settings dialog box that appears, click the General tab.
In the Catalog Settings dialog box that appears, click the General tab.
Timesaver
You can also use the left and right arrow keys to quickly toggle between tabs in any dialog box.
![]() Choose a backup catalog option from the Back Up Catalog drop-down list.
Choose a backup catalog option from the Back Up Catalog drop-down list.
![]() Close the Catalog Settings dialog box.
Close the Catalog Settings dialog box.
![]() The next time a backup is scheduled, the Back Up Catalog dialog box appears. You can choose a backup directory by clicking the Choose button. Navigate to it in the Choose Folder dialog box and click Choose. You should only have to choose the backup directory once.
The next time a backup is scheduled, the Back Up Catalog dialog box appears. You can choose a backup directory by clicking the Choose button. Navigate to it in the Choose Folder dialog box and click Choose. You should only have to choose the backup directory once.
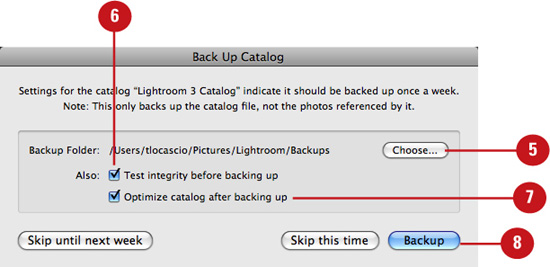
![]() Enable the Test Integrity Before Backing Up option to test for any corruptions in the database.
Enable the Test Integrity Before Backing Up option to test for any corruptions in the database.
![]() Enable the Optimize Catalog After Backing Up option to reduce wait time while working in Lightroom.
Enable the Optimize Catalog After Backing Up option to reduce wait time while working in Lightroom.
![]() Click Backup.
Click Backup.
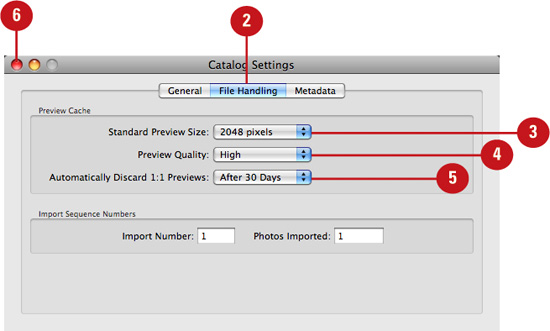
Choosing Preview Settings
Before you start working with photos in Lightroom, you should choose the proper preview cache settings. If you use Lightroom with a large 30” monitor, then you should choose the highest pixel setting (2,048 pixels) as the Standard Preview Size. If you use Lightroom on a laptop, then the 1,024 pixels setting should keep the preview cache size manageable. If hard drive space is limited, choose Low or Medium preview quality. If hard drive space is not a concern, then choose high-quality, which applies the least amount of compression and results in the best preview. The High Preview Quality setting also uses the ProPhoto RGB space, thereby ensuring better color consistency between Library and Develop modules.
Select preview options from the Catalog Settings dialog box
![]() Under the Lightroom menu (Mac) or the Edit menu (Win), choose Catalog Settings.
Under the Lightroom menu (Mac) or the Edit menu (Win), choose Catalog Settings.
Timesaver
Press Cmd+Option+comma (Mac) or Ctrl+Alt+comma (Win) to display the Catalog Settings dialog box quickly.
![]() In the Catalog Settings dialog box that appears, click the File Handling tab.
In the Catalog Settings dialog box that appears, click the File Handling tab.
Timesaver
You can also use the left and right arrow keys to quickly toggle between tabs in any dialog box.
![]() Choose a preview size that is suitable for your display monitor from the Standard Preview Size drop-down list.
Choose a preview size that is suitable for your display monitor from the Standard Preview Size drop-down list.
![]() Choose a preview quality setting suitable for your hard drive from the Preview Quality drop-down list.
Choose a preview quality setting suitable for your hard drive from the Preview Quality drop-down list.
![]() As they are generated, 1:1 Previews can take up a lot of room on your hard disk. To manage this, you can choose when to discard 1:1 Previews by selecting an option from the Automatically Discard 1:1 Previews drop-down list.
As they are generated, 1:1 Previews can take up a lot of room on your hard disk. To manage this, you can choose when to discard 1:1 Previews by selecting an option from the Automatically Discard 1:1 Previews drop-down list.
![]() Click the Close Dialog Box button.
Click the Close Dialog Box button.
Importing Photos from a Camera or Card Reader
Unlike Adobe Bridge, Lightroom is much more than just a browser application. Lightroom is both a catalog manager and a raw image processor. To work with images in Lightroom, you must first import them into a catalog. The most common way to do this is to import photos directly from a camera or card reader.
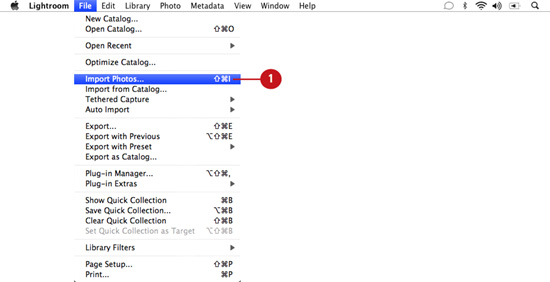
Choose the Import Photos command
![]() Plug your camera or card reader into your computer. Make sure the memory card is inserted and the device is turned on. Then, under the File menu, choose Import Photos or click the Import button in the bottom-left corner of the Library module.
Plug your camera or card reader into your computer. Make sure the memory card is inserted and the device is turned on. Then, under the File menu, choose Import Photos or click the Import button in the bottom-left corner of the Library module.
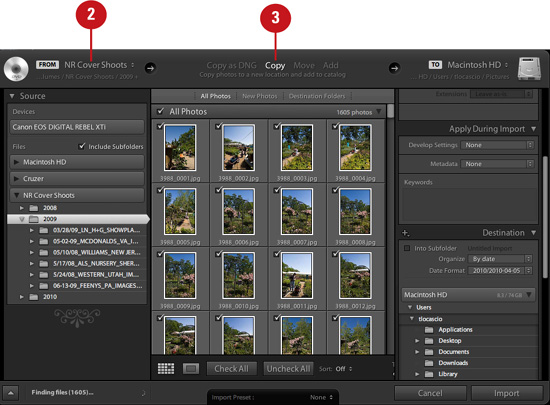
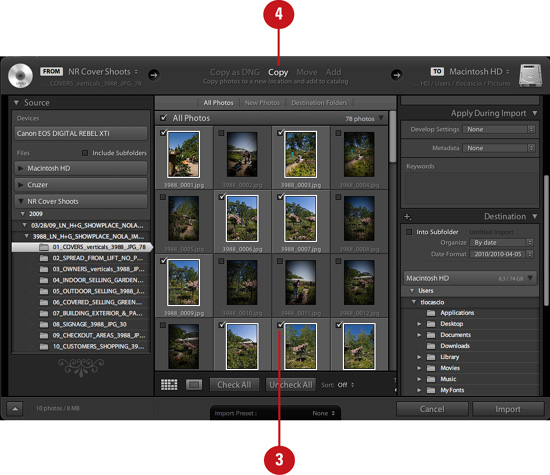
![]() In the dialog box that appears, select the image source from the Source drop-down list, or from the Source panel.
In the dialog box that appears, select the image source from the Source drop-down list, or from the Source panel.
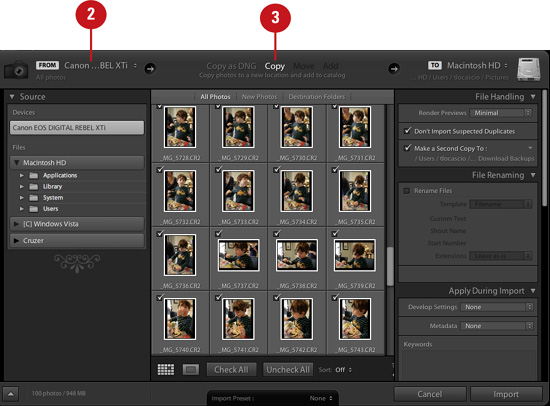
Lightroom displays the image thumbnails in the center panel of the dialog box.
![]() Click one of the following Import buttons at the top of the dialog box:
Click one of the following Import buttons at the top of the dialog box:
• Copy as DNG—Choose this option to copy the photos to a preferred folder and convert them to Digital Negative format as you import them.
• Copy—Choose this option to copy the photos to a preferred folder as you import them.
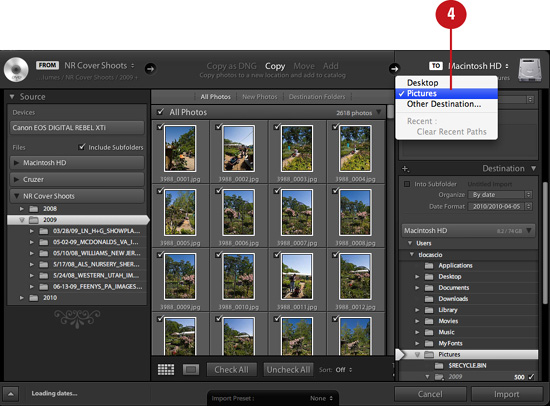
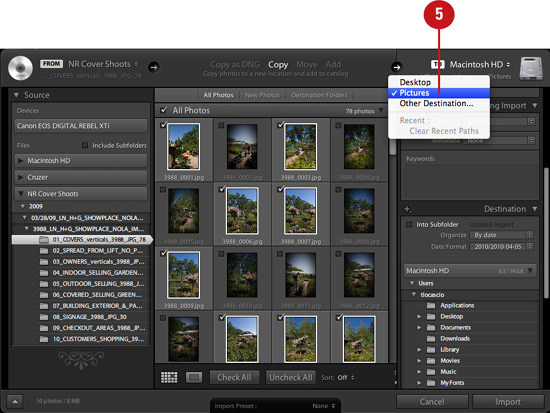
![]() By default, the selected photos are copied into username/Pictures (Mac) or usernameMy DocumentsMy Pictures (Win). If you’d like to copy the photos into a different location, select one from the Destination drop-down list or choose one from the Destination panel. Choose Other Destination from the Destination drop-down list to specify a destination folder on your disk. In the Choose Destination Folder dialog box that appears, browse to a different folder on your disk and click Choose.
By default, the selected photos are copied into username/Pictures (Mac) or usernameMy DocumentsMy Pictures (Win). If you’d like to copy the photos into a different location, select one from the Destination drop-down list or choose one from the Destination panel. Choose Other Destination from the Destination drop-down list to specify a destination folder on your disk. In the Choose Destination Folder dialog box that appears, browse to a different folder on your disk and click Choose.
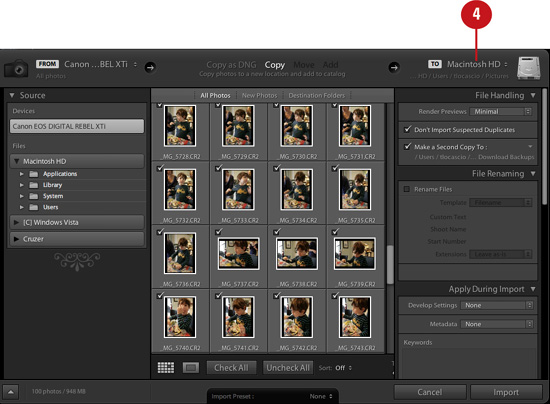
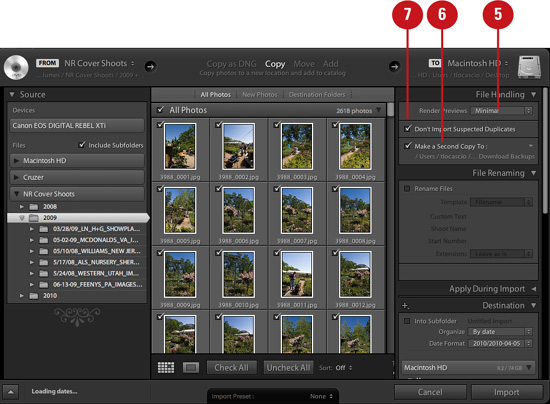
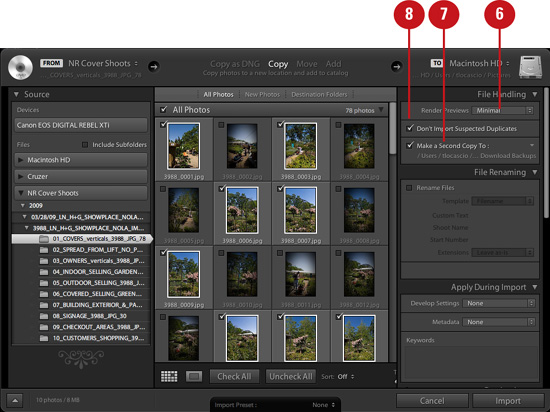
![]() From the File Handling panel, choose the quality of preview you would like Lightroom to generate by selecting an option from the Render Previews drop-down list. Choose Minimal for a quicker import into Lightroom. Choose 1:1 for high-quality previews.
From the File Handling panel, choose the quality of preview you would like Lightroom to generate by selecting an option from the Render Previews drop-down list. Choose Minimal for a quicker import into Lightroom. Choose 1:1 for high-quality previews.
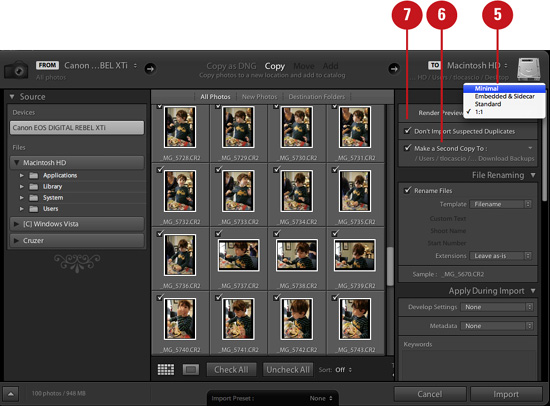
![]() From the File Handling panel, enable the Make a Second Copy To option to save backup copies of the photos to a separate folder. Click the current location displayed in the panel to specify a backup location. In the Choose Folder dialog box that appears, browse to the preferred folder and click Choose.
From the File Handling panel, enable the Make a Second Copy To option to save backup copies of the photos to a separate folder. Click the current location displayed in the panel to specify a backup location. In the Choose Folder dialog box that appears, browse to the preferred folder and click Choose.
![]() To avoid importing duplicates into the catalog, be sure to enable the Don’t Import Suspected Duplicates option in the File Handling panel.
To avoid importing duplicates into the catalog, be sure to enable the Don’t Import Suspected Duplicates option in the File Handling panel.
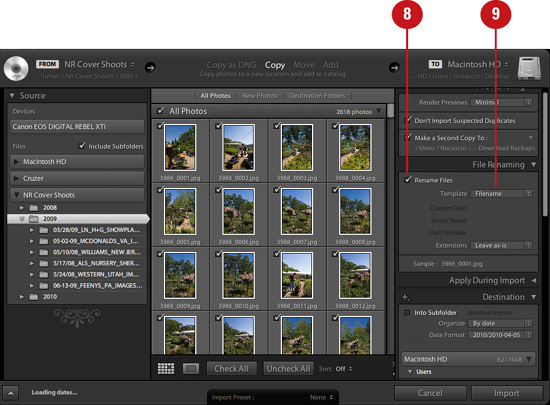
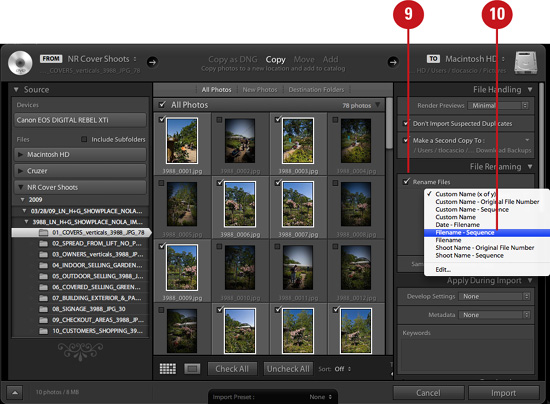
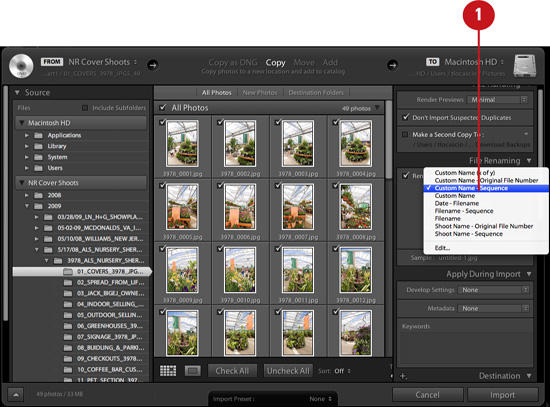
![]() To rename the files as you import them, enable the Rename Files option in the File Renaming panel.
To rename the files as you import them, enable the Rename Files option in the File Renaming panel.
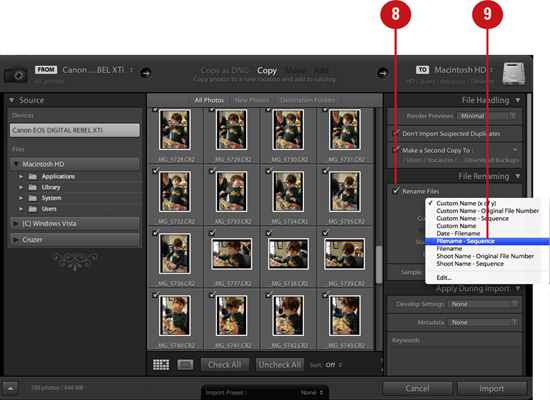
![]() Choose a file-naming preset from the Template drop-down list. To create a custom preset, choose Edit and enter your preferred settings in the Filename Template Editor dialog box.
Choose a file-naming preset from the Template drop-down list. To create a custom preset, choose Edit and enter your preferred settings in the Filename Template Editor dialog box.
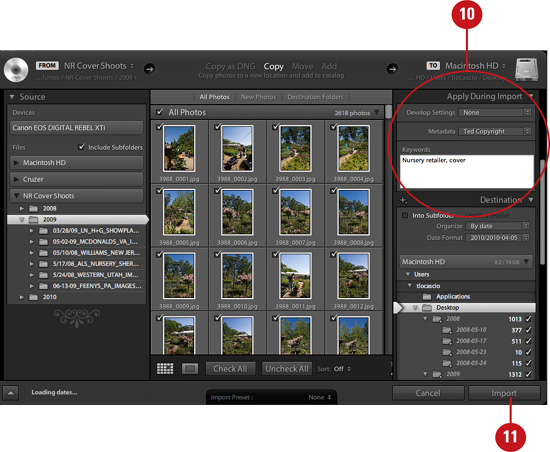
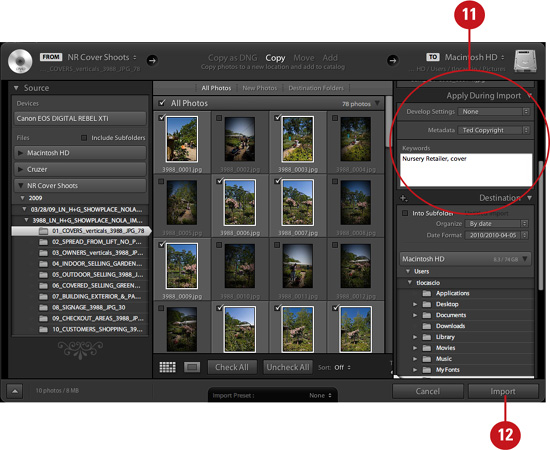
![]() In the Apply During Import panel, choose from the following options:
In the Apply During Import panel, choose from the following options:
• Develop Settings—You can apply adjustments to the images as they are imported by choosing any one of the available develop presets.
• Metadata—You can add metadata to the images as you import them by choosing a preexisting metadata preset from the drop-down list. You can create a metadata preset by choosing New, entering the info in the New Metadata Preset dialog box that appears, and clicking Create.
• Keywords—You can add keywords to the images as they are imported by entering them in the field provided here. Separate each keyword with a comma.
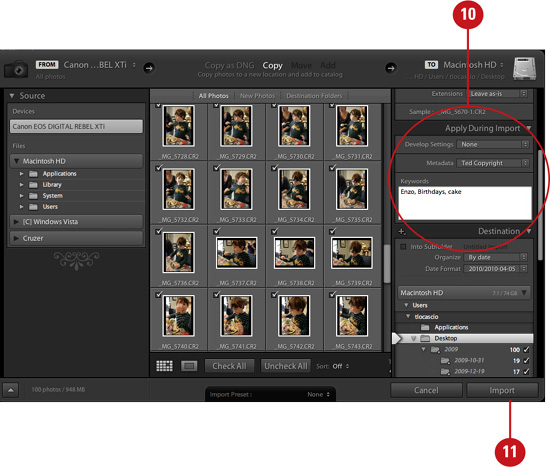
![]() Click the Import button.
Click the Import button.
As the photos import, their respective thumbnails begin to appear in the library Content area. The status indicator in the upper-left of the module displays the import progress.
Importing Photos from a Folder
Although most of your images will most likely be imported into Lightroom via a camera or card reader, you may also have photos stored on your system that you’d like to include. You may also want to import photos that are stored on external media such as a CD, a DVD, or an external drive. Lightroom will accept 16- or 8-bit TIFF, JPEG, and PSD file formats saved in RGB or CMYK mode. Layered PSD files must be saved with the Maximum Compatibility option turned on in Photoshop’s File Handling preferences. Lightroom will also accept various raw file formats, including DNG, CR2, and NEF.
Choose the Import Photos command
![]() Under the File menu, choose Import Photos or click the Import button in the Library module.
Under the File menu, choose Import Photos or click the Import button in the Library module.

![]() In the dialog box that appears, select the image source from the Source drop-down list, or from the Source panel.
In the dialog box that appears, select the image source from the Source drop-down list, or from the Source panel.
Lightroom displays the image thumbnails in the center panel of the dialog box.
![]() Click one of the following import buttons at the top of the dialog box:
Click one of the following import buttons at the top of the dialog box:
• Copy as DNG—Choose this option to copy raw photos to a preferred folder and convert them to Digital Negative format as you import them.
• Copy—Choose this option to copy the photos to a preferred
• Move—Choose this option to move the photos to a preferred folder as you import.
• Add—Choose this option to keep the photos in their current location as you import.
![]() By default, the selected photos are placed into username/Pictures (Mac) or usernameMy DocumentsMy Pictures (Win). If you’d like to place the photos into a different location, select one from the Destination drop-down list or choose one from the Destination panel. Choose Other Destination from the Destination drop-down list to specify a destination folder on your disk. In the Choose Destination Folder dialog box that appears, browse to a different folder on your disk and click Choose.
By default, the selected photos are placed into username/Pictures (Mac) or usernameMy DocumentsMy Pictures (Win). If you’d like to place the photos into a different location, select one from the Destination drop-down list or choose one from the Destination panel. Choose Other Destination from the Destination drop-down list to specify a destination folder on your disk. In the Choose Destination Folder dialog box that appears, browse to a different folder on your disk and click Choose.
Important
If you choose to add photos to the catalog without moving them, then the Destination drop-down list and panel do not appear in the dialog box.
![]() From the File Handling panel, choose the quality of preview you would like Lightroom to generate by selecting an option from the Render Previews drop-down list. Choose Minimal for a quicker import into Lightroom. Choose 1:1 for high-quality previews.
From the File Handling panel, choose the quality of preview you would like Lightroom to generate by selecting an option from the Render Previews drop-down list. Choose Minimal for a quicker import into Lightroom. Choose 1:1 for high-quality previews.
![]() From the File Handling panel, enable the Make a Second Copy To option to save backup copies of the photos to a separate folder. Click the current location displayed in the panel to specify a backup location. In the Choose Folder dialog box that appears, browse to the preferred folder and click Choose.
From the File Handling panel, enable the Make a Second Copy To option to save backup copies of the photos to a separate folder. Click the current location displayed in the panel to specify a backup location. In the Choose Folder dialog box that appears, browse to the preferred folder and click Choose.
![]() To avoid importing duplicates into the catalog, be sure to enable the Don’t Import Suspected Duplicates option in the File Handling panel.
To avoid importing duplicates into the catalog, be sure to enable the Don’t Import Suspected Duplicates option in the File Handling panel.
![]() To rename the files as you import them, enable the Rename Files option in the File Renaming panel.
To rename the files as you import them, enable the Rename Files option in the File Renaming panel.
![]() Choose a file-naming preset from the Template drop-down list. To create a custom preset, choose Edit and enter your preferred settings in the Filename Template Editor dialog box.
Choose a file-naming preset from the Template drop-down list. To create a custom preset, choose Edit and enter your preferred settings in the Filename Template Editor dialog box.
Important
If you choose to add photos to the catalog without moving them, then the File Renaming panel does not appear in the dialog box.
![]() In the Apply During Import panel, choose from the following options:
In the Apply During Import panel, choose from the following options:
• Develop Settings—You can apply adjustments to the images as they are imported by choosing any one of the available develop presets.
• Metadata—You can add metadata to the images as you import them by choosing a preexisting metadata preset from the drop-down list. You can create a metadata preset by choosing New, entering the info in the New Metadata Preset dialog box that appears, and clicking Create.
• Keywords—You can add keywords to the images as they are imported by entering them in the field provided here. Separate each keyword with a comma.
![]() Click the Import button.
Click the Import button.
As the photos import, their respective thumbnails begin to appear in the library Content area. The status indicator in the upper-left of the module displays the import progress.
Importing Photos via Drag-and-Drop
Another quick-and-easy way to import photos into a Lightroom catalog is to simply drag-and-drop the selected images, or folder(s) of images, into the Library module. Anytime you do so, Lightroom automatically displays the import dialog box.
Drag-and-drop photos from Finder (Mac) or Explorer (Win)
![]() Select the images that you’d like to add to your catalog from Finder (Mac) or Explorer (Win).
Select the images that you’d like to add to your catalog from Finder (Mac) or Explorer (Win).
![]() Drag-and-drop the selected photos into the Content area of the Library module.
Drag-and-drop the selected photos into the Content area of the Library module.
![]() In the Import dialog box that appears, select the thumbnails for the photos you would like to import from the center Preview area.
In the Import dialog box that appears, select the thumbnails for the photos you would like to import from the center Preview area.
![]() Click one of the following import buttons at the top of the dialog box
Click one of the following import buttons at the top of the dialog box
• Copy as DNG—Choose this option to copy raw photos to a preferred folder and convert them to Digital Negative format as you import them.
• Copy—Choose this option to copy the photos to a preferred folder as you import them.
• Move—Choose this option to move the photos to a preferred folder as you import.
• Add—Choose this option to keep the photos in their current location as you import.
![]() By default, the selected photos are placed into username/Pictures (Mac) or usernameMy DocumentsMy Pictures (Win). If you’d like to place the photos into a different location, select one from the Destination drop-down list or choose one from the Destination panel. Choose Other Destination from the Destination drop-down list to specify a destination folder on your disk. In the Choose Destination Folder dialog box that appears, browse to a different folder on your disk and click Choose.
By default, the selected photos are placed into username/Pictures (Mac) or usernameMy DocumentsMy Pictures (Win). If you’d like to place the photos into a different location, select one from the Destination drop-down list or choose one from the Destination panel. Choose Other Destination from the Destination drop-down list to specify a destination folder on your disk. In the Choose Destination Folder dialog box that appears, browse to a different folder on your disk and click Choose.
Important
If you choose to add photos to the catalog without moving them, then the Destination drop-down list and panel do not appear in the dialog box.
![]() From the File Handling panel, choose the quality of preview you would like Lightroom to generate by selecting an option from the Render Previews drop-down list. Choose Minimal for a quicker import into Lightroom. Choose 1:1 for high-quality previews.
From the File Handling panel, choose the quality of preview you would like Lightroom to generate by selecting an option from the Render Previews drop-down list. Choose Minimal for a quicker import into Lightroom. Choose 1:1 for high-quality previews.
![]() From the File Handling panel, enable the Make a Second Copy To option to save backup copies of the photos to a separate folder. Click the current location displayed in the panel to specify a backup location. In the Choose Folder dialog box that appears, browse to the preferred folder and click Choose.
From the File Handling panel, enable the Make a Second Copy To option to save backup copies of the photos to a separate folder. Click the current location displayed in the panel to specify a backup location. In the Choose Folder dialog box that appears, browse to the preferred folder and click Choose.
![]() To avoid importing duplicates into the catalog, be sure to enable the Don’t Import Suspected Duplicates option in the File Handling panel.
To avoid importing duplicates into the catalog, be sure to enable the Don’t Import Suspected Duplicates option in the File Handling panel.
![]() To rename the files as you import them, enable the Rename Files option in the File Renaming panel.
To rename the files as you import them, enable the Rename Files option in the File Renaming panel.
![]() Choose a file-naming preset from the Template drop-down list. To create a custom preset, choose Edit and enter your preferred settings in the Filename Template Editor dialog box.
Choose a file-naming preset from the Template drop-down list. To create a custom preset, choose Edit and enter your preferred settings in the Filename Template Editor dialog box.
Important
If you choose to add photos to the catalog without moving them, then the File Renaming panel does not appear in the dialog box.
![]() In the Apply During Import panel, choose from the following options:
In the Apply During Import panel, choose from the following options:
• Develop Settings—You can apply adjustments to the images as they are imported by choosing any one of the available develop presets.
• Metadata—You can add metadata to the images as you import them by choosing a preexisting metadata preset from the drop-down list. You can create a metadata preset by choosing New, entering the info in the New Metadata Preset dialog box that appears, and clicking Create.
• Keywords—You can add keywords to the images as they are imported by entering them in the field provided here. Separate each keyword with a comma.
![]() Click the Import button.
Click the Import button.
As the photos import, their respective thumbnails begin to appear in the library Content area. The status indicator in the upper-left of the module displays the import progress.
Importing Photos from a Catalog
If you use Lightroom on two computers, then your workflow will most likely involve importing images that were saved in a separate catalog. It may also involve importing image data that was edited remotely in an exported catalog.
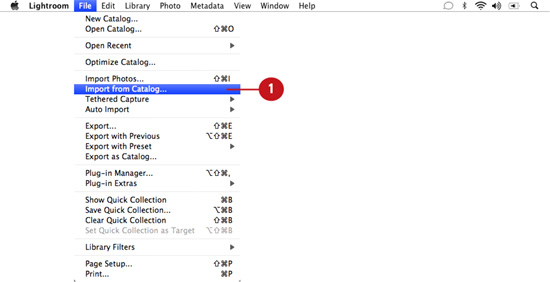
Choose the Import from Catalog command
![]() Under the File menu, choose Import from Catalog.
Under the File menu, choose Import from Catalog.
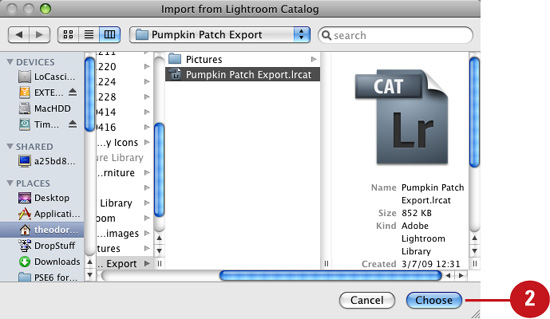
![]() Lightroom displays the Import from Lightroom Catalog dialog box. Navigate to the catalog (.lrcat) file on your system and click Choose.
Lightroom displays the Import from Lightroom Catalog dialog box. Navigate to the catalog (.lrcat) file on your system and click Choose.
![]() In the Import from Catalog dialog box that appears, enable the Show Preview option. You can then select the thumbnails for any new photos you would like to import into the current catalog from the Preview area on the right.
In the Import from Catalog dialog box that appears, enable the Show Preview option. You can then select the thumbnails for any new photos you would like to import into the current catalog from the Preview area on the right.
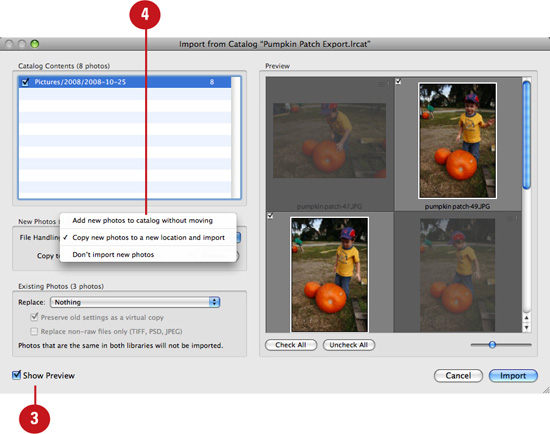
![]() For any new photos, choose one of the following options from the File Handling drop-down list:
For any new photos, choose one of the following options from the File Handling drop-down list:
• Add New Photos to Catalog Without Moving—Choose this option to keep the photos in their current location as you import.
• Copy New Photos to a New Location and Import—Choose this option to copy the photos to a preferred folder as you import. This option is only available when the catalog you are importing from includes negative master files.
• Don’t Import New Photos—Choose this option to ignore any new photos and only import existing ones.
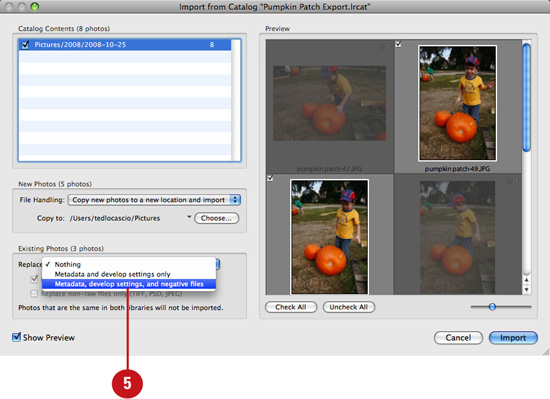
![]() For any existing photos, choose one of the following options from the Replace drop-down list:
For any existing photos, choose one of the following options from the Replace drop-down list:
• Nothing—Choose this option to ignore any existing photos and only import new ones.
• Metadata and Develop Settings Only—Choose this option to replace the metadata and develop settings for any existing photos that you import.
• Metadata, Develop Settings, and Negative Files—Choose this option to replace the metadata, develop settings, and negative files for any existing photos that you import. This option is only available when the catalog you are importing from includes negative master files.
![]() Enable Preserve Old Settings as a Virtual Copy to maintain a virtual copy of the existing photo in the catalog with its current metadata and develop settings. If you keep this option disabled, you will overwrite the settings for the existing photo.
Enable Preserve Old Settings as a Virtual Copy to maintain a virtual copy of the existing photo in the catalog with its current metadata and develop settings. If you keep this option disabled, you will overwrite the settings for the existing photo.
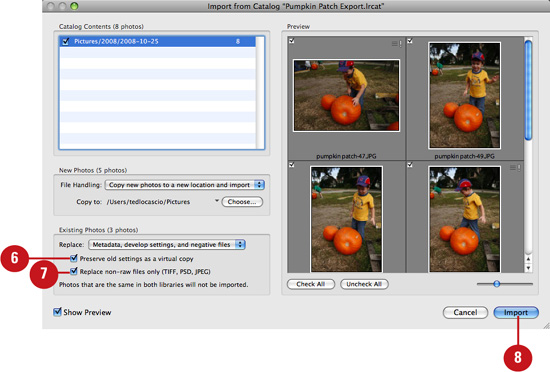
![]() Enable Replace Non-Raw Files Only (TIFF, PSD, JPEG) to preserve any versions in raw file format when replacing negative files. This option is only available when the catalog you are importing from includes negative master files.
Enable Replace Non-Raw Files Only (TIFF, PSD, JPEG) to preserve any versions in raw file format when replacing negative files. This option is only available when the catalog you are importing from includes negative master files.
Important
Any photos that are exact duplicates (with identical metadata and develop settings in both catalogs) will not be imported.
![]() Click the Import button.
Click the Import button.
As the photos import, their respective thumbnails begin to appear in the library Content area. The status indicator in the upper-left of the module displays the import progress.
Using Auto Import
Lightroom also contains an Auto Import feature, which provides an alternative way to conduct a tethered photo shoot. In this scenario, you must rely on your camera’s manufacturer-supplied software to download captured files from the camera to a specific folder location on your drive as you shoot. If you set up this folder as a watched folder in Lightroom, the photos are automatically imported into the current catalog.
Set up a watched folder
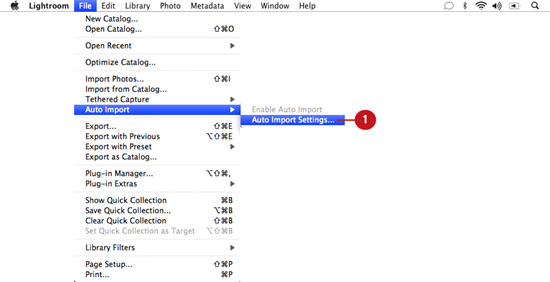
![]() Under the File menu, choose Auto Import, then choose Auto Import Settings.
Under the File menu, choose Auto Import, then choose Auto Import Settings.
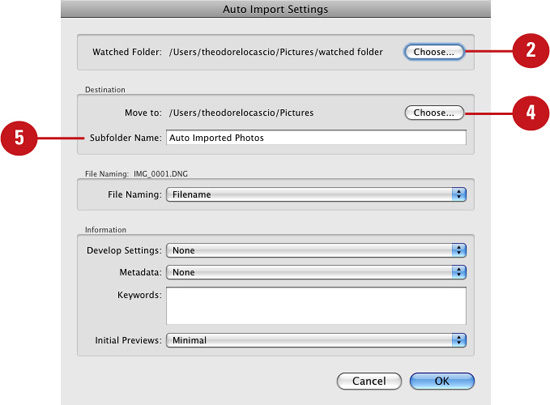
![]() Lightroom displays the Auto Import Settings dialog box. To specify a watched folder, click the Choose button at the top of the dialog box.
Lightroom displays the Auto Import Settings dialog box. To specify a watched folder, click the Choose button at the top of the dialog box.
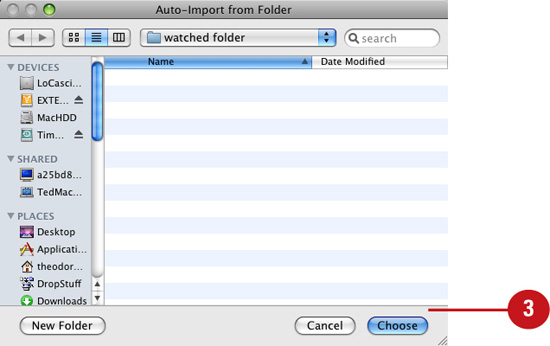
![]() Lightroom displays the Auto-Import from Folder dialog box. Navigate to the preferred folder on your system or create a new one by clicking the New Folder button; then click Choose.
Lightroom displays the Auto-Import from Folder dialog box. Navigate to the preferred folder on your system or create a new one by clicking the New Folder button; then click Choose.
![]() By default, the selected photos are moved to username/Pictures (Mac) or usernameMy DocumentsMy Pictures (Win). If you’d like to move the photos to a different location, click Choose in the Destination section of the Auto Import Settings dialog box. In the Choose Folder dialog box that appears, browse to a different folder on your disk and click Choose.
By default, the selected photos are moved to username/Pictures (Mac) or usernameMy DocumentsMy Pictures (Win). If you’d like to move the photos to a different location, click Choose in the Destination section of the Auto Import Settings dialog box. In the Choose Folder dialog box that appears, browse to a different folder on your disk and click Choose.
![]() Enter a descriptive name in the Subfolder Name field. The defaullt name is Auto Imported Photos.
Enter a descriptive name in the Subfolder Name field. The defaullt name is Auto Imported Photos.
![]() Choose a file-naming preset from the File-Naming drop-down list. To create a custom preset, choose Custom Settings and enter your preferred settings in the Filename Template Editor dialog box.
Choose a file-naming preset from the File-Naming drop-down list. To create a custom preset, choose Custom Settings and enter your preferred settings in the Filename Template Editor dialog box.
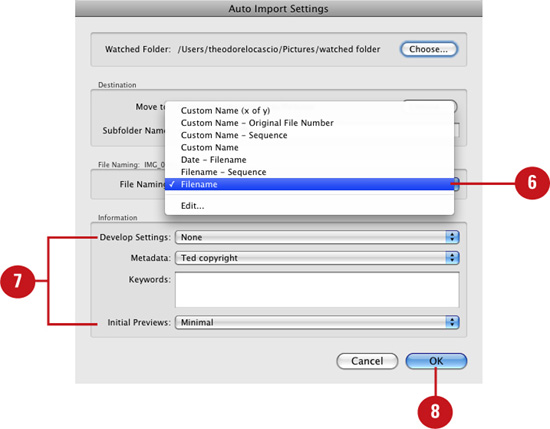
![]() In the Information portion of the Auto Import Settings dialog box, choose from the following options:
In the Information portion of the Auto Import Settings dialog box, choose from the following options:
• Develop Settings—You can apply adjustments to the images as they are imported by choosing any one of the available develop presets.
• Metadata—You can add metadata to the images as they are imported by choosing a preexisting metadata preset from the drop-down list. You can create a metadata preset by choosing New, entering the info in the New Metadata Preset dialog box that appears, and clicking Create.
• Keywords—You can add keywords to the images as they are imported by entering them in the field provided here. Separate each keyword with a comma.
• Initial Previews—Choose the quality of preview you would like Lightroom to generate at import. Choose Minimal for a quicker import into Lightroom as you continue tethered shooting. High-quality 1:1 previews can always be rendered later.
![]() Click OK to apply the Auto Import settings.
Click OK to apply the Auto Import settings.
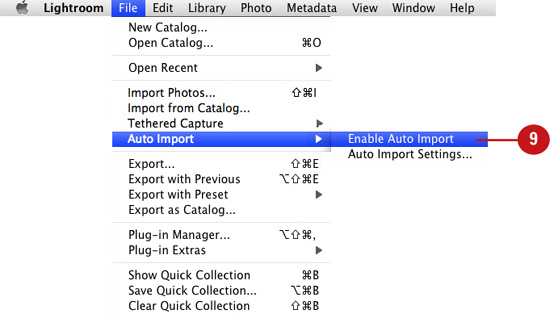
![]() From the File menu, choose Auto Import; then choose Enable Auto Import.
From the File menu, choose Auto Import; then choose Enable Auto Import.
The photos are automatically imported into the current Lightroom catalog and saved in the Auto Import destination folder.
Importing Photos through Bridge
If, in addition to Lightroom 3, you also own a copy of Adobe Photoshop CS2 or later, then you have access to the Bridge browser application. You can use Bridge to locate images stored in various folders on your system and add them to the current Lightroom catalog. You can either drag and drop the selected photos onto a desktop Lightroom alias or add photos to an auto import watched folder that you’ve saved to your Bridge Favorites.
Drag and drop from Bridge to a Lightroom alias
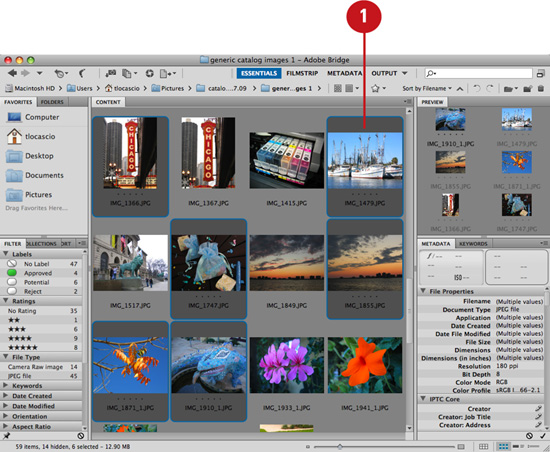
![]() Use the Adobe Bridge application to preview and select the photos that you’d like to add to your Lightroom catalog.
Use the Adobe Bridge application to preview and select the photos that you’d like to add to your Lightroom catalog.
Timesaver
Shift+click to select multiple adjacent photos; Cmd+click (Mac) or Ctrl+click (Win) to select multiple non-adjacent photos.
![]() Drag-and-drop the selected photos onto the Lightroom alias saved on your desktop or the Lightroom icon saved in the OS X Dock (Mac).
Drag-and-drop the selected photos onto the Lightroom alias saved on your desktop or the Lightroom icon saved in the OS X Dock (Mac).
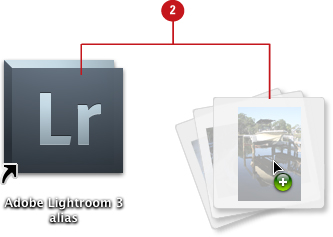
Lightroom displays the Import Photos dialog box.
Save a watched folder in Bridge Favorites
![]() In Adobe Bridge, navigate to the preexisting Auto Import Watched folder.
In Adobe Bridge, navigate to the preexisting Auto Import Watched folder.
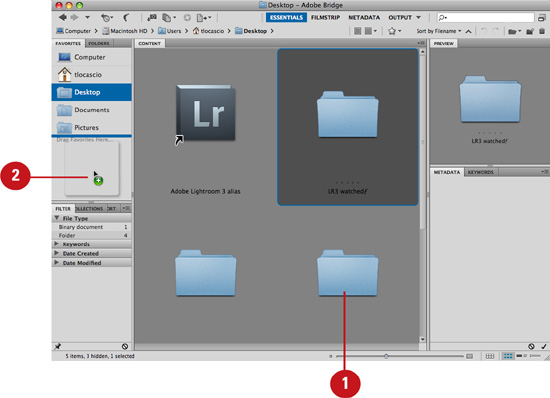
![]() Select the watched folder and drag-and-drop it into the Bridge Favorites panel.
Select the watched folder and drag-and-drop it into the Bridge Favorites panel.
![]() Preview and select the photos that you’d like to add to your Lightroom catalog.
Preview and select the photos that you’d like to add to your Lightroom catalog.
Timesaver
Shift+click to select multiple adjacent photos, and Cmd+click (Mac) or Ctrl+click (Win) to select multiple non-adjacent photos.
![]() Drag-and-drop the selected photos onto the watched folder in the Favorites panel.
Drag-and-drop the selected photos onto the watched folder in the Favorites panel.
The photos are automatically imported into the current Lightroom catalog and saved in the Auto Import Destination folder.
Exporting Photos from a Catalog
It’s not uncommon for a professional photographer’s Lightroom workflow to include more than one computer; usually a master desktop system accompanied by a portable laptop. This scenario involves exporting a catalog, or portions of a catalog, so that work can be done remotely on a laptop. Ratings, keywords, and metadata can be applied to images exported without negatives, but develop settings can be applied only to images exported with negatives.
Export a catalog without negatives
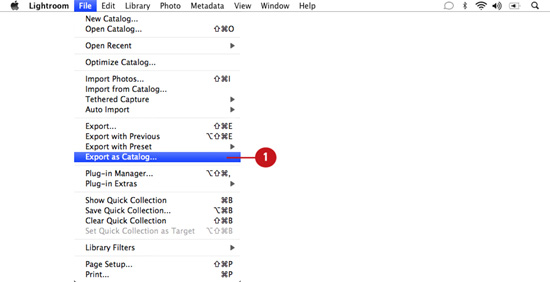
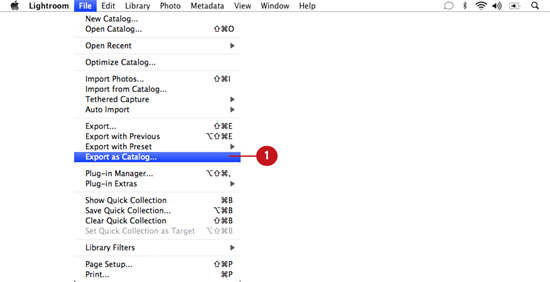
![]() Under the File menu, choose Export as Catalog.
Under the File menu, choose Export as Catalog.
![]() Lightroom displays the Export as Catalog dialog box. Enter a name for the catalog in the Save As field.
Lightroom displays the Export as Catalog dialog box. Enter a name for the catalog in the Save As field.
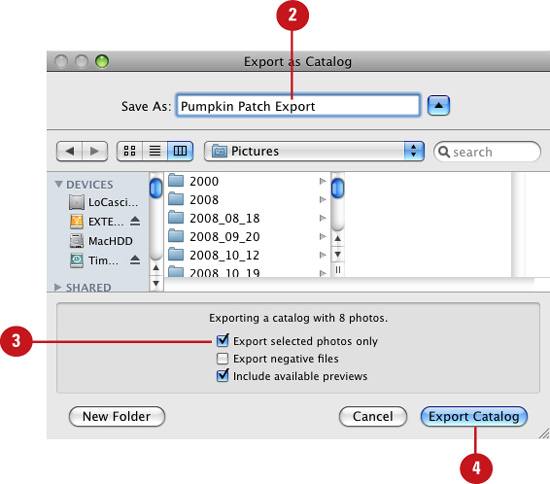
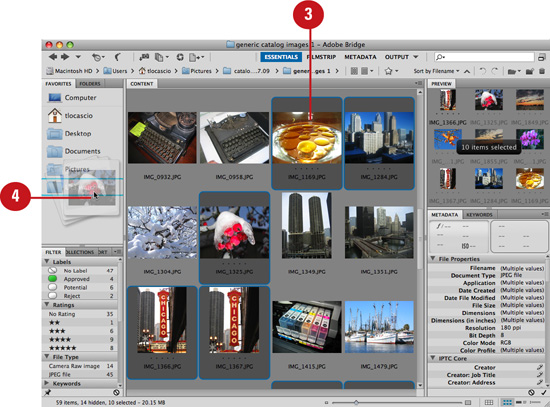
![]() If you’d only like to export the photographs that you currently have selected in the Library module or Filmstrip, then you must enable the Export Selected Photos Only option. Otherwise, all the photographs in the entire catalog will be exported.
If you’d only like to export the photographs that you currently have selected in the Library module or Filmstrip, then you must enable the Export Selected Photos Only option. Otherwise, all the photographs in the entire catalog will be exported.
![]() Choose a save location for the new catalog on your system and click Export Catalog.
Choose a save location for the new catalog on your system and click Export Catalog.
Lightroom creates a new catalog file (.lrcat) and saves it in the specified folder.
Export a catalog with negatives
![]() Under the File menu, choose Export as Catalog.
Under the File menu, choose Export as Catalog.
![]() Lightroom displays the Export as Catalog dialog box. Enter a name for the catalog in the Save As field.
Lightroom displays the Export as Catalog dialog box. Enter a name for the catalog in the Save As field.
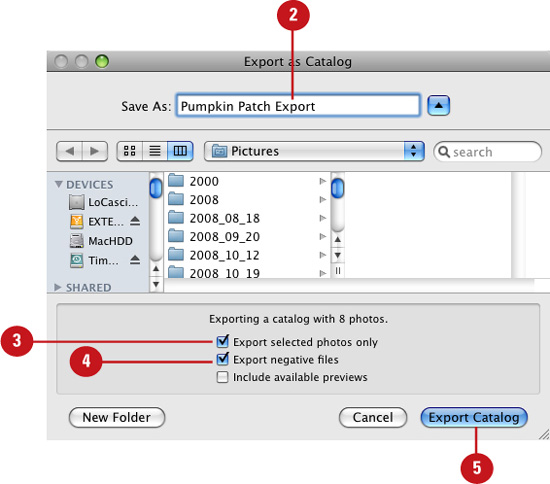
![]() If you’d only like to export the photographs that you currently have selected in the Library module or Filmstrip, then you must enable the Export Selected Photos Only option. Otherwise, all the photographs in the entire catalog will be exported.
If you’d only like to export the photographs that you currently have selected in the Library module or Filmstrip, then you must enable the Export Selected Photos Only option. Otherwise, all the photographs in the entire catalog will be exported.
![]() Enable the Export Negative Files option to include all the master files associated with the photographs in their native, unflattened state.
Enable the Export Negative Files option to include all the master files associated with the photographs in their native, unflattened state.
![]() Choose a save location for the new catalog on your system and click Export Catalog.
Choose a save location for the new catalog on your system and click Export Catalog.
Lightroom creates a new .lrcat file saved in the folder you specified. It also creates a subfolder containing the master negatives.
Export a catalog with previews
![]() Under the File menu, choose Export as Catalog.
Under the File menu, choose Export as Catalog.

![]() Lightroom displays the Export as Catalog dialog box. Enter a name for the catalog in the Save As field.
Lightroom displays the Export as Catalog dialog box. Enter a name for the catalog in the Save As field.
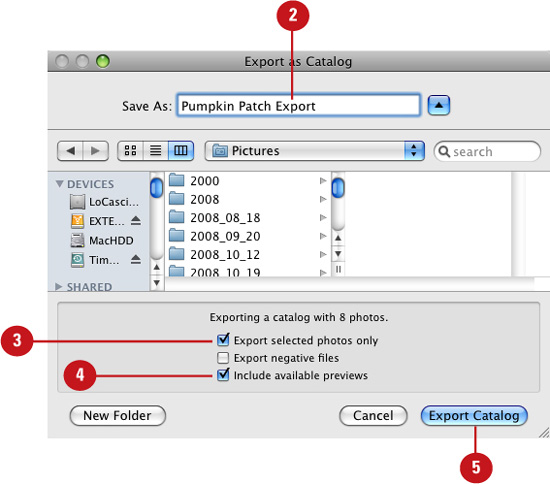
![]() If you’d like to only export the photographs that you currently have selected in the Library module or Filmstrip, then you must enable the Export Selected Photos Only option. Otherwise, all the photographs in the entire catalog will be exported.
If you’d like to only export the photographs that you currently have selected in the Library module or Filmstrip, then you must enable the Export Selected Photos Only option. Otherwise, all the photographs in the entire catalog will be exported.
![]() Enable the Include Available Previews option to include all Library Grid thumbnails, standard resolution Loupe views, and available 1:1 rendered views.
Enable the Include Available Previews option to include all Library Grid thumbnails, standard resolution Loupe views, and available 1:1 rendered views.
![]() Choose a save location for the new catalog on your system and click Export Catalog.
Choose a save location for the new catalog on your system and click Export Catalog.
Lightroom copies the photos and creates a new lrcat file saved in the folder you specified. It also creates an .lrdata file that contains the thumbnails and preview image data.
Renaming Photos
In addition to adding keywords to your photos in Lightroom, it’s also good organizational practice to rename your photos to something more descriptive than the default serial code that your camera assigns. Doing so can make it much easier to manage and track your images as you work with them. Lightroom enables you to rename the images during the import process, or rename them later, after they’ve already been imported.
Rename photos at import
![]() In the file-naming section of the Import Photos dialog box, choose a file-naming preset from the File Naming drop-down list. To create a custom preset, choose Edit and enter your preferred settings in the Filename Template Editor dialog box.
In the file-naming section of the Import Photos dialog box, choose a file-naming preset from the File Naming drop-down list. To create a custom preset, choose Edit and enter your preferred settings in the Filename Template Editor dialog box.
![]() Click the Import button.
Click the Import button.
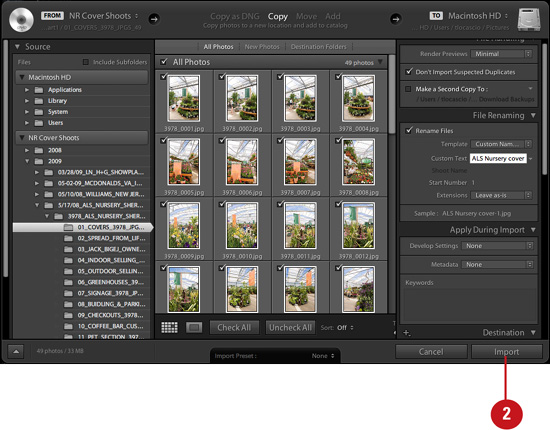
The photos are renamed as they are imported into the current Lightroom catalog. As the photos import, their respective thumbnails begin to appear in the library Content area. The status indicator in the upper-left corner of the module displays the import progress.
Rename photos after import
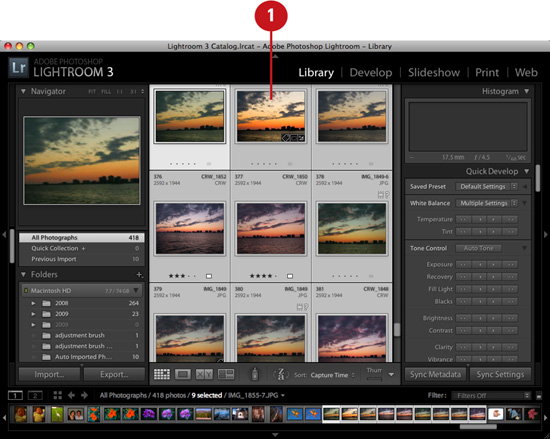
![]() Select the photos you would like to rename from the Library module Content area or the Filmstrip.
Select the photos you would like to rename from the Library module Content area or the Filmstrip.
Timesaver
Shift+click to select multiple adjacent photos, and Cmd+click (Mac) or Ctrl+click (Win) to select multiple non-adjacent photos.
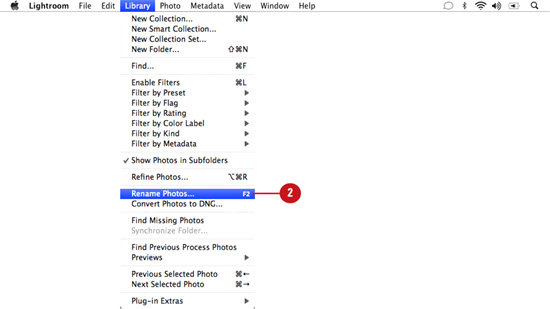
![]() Under the Library menu, choose Rename Photos.
Under the Library menu, choose Rename Photos.
![]() In the Rename Photos dialog box that appears, choose a file-naming preset from the File Naming drop-down list. To create a custom preset, choose Custom Settings and enter your preferred settings in the Filename Template Editor dialog box.
In the Rename Photos dialog box that appears, choose a file-naming preset from the File Naming drop-down list. To create a custom preset, choose Custom Settings and enter your preferred settings in the Filename Template Editor dialog box.
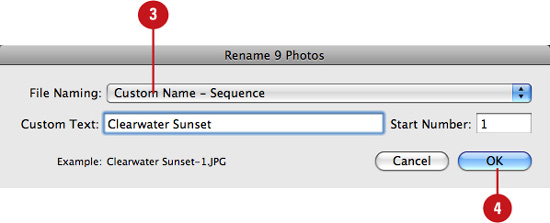
![]() Click OK.
Click OK.
The selected catalog photos are renamed.
Converting Photos to DNG
DNG (Digital Negative Format) is a file format created by Adobe. It was developed with the intention of standardizing a raw file capture format that can be read by a much wider variety of software applications. If you plan to share your raw image files across complex workflows, then converting them to DNG will ensure their compatibility. However, it is also important to note that choosing certain DNG conversion options can cause an image’s file size to increase dramatically. You can convert raw images to DNG during the import process, or convert them later, after they’ve already been imported.
Convert to DNG at import
![]() At the top of the Import dialog box, click Copy as DNG. Proceed to choose the preferred import dialog box settings.
At the top of the Import dialog box, click Copy as DNG. Proceed to choose the preferred import dialog box settings.
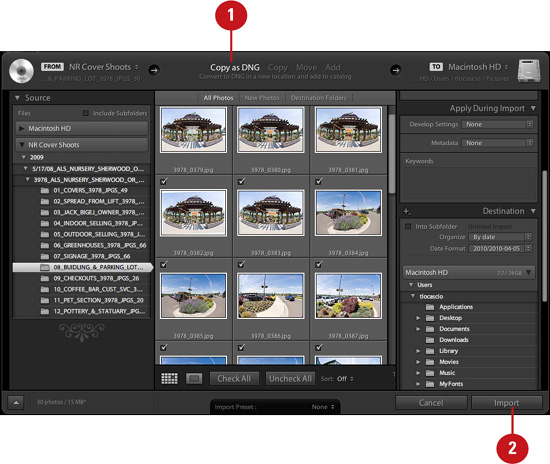
![]() Click the Import button.
Click the Import button.
Important
Only raw files are converted to DNG at import. Non-raw files are left in their original file format.
The photos are converted to DNG as they are imported into the current Lightroom catalog. As the photos import, their respective thumbnails appear in the library Content area. The status indicator in the upper-left corner of the module displays the import progress.
Convert to DNG after import
![]() Select the photos you would like to convert to DNG from the Library module Content area or the Filmstrip.
Select the photos you would like to convert to DNG from the Library module Content area or the Filmstrip.
Timesaver
Shift+click to select multiple adjacent photos; Cmd+click (Mac) or Ctrl+click (Win) to select multiple non-adjacent photos.
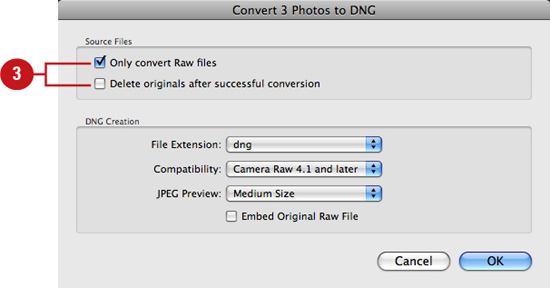
![]() Under the Library menu, choose Convert Photos to DNG.
Under the Library menu, choose Convert Photos to DNG.

![]() Lightroom displays the Convert Photos to DNG dialog box. In the Source Files section of the dialog box, choose from the following options:
Lightroom displays the Convert Photos to DNG dialog box. In the Source Files section of the dialog box, choose from the following options:
• Only Convert Raw Files—Choose this option to ensure that only Raw files are converted to DNG, whereas non-Raw file formats, such as TIFF, JPEG, or PSD, are left in their current file format.
• Delete Originals After Successful Conversion—Choose this option to remove the original images from the catalog after they are converted to DNG.
![]() In the DNG Creation section of the Convert Photos to DNG dialog box, choose from the following options:
In the DNG Creation section of the Convert Photos to DNG dialog box, choose from the following options:
• File Extension—Choose whether to display the file extension in lowercase or uppercase letters.
• Compatibility—Choose the version of Adobe Camera Raw that you’d like to make the DNG files cpmpatible with. Refer to the tooltip for more info.
• JPEG Preview—Choose the size of JPEG to use for the embedded preview (not the Lightroom catalog preview). Options include None, Medium Size, and Full Size.
• Embed Original Raw File—Enabling this option allows you to embed a copy of the original raw file inside the DNG. Doing so ensures access to the original raw image data, some of which can only be edited using the camera’s proprietary software, but also increases the file size dramatically.
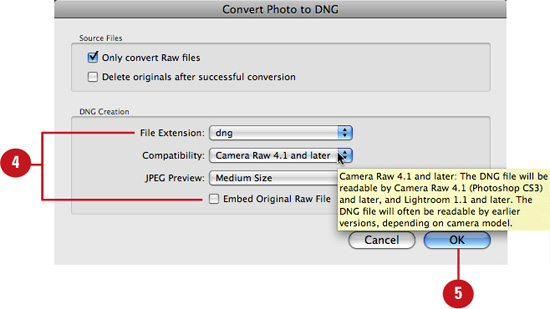
![]() Click OK.
Click OK.
The selected catalog photos are converted to DNG file format.
Importing Photos via Tethered Capture
Lightroom 3 enables you to perform a tethered capture session without having to rely on your camera’s manufacturer-supplied software. All you have to do is plug your camera into the computer and start a tethered capture session in Lightroom. As you shoot, Lightroom downloads the captured files from the camera to a specific folder on your drive. The session photos are automatically added to the Lightroom catalog.
Start a tethered capture
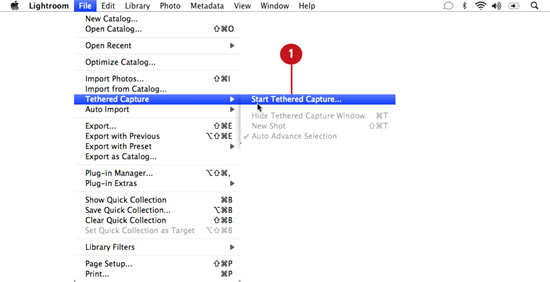
![]() Plug your camera into your computer. Make sure the memory card is inserted and the camera is turned on. Then, under the File menu, choose Tethered Capture > Start Tethered Capture.
Plug your camera into your computer. Make sure the memory card is inserted and the camera is turned on. Then, under the File menu, choose Tethered Capture > Start Tethered Capture.
![]() In the Tethered Capture Settings dialog box that appears, enter a name in the Session Name field.
In the Tethered Capture Settings dialog box that appears, enter a name in the Session Name field.
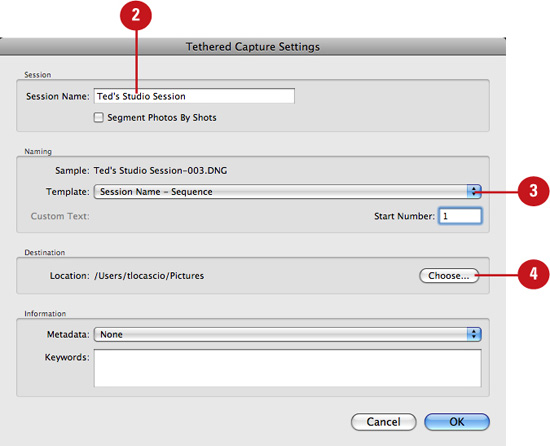
![]() Choose a file-naming preset from the Template drop-down list. To create a custom preset, choose Edit and enter your preferred settings in the Filename Template Editor dialog box.
Choose a file-naming preset from the Template drop-down list. To create a custom preset, choose Edit and enter your preferred settings in the Filename Template Editor dialog box.
![]() By default, the captured photos are placed into username/Pictures (Mac) or usernameMy DocumentsMy Pictures (Win). If you’d like to place the photos into a different location, click Choose. In the Choose Folder dialog box that appears, browse to a different folder on your disk and click Choose.
By default, the captured photos are placed into username/Pictures (Mac) or usernameMy DocumentsMy Pictures (Win). If you’d like to place the photos into a different location, click Choose. In the Choose Folder dialog box that appears, browse to a different folder on your disk and click Choose.
![]() In the Information portion of the dialog box, choose from the following options:
In the Information portion of the dialog box, choose from the following options:
• Metadata—You can add metadata to the images as you import them by choosing a preexisting metadata preset from the drop-down list. You can create a metadata preset by choosing New, entering the info in the New Metadata Preset dialog box that appears, and clicking Create.
• Keywords—You can add keywords to the images as they are imported by entering them in the field provided here. Separate each keyword with a comma.
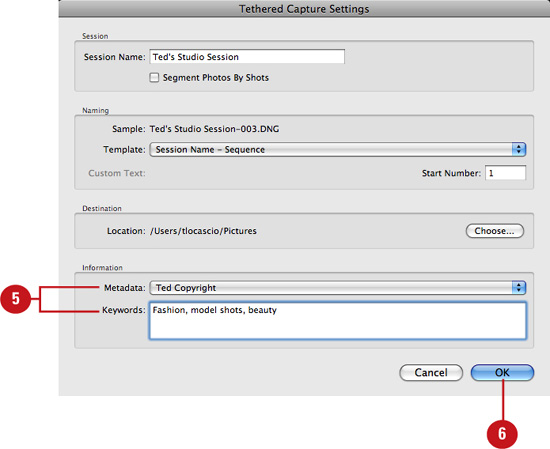
![]() Click OK.
Click OK.
![]() Lightroom displays the Tethered Capture Window. Click the Capture button to take photos and import them into the catalog automatically.
Lightroom displays the Tethered Capture Window. Click the Capture button to take photos and import them into the catalog automatically.
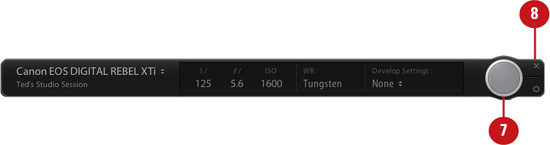
![]() To end the tethered capture session, choose File > Tethered Capture > Stop Tethered Capture, or click the Close button in the upper-right corner of the Tethered Capture window.
To end the tethered capture session, choose File > Tethered Capture > Stop Tethered Capture, or click the Close button in the upper-right corner of the Tethered Capture window.