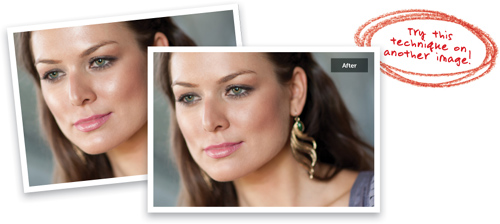
Chapter 2. Under My Skin: Retouching Skin
Have you ever been on a flight and heard one of the passengers say, “Hey, that was a really nice takeoff!” No? That’s because nobody really cares about takeoffs (well, as long as the plane does, indeed, take off). But, when it comes to landing the plane, that’s where you really judge the quality of a pilot (well, it’s where other pilots judge the quality anyway). Now, if there’s one thing I’ve learned over the years about retouching, it’s that nobody in the retouching industry really cares which technique you use to brighten the eyes, or slim someone’s love handles, or add highlights to the hair. To them, they’re all like takeoffs. But when it comes to skin, the gloves come off. If they catch you blurring the skin to soften it, they will pull out a shank and stab you like a Rikers Island inmate during lockdown (by the way, I have no idea what that means). For high-end retouchers, it’s all about creating flawless skin while maintaining real skin texture throughout, and they are absolute masters at it. They’ll spend four hours or more on just the face, going pore by pore, until it’s absolutely perfect. So, how are we, as photographers, going to get perfect, non-blurred skin like that? Actually, it’s pretty easy. We’re going to send our photos to high-end retouchers and have them do it for us, because there’s no way we can spend four hours on a face. Ever. Since we have very little time available for retouching at all, we have to cut a few corners when it comes to skin—investing only 5 or 10 minutes on the skin at best. But to do that, we sometimes have to do some unspeakable things that might get us shanked on our way to “the yard,” but if we can use some tricks to bring back enough texture (and we bribe them with a pack of smokes), they might let us by with just a snarling glance.
Removing Blemishes
When it comes to skin, I always start by removing the blemishes. One reason is that after you remove all the blemishes, you might not have to soften or smooth the skin at all. Plus, even if you know you’re going to have to soften the skin, you’re going to have to remove the blemishes first, so it’s a great place to start.
Step One:
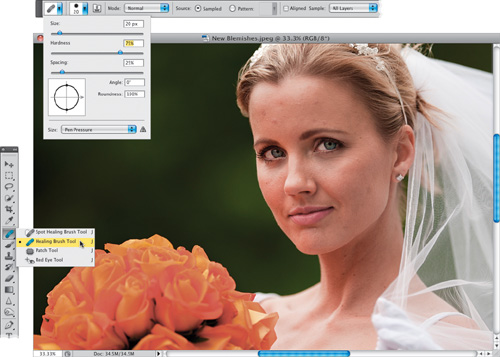
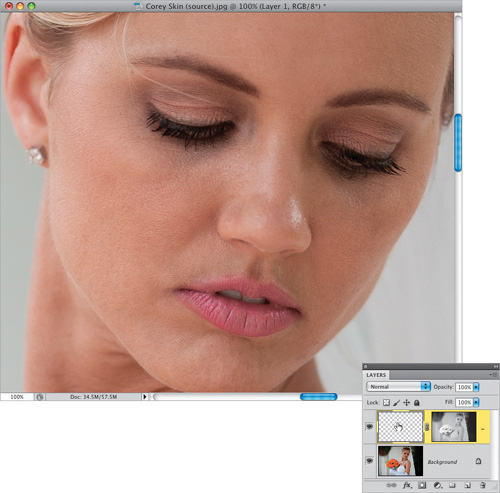
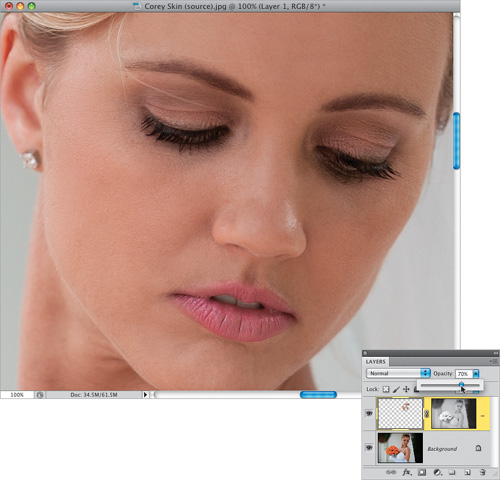
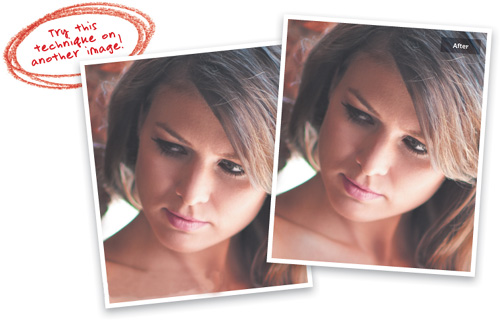
Here’s the image we’re going to retouch. We’re going to use the Healing Brush tool (it’s nested below the Spot Healing Brush tool) for removing blemishes, because most blemishes are alone and not touching any edges, which is when the Healing Brush works best. If you use it to remove a blemish near the edge of something (right near the lips, or the hair, or eyebrows, etc.), it tends to smear (in which case, you should undo the healing, and switch to the Clone Stamp tool, because it doesn’t smear). Now, go up to the Options Bar, click on the Healing Brush icon to get the Brush Picker (shown here), choose a brush size that’s just a little larger than the blemish you want to remove, and lower the Hardness to 75% to get a little smoother blending. Also, from the Sample pop-up menu, choose All Layers, so it can sample from your Background layer.
Step Two:
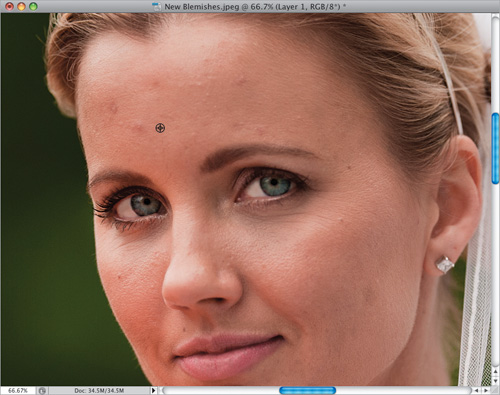
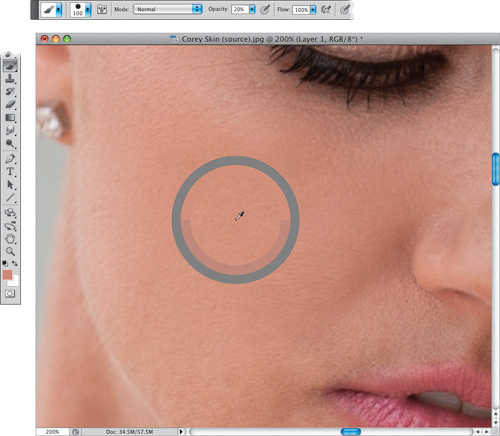
Zoom in, then click on the Create a New Layer icon at the bottom of the Layers panel to create a new blank layer. Press-and-hold the Option (PC: Alt) key, and click in a clean area right near the blemish (as shown here). Because this particular blemish is on her forehead, I had to sample (Option-click) to the side of the blemish, because on the forehead, the texture of the skin goes horizontally (side to side). It’s not as critical on other parts of the face, but on the forehead you usually get better results if you sample to the side of the blemish, rather than above or below.
Step Three:
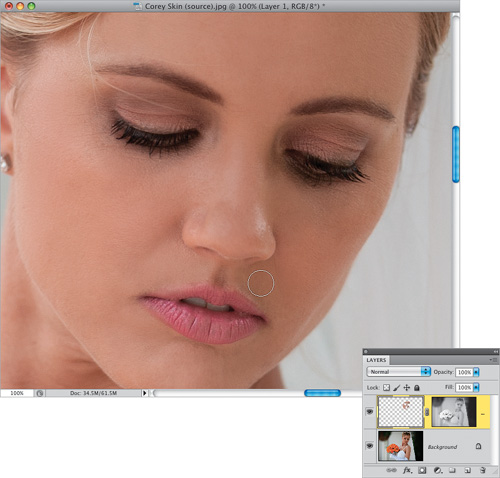
Now, move your cursor directly over the blemish. Don’t paint, just click once. That’s it—it’s gone (as seen here). That’s how you remove blemishes: sample a nearby area, move your cursor over the blemish, and just click. You don’t have to resample (Option-click) each time you remove a blemish, just when you move to a different area of the face (nose, cheeks, chin), as they all have slightly different textures.

Step Four:
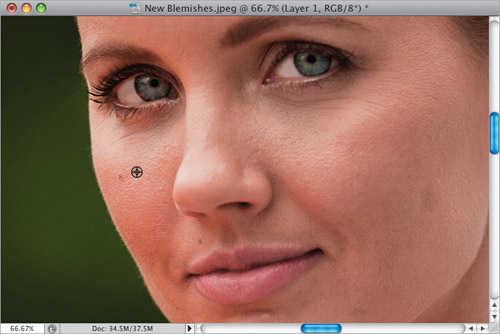
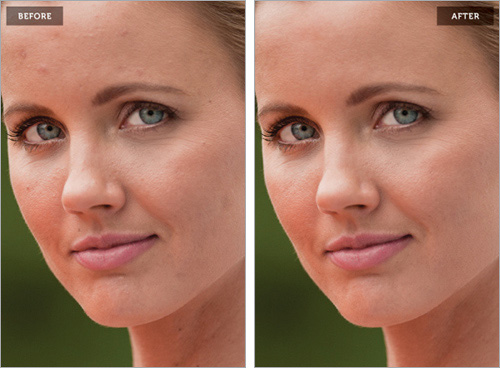
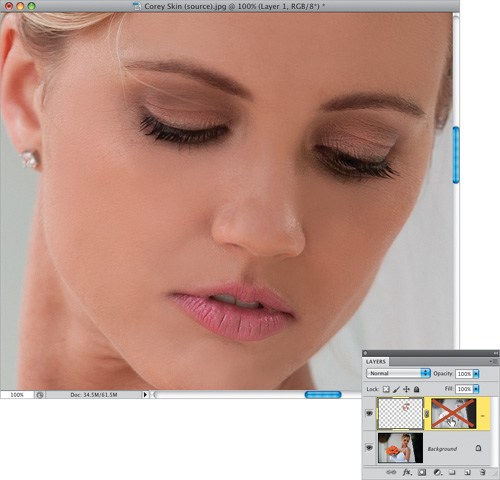
Let’s move to another part of the face. Same routine: Option-click in a clean area near the blemish, then move over the blemish, and just click. You’re going to repeat this process all the way around the face, removing the blemishes one by one. At this point in the retouching process, I just remove the blemishes that really stand out—smaller ones will get removed in the skin smoothing process later on. A before/after is on the following page, and I did nothing more than what you saw on this page—sample, move over the blemish, and just click.
Download this image. See pg. xi.
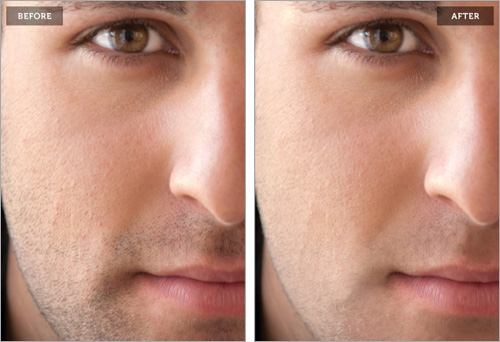
How to Avoid Plastic-Looking Skin
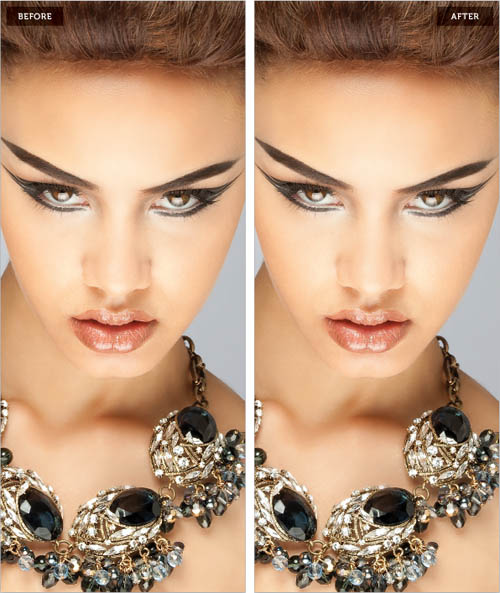
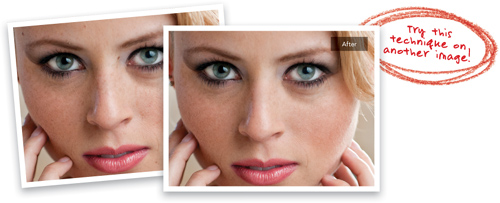
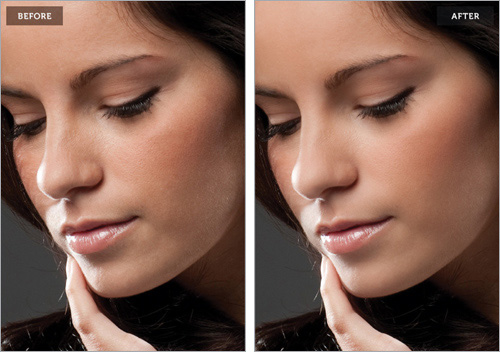
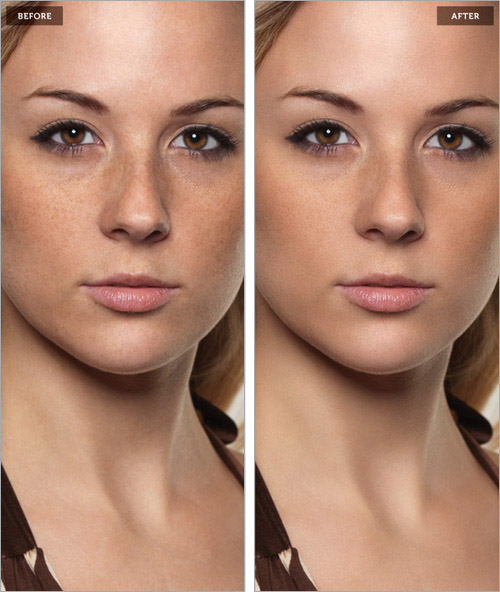
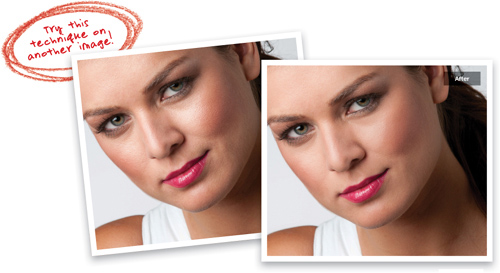
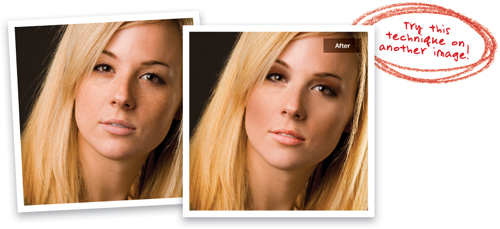
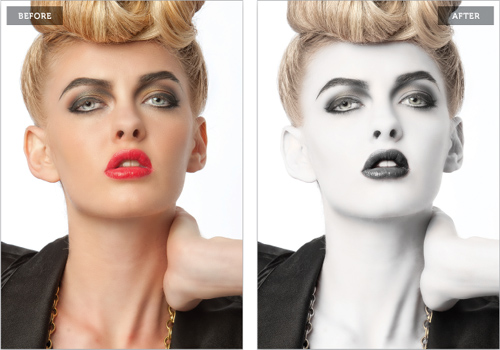
High-end retouchers cringe when they hear that you applied blurring to the skin, because we’ve all seen so many examples where the subject has grossly over-blurred skin, with no visible texture, and it looks plastic (like the shot on the left below). So, any mention of skin blurring freaks them out. However, as photographers (and not high-end retouchers), we have to get each photo retouched really quickly, so in some cases we use “controlled” skin blurring, which gives us good-looking skin, but without losing all the texture and detail (as seen on the right below).
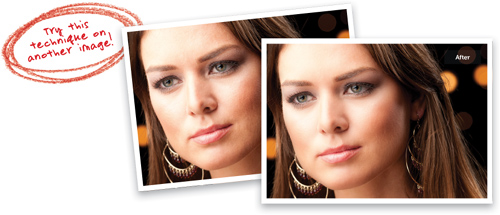
Blurred Plastic-Looking Skin (Yeech!)
This is what you want to avoid (see the photo on the left), and what has given skin blurring, in general, a bad name. There are really no visible pores, and the skin looks plastic, which makes the eyes and lips look over-sharpened and weird. In general, it just looks fake and obviously retouched. Okay, over-retouched. Avoid this like the plague (unless you’re retouching for children’s beauty pageants. For some reason, they dig this).
Bad Blurring
Controlled Blur
Softened Skin with Texture
Although I’m going to show you two ways to soften skin that don’t blur the skin at all, sometimes the fastest way for us photographers to get the job done is to use some kind of blurring, but don’t worry—when we do, we’ll use a trick or two to bring back some of the original texture, so the skin looks realistic (and not plastic, like the image on the right). So, just remember, although blurring in general is bad, if you use the blurring techniques shown here in the book, you’ll get smooth-looking skin fast, with texture and detail, but without the fake plastic look. By the way, there’s still more retouching left to be done on the photo on the right—it’s just an example to show skin smoothing (just in case you were wondering, I used the technique on page 113).
Basic “Quickie” Skin Softening
When you smooth skin, there’s definitely a tradeoff: You can use techniques that totally avoid blurring the skin, but they take a really long time. Or, you can use a technique that’s really quick, but you’ll have to blur the skin a bit (which, in high-end retouching circles, is a huge no-no, because you lose skin texture). As photographers, we sometimes have to get the job done really fast, and that means using some blurring. However, there are two things we do at the end of this technique to help retain some of the original texture, and add some additional texture in. That way, this quickie skin technique actually looks pretty decent for something that takes us no more than two minutes to do.
Step One:
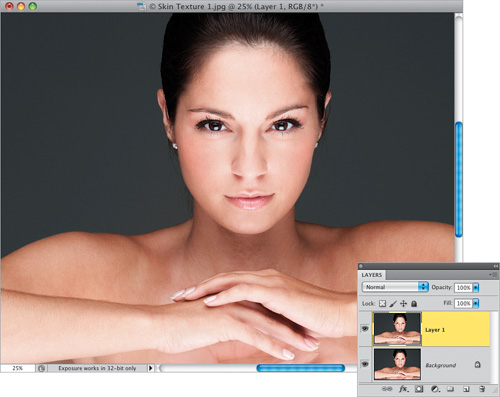
Okay, before you consider using this technique, consider this: If your photo will be published anywhere professional retouchers might see it, this isn’t the one to use. If it’s going to be used on a photo of Uncle Earl for his Christmas card, then it’s probably okay (but only if you don’t really like Uncle Earl all that much). Of course, before you do any skin softening of any kind, remove all the major blemishes first (see page 86). Once they’re gone, press Command-J (PC: Ctrl-J) to duplicate the Background layer (as seen here).
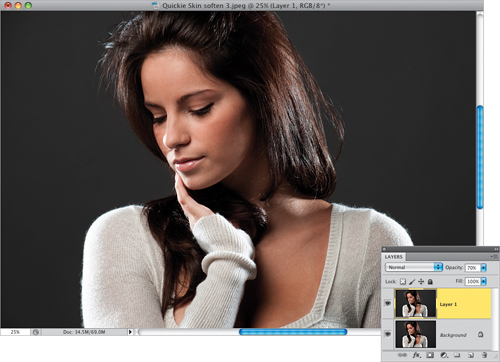
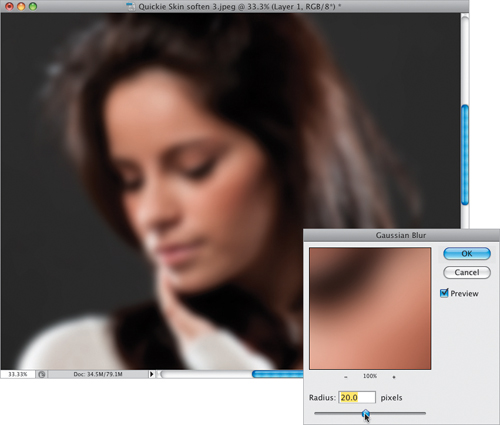
Step Two:
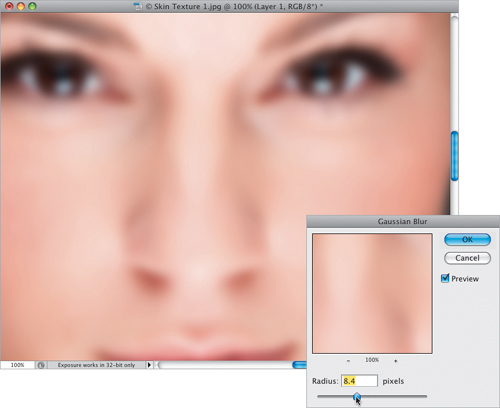
Now, go under the Filter menu, under Blur, and choose Gaussian Blur. When the Gaussian Blur dialog appears (seen here), set the Radius to 20 pixels to really blur the entire image (as shown here) and click OK.
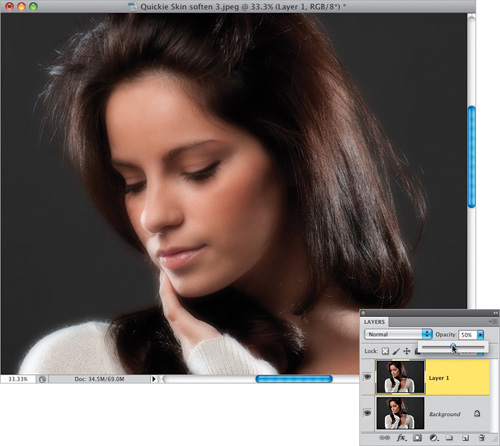
Step Three:
Lower the Opacity of the blurry layer to 50% (as shown here) to reduce the impact of the blurring. I know that a lot of people leave this setting at 50%, but the skin looks way too blurry. I’ll leave it at 50% for now, though, because it makes it easier to see what you’re painting (so, 50% opacity is a visual tool, not a final number by any means).
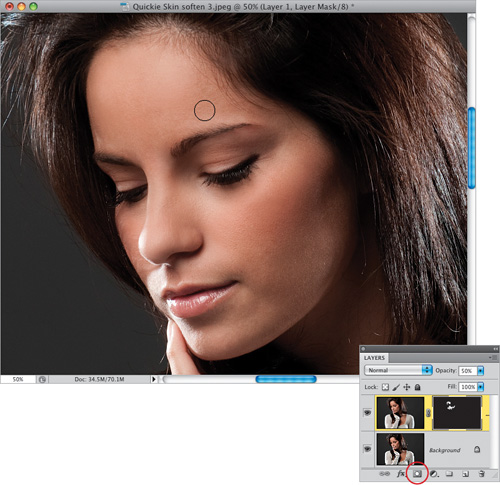
Step Four:
Press-and-hold the Option (PC: Alt) key and click on the Add Layer Mask icon at the bottom of the Layers panel (it’s shown circled here in red) to hide your blurry layer behind a black mask (so now your image looks like it did when you first opened it). Press D to set your Foreground color to white and get the Brush tool (B), then in the Options Bar, choose a medium-sized, soft-edged brush (at least to start with) and set the Opacity to 100%. Now, paint over everything except the areas that are supposed to have full detail, like the eyebrows, eyes, hair, nostrils, lips, teeth, and the edges of the face (you have to stop right before the edges of her face or they will soften). You’ll have to shrink the size of your brush when you get to places like the area that goes from her nose down to her top lip (technically called the philtrum, but I always call it “the area that goes from her nose down to her top lip”).
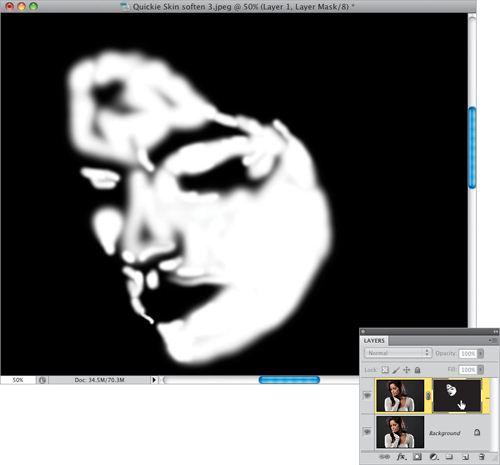
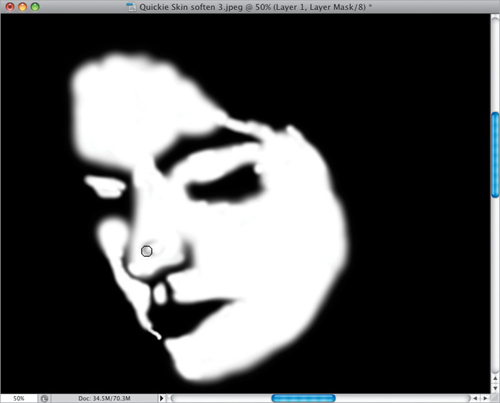
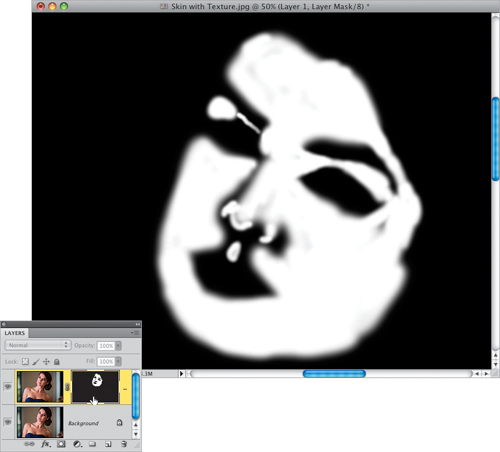
Step Five:
To quickly check to see if you missed softening any areas, go to the Layers panel, press-and-hold the Option (PC: Alt) key, and click directly on the layer mask thumbnail that is attached to your top layer. You’ll see the actual layer mask you’ve been painting on, and any areas that appear in black haven’t been softened yet (see those areas on her forehead and nose that I completely missed?).
Step Six:
Just take your brush and paint in white, right on the mask, over any spots you missed (as shown here), until the only places that are still black on the face are those detail areas you didn’t want to soften. Now, Option-click on that layer mask thumbnail again to bring back the regular color image.
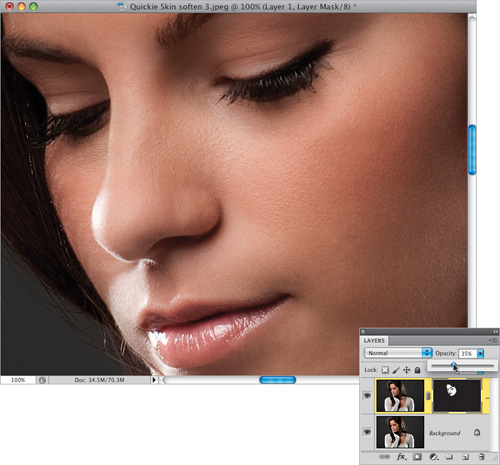
Step Seven:
Here’s where you get some of your skin detail and texture back. Lower the Opacity of your layer to at least 35% (as shown here) and see how that looks. If you can get away with less, try that (but, of course, to see how it really looks, you’ll need to see a before/after by toggling the top layer on/off by clicking on the little Eye icon that appears to the left of the layer’s thumbnail). I’ve used as little as 18% on a subject with pretty good skin, but more often it’s around 25% to 35%. Remember, the lower opacity you can get away with, the more of the original skin texture you’ll get back.
Step Eight:
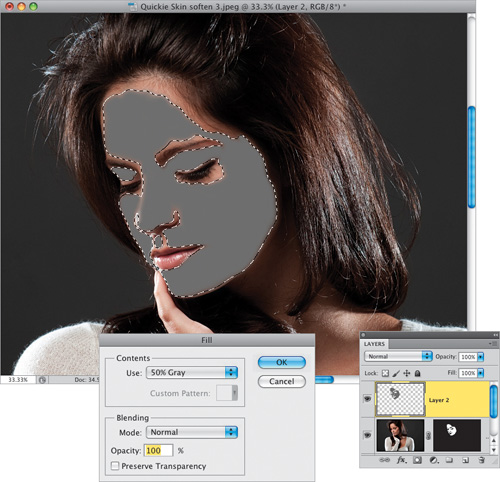
If you look at the image at this point and think you need even more skin texture (but it looks bad if you lower the Opacity any further), then you can fake the texture using a very popular technique. Start by Command-clicking (PC: Ctrl-clicking) directly on the layer mask thumbnail from your blurred layer, so it loads the mask as a selection. Now, click on the Create a New Layer icon at the bottom of the Layers panel to add a new blank layer, go under the Edit menu, and choose Fill. In the Fill dialog, from the Use pop-up menu up top, choose 50% Gray, and click OK to fill your selected area with gray. Don’t deselect yet.
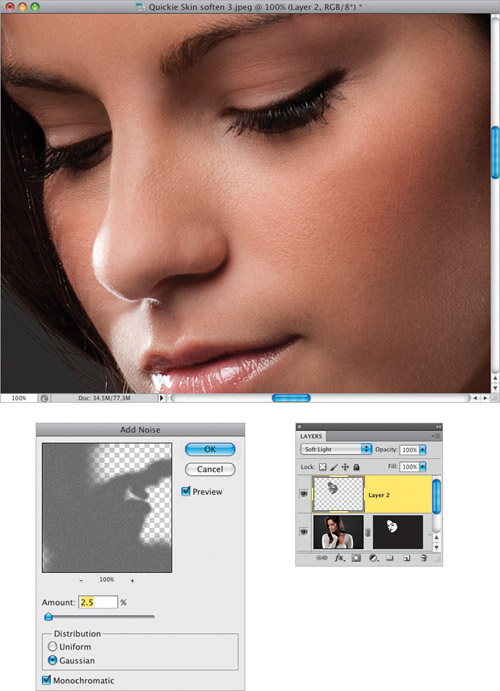
Step Nine:
Go under the Filter menu, under Noise, and choose Add Noise. In the filter dialog, enter 2.5% to 3% for your Amount, choose Gaussian for your Distribution, and turn on the checkbox for Monochromatic, then click OK. Now, press Command-D (PC: Ctrl-D) to Deselect, then change the layer’s blend mode from Normal to Soft Light (for more subtle texture) or Overlay (for the full texture effect). To see a before/after onscreen when you have more than two layers, simply Option-click (PC: Alt-click) on the Background layer’s Eye icon. This will turn off all layers above the Background layer, then you can Option-click again to turn them back on. A before/after at 35% opacity (through Step Seven) is shown on the next page.
Download this image. See pg. xi.
Softening Skin While Retaining Texture
This is a technique I use when I need a nice, quick skin smoothing without blurring out the skin, and it works really well—especially because of how it maintains skin texture. I want to give credit to “byRo,” a Brazilian retoucher who invented the technique (he’s a forum moderator over at RetouchPRO.com—a really great site for professional retouchers).
Step One:
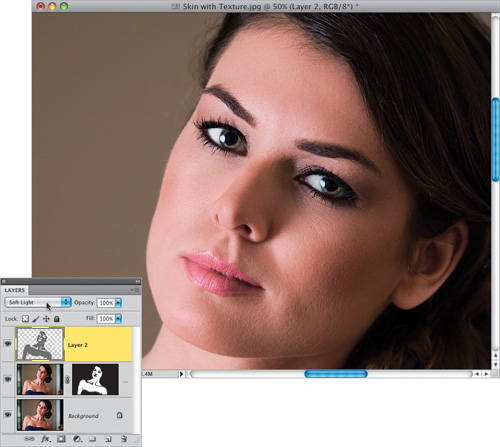
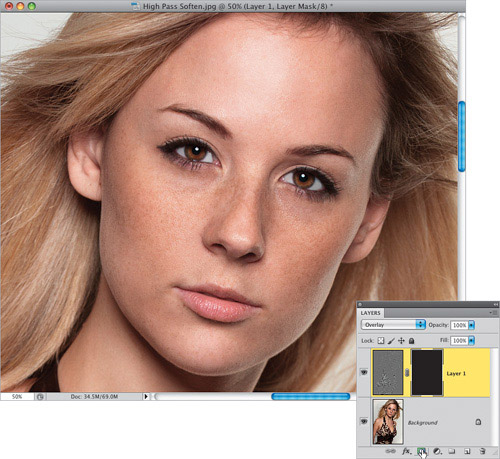
Here is the beauty-style image we’re going to retouch (the model is leaning on a sheet of plexiglass held up by two assistants. She couldn’t put any weight on the plexiglass, because it started to bow, so she’s standing there, lightly resting on it). It’s hard to see at this zoomed out view, but she’s got a nice skin texture, and of course we want to preserve that. This technique does a great job of that. So, start by pressing Command-J (PC: Ctrl-J) to duplicate the Background layer.
Step Two:
Go under the Filter menu, under Blur, and choose Gaussian Blur (don’t worry—we’re not actually going to blur the skin here, we’re just using this dialog to do a calculation for us that we’re going to need to use in a different dialog). Drag the slider to the right until you see the skin smooth out, and the different tones of skin start to go away (as shown here). Don’t click OK. Instead, just remember the number you stopped at (in this case, it’s 8.4). Now, click the Cancel button to close the dialog without applying the blur.
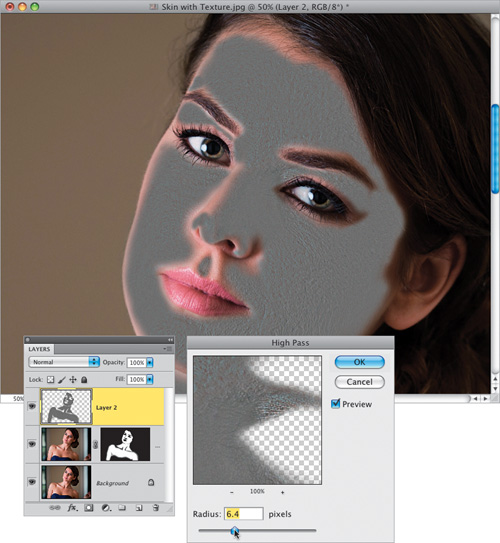
Step Three:
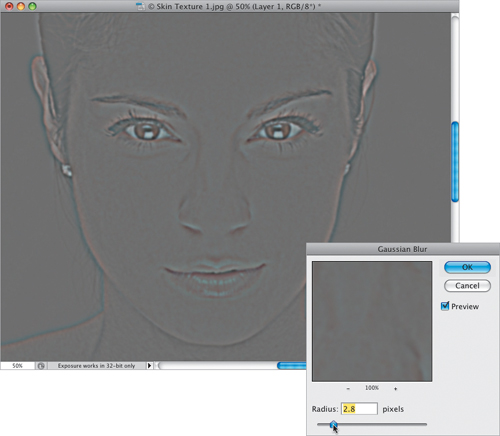
Go under the Filter menu, under Other, and choose High Pass. When the High Pass filter dialog appears, enter that number you memorized from the Gaussian Blur dialog—8.4 (as shown here)—and click OK. At this point, our texture layer is really, really sharp (the High Pass filter acts like an Unsharp Mask on steroids, but we’ll fix that in just a moment).

Step Four:
Now, reopen the Gaussian Blur filter again, so we can apply a small amount of blur to this sharp texture layer. First, a little math: you’re going to enter an amount of blur that is approximately 33% (1/3) of the amount you entered in the High Pass filter in the previous step. In this case, 33% of 8.4 is approximately 2.8 (I’m not proud of the fact that I had to get a calculator to figure that one out. I should have just chosen 9 and made it easy on myself). So, enter 2.8 and click OK.
Step Five:
Now, you’re going to Invert this High Pass layer by going under the Image menu, under Adjustments, and choosing Invert (as shown here), or by just pressing Command-I (PC: Ctrl-I).

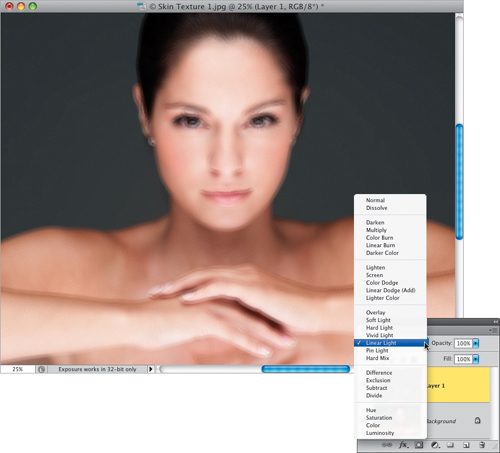
Step Six:
Next, go to the Layers panel and change the blend mode from Normal to Linear Light (as shown here). This is looking really, really bad. But, continue on!
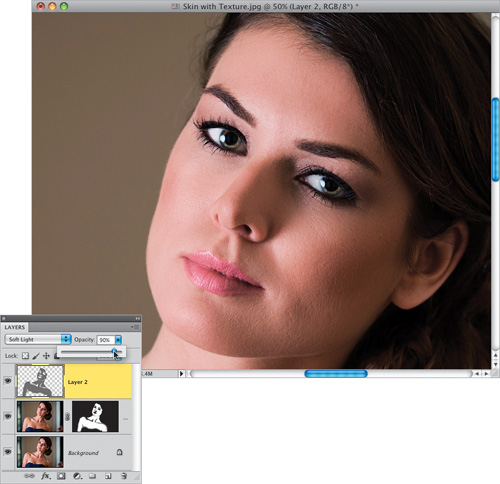
Step Seven:
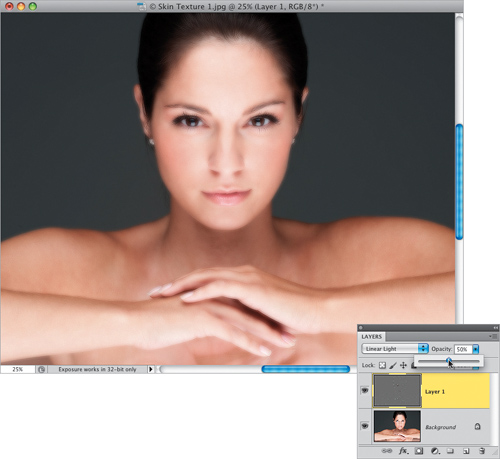
Lower the Opacity of this layer to 50%, and things are starting to look a lot better for the skin areas—except, of course, for the edges of...well...everything, so we’ll have to fix that in the next step.
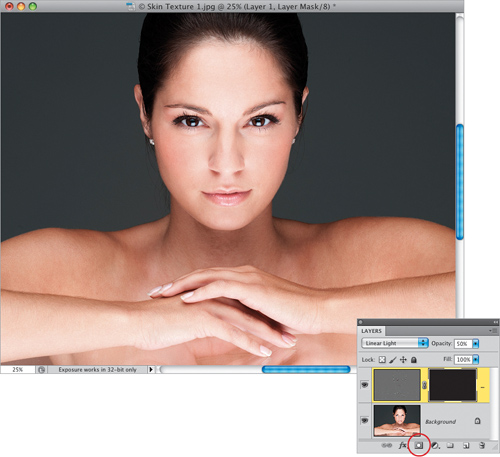
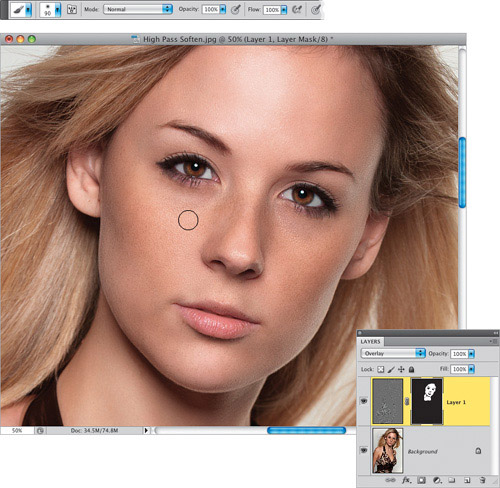
Step Eight:
Press-and-hold the Option (PC: Alt) key and click on the Add Layer Mask icon at the bottom of the Layers panel (it’s shown circled here in red) to hide your High Pass filter layer behind a black mask (as seen here).
Step Nine:
Now, press D to set your Foreground color to white and get the Brush tool (B), then in the Options Bar, choose a medium-sized, soft-edged brush and set the Opacity to 100%. Now, paint just the skin areas (as shown here), avoiding all the detail areas like the eyebrows, eyes, hair, nostrils, lips, teeth, and the edges of the face (avoid the edges of her face, or they will get softer).
Step 10:
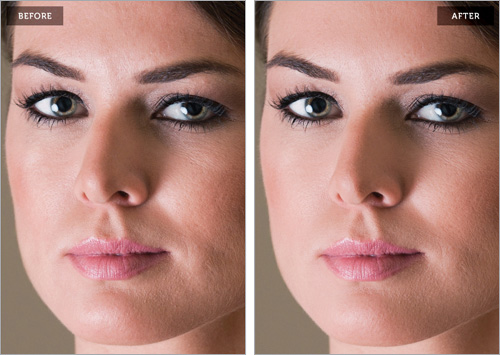
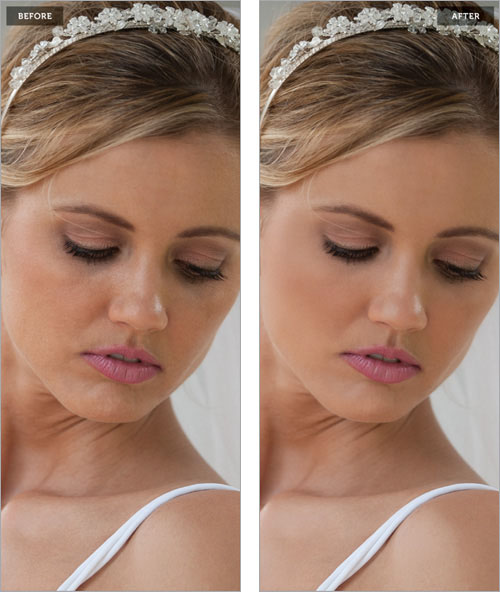
To check and see if you missed any areas, go to the Layers panel, press-and-hold the Option (PC: Alt) key, and click directly on the layer mask thumbnail that is attached to your top layer (as shown here) to see just the layer mask. Any areas that appear in black haven’t been painted over yet (clearly, I need this “mask only” view pretty badly). Take your brush and paint in white right on the mask over any spots you missed. Now, Option-click on that layer mask thumbnail again to return to the normal image. Look at the before and after on the next page, and you can see that the skin has been smoothed out nicely, and yet you see lots of texture in it.
Download this image. See pg. xi.
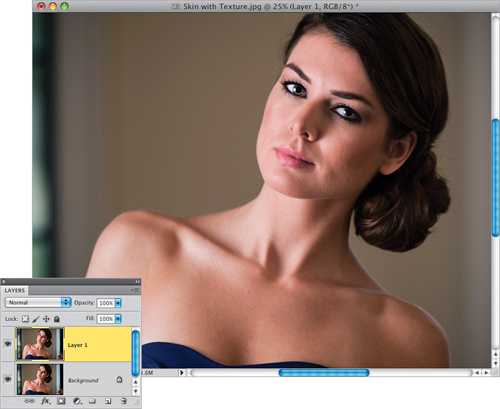
Softening Skin & Adding Texture Back In
This one takes a few steps, but it’s not hard at all. In fact, it’s simple, so don’t let the number of steps throw you. Also, at one point it does have a teeny, tiny bit of blur in it, but not enough to hurt anybody. It uses the Surface Blur filter at one stage, but don’t worry, the whole idea of this technique is to have loads of texture, so don’t freak out when you see the Surface Blur filter.
Step One:
As always, before you do any skin softening, remove all the major blemishes using the Healing Brush (see page 86). Here, I removed them already, so we can just focus on softening the skin. Start by pressing Command-J (PC: Ctrl-J) to duplicate the Background layer, as shown here.
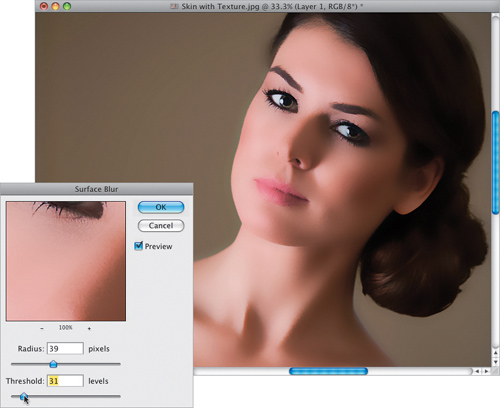
Step Two:
Go under the Filter menu, under Blur, and choose Surface Blur. There are big advantages to using this filter over Gaussian Blur, and one is that it does a better job of preserving edges (rather than Gaussian Blur, which just blurs everything equally). I set the Radius (which controls the amount of blur) to around 39, and I make sure the Threshold slider (which controls the tonal values that get blurred) doesn’t get higher than the Radius amount (here, I have set it to 31, and I usually have it between 5 and 10 lower than the Radius setting). This gives a blocky, almost posterized look to your subject’s skin at this point. Go ahead and click OK to apply this filter to your image (it’s doing a lot of math to make some parts blurry while the edges maintain detail, so don’t be surprised if a progress bar appears onscreen, as this one usually takes a few extra seconds to apply).
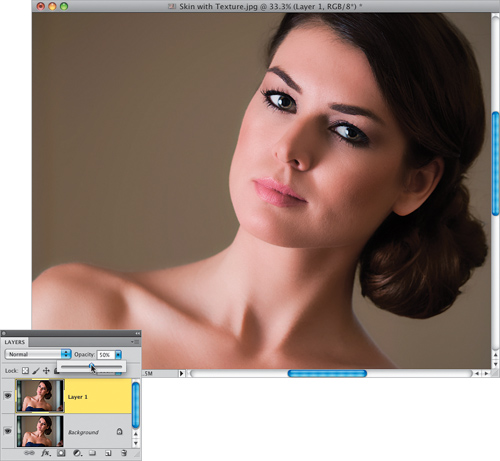
Step Three:
Now, go to the Layers panel and lower the Opacity of this Surface Blur layer to 50% (as shown here). Although it looks a lot better at this point (and the skin looks pretty decent), the rest of the image also has the effect applied. We just want it on her skin, so we’re going to have to mask it.
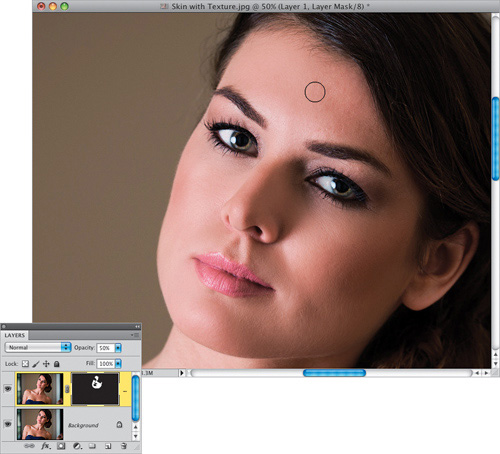
Step Four:
Press-and-hold the Option (PC: Alt) key and click once on the Add Layer Mask icon at the bottom of the Layers panel. This adds a black layer mask to your blurry layer (seen here to the right of the top layer), which hides the blurry layer, so all you’re seeing now is the original, unblurred Background layer. Press D to set your Foreground color to white, get the Brush tool (B), and choose a medium-sized, soft-edged brush from the Options Bar. Now, paint over her skin, but be careful to avoid all the detail areas, like her eyes, hair, clothing, eyebrows, nostrils, lips, etc.
Step Five:
To make sure you haven’t missed any areas, in the Layers panel, Option-click (PC: Alt-click) directly on the layer mask thumbnail (as shown here). This displays just the mask by itself, and any areas on her face that appear in black aren’t getting the effect, so you’ll see instantly whether you missed any areas or not. These missed areas are really easy to fix—just take your Brush tool and paint right over them (you’re painting right on the mask itself, so you’ll be able to see perfectly as you paint). Here, you can see I missed a bunch of areas on her forehead and by her nose, and a few tiny areas here and there. When you’re done (don’t forget her neck and shoulders), Option-click directly on the layer mask thumbnail again to return to your normal image.
Step Six:
Now that you can see your full-color image again, you’re going to load your layer mask as a selection. So, press-and-hold the Command (PC: Ctrl) key and click once directly on the layer mask thumbnail (as shown here). This loads your mask as a selection, as seen here. Remember, that selection is made from your mask, and your mask is a selection of all her skin, but without her eyes, nostrils, mouth, and the other detail areas included.
Step Seven:
While your selection is still in place, go to the Layers panel and click on the Background layer (this is original unsoftened layer). Now, press Command-J (PC: Ctrl-J) to take just that selected area and put it on its own layer (as seen here, where just her original unretouched facial skin is on its own layer now).
Step Eight:
In the Layers panel, click-and-drag that “just the skin” layer up to the top of the layer stack (so it’s the top layer, as seen here). Now, we’re going to bring out the texture in her skin by going under the Filter menu, under Other, and choosing High Pass. When the dialog appears, drag the Radius slider all the way to the left (so the preview looks solid gray), and then drag the slider to the right until you see lots of nice skin texture coming through your solid gray image. Stop when you see a glow starting to develop (here, I was able to go to around 6.4. When I went too much higher, things started to glow). Click OK.
Step Nine:
To have your skin texture layer blend in with your softened skin layer below it, go to the Layers panel and change the blend mode for this High Pass layer from Normal to Soft Light (as shown here). There’s now a layer of skin texture over your softened layer (so basically, you softened and smoothed the skin, then brought back some skin texture on top to bring back the detail lost by running the Surface Blur filter).
Step 10:
This face texture (High Pass) layer on top gives you its full effect (the most texture) when the layer’s Opacity is set at 100%. If you lower the Opacity, it actually makes the skin softer, because you’re lowering the amount of texture. Here, I’ve lowered the Opacity of the High Pass layer a bit to soften up the skin a little more, because there’s plenty of texture visible in the image. Whether you lower the texture amount or not is totally your call, but you’ll make that call based on the skin of your particular subject. A before/after of the retouch is shown on the next page.
Download this image. See pg. xi.
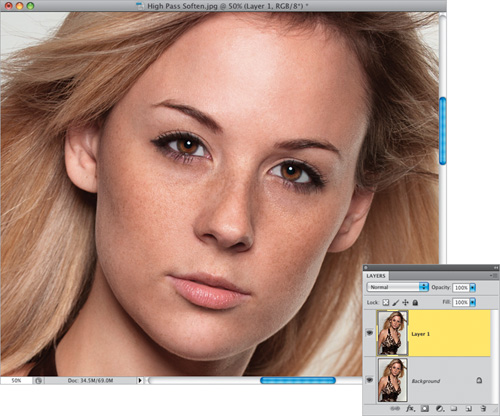
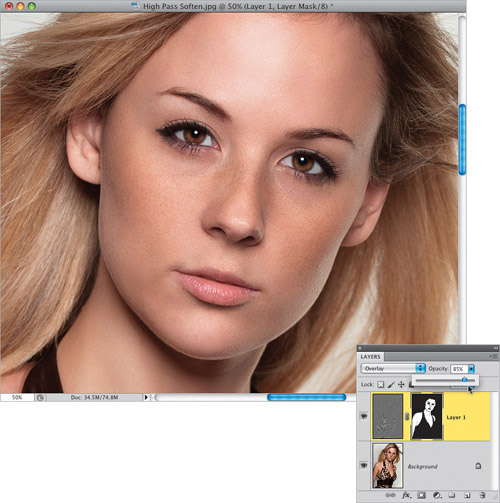
High Pass Skin Softening
I know, you’re probably thinking: “High Pass! Doesn’t that make skin sharper?” Normally it does, but in this technique (which has been around for years now), you invert the layer you apply the High Pass filter to, so it acts more like a blurring filter, which sounds bad at first, but this is actually a great technique for keeping texture, and it’s faster and easier than the other High Pass methods in this chapter. So, which one looks better? It just depends on the skin of the particular person you’re retouching. That’s why it’s handy to know them all.
Step One:
Here’s the image we’re going to retouch. Start by pressing Command-J (PC: Ctrl-J) to duplicate the Background layer.
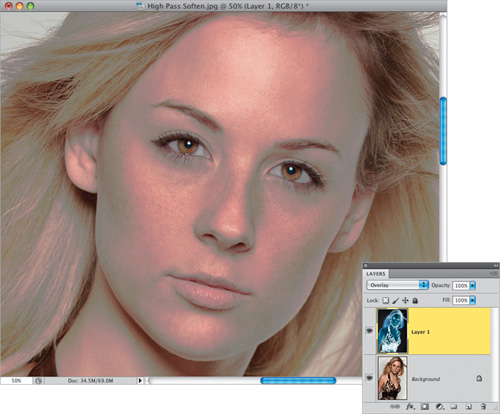
Step Two:
Change the blend mode of this duplicate layer from Normal to Overlay. Now, press Command-I (PC: Ctrl-I) to Invert the layer (it should look pretty bad at this point, like you see here).
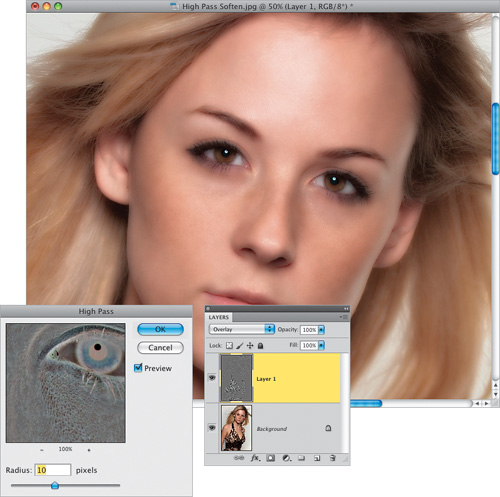
Step Three:
Go under the Filter menu, under Other, and choose High Pass. When the filter dialog appears, enter 10 pixels, and click OK. This is the part that freaks people out, because normally the photo would look super-sharpened at this point, but instead, it looks pretty blurry (as seen here).
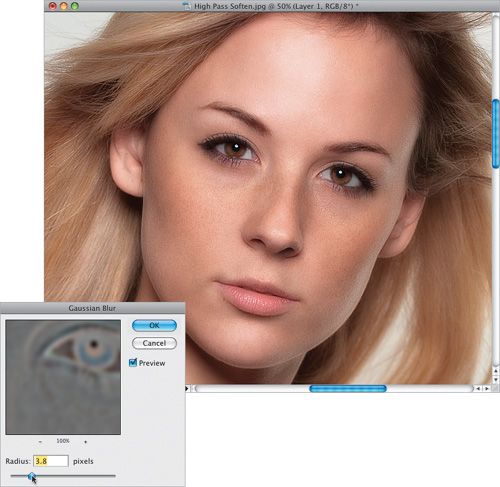
Step Four:
Now, to limit how blurry your image looks, you’re going to add a Gaussian Blur (I know, I know...just stick with this and you’ll see that somehow it actually works). So, go under the Filter menu, under Blur, and choose Gaussian Blur. Just so you can see how this filter affects your image, when the Gaussian Blur filter dialog appears, drag the Radius slider way over to the right, adding lots of blur, and you’ll see that the photo gets very sharp, not blurrier. Now, drag the Radius slider all the way to the left (to 0.1 pixels), and it’s blurry again. Because we inverted the High Pass layer, everything is working in reverse, but in this case, that’s exactly what we want. So, with your Gaussian Blur set at 0.1, start slowly dragging to the right, and somewhere between 1 and 4 pixels (here I dragged to 3.8), the skin will start looking good, and you’ll see lots of smooth skin texture, then click OK.
Step Five:
Of course, when you’re applying a filter over the entire image like this, it makes everything have that texture, but you just want that limited to the skin (avoiding the detail areas like the eyes, lips, eye-brows, and so on). So, press-and-hold the Option (PC: Alt) key, and click on the Add Layer Mask icon at the bottom of the Layers panel to hide the textured layer behind a black mask (as seen here).
Step Six:
Now, get the Brush tool (B), choose a medium-sized, soft-edged brush with the Opacity set to 100% up in the Options Bar, make sure your Foreground color is set to white, and paint over the skin areas to reveal the softened texture in those areas. Don’t forget to Option-click (PC: Alt-click) on the layer mask to only see the mask, and to see if you’ve missed any spots, just as we did in the previous skin softening techniques.
Step Seven:
If the texture seems too intense, all you have to do is lower the layer’s Opacity until the skin tone looks right (I lowered it to 85% here). A before/after is shown on the next page.
Download this image. See pg ix.
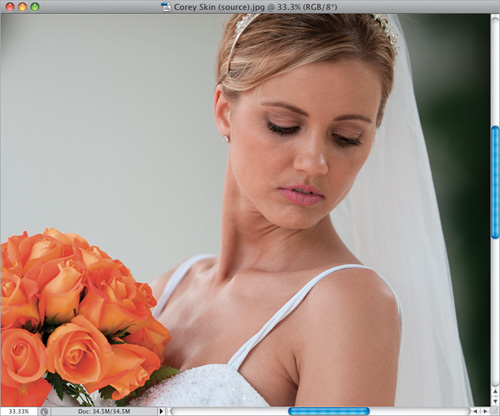
Softening Skin Using Channels
Corey Barker, one of my “Photoshop Guys” here at Kelby Media Group, came up with a slick skin softening technique that lets us keep lots of skin texture, because it’s based on using the skin texture as the mask part of a layer mask. What’s cool about this technique is that, if you feel the skin needs extra softening, you can add a Surface Blur along the way, but the really cool thing is that you don’t have to—you can avoid the blurring altogether (it’s totally up to you). My thanks to Corey for letting me share this technique with you here in the book.
Step One:
Here’s the image we want to retouch. As always, we start by removing the blemishes, so the image you see here has had them removed using the Healing Brush tool and the exact technique you learned earlier in this chapter.
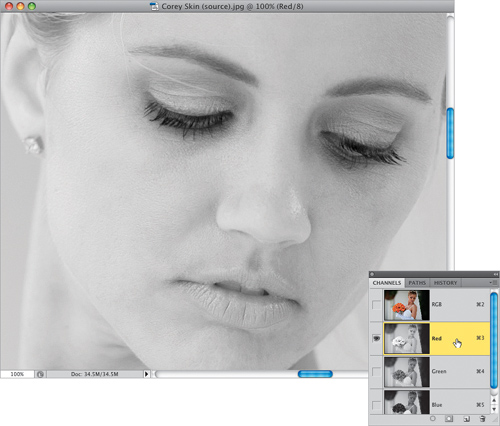
Step Two:
Go to the Channels panel (go under the Window menu and choose Channels, if it’s not already open) and click on the Red channel (as shown here). In portraits, the Red channel almost always has the least amount of skin texture in it, but while you’re already in the Channels panel, go ahead and click on the Green and Blue channels for just a moment, and you’ll see what I mean (they have all the serious skin texture—the stuff we don’t want).
Step Three:
Press-and-hold the Command (PC: Ctrl) key, and click directly on the Red channel’s thumbnail (as shown here) to load this channel as a selection.

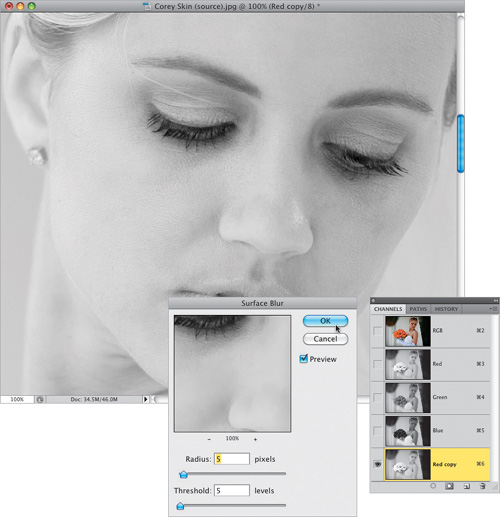
Step Four:
This step is totally optional, and I encourage you to try this technique without using this step (which will forever be known as the “evil blurring step” by high-end retouchers, who will scorn you for this, so I beg you—try it without this step at least once and see what you think). To do this optional, bonus, don’t-really-try-this step, first you have to Deselect what you did in the previous step, so press Command-D (PC: Ctrl-D). Now, duplicate the Red channel by dragging it down onto the Create New Channel icon (which looks just like the Create a New Layer icon). Next, go under Filter menu, under Blur, and choose Surface Blur. Enter 5 pixels for the Radius and 5 levels for the Threshold, and click OK. Press-and-hold the Command (PC: Ctrl) key, and click directly on the duplicate Red channel’s thumbnail (named “Red copy” in the Channels panel) to load this channel as a selection. Now, just continue on with the rest of the technique.
Step Five:
Go back to the Layers panel and click on the Create a New Layer icon to add a new blank layer. Now, while your selection is still in place, click on the Add Layer Mask icon at the bottom of the Layers panel, and it takes your selection and turns that into your layer mask. Take a look at the thumbnail for the layer mask attached to this layer, and you’ll see what I mean. Remember, any other time we add a layer mask, it’s always solid black or solid white (well, until we start painting on it, anyway), but here the layer mask looks like the Red channel. That’s the secret to this technique (but this will make more sense in just a moment). Another big difference is that we’re not going to paint on the layer mask, like usual. Instead, we’re going to paint on the blank layer itself, and then the layer mask will be used to maintain the texture. To do this, you need to go to the Layers panel and click on the blank layer’s thumbnail (as shown here), so the layer is active, instead of the mask.
Step Six:
Get the Brush tool (B), set the brush’s Opacity to 20% up in the Options Bar (unless you’re using a tablet with Pressure Sensitivity turned on, in which case you can leave it set at 100%), choose a large brush, then Option-click (PC: Alt-click) on the skin area right around where you want to smooth the skin to sample the color, and start generally building up strokes over the area you want to soften. As you paint over the area, it starts to soften. You’ll have to let it build up, so paint over the area at least a couple of times, and as you paint, you’ll see the skin starting to soften. The more you paint, the softer it gets, so you don’t want to paint too much.
Step Seven:
The real key to making this technique work for you is to make certain you resample again and again as you move around the face to different color tones. Also, you’ll need to shrink your brush size as you move around to tighter areas, but don’t forget to resample again and again as you move around. Here, I’ve painted over nearly all the areas I wanted to soften, being careful not to soften the lips, nostrils, eyes, eyebrows, hairs, and so on.
Step Eight:
Okay, this step is really just to help you understand what’s going on in this technique (and it will help you understand why her skin looks so plastic in the shot you see here). Press-and-hold the Shift key, and click directly on the layer mask thumbnail attached to your layer, and it hides the effect of the mask from view (and puts a big red X over your mask, as seen here, to let you know it’s hidden). Now her skin looks really plastic, because without that mask, all you’ve really done is sampled a flesh tone and then painted a solid color right over her skin. To toggle this on/off so you can compare, just keep that Shift key held down and click on that layer mask thumbnail and few times, and you’ll see exactly what’s going on. When you’re done, just make sure the mask is active again (so there’s no big red X across it).
Step Nine:
The great thing about this is that you did all this painting on a layer, so if you think the skin looks too soft, you can just lower the Opacity to reduce the intensity of the softening (here, I lowered the Opacity to 70% to keep even more skin texture). A before and after of our work is shown on the next page.
Download this image. See pg ix.
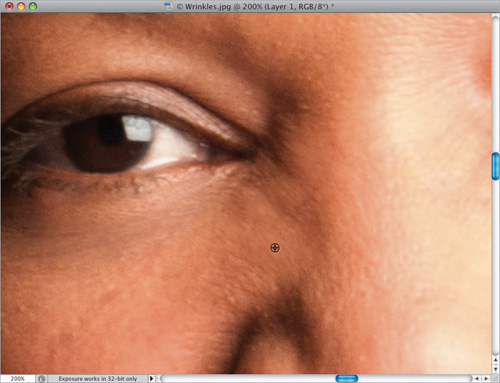
Reducing or Removing Wrinkles
The older the subject, the deeper and longer any wrinkles on their face may be. The thing about wrinkles is that, for the most part, you can’t remove them or the subject looks weird. Instead, you just have to reduce them by lightening the shadows in the wrinkles themselves. The thing to keep in mind when reducing wrinkles is that you want to make your subject look 10 years younger, not 40 years younger.
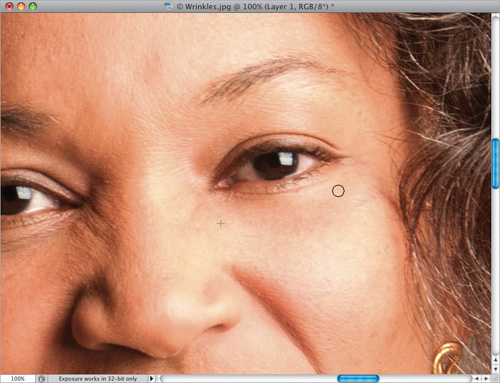
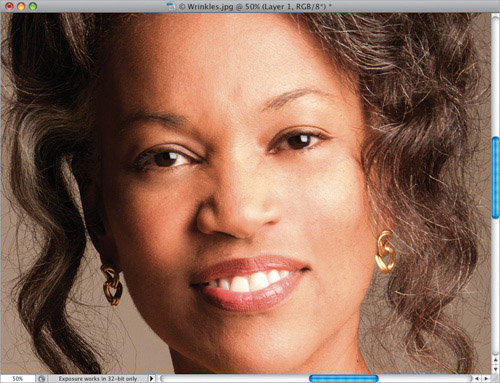
Step One:
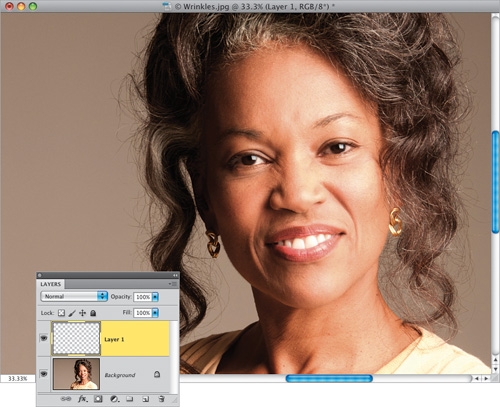
Here’s our subject, and we’re going to do a simple two-step process to remove the wrinkles. First, we’re going to remove all the wrinkles completely, then we’re going to bring back some of them to make it look realistic. Start by clicking on the Create a New Layer icon at the bottom of the Layers panel to create a new blank layer (we’ll be doing all our retouching up on this new layer).
Step Two:
Zoom in, and get the Healing Brush tool (press Shift-J until you have it). In the Options Bar, choose a small brush size and, from the Sample pop-up menu, choose All Layers (if it’s not already chosen). That way, when you use the Healing Brush on this new blank layer, it will sample from your photo on the Background layer. Option-click (PC: Alt-click) in a clean area near some wrinkles (as shown here). Make sure you choose an area to sample that has a similar texture to the area surrounding the wrinkles.

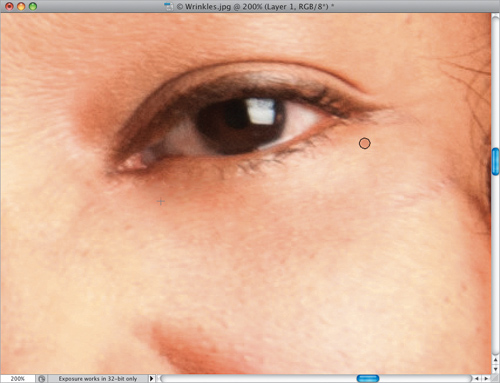
Step Three:
Now, you’re going paint over the wrinkles with the Healing Brush. In this case, I painted a stroke from left to right over the wrinkle under the eye on the right. In the capture shown here, you can see where my brush cursor is, and you can also see the little crosshair cursor (+) that shows the spot I sampled from. Now, here’s some good news: since you’re going to bring back some of these wrinkles a little later on, making absolutely perfect wrinkle removal isn’t a big worry. So, if you remove a wrinkle and it doesn’t look great, don’t sweat it, because a lighter version of the wrinkle is coming back soon, and it will cover up most of your work here anyway.
Step Four:
Chances are it’s going to take more than just a few strokes to get all of the wrinkles, so feel free to paint more strokes to completely remove them. Here I zoomed in tighter, and worked on the next wrinkle up. I also had to remove a few little “straggler” wrinkles left over right near the eyelashes and at the corner of the eye. It took around three big and six little strokes to remove all the wrinkles here.
Step Five:
Let’s switch over to the other eye and repeat the process: use a small-sized brush, and sample (Option-click) near the area of wrinkles you want to remove (as shown here).
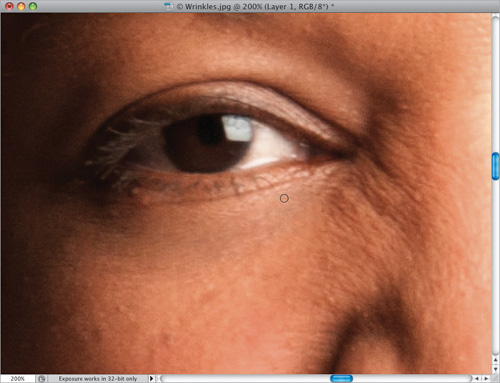
Step Six:
Now, paint a stroke going from left to right to remove the bottom wrinkle, like I did here (I zoomed in tight to 200% here, so you could see better. While zooming beyond a 100% full-size view makes things a little soft and pixelated, you have to do it sometimes with detail work).
Step Seven:
Here, you can see I’ve removed the wrinkles from beneath the eye on the left, but we’ve got to do a little more work in this area. You also need to remove those wrinkles to the left of her nose. They’re much more noticeable than the ones to the right because of the lighting, but either way, you’re going to have to remove them. Start by sampling in a nearby area that has basically the same texture, but doesn’t have a wrinkle in it.

Step Eight:
Now, start painting over the wrinkles to make them go away. You might have to resample a few times to get this entire area (you can see me resampling here), but just be patient and remove most of the wrinkles. Compare this side of the nose with the one in Step Seven, and you can see it’s quite a bit better. Again, it’s not perfect, but because we’re going to be bringing some of those wrinkles back, it doesn’t have to be.
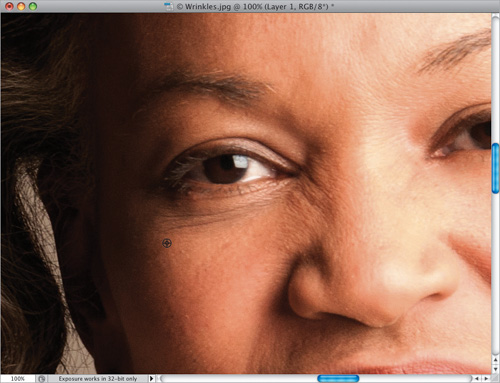
Step Nine:
Let’s move down to the cheeks and mouth area. She has some little smile lines right above her lips, extending from one end to the other like a half-oval. We’re going to get rid of those first. Option-click in a nearby clean area (as shown here).
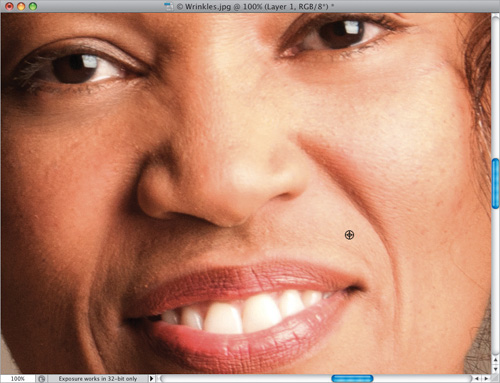
Step 10:
Paint over those smile lines (again, it might take more than one stroke) until they’re gone (as seen here). Now, we’re going to tackle something much larger—the larger smile lines on her cheeks extending down to her jaw. Our goal here is to completely remove them, and then when we bring them back, it will soften those shadows, which makes them look less deep, and makes the subject look younger (the older we get, the deeper these lines get, and the darker the shadows get. Man, this getting old thing is a blast!). Here, I’ve sampled near the bottom of the line on the right side of her mouth, just to the right of the line.
Step 11:
Now, you’re going to paint away that entire line. It’s going to take a few strokes and a medium-sized brush to get this one done. Plus, you’ll probably have to re-sample a few times, in other nearby clean areas, along the way (as I have here).
Step 12:
I did the smile line on the other side of her face the exact same way. It took a few strokes to completely remove it, but if that’s what it takes, that’s what it takes. So, here’s the image with the most obvious wrinkles, crow’s feet, and smile lines completely removed. Now, you can see how freaky it looks when you remove all the wrinkles from a person’s face (the goal is to make her look 40—not 14). In the next step, we’ll fix that fast.
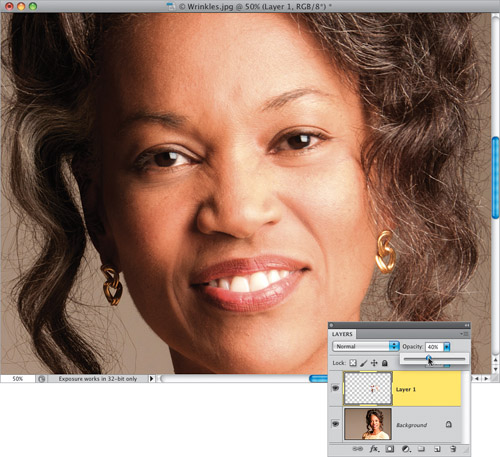
Step 13:
The final step is simply to lower the Opacity of your healing layer (the layer you did all your healing on from the beginning) in the Layers panel to bring back some of the original wrinkles. Here, I’ve lowered the layer Opacity to 40%, and you can see how natural it looks. The shadows are all lighter, and while you can see all the wrinkles, they look less deep, which makes her look younger. The amount will be different for every person you retouch, based on their age and their wrinkles. If you’re doing this on someone much younger, and you just want a hint of natural wrinkles, then you might leave the Opacity up at around 80%, but again, you have to make the call based on age, amount of wrinkles, etc.
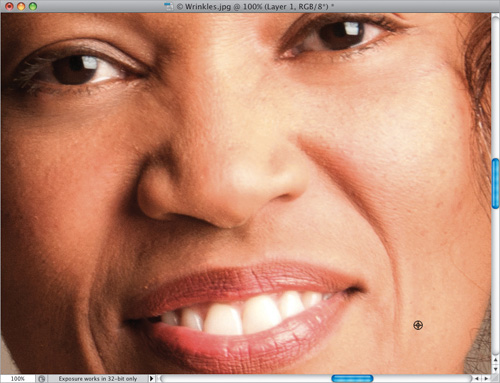
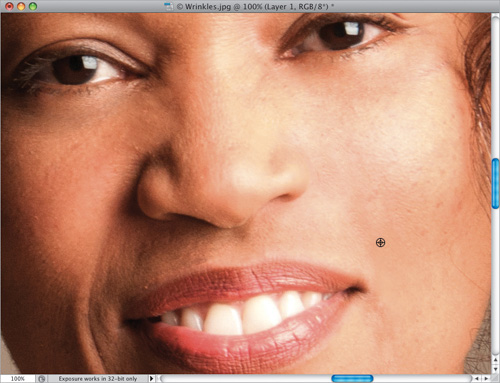
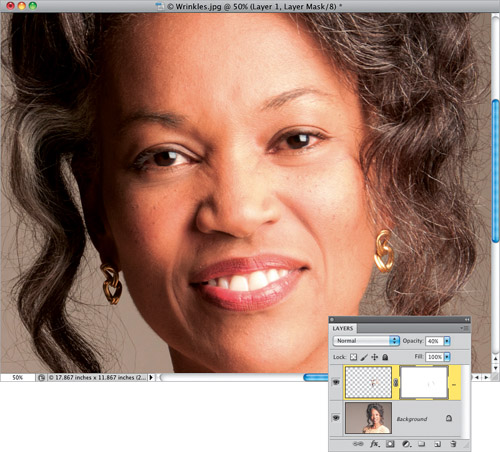
Step 14:
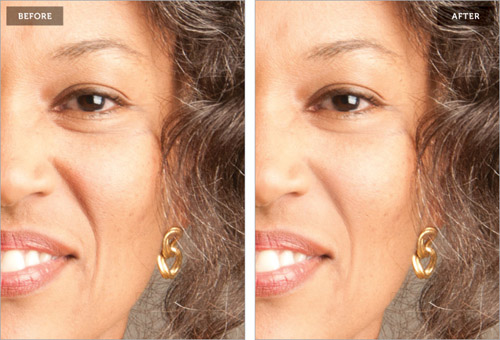
If you want to bring back a little more of an area, like the laugh lines, just click on the Add Layer Mask icon at the bottom of the Layers panel, then get the Brush tool (B), lower its Opacity to around 10%, make sure your Foreground color is set to black, and paint over the lines or wrinkles you want to bring back a little more. You can see the before and after (at 40% opacity) on the next page.
Download this image. See pg. xi.
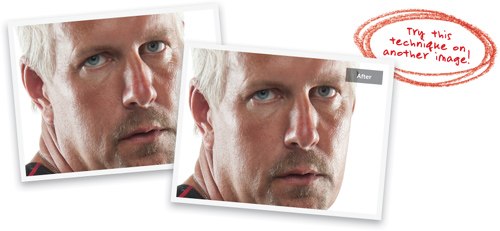
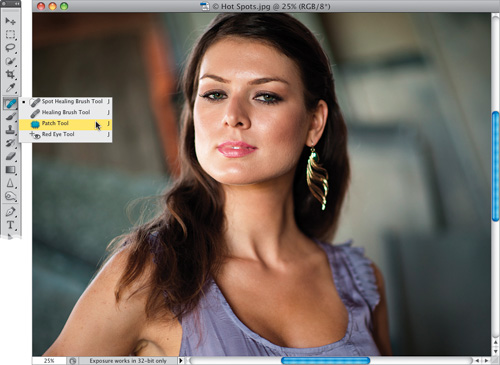
Removing Hot Spots
Hot spots are those shiny areas on your subject’s face that reflect the lighting and almost make their face look like they’re sweating. I try to fix these while we’re on the shoot, but one set of shots with them always seems to sneak through (unless I have a makeup artist on the set—they never let the models get shiny). If a few sneak into one of your sets, here’s how to quickly get rid of them:
Step One:
Here’s a shot of our subject, with hot spots on the bottom of her forehead, on her nose, her cheek on the right, and her chin. The Patch tool (shown here) works well with these larger repairs, but you can use the Healing Brush tool to do this, too. If you do, though, you have to remove the entire hot spot in just one stroke (you’ll see why in a minute).
Step Two:
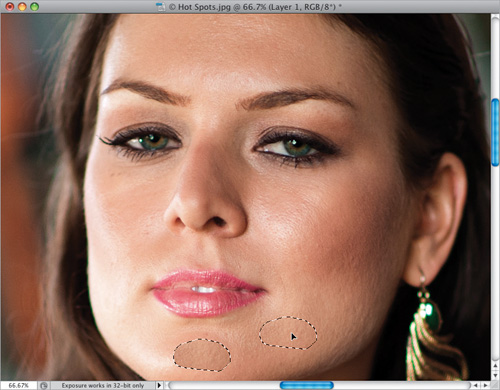
Zoom in on her face, then press Command-J (PC: Ctrl-J) to duplicate the Background layer—we’ll do all our patching on that layer. Take the Patch tool and draw a selection around the hot spot on her forehead (as shown here). The Patch tool works just like the Lasso tool for making selections, so you’ll feel pretty comfortable with it the first time you use it.
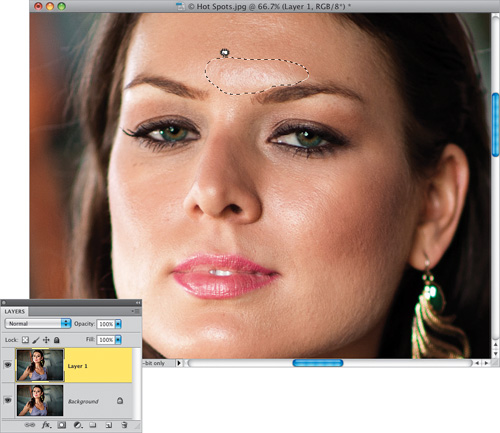
Step Three:
Now, click inside your selected area and drag that selection to a nearby area that has a similar texture (so, somewhere on the forehead), but isn’t shiny (as shown here). Release your mouse button (or remove your pen from the tablet surface), and your selection snaps back to its original position (over the hot spot), and your hot spot is gone. Sadly, so is the highlight, which we don’t want to lose—a nice highlight area adds dimension, so we don’t want it removed—we just want the amount of highlight lessened, so we’ll fix that in the next step. For now, whatever you do, don’t deselect (you need to keep your selection in place).
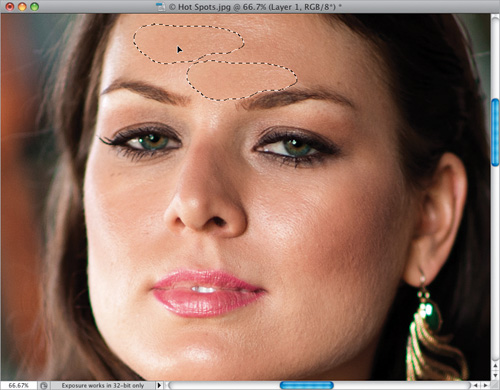
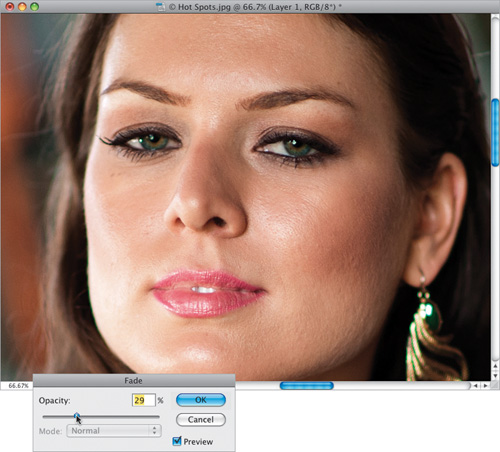
Step Four:
Press Command-H (PC: Ctrl-H) to hide your selection around the area where the hot spot used to be. Now, go under the Edit menu and choose Fade Patch Selection. This brings up the Fade dialog (shown here), which I like to think of as “Undo on a slider.” At 100%, you have the full effect of whatever you did last (in this case, you used the Patch tool to remove the hot spot, and everything else, on her forehead). If you lower the Opacity to 0%, it would all come back as if you never did anything. So, your job here is to lower the Fade Opacity amount until the highlight comes back, but you want to stop before the shininess comes back. In this case, 29% brought back the highlight we want, without the shiny stuff we don’t want. Click OK, and you’re done with that hot spot.
Step Five:
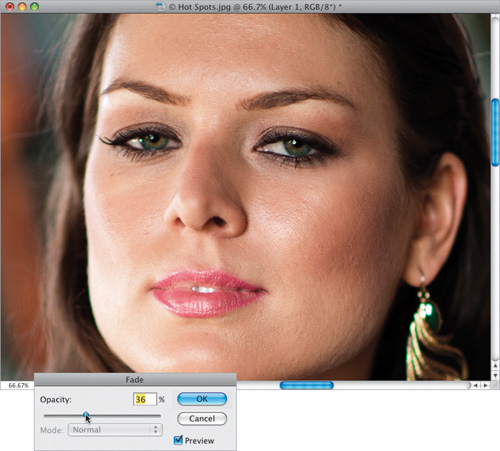
You’re going to continue this process on each of the other hot spots, and don’t be surprised if you use a different Fade Opacity amount for each one—just use your best judgment. Also, Fade only works on the very last thing you do, which is why immediately after you use the Patch tool, the very next thing you need to do is Fade it—the Fade command will disappear as soon as you do anything else (luckily, it doesn’t count the Command-H [Hide Selection] keyboard shortcut as a step). So, I always do it in this order: (1) remove the hot spot, (2) hide the selection, and then (3) go right to Fade and lower the Opacity. Now, select the hot spot on her chin (as shown here) and drag it to a nearby clean area with similar skin texture.
Step Six:
Hide the selection (so you can clearly see what you’re doing), then go under the Edit menu, choose Fade Patch Selection, and lower the Opacity until it looks about right (as shown here; for this hot spot, the amount that looked right to me was 36%). Remember, all your patching was done on a copy of the Background layer, so if you feel like the highlights all still look a little too dull, you can lower the Opacity of the layer a little bit and it will all back down proportionally. A before/after of the retouch is shown on the next page.
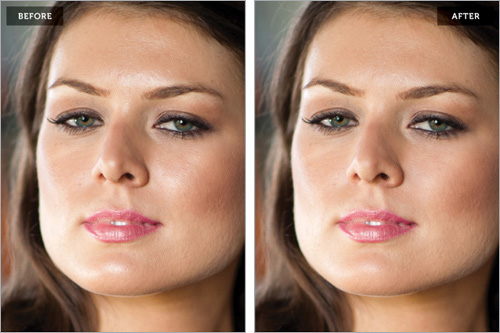
Download this image. See pg. xi.
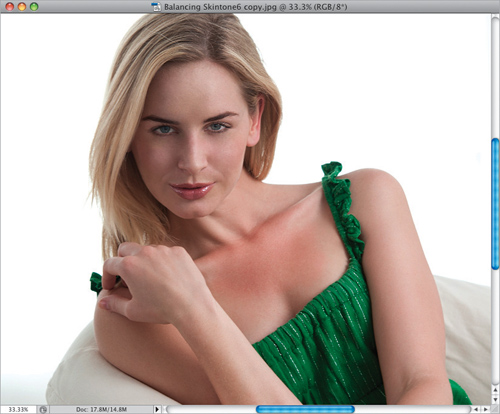
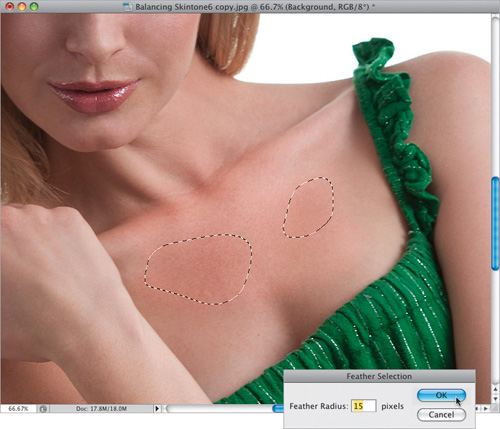
Balancing Skin Tones
You’re definitely going to run into situations where your subject has a patch of skin, maybe on their arm, or back, or leg, that is either brighter or darker than the surrounding skin. So, we should do a quick retouch to balance those areas before we start any kind of skin softening or smoothing. You don’t want to spend a lot of time on this, but if you can get the skin tones in these areas closer in just 60 or so seconds, it makes things easier down the road. Luckily, it’s a very quick and easy technique.
Step One:
Here’s the image we want to retouch, and if you look between our subject’s collarbone and her chest, you’ll see a large area of skin that’s darker than her surrounding skin. Ideally, we’d like to balance these areas of skin before we do any skin softening or enhancing.
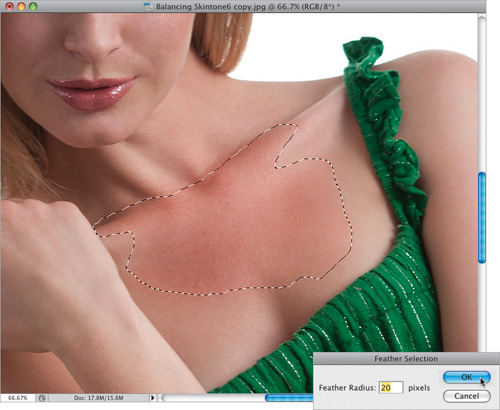
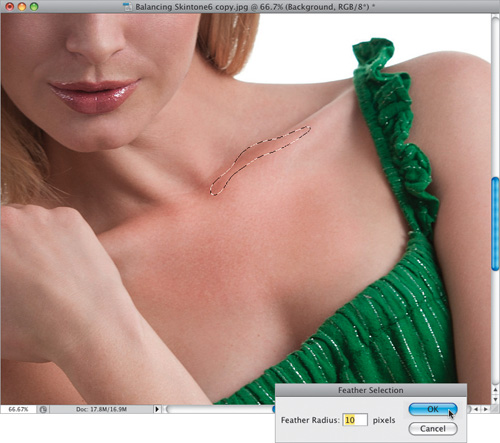
Step Two:
Get the Lasso tool (L) and trace right around that darker area (as shown here). Try to keep your selection pretty darn close to that area, but don’t spend a lot of time making it exactly perfect, because you’re going to add a huge feather to the edges that will make up for not having a perfect selection, but you should at least try to get close. Now, go under the Select menu, under Modify, and choose Feather. When the dialog appears, enter 10 pixels if you selected a smallish area, or 20 pixels if it’s a larger area, like the one we have here.
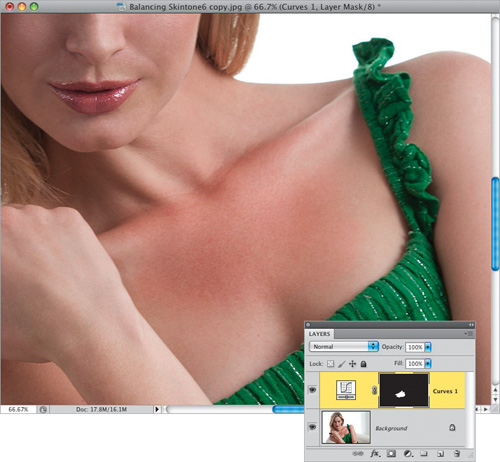
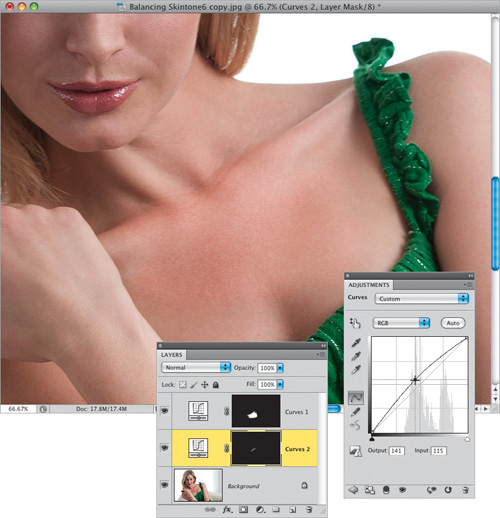
Step Three:
Now, click on the Create New Adjustment Layer icon at the bottom of the Layers panel and choose Curves from the pop-up menu. Notice that your selection is already masked out on the Curves adjustment layer mask.
Step Four:
Now, don’t worry, even if you’ve never used Curves before, you’ll be able to do this. You’re going to change the tone of these patches of skin (whether they’re too dark, like the ones shown here, or too bright, which is often the case) by adjusting the midtones. So, start by clicking once right on the center of the diagonal line in the Curves graph (shown circled here in red) in the Adjustments panel to add a point to the midtones area of the curve. So far, pretty easy, right? You just click once right in the middle of the line.
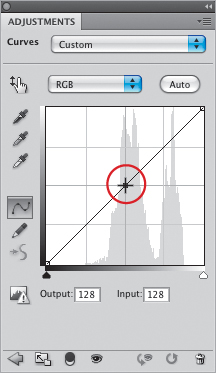
Step Five:
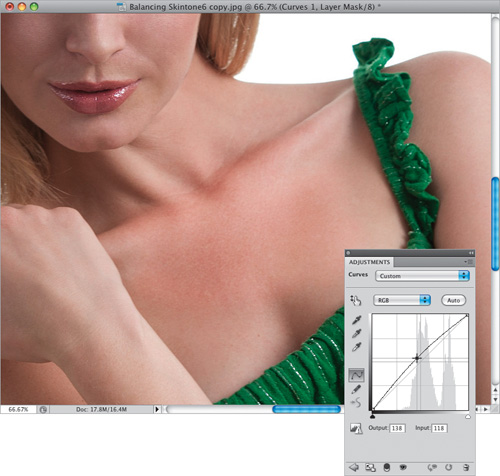
All you’re going to do now is drag that middle point diagonally up and to the left to brighten that whole darker area. Just drag a tiny little bit, keeping an eye on your selected area as you drag, and with just a little bit of dragging, you’ll be able to make that darker area of skin match the surrounding area (this is much easier than you’d think, so make sure you try it for yourself). Also, if the area had been brighter, instead of darker like it is here, you’d drag that center point diagonally down toward the bottom-right corner. Either way, this is usually a very small movement, and to know exactly how much to move, keep an eye on the area of skin you’re adjusting. Also, it sometimes helps to move the curve a lot—making it much brighter—and then pull it back down again to match (this is kind of like turning the focus ring on your lens so it goes way out of focus, and then turning it back the other way to snap it into sharp focus. By putting it way out of focus, it makes seeing when it’s in sharp focus that much easier. Same thing here).
Step Six:
Now that we’ve balanced that large area, if you wanted to take it a step further, I see two other remaining parts of that same general area that could use a little more balancing. So, first, in the Layers panel, click on the Background layer. One area is on the right side of her collarbone, so go ahead and trace it with the Lasso tool (as shown here), and then apply a 10-pixel feather. The reason we’re only using 10 pixels this time is because the size of the selected area is so much smaller.
Step Seven:
Add another Curves adjustment layer, click on the center of the Curve to add a point to the midtone area, and once again, drag up just a tiny bit until that darker area better matches the surrounding skin (as shown here). You can see, once again, it’s just a tiny move of that Curve.
Step Eight:
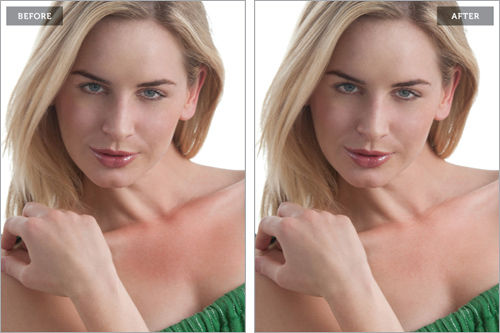
The last thing I might adjust is those remaining dark areas within that first large area we brightened. Click back on the Background layer, and trace around them with the Lasso tool (select the first area, then press-and-hold the Shift key, and select the second area), add a 15-pixel feather (for medium-sized areas), and add a Curves adjustment layer. Add a point to the center of the curve, and move it just a little bit up, once again, to brighten those areas. Just a reminder: This process should be pretty quick, and you won’t do it to every photo, just to ones where a darker or lighter area of skin really jumps out at you. A before and after is shown on the next page.
Download this image. See pg. xi.
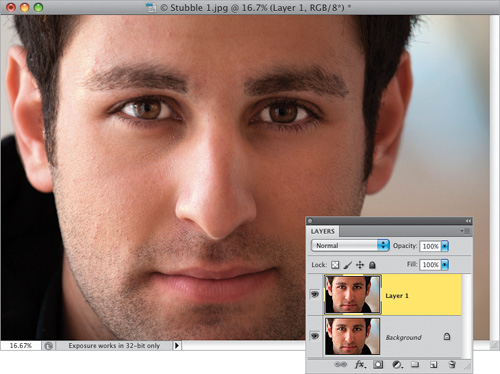
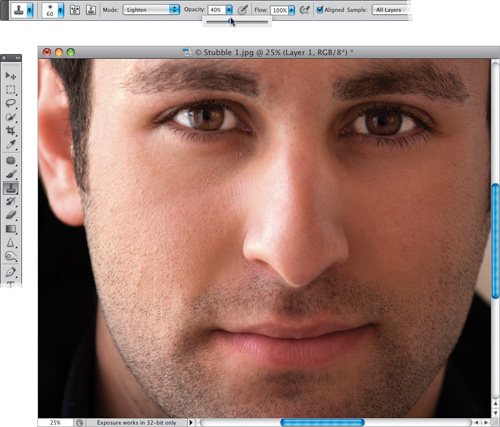
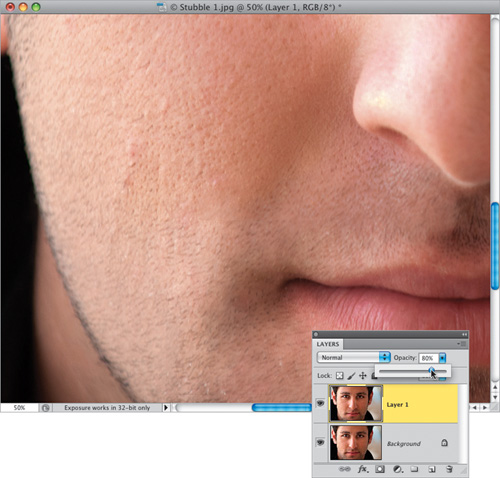
Reducing Stubble
This is a quick trick for getting rid of, or lessening, facial stubble. I’m not sure what else to say about it, but that one sentence alone just looked kinda lame, so please consider this extra sentence filler.
Step One:
Here’s the image we’re going to retouch, and you can see he has a one- or two-day growth going on. If you want to get rid of that, or reduce it, start by pressing Command-J (PC: Ctrl-J) to duplicate the Background layer.
Step Two:
Now, get the Clone Stamp tool (S), go up to the Options Bar, and change the Mode from Normal to Lighten, then lower the Opacity to 40% (as shown here). By changing the blend mode to Lighten, you’re telling the tool to only affect pixels that are darker than the area you’ve sampled (so when you sample a clean area of skin, it will only affect pixels darker than that clean area).
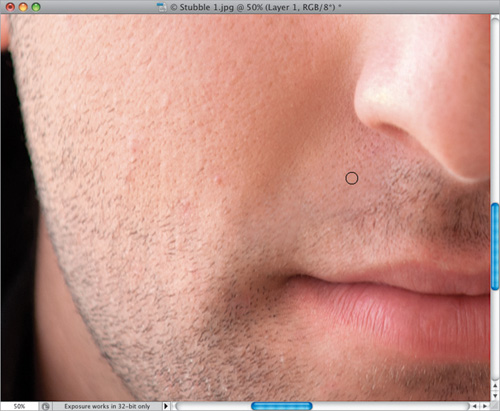
Step Three:
Get a small, soft-edged brush, press-and-hold the Option (PC: Alt) key, and click once in a clean area of skin nearby the area where you’re going to start “cleaning up.” Move your cursor over some of the stubble and start painting it away, following the contours of the stubble (in other words, clone in the direction the hairs are going).
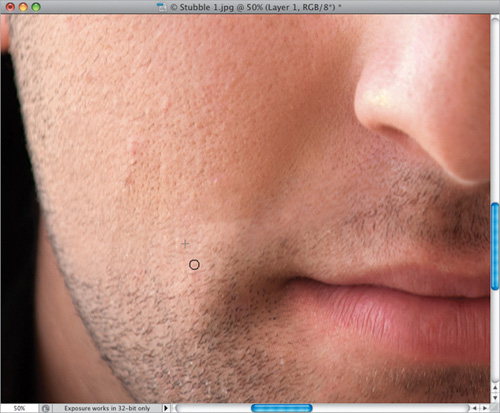
Step Four:
Continue your way around the face, and don’t forget to resample (Option-click on) different areas from time to time to keep things looking random. Also, resample any time you’re repairing a different area of the face, because the skin texture and tone may change. Here, I’ve gone down the side of his face, and part of the side of his stubbly mustache.
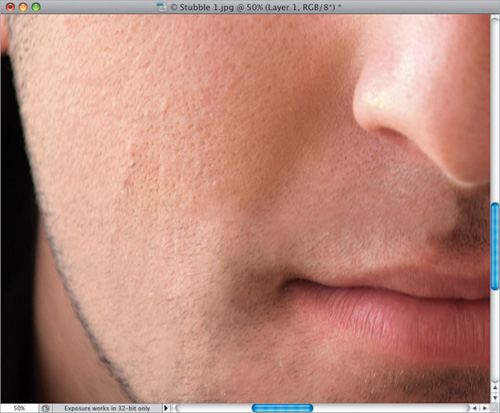
Step Five:
Here’s what it looks like after about a five-minute cloning job (so it could use a little more work, but you get the idea). You can still see plenty of original skin texture using this technique, which is why I prefer it to just blurring it all away.
Step Six:
If it looks a little too clean for you, just go to the Layers panel and lower the Opacity to bring a tiny bit of the original stubble back from the Background layer (here, I lowered the Opacity to 80% and I think it looks clean, but a bit more natural).
Download this image. See pg. xi.
Tip
When the whiskers are lighter than the skin, because of their color or how the light hits them, you’ll need to change the Mode of the Clone Stamp tool to Darken (instead of Lighten) to affect them.
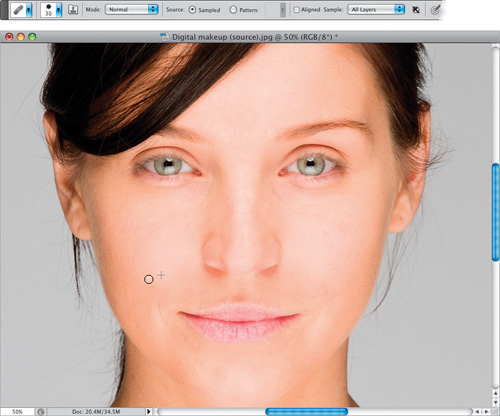
Applying Digital Makeup
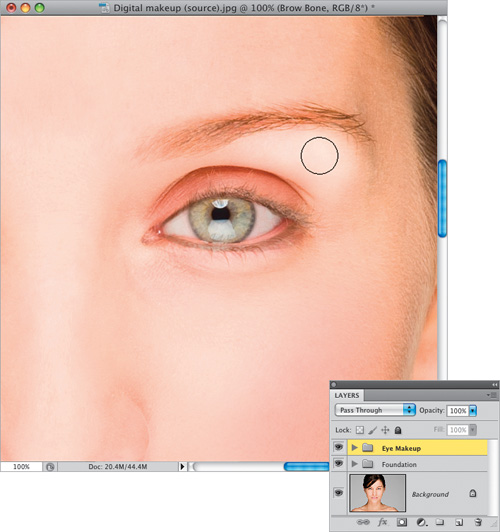
Professional makeup artists are worth their weight in gold during a shoot, and I hire one every time I can, because they are miracle workers (and they make our retouching jobs dramatically easier). What I’m going to show you here won’t replace using an MUA, but if you need to touch up, add, or enhance makeup, you’ll find this really helpful. We’re starting from scratch on a face with no makeup at all, and going through the whole process. A big thanks to professional MUA Shelley Giard for guiding me through how she applies makeup in the real world, and to and my friend and brush master, Corey Barker, for his help and input.
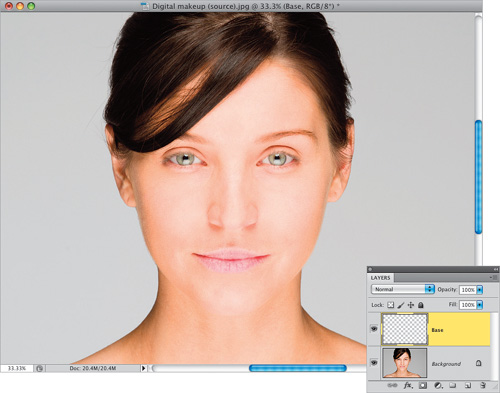
Step One:
Here’s the image we’re going to apply digital makeup to—we asked our model not to wear any makeup for this shoot, so we could apply it all from scratch. Of course, we start by removing any major blemishes or wrinkles first, before we add any makeup, so let’s do that first using the Healing Brush tool (press Shift-J until you have it), and the technique for removing blemishes you learned on page 86. Also, she has a couple of stray hairs crossing onto her face, so go ahead and get rid of them, too, using the Healing Brush (that one hair going right over her eye was a pain. You’ll have to switch to the Clone Stamp tool [S] with a really small brush for that one). If those stray hairs on the side of her face are distracting you (they are me), you can get rid of those, too, using the technique on page 196. Also, since we’re going to be applying eye makeup before long, you might want to remove any red eye veins (page 32).
Step Two:
Ahhhh, that’s better. It could still use a lot of retouching work (like filling in that gap in her hair, for one), but at least the main distracting stuff is out of the way. Start by clicking the Create a New Layer icon to add a new blank layer, and name it “Base” (as seen here). We’re going to use this layer to balance out the skin tones, and make the skin look even (from a makeup point of view, anyway). Next, we’ll set up our brush for painting the Base layer.
Step Three:
Get the Brush tool (B), choose a large-sized, soft-edged brush, then go up to the Options Bar and lower the Opacity to 10%, so the strokes you make build up, one on top of another. Now you’re going to press-and-hold the Option (PC: Alt) key to temporarily switch to the Eye-dropper tool, and click once on a bright area of skin (as shown here) to make that your Foreground color. Release the Option key to return to the Brush tool.

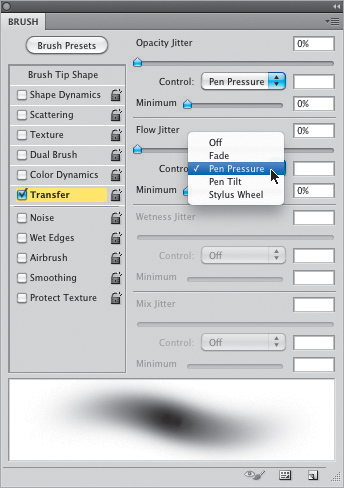
Note: If you’re using a Wacom tablet, this works great using pressure sensitivity: click on the Brush panel icon next to the Brush icon in the Options Bar to open the Brush panel, click on Transfer in the list on the left, then from the Flow Jitter and Opacity Jitter pop-up menus, choose Pen Pressure (as shown here). Then set your Opacity in the Options Bar to 100%, because now you’re controlling both the flow and opacity with how hard you press down on the tablet with your pen—in this case, you’ll press down very softly.
Step Four:
Now you’re going to lightly build up color over the areas of her face that are white, so the skin tone looks even (don’t worry, we’re going to highlight and contour the bone structure in a minute). If you’re using a tablet, press lightly and build up your strokes. If you’re not, your brush is already set at 10% opacity and you’ll see a similar type of buildup. Here, I’m painting on both cheeks, down the top of her nose, on the white areas on her forehead, on her chin, on either side of her nose, kinda below her eyes (as seen here), and basically any area that looks whiter than the rest, you’re going to tone using that flesh-tone color. If you toggle on/off this Base layer (by clicking on the Eye icon to the left of the layer in the Layers panel), you’ll see the difference this buildup made. Of course, since you did this buildup on a separate layer, if it looks too intense (you think you built up too many strokes), you can just lower the opacity until it looks right to you.

Step Five:
It’s time to add some contouring, and we’ll start by defining her cheekbones. Create a new blank layer (name it “Dark Contour”), change its blend mode to Multiply (so strokes made on this layer darken that part of the image), then use the same temporary Eyedropper tip you learned earlier to sample the darker skin tone from her shadow areas (as shown here).
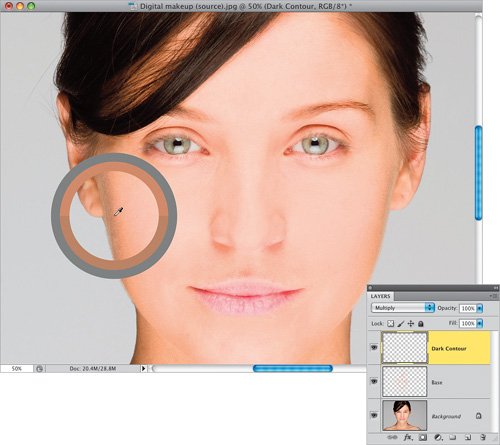
Step Six:
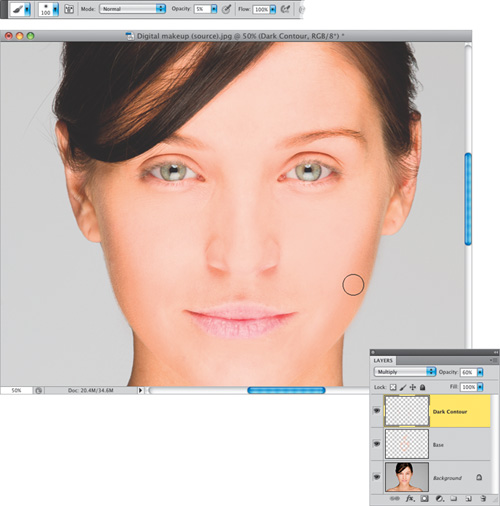
You’re going to darken beneath her cheekbone, so use the same Brush tool, but you might want to lower the Opacity setting to around 5% for this step, because those dark strokes are really going to jump out at you. Now, take your brush and lightly paint strokes from top to bottom in that shadow area, following the same lines, almost down to her jaw, and building up as you go, painting over the same stroke a few times. Again, you’re on a separate layer, so if it looks too dark when you’re done, you can lower the layer’s Opacity (here, I lowered mine to 60%).
Step Seven:
Next we’ll add some highlighting, so add a new layer, name it “Light Contour,” change its blend mode to Screen (so our paint strokes on this layer get brighter), then increase your brush’s Opacity back to 10%. Now, sample a bright area of her skin using the Eyedropper tool (I chose a bright area right on her cheek), and then paint a stroke like the bottom half of a donut under both eyes (Mmmm. Donut). Also paint a few strokes right down the center of the nose, a little right under the nose, and on the front of the chin (basically, anything that protrudes forward from the face). If it’s too bright, lower the layer’s Opacity a little (I lowered mine to 79% here). Add another new layer, name this one “Blush,” and change its blend mode to Multiply.

Step Eight:
Now you’ll need to choose a color for your blush. Click on the Foreground color swatch (at the bottom of the Tool-box) to bring up the Color Picker. In this case, we’re going to use a pinkish flesh tone (if you want the same settings I used here, type this in the RGB fields: R=226, G=165, B=159). We added dark contouring under the cheekbones back in Step Six, but now you’re going to accentuate the cheekbones themselves. Start by lowering your brush’s Opacity to 5%, then begin painting light strokes, and building up gradually over the cheekbone (as shown here) using this pinkish flesh tone color. Again, if it looks too intense, lower the layer’s Opacity. Once you’re done, in the Layers panel, Command-click (PC: Ctrl-click) on all these makeup layers to select them, then choose New Group From Layers from the panel’s flyout menu to combine these into a layer group. Name it “Foundation.” If the whole thing looks too intense, lower the Opacity of this group (I lowered mine to 70%).

Step Nine:
Now let’s work on the eyes (of course, I would fill in and darken the eyebrows, but I covered that back on pages 76, and 80). We’ll start with applying eye shadow (we’re going to do a casual daytime eye shadow look). Create a new blank layer, name it “Eye Shadow,” and change its blend mode to Multiply. You’re going to use the same brush settings, and same pinkish flesh-tone hue, as we did for the blush in the last step. Before we start painting, zoom in on one of the eyes.
Step 10:
Shrink the size of your brush, and then begin lightly painting over the eyelid to bring in the color (as shown here). By the way, don’t forget to do both eyes. Next, we’ll add some eyeliner to give the impression of darker and thicker lashes (again, just remember—this is digital makeup. If we want to add thicker lashes, we can use the technique on page 57).
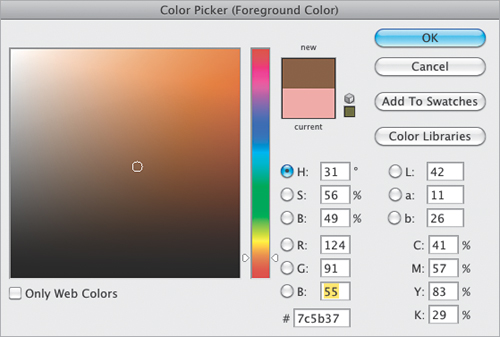
Step 11:
Create a new blank layer, change its blend mode to Multiply, and name it “Eyeliner.” You’re going to use the same brush settings again, but you’re going to need to click on the Foreground Color swatch and, in the Color Picker, change your color to a dark brown (I used: R=124, G=91, B=55 here). Shrink the size of your brush so it’s very small (I used just a 5-pixel, soft-edged brush here), but you need to make the brush a little bit harder, so increase the Hardness amount (in the Brush Picker up in the Options Bar) to around 20%. Now, trace right along the upper lash line to darken it. Start at the inner corner and continue out to the end of the eye (as shown here). Do the same thing on the bottom lash line, as well—painting right along the line where the lashes meet the eyelid. Don’t forget the other eye.
Step 12:
Now you’re going to highlight the brow bone, which opens up the eyes a bit. Create a new blank layer, change its blend mode to Screen, and name this layer “Brow Bone.” You’re going to use the same brush settings, but make the brush size quite a bit larger, and set the Hardness amount back to 0%, so the brush is really soft. Use the Eyedropper to sample a bright area of skin right under her eyebrow, then paint a few strokes over the brow bone area to build that up a bit with a brighter tone (it’s brighter because the layer is in Screen mode), then do around the tear duct area, as well. Again, if it seems too bright, just lower the layer’s Opacity a bit. Once you do both eyes, go to the Layers panel, select all those eye makeup layers, put them into a layer group, and name it “Eye Makeup.”
Step 13:
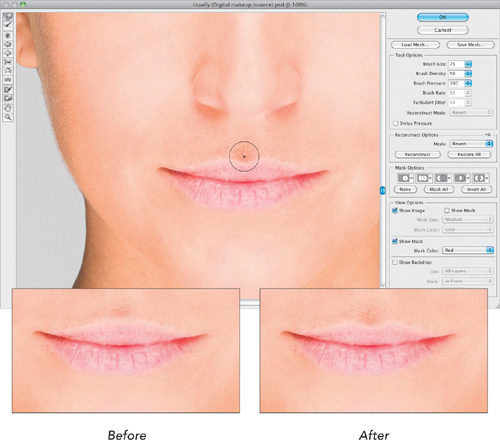
Now, let’s work on the lips. We’re going to smooth out the lips, then add in some color, but before we do that, for this particular image, we’re actually going to insert a small retouch (so we’re going to step aside from applying makeup for just a moment). We’re going to create the missing center dip in her top lip. Start by clicking on the Background layer. Now, go under the Filter menu and choose Liquify. Next, get the Forward Warp tool (W), and then push the top center of her lip down just a tiny bit to make an indent. Push it down so it creates a subtle shape of a “V” (as shown in the After here), then click OK to lock in your retouch. Okay, back to makeup.
Step 14:
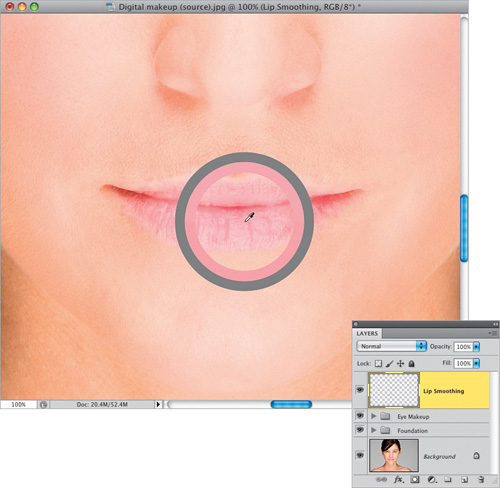
Before we add color, to keep the lips from looking too dry, we’re going to smooth out some of the rough areas a bit. In the Layers panel, click on the Eye Makeup group at the top, then create a new blank layer above it, and name it “Lip Smoothing.” You’re going to use the same brush settings, but you want to use the lip color, so press-and-hold the Option (PC: Alt) key to get the Eye-dropper tool, and click on the existing lip color (as shown here) to make it your Foreground color, then paint over the lips a bit, building up tone, until it starts to smooth those rough edges.
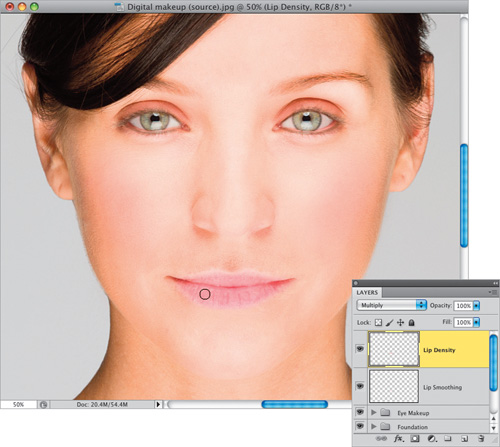
Step 15:
Now we’re going to darken the density of the lips. Create a new blank layer (name it “Lip Density”), and change its blend mode to Multiply. You can use the sample color you already have, because it will automatically appear darker since you’re on a Multiply layer. Now, begin painting over the lips to darken them (as shown here).
Step 16:
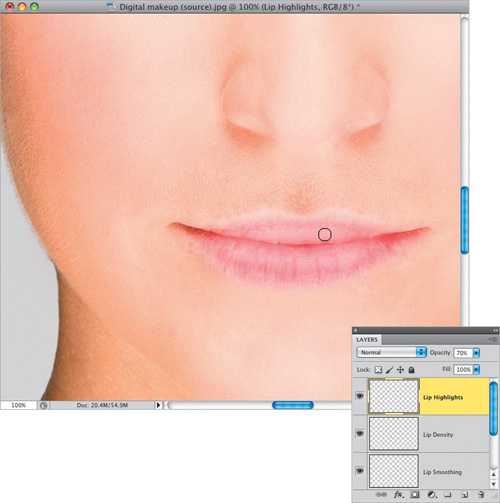
It’s time to add some highlights back into the lips. Create a new blank layer (name it “Lip Highlights”). Press D, then X to set your Foreground color to white, keep your brush size about the same, and use the same brush settings we’ve been using. Now, you’re going to paint some horizontal strokes over the middle center of the top and bottom lips, kind of in an arc, following the contour of the lips, to add a highlight area. It’ll probably be too bright, but that’s okay, you can tone it down after the fact by lowering the Opacity setting of the layer.
Step 17:
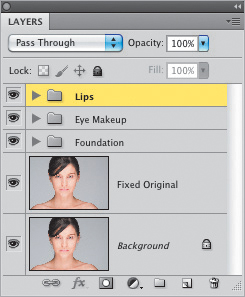
Lastly, just to keep things organized, I would go to the Layers panel, select all those lip layers, put them into a layer group, and name it simply “Lips.”
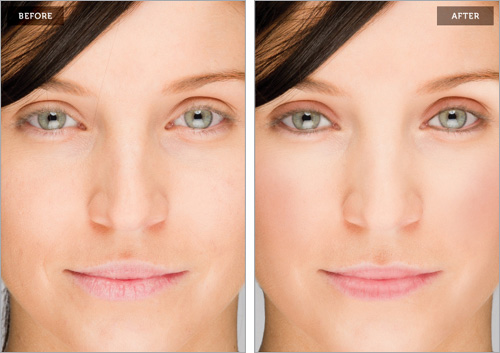
Download this image. See pg. xi.
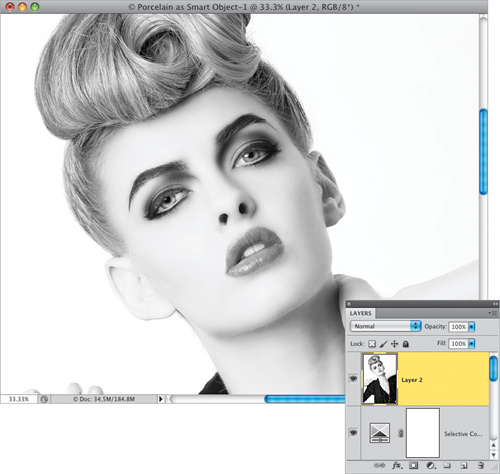
Creating Porcelain-Looking Skin
In this technique, you actually turn the skin white (then I wipe out all the skin texture, and add a few other tweaks). I used to use a series of screen layers, and another popular technique had you using the Diffuse Glow filter, but now I use a trick I picked up from my friend, German retoucher Calvin Hollywood, where now turning the skin porcelain white takes just two sliders and five seconds. Of course, we do other stuff, too, but at least the white skin part is now incredibly simple.
Step One:
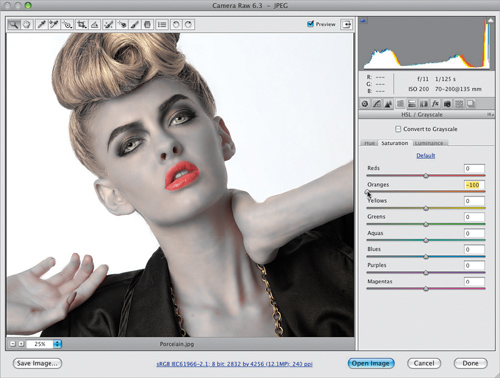
Here’s the image we’re going to convert to a porcelain skin look. You’re going to need to do the main part of this in either Photoshop’s Camera Raw or Lightroom’s Develop module, because you need the Oranges slider in the HSL panel that doesn’t appear in Photoshop’s normal Hue/Saturation feature. So, start by opening your image in Camera Raw. (By the way, it does not have to be a RAW image to open it in Camera Raw—Camera Raw in CS5 supports TIFFs, JPEGs, and even PSDs. To open an image in Camera Raw from Bridge, just click on it and press Command-R [PC: Ctrl-R]. To open it using the regular Photoshop Open [PC: Open As] dialog, just select the photo, then from the Format [PC: Open As] pop-up menu, choose Camera Raw.)

Step Two:
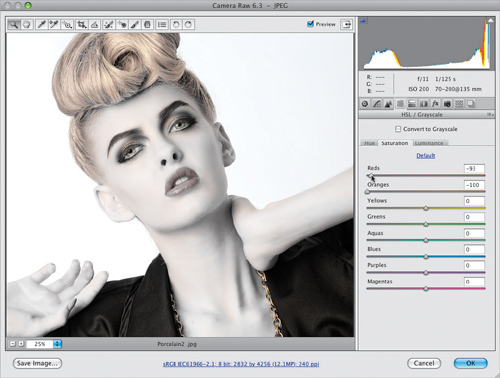
Once your image is open in Camera Raw, click on the HSL/Grayscale icon, then click on the Saturation tab (or scroll down to the HSL/Color/B&W panel in Lightroom’s Develop module and click on HSL, then click on Saturation). Drag the Oranges slider all the way to the left (as shown here). Depending on the image, you may not need to drag it all the way, but for this image, I took it all the way to the left. At this point, her skin doesn’t look white, it looks kind of gray, so we’ll fix that next. But one of the things it does do well is it keeps the color in the eyes and lips, which we’ll need later.
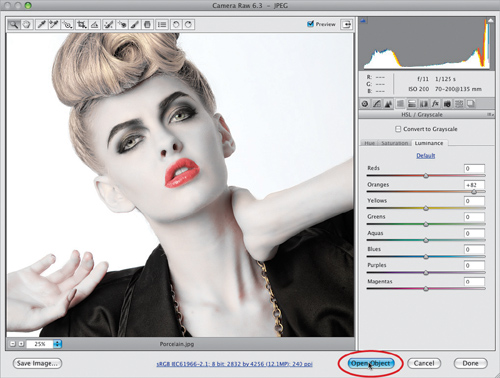
Step Three:
Next, click on the Luminance tab, drag the Oranges slider to the right (as shown here, where I dragged to +82), and the skin turns white. Now, if you look closely, there’s still some red left under her eyes, around the top of her ears, and on her neck and hands, so we’ll have to do a little adjusting to this particular image that you probably won’t always have to do. Here, we need to get rid of those areas. Also, I want to be able to bring back some of her original hair color. The trick to do this is to open the image in Photoshop as a Smart Object. That way, we can return to the Camera Raw dialog any time by just double-clicking on the layer’s thumbnail. So, press-and-hold the Shift key and the blue Open Image button will change to Open Object (shown circled here in red). Clicking it will open your image as a Smart Object.
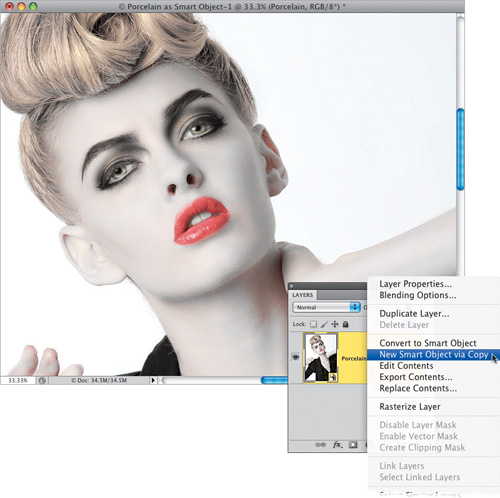
Step Four:
Here’s the image opened in Photoshop as a Smart Object. I need to make a duplicate of this Smart Object layer, so I can return to Camera Raw’s HSL/Grayscale panel and remove the extra red areas, but I need to do that without disturbing the original layer. There’s a weird thing about Smart Object layers: if you just duplicate the layer like usual, the new layer is linked to the original layer, so any changes you make to this duplicate layer are also automatically applied to the original layer. We need to break this link, so we can edit them individually (which is one of the big benefits of Smart Objects). To make a copy and break that link, just Right-click directly on the Smart Object layer in the Layers panel, and choose New Smart Object via Copy from the pop-up menu, as shown here.
Step Five:
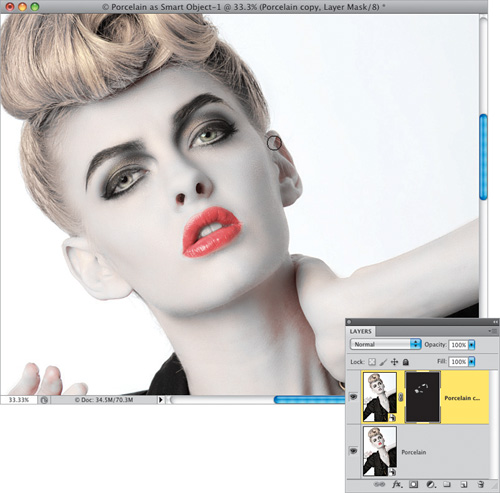
Now that you have a duplicate Smart Object layer, you can edit it separately. Double-click on its layer thumbnail and the image opens in Camera Raw. Go to the HSL/Grayscale panel, click on the Saturation tab, and drag the Reds to the left until the red leaves the area under her eyes, on her ears, and so on (as shown here, where I dragged to −93). Now, click OK to apply these changes to just this single layer.
Step Six:
Press-and-hold the Option (PC: Alt) key and click on the Add Layer Mask icon at the bottom of the Layers panel to hide this layer behind a black mask. Now, press D to set your Foreground color to white, get the Brush tool (B), choose a medium-sized, soft-edged brush from the Brush Picker, and paint over the reddish areas to remove them (as shown here).
Step Seven:
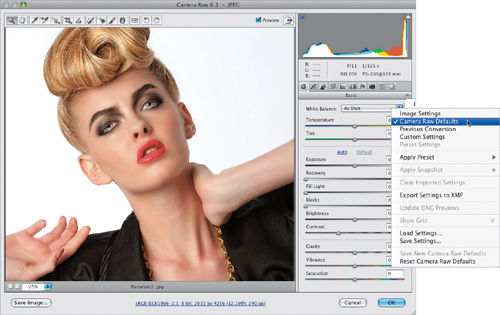
Now, let’s duplicate the original background layer, so we can bring back some of the original color. In the Layers panel, Right-click on the bottom Smart Object layer, then choose New Smart Object via Copy from the pop-up menu. Drag this duplicate layer to the top of the layer stack (so it’s the top layer in the Layers panel), and double-click on the thumbnail to open it in Camera Raw. Next, from Camera Raw’s flyout menu (at the top-right corner of the Panel area), choose Camera Raw Defaults (as shown here) to reset the image to how it looked when you first opened it. If you did some tweaking to the image before we started this, you can do that again now, but we’re just going to use this to get her hair color back, so if that looks okay to you, just click OK.
Step Eight:
Add a black layer mask to this layer, too, and paint in white over her hair to reveal its original color. I know it’s a bit much at this point, but we’re going to back off the intensity in a moment, so for now just paint it back in. You might have to decrease the size of your brush quite a bit to paint over some of those areas where there’s just a little bit of hair extending down onto her skin. It doesn’t have to be perfect, because it won’t be nearly as dark in just a moment, and it won’t stand out as severely.
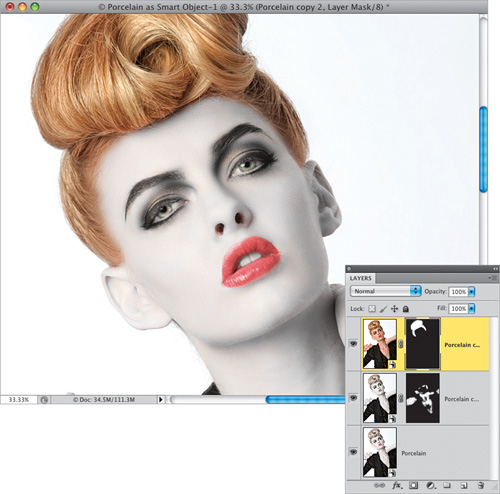
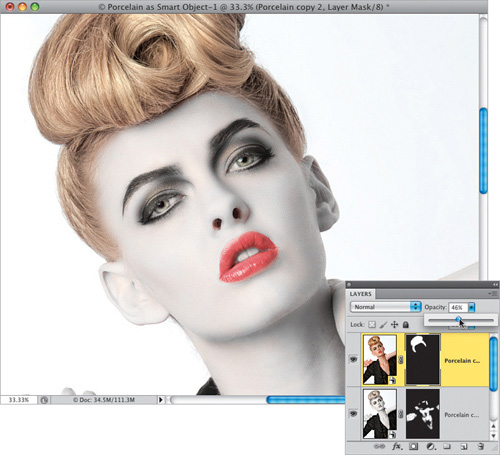
Step Nine:
Go and lower the Opacity of this layer, so the original color doesn’t overwhelm the rest of the image (as shown here, where I lowered mine to 46%).
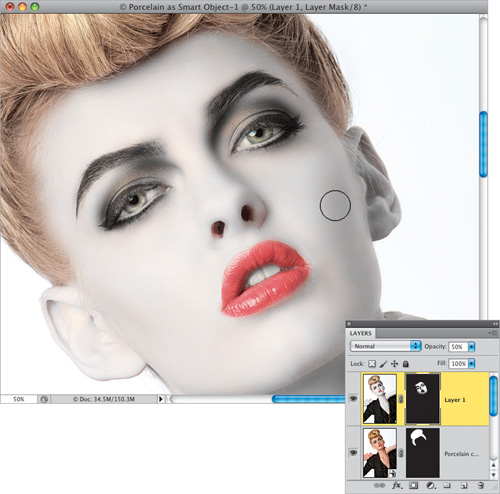
Step 10:
Now, we’re going to make a merged layer (a layer that looks like a flattened version of our image), so press Command-Option-Shift-E (PC: Ctrl-Alt-Shift-E) and it creates a new layer on top of the layer stack (as seen here). Next, we’re going to do something very different than we do in other parts of this chapter. You see, here, we’re not concerned with keeping skin texture. In fact, we’re going to remove all of it. You can blur the skin (as I’m doing here, using the “Quickie” method you learned earlier in this chapter), or use the Healing Brush tool to remove pores, or use whichever horribly destructive technique you like to remove the texture and replace it with smooth, porcelain-like skin.
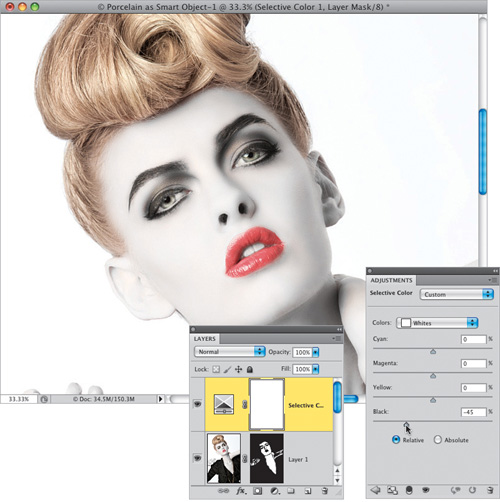
Step 11:
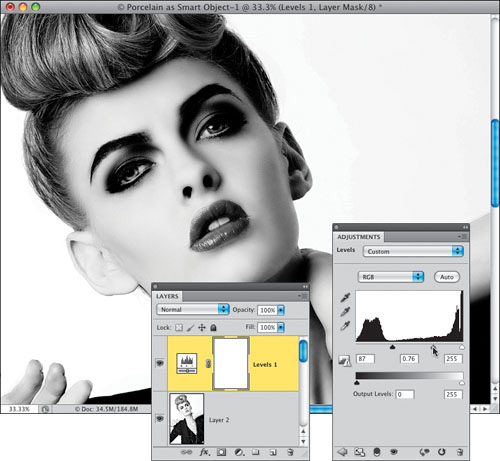
If you want really, really white skin, you can tweak this a little bit more to really white it out. Click on the Create New Adjustment Layer icon at the bottom of the Layers panel, choose Selective Color from the pop-up menu, then in the Adjustments panel, switch the Colors pop-up menu to Whites. Now, drag the Black slider to the left and you get mega-white (as seen here, where I dragged to −45).
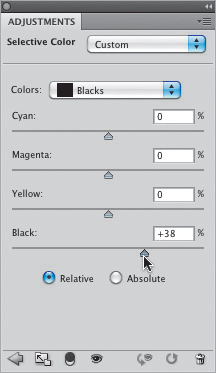
Tip: Make the Lips Really Red
If you want to make the lips really red here, you can add a Selective Color adjustment layer and choose Blacks from the Colors pop-up menu, then drag the Black slider to the right. That really saturates the red in the lips.
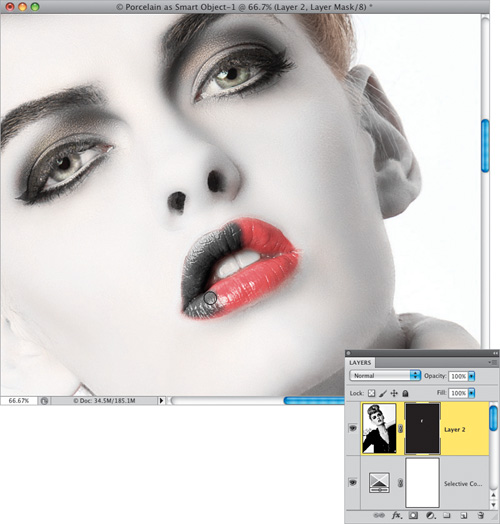
Step 12:
We’re actually going to change her lip color to a dark, almost black, silver look, that better matches the look (for this photo, anyway). Start by making another merged layer and remove the color from this layer by pressing Command-Shift-U (PC: Ctrl-Shift-U), which is the keyboard shortcut for Desaturate. This removed all the color, but it didn’t do much for making her lips dark silver, so we’ll fix that next.
Step 13:
We’re going to use a very simple move to darken her lips. Choose Levels from the Create New Adjustment Layer pop-up menu, and when the Levels options appear in the Adjustments panel, move the shadows Input Levels slider (the black one on the left underneath the histogram) to the right quite a bit to fill in the shadows, and then move the midtones Input Levels slider (the gray one in the middle) to the right, as well. It trashes the rest of the image, but we’re only worried about the lips, which look pretty good at this point. Press Command-E (PC: Ctrl-E) to merge this Levels adjustment layer with your desaturated layer right below it, so they’re just one layer (but the image will look exactly the same).
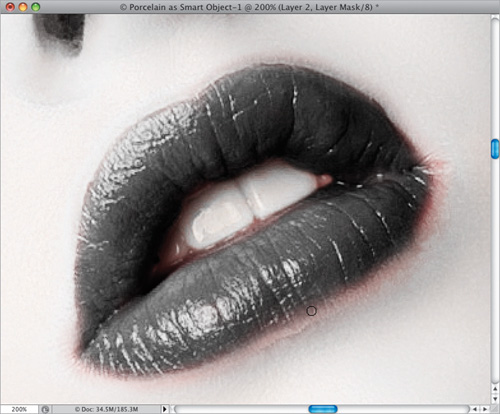
Step 14:
Option-click (PC: Alt-click) on the Add Layer Mask icon to hide this darker layer behind a black mask (as seen here). Then, get the Brush tool, choose a small, soft-edged brush, and with its Opacity set at 100%, set your Foreground color to white and start carefully painting over the lips (as seen here) to bring in the darker color.
Step 15:
There’s a lot of lipstick bleed along the edges of the lips, so lower the Opacity of your brush quite a bit and paint along those areas just outside the lips that are still a little red. Since the skin around it is white, you don’t have a lot to worry about, but just be reasonably careful and paint over those red areas with your low-opacity brush until they’re all gone. Although there are a lot of steps in this technique, it takes just a few minutes, so don’t let that throw you off—it’s easy and quick. A before/after of the retouch is shown on the next page.
Download this image. See pg. xi.
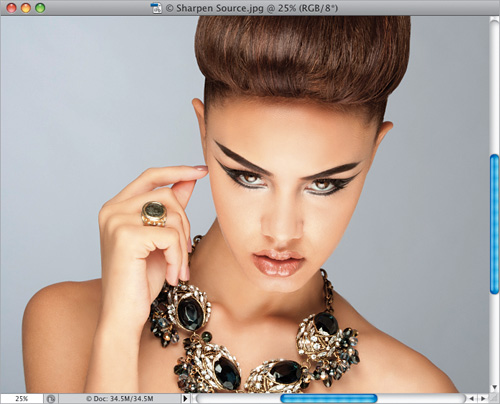
Sharpening Portraits
In most cases, sharpening a guy’s skin is easy, because nice, sharp skin texture usually looks pretty good on guys. However, when sharpening a woman’s skin, we want to avoid sharpening the existing skin texture as much as possible, and instead have our sharpening just affect the detail areas, like the eyes, eyebrows, mouth, etc. Here are three great ways to do just that: one that’s super-quick and does a pretty good job, one that takes a bit of time and effort, but you’re guaranteed to have the sharpening only where you want it, and a third in Camera Raw.
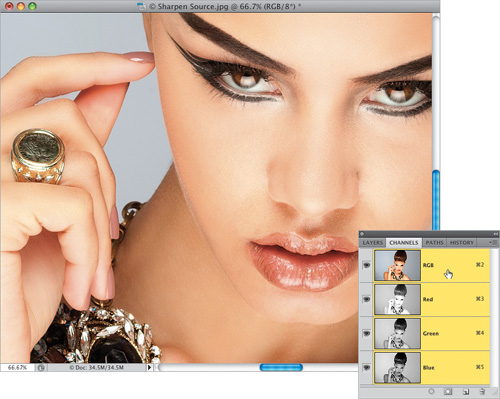
Step One:
Here’s the image we’re going to sharpen (the cover shot of this book), and we’ll start with the quick and easy version (and the one you’ll probably use the most), which has you targeting just the Red (of the RGB—Red, Green, Blue) color channel, and then applying your sharpening there, because there’s so little skin texture on the Red channel (as you’ll see). But, first, let’s look at the other channels, so you’ll see precisely why we choose the Red channel to hold our sharpening.
Step Two:
Go to the Channels panel (if it’s not open, go under the Window menu and choose Channels), and click on the Blue channel (as shown here). I zoomed in a bit so you can get a clear look at the skin texture, and you can see there’s plenty of it. This is the last place you’d want to sharpen, because you’d be sharpening the skin texture big time.
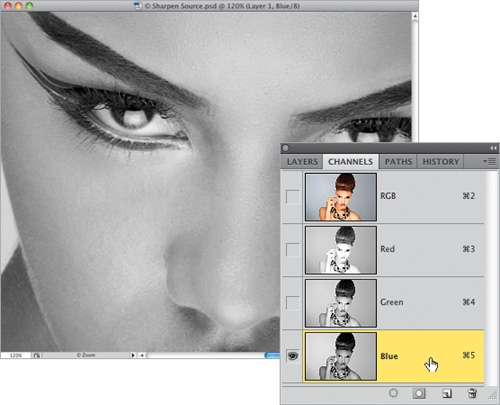
Step Three:
Next, try clicking on the Green channel (which doesn’t make a bad black-and-white conversion), and while there’s less skin texture here, there’s still a pretty decent amount. Since our goal is to sidestep all that texture, the Green channel wouldn’t be a good choice.
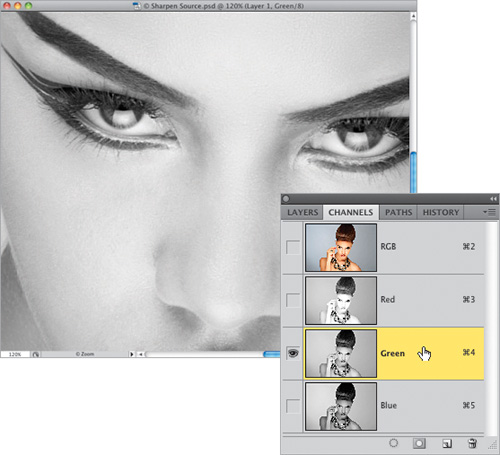
Step Four:
Click on the Red channel, and look at the image now. Basically, what’s on this channel is all the detail areas, like her eyes, eyebrows, lips, and hair—the very stuff you want to sharpen. But if you look at her skin, there’s very little texture or detail there at all, which is why this is a great place to sharpen photos of women. So, now that you’re on the Red channel, go under the Filter menu, under Sharpen, and choose Unsharp Mask. When the filter dialog comes up, enter your favorite settings. I generally use Amount: 120%, Radius: 1.0, and Threshold: 0 when sharpening on the Red channel like this.
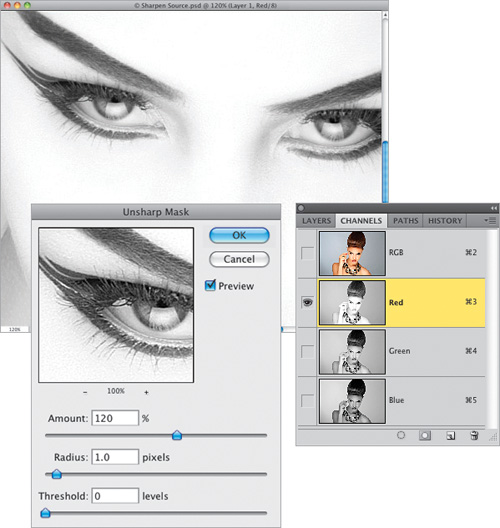
Step Five:
Click OK to apply the Unsharp Mask filter to the Red channel, then in the Channels panel, click back on the RGB channel (as shown here) to return to the full-color image (as seen here). Look at the eyes, lips, even the jewelry—they all look sharper, yet we avoided applying a lot of sharpening to her skin. Plus, the big advantage of this technique is that you can record an action for it (see page xxii), which will totally automate this process for you, so it’s down to just one click, and five seconds later—it’s done.
Step Six:
The second method takes more time and effort on your part, but with this method, you get the sharpening exactly—and only—where you want it. The first part of this sharpening method is also the method I use for sharpening men’s skin (I’ll tell you where to stop in Step Seven). Start by going under the Image menu, under Mode, and choosing Lab Color, then press Command-J (PC: Ctrl-J) to duplicate the Background layer. This converts your RGB image to Lab Color mode, and while your Channels panel definitely looks different, it doesn’t change the look of your image, or do any damage to it. Basically, it separates the color in your image from the detail in it, putting all the color in the “a” and “b” channels, and leaving the detail in the Lightness channel. In the Channels panel, click on that Lightness channel, then apply your sharpening. I bumped up my Unsharp Mask settings here quite a bit (to Amount: 81%, Radius: 1.5, and Threshold: 0), so you can really see a clear difference between what you see in the filter’s preview window, and what you see in the image itself.
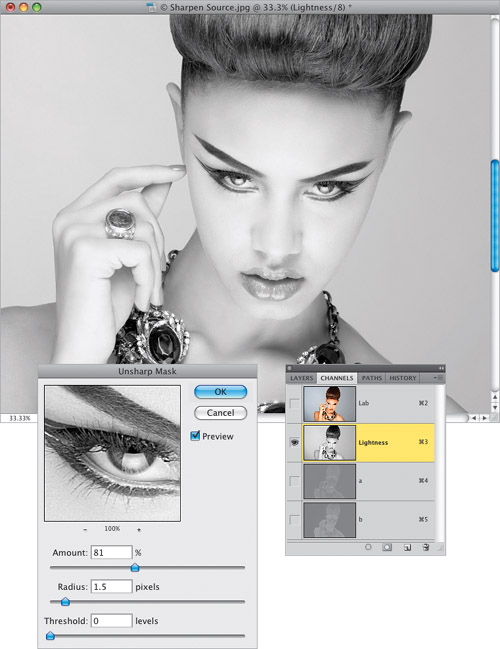
Step Seven:
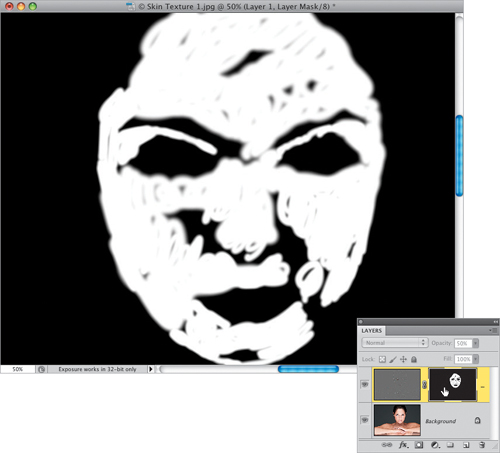
Go back under the Image menu, under Mode, and choose RGB Color to return to RGB mode. When the warning dialog appears, choose Don’t Flatten. Now, if we were sharpening a man’s skin, we’d be done, and you can end the sharpening process here (at the beginning of Step Seven). However, if you’re sharpening a woman’s skin, you’ll need to do some more work. So, press-and-hold the Option (PC: Alt) key and click on the Add Layer Mask icon at the bottom of the Layers panel to hide this super-sharpened version of your image behind a black mask (as seen here). Then, press D to set your Foreground color to white, get the Brush tool (B), choose a small, soft-edged brush at 100% Opacity, and paint over all the areas that you want sharpened in your image (for example, the eyebrows, eyes, eyelashes, mouth, edges of the nostril openings, hair, jewelry, fingernails, and so on). So, this method does take some time, but you get exactly what you want sharpened, and you completely avoid the skin.
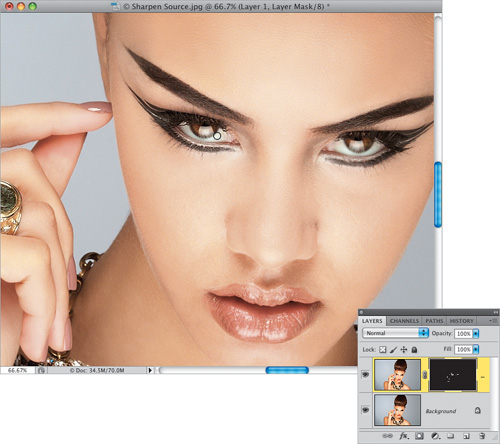
Step Eight:
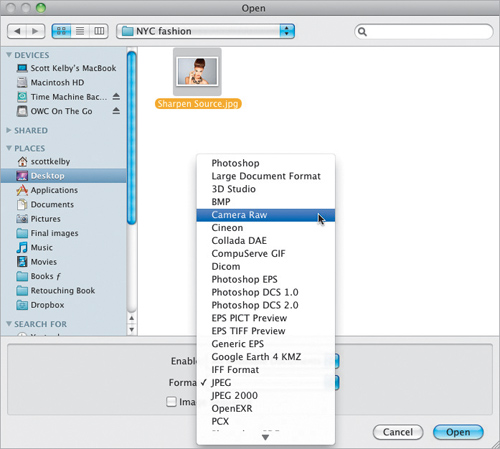
The third way to sharpen a woman’s skin is to open the image in Photoshop’s Camera Raw, and use its pretty darn brilliant built-in sharpening masking there. To do that, go under Photoshop’s File menu and choose Open (PC: Open As), and in the dialog, click on the JPEG, TIFF, or PSD image you want to sharpen, and then from the Format (PC: Open As) pop-up menu at the bottom, choose Camera Raw (as shown here) and click the Open button.
Step Nine:
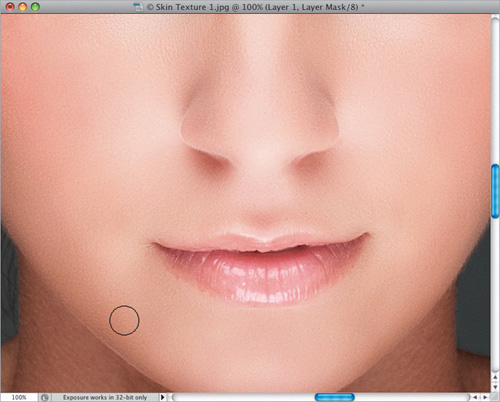
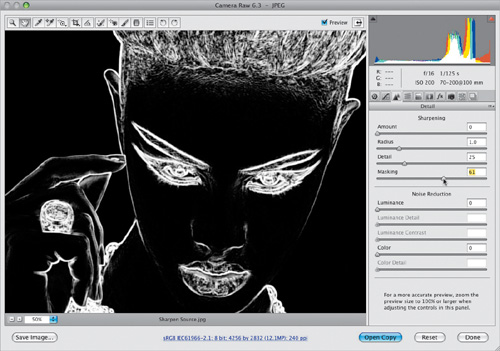
When your image opens in Camera Raw, click on the Detail icon to open the Detail panel, and you’ll see four Sharpening sliders at the top. The Amount and Radius are like the ones found in the Unsharp Mask dialog, but it’s the Masking slider that holds the trick for sharpening women’s skin. Start by pressing-and-holding the Option (PC: Alt) key, then click-and-hold on the Masking slider (as shown here) and the preview area will turn solid white (as seen here). This lets you know that the entire image is being sharpened equally.

Step 10:
Now, start dragging that Masking slider to the right, and as you drag it, parts of the image will begin to turn black. Those black areas are now not getting sharpened, which is great, because as you can see in the preview area now, her skin is all in black (not getting sharpened). The areas that appear in white are getting sharpened, and are exactly the areas we want sharpened—the eyebrows, eyes, hair, edges of the nostril openings, lips, jewelry, and edge detail on her face. It’s really pretty darn amazing that one slider can do all the masking for you—but it does. So, drag this slider to the right until just those detail areas appear in white (here, I dragged over to 61), and now you’re ready to apply your sharpening.
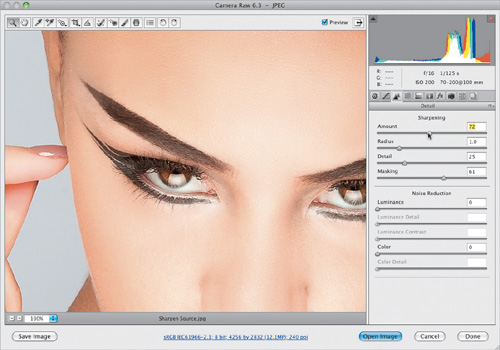
Step 11:
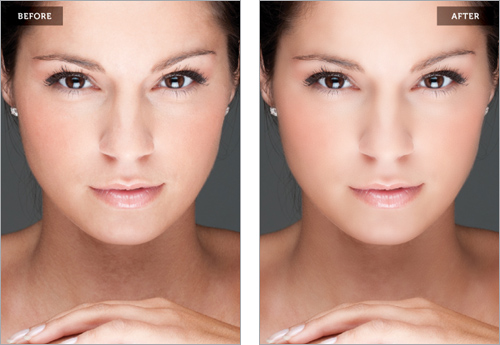
Drag the Amount slider to the right until the sharpening looks good to you (I generally leave the Radius at 1.0, and the Detail slider, which is really more of a “halo avoidance slider,” so you don’t get halos or other sharpening side effects, set at its default setting of 25, as seen here). For this image, I dragged the Amount slider to 72. That’s all there is to it. Now, click the Open Image button to reopen the image in Photoshop, or the Done button if you’re done retouching this image. On your next project, take a minute to try all three methods of sharpening, and see which process and/or result feels the best to you, because all three do a great job of sharpening without accentuating the skin texture. You can see a before and after on the next page.
Download this image. See pg. xi.