
Chapter 1. Rails Environments and Configuration
[Rails] gained a lot of its focus and appeal because I didn’t try to please people who didn’t share my problems. Differentiating between production and development was a very real problem for me, so I solved it the best way I knew how.
—David Heinemeier Hansson
Rails applications are preconfigured with three standard modes of operation: development, test, and production. These modes are basically execution environments and have a collection of associated settings that determine things such as which database to connect to, and whether the classes of your application should be reloaded with each request. It is also simple to create your own custom environments if necessary.
The current environment can be specified via the environment variable RAILS_ENV, which names the desired mode of operation and corresponds to an environment definition file in the config/environments folder. You can also set the environment variable RACK_ENV or as a last resort you may rely on the default being development. Since this environment setting governs some of the most fundamental aspects of Rails, such as class loading, in order to really understand the Rails way you should understand its environment settings.
Bundler is a tool that manages gem dependencies for your Ruby application. It takes a gem manifest file and is able to fetch, download, and install the gems in this manifest, and all child dependencies.
In this chapter, we start by covering Bundler, which is a fairly new addition to the Rails ecosystem and one of the biggest differences about working with Rails 3 versus older versions. Then we move on to more familiar territory by covering how Rails starts up and handles requests, by examining scripts such as boot.rb and application.rb and the settings that make up the three standard environment settings (modes). We also cover some of the basics of defining your own environments, and why you might choose to do so.
Note that this book is not written with absolute newcomers to Rails in mind. To make the most out of this book, you should already be at least somewhat familiar with how to bootstrap a Rails application and the meaning of M.V.C. If you are not, I recommend that you first take advantage of the excellent Ruby on Rails 3 Tutorial book and website1 by Michael Hartl, another Professional Ruby Series author.
1.1 Bundler
Bundler2 is not a technology that is specific to Rails 3, but it is the preferred way to manage your application’s gem dependencies. Applications generated with Rails 3 use Bundler automatically, and you should not need to install the bundler gem separately since it’s a dependency of Rails 3 itself.
Since we believe that you should use Bundler, figuring out how to not use Bundler is left as an exercise for adventurous and/or nonconformist readers.
One of the most important things that Bundler does is dependency resolution on the full list of gems specified in your configuration, all at once. This differs from the one-at-a-time dependency resolution approach employed by Rubygems and previous versions of Rails, which can (and often did) result in the following hard-to- fix problem:
Assume that your system had the following Rubygem versions installed.
activesupport 3.0.pre
activesupport 2.3.4
activemerchant 1.4.2
rails 2.3.4
It turns out that activemerchant 1.4.2 depends on activesupport >= 2.3.2, therefore when you load it using the gem command (from the RubyGems library) like this
gem "activemerchant", "1.4.2"
it results in the loading of activemerchant, as well as the latest compatible versions of its dependencies, including the activesupport 3.0.pre gem, since it is greater than or equal to version 2.3.2. Subsequently, trying to load rails itself with
gem "rails", "2.3.4"
results in the following exception at runtime:
can't activate activesupport (= 2.3.4, runtime)
for ["rails-2.3.4"],
already activated activesupport-3.0.pre for ["activemerchant-1.4.2"]
The exception happens because activemerchant has a broader dependency that results in the activation of a version of activesupport that does not satisfy the more narrow dependency of the older version of Rails. Bundler solves this problem by evaluating all dependencies at once and figuring out exactly the right versions of gems to load.
For an interesting perspective concerning the way that Bundler was conceived and how it contrasts with gem environment managers such as rip, make sure to read Yehuda’s blog post on the subject.3
Xavier says ...
Bundler is a strong default in Rails 3, but you can easily opt-out.
The rails command has a flag to disable Gemfile generation. If your app already has a Gemfile, it is enough to delete it to stop depending on Bundler. Rails bootstrapping routines check whether the Gemfile exists, and if it does not then Bundler is not used.
1.1.1 Gemfile
Once you need gems other than those belonging to Rails itself, you’ll need to introduce a Ruby-based manifest file named Gemfile into the root of your Rails project directory. The basic syntax for the Gemfile is super simple:
gem "nokogiri"
gem "geokit"
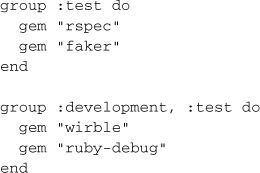
To load a dependency only in a specific environment, place it in a group block specifying one or more environment names as symbols:
The gem directive takes an optional second argument describing the version of the Rubygem desired. Leaving the version argument off will simply get the latest available stable version, which may not be the latest version available. To include a release candidate or a pre-release gem you’ll need to specify the version explicitly.
The format of the version argument matches the Rubygem versioning scheme to which you should already be accustomed.
gem 'nokogiri', '1.4.2'
gem 'faker', '> 0.3'
gem 'decent_exposure', '~> 1.0.0.rc1'
gem 'rspec', '2.0.0.beta.20'
You can find full instructions on how to craft a version string in the RubyGems documentation.4
Occasionally, the name of the gem that should be used in a require statement is different than the name of that gem in the repository. In those cases, the :require option solves this simply and declaratively right in the Gemfile.
gem 'sqlite3-ruby', :require => 'sqlite3'
Loading Gems Directly From a Git Repository
Until now we have been loading our gems from http://rubygems.org. It is possible to specify a gem by its source repository as long as it has a .gemspec text file in the root directory. Just add a :git option to the call to gem.
gem 'paperclip', :git => 'git://github.com/thoughtbot/paperclip.git'
Gemspecs with binaries or C extensions are also supported.
gem 'nokogiri', :git => 'git://github.com/tenderlove/nokogiri.git'
If there is no .gemspec file at the root of a gem’s git repository, you must tell Bundler which version to use when resolving its dependencies.
gem 'deep_merge', '1.0', :git =>
'git://github.com/peritor/deep_merge.git'
It’s also possible to specify that a git repository contains multiple .gemspec files and should be treated as a gem source. The following example does just that for the most common git repository that fits the criteria, the Rails codebase itself. (Note: You should never actually need to put the following code in a Gemfile for one of your Rails applications!)
git 'git://github.com/rails/rails.git'
gem 'railties'
gem 'action_pack'
gem 'active_model'
Additionally, you can specify that a git repository should use a particular ref, branch, or tag as options to the git directive:
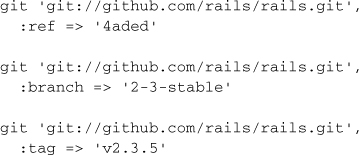
Specifying a ref, branch, or tag for a git repository specified inline uses the same option syntax.

Loading Gems From the File System
You can use a gem that you are actively developing on your local workstation using the :path option.
gem 'nokogiri', :path => '~/code/nokogiri'
1.1.2 Installing Gems
Everytime you modify the Gemfile, or more specifically, if you introduce dependencies not yet installed, invoke the install command to ensure that all the dependencies in your Gemfile are available to your Rails application.5

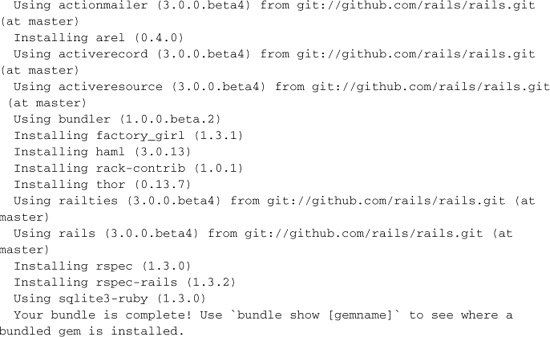
The install command updates all dependencies named in your Gemfile to the latest versions that do not conflict with other dependencies.
You can opt to install dependencies, except those in specified groups using the --without option.
$ bundle install --without development test
$ bundle install --without test
Installation Directory
The default location for gems installed by bundler is directory named .bundle in your user directory. To specify a project specific directory simply add the name of the directory like this:
$ bundle install vendor
Disabling Shared Gems
By passing --disable-shared-gems, to bundle install you are telling Bundler to install gems even if they are already installed in the system. Normally Bundler avoids that and symlinks to already downloaded gems that exist in your system.
$ bundle install vendor --disable-shared-gems
This option is especially useful if you’re trying to package up an application with all dependencies unpacked.
1.1.3 Gem Locking
Everytime you install or update, Bundler calculates the dependency tree for your application and stores the results in a file named Gemfile.lock. From that point on Bundler will only load specific versions of gems that you are using at the moment that the Gemfile was locked, versions that you know will work well with your application.
1.1.4 Packaging Gems
You can package up all your gems in the vendor/cache directory inside of your Rails application.
$ bundle package
Running bundle install in an application with packaged gems will use the gems in the package and skip connecting to rubygems.org or any other gem sources. You can use this to avoid external dependencies at deploy time, or if you depend on private gems that are not available in any public repository.
Making gem dependencies available to non-Rails scripts
Non-Rails scripts must be executed with bundle exec in order to get a properly initialized RubyGems environment.
$ bundle exec cucumber
1.2 Startup and Application Settings
Whenever you start a process to handle requests with Rails (such as with rails server), one of the first things that happens is that config/boot.rb is loaded.
There are three files involved in setting up the entire Rails stack:
boot.rb sets up Bundler and load paths
application.rb loads rails gems, gems for the specified Rail.env, and configures the application
environment.rb runs all initializers
All three are run when you need the whole Rails environment loaded. That’s what’s done by runner, console, server, etc.
1.2.1 application.rb
The file config/environment.rb used to be where many of your application settings lived. In Rails 3, the settings move to a file called config/application.rb, and it’s the only file required at the top of config/environment.rb.
Let’s go step by step through the settings provided in the default application.rb file that you’ll find in a newly created Rails application. By the way, as you’re reading through the following sections, make a mental note to yourself that changes to these files require a server restart to take effect.
The next lines of application.rb are where the wheels really start turning, once config/boot.rb is loaded:
require File.expand_path('../boot', __FILE__)
Note that the boot script is generated as part of your Rails application, but you won’t usually need to edit it.
Getting back to application.rb we find the following line:
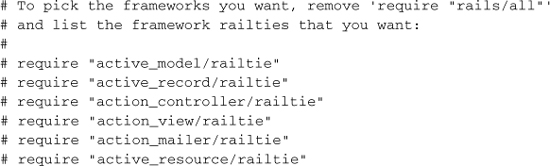
require 'rails/all'
A new feature of Rails 3 is the ability to easily cherry-pick only the components needed by your application.
The main configuration of our application follows, which in Rails 3 gets its own module and class:

The creation of a module specifically for your application is part of the groundwork for supporting running multiple Rails applications in the same process.
Load Path Modifications
By default, Rails looks for code in a number of standard directories such as app/models and app/controllers, referred to collectively as the load path. You can add other directories to the load path using the following code:
# Custom directories with classes and modules you want to be autoloadable
# config.autoload_paths += %W(#{config.root}/extras)
Note that config.root refers to the root directory of your Rails application. Therefore, if you wanted to, for instance, create a separate directory for observers instead of having them in with your models, you might do the following:
config.autoload_paths += %W(#{config.root}/app/observers)
In case you didn’t know, the %W functions as a whitespace-delimited array literal and is used quite often in the Rails codebase for convenience.
Xavier says ...
Since Ruby has $LOAD_PATH, config.load_paths of older Rails versions has been renamed to config.autoload_paths in Rails 3 so that it is crystal clear to the develooper that the collection is about stuff that can be autoloaded. Those directories are also added to $:, but in general that is of little interest, because stuff in autoload_paths is usually meant to be autoloaded.
Plugin Load Order
Normally, Rails loads plugins alphabetically by directory name. If you are unlucky enough to run into a problem with the default order, you can use the following code to adjust ordering.

Chapter 19, “Extending Rails with Plugins,” covers the subject, and a companion book to this one in the Addison-Wesley Professional Ruby Series, Rails Plugins: Extending Rails Beyond the Core (ISBN: 0-321-48351-0) by James Adam, is an exhaustive reference about authoring plugins.
Observers
Active Record observers are first-class objects in your Rails applications that perform specific tasks such as clearing caches and managing denormalized data. The examples below are just that, examples of classes that you might theoretically be writing in your application as observers. (There aren’t actually cacher or garbage_collector observers provided by Rails, but don’t take that to mean that Ruby doesn’t do garbage collection!)
# Activate observers that should always be running
config.active_record.observers = :cacher, :garbage_collector,
:forum_observer
This book covers Active Record observers in-depth in Chapter 9, Advanced Active Record.
Time Zones
The default time zone for Rails 3 applications is UTC. If the business domain of your application is sensitive to knowing exactly what time zone the server is in, then you can use the following setting to override the default:

Localization
Rails features localization support via locale files and is covered in great detail in Chapter 11, “All About Helpers” in the TranslationHelper and I18n API section.
The default locale is :en and can be overridden in your configuration.

Generator Default Settings
Rails generator scripts make certain assumptions about your tool chain. Setting the correct values here means having to type less parameters on the command line. For instance, at Hashrocket we use RSpec without fixtures and Haml exclusively, so our settings would look like:

1.2.2 Initializers
Rails 2 introduced the concept of breaking out configuration settings into their own small ruby files under the config/initializers directory, where they are automatically loaded at startup. You can add configuration settings for your own application by adding ruby files to the initializers directory. The following five initializers are included by default in all Rails applications.
Backtrace Silencers
Nobody likes really long exception backtraces, except maybe Java programmers. Rails has a mechanism for reducing the size of backtraces by eliminating lines that don’t really add anything to your debugging.
The backtrace_silencers.rb initializer lets you modify the way that backtraces are shortened. I’ve found it useful to remove backtrace entries for noisy libraries, but removing all silencers is usually never needed during normal application development.

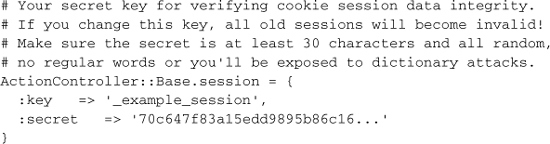
Cookie Verification Secret
Certain types of hacking involve modifying the contents of cookies without the server knowing about it. By digitally signing all cookies sent to the browser, Rails can detect whether they were tampered with. The cookie_verification_secret.rb initializer contains the secret key, randomly generated along with your app, which is used to sign cookies.

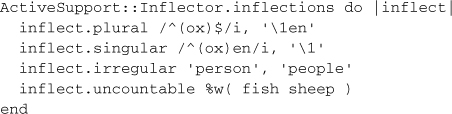
Inflections
Rails has a class named Inflector whose responsibility is to transform strings (words) from singular to plural, class names to table names, modularized class names to ones without, and class names to foreign keys, etc. (Some of its operations have funny names, such as dasherize.)
The default inflections for pluralization and singularization of uncountable words are kept in an interesting file inside the ActiveSupport gem, named inflections.rb.
Most of the time the Inflector class does a decent job of figuring out the pluralized table name for a given class, but occasionally it won’t. This is one of the first stumbling blocks for many new Rails users, but it is not necessary to panic. With a little ad hoc testing beforehand, it’s easy to find out how Inflector will react to certain words. We just need to use the Rails console, which by the way is one of the best things about working in Rails.
You fire up the console from your terminal with the rails console command.
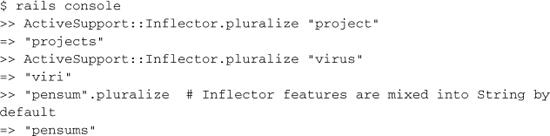
As you can see in the example, Inflector tries to be smart, pluralizing virus as viri; but if you know your Latin you have already noticed that the plural pensum should actually be pensa. Needless to say, the inflector does not know Latin.6
However, you can teach the inflector new tricks by adding new pattern rules, by pointing out an exception, or by declaring certain words unpluralizable. The preferred place to do that is inside the config/initializers/inflections.rb file, where a commented example is already provided:
The file activesupport/test/inflector_test.rb has a long list of pluralizations correctly handled by Inflector. I found some of them pretty interesting, such as:

Custom MIME Types
Rails supports a standard set of MIME types (*/*, text/html, text/plain, text/ javascript, text/css, text/calendar, text/csv, application/xml, application/rss+xml, application/atom+xml, application/x-yaml, multipart/form-data, application/x-www-form-urlencoded).
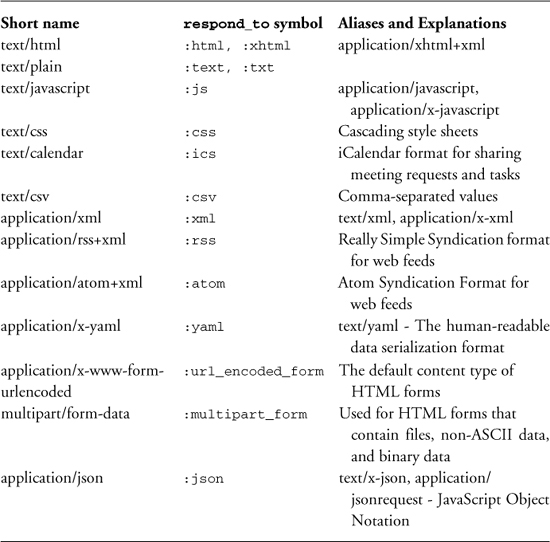
If your application needs to respond to other MIME types, you can register them in the mime_types.rb initializer
# Add new mime types for use in respond_to blocks:
# Mime::Type.register "text/richtext", :rtf
# Mime::Type.register_alias "text/html", :iphone
Session Store
Session cookies in Rails are signed with a random secret string that’s generated along with new Rails apps. You can change that secret string in session_store.rb if you’re really paranoid.
If you want to store user sessions in the database instead of in cookies, which you want to do if your application keeps sensitive data in sessions, then this initializer is the place to do it:
# Use the database for sessions instead of the cookie-based default
# (create the session table with "rake db:sessions:create")
ActionController::Base.session_store = :active_record_store
This book covers configuration and implications of Active Record session store in Chapter 13, Session Management.
1.2.3 Additional Configuration
That does it for the configuration options for which we get examples in the default application.rb and the standard initializers. There are additional options, which you can add in additional initializer files.
Log-Level Override
The default log level is :debug and you can override it if necessary.
# Force all environments to use the same logger level
# (by default production uses :info, the others :debug)
config.log_level = :debug
This book covers use of the Rails logger in-depth later on in this chapter.
Schema Dumper
Every time you run tests, Rails dumps the schema of your development database and copies it to the test database using an autogenerated schema.rb script. It looks very similar to an Active Record migration script; in fact, it uses the same API.
You might find it necessary to revert to the older style of dumping the schema using SQL, if you’re doing things that are incompatible with the schema dumper code (see the comment).

Remember we said that the value of the RAILS_ENV environment variable dictates which additional environment settings are loaded next? So now let’s review the default settings for each of the standard Rail modes.
1.3 Development Mode
Development is Rails’ default mode and the one in which you will spend most of your time as a developer. This section contains an in-depth explanation of each setting.

1.3.1 Automatic Class Reloading
One of the signature benefits of using Rails is the quick feedback cycle whenever you’re working in development mode. Make changes to your code, hit Reload in the browser, and Shazam! Magically, the changes are reflected in your application. This behavior is governed by the config.cache_classes setting:

Without getting into too much nitty-gritty detail, when the config.cache_classes setting is true, Rails will use Ruby’s require statement to do its class loading, and when it is false, it will use load instead.
When you require a Ruby file, the interpreter executes and caches it. If the file is required again (as in subsequent requests), the interpreter ignores the require statement and moves on. When you load a Ruby file, the interpreter executes the file again, no matter how many times it has been loaded before.
Now it’s time to examine the Rails class-loading behavior a bit more in depth, because sometimes you won’t be able to get certain things to reload automatically and it will drive you crazy unless you understand how class loading works!
The Rails Class Loader
In plain old Ruby, a script file doesn’t need to be named in any particular way that matches its contents. In Rails, however, you’ll notice that there’s almost always a direct correlation between the name of a Ruby file and the class or module contained within. Rails takes advantage of the fact that Ruby provides a callback mechanism for missing constants. When Rails encounters an undefined constant in the code, it uses a class loader routine based on file-naming conventions to find and require the needed Ruby script.
How does the class loader know where to search? We already covered it earlier in the chapter where we discussed the role of initializer.rb in the Rails startup process. Rails has the concept of load paths, and the default load paths include the base directories of just about anywhere you would think of adding code to your Rails application.
Want to see the contents of your project’s load path? Just fire up the console and type $LOAD_PATH

I snipped the console output to save space. A typical Rails project load path will usually have 30 or more items in its load path. Try it and see.
Xavier says ...
Note that files in lib are no longer autoloaded. The lib directory is added to $LOAD_PATH, but not to autoload_paths. You’ll have to require files in lib manually where they are needed or add lib back to autoload_paths in config/application.rb.
Rails, Modules, and Auto-Loading Code
Normally in Ruby, when you want to include code from another file in your application, you have to include a require statement. However, Rails enhances Ruby’s default behavior by establishing a simple convention that enables Rails to automatically load your code in most cases. If you’ve used the Rails console at all, you’ve already seen this behavior in action: You never have to explicitly require anything!
This is how it works: If Rails encounters a class or module in your code that is not already defined, Rails uses the following convention to guess which files it should require to load that module or class:
If the class or module is not nested, insert an underscore between the constant’s names and require a file of this name. For example:
• EstimationCalculator becomes require "estimation_calculator"
• KittTurboBoost becomes require "kitt_turbo_boost"
If the class or module is nested, Rails inserts an underscore between each of the containing modules and requires a file in the corresponding set of subdirectories. For example:
• MacGyver::SwissArmyKnife becomes require "mac_gyver/swiss_army_knife"
• Example::ReallyRatherDeeply::NestedClass becomes require "example/really_rather_deeply/nested_class" and if not already loaded, Rails would expect to find it in a file called nested_class.rb, in a directory called really_rather_deeply, itself in the directory example of which can be found somewhere in Ruby’s load path (e.g., one of the app subdirectories, lib, or a plugin’s lib directory).
The bottom line is that you should rarely need to explicitly load Ruby code in your Rails applications (using require) if you follow the naming conventions.
1.3.2 Whiny Nils
Rails attempts to help newbie developers figure out what’s wrong with their code with extensions to Ruby’s NilClass. The flag config.whiny_nils determines whether this feature is enabled. By default it is on in development and test modes, and it is off in production mode.
# Log error messages when you accidentally call methods on nil.
config.whiny_nils = true
The complete behavior of whiny nils is covered in Appendix B, “Active Support API Reference.”
1.3.3 Error Reports
A couple of settings govern Rails error reporting. Requests from localhost, like when you’re developing, generate useful error messages that include debugging information such as a line number where the error occured and a backtrace. Setting consider_all_requests_local to true causes Rails to display those developer-friendly error screens even when the machine making the request is remote.
config.consider_all_requests_local = true
The config.action_view.debug_rjs setting governs whether RJS responses should be wrapped in a try/catch block that alerts errors before re-raising them.
config.action_view.debug_rjs = true
1.3.4 Caching
You normally do not want caching behavior when you’re in development mode. The only time you do want it is if you’re actually testing caching.
config.action_controller.perform_caching = true # for testing in
development mode
Remember to set it back to false when you’re done testing. Unexpected caching behavior can be very tricky to figure out.
1.3.5 Raise Delivery Errors
Rails assumes that you don’t want Action Mailer to raise delivery exceptions in development mode, so based on the config.action_mailer.raise_delivery_errors settings, it will swallow them. Mailing capabilities don’t necessarily work in an average development workstation, particularly on Windows and other platforms that lack sendmail.
# Don't care if the mailer can't send
config.action_mailer.raise_delivery_errors = false
If you actually want to send mail while in development mode as part of debugging or ad-hoc testing, then you probably want to toggle this setting.
Xavier says ...
I find it handy to set config.action_mailer.perform_deliveries = false in development. No delivery attempt is performed, but you can still see the mail in the log file to check it looks good, copy account activation URLs, etc.
1.4 Test Mode
Whenever you run Rails in test mode, that is, the value of the RAILS_ENV environment value is test, then the following settings are in effect (reproduced here for reference purposes):
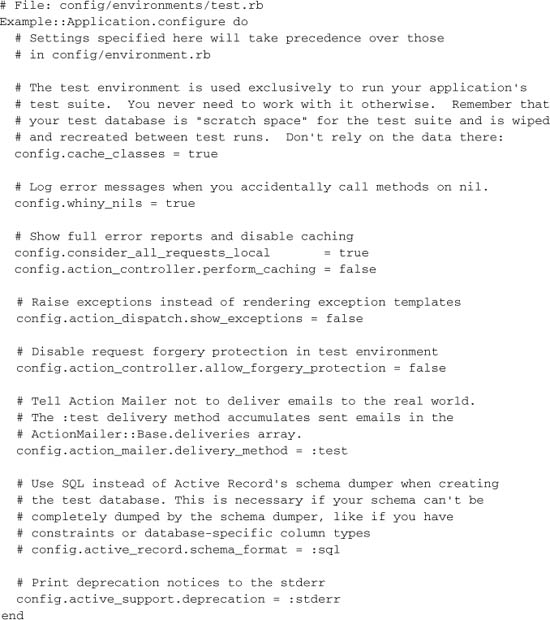
Most people get by without ever needing to modify their test environment settings.
Custom environments
If necessary, you can create additional environments for your Rails app to run by cloning one of the existing environment files in the config/environments directory of your application. The most common use case for custom environments is in setting up additional production configurations, such as for staging and QA deployments. Do you have access to the production database from your development workstation? Then a triage environment might make sense. Use the normal environment settings for development mode, but point its database connection to a production database server. It’s a potentially life-saving combination when you need to quickly diagnose issues in production.
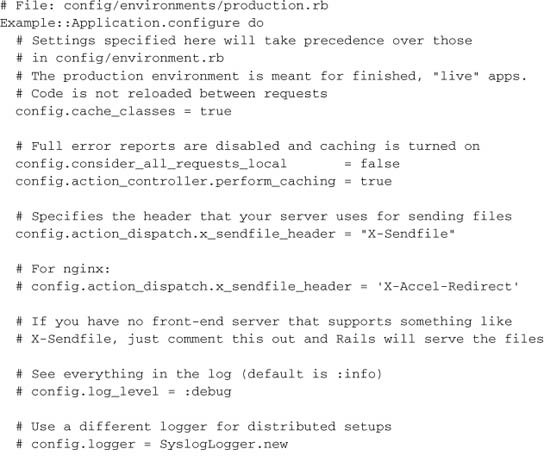
1.5 Production Mode
Finally, production mode is what you want your Rails application running in whenever it is deployed to its hosting environment and serving public requests. There are a number of significant ways that production mode differs from the other modes, not least of which is the speed boost you get from not reloading all of your application classes for every request.
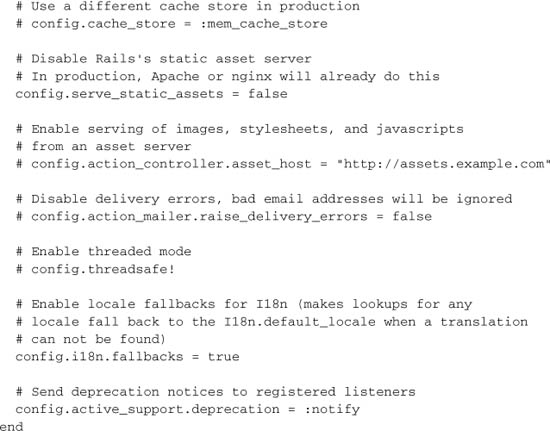
1.5.1 Asset Hosts
By default, Rails links to assets on the current host in the public folder, but you can direct Rails to link to assets from a dedicated asset server. The config.action_controller.asset_host setting is covered in detail in Chapter 10 in the Using Asset Hosts section.
1.5.2 Threaded Mode
Rails 2.2 introduced a thread-safe mode that, depending on your web server infrastructure, means you can handle more requests with fewer copies of Rails in memory, leading to better server performance and higher utilization of multiple cores. Threadsafe operation is incompatible with development mode. Automatic dependency loading and class reloading are automatically disabled when you call config.threadsafe!.
Threadsafe operation is a big deal for folks that run Rails on JRuby, since that platform supports usage of multiple native threads across cores from a single operating system process. Accordingly, one of the main authors of JRuby, Charles Nutter, published this explanation of threadsafe mode on his blog:7
Basically it means removing the single coarse-grained lock around every incoming request and replacing it with finer-grained locks around only those resources that need to be shared across threads. So for example, data structures within the logging subsystem have either been modified so they are not shared across threads, or locked appropriately to make sure two threads don’t interfere with each other or render those data structures invalid or corrupt. Instead of a single database connection for a given Rails instance, there will be a pool of connections, allowing N database connections to be used by the M requests executing concurrently. It also means allowing requests to potentially execute without consuming a connection, so the number of live, active connections usually will be lower than the number of requests you can handle concurrently.
In the same blog post, Charles also eloquently explained why threadsafe operation is significant even for green-thread8 implementations of Ruby.9
Thread-safe Rails will mean that an individual instance, even with green threads, can handle multiple requests at the same time. By “at the same time” I don’t mean concurrently...green threads will never allow two requests to actually run concurrently or to utilize multiple cores. What I mean is that if a given request ends up blocking on IO, which happens in almost all requests (due to REST hits, DB hits, filesystem hits and so on), Ruby will now have the option of scheduling another request to execute. Put another way, removing the coarse-grained lock will at least improve concurrency up to the “best” that green-threaded implementations can do, which isn’t too bad.
To learn the practical implications of writing thread-safe application code, the extent of which exceed the scope of this book, make sure to study Pratik Naik’s excellent (but foul-mouthed) analysis of the subject.10
1.6 Logging
Most programming contexts in Rails (models, controllers, view templates) have a logger attribute, which holds a reference to a logger conforming to the interface of Log4r or the default Ruby 1.8+ Logger class. Can’t get a reference to logger somewhere in your code? The Rails.logger method references a logger that you can use anywhere.
It’s really easy to create a new Logger in Ruby, as shown in the following example:
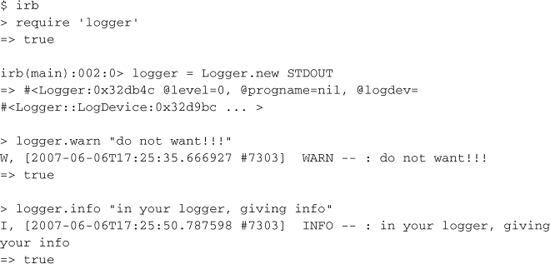
Typically, you add a message to the log using the logger whenever the need arises, using a method corresponding to the severity of the log message. The standard logger’s severities are (in increasingly severe order):
debugUse the debug level to capture data and application state useful for debugging problems later on. This level is not usually captured in production logs.
infoUse info level to capture informational messages. I like to use this log level for timestamping non-ordinary events that are still within the bounds of good application behavior.
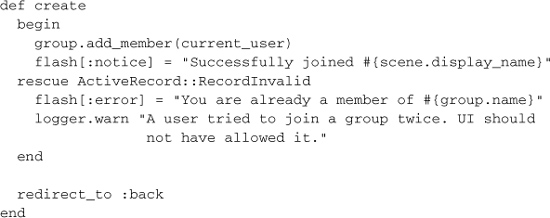
warnUse the warn level to capture things that are out of the ordinary and might be worth investigating. Sometimes I’ll throw in a logged warning when guard clauses in my code keep a client from doing something they weren’t supposed to do. My goal is to alert whoever’s maintaining the application about a malicious user or bug in the user interface, as in the following example:
errorUse the error log level to capture information about error conditions that don’t require a server restart.
fatalThe worst-case imaginable has happened—your application is now dead and manual intervention is necessary to restart it.
1.6.1 Rails Log Files
The log folder of your Rails application holds three log files corresponding to each of the standard environments. Log files can grow very large over time. A rake task is provided for easily clearing the log files:
rake log:clear # Truncates all *.log files in log/ to zero bytes
The contents of log/development.log are very useful while you’re working. Many Rails coders leave a terminal window open with a continuous tail of the development log open while they’re coding:
$ tail -f log/development.log
User Load (0.5ms) SELECT * FROM users WHERE (users.'id' = 1)
CACHE (0.0ms) SELECT * FROM users WHERE (users.'id' = 1)
All sorts of valuable information are available in the development log. For instance, every time you make a request, a bunch of useful information about it shows up in the log. Here’s a sample from one of my projects.
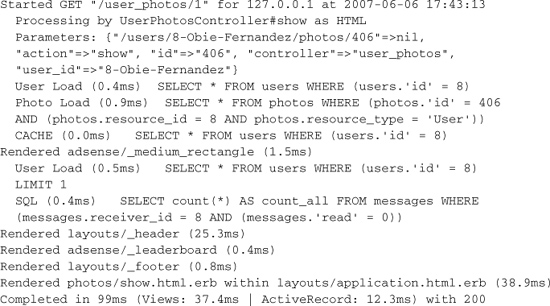
This is a list of all the data items contained in that chunk of log output:
• The controller and action that were invoked
• The remote IP address of the computer making the request
• A timestamp indicating when the request happened
• The session ID associated with the request
• The hash of parameters associated with the request
• Database request information including the time and the SQL statement executed
• Query cache hit info including time and the SQL statement triggering results from the cache instead of a roundtrip to the database
• Rendering information for each template involved in rendering the view output and time consumed by each
• Total time used in completing the request with corresponding request-per-second figures
• Analysis of the time spent in database operations versus rendering
• The HTTP status code and URL of the response sent back to the client
1.6.2 Log File Analysis
A number of informal analyses can be easily performed using just the development log output and some common sense.
PerformanceOne of the more obvious analyses would be a study of the performance of your application. The faster your requests execute, the more requests you can serve with a given Rails process. That’s why performance figures are often expressed in terms of requests per second. Find the queries and rendering sections that are taking a long time and figure out why. It’s important to realize that the times reported by the logger are not super-accurate. In fact, they’re wrong more often than not, if simply for the reason that it’s very difficult to measure the timing of something from within itself. Add up the percentage of rendering and database times for any given request and it will not always be close to 100 percent.
However, despite not being accurate in a purely objective sense, the reported times are perfect for making subjective comparisons within the same application. They give you a way of gauging whether an action is taking longer than it used to, or whether it is relatively faster or slower than another action, and so on.
SQL queriesActive Record not behaving as expected? The fact that SQL generated by Active Record is logged can often help you debug problems caused by complicated queries.
Identification of N+1 select problemsWhenever you are displaying a record along with an associated collection of records, there’s a chance that you will have a so-called N+1 select problem. You’ll recognize the problem by a series of many SELECT statements, with the only difference being the value of the primary key.
For example, here’s a snippet of some log output from a real Rails application showing an N+1 select issue in the way that FlickrPhoto instances are being loaded:
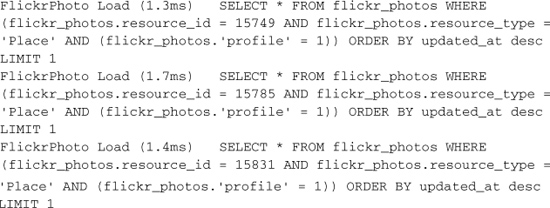
and so on and so forth, for pages and pages of log output. Look familiar?
Luckily, each of those database queries is executing very quickly, around 0.0015 seconds each. That’s because 1) MySQL is extraordinarily fast for small SELECT statements, and 2) my Rails process is on the same physical machine as the database.
Still, accumulate enough of those N queries and they add up quickly to eat away at performance. Absent the mitigating factors I mentioned, I would have a serious performance problem to address. The problem would be especially severe if the database was on a separate machine, giving me network latency to deal with on each of those queries.
N+1 select issues are not the end of the world. A lot of times all it takes is proper use of the includes method on a particular query to alleviate the problem.
Separation of concerns
A well-designed model-view-controller application follows certain protocols related to which logical tier does database operations (that would be the model) versus rendering tasks (the view). Generally speaking, you want your controller to cause the loading of all of the data that is going to be needed for rendering from the database. In Rails, it is accomplished by controller code that queries the model for needed data and makes that data available to the view.
Database access during rendering is usually considered a bad practice. Calling database methods directly from template code violates proper separation of concerns and is a maintainability nightmare.11
However, there are plenty of opportunities for implicit database access during view rendering to creep into your codebase, encapsulated by the model, and perhaps triggered by lazy loading of associations. Can we conclusively call it a bad practice? It’s hard to say so definitively. There are cases (such as usage of fragment caching) where it makes sense to have database operations happening during view rendering.
Rails::Subscriber.colorize_logging
Tells Rails whether to use ANSI codes to colorize the logging statements. The colors make it much easier to read the logs (except on Windows) and may complicate matters if you use software like syslog. Defaults to true. Change to false if you view your logs with software that doesn’t understand the ANSI color codes.
Using alternate logging schemes
It’s easy! Just assign a class compatible with Ruby’s Logger to one of the various logger class variables, such as ActiveRecord::Base.logger. A quick hack based on the ability to swap loggers is one demonstrated by David at various events, including his keynote at Railsconf 2007. During a console session, assign a new Logger instance pointing to STDOUT to ActiveRecord::Base.logger in order to see the SQL being generated right in your console. Jamis has a complete write-up of the technique and more at http://weblog.jamisbuck.org/2007/1/31/more-on-watching-activerecord.
Here’s a snippet of log output with the ANSI codes visible:

Wilson says ...
Almost nobody I meet seems to know how to display colorized logs in a pager. The -R option tells less to output “raw” control characters to the screen.
Syslog
UNIX-like systems have a system service called syslog. For various reasons, it might be a better choice for production logging of your Rails applications.
• Finer-grained control over logging levels and content.
• Consolidation of logger output for multiple Rails applications.
• If you’re using remote syslog capabilities of many systems, consolidation of logger output for multiple Rails application servers is possible. Contrast with having to handle individual log files on each application server box separately.
You can use Eric Hodel’s SyslogLogger* to interface your Rails application to syslog.
* http://seattlerb.rubyforge.org/SyslogLogger
1.7 Conclusion
We’ve kicked off our Rails journey by covering Bundler in fairly good detail and then reviewing the different environments in which Rails executes and how it loads its dependencies, including your application code. An in-depth look at application.rb and its per-mode variants revealed how we can customize Rails behavior to our taste.