
5. Creative iMovie Projects
I’ve covered a lot of ground so far, and hopefully by now you have not only a good foundation for how to edit in iMovie, but also the confidence to try new things and explore features that aren’t obvious. In this chapter, I get more creative, using a variety of techniques to create a travel highlights movie, demonstrate how to incorporate green-screen special effects, create a music video, make a sports highlight video using iMovie’s clever Sports Team Editor, and build a custom soundtrack for a movie using the looping capabilities of GarageBand.
Make a Music Video Project
So far in this book, when working with music, you’ve added music to a previously edited movie. Perhaps if you’re the creative type, you’ve already played with editing your movie a bit to sync more closely with the music, but even in that case, the movie came first. In some instances, though, you may want to start with the music. Music videos are a great example, where the visuals serve the beat.
Tip
Music videos are only one example of where this technique might be useful. Slideshows, montage and action sequences, and movie trailers are other examples of when this technique could be useful. In fact, iMovie’s movie trailers feature, at heart, uses the techniques described here, just in a more guided interface.
Use beat markers
To start with the music and work from there, use iMovie’s beat markers. This feature lets you build a project full of edit points and then populate the movie with video and photo clips, which are all automatically cut to the markers.
Making a music video using beat markers
- Choose File > New Project to create a new project.
- Enable Snap to Beats under the View menu, if it’s not already active.

- Click the Music and Sound Effects Browser button, or press Command-1, to access your music library.
- Choose a song from your iTunes playlist and drag it to the Project browser (Figure 5.1).
Figure 5.1. Adding a song to an empty project

- Click the song’s Action menu and choose Clip Trimmer to open it.
- Add beat markers using one of the following techniques:
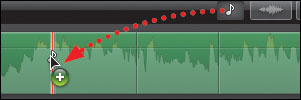
• Using the audio waveform as a guide, create a new beat marker by dragging a marker from the Beat Marker icon to the clip (Figure 5.2).
Figure 5.2. Drag from the Beat Marker icon to add a new beat marker.
• Play the song by pressing the spacebar or the backslash () key, and then press the M key whenever you want to add a beat marker. Don’t worry about being exact—you can move the markers later.
Tip
Think like an editor while you add markers. If you add too many markers you’ll end up with a bunch of really quick edits (although that may be the effect you want).
- Play through your song and make sure all the beat markers are where you want them. If you need to adjust one, click and drag it. To delete a marker, drag it out of the Clip Trimmer; or, bring up the contextual menu and choose Remove Beat Marker.
Note
If you don’t see Remove Beat Marker in the contextual menu, you’re not hovering close enough to the marker. Click outside of the menu to close it and try again. You can also Control-click an empty part of the song and add a beat marker by selecting Add Beat Marker.
- Once all your markers are in place, click Done to close the Clip Trimmer.
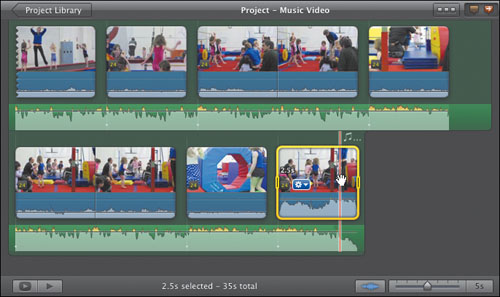
- Add video clips to the project, either individually or in groups. iMovie automatically trims them to fit between your beat markers (Figure 5.3).
Figure 5.3. Clips added are trimmed at the beat markers.
Tip
I often find it’s easiest to roughly define clip selections, drag them into the project, and then open them in the Clip Trimmer to precisely edit the selection. This enables me to work more quickly and to synchronize the clip selections with the music more closely.
Tip
For most music videos, you want the song to be the only audio playing. To quickly mute the video clips in the project, select them all and choose Clip > Mute Clips or press Command-Shift-M.
Editing beat markers after clips are placed
- Select the background music track and open it in the Clip Trimmer.
- With Snap to Beats still enabled in the View menu, do any of the following:
• Drag a new beat marker to the track. iMovie splits the clip that’s bisected by the new marker.
• Drag a beat marker to a new location. iMovie adjusts the durations of affected clips to accommodate the change.
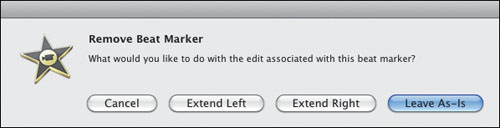
• Delete a beat marker. iMovie asks how you’d like to deal with the edit at that spot (Figure 5.4).
Figure 5.4. iMovie needs guidance when you delete a beat marker.
Tip
As much as possible, perform a first edit of your music video using the beat markers and the Clip Trimmer. If you delete a clip in the Project browser, iMovie warns that doing so can knock everything out of sync.
Fine-tuning the edits
With the clips you want to use in place, edit them using the techniques described in Chapter 4. For example, use the Replace edits to swap one clip for another; or, to use a different portion of the same clip, open the clip in the Clip Trimmer and drag using the bottom of the selection border to make the other portion visible while still maintaining the clip’s duration. The Precision Editor is especially helpful, because you can see how clip edges interact at the edit point.
Record a Voiceover Project
Narrators are often maligned in dramatic films—it’s commonly an indication that the screenwriter or director got sloppy and needed to employ a narrator to help explain the story. But in documentary films they can be essential. Imagine March of the Penguins without Morgan Freeman’s mellifluous narration.
Record audio using the Voiceover tool
Whether you’re adding detail to vacation highlights or explaining something technical, you can record audio directly into the iMovie timeline.
Tip
Modern Macs include built-in microphones, but you’ll get much better results if you use an external mic. The built-in ones are designed for chatting via audio or video, not for making audio recordings of any quality. The easiest way to attach an external microphone is to use a USB mic. Many models are available, from expensive options by SE Electronics, Rode, and MXL, to more affordable ones by Logitech and Blue.
Recording audio
- Connect a microphone to your Mac, if necessary.

- Click the Voiceover button in the toolbar, or press the O key, to open the Voiceover window (Figure 5.5).
Figure 5.5. Audio levels in the Voiceover window
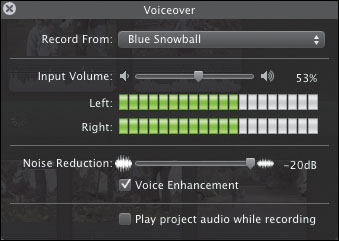
- Choose an input source from the Record From pop-up window.
- Speak into the microphone and adjust the Input Volume slider so the meters show a strong signal but remain green.
- Drag the Noise Reduction slider to the right to filter out ambient noise.
- The Voice Enhancement checkbox enables an algorithm to electronically smooth spoken word recordings; uncheck the box if you prefer your voice to be unaltered (definitely experiment to see which you prefer).
- Enable the “Play project audio while recording” checkbox if you’re listening through headphones and need to hear audio cues from your movie while you record.
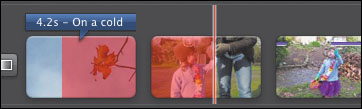
- To begin recording, click the point on the filmstrip where you want the audio to start. iMovie gives you a 3-second countdown before it starts to record.
- Speak into the microphone. The filmstrip turns red to indicate where you’ve recorded (Figure 5.6).
Figure 5.6. Recording a voiceover
- Click anywhere within the Project browser or press the spacebar to stop recording. A new purple audio clip appears (Figure 5.7).
Figure 5.7. The voiceover appears as a purple audio clip.

Tip
Make sure you click the clip or press the spacebar to stop recording; if you close the Voiceover window (or press the O key), your recording isn’t saved.
- The Voiceover tool remains active; to record another clip, click another spot in the filmstrip.
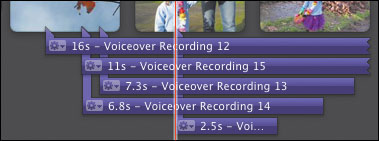
You can record multiple takes and then delete the ones you don’t like (Figure 5.8). Be aware that when you play your project back you’ll hear all your takes at once unless you mute some of them.
Figure 5.8. Feel free to record multiple takes.
- When you’re finished recording, click the close button on the Voiceover window to close it, or press the Esc key.
Tip
Voiceover recordings are regular audio clips, which means you can edit them like any other clip. If the beginning of one recording sounds great but includes a flub later, you can trim away the error and record just the section you need (Figure 5.9).
Figure 5.9. Mix and match voiceover recordings to get the best result.

Create a Travel Highlights Movie Project
The modern version of iMovie was designed for making travel videos. I’m being literal: An Apple engineer went on a diving vacation and wanted a better, faster way to cut together the footage he shot. Although iMovie is used for making everything from family videos to school projects, my guess is that a majority of movies out there relate people’s epic vacation adventures. This project uses a theme to provide structure, and includes an animated map to show where you’ve been.
Create a travel-themed project
Although applying a theme for the project is entirely optional, it provides a framework for your movie and automatically adds many titles and transitions.
Creating a project and applying a theme
- Choose File > New Project (or press Command-N) to create the new project.
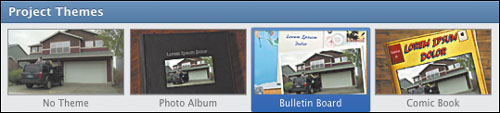
- Click a theme to choose it; in this case, I’m using the Bulletin Board theme as an example (Figure 5.10).
Figure 5.10. Choosing a project theme
- Enable the “Automatically add transitions and titles” checkbox below the theme preview. This, too, is optional, but part of the point with the project is to let iMovie do some of the heavy lifting.
- Click the Create button to create the project.
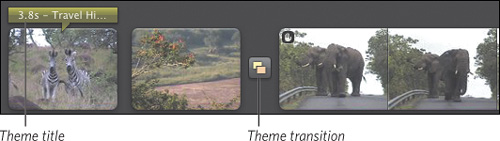
- Drag clips from the Event browser to the Project browser to build your movie. As you do, notice that themed titles and transitions automatically appear (Figure 5.11). In fact, iMovie keeps them organized: If you add a clip to the beginning of the movie, the theme title shifts to the first clip.
Figure 5.11. Theme elements are added automatically.
Tip
Each theme includes a handful of different title and transition types. Open the Titles or Transitions browser to view theme-specific options above the standard complement of options.
Add a map
In one of my early travel videos, I painstakingly attempted to replicate the Indiana Jones-style map where a line progresses from location to location on a map to indicate our travel route. Now, iMovie makes it extremely easy.
Adding a map
![]()
- Click the Maps, Backgrounds, and Animatics button to view the available maps.
- Drag one of the maps from the browser to a spot in your project. (Only the top two rows of maps are animated.)
- In the inspector that appears, iMovie fills in your current location (if it knows it) as the Start Location (Figure 5.12).
Figure 5.12. Map-specific options in the inspector
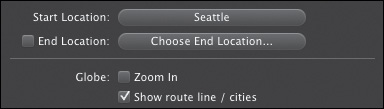
- Click the Choose End Location button to specify a destination.
- Enter the name of a city, airport, or major landmark and choose from the list of results that appears. You can also customize the name in the “Name to display on map” field.
- Click Done to finish editing the map.
Tip
Easily change the map style by dragging a different map onto the map in the Project browser.
Tip
When you add a map in the Bulletin Board theme, the maps that appear in the background of the theme transitions change to match the style of the one you added.
- Select a transition in the Project browser. A full view of the transition image (which normally appears zoomed) includes numbered image areas.
- In the Project browser, drag one of the numbered flags to an area of your movie to use that frame in the transition image (Figure 5.13).
Figure 5.13. Editing transition elements
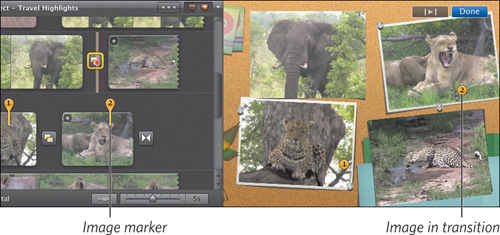
- Click Done to apply the changes.
Create a Sports Highlights Movie Project
Almost as soon as I started writing about iMovie years ago, I started to receive questions from parents and coaches who were using iMovie to create weekly recaps of sporting events for their teams to watch and learn from. iMovie ’11 includes a new feature, the Sports Team Editor, an internal team database you can access for such sports highlight movies.
Build the sports team database
iMovie’s Sports Team Editor is designed to keep track of your team and be available for upcoming videos.
Entering team information into the Sports Team Editor
- Choose Window > Sports Team Editor to open the editor.
- Click the Create a New Team button, and enter a season and team name and choose the sport (Figure 5.14).
Figure 5.14. Setting up your very own sports franchise
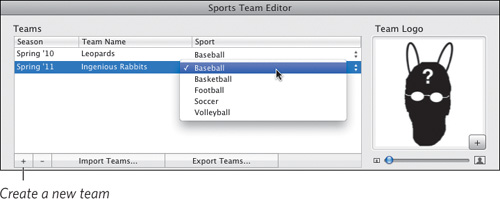
- If you want to include a team logo, click the + button in the Team Logo field and locate an image file on disk.
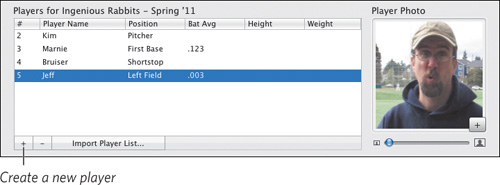
- In the Players section, click the Create a New Player button.
- Enter the player’s name, position, and other information, and add a player photo (Figure 5.15).
Figure 5.15. Adding players to the team
- Click Done to exit the Sports Team Editor.
Note
The default player information is pretty generic, but you can customize the columns. Click the expansion triangle next to Sports at the bottom of the window, and double-click a label for your sport to change it.
Tip
If you already track your team information in a spreadsheet or other database, export the data to a tab-delimited text file. You can then import that into the Sports Team Editor and save some time.
Add Sports theme elements
The Sports Team Editor, unsurprisingly, ties into iMovie’s Sports theme, with some transitions that take advantage of the player information.
Adding Sports theme elements
Create a new project using the Sports theme. If you’ve already created a project, you can switch to the Sports theme by choosing File > Project Theme (or pressing Command-Shift-J).
If the option to automatically add transitions and titles is enabled, iMovie creates those items on its own. However, the coolest ones are titles that need to be added manually. Open the Titles browser and check out the following:
• Score. Add this title to drop a game score summary from the top of the screen. In the pop-ups that appear in the Viewer, specify each team and then enter a number in the score fields provided.
• Team vs Team. Good for placing near the front of the video, this title lets you choose which teams are playing and displays their logos.
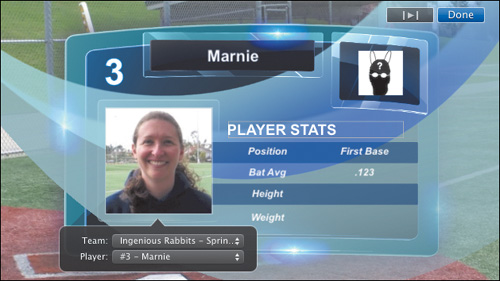
• Player Stats. Add this title to overlay a player’s information. Choose the player in the pop-up menu that appears (Figure 5.16).
Figure 5.16. Adding a Player Stats title to a clip
Note
If you change any information in the Sports Team Editor, an alert appears at the bottom of the window informing you that the project contains outdated team information and needs to be updated. Click the Update Project button.
Make a Green-Screen Effect Project
Difficulty: Intermediate
I’ll admit it, one reason I go to see summer Hollywood movies is the special effects. Compared to effects just 20 years ago, what artists can do with pixels now is amazing. Now, I won’t pretend that you can get that level of quality in iMovie, but you can take footage shot against a green screen or a blue screen and project something else in its place. Imagine shooting a video podcast, or creating a school report where your child stands in front of a diagram and points to key sections of it. Or really, just imagine yourself in a galaxy far, far away...
Note
Why green or blue? iMovie looks for a broad range of color, so if you happen to be wearing something that’s green, you’d want to use a blue screen; use a green screen if something in the video is blue.
Shoot against a green or blue screen
The first thing you need is some green or blue material to drape behind your subject. That can be an inexpensive piece of cloth from a fabric store or even a wall or board painted a solid color. Any area that’s green or blue will be rendered invisible when you add it to your iMovie project (Figure 5.17).
Figure 5.17. Green screen for all your dramatic readings

When setting up the scene, try not to project harsh shadows on the background. Also try to avoid items with reflective surfaces that might pick up some of the green color.
Tip
When shooting the green-screen footage, move out of the frame at the end of a scene so the camera records a few frames of just the area with the green screen. iMovie can use that to better identify areas that should be masked.
Add a green-screen clip to your movie
A green-screen clip works similar to a cutaway (described in Chapter 4) in that it overlays other footage in your project. When you add it as a green-screen or blue-screen clip, those colors are knocked out.
Adding a green-screen clip to your movie
- Add the clip that will be visible in the background. That can be regular footage, a photo, or even one of the backgrounds found in the Maps, Backgrounds, and Animatics browser.
- Drag a clip shot against the screen from the Event browser onto one of the background clips.
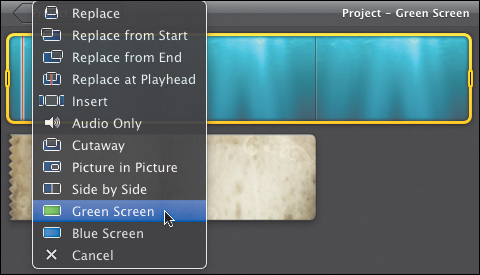
- From the pop-up menu that appears, choose Green Screen or Blue Screen (depending on the screen color you shot) (Figure 5.18).
Figure 5.18. Adding the clip as Green Screen
iMovie automatically removes the green or blue areas, which you can see in the Viewer (Figure 5.19).
Figure 5.19. Just another weeknight under the sea.

Improve the green-screen effect
iMovie doesn’t have the advanced features found in professional compositing software, but there are a few things you can do to try to improve the appearance of the green-screen effect.
Cropping areas
- If there are areas in the clip that aren’t important, such as around the edges, first select the green-screen clip in the Project browser.
- In the Viewer, click the Cropped button to display corner handles.
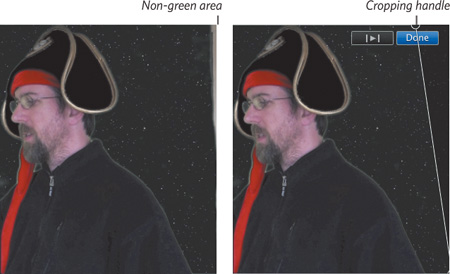
- Drag the handles to mask out areas that you’re sure will not contain any of the clip’s content (Figure 5.20).
Figure 5.20. I unintentionally included an area outside the green screen when shooting, which isn’t hidden (left). Cropping that edge removes the gaffe (right).
Using the Subtract Last Frame feature
Earlier I suggested that you step out of the frame when recording and capture the green screen by itself. That’s to take advantage of the Subtract Last Frame feature, where iMovie performs some extra color cleanup using that frame as a guide.
- Add the green-screen clip to your project.
- Double-click the clip to bring up the Clip inspector.
- Go to the Background settings and enable the Subtract Last Frame option, and then click Done. iMovie uses the frame as a reference to remove more color (Figure 5.21).
Figure 5.21. By itself, the green-screen clip gave iMovie some trouble around the book (left). With Subtract Last Frame enabled, the noise disappeared.

Tip
One other technique to improve the mask is to adjust the green or blue gain sliders in the Video inspector. Your mileage will definitely vary, but it’s worth a try.
Create a Score in GarageBand Project
Difficulty: Intermediate
Software needed: GarageBand ’11
You’ve already used iMovie’s built-in audio clips and imported songs into a movie from your iTunes library, but what if you want something original? If you own both iMovie and GarageBand (either purchased separately through the App Store or as part of the iLife ’11 package), you have all the tools you need to create your own soundtrack—even if you don’t know a lick about making music.
GarageBand ships with thousands of short audio snippets called loops, brief segments of music that can be repeated—looped—to create sections of a song. They’re typically played by one instrument or instrumental group, like a guitar, a drum kit, or a horn section. By layering and combining various loops, you can quickly and easily create a unique composition. For this project, you’ll need a movie that’s roughly two to three minutes in length.
Tip
I highly recommend two excellent books by my colleague Jeff Tolbert. If you’re new to GarageBand, read Take Control of Making Music with GarageBand ’11. If you already know how to play an instrument, you need (yes, need) Take Control of Recording with GarageBand ’11 (www.takecontrolbooks.com/news/garageband).
Get your movie into GarageBand
As you work to build a soundtrack for your movie, obviously you want to be able to reference the footage. To do that, you can import a version of the movie directly into GarageBand as its own track.
Preparing the movie for export
- In iMovie’s Project Library, select the project you want to work on.
- Choose Share > Media Browser. The Media Browser is a library of media shared by many other programs, including the iLife and iWork applications.
- Choose an export size. I recommend picking a low-resolution version, because ultimately you’re going to bring the completed score back into iMovie.
(It is possible to send the movie to GarageBand and export the final version from there, but it involves an extra layer of video compression between your original and the end result.)
- Click the Publish button. iMovie creates the shared version of the movie for the Media Browser. (GarageBand doesn’t recognize iMovie projects that have not been shared to the Media Browser.)
Opening your movie in GarageBand
- Launch GarageBand.
- In the New Project dialog, choose Movie.
- Click the Choose button. The New Project from Template dialog appears, basically a Save As dialog box with a few extra features (Figure 5.22, on the next page).
Figure 5.22. Save the file and set the key.
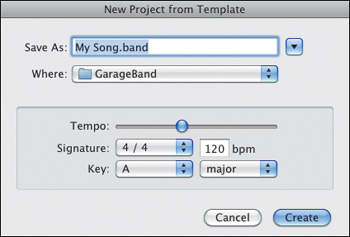
- Enter a name for your project in the Save As field.
- Choose a folder in the Where pop-up menu. Your GarageBand folder is a great default location.
- Change the Key setting to A major.
Note
I’m changing the key to A major here because I know I’m going to use certain loops that sound better in the key of A. This is not something you normally have to do when you create a project. You can always change the key later, too.
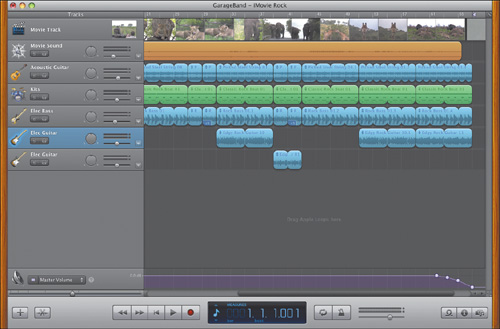
- Click Create. The main GarageBand window opens with a Movie track already in place and the Media Browser open (Figure 5.23).
Figure 5.23. GarageBand with a Movie track

- In the Movies tab of the Media Browser, select iMovie from the pop-up menu.
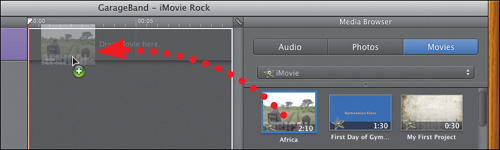
- Locate the movie project you shared to the Media Browser and drag it into the timeline (Figure 5.24).
Figure 5.24. Adding the movie to the Movie track
GarageBand takes a moment to build thumbnails for your movie and then displays it in the timeline. Your movie’s audio appears in a separate Movie Sound track.
Tip
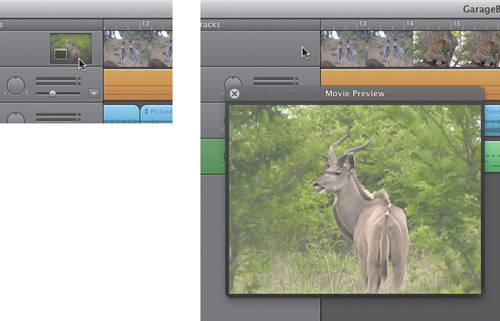
If you look carefully, you’ll notice a tiny preview of your video in the Movie Track header, to the left of the movie thumbnails. To see a bigger preview, double-click the thumbnail to open it in a larger floating window (Figure 5.25).
Figure 5.25. View a larger preview of your movie.
Start creating your first song
Now that your movie is in place, it’s time to start building some music. In order to do that, we need to get all the extraneous panes out of the way and open the Loop browser.
Note
I’m being more detailed than usual in this project, specifying particular loops to use by way of example. Feel free to follow along, or use the tutorial as a general indicator of how to build your own score.
Opening the Loop browser
![]()
- Choose Control > Hide Editor or click the Editor button to hide the editor. (The editor allows you to add markers and chapters to your movie track, and enables more precise editing of audio tracks.)
Note
A “track” in GarageBand refers to a discrete lane of audio data. Each track usually carries a separate musical instrument, and you can independently adjust each track’s volume and effects without affecting other tracks in the song.

- Choose Control > Show Loop Browser or click the Loop Browser button to show the Loop browser.
The Loop browser, as the name implies, is where GarageBand stores all of its loops. Looking for a drum beat or a guitar riff? This is where you’ll find it!
- For this piece, you’re going to start with an acoustic guitar. Click the Guitars button in the top half of the Loop browser. A list of available loops appears in the list below.
Adding your first loops
- If you needed to download the extra loops, relaunch GarageBand, open the Loop browser, and click the Guitars button to get back to where you left off.
- In the results list, scroll down to find Picked Steel String 01. Clicking its name plays a preview.
Note
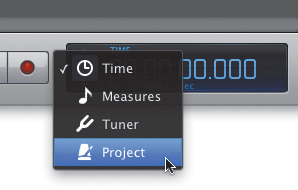
If you don’t see Picked Steel String 01 in the results list, your song may not be in the correct key. Click the icon in the LCD and switch to the Project mode (Figure 5.26). Change the key to A major.
Figure 5.26. Switching to the Project mode in order to change key
- Drag the loop to the timeline, making sure it starts at the beginning of the movie (Figure 5.27). GarageBand creates a new track called Acoustic Guitar, and a blue region appears in the timeline.
Figure 5.27. Adding a loop to the project

Note
Regions are the GarageBand equivalent of clips. They each hold a discrete chunk of music or audio. Like iMovie clips, two regions can butt up against one another, but they can’t overlap.
- Click the icon in the LCD and switch to Measures mode. A measure is a segment of musical time measured in beats. This piece, like many pieces of Western music, has four beats per measure. Working in measures makes it much easier to align regions to create a song.
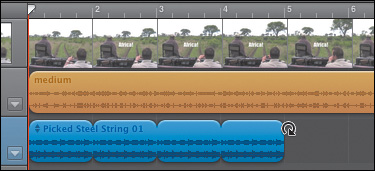
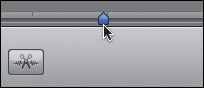
- Hover the cursor over the upper-right corner of the Picked Steel String 01 region. Notice how the cursor changes into a circular arrow, called the loop pointer.
- With the loop pointer still over the upper-right corner of the region, click and drag to the right. The region duplicates itself—it loops—to fill the space under the cursor.
- Drag right to loop the region four times. The end of the region should line up with the 5 on the beat ruler, above the movie thumbnails (Figure 5.28).
Tip
Make sure Control > Snap to Grid is checked. This makes moving, looping, and aligning regions much easier.
- Hit the Return key to make sure the playhead is at the beginning of the movie.
- Press the spacebar or click the Play button to hear the beginning of your piece.
The song is not very exciting yet, but it’s a start. In the next section, you’re going to add more loops and start building an actual song.
Tip
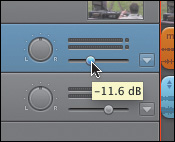
If your movie has sound, you may want to mute it or lower its volume. To mute it, click the Mute button underneath the track name. To lower its volume, drag the track volume slider to the left (Figure 5.29).
Figure 5.29. Muting the movie’s audio track
Adding more loops
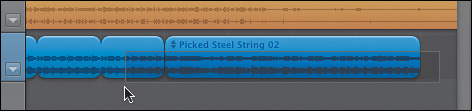
- In the Loop browser, click Picked Steel String 02. Not surprisingly, it sounds like it might go well with Picked Steel String 01.
- Drag it to the timeline at the end of the Acoustic Guitar track, immediately following the last repetition of Picked Steel String 01.
- Hit Return to go back to the beginning of the song and press Play. Now you’re getting somewhere.
- Click and drag a marquee around both guitar regions to select them (Figure 5.30).
Figure 5.30. Select both regions.
- Chose Edit > Copy (or press Command-C) to copy both regions.
- Click the 9 in the beat ruler to move the playhead to the end of the second region.
- Choose Edit > Paste. You should now have four regions of acoustic guitar, ending at the beginning of measure 17.
- Move the last region, Picked Steel String 02.1, ahead two measures, so it begins at measure 15. There should now be a two-measure gap between it and the previous region.
- In the Loop browser, select Picked Steel String 04 and drag it to the timeline into the hole you just created. It should span from measures 13 through 15.
- Hit Return and then press the spacebar to hear your song so far.
Note
The loops Picked Steel String 01, 02, and 04 are all part of the same loop “family.” Apple specifically designed loop families so you could mix and match them on a track and it would sound like a natural performance. Some especially nice loop families to check out are Delicate Piano, Emotional Piano, and Fusion Electric Piano, among others.
Add more instruments
Your project is starting to sound like a real song, but it definitely needs some other elements. In this next section, you’re going to add some new instruments and start to flesh out the arrangement.
At the beginning of this section I said you were going to create a rock soundtrack, and nothing says “rock” like a good backbeat. It’s time to add some drums.
- In the Loop browser, click the Reset button to start a new search.
- Click Kits to select all the drum-kit–related loops.
- Now I’m going to show you a nifty trick you can use to audition new loops in the context of the rest of the song: Press Return and then the spacebar to begin playing the song from the beginning.
- While the song is playing, click Classic Rock Beat 01 in the Loop browser.
The drumbeat starts playing along with the guitar. There may be a slight delay before the drumbeat begins. This is so the beat starts at the beginning of a measure and allows the two loops to synchronize.
Tip
You can adjust the volume of the drum loop by moving the volume slider at the bottom of the Loop browser. You can also use the volume slider to the left of the acoustic guitar regions to adjust the volume of the guitar track.
- The beat works well with the guitar loops, but it might be nice to start with a fill. Drummers often play fills, which are sort of like mini-solos, in between musical phrases and at the beginnings of sections to add excitement and sustain listeners’ interest.
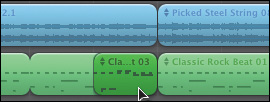
- Click Classic Rock Beat 03. The first half is similar to the earlier drum beat, but the second half features a nice fill that would work perfectly.
- Drag Classic Rock Beat 03 into the timeline below the acoustic guitar track. Position it so it starts at measure 7.
Note
Notice that the drum track is green, while the guitar track is blue. This is because the guitar track is what GarageBand calls a Real Instrument track, which means that it’s an actual audio recording of a guitar player. The drum track, by contrast, is a Software Instrument track. Instead of being an actual recording of a drum kit, it’s a collection of instructions that trigger the computer to play samples—short recordings of individual drum hits that, combined together, sound like a real drum kit. One of the cool things about Software Instrument tracks is that you can actually edit the instructions and change the notes, or in this case the drum hits, that are being triggered. You can also change the instrument that’s playing the notes—to a different drum kit or even to a piano or a cello.
- I want to start with the fill, so cut the drum region in half and delete the first part. As in iMovie, you can split a region at the playhead. To do so, click the beat ruler at measure 8, and then select Edit > Split (Command-T) to split the region at the playhead.
- Make sure that the first region is selected and press Delete.
- Drag Classic Rock Beat 01 into the timeline immediately after the fill (Figure 5.31). Loop it one and a half times so it ends where the guitar does.
Figure 5.31. Replacing the region
- Listen to the song from the beginning. The drums add some activity and interest during the repeat of the guitar part.
Create a new section
Things are starting to come together, but where to go next? You could repeat the section again and add more instruments, but that could get boring. Adding music to your movie should make it more exciting, not less. Instead, consider switching gears and adding a new section.
Starting with a new loop
- Reset the Loop browser and click Guitars.
- Drag Picked Steel String 08 onto the Acoustic Guitar track at measure 19, at the end of the existing guitar regions.
- Loop it three times so it ends at measure 27.
- Reset the Loop browser and click the Kits button to return to the drum loops.
- Drag Classic Rock Beat 01 into the Kits track at measure 19. Loop it once so it ends with the new guitar region.
- Scroll to measure 8 and find the drum fill at the beginning of the drum track.
- Hold down the Option key and drag the fill to measure 18 in the timeline. The fill replaces that measure of Classic Rock Beat 01.
Note
Option-dragging copies a region, but GarageBand is finicky about holding down the Option key before you start to drag. If you do these two actions at once, you end up dragging the loop itself and not a copy.
Adding some bass
- Reset the Loop browser again and click Bass to reveal the bass loops.

- Click the Cycle button to enable the cycle region. Watch the beat ruler while you click the button. A new bar appears under the beat ruler, with the same tick marks as the ruler. This is the cycle ruler.
The cycle region enables you to audition one area of your song repeatedly. This makes it easier to find loops that work with a specific section or make small tweaks to a particular area of a song.
- Click in the cycle ruler and drag from measure 19 to measure 27 (Figure 5.32). A yellow bar appears where you drag, defining the cycle region.
- Press Play. GarageBand plays the cycled section of the song. When the playhead gets to the end of the cycle region, it jumps back to the beginning of the yellow bar.
- With the cycle region still playing, click Rock Bass 01 in the Loop browser.
- This bass part works perfectly with the new section of the song, so drag it into the timeline and loop it so it fills the cycle region.
Tip
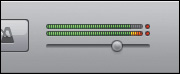
At this point in the process, you’ve got several elements going at once, and the song may be getting loud. Yes, loud is often good when it comes to rock and roll, but there is a limit. Look at the master level meter (Figure 5.33). If you see red dots to the right of the meters, see the sidebar below.
Figure 5.33. Clipping indicators
Selecting some favorites
You’re going to be using a lot of the same loops over and over again. It would be great if GarageBand had a way to select some favorite loops so you didn’t have to keep hunting for the same loops in the Loop browser. Well guess what? It does!
- Reset the Loop browser and click Guitars.
- Find Picked Steel String 01 in the results list.
- Click its checkbox in the Fav column (Figure 5.34).
Figure 5.34. Mark your favorites.

- Do the same for the other loops in the song (Picked Steel String 02, 04, and 08; Classic Rock Beat 01; and Rock Bass 01 and 03).
- Reset the Loop browser again and click Favorites. Voila! There are all your loops in one handy place!
Using the resize pointer
- From the Favorites list, drag Picked Steel String 04 onto the end of the Acoustic Guitar track, followed by Picked Steel String 02.
This transitional section should be four measures long, not six, so you’ll need to crop the second loop.
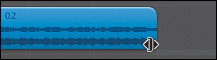
- Hover the pointer over the lower-right corner of the final guitar loop. A bracket with arrowheads appears, called the resize pointer.
- Click and drag with the resize pointer to make the region two measures shorter (Figure 5.35). It should now end at measure 31.
Figure 5.35. Drag the resize pointer.
- Drag Classic Rock Beat 01 onto the Kits track under the two new guitar regions.
Transposing a region
- Drag Rock Bass 03 onto the Elec Bass track, under the new regions.
- Use the resize pointer to shorten the new bass region to two measures.
- Option-drag the shortened bass region to copy it and fill out the remainder of this new section.
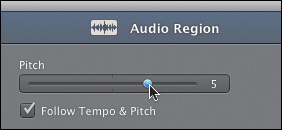
- Double-click the second new bass region to open it in the editor.
- On the left-hand side of the editor, move the Pitch slider to 5 (Figure 5.36). This raises the pitch of the region by five semitones, the equivalent of five white and black keys on a piano.
Figure 5.36. Adjusting the pitch

- Click the editor button to close the editor.
Add a new instrument
The piece sounds great so far, but it’s time for some new blood. This is supposed to be a rock song, so how about some electric guitar?
Finding some new guitar loops
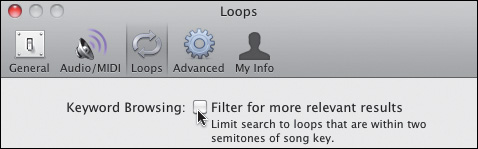
- Reset the Loop browser and click the Guitars button. I want to add some of the loops in the Edgy Rock Guitar family. Unfortunately, you’ll notice that the only ones visible at the moment are Edgy Rock Guitar 01, 06, and 14. What happened to the others?
- Open GarageBand’s Preferences and click the Loops button.
- Deselect the “Keyword Browsing: Filter for more relevant results” checkbox (Figure 5.37).
Figure 5.37. View more results by turning off filtering.
- Close Preferences.
- The Loop browser has reset itself, so click the Guitars button again.
- Scroll down to the Edgy Rock Guitar family, and notice that all the loops, 01–15, show up in the results list now.
- Favorite 01, 10, and 11.
Adding edgy rock guitar
- Reset the Loop browser and click the Favorites button.
- Drag Picked Steel String 01 onto the Acoustic Guitar track and loop it from measure 31 to 39.
- Select the drum and bass regions between measures 19 and 27 (Classic Rock Beat 01 and Rock Bass 01).
- Option-drag them to measure 31.
Tip
It may help to zoom out a bit to see more of the timeline. To do so, drag the zoom slider, at the bottom of the track header section (Figure 5.38). Dragging left zooms out, and dragging right zooms in.
- Drag Edgy Rock Guitar 10 into the timeline underneath the Elec Bass track.
- Loop it once so it ends at measure 39 with the rest of the regions.
Finish your song
It’s time to finish this puppy. You’re going to copy and paste a few sections, add a couple more guitar parts, and fade the piece out.
Copying sections
- Select all the regions between measures 27 and 31 (the section with the transposed bass region).
- Option-drag them to measure 39.
- Select all the regions between measures 19 and 27, with Picked Steel String 08, and Option-drag them to measure 43.
- Finally, select all the regions between measures 31 and 39, with Edgy Rock Guitar 10, and drag them to measure 51.
- Copy them one more time and drop them at measure 59.
Adding the final guitar parts and finishing your soundtrack
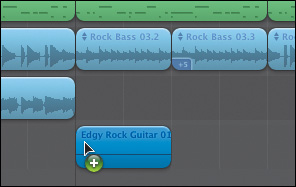
- In the Favorites section of the Loop browser, find Edgy Rock Guitar 01 and drag it to the timeline at measure 39, under the existing Elec Guitar track (Figure 5.39).
Figure 5.39. Dragging a new guitar loop
Note
You could add the new loop to the existing electric guitar track, but Edgy Rock Guitar 01 is quieter than 10, and for now, it’s easier to leave them on their own tracks to adjust their relative volumes.
- Drag Edgy Rock Guitar 11 onto the first electric guitar track at measure 59, over the existing region that’s there. As with the drum fill earlier, it will replace the guitar region that’s there.
- Loop Edgy Rock Guitar 11 once so it ends with the rest of the regions. Again, it replaces the guitar region that was there.
- Listen to the song all the way through once or twice, making sure everything sounds balanced and even. Use the track volume sliders to adjust track volumes, and make sure your master level meters aren’t clipping. If they are, see the sidebar “Set Your Levels,” earlier.
Also check to make sure the movie sound is at an appropriate level. If there’s dialogue in your video that you want to be audible, you’ll need to turn the music down quite a bit.
- Select Track > Fade Out to create a fade at the end of the piece, which is implemented on the Master Volume control (Figure 5.40).
Figure 5.40. Fade out at the end of the song.
Note
Fade Out uses the last region in the song to determine where the fade-out ends. If your movie contains audio and is significantly longer than the song, the song won’t fade, only the movie sound will. To remedy this, do one of the following: Copy one or more sections of the song to make it longer; or, delete the Movie Sound track. You’re not going to use it until you reopen your video in iMovie anyway, so it’s unnecessary at the moment.
Exporting your song
- Use the scroll bar at the bottom of the timeline to scroll to the end of the song.
- Find the end-of-project marker in the beat ruler (Figure 5.41).
Figure 5.41. Setting the important end-of-project marker
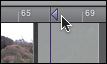
- Move the end-of-project marker to the end of the last region in your song. This sets the total length of your song and determines where GarageBand ends its export.
- Click the Mute button in the Movie Sound track.
- Open GarageBand Preferences and mark the Audio Preview checkbox (if it isn’t already checked). Close Preferences.
- Save and close your song. GarageBand exports the audio and creates an iLife preview, which you’ll use in a moment when you reopen the song in iMovie.
Note
In this case, you’re going to bring your song back into iMovie and export the movie from there. But you also have the option of exporting directly from GarageBand. To do so, select Share > Export Movie to Disk before you mute the Movie Sound track.
Finishing your film in iMovie
- In iMovie, open your video project.
- Click the Music and Sound Effects button.
- Find your GarageBand folder in the Music and Sound Effects pop-up menu. Browse to find your song.
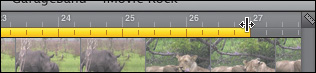
- Drag the song to the Project browser so that it’s added as a background audio track.
Your song is now part of your iMovie project. The green area indicates the length of your song. If your movie is longer or shorter than your song, you can edit the movie to fit. You can also edit it so important cuts in your film happen in sync with musical changes. This makes it feel like the music “fits” your movie better.
Now pour yourself a cold beverage and relax in a comfy chair. You’ve just created your first GarageBand song! You can now use these techniques to create all kinds of great music using just the loops that come with GarageBand.