
7. Edit Video on the iPad, iPhone, or iPod touch
One of the hallmark characteristics of iMovie is that it enables anyone to quickly and easily edit a movie using various snippets of video they’ve shot. Now that Apple’s mobile iOS devices all capture HD video, it makes sense that there should be a way to edit that footage together without waiting to bring it back to your computer.
iMovie for iOS takes the concepts used by the Mac version and makes them work on a mobile device. Although you won’t find every feature from the desktop software, iMovie for iOS is more than capable of creating high-quality movies wherever you happen to have some video clips, an iOS device, and a bit of spare time.
Work with Projects in iMovie for iOS
To accommodate smaller screens compared to the Mac, and to take advantage of a touch interface, Apple made some significant design decisions when developing the mobile version of iMovie. Although most of it will be immediately familiar, there are some aspects—such as how iMovie organizes projects or handles themes—that may require some getting used to.
Note
iMovie for iOS is a separate $4.99 app available from the App Store. If you purchased the original version of the software, which ran on the iPhone 4 and fourth-generation iPod touch, you can upgrade to the latest version for free. Check for updates in the App Store app on your device or within iTunes on your computer.
Note
In addition to working on the iPhone 4 and fourth-generation iPod touch (the current models at the time of this writing), iMovie for iOS runs on the iPad 2—but not on the original iPad.
Create a new project
Every movie you edit is its own iMovie project, accessible from the neon-lit opening screen. To get you started quickly, however, iMovie jumps right into the editing environment after you create a new project. You can return later to grace the project with a name.
Creating a new project
![]()
At the main screen, tap the New Project button. iMovie takes you to the editing environment. The interface differs between the iPad (Figure 7.1) and the iPhone or iPod touch (Figure 7.2) due to the sizes of the devices’ screens. Each device enables you to edit in either the horizontal or portrait orientation.
Figure 7.1. The iPad editing environment in landscape orientation.
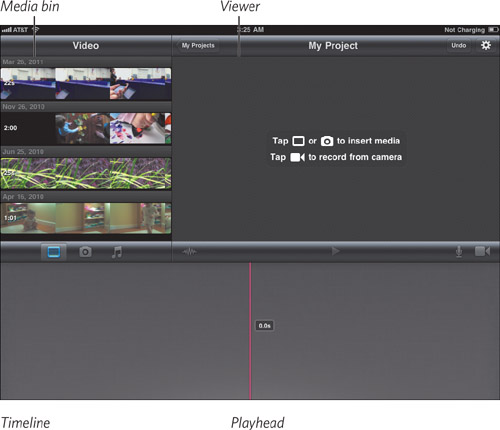
When viewed in portrait orientation, the Media bin is hidden and accessible as a popover window.
Figure 7.2. The iPhone and iPod touch editing environment

Note
It’s not currently possible to move projects between iMovie ’11 and iMovie for iOS. Files created in the iPad version of iMovie’s sister app GarageBand can currently be brought into GarageBand on the Mac, so I’m optimistic that we’ll see this capability arrive with iMovie in the future. (Although you can move projects between iOS devices, as I describe near the end of this chapter.)
Naming your project
- Make any edit, such as adding a clip to the timeline.
- Tap the My Projects button to return to the opening screen.
- Tap the title in the marquee to make it editable (Figure 7.3).
Figure 7.3. Editing a project title

- Enter a new title, and then tap the Done button on the virtual keyboard.
Tip
If you create a project and then immediately return to the opening screen, iMovie discards the new project because it has no content.
Choose the theme
Every movie must have a theme, even if you don’t plan to use theme elements. New projects adopt the Modern theme, but you won’t see evidence of it unless you specifically choose a theme transition or add a title to a clip. You can change a project’s theme at any time. Any themed assets in the movie automatically switch to the chosen theme (which also means you can’t mix and match elements from different themes in the same project).
Choosing the theme
- Tap the Project Settings button.
- In the Project Settings window, drag the theme thumbnails left or right to highlight the theme you want to use (Figure 7.4).
Figure 7.4. Changing the theme

- Tap outside the window to apply the setting; on the iPhone or iPod touch, tap the Done button.
Apply a fade in or fade out to the movie
Instead of starting with the first frame of the first clip, you may want to begin your movie with a fade in from black. The Project Settings window includes a single-switch option for adding fades to the start and end of a project.
Applying a fade in or fade out
![]()
- Tap the Project Settings button to open the Project Settings window.
- Tap the switch next to “Fade in from black” or “Fade out to black” (or both) to change the setting from Off to On.
- Tap outside the window or tap the Done button to apply the setting.
Open an existing project
iMovie keeps track of your saved projects on the opening screen, like you’re choosing a video at a stylish multiplex. (Being from Seattle, I keep expecting a light drizzle of rain to come down while I’m scrolling through project thumbnails; maybe in a future update.)
Opening other projects

- Tap the My Projects button (which displays the words on the iPad, and an icon, shown here, on the iPhone and iPod touch) to return to the main screen.
- Swipe the project icons until the one you want is highlighted.
- Tap the icon to open the project.
Add Video to a project
iMovie for iOS is pretty picky about the video it uses. Basically, if the video came from an iPad, iPhone, or iPod touch, you’re golden. I’ve also had success with footage from my Flip MinoHD. If you want to bring in video you’ve shot using other cameras, you need to first convert it on your Mac. That said, there are several ways to get video into iMovie.
Capture video directly
Using the cameras on the device, you can record video directly into your iMovie timeline. With a project open, do the following.
Capturing video into iMovie
![]()
- Tap the Camera button.
- Set the mode switch to video (or to photo, if you want to capture a still photo).
- Tap the Record button to begin capturing the footage (Figure 7.5).

- Tap the Record button again to stop recording.
- Press the Play button that appears to review your footage; you can also skim through the clip at the top of the screen.
- If the clip is acceptable, tap the Use button. The video clip appears in the Video browser as well as at the point in your movie where the playhead was positioned before recording.
If not, tap the Retake button and shoot again.
Moving clips to the Camera Roll
![]()
Video shot by the device stays with the project in which it was captured. It isn’t automatically added to the Camera Roll, which is where the iOS stores photos and videos that have been shot by the device or, on the iPad, imported using the iPad Camera Connection Kit. To move a clip to the Camera Roll, tap the Edit button and then tap the Move button.
Tip
Whenever possible, I prefer to shoot video using the Camera app instead of using iMovie. Shooting in iMovie makes the clips unavailable for other projects without moving them to the Camera Roll.
Import from a camera, iPhone, or iPod touch
If you own an iPad as well as an iPhone or iPod touch, you can import media to the iPad’s Camera Roll using Apple’s $29 iPad Camera Connection Kit. I’m far more likely to shoot video using my iPhone than my iPad 2, but I prefer to edit in iMovie on the iPad’s larger screen when possible.
Importing from a camera, iPhone, or iPod touch
- Connect the USB adapter from the iPad Camera Connection Kit to the iPad’s sync port.
- Plug the iPad’s connector cable into the USB port on the adapter and the port of the iPhone or iPod touch.
- Wake up both devices; the Photos app launches on the iPad, displaying the photos and videos on the iPhone or iPod touch.
- Tap the videos and photos you wish to add; a blue checkmark indicates they’re queued for importing (Figure 7.6).
Figure 7.6. Video clips ready to be imported
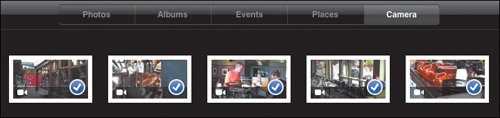
- Tap the Import button, and in the popover that appears, tap Import Selected to copy them to the Camera Roll.
- When you’re asked whether you want to delete or keep the imported photos on the iPhone or iPod touch, I recommend tapping Keep.
Add clips from the Media Library
With a library of clips to work from, it’s easy to add clips to your project’s timeline.
Adding clips from the Media Library
- Scroll to the position in the timeline where you want the clip to appear. (This doesn’t apply if no clips are in the timeline yet.)

- If you’re editing on an iPhone or iPod touch, or you’re holding the iPad in its portrait orientation, tap the Media Library button. (If editing on the iPad in landscape orientation, the Media Library appears in the upper-left corner.)
- To preview the contents of a clip, drag your finger across it. The preview doesn’t play in real time or with sound—the speed depends on how fast you drag your finger.
- Tap once on a clip to reveal its selection handles.
- Drag the handles to define which portion of the clip you want to add (Figure 7.7).
Figure 7.7. Selecting a portion of a video clip to add

- Tap the clip again to add it to the timeline.
Tip
A clip can be added only before or after an existing clip; you can’t insert a new clip in the middle of an existing clip. To do that, you must first split the clip in the timeline (see “Splitting a clip,” later in the chapter).
Edit Video
Working with video clips in the timeline is quite similar to editing clips in iMovie ’11, but designed to be done with the tip of a finger instead of a mouse and keyboard, of course.
Play and skim video
![]()
Unlike iMovie ’11 (unless you’re using the Single-Row View described in Chapter 2), the timeline in iMovie for iOS runs left to right across the bottom of the screen. Tap the Play button to preview the movie in real time in the Viewer.
To skim the timeline, swipe left or right. The playhead remains in the middle of the screen, so instead of positioning the playhead on the video, you’re actually positioning the video clips under the playhead.
Tip
On the iPhone or iPod touch, you can also swipe within the Viewer to skim the timeline. On the iPad, tap and hold the upper-left or upper-right corner of the timeline to quickly jump to the beginning or end.
Edit clips
After adding footage to the timeline, you’ll find yourself moving, trimming, splitting, and deleting sections to cut out unwanted sections and create good timing. iMovie on the iPad 2 also has an abbreviated Precision Editor for fine-tuning the edit points between clips.
Moving a clip on the timeline
- Tap and hold the clip you want to move. It lifts out of the timeline as a small thumbnail (Figure 7.8).
Figure 7.8. Moving a clip in the timeline

- Without lifting your finger from the screen, drag the clip to a new location in the timeline.
Trimming a clip
- Tap a clip once to reveal its selection handles.
- Drag a handle to shorten or lengthen a clip (Figure 7.9).

Tip
To view more thumbnails in the timeline, pinch outward horizontally with two fingers to expand the clips; pinch inward to compress the sizes of the clips.
Splitting a clip
- Position the clip so the playhead is at the point where you want to split it.
- Tap the clip to select it.
- Slide one finger down the playhead from the top of the clip to the bottom (Figure 7.10). The clip is split into two, with a transition added between them. (The transition, however, is set to None, so there’s no break between clips when you play the video. See “Edit transitions,” on the next page.)

Deleting a clip
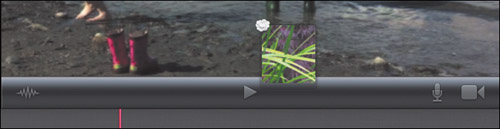
Drag a clip from the timeline to the Viewer until you see a small cloud icon appear (Figure 7.11). When you lift your finger from the screen, the clip disappears in a puff of smoke.
Figure 7.11. Giving a clip the Keyser Söze treatment
Using the Precision Editor
- On the iPad 2, tap a transition icon to select it and then tap the double-triangle icon to display the Precision Editor (Figure 7.12). Or, pinch outward vertically on a transition.
Figure 7.12. The Precision Editor

- Do any of the following to adjust the edit point:
• Drag the transition itself to reposition the edit point without changing the duration of the surrounding clips.
• Drag the top handle to change the end point of the previous clip, without adjusting the next clip.
• Drag the bottom handle to change the start point of the next clip without adjusting the previous clip.
Note
It’s not possible to adjust the duration of the transition from within the Precision Editor. For that you need to edit the transition itself.
- Tap the triangle icons, or pinch two fingers together, to close the Precision Editor.
Edit transitions
Whether you like it or not, iMovie automatically adds transitions between every clip. Now, before your imagination fills with endless cross dissolves, note that it’s possible to have a transition that doesn’t do anything at all. In other words, iMovie adds a transition placeholder between every clip so you don’t have to drag one from elsewhere.
Editing transitions
- Double-tap a transition icon to reveal the Transition Settings window (Figure 7.13).
Figure 7.13. Choosing a transition style and duration

- At the left side of the window, scroll to choose the type of transition: None (creating an abrupt jump cut between the clips on either side), Cross Dissolve, or Theme.
The appearance of the latter depends on which theme you chose for your project. To change the theme, tap the Project Settings button and highlight a new one, as described earlier in the chapter.
- At the right side of the window, scroll to choose one of the four preset durations for the transition.
- To apply the changes, tap outside the window to dismiss it on an iPad 2; on an iPhone or iPod touch, tap the Done button.
Add a title
Like transitions, titles do not exist in a separate pane, ready to be dragged onto a clip. Instead, any clip can have a title, which is an attribute of the clip, not something added separately.
Adding a title
- Double-tap a clip to view the Clip Settings window (Figure 7.14).
Figure 7.14. The Clip Settings window

- Tap the Title Style button; the default style is None.
- Choose a title style: Opening, Middle, or Ending. The styles depend on the project’s theme, and are designed for common spots in your movie. For example, Opening is good for titles at the start of a movie and can occupy the entire screen, while Middle typically runs a title at the bottom of the screen without obscuring your video. Of course, you can choose whichever style you want at any point in your movie.
- Tap the text field in the Viewer and enter your title text (Figure 7.15).
Figure 7.15. Entering text in a theme title
- Tap Done in the virtual keyboard to stop editing the title.
Adding a title to just a portion of a clip
A title spans the entire length of a clip—even if the clip is several minutes long. If you want the title to appear on just a portion, such as the first few seconds, do the following:
- Position the playhead in the clip where you want the title to end.
- Split the clip.
- Double-click the portion you want and add a title to it.
Specify a location
The iPhone, iPad 2, and iPod touch can all embed location data in the photos and video they capture, thanks to their built-in assisted-GPS technologies. iMovie reads that data, too, and gives you the option of using it in titles and, creatively, a few themes.
Specifying a location
- Double-tap a clip to bring up the Clip Settings window.
- Tap the Location button.
- If location information was saved with the clip, it appears in the Location window (Figure 7.16). To change the location, do one of the following:
• To use your current location, tap the crosshairs button.
• To find a location, tap the Other button to search iMovie’s database of locations. Tap the closest match to use it.
Figure 7.16. Location settings

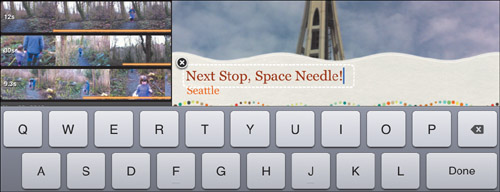
- You can also change the label to something more specific, like a neighborhood or restaurant name. Tap the label and enter new text. It won’t change the underlying location data. For example, the Travel theme adds a location marker to a map in its Opening title; the marker stays in place, but its label changes (Figure 7.17).
Figure 7.17. A custom label applied to the location data

- To exit the Clip Settings window, tap outside it (iPad 2) or tap the Done button (iPhone and iPod touch).
Tip
In most themes, the location appears as a subhead below the title. If you don’t want to announce the location, why not put that text to good use? In the Location window, enter any text you wish to display, even if it has nothing to do with location (Figure 7.18).
Figure 7.18. Use the Location line as a subhead.

Tip
As you’re working on editing your movie, you can tap the Undo button to reverse the last action; on the iPhone or iPod touch, shake the device to display the Undo button. But what if you tap Undo a few too many times? On the iPad, tap and hold the Undo button, which reveals a Redo button; on the iPhone and iPod touch, Redo appears with Undo when you shake the device.
Add and Edit Photos
Predictably, iMovie for iOS can import photos as well as video, and even manages to apply the Ken Burns Effect to them. In fact, every photo gets the Ken Burns treatment, without an easy way to keep an imported photo from moving.
Import photos from the Photos app
Photos you’ve shot using the device or that were synced from your computer can be brought into your iMovie project. As with video, if you captured photos from within iMovie, those images are restricted to the project that was active when you did the shooting.
Tip
If you shot photos using your iPhone or iPod touch, you can transfer them directly to an iPad using Apple’s iPad Camera Connection Kit. See “Import from a camera, iPhone, or iPod touch,” earlier in this chapter.
Importing photos
- Position the playhead in the timeline where you want a new photo to appear.

- Go to the Media Library and tap the Photos button to view available photo albums.
- Tap an album name to view its photos (Figure 7.19).
Figure 7.19. The Photos library as viewed on the iPhone

- To preview a photo, tap and hold its thumbnail. On the iPad 2 in landscape orientation, the preview appears in the Viewer. On other devices, a larger version of the image floats above the album.
- Tap the photo thumbnail once to add it to the timeline.
Edit the Ken Burns Effect
If you recall from Chapter 4, the Ken Burns Effect is based on the position of the frame at the beginning and end of the clip. iMovie determines how best to make the camera move from one state to the other.
Editing the Ken Burns Effect settings
- In the timeline, tap a photo you’ve imported to select it.
- Tap the Start button to move the playhead to the first frame of the clip (Figure 7.20).
Figure 7.20. Editing Ken Burns Effects on the iPhone

- Position the starting frame the way you wish: Pinch inward or outward to zoom in on, or out of, the frame.
- Tap the End button to move the playhead to the last frame of the clip.
- Adjust the image to the way you want it to appear at the end of the sequence.
- Tap Done to finish editing the Ken Burns Effect.
Disabling the Ken Burns Effect
Unfortunately, there’s no easy control to turn off the Ken Burns Effect and just display a static photo. However, it is possible.
- Tap the Start button.
- Pinch the image on screen so you can see all of its edges (zoomed out) and then release it—iMovie snaps it back into place with a minimal amount of zoom applied.
- Tap the End button and repeat step 2 to let iMovie snap it into place.
- Tap Done to stop editing the photo.
Edit Audio
One area where iMovie for iOS sacrifices features for mobility is in editing audio. You can adjust the volume level for an entire clip, not specific levels within the clip; it’s also not possible to detach audio from a video clip. Still, that leaves plenty of functionality, especially now that you can add multiple background music clips, include up to three additional sound effects at a time, and record voiceovers.
![]()
When working with audio on the iPad 2, it’s extremely helpful to view audio waveforms on tracks; the feature isn’t available on the iPhone or iPod touch. Tap the Audio Waveforms button to make them visible.
Change a clip’s volume level
So you don’t have multiple audio sources fighting for attention, you can adjust the volume level for any clip, or mute it entirely.
Changing a clip’s volume level
- Double-tap a clip in the timeline to display the Clip Settings window.
- Drag the volume slider to increase or decrease the overall level (Figure 7.21). To mute, tap the On/Off switch so it’s set to Off.
Figure 7.21. Change a clip’s volume in the Clip Settings window.

Add background music
For the easiest approach, iMovie can include background music, designed for the current theme, that loops in the background. Or, you can add your own audio tracks (with a few limitations). As with iMovie on the Mac, a project can have a background music track that operates a bit differently than other audio tracks. In the iOS version, a song in the background starts at the beginning of the movie; it can’t be pinned to a specific location in the movie.
Adding automatic theme music
![]()
- Tap the Project Settings button.
- Tap the Theme Music switch so it’s set to On. (The Loop Background Music option is automatically enabled.)
- Tap outside the Project Settings window (iPad) or tap the Done button (iPhone and iPod touch) to apply the setting.
Adding a background music clip
![]()
- Go to the Media Library and tap the Audio button.
- Choose an audio source (Figure 7.22). In addition to iMovie’s theme music selections, the Audio window gives you access to your iTunes music library, sorted by playlists, albums, artists, or songs.

- Tap the name of a song to add it to your project. It appears as a green track behind the video clips in the timeline (Figure 7.23).
Figure 7.23. A background song added to the timeline

Tip
Music written for each theme is available to add to any project, not just to movies with those themes. In the Audio library, tap Theme Music and choose any song you wish.
- To add multiple background songs that play one after another, go to the Project Settings window and disable the Loop Background Music option. You can then add more audio clips. If you don’t change that project setting, iMovie replaces any background song when you add a new one.
Note
iMovie does not import any music encumbered with Apple’s FairPlay DRM scheme; those tracks appear in the song list, but in gray with “(Protected)” before their names. Apple abandoned DRM for music tracks a while ago, but you may still have tracks in your iTunes library from before the switch. If you still want to use a specific song, go to iTunes on your computer, click iTunes Store in the sidebar, and then click the iTunes Plus link under Quick Links. That gives you the option to upgrade protected songs (for a fee of $0.30 per song, or 30 percent of an album’s current price) to the DRM-free iTunes Plus format.
Tip
iMovie considers any audio file less than one minute in length to be a sound effect, and won’t add it as a background song.
Aside from the fact that a background song can’t be repositioned in the timeline, you can edit it like most clips. Tap to select it and adjust its duration using the selection handles, or double-tap it to adjust the clip’s overall volume.
One downside is that you can’t apply a fade to an audio clip, so if you shorten the clip, the audio ends abruptly.
Note
Whenever a video clip with audio appears over a background song, the song is automatically ducked (made softer). Unfortunately, iMovie offers no controls for specifying the amount of ducking to apply.
Add a sound effect
When you want to add a little punch to your audio, consider throwing in a sound effect. Up to three sound effect clips can appear in a section at a time.
Adding a sound effect
- Position the playhead at the section where you want a sound effect to start.
- In the Media Library, tap the Audio button.
- Tap the Sound Effects button to view a list of available effects.
- Tap the name of the effect you want to use. It’s added to the timeline (Figure 7.24).
Figure 7.24. The Water Splash sound effect is added to coincide with a splash in the video.

Tip
Using iMovie’s audio recording feature, you can record sound effects while you’re shooting or anywhere else. See “Add a voiceover” on the next page.
Tip
iMovie’s automatic assumption that any audio clip less than one minute in length is a sound effect is an annoyance when you want to use a short song to open your movie. But it’s also an advantage: You can add any music file—whether its content is a sound effect or not—that’s under one minute as a sound effect clip.
Add a voiceover
Most of the time, your videos can speak for themselves. On occasion, though, you may want to provide narration or a commentary track that plays over the footage. iMovie’s audio import feature lets you record your voice (or any sound, for that matter) into the timeline.
Adding a voiceover
- Position the playhead in your movie where you want to begin recording audio.

- Tap the Record button to bring up the Ready to Record window.
- When you’re ready to start capturing audio, tap the Record button in the window. iMovie counts down from 3 to 1 and then begins recording (Figure 7.25).
Figure 7.25. Recording a voiceover

- Tap the Stop button to end recording. The recorded clip appears as a purple audio clip below the video in the timeline.
- Choose what to do with the recorded clip: Tap Review to listen to it; tap Retake to record again; tap Discard to delete the recording; or tap Accept to keep it in your project (Figure 7.26).
Figure 7.26. Review your recording before adding it to the timeline.

Feel free to record multiple takes, but keep in mind that you can have only three audio tracks in one spot at a time. Also, mute the other takes before you record a new one.
Tip
To capture better-quality audio, consider using a microphone instead of relying on the device’s built-in mic. That can be the microphone on the earbuds that come with the iPhone or even, when connected to the iPad using the iPad Camera Connection Kit, a professional microphone or USB headset.
Share Projects
iMovie for iOS is designed to easily turn footage into a movie, but it’s also intended to take your video and share it with the world. That could mean saving the finished movie to the Camera Roll for later viewing or for importing into iTunes on your computer, or sending it directly to YouTube, Facebook, Vimeo, or CNN iReport.
Share to the Camera Roll
When you share your project to the Camera Roll, a final version of the movie is created and made available for you to not only watch, but access from other apps with access to your photo and video library, such as Keynote.
Sharing to the Camera Roll
- Tap the My Projects button to return to the opening screen.
- With the project you want to share highlighted front and center, tap the Share button (Figure 7.27).
Figure 7.27. Share menu options

- Tap the Camera Roll button.
- In the next dialog, choose a resolution to export: Medium (360p), Large (540p), or HD (720p). iMovie creates the finished movie and saves it to the Camera Roll.
- To view the movie, open the Photos app, locate the movie at the bottom of the Photos list, and tap the Play button.
Tip
To upload a finished movie to your MobileMe Gallery, share it to the Camera Roll first. From there, you can open the movie, tap the Action button, and choose Send to MobileMe.
Share to YouTube, Facebook, Vimeo, or CNN iReport
With an Internet connection, you can upload your video directly to a sharing service that publishes the work online almost instantly—you don’t need to sync with a computer first.
Sharing to YouTube, Facebook, Vimeo, or CNN iReport
- At the My Projects screen, highlight the movie you want to export.
- Tap the Share menu to bring up the list of destinations.
- Tap the button for the service you want to use. (I’m presuming you already have an account with one or more of them; if not, you’ll need to go sign up for one on the Web.)
- If prompted, enter your login information.
- Enter a title and description in the fields provided (Figure 7.28, on the next page).
Figure 7.28. Enter information about the movie when sharing online.

- Tap the Category field and specify one of the categories.
- Choose a size to create for uploading.
- Set the privacy level to control who can view the movie.
- Tap the Share button when you’re ready to proceed. iMovie prepares the movie and uploads it.
When finished, iMovie gives you the option of viewing the movie on the Web or sharing the location in an outgoing email message.
Send the project to another device via iTunes
Another method of sharing an iMovie project is, quite frankly, a weird workaround. It’s possible to export the project itself, not just a rendered version of the movie, for backing up to your Mac or sending to another iOS device for editing. (Sadly, at this time you can’t bring your iMovie for iOS project and finish editing it in iMovie on the Mac. Someday, I hope.) It is, however, a fairly counterintuitive procedure.
Exporting a project to iTunes
- At the My Projects screen, highlight the project you wish to export and tap the Share button.
- Tap the Send Project to iTunes button. iMovie packages all the data and resources (including video clips and audio files) and then informs you when the export is complete.
- Connect your iPad, iPhone, or iPod touch to your computer.
- Open iTunes and select the device in the sidebar.
- Click the Apps button at the top of the screen and scroll down to the File Sharing section.
- Select iMovie in the Apps column.
- Select the project you exported (Figure 7.29) and click the Save To button. Specify a location, such as the Desktop.
Figure 7.29. The exported project in iTunes

Importing the project into iMovie on another iOS device
- Connect the other device to iTunes and select it in the sidebar.
- Go to the Apps screen, scroll down to the File Sharing section, and select iMovie in the Apps column.
- Click the Add button and locate the project file you exported above. Or, drag the project from the Finder to the iMovie Documents column. (You don’t need to sync the device to copy the file; it’s added directly.)
- Open iMovie on the device.

- Although the project now exists on the device, iMovie doesn’t yet know about it. Go to the My Projects screen and tap the Import button.
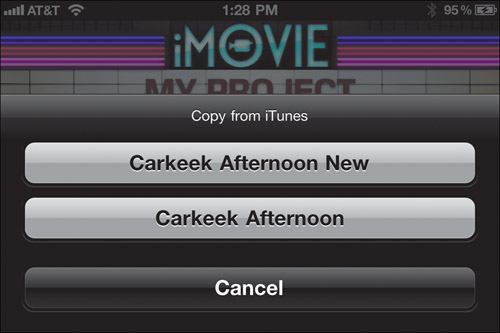
- In the dialog that appears, tap the name of the project to import it. It appears among your other projects (Figure 7.30).
Figure 7.30. Importing the “Carkeek Afternoon New” project into iMovie on an iPhone
See? Only 13 steps to move a project from one device to another!
Tip
This method is also a way to duplicate a project—for example, if you want to save what you’ve done but try an editing experiment. After sharing to iTunes, tap the Import button to bring a copy back in; it will have a slightly different name.