Chapter 3. Reading on Your NOOKcolor and Beyond
Although your NOOKcolor has many unique features and capabilities, its primary purpose is for reading ebooks and other content. One of the benefits of owning a NOOKcolor is that you can carry a complete library with you everywhere you go. If you don’t happen to have your NOOKcolor with you, you can also read your ebooks on your PC, Mac, iPhone, iPad, iPod touch, Android phone, and Blackberry.
Various forms of content are available to read on Your NOOKcolor—NOOKbooks and other EPUB files, along with PDFs; Microsoft Word, Excel, and PowerPoint files; and plain text files. Appendix A, “Understanding ebook Formats,” explains more about the details of ebook formats. You are probably already familiar with Microsoft documents, though you can use either the DOC or DOCX formats (and the corresponding XLS or XLSX and PPT or PPTX formats) used in all versions of Word.
Browsing Your Library
The two main places for content on your NOOKcolor are Home screen and Library.
The Home Screen
The Home screen includes the Daily Shelf, covers you have placed on the Home pages, and other ways to access your content. (See the section “The Home Screen” in Chapter 1, “Getting Started with Your NOOKcolor,” for a complete review of the options.)
The Daily Shelf shows the most recent downloads on the left with less recent downloads on the right. Swipe left or right to see more of the Daily Shelf.
To open an ebook, magazine, or newspaper from the Home screen, tap the cover. The ebook, magazine, or newspaper opens to the last page that you were on when you closed it. However, NOOKkids books always open from the beginning.
Tip
On an open space of the Home page, double-tap to have the book, magazine, and newspaper icons align in a grid format. Alternatively, press and hold on a blank area of the screen, and then tap Clean Up This Panel to achieve the same result.
The Home screen has three Home pages. (You can see which page you are on at the top, just beneath the Keep Reading bar by the three dots—the white one is the Home page you are on). You can add icons to the Home pages (not the Daily Shelf) by tapping and dragging a cover from the Daily Shelf. In the Library, you can press and hold a cover and then tap Add to Home from the menu that appears.
To remove an item from a Home page, press and hold the cover. Tap Remove from Home from the menu that appears.
To place an item on a different Home page, press and drag the cover over to the far right or left edge of the screen. The cover will slide to the next page. Release the cover.
Note
If you have difficulty moving the last cover from a Home page to another, the best way to do that is to drag the cover down to the Daily Shelf, swipe to the Home page you want it on, and then drag it from the Daily Shelf to the Home page.
Finally, you can remove an item from the Daily Shelf by pressing and holding the cover. Tap Remove from Home from the menu that appears.
The Library
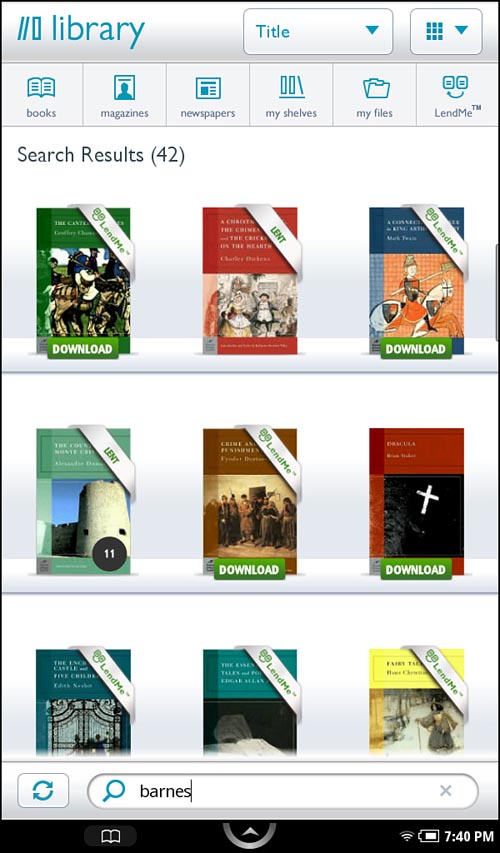
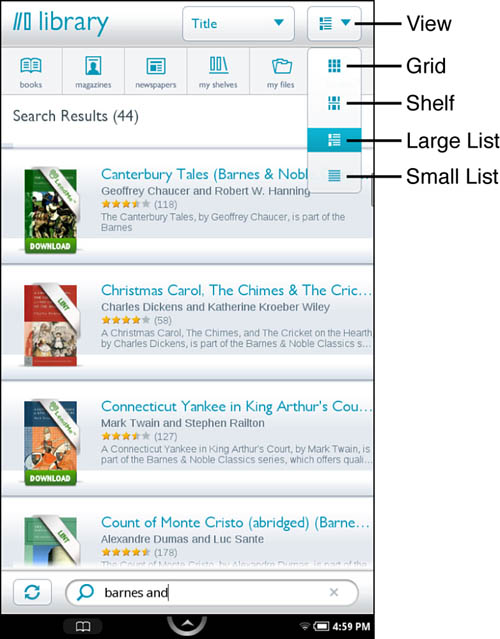
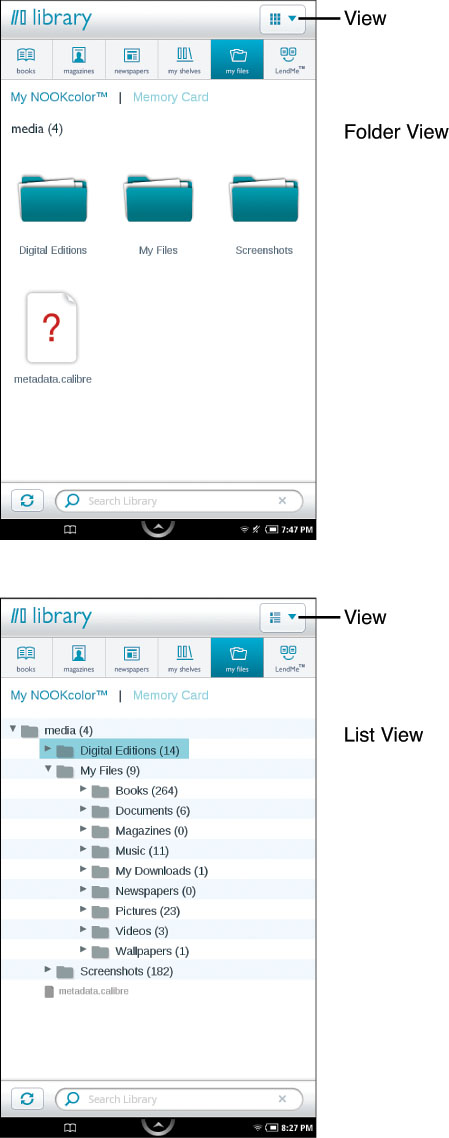
The Library contains all the content you’ve purchased from B&N and the content you have sideloaded (see Figure 3.1). This includes not only ebooks you’ve purchased, but also magazine and newspaper subscriptions, sample books, videos, music, Microsoft documents, PDFs, ebooks purchased from other sources, and free books downloaded from B&N and other sites.
Figure 3.1. The Library where all your books and content are stored.
To go to the Library, tap Library on the Quick Nav Bar. When at the Library, a set of buttons to choose from are always available:
• Books: Tapping this displays the full list of ebooks on your NOOKcolor, whether from B&N or other sources.
• Magazines: Tapping this displays the full list of magazines on your NOOKcolor, whether from B&N or other sources.
• Newspapers: Tapping this displays the full list of newspapers on your NOOKcolor, whether from B&N or other sources.
• My Shelves: Tapping this displays the shelves you have created and one default shelf: Archived.
• My Files: Tapping this displays the folders on your NOOKcolor and microSD card if installed.
• LendMe: Tapping this displays available ebooks from your library to lend, what ebooks you have borrowed, and what ebooks you have lent. For more information on the LendMe feature, see Chapter 4, “Lending and Borrowing Books with LendMe on Your NOOKcolor.”
If you purchase a book using the Shop on your NOOKcolor, that book is automatically downloaded to your NOOKcolor within a few minutes. If you purchase an ebook from B&N using your computer, the ebook is added to My NOOK Library on bn.com, but it isn’t downloaded to your NOOKcolor automatically—though the cover appears. You can tell it was not downloaded because a green Download icon appears on the bottom of the cover. Tap the cover to download the NOOKbook.
Caution
If you plan to be away from Wi-Fi hotspots, you should make sure that the items that appear in My NOOK Library have actually been downloaded to your NOOKcolor.
So many options exist here, so work your way through each button and the myriad actions you can take in interacting with the Library.
Books
This is the default location after you tap Library from the Quick Nav Bar, unless you have tapped Newspapers or one of the other buttons, and then tapping Library from the Quick Nav Bar takes you to the last button you were on (see Figure 3.2). Note that all files placed in the microSD card’s My FilesBooks folder are shown here along with all NOOKbooks and documents in the NOOKcolor’s My FilesBooks folder or NOOKcolor’s Digital Editions folder.
Figure 3.2. Sort your library by one of these choices.
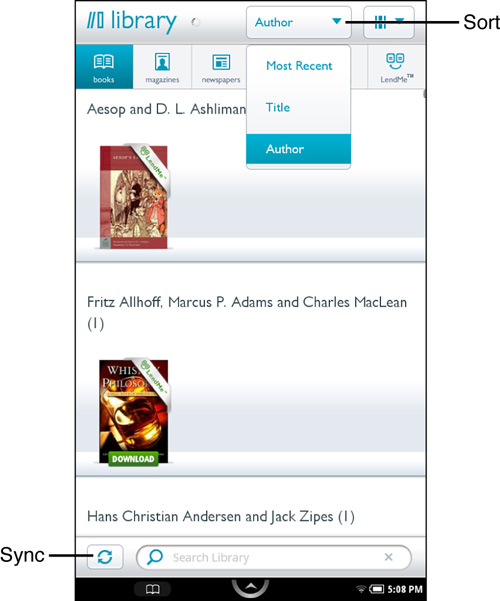
At the top of the screen, you have the Sort and View buttons. Tapping the Sort button enables you sort your ebooks by Title, Author, or Most Recent, which means either read or added (refer to Figure 3.2). The View by default is Grid view. Scroll up or down to view the library. The Grid view option is a series of nine squares (see Figure 3.3). Below that, you have Shelf view (you swipe left or right to view the entire shelf), Large List view, and Small List view. You can work with various Sorts and Views. For example, if you have 10 novels by Donna Leon and you sort by Author and view by Shelf view, all of Donna Leon’s books appear on a shelf. Large List view shows a medium size cover, the full title, and the author. Small list view does the same, but with a small cover.
Figure 3.3. View your library in one of these views.
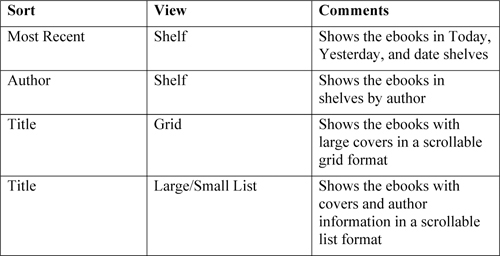
In general, sorting by title and using Shelf view is impractical (it’s essentially a Large List view) because most titles are different. Table 3.1 shows some useful combinations.
Table 3.1. Recommended Sort and View Combinations
From the Books part of the Library, you can interact with your ebooks in two ways. First, you can just tap the cover to open the ebook. Second, if you tap and hold the cover, a pop-up menu appears (see Figure 3.4) with several options:
Figure 3.4. The pop-up menu that appears after pressing and holding a cover.
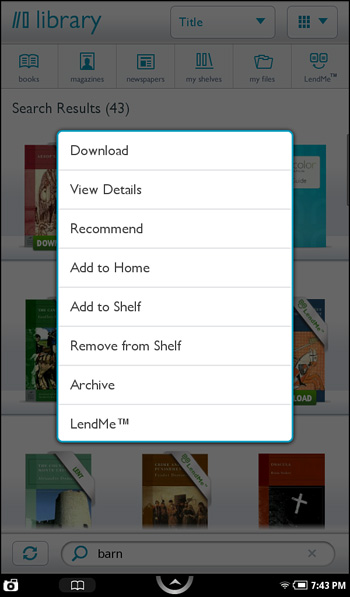
• Read: This option is only available if you have downloaded the NOOKbook. Tapping this option opens the ebook for reading.
• Download: This option is only available if you have not yet downloaded the NOOKbook. Tapping this option downloads the NOOKbook assuming you have a Wi-Fi connection enabled.
• View Details: Tapping this option opens a screen with several options (see Figure 3.5). If it is a NOOKbook, you see the star rating from B&N. Tapping the Read button opens the ebook for reading. (Alternatively, if you have not downloaded the NOOKbook yet, you can tap Download to download the NOOKbook.)
Figure 3.5. The View Details screen.
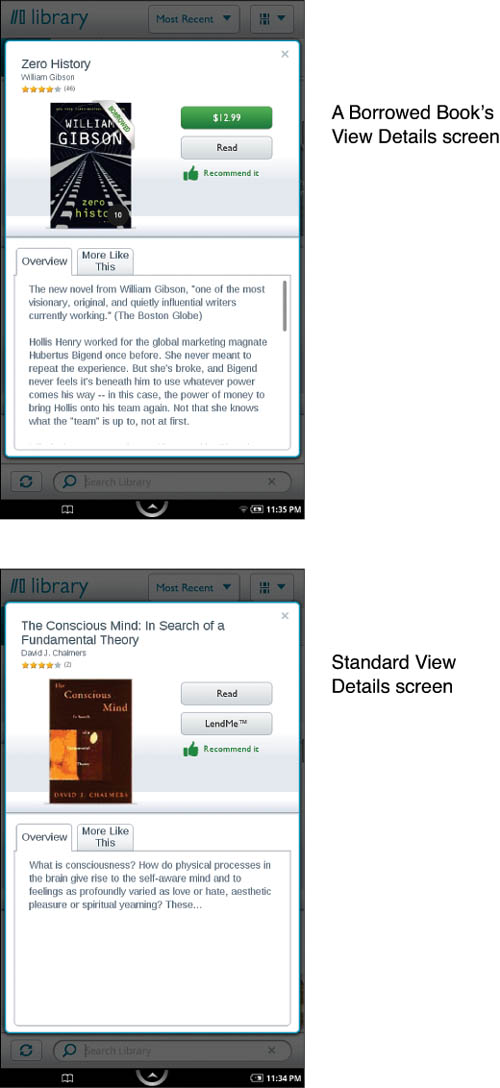
Tap LendMe to see the LendMe screen. For more information on the LendMe feature, see Chapter 4, “Lending and Borrowing Books with LendMe on Your NOOKcolor.”
Tap Recommend It to see the Recommend screen. For more information on the Recommend feature, see Chapter 8, “Using the Social Features of Your NOOKcolor.”
The Overview tab provides text describing the ebook.
The More Like This tab provides cover images to NOOKbooks that B&N’s computers think are like the particular book you are viewing. Tapping one of those covers opens a View Details screen for that NOOKbook.
If the NOOKbook is a sample or borrowed (for more information related to shopping and sampling NOOKbooks, see Chapter 9, “Shopping and Visiting B&N on Your NOOKcolor.” You can tap Read Sample (or just Read for borrowed NOOKbooks) to read the sample or tap the Price button and then tap Confirm to purchase the NOOKbook.
• Recommend: Just like Recommend It from the View Details screen, you can recommend an ebook. For more information on the Recommend feature, see Chapter 8, “Using the Social Features of Your NOOKcolor.”
• Add to Home: This option lets you add it to the Home page with a single tap.
• Add to Shelf: This option lets you add it to a shelf. An Add to Shelf screen appears. You can tap an existing shelf to add that ebook to that shelf. Alternatively, you can tap Add to a New Shelf. The Create New Shelf screen appears. Type in the shelf name and tap Save. The shelf is created and that ebook is added to that shelf. You can add ebooks to multiple shelves.
• Remove from Shelf: This option lets you remove the ebook from a shelf. If you tap Remove from Shelf, the Select Self screen appears and displays all the shelves this ebook is in. Tap the shelf you want to remove this ebook from.
• Archive: This option lets you archive a NOOKbook. This removes it from ready access, though it does not remove it from your My NOOK Library at B&N. If the NOOKbook is already archived, this option reads Unarchive. Tapping it unarchives the NOOKbook.
Tip
You can manage your ebook library (including archiving and unarchiving items) using My NOOK Library at bn.com. My NOOK Library is covered in detail in Chapter 21, “Using My NOOK Library.”
• LendMe: As in the View Details screen, you can lend a NOOKbook from this menu. For more information on the LendMe feature, see Chapter 4, “Lending and Borrowing Books with LendMe on Your NOOKcolor.”
Books, magazines, and newspapers purchased from B&N often have notices on the cover regarding them:
• New:This is a recent NOOKbook you have purchased and not yet downloaded.
• LendMe:This NOOKbook can be lent to a friend.
• Borrowed:You have borrowed this NOOKbook from a friend. The number of days left (out of 14) is in a small, gray circle at the bottom right of the cover.
• Lent:You have lent this NOOKbook to a friend. The number of days left (out of 14) is in a small, gray circle at the bottom right of the cover.
• Sample:This is only a portion of the NOOKbook to give you a chance to review before you buy.
• Download:The NOOKbook is not yet downloaded. Tap the cover to download it.
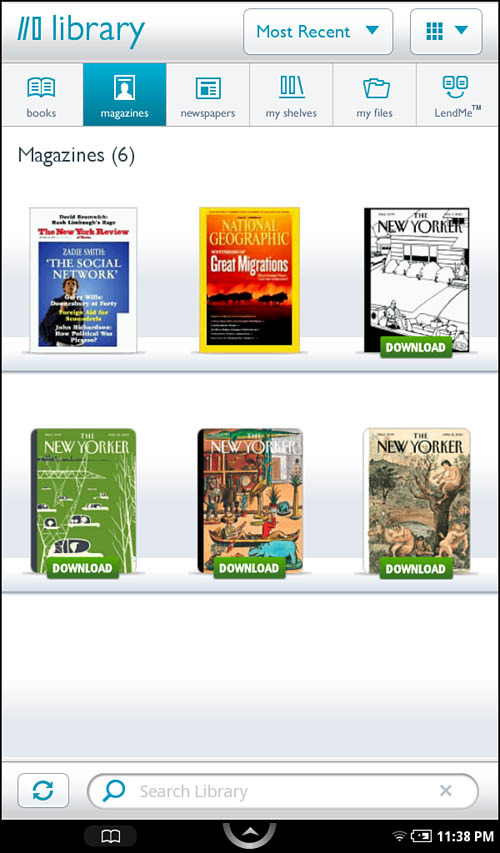
Magazines
This is where B&N places all your magazines (as opposed to newspapers) that you purchase from B&N (see Figure 3.6). Also, if you placed any files in either the NOOKcolors Magazines folder or in the microSD card’s My FilesMagazines folder, those documents are shown here as well. You have the same options here as you do with the Books section.
Figure 3.6. The Magazines screen.
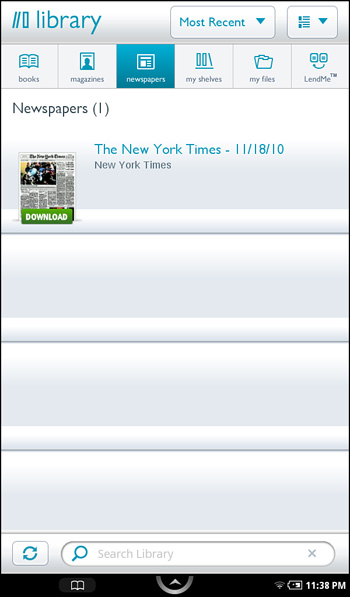
Newspapers
This is where B&N places all your newspapers (as opposed to magazines) that you purchase from B&N (see Figure 3.7). Also, if you have placed any files in either the NOOKcolors Newspapers folder or in the microSD card’s My FilesNewspapers folder, those documents are shown here as well. You have the same options here as you do with the Books section.
Figure 3.7. The Newspapers screen.
My Shelves
The NOOKcolor enables you to organize your ebooks into categories, or shelves, that you can name (see Figure 3.8). If you have a lot of ebooks and you want to categorize them beyond just author name, title, and most recent, this is how you can do it.
Figure 3.8. The My Shelves view.
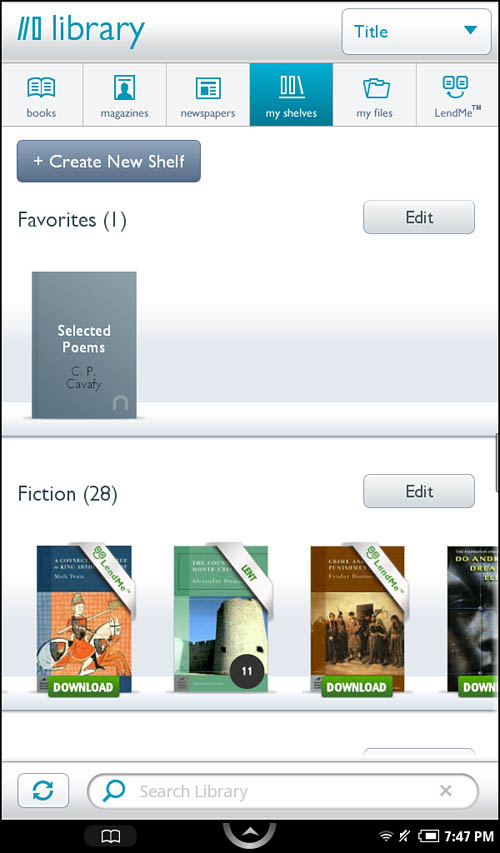
My Shelves shows you any existing shelves. (Two exist by default: Favorites and Archived.) To add a shelf, tap Create New Shelf. The Create New Shelf screen appears. Type the name of the shelf and tap Save.
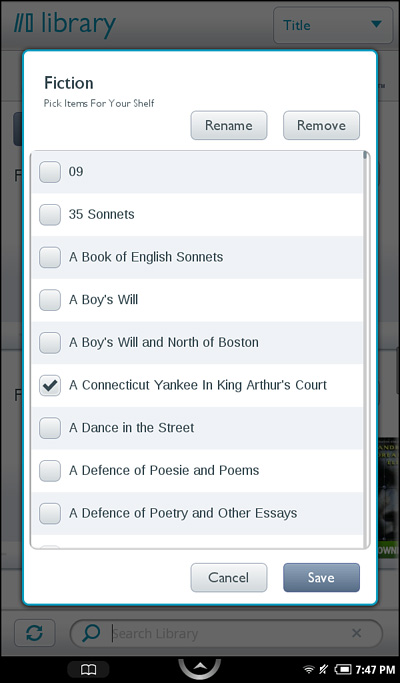
You can also edit existing shelves by tapping Edit next to the shelf you want to edit (see Figure 3.9). Here you can do several things. A listing of titles appears. To add titles to this shelf, tap the check box next to the title so that a check mark appears. Tap Save to add those titles to the shelf. Tapping Remove, instead, removes those titles from the shelf. Tap Rename to rename the shelf.
Figure 3.9. Edit existing shelves.
My Files
My Files lets you access files on the NOOKcolor internal memory or on the microSD card. The view defaults to the files on your NOOKcolor. Tap Memory Card, which appears only if a microSD card is installed, to access the files there.
The folder structure on the NOOKcolor and on the microSD card is straightforward, as shown in Figure 3.10. You can view either the folders and files with small or large folder icons by tapping the View icon. Books, Magazines, and Newspapers have already been covered because they appear in the appropriate locations in the Library.
Figure 3.10. Two views of the My Shelves screen.
Note
Adobe Digital Editions (ADE) ebooks also appear in the Books section of the Library. For more information about ADE ebooks, see Appendix A.
Interacting with documents, music, and videos is covered in the appropriate sections throughout this book.
LendMe
For more information on the LendMe feature, see Chapter 4, “Lending and Borrowing Books with LendMe on Your NOOKcolor.”
The Sync button forces a sync with My NOOK Library, downloading any new content, and so on. You can also tap the Search Library box to search your library for particular books and such.
Reading NOOKbooks on Your NOOKcolor
If you open a NOOKbook or sideloaded EPUB file for the first time, after you select it, you are taken to the starting point that the publisher has chosen for that item. This might or might not be the first page. For example, some ebooks open on the first page of Chapter 1, “Getting Started with Your NOOKcolor.” Other ebooks open on the cover or title page. The publisher of the book decides which page is visible when you first open an ebook.
Note
You can expect in early 2011 to begin seeing cookbooks with embedded video. How do you make cute chocolate curls or cut up a chicken? Tap to see.
If you are opening a NOOKbook that you have read on the NOOKcolor before in any of the NOOK apps, NOOKstudy, or original NOOK, you are taken to the last location you were reading. If you open a sideloaded EPUB file you have read on the NOOKcolor before, it opens to the last page you were on in the NOOKcolor. In other words, non-B&N content does not sync across applications.
As you’re reading, swipe right across the page to go to the previous page or swipe left across the page to go to the next page.
Of course, there’s more to reading books than just reading, right? Figure 3.11 shows the reading screen and the Reading Tools available. To see the Reading Tools, quickly tap the reading screen.
Figure 3.11. The reading interface.
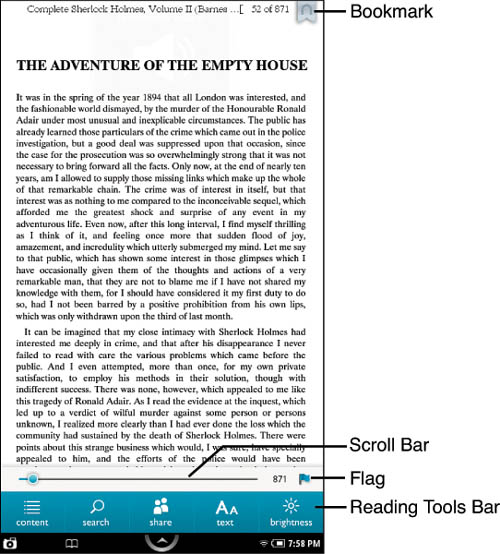
Following are features of the Reading Tools:
• Bookmark:Tap this to add a bookmark. Chapter 5, “Using Highlights, Bookmarks, and Annotations,” covers using bookmarks in detail.
• Scroll Bar:Drag this to quickly slide through the book.
• Flag:Appears only for B&N purchased content. Tap this to access some options not on the Reading Tools bar. See Chapter 8, “Using the Social Features of Your NOOKcolor,” for more details.
• Reading Tools Bar:This bar has five buttons: Content, Search, Share, Text, and Brightness. You see each of these buttons in action in the following sections.
To exit the Reading Tools, tap anywhere on the reading screen without those tools appearing.
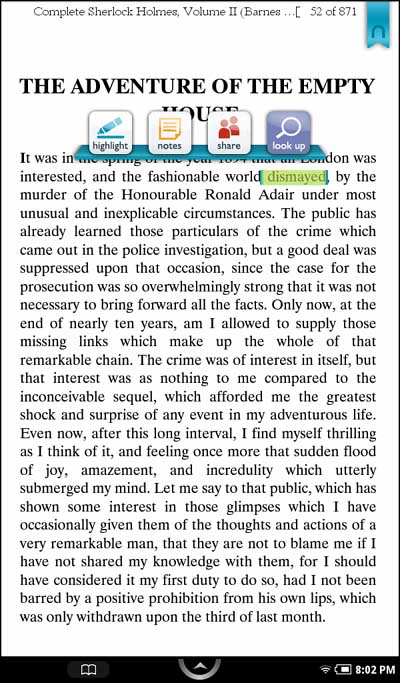
Finally, while reading, you can press and hold on a word. The Text Selection Toolbar appears (see Figure 3.12). If you want to select more than that single word, drag the selection highlight to the end of the block of text you want to select. For the Highlight, Note, and Look Up button, see Chapter 5, “Using Highlights, Bookmarks, and Annotations.” For the Share button, see Chapter 8, “Using the Social Features of Your NOOKcolor.” Looking up words is discussed in the “Looking Up Words” section.
Figure 3.12. The Text Selection Toolbar.
Changing the Text Font and Text Size
Your NOOKcolor enables you to easily change the text font and text size while reading. To change the font or the text size, tap the reading screen, and then tap Text on the Reading Tools bar (see Figure 3.13).
Figure 3.13. Use this screen to adjust the font size among other things.
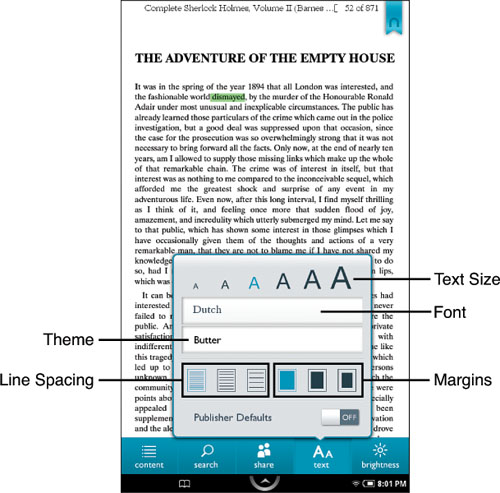
Your NOOKcolor supports six text sizes, represented by the A. The current text size A is colored teal. Tap the A for the size you want. You can see the text size adjust behind the text menu. Adjust the text size to whichever size you want.
To change the text font, tap the Font selection, which enlarges and shows a check mark next to the current font. You have six fonts to choose from, and you can see a representation of them in the Font selection. (Scroll to see all the fonts.) You can see the font change.
• You cannot change the text font if the publisher created the content with a specific font embedded in it.
• You cannot change the text font for PDF files. If the creator of the PDF file embedded a particular font, your NOOKcolor uses that font. Otherwise, it uses the default font.
• Some ebooks consist of pages scanned as images, usually as PDF files. You cannot change the text font for these ebooks.
Note
Tapping Publisher Defaults to On changes all settings on this screen to the options chosen by the Publisher for all content that you read. You can toggle that back to Off at anytime.
Changing the Color Theme, Line Spacing, Margins, and Brightness
Your NOOKcolor enables you to change the color scheme, space between lines, and margins while reading. To change these, tap the reading screen, and then tap Text on the Reading Tools bar.
Tap the Theme box to change the color settings for the background and text. You have six options ranging from Normal (black on white) to Night (white on black). Tap your choice. The reading screen changes to reflect that, so choose any you like.
Tip
With Butter, the background screen is not so white. However, if you read at night with no ambient light, you might prefer the Night or Gray option.
The Line Spacing options are similar to using single-space or double-space. The current selection is in a teal color, and you have three options. Tap the option you want. The reading screen adjusts.
The Margin options determine the amount of white space on the right and left sides of the text. The current selection is in a teal color, and you have three options. Tap the option you want. The reading screen adjusts.
To adjust the Brightness of the screen, tap Brightness. You see the familiar scrollbar that you can tap and drag to the desired brightness.
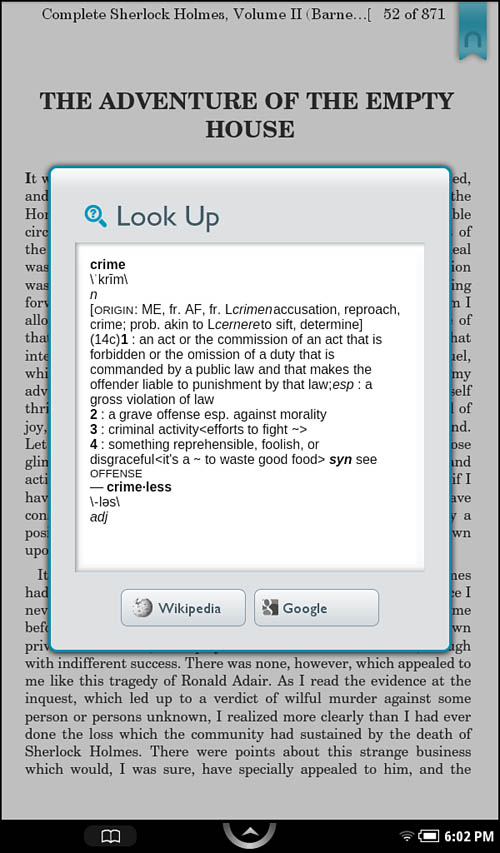
Looking Up Words
One of the most convenient features of your NOOKcolor is to quickly look up the definitions of words you don’t know. If you’re reading a book and encounter a word you don’t know or are curious about, press and hold on that word until the Text Selection toolbar appears. Tap Look Up. A window appears with a dictionary entry (see Figure 3.14). You can also tap Wikipedia or Google. Tapping either takes you to the browser, opens up the corresponding website, and enters that word as the search criteria. (Tap the Keep Reading link Status bar to return quickly to your book.)
Figure 3.14. Your dictionary goes wherever your NOOKcolor goes.
Note
Looking up words is not supported for certain types of ebooks:
• Magazines
• ADE PDFs and PDFs
• NOOKbooks for Kids
To search your ebook, tap the Search button, and then type the text you want to search. A keyboard and text entry box appear. Type your search words and tap Search. If it finds your word, the word is highlighted in yellow (see Figure 3.15). You can then tap either the left or right keys to go to and highlight the next appearance of that word. Tap the X to exit search mode. If you want to search for a different word or phrase, tap in the box that contains your original search term.
Figure 3.15. Searching your ebook is easy.

Tip
Typing lots of uppercase letters? Tap the Shift key twice. (It has a white highlight around the key.) This enables you to enter only uppercase letters. Tap the Shift key again to release the caps lock.
Reading Magazines on Your NOOKcolor
In addition to books, B&N provides magazine subscriptions for your NOOKcolor. B&N automatically delivers subscription content to your NOOKcolor if a Wi-Fi connection is available. For more information on subscribing to content on your NOOKcolor, see Chapter 9, “Shopping and Visiting B&N on Your NOOKcolor.”
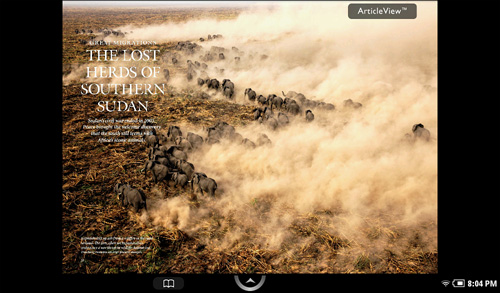
B&N recognizes that many magazines are more image intensive than ebooks, and the NOOKcolor takes full advantage of that to display a rich reading environment for magazines. Often, magazines are read in landscape mode (see Figure 3.16), though portrait mode works as well.
Figure 3.16. Reading magazines is best in landscape view.
Note
Some magazines function more like newspapers (for example, The New York Review of Books), so if you encounter a magazine like that, use the “Reading Newspapers on Your NOOKcolor” section for more appropriate instructions.
Caution
Some magazines (for example, The New Yorker) work only on the original NOOK. These will probably be updated in the near future to also work on the NOOKcolor.
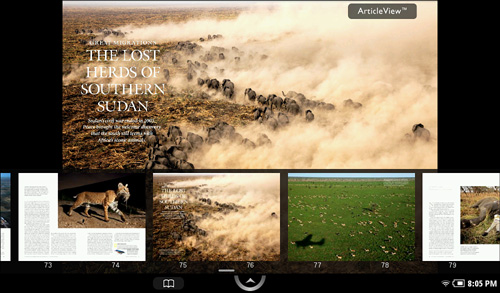
When you open a magazine, you can use pinch and zoom techniques to narrow in on pages. If you tap the page, you see the Thumbnail view at the bottom of the page (see Figure 3.17). This is a thumbnail of each page that you can scroll through. Tap the thumbnail to go to that page.
Figure 3.17. Scroll through a magazine’s pages in Thumbnail view.
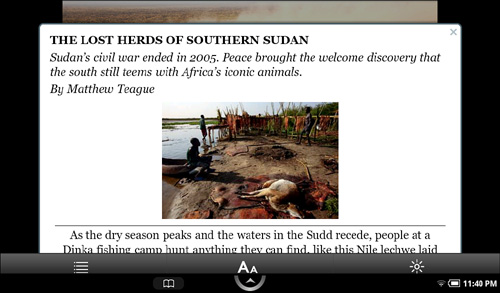
Pinching and zooming and dragging can be tedious for reading articles, and this is where the Article View comes in handy. When you see that button, tap Article View, and a secondary reading window opens on top of the magazine (see Figure 3.18). This is the text of the article (with an opening image) that you can scroll through to read more easily. Tap the X to close Article View. The good news is that your NOOKcolor remembers where you were in the article, so if you tap Article View again for that article, it takes you to where you last stopped reading. You can also swipe left and right to navigate from article to article.
Figure 3.18. Reading an article.

While in Article View, if you tap the screen in the article, a Reading Tools bar appears (see Figure 3.19). This is slightly more limited than for ebooks, containing only Content, Text, and Brightness controls.
Figure 3.19. The Reading Tools bar in a magazine.
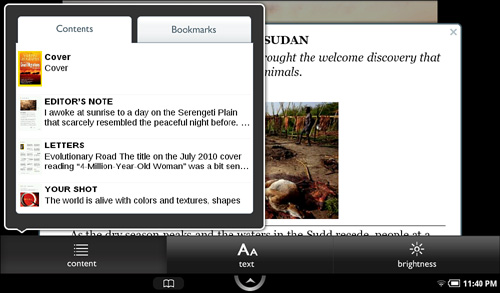
The Content option provides a table of contents for the magazine with brief descriptions of each article (see Figure 3.20). The Text and Brightness options are identical, excepting the Publisher Default option, as the Text and Brightness options for ebooks.
Figure 3.20. The contents of a magazine.
Reading Newspapers on Your NOOKcolor
In addition to books, B&N provides newspaper subscriptions for your NOOKcolor. B&N automatically delivers subscription content to your NOOKcolor if a Wi-Fi connection is available.
For more information on subscribing to content on your NOOKcolor, see Chapter 9, “Shopping and Visiting B&N on Your NOOKcolor.”
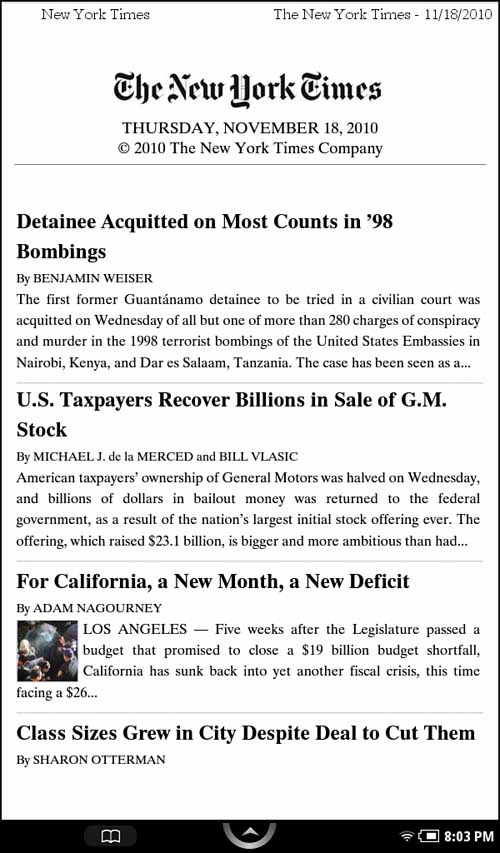
Unlike books, newspaper content isn’t presented in a linear format. Content is often presented as article headlines followed by a small synopsis of each article (see Figure 3.21). To read the specific article, tap the headline for that article. After an article is open, use swipe left and right gestures to navigate between pages just as you do when reading a book.
Figure 3.21. Reading a newspaper.
Tapping the screen displays the Reading Tools, which are the same as the ebook Read Tools (see Figure 3.22).
Figure 3.22. The Reading Tools bar is the same for ebooks and newspapers.
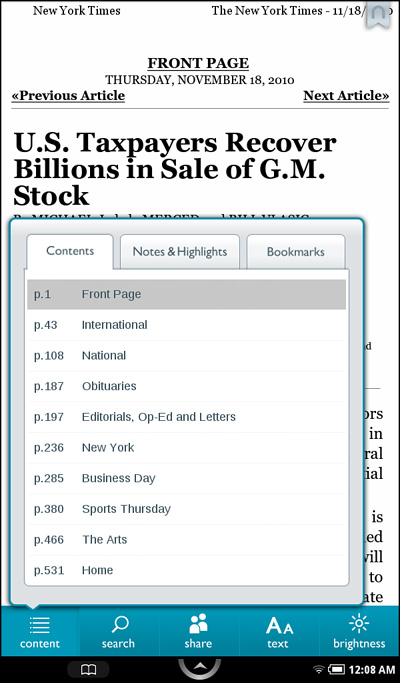
Many newspapers set their contents to go from section to section. Tap the Content button and tap the section (scroll if you need to) to go to that section (see Figure 3.23), where you can see a list of articles.
Figure 3.23. Use the Contents feature to navigate quickly from section to section.
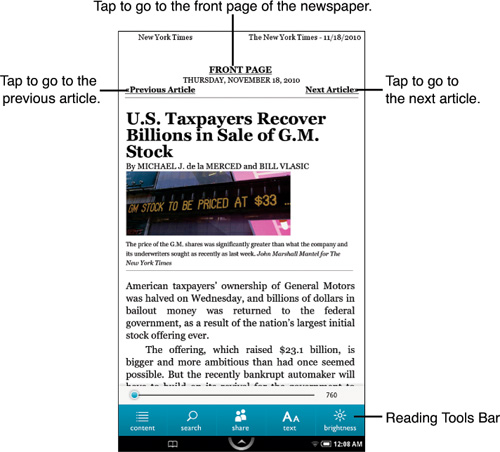
Newspaper content often contains links that make navigating the content easier. For example, when reading The New York Times, you can move to the next or previous articles (as available) by tapping Previous Article or Next Article.
For more information on subscription content, including when your NOOKcolor automatically deletes subscription content, see Chapter 9, “Shopping and Visiting B&N on Your NOOKcolor.”
Reading NOOKbooks for Kids on Your NOOKcolor
One of the exciting things about the NOOKcolor are the NOOKbooks for Kids; many of them (and growing) feature Read to Me. If you are shopping at BN.com, you will see two formats for children’s books: NOOK kids read to me and NOOK kids. NOOK kids read to me has the enhanced Read to Me experience. The regular NOOK kids book lacks that feature, though it functions in every other way as a NOOKbook for Kids. If you are shopping from your NOOKcolor, there is not explicit indication whether the Read to Me feature is available for that NOOKbook; thus, I recommend shopping from your computer.
At bn.com, interactive content on NOOKbooks for Kids is also highlighted. (See the example in the book Jamberry.) However, at the time of this writing, the interactive NOOKbooks for Kids are unavailable.
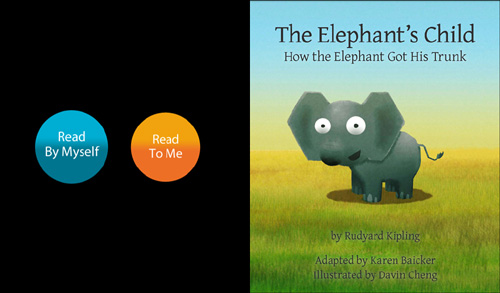
NOOKbooks for Kids function differently than other content you read (or listen to) on the NOOKcolor. The books open in landscape mode. The first page you are presented with has at least a Read by Myself button, though it can also have a Read to Me button (see Figure 3.24).
Figure 3.24. Tap Read to Me to have your NOOKcolor read to you.
Read to Me opens the next page of the book, and you hear a voice reading the title (and not a mechanical voice). Each time you swipe to the next page, the voice reads the text on that page.
Read by Myself opens the next page of the book, but no voice begins reading. Instead, you can choose to have segments of the text read to you while you’re reading if you want.
Picking either choice does not limit you to that choice again when you next open the book or return to the cover page.
NOOKbooks for Kids features a Thumbnail view much like magazines (see Figure 3.25). Tap the upward pointing arrow to display the thumbnails. You can then scroll through these and tap the thumbnail you want to advance directly to that page. If you chose Read to Me, after that page opens, the reading begins. Tap the downward pointing arrow to hide the thumbnails.
Figure 3.25. NOOKbook for Kids’ Thumbnail view.
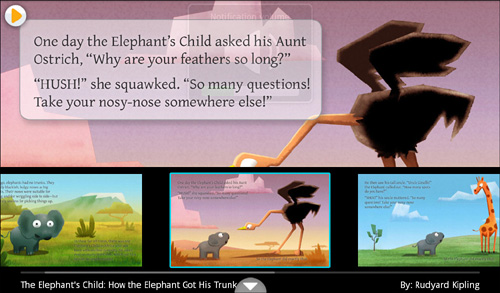
If you tap a block of text, the text displays in a whitish balloon for easier reading. In addition, you see a right-pointing yellow arrow. Tapping that arrow reads to you that particular bit of text in that balloon. This works whether you chose Read to Me or Read by Myself earlier and does not alter what happens on the next page. In other words, if you chose Read by Myself, choosing to have a balloon of text read to you does not then activate Read to Me for the rest of the NOOKbook for Kids.
Reading Microsoft Office and Other Documents on Your NOOKcolor
Beyond the NOOKbooks, magazines, ebooks from other sources, and newspapers you can read, on your NOOKcolor you can also read Microsoft Office documents, HTML files, and PDFs.
Reading Microsoft Office Documents
Your NOOKcolor has Quickoffice installed, which is an application running on your NOOKcolor that can open and read Microsoft Office documents.
A great thing about this is you don’t have to worry about which version of Word or Excel you have, you can open them up so long as they are valid Office documents. Have Word 2010 DOCX files? You can open these as easily as you open Word 2003 DOC files. No worries either between Mac or PC.
To open an Office document, tap Library from the Quick Nav Bar and tap My Files. You can then navigate to the location on either the NOOKcolor or microSD card where your Office document is located. (Generally, these are in the My FilesDocuments folder.)
You see a listing of files. You have two options at this point. Tapping the File icon opens the file. Pressing and holding the File icon displays a menu with Read, View Details, and Add to Shelf options, which are familiar options previously described in the chapter.
The different types of Office documents have some similar and some different options available when you open them, so now look at them individually.
Word
After the Word document opens, the Status bar adds two icons: Return and Reading Tools (see Figure 3.26). Tap the Return icon to undo the most recent action. (For example, if you tap it immediately after opening the document, you return to the folder from which you opened it.)
Figure 3.26. Reading Word documents on your NOOKcolor.
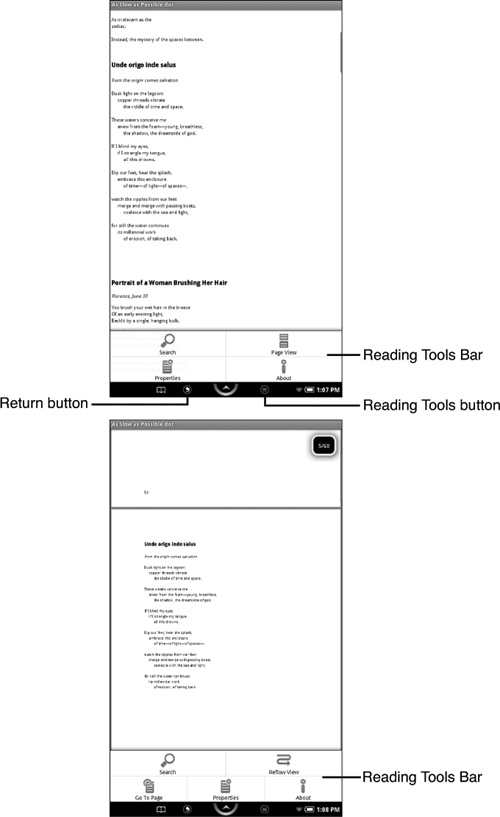
Tap the Reading Tools icon to see a list of options:
• Search:Searches for words or phrases in the document.
• Page View:Displays individual pages versus continually flowing text. This option is available only when you are in Reflow view.
• Reflow View:Displays the text in continually flowing text. This option is available only when you are in Page view.
• Go to Page:Tap this and type the page number you want to go directly to. This option is available only when you are in Page view.
• Properties:Displays some basic information about the document.
• About:Shows information about Quickoffice.
While reading Word documents in either Page or Reflow view, you can use pinch and zoom to zoom in and out of the document. If you tap the reading screen, two zoom control buttons appear at the bottom of the page.
Excel
After the Excel document opens, the Status bar adds two icons: Return and Reading Tools. Tap the Return icon to undo the most recent action. (For example, if you tap it immediately after opening the document, you return to the folder from which you opened it.)
Tap the Reading Tools icon to see a list of options (see Figure 3.27):
Figure 3.27. View Excel spreadsheets on your NOOKcolor.
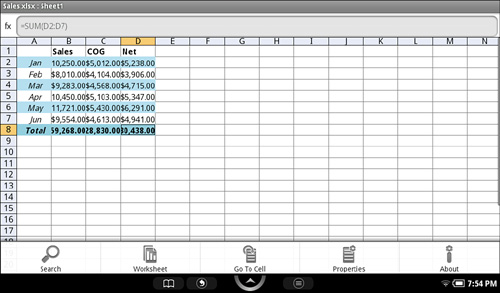
• Search:Searches for words or phrases in the document.
• Worksheet:Opens a menu that enables you to move from worksheet to worksheet.
• Go to Cell:Opens a text entry screen. Type the cell (for example, D1) that you want to go to. The cell is then selected.
• Properties:Displays some basic information about the document.
• About:Shows information about Quickoffice.
While reading Excel documents, you can use pinch and zoom to zoom in and out of the document. If you tap the reading screen, two zoom control buttons appear at the bottom of the page.
The FX row at the top shows the formula or text in the selected cell. You cannot modify it, but you at least can see what is going into that cell.
PowerPoint
After the PowerPoint document opens, the Status bar adds two icons: Return and Reading Tools. Tap the Return icon to undo the most recent action. (For example, if you tap it immediately after opening the document, you return to the folder from which you opened it.)
Tap the Reading Tools icon to see a list of options (see Figure 3.28):
Figure 3.28. Watch PowerPoint presentations on your NOOKcolor.
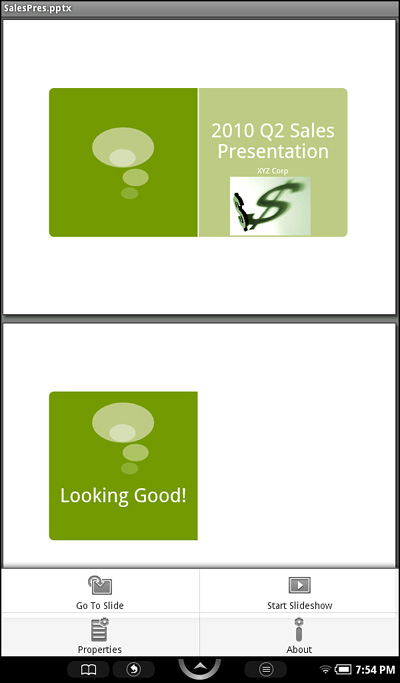
• Go to Slide:Tap this and type the slide number you want to go directly to. This option is available only when you are in Page view.
• Start Slideshow:Start the slideshow. During the slideshow, which advances automatically through the slides, if you tap the screen, a slide control bar appears. Use this to pause or restart the slideshow or advance to the beginning or end slides or back and forth to the next slide. The Reading Tool icon also shows a Stop Slideshow button.
• Properties:Displays some basic information about the document.
• About:Shows information about Quickoffice.
While reading PowerPoint documents, you can use pinch and zoom to zoom in and out of the document. If you tap the reading screen, two zoom control buttons appear at the bottom of the page. Advancing through the slides is either done by either swiping (in portrait mode) or scrolling (in landscape mode).
Reading HTML Files
After you tap to open an HTML file, the HTML file is opened in the web browser. For more information about using the web browser, see Chapter 7, “Using NOOKextras and Surfing the Web” for more information.
Reading PDFs
This section is specifically about PDFs outside of Adobe Digital Editions PDFs (ADE PDFs). ADE PDFs operate like regular ebooks.
Similar to Office documents, when a PDF opens, the Return and Reading Tools icons appear on the Status bar.
Tap the Reading Tools icon to see a list of options (see Figure 3.29):
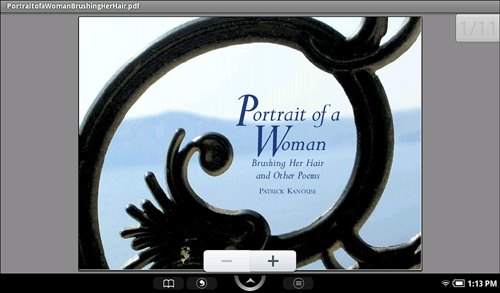
Figure 3.29. Reading a PDF document.
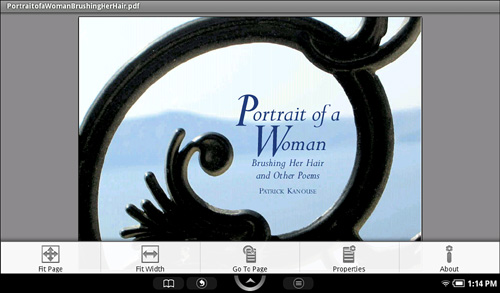
• Fit Page:Tap this to have the page of the PDF fit within the entire screen. This works in either portrait or landscape mode.
• Fit Width:Shows the PDF page to fit the width of that page. (In general, this means that you get a closer view of the page, particularly in landscape mode.)
• Go To Page:Tap this and type the page number you want to go directly to.
• Properties:Displays some basic information about the document.
• About:Shows information about Quickoffice.
While reading PDF documents, you can use pinch and zoom to zoom in and out of the document. If you tap the reading screen, two zoom control buttons appear at the bottom of the page (see Figure 3.30).
Figure 3.30. The Zoom controls for a PDF document.