4. Getting the Type Right
In general, I think that you should write your presentation before you ever start working with Keynote. Even writing your topics for each slide on a piece of paper first will help. Focusing on your presentation’s text, rather than the text on your individual slides, will lead you to create better presentations.
But sooner or later, you will need to work with the text on your slides, and that’s what this chapter is all about. For this chapter, at least, I’ll assume that you’ll be entering text directly onto slides.
Keynote showcases iOS’s superior text handling, layout, and display abilities, and you’ve got good control over the appearance and style of text within Keynote.
In this chapter, you’ll learn how to enter text on slides, style that text as you wish, change the alignment and spacing of text, work with indents on slides, save time when you’re setting text styles, and avoid embarrassing spelling errors.
Adding Title and Body Text
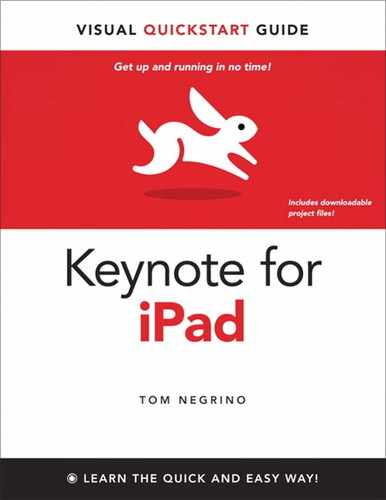
The first slide in your presentation is by default the Title, Subtitle, & Photo slide (though you can delete and replace it if you want), which contains three pieces of information: the title of the presentation; a subtitle, where you put your name and company affiliation; and a photo placeholder, to illustrate the overall topic of your presentation ![]() .
.
In Keynote, all text must be in text boxes. A text box defines the boundaries of the text. If you have more text than the text box can contain (which depends on the size of the text box and the size and style of the text within the box), Keynote first shrinks the text size, trying to make the extra text fit. If you persist in adding text to the text box, text will be cut off, and Keynote will display a plus icon at the bottom of the text box to let you know that you are missing some text. Text automatically wraps inside text boxes.
Most of the time, you’ll use the text boxes provided on the slide layout that you have chosen for your slide, but you can also add your own text boxes to a particular slide, as discussed in the next section.
![]() By default, the first slide of any new presentation uses the Title, Subtitle, & Photo slide layout.
By default, the first slide of any new presentation uses the Title, Subtitle, & Photo slide layout.
1. Create a new presentation file, and apply a theme from the “Choose a Theme” view.
Keynote creates a new slide based on the Title, Subtitle, & Photo slide layout. The new slide will contain placeholder text for its text boxes, which say, “Double-tap to edit,” as shown in ![]() .
.
2. Double-tap in the title box, which usually contains larger sized text than the subtitle.
An insertion point will begin blinking in the title box.
3. Type in your title using the on-screen keyboard, or, if you have one, an external keyboard.
4. When you’re done entering the title, tap outside the title box to deselect it, or double-tap in the subtitle box to begin entering your subtitle.
You’ll know Keynote’s ready for you to enter text in the subtitle box when you see the insertion point blinking in that box.
5. Type in your subtitle ![]() .
.
6. Tap outside the subtitle box to deselect it.
Tip
It’s natural to want to press Return or Enter when you’re done entering text in a Keynote text box. But if you do that, Keynote will insert another line in the text box.
Tip
Your default title slide has a photo placeholder. See Chapter 5 for information about placing graphics on slides.
![]() Double-tap to replace the text placeholders and enter text on slides.
Double-tap to replace the text placeholders and enter text on slides.
Working with Text Boxes
On many slides, you’ll use bulleted text, which you’ve seen in most presentations to denote the individual talking points on a slide ![]() . Bulleted text is just that, text preceded by a marker called a bullet. In Keynote, a bullet can be either a text character or an image built into the theme. When you enter text in a bulleted text box, Keynote automatically inserts the bullets whenever you begin a new line by pressing Return.
. Bulleted text is just that, text preceded by a marker called a bullet. In Keynote, a bullet can be either a text character or an image built into the theme. When you enter text in a bulleted text box, Keynote automatically inserts the bullets whenever you begin a new line by pressing Return.

![]() This text box contains all the bullets on your slide.
This text box contains all the bullets on your slide.
To enter bulleted text:
1. Create a slide with a slide layout containing a bulleted text box.
Typical slide layouts with bulleted text boxes include Title & Bullets, Bullets, and Title, Bullets & Photo.
2. In the text box with the “Double-tap to edit” placeholder, double-tap to place the insertion point.
3. Enter your text.
If your entry is too large for the text box, it will wrap within the text box, with the default left text alignment.
4. Press Return to begin a new line.
Keynote automatically inserts a new bullet at the beginning of the line.
Tip
In every other presentation program on the planet (OK, that could be a bit of hyperbole), including Keynote for Mac, you indent text one level in a bulleted text box by pressing Tab before you begin typing on a new line. But there’s no Tab key on the on-screen iOS keyboard. So bulleted text is just a list style. To indent text, see “Setting Text Alignment and Spacing,” and for information about working with lists, see “Working with Lists,” both later in this chapter.
Adding Text Boxes
Besides the bulleted text boxes found on many slide layouts, you can also add your own text boxes to slides. These “free” text boxes can be used wherever you need extra text on a slide. For example, you can use a free text box as a picture caption ![]() .
.

![]() You can use a free text box as a picture caption.
You can use a free text box as a picture caption.
To add a free text box:
1. On the slide where you want to add the text box, tap the Media button on the toolbar.
The Media popover appears ![]() . Tapping one of the items in this popover places it on the slide canvas. There are four panes in the popover: Media, Tables, Charts, or Shapes. The popover appears displaying the pane you last used.
. Tapping one of the items in this popover places it on the slide canvas. There are four panes in the popover: Media, Tables, Charts, or Shapes. The popover appears displaying the pane you last used.

![]() Tap the big T in the Shapes pane of the Media popover to add a free text box, which you can see on the slide.
Tap the big T in the Shapes pane of the Media popover to add a free text box, which you can see on the slide.
2. If necessary, tap the Shapes button in the popover to get to the correct pane, and then tap the Text item in the popover (the big T).
A text box appears in the center of the slide with the placeholder text “Text”![]() .
.
3. Drag the text box to where you want to position it on the slide.
As you drag the text box, Keynote will show you alignment guides (shown as yellow lines on the slide) to help you line the text up easily.
4. Double-tap in the text box to get an insertion point and then enter your text.
Tip
Free text boxes only have two selection handles, at the right and left edges. Free text boxes automatically grow or shrink vertically to handle the length of your text. They can’t be made taller by dragging.
Tip
If you don’t see the alignment guides as you move objects on the slide, they are turned off in the Guides section of the Tools popover.
Styling Text
One of the benefits of Keynote’s themes and slide layouts is that much of the work of styling is done for you. In many cases, you won’t have any need to style slide text, even though you have a complete style toolbox available to you.
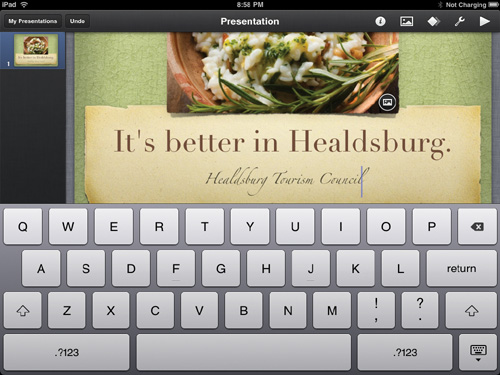
But when you want to style text in Keynote, it’s important to know that the program acts differently depending on whether you have selected a text box (which contains text), or you have selected text that is inside a text box. In either case, you make your changes by tapping the Info button in the toolbar, but the available options differ based on your selection, as shown in Table 4.1.
When you have a whole text box selected, the Info popover looks like ![]() . When you select text within a text box, the popover looks like
. When you select text within a text box, the popover looks like ![]() .
.
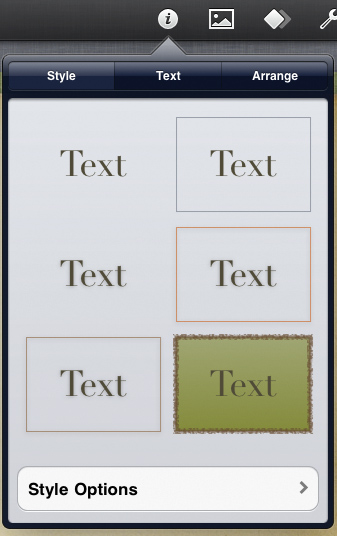
![]() The Style pane of the Info popover when you have a text box selected.
The Style pane of the Info popover when you have a text box selected.
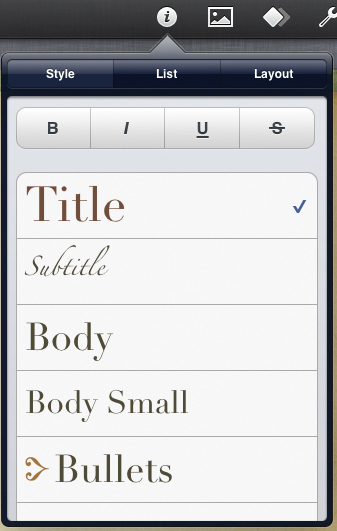
![]() The Style pane of the Info popover when you have text on a slide selected.
The Style pane of the Info popover when you have text on a slide selected.
Keynote treats text boxes as a special kind of graphic, so two of the sections in Table 4.1 (Style and Arrange, under Text box selected) work much the same as they do for any graphic. I’ll address how those sections work in Chapter 5, when I discuss working with graphics. Styling all the text in a text box (Text, under Text box selected) works almost the same as when you have individual text selected; the only change is that some of the controls are in different places.
Keynote also treats hyperlinks in a different fashion than other text. Keynote automatically formats the text when you type a Web address into a slide, such as www.peachpit.com. Keynote is smart enough to automatically turn that into a hyperlink, and it can also handle email addresses ![]() .
.

![]() Keynote knows how to automatically format Web and e-mail addresses on slides.
Keynote knows how to automatically format Web and e-mail addresses on slides.
Tip
If you’re playing the presentation on the iPad screen, you can tap a hyperlink during your presentation, which leaves Keynote and hides it, opens Safari or Mail, and brings you to the hyperlink’s destination. But if you’re displaying the presentation on an external screen, you can’t activate the hyperlink.
Copying Styles
Sometimes, rather than recreating a set of styles from scratch, it’s enough to say that you want this text to look like that text over there. Keynote makes it easy to copy text styles from one place to another. When you copy styles, Keynote replicates the whole set of styles from the source, including the font, size, text color, and so on, to the target text.
To copy styles:
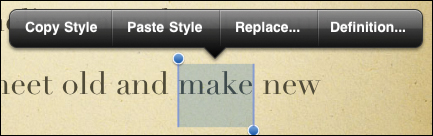
1. Select the source text, which has the style you want to copy.
The Edit popover appears ![]() .
.
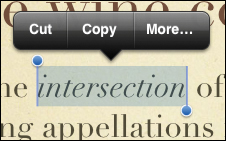
![]() Begin copying styles with the Edit popover.
Begin copying styles with the Edit popover.
2. Tap More.
The Edit popover changes ![]() .
.
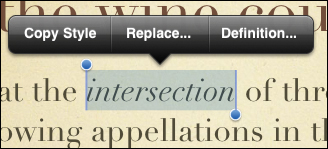
![]() Tapping the Edit popover’s More button displays the Copy Style choice.
Tapping the Edit popover’s More button displays the Copy Style choice.
3. Tap Copy Style.
4. Select the target text, to which you want to copy the style.
The Edit popover appears.
5. Tap More.
The More choices appear in the Edit popover ![]() .
.
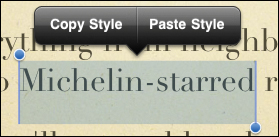
![]() Tap Paste Style to apply the copied style to the selected text.
Tap Paste Style to apply the copied style to the selected text.
6. Tap Paste Style.
The selected text takes on the styles of the source text.
Working with Font Styles
Keynote does a great job of showing off the excellent font capabilities of the iPad. The operating system comes with a good selection of razor-sharp fonts, and Keynote lets you display them to best effect. You can scale text with no loss of quality, so your presentations remain readable (unless you make the text too small for people in the back row!).
Keynote has the concept of preset text styles, which are part of the theme file, and allow you to apply a number of styling options with a single tap. Of course, if you prefer, you can add any style attributes you like, one at a time. Unfortunately, there’s no way to create your own preset text styles.
Remember that depending on what you have selected, you can control the styling either for an entire text box, or for selected text within a text box. Text styling when you select a text box is available by tapping the Info button in the toolbar, and then tapping the button to display the Text pane in the resulting popover. Settings within this pane are almost identical to the settings in Info > Style when you’ve selected text within a text box. Because this chapter is about working with text, the instructions in this section focus on text within a text box.
1. Select the text you want to change.
2. Tap the Info button in the toolbar.
The popover appears. If necessary, tap the Style button to display the Style pane ![]() .
.
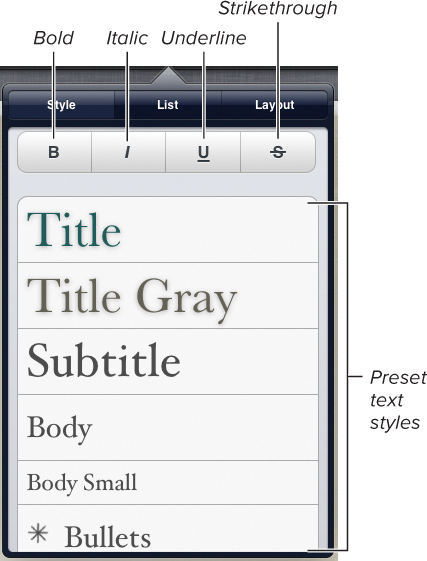
![]() You’ll use the Style pane of the Info popover to style selected text.
You’ll use the Style pane of the Info popover to style selected text.
3. To make the text bold, italic, underlined, or strikethrough, tap the respective button at the top of the popover. You can apply more than one of these options if you like.
or
Tap on one of the preset text styles. This list scrolls to show more available styles; swipe up to show them.
Keynote styles the text.
To change text size, color, or font:
1. Select the text you want to change.
2. Tap the Info button in the toolbar.
The popover appears. If necessary, tap the Style button to display the Style pane ![]() .
.
3. Swipe up to display the bottom of the popover, and then tap Text Options.
The Text Options pane appears ![]() .
.
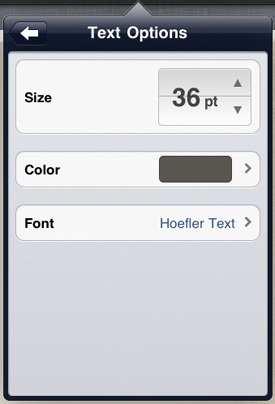
![]() The Text Options pane allows you to change the font size, color, or font family.
The Text Options pane allows you to change the font size, color, or font family.
4. To change the text’s size, tap the up or down arrows in the size widget.
or
To change the text color, tap the color swatch, which displays the Text Color pane ![]() . Swipe as needed to see all the color options. Tap the one you want and then tap the arrow in the title bar to return to Text Options.
. Swipe as needed to see all the color options. Tap the one you want and then tap the arrow in the title bar to return to Text Options.
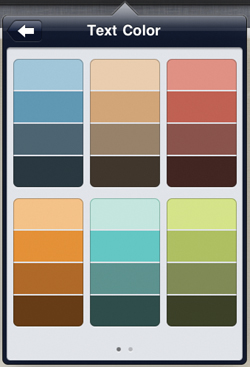
![]() Tap on a swatch to apply that color to the selected text.
Tap on a swatch to apply that color to the selected text.
or
To change the font, tap Font, which displays the Fonts pane ![]() . Swipe to scroll the list, and then tap the font you want. To display the different typefaces for a font family, tap the arrow next to the name of the font family and then tap the typeface
. Swipe to scroll the list, and then tap the font you want. To display the different typefaces for a font family, tap the arrow next to the name of the font family and then tap the typeface ![]() .
.
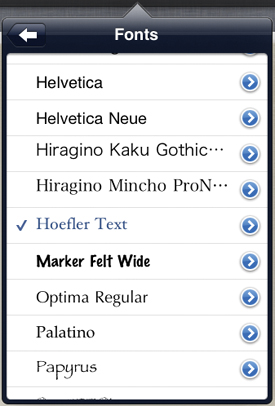
![]() Choose the font family you want from the Fonts pane.
Choose the font family you want from the Fonts pane.
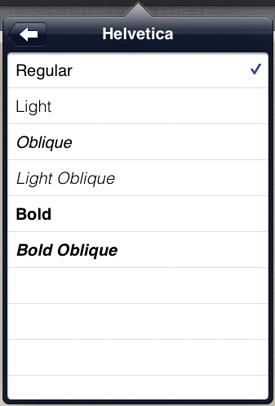
![]() A given font family may have many typefaces, only a few, or just one.
A given font family may have many typefaces, only a few, or just one.
Working with Lists
Keynote treats bulleted text as a kind of list, and gives you full control over that list’s indentation, limited control over the kind of bullets it uses (text bullets or a single kind of image bullet built into the theme), and whether letters or numbers automatically precede items in the list. You can’t mix different bullet styles within a text box, but you can set some items in the list to have no bullets, as shown in ![]() .
.

![]() All of the items in this text box started off with bullets, but I individually selected the program names and selected None from the bullet choices.
All of the items in this text box started off with bullets, but I individually selected the program names and selected None from the bullet choices.
To change text indentation:
1. Select the text you want to change.
2. Tap the Info button in the toolbar.
The popover appears. If necessary, tap the List button to display the List pane ![]() .
.
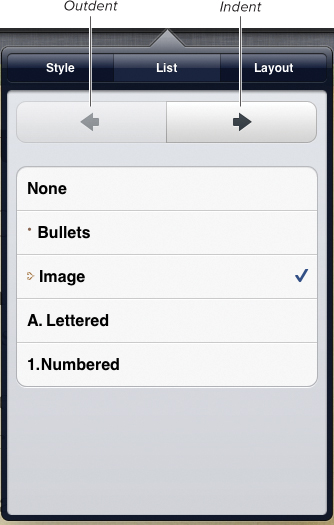
![]() You indent or outdent text using the List pane.
You indent or outdent text using the List pane.
3. To indent text (shift it to the right), tap the Indent button.
or
To outdent text (shift it to the left), tap the Outdent button.
The text moves as you command.
Tip
When working with lists, don’t forget that you can select multiple lines and change them all at once.
1. Select the text you want to change.
2. Tap the Info button in the toolbar.
The popover appears. If necessary, tap the List button to display the List pane.
3. To use a text bullet, tap Bullets.
or
To use an image bullet, tap Image.
The selected text changes to the bullet style you set.
Tip
You can see what either a text or image bullet will look like in the popover, to the left of each label. Unfortunately, Keynote for iPad doesn’t allow you to set custom image bullets, as you can with Keynote ’09.
Tip
You can make text more important on your slide by increasing its size and setting the bullet to None ![]() .
.
Tip
You can work around Keynote’s inability to mix different kinds of bullets. I wanted to number the different space programs, so I just typed the numbers in before each program name ![]() . It’s inelegant, but it works.
. It’s inelegant, but it works.
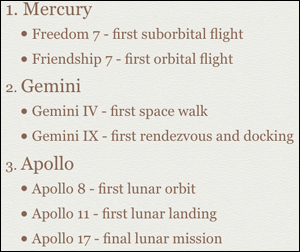
![]() Sometimes the easiest way to get what you want is simply to type it, rather than try to make automatic numbering work.
Sometimes the easiest way to get what you want is simply to type it, rather than try to make automatic numbering work.
To set lettered or numbered lists:
1. Select the text you want to change.
2. Tap the Info button in the toolbar.
The popover appears. If necessary, tap the List button to display the List pane.
3. To set the list to use letters, tap Lettered.
or
To set the list to use numbers, tap Numbered.
Setting Text Layout
Keynote has several controls for arranging text within a text box. You can set the text’s alignment, left indent (Keynote calls this the inset margin), line spacing, and the number of columns the text flows into (which isn’t—and shouldn’t be—used on slides very often).
Keynote has two ways to control text alignment: horizontal and vertical. You can set horizontal alignment in the four standard ways: Left, Center, Right, and Justified. You can set vertical alignment, which controls where the text is placed (Top, Center, Bottom) within its text box.
To set text alignment:
1. On your slide, select the text whose alignment you wish to change.
2. Tap the Info button in the toolbar.
The popover appears. If necessary, tap the Layout button to display the Layout pane ![]() .
.
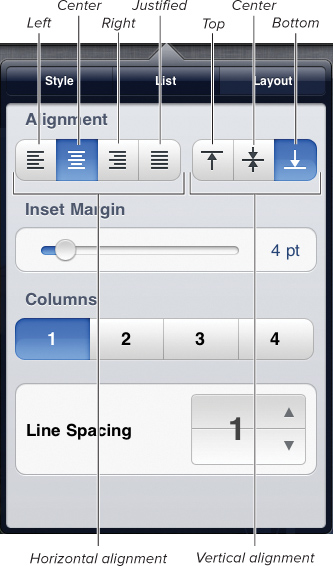
![]() Use the buttons in the List pane to set horizontal and vertical alignment.
Use the buttons in the List pane to set horizontal and vertical alignment.
3. Tap the appropriate alignment button in the Alignment section.
The text alignment changes.
To set the inset margin:
1. On your slide, select the text whose inset margin you wish to change.
2. Tap the Info button in the toolbar.
The popover appears. If necessary, tap the Layout button to display the Layout pane ![]() .
.
3. Drag the slider in the Inset Margin section.
As you move the slider, the inset shows in points, on the right side of the section.
1. On your slide, select the text you want to put into columns.
2. Tap the Info button in the toolbar.
The popover appears. If necessary, tap the Layout button to display the Layout pane ![]() .
.
3. In the Columns section, tap the number of columns you want.
The text changes ![]() .
.
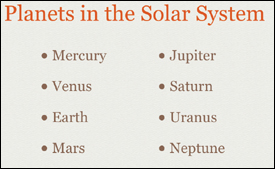
![]() The bulleted text has been set to appear as two columns.
The bulleted text has been set to appear as two columns.
Tip
Depending on the font styling you have set, you may need to drag the text box containing the columns of text on your slide to make it look centered, as I did in ![]() .
.
To set the line spacing:
1. Select the text that you wish to change.
2. Tap the Info button in the toolbar.
The popover appears. If necessary, tap the Layout button to display the Layout pane.
3. In the Line Spacing section, tap the up or down arrows to increase or decrease the line spacing in ½ line increments.
Finding and Replacing Text
Keynote allows you to find, or find and replace text on your slides, which is handy when Marketing tells you that they’ve decided to rename the SuperWidget to UltraWidget half an hour before your presentation.
You can also replace text with a best guess from Keynote’s dictionary, which is sometimes useful, but more often inadvertently hilarious.
To find or replace text:
1. Tap the Tools button in the toolbar, and then tap Find ![]() .
.
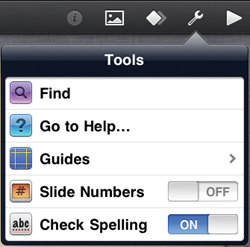
![]() Begin finding text in the Tools popover.
Begin finding text in the Tools popover.
The Find popover appears at the bottom of the screen.
2. Type the word or phrase you want to find and press Return.
Keynote finds the first instance of the text ![]() .
.
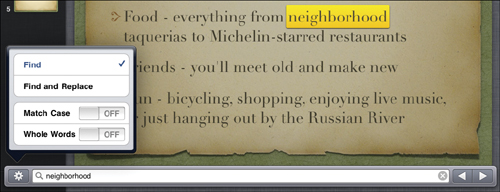
![]() Keynote highlights found text in yellow.
Keynote highlights found text in yellow.
3. (Optional) If you want to replace the found text, tap the Settings button (it looks like a gear) at the left edge of the Find popover, tap Find & Replace, and then type the replacement text in the Replace field ![]() . Tap Replace to change the text.
. Tap Replace to change the text.
![]()
![]() Enter text you want to find in the left field, and text you want to replace it with in the right field.
Enter text you want to find in the left field, and text you want to replace it with in the right field.
Tip
Holding down the Replace button gives you a Replace All popover, which makes it easy to change text throughout your presentation.
Tip
You can step through instances of found text with the arrow buttons at the right edge of the Find popover.
To replace text from the dictionary:
1. Select a word on a slide.
The Edit popover appears.
2. Tap More.
The More popover appears ![]() .
.
![]() You’ll find Replace after you tap More in the Edit popover.
You’ll find Replace after you tap More in the Edit popover.
3. Tap Replace.
A popover appears with suggestions from Keynote’s dictionary ![]() .
.
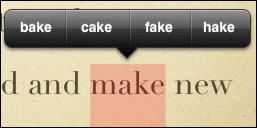
![]() Choose a replacement (or not) from the choices Keynote offers.
Choose a replacement (or not) from the choices Keynote offers.
4. Tap one of the suggestions to replace the selected text with the suggestion.
Proofing your Work
By default, spell checking is turned on in Keynote, and misspellings will show up on your slides with red dotted underlines, as in any other iOS program.
To fix misspellings:
1. Tap on a word with a red dotted underline.
The dotted underline goes away, and a suggestion popover appears with one or more suggestions ![]() .
.

![]() Tap the word you want from the suggestion popover.
Tap the word you want from the suggestion popover.
2. Tap the replacement you want.
Keynote replaces the misspelled word.
Tip
You can turn spell checking off by changing the setting in the Tools popover (see ![]() in “Finding and Replacing Text”).
in “Finding and Replacing Text”).
Tip
If you misspell a word to such an extent that Keynote has no suggestion, the popover will say “No Replacements Found.”
Using the Dictionary
Keynote uses the iPad’s built-in dictionary to give you definitions, which is useful for those times when you spell a word correctly, but still wonder, “Is that the right word in this context?” Wonder no more, my friend.
To use the dictionary:
1. Select a word on a slide.
The Edit popover appears.
2. Tap More.
The More popover appears (see ![]() in “Finding and Replacing Text”).
in “Finding and Replacing Text”).
3. Tap Definition.
The Dictionary popover appears, with the word’s definition ![]() .
.
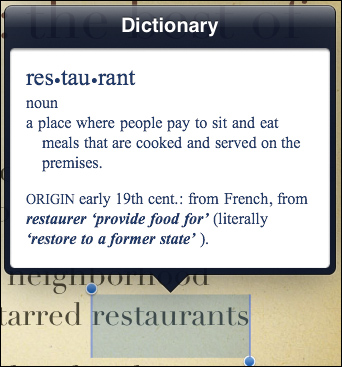
![]() The definition of most of the words in your presentation is just a couple of taps away.
The definition of most of the words in your presentation is just a couple of taps away.