9. Giving the Presentation
The funny thing about presentations is that you do lots of work to create your presentation and make it look good, and when you’re done the real job hasn’t even started yet—you still have to give the presentation. For some people, giving a presentation (and public speaking in general) ranks in popularity just this side of dental surgery. Other folks like nothing better than standing in front of an audience. Most of us, however, fall somewhere between those extremes.
Luckily, people have been speaking in front of groups for thousands of years, and there is a lot of good advice about what you can do to make giving a presentation a comfortable experience for all involved. Besides the nuts and bolts of giving a presentation with Keynote, I’ll include some speaking tips that should help improve your presentations.
You’ll also learn how to connect your iPad to external monitors or projectors, and discover some cool hardware and software extras for presentations.
Preparing to Present
The more presentations you give, the better a speaker you will be. The key to giving a good presentation is to be prepared, pay attention to the details, and have plenty of practice. Here are some tips that can help your overall presentation.
Before the presentation
• Before you give a presentation, get a friend or coworker to read through it. You’ll be surprised at how often they’ll find a typo or awkward grammar that you missed.
• Try hard not to run over your allotted time. It’s always a good idea to practice your presentation using a clock or stopwatch to see how long your presentation is. It’s much better to cut slides before the presentation than to run out of time and not be able to finish at all. On the other hand, if your presentation is running short, it’s better to find out before you’re in front of a bunch of expectant faces.
• Speaking of practice, make sure that you build enough time into your preparation schedule so you can rehearse the presentation, out loud, at least twice before you give it. By the way, practicing your presentation means giving the entire presentation just as you would in front of an audience. It doesn’t mean quickly riffling through your Keynote slides half an hour before you hit the stage.
• I recommend that you give the presentation in front of one or two trusted associates twice. The first time, your friends can stop you during the presentation and make suggestions or ask questions. Then you should incorporate their feedback and if necessary tighten up the presentation. The second time, give the presentation exactly the way you plan to give it to your audience. Your associates can take notes and give you feedback at the end. But you absolutely need the experience of giving the entire presentation all the way through before you give it for real. Here’s a tip you can take from one of the best presenters in the world, Steve Jobs. According to Carmine Gallo, author of The Presentation Secrets of Steve Jobs, Jobs rehearses his presentations for many hours, up to four hours a day, before he gives them to the public. OK, I understand that one of Steve’s presentations is probably a little more high-stakes than one of yours. But you don’t want to have one of your big presentations fall flat because of a lack of rehearsal.
• Things do go wrong; your iPad could die before you give your show, or it could have video problems with the venue’s projectors. Make sure you keep a backup copy of your presentation file on something other than your iPad. I prepare two backup copies of important presentations: one on a USB flash drive and another on my iPhone or burned to a CD. That way, if I get to the venue and I have hardware troubles, I can borrow a computer and still go on with the show.
Giving the presentation
• If you can, get to the presentation venue a little early. Sit or stand where you will be when you’re speaking, and make sure that your seating (or the podium) is adjusted the way you want it. Take a moment to adjust the microphone and work with the venue’s AV technician to get the audio levels right before the audience arrives. Make sure you have a spot to place a cup of water. Getting comfortable with the physical space and the facilities helps a lot.
• If you have the opportunity to greet some of the audience members as they enter the room, you should do so. It’s easier to speak to people you know, even if all you’ve done is say hello.
• If you’re speaking at an event where you’re wearing a conference badge, take it off before you begin your talk. It will often reflect stage lights back at the audience, which can be distracting. Take off your watch, too; if you need it, place it on the table or lectern.
• Before you begin, visualize yourself giving a successful presentation. Imagine that you’ve spoken very well, and see in your mind the audience’s involvement in your talk. Hear their applause, and picture audience members coming up to congratulate you after the show. It sounds a bit silly, but visualizing success works.
• Concentrate on your message, not on the audience. If you focus on what you’re saying, you will distract yourself from being nervous.
• If you are nervous, never apologize for it. Except in extreme cases, most audiences don’t notice that speakers are nervous, and it doesn’t help your case to point it out.
• Always keep in mind that your audience wants you to succeed. People don’t go to a presentation thinking, “I sure hope this person gives a lousy talk and wastes my time.” They want to get something out of your presentation as much as you do.
• Unless you are a professional comedian, keep the jokes to a minimum, or skip them altogether. A joke that falls flat isn’t a good way to start a show.
• Don’t read straight from a script. Very few people can read from a script without putting their audience to sleep; we call those people actors (and professional speakers).
• Never read your slides aloud word for word. Your slides should be signposts and reminders of what you want to say. Using your slides as your teleprompter is another way to lose audience interest. For prompts, print speaker notes in advance.
• Because Keynote for iPad does not mirror your slides in its screen as they are projected, it makes it much harder for you to read your slides word for word unless you turn your back to the audience—horrors! That’s a limitation in the program that will make you a better presenter. Instead, rehearse well and use printed speaker notes to guide your way through your talk.
• It’s a good idea to put a summary slide at the end of your presentation. Not only does it bring your talk to a natural end, it helps to once again drive your argument home to your audience.
• When the presentation is over, thank your audience and make yourself available for questions. As you chat with people, get feedback so you can improve the next show. Simply asking them if there was anything they wish you had covered can yield useful information.
Cool Presentation Gear
As already noted in this book, what matters is what you’re saying in your presentation. But there’s hardware and software that can make giving presentations easier and more convenient.
The hardware
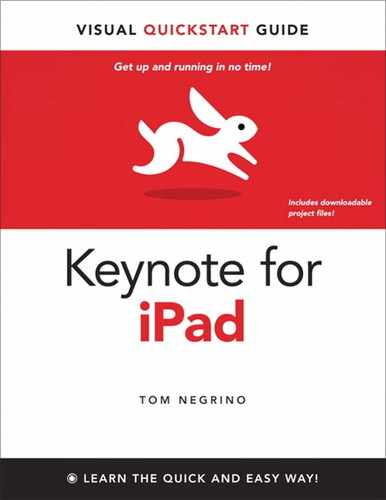
The most important hardware you need is a way to connect your iPad to a projector or external computer monitor. The $29 Apple iPad Dock Connector to VGA Adapter ![]() is the only hardware that can do the job (when I wrote this in September 2010). This adapter is, frankly, overpriced for the value you get from it. The main problem with it isn’t really the hardware’s fault; it’s the iPad’s software. For any app to use the adapter, it must have its own support built-in, instead of it all being handled by the iPad’s system software. So, for example, Keynote supports the adapter, but Safari does not. If you want to show Web pages as part of your presentation, you’re either out of luck or must purchase another app that has a built-in Web browser and also supports the adapter (I’ll suggest one of those apps later in this chapter). Similarly, you can show YouTube videos and videos from the Photos and Videos apps (as those apps support the adapter), but not videos purchased from the iTunes store. Another drawback to this adapter (in fairness, it’s a VGA limitation) is that it doesn’t support audio.
is the only hardware that can do the job (when I wrote this in September 2010). This adapter is, frankly, overpriced for the value you get from it. The main problem with it isn’t really the hardware’s fault; it’s the iPad’s software. For any app to use the adapter, it must have its own support built-in, instead of it all being handled by the iPad’s system software. So, for example, Keynote supports the adapter, but Safari does not. If you want to show Web pages as part of your presentation, you’re either out of luck or must purchase another app that has a built-in Web browser and also supports the adapter (I’ll suggest one of those apps later in this chapter). Similarly, you can show YouTube videos and videos from the Photos and Videos apps (as those apps support the adapter), but not videos purchased from the iTunes store. Another drawback to this adapter (in fairness, it’s a VGA limitation) is that it doesn’t support audio.
![]() The Apple iPad Dock Connector to VGA Adapter lets you send your iPad’s video output to most external projectors and monitors.
The Apple iPad Dock Connector to VGA Adapter lets you send your iPad’s video output to most external projectors and monitors.
The next bit of hardware that should be on your list is a laser pointer. These handy items are perfect for drawing the audience’s attention to a part of your slide, and they’re essential if you will be doing a demonstration on the computer as well as the slideshow. They are widely available for as little as $10. For a little more money, I think that the lasers with a green beam are especially cool, but that’s because I’m a presentation geek. You’ll see later in this chapter that Keynote provides a virtual laser pointer, but I’m not a huge fan of it, for reasons I’ll detail.
Tip
If you want to output to a television that doesn’t have a VGA connector (most recent televisions do), then you have your choice of two other adaptors: the Apple Composite AV Cable or the Apple Component AV Cable. The latter will give you better video quality than the former, if your television supports component connections. Both cables also support audio output from the iPad.
Tip
You can get around the lack of VGA audio support by using the iPad’s headphone jack and an amplified set of speakers. The exact audio adapter cable you’ll need will depend on the audio capabilities of the presentation venue. Before the show, consult the venue’s audio/video technician and alert them you’ll be using VGA output for the video and a headphone jack output for the audio. They should be able to easily handle that combination.
I think an essential backup device for presenters is a USB flash drive. These units are about as long as your thumb and plug into any USB port. They commonly provide between 4 and 16 GB of storage with no moving parts, and are powered by a computer. When you plug one into a computer, it shows up just like any other drive. I transfer presentation files to a computer, and then copy them to a flash drive as a backup, so I know that even if my iPad dies, I can plug the USB drive into a borrowed Mac with iWork and the show can go on.
Tip
Another good adapter to have in your presentation toolkit is a VGA (Male) to DVI (Female) adapter in case you run across a DVI-input only projector. As there’s no iPad Dock Connector to DVI adapter, this one additional adapter will save you in this situation.
Helpful software
There are a few iOS apps that can enhance the presentation process or work around some of Keynote’s or the iPad’s limitations:
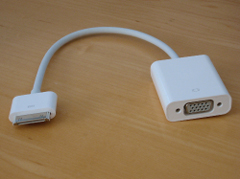
• The 2Screens Presentation Expert app promises to mirror (which means showing the same picture on the iPad and an external display) Keynote files, Web pages, and more through the Apple VGA Adapter. And it delivers on that promise—sort of. It uses the iPad’s built-in ability to read Keynote files, but that ability doesn’t actually run the presentations as Keynote does, full-screen with builds and slide transitions. Instead, 2Screens provides its own file browser and display area ![]() , and shows Keynote files as a series of static pages you can page through. If you have the opportunity to just use Keynote, I recommend that you do so. In my tests with 2Screens, I found that I got better results on external displays if I first exported presentations from Keynote as PDF files and then displayed them in 2Screens. Its biggest benefit is that 2Screens Presentation Expert mirrors the iPad and external screens, so you can refer to the iPad while screening the presentation.
, and shows Keynote files as a series of static pages you can page through. If you have the opportunity to just use Keynote, I recommend that you do so. In my tests with 2Screens, I found that I got better results on external displays if I first exported presentations from Keynote as PDF files and then displayed them in 2Screens. Its biggest benefit is that 2Screens Presentation Expert mirrors the iPad and external screens, so you can refer to the iPad while screening the presentation.
![]() 2Screens Presentation Expert has its own built-in file and Web browsers, allowing you to follow hyperlinks when playing back your Keynote presentations. When you’re showing PDFs (like this college presentation I exported to PDF from Keynote), you can also pop up a handy popover with thumbnails of each page, as shown here.
2Screens Presentation Expert has its own built-in file and Web browsers, allowing you to follow hyperlinks when playing back your Keynote presentations. When you’re showing PDFs (like this college presentation I exported to PDF from Keynote), you can also pop up a handy popover with thumbnails of each page, as shown here.
The same developer offers 2Screens Remote, an iPhone application that uses Bluetooth to act as a remote control for 2Screens Presentation Expert ![]() .
.

![]() 2Screens Remote gives you a Bluetooth remote control from your iPhone to an iPad running 2Screens Presentation Expert.
2Screens Remote gives you a Bluetooth remote control from your iPhone to an iPad running 2Screens Presentation Expert.
• GoodReader for iPad is an app that displays many kinds of files, but shines with PDFs. It also supports the Apple VGA Adapter, and mirrors the iPad screen on the external display. If you decide to export your presentation as static PDF pages, then GoodReader will display your slides well. GoodReader also has excellent abilities to connect to Internet servers, so you can download files into the app from email, FTP servers, and online storage services such as MobileMe, Google Docs, Dropbox, and many more.
Running the Presentation
Now that the presentation and the projector are ready to go and the audience has arrived, it’s time to get your presentation going. During the presentation, you can control your show with the iPad’s screen.
Depending on whether you have an external video adapter connected, the Play button in Keynote’s toolbar will look different. Without an adapter, the Play button is merely a right-pointing triangle. With the adapter connected, the triangle is inside a rectangular frame, reminiscent of a screen ![]() .
.
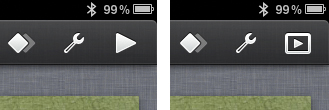
![]() The Play button in the toolbar changes when you have an external display connected (right).
The Play button in the toolbar changes when you have an external display connected (right).
Before you begin, you need to be aware of one big issue with Keynote for iPad when using a projector: when the presentation is running, it is not mirrored on the iPad’s screen. Instead, you get a Video Out interface that helps you control the presentation’s playback, but doesn’t show you the slides.
The Video Out interface is simple and allows you to run the presentation forward and back ![]() . You can also bring up a list of slides
. You can also bring up a list of slides ![]() , reminiscent of the Slide Navigator in Keynote’s editing view, that you can use to skip slides during your show (to choose slides to skip before you begin the show, see Chapter 3).
, reminiscent of the Slide Navigator in Keynote’s editing view, that you can use to skip slides during your show (to choose slides to skip before you begin the show, see Chapter 3).
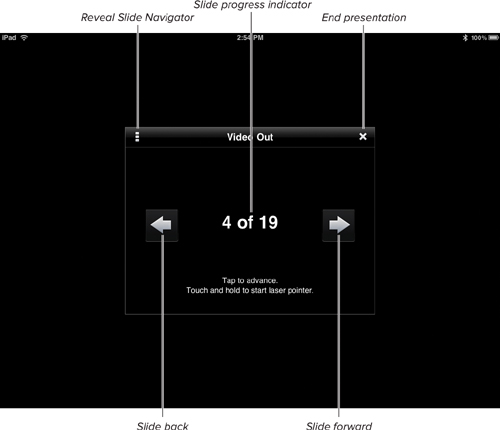
![]() Keynote’s Video Out interface appears when you have an external display connected and you play the presentation.
Keynote’s Video Out interface appears when you have an external display connected and you play the presentation.
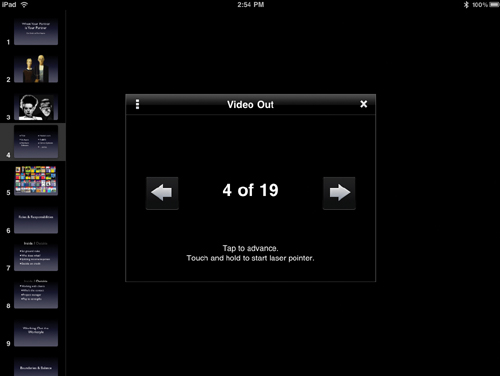
![]() The Slide Navigator lets you skip slides on the fly during your presentation.
The Slide Navigator lets you skip slides on the fly during your presentation.
When you are using a projector, you have access to Keynote’s virtual laser pointer. This is a red spot that you can throw on the external screen during your show to emphasize a particular part of your slide. Unfortunately, there doesn’t seem to be a way for me to grab a screenshot of it.
To run your presentation using an external projector or monitor:
1. In the Slide Navigator in Keynote’s editing view, tap to select the first slide in the presentation.
Of course, if you don’t want to start at the first slide, you can tap to select the slide you do want to start on.
2. Tap the Play button in the toolbar.
The presentation begins, and the slides are replaced by the Video Out interface ![]() .
.
3. To advance through the slides, tap the Slide forward button, or tap anywhere on the screen except for the Slide back button.
If you have slide builds, each tap will trigger a build.
4. (Optional) To play the previous slide, tap the Slide back button.
5. (Optional) To skip a slide during the presentation, tap the Reveal Slide Navigator button.
When the Slide Navigator appears ![]() , tap the slide you want to skip to. Keynote switches to that slide and the Slide Navigator disappears.
, tap the slide you want to skip to. Keynote switches to that slide and the Slide Navigator disappears.
6. (Optional) To use the virtual laser pointer, touch and hold on the screen. After a short delay, a red spot will appear on the external display. You can drag your finger on the iPad’s screen to move the pointer.
The virtual laser pointer can be finicky to use (lift your finger for a fraction of a second, and it disappears). It can also be difficult to accurately point at a part of your slide, considering that the slide isn’t shown on the iPad’s screen.
7. To end your presentation and return to Keynote’s editing view, tap to advance the slide when you are already on the last slide, or tap the End presentation button in the Video Out interface.
Tip
There doesn’t appear to be a way to follow a hyperlink on your slide when using an external display.
To run your presentation on the iPad’s screen:
1. In the Slide Navigator in Keynote’s editing view, tap to select the first slide in the presentation.
2. Tap the Play button in the toolbar.
The presentation begins. The slide expands to fill the iPad’s screen.
3. To advance through the slides, tap anywhere on the screen, or swipe left.
If you have slide builds, each tap or swipe will trigger a build.
4. (Optional) To play the previous slide, swipe right.
5. (Optional) To follow a hyperlink on a slide, tap the hyperlink.
Keynote disappears, and Safari opens and displays the link.
6. To end your presentation and return to Keynote’s editing view, double-tap anywhere on the screen.