15. Retiming
Retiming is the process of changing the speed of a clip. (I could have called this chapter “Speed Changes,” but that wouldn’t have sounded as exotic and sexy.)
There are three basic ways you can change speed: freeze a single frame, change the speed of an entire clip by the same amount, or change the speed of an entire clip by an amount that varies over time.
There are variations on these methods, but those are the basics. I cover all of them in this chapter.
The Basics of Retiming
Every video clip runs at a fixed rate—for example, 24 frames per second (fps), 25 fps, or 30 fps. In fact, in the world of high definition (HD), there are about eight different frame rates. (It’s so depressing.) What retiming does is change the number of original frames that play every second. For instance, if you have a clip that plays at 30 fps and you change the frame rate to play at 15 frames per second, you create the illusion of slow motion.
Tip: Are Some Speeds Better than Others?
Actually, yes. When it comes to fast motion, any speed is fine. But for slow motion, there are certain magic numbers that tend to yield better results than others. Here’s the secret: If you have a choice—and sometimes you don’t—any speed percentage that divides evenly into 200 will look better than a speed percentage that doesn’t. So, percentages such as 10, 20, 40, and 50 percent are all slow-motion speeds that play back especially smoothly. For extremely slow motion—less than 15 percent—you’ll need to read on for some special techniques you can use to make your playback look smoother.
This is the heart of retiming: You take a clip that was recorded at one speed and play it at another speed. Speed changes only apply to true video and audio clips. Unless you put them in a compound clip, you can’t apply speed changes to still images (duh!), generators, titles, or themes.
Rather than force people to figure out how many frames need to play per second, Apple expresses all speed changes as percentages. One hundred percent plays a clip at the same speed it was recorded (normal speed), 50 percent is slower than normal, and 200 percent is faster than normal.
You can set the speed of a clip to any percentage you want; however, FCP gives you some shortcuts you can use to set popular playback speeds.
By default, Final Cut Pro preserves the audio pitch of a clip, though you can turn this off if you wish. For freeze frames this doesn’t make a difference, but for both constant and variable speed changes, it does. Preserving the pitch means that while the speed of the audio changes, the pitch, or frequency, of the clip remains constant. This makes it easier to listen to and understand the audio when the speed of the clip is changed.
Finally, simply for reassurance, nothing you do with retiming has any effect on the media stored on your hard disk.
Hold Frames
Final Cut Pro X calls them hold frames. I grew up calling them still frames. In Final Cut Pro 7 or Final Cut Express they were called freeze frames. They all mean the same thing: an image in your clip that doesn’t change.
You can create hold frames anywhere in a clip: at the beginning, middle, or end. Hold frames default to a two-second duration, but can be adjusted to any length. However, you can only create hold frames in the Timeline, and, unlike FCP 7, you can’t store them in the Event Browser. (But you could export the hold frame and reimport it into the Browser for reuse later. I’ll show you how in the next section.)
Let’s start with a simple case of adding one hold frame to the end of a clip with a fade-to-black at the end.
1. Position the playhead on the last frame of a clip and select the clip. (You can also use the skimmer, provided you remember the keyboard shortcut I’m about to give you.)
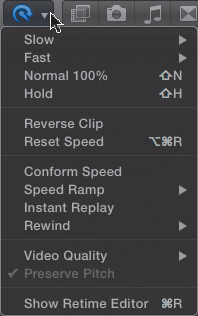
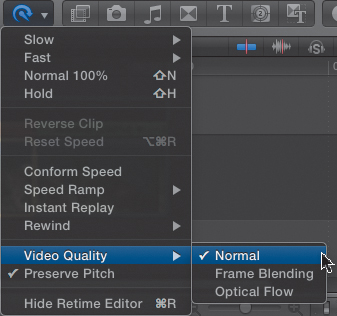
2. Click the Retime icon in the toolbar (to me, it looks like a Smurf wearing a headset; Apple says it is a speedometer with a circular arrow) to reveal the Retime pop-up menu (Figure 15.1). If the menu doesn’t appear, make sure the clip is selected and the playhead is in the clip.
Figure 15.1 Click the Retime icon in the toolbar to display the Retime pop-up menu.
3. Choose Hold, or press Shift+H.
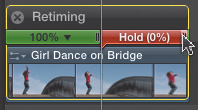
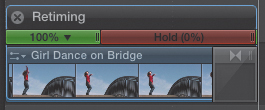
The Retime Editor appears above the clip, and the top of the clip displays two colors: green, where the clip speed remains untouched, and red, which represents the hold frame (Figure 15.2).
Figure 15.2 The Retime Editor appears above the clip, with a hold frame created at the position of the playhead.
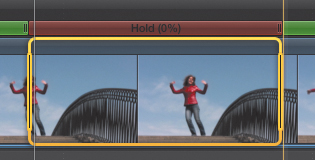
4. By default, a hold frame has a two-second duration. However, you can change this by clicking the handle at the right edge of the red Hold bar and dragging to make the hold frame run longer or shorter. (You can only set hold-frame durations by clicking and dragging.)
5. To add a fade-to-black at the end of the hold frame, select the end of the hold frame and press Command+T or add any other transition from the Transitions Browser (Figure 15.3).
Figure 15.3 Select the right edge of the hold frame and apply a transition to fade to black.
6. To delete the hold frame and reset the clip to normal speed, delete the transition, then choose Reset Speed from the Retime menu, or press Option+Command+R.
For you menu mavens, all retiming options are also available from Modify > Retime.
You can also create hold frames in the middle of a clip—or at the start, for that matter—by placing the playhead on the selected clip you want to freeze and pressing Shift+H, or using the Retime pop-up menu (Figure 15.4). There is no limit to the number of hold frames you can put in one clip. Just follow the same procedure.
Figure 15.4 Hold frames can be created anywhere in the Timeline you can put the playhead.
The Retime Editor is the bar that appears at the top of every clip. This gives you the controls you need to change the speed of a clip. To toggle the display of the Retime Editor, press Command+R, or choose Show Retime Editor from the Retime pop-up menu.
You can also create a hold frame from a range within a clip (but not spanning across clips). Simply select the Range tool (R) and select a range within a clip (Figure 15.5). Press Shift+H, or choose Hold Frame from the Retime pop-up menu (Figure 15.6). The first frame in the selected range will hold, and the duration of the hold will match the duration of the range.
Figure 15.5 To create a hold frame for a range, first select the range in a clip.
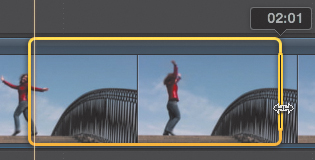
Figure 15.6 Choose Modify > Retime > Hold to replace the selected range with a hold frame, or press Shift+H.
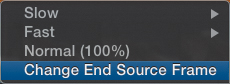
Sometimes you don’t get the freeze frame quite right. In the past, changing the frame involved doing everything all over from the top. In this case, changing the frame is easy. Click the small, downward-pointing triangle in the green bar just before the hold frame, and choose Change End Source Frame (Figure 15.7). A small white frame appears in the Retime menu. Drag it to select a different frame to freeze (Figure 15.8). Simple, easy, sweet, and neat!
Figure 15.7 To change the frame for the hold, choose Change End Source Frame.
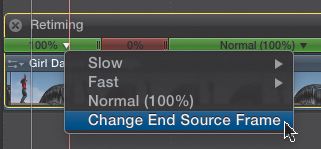
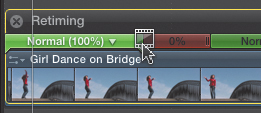
Figure 15.8 In the Retime menu, drag the little white frame to change the hold frame.
Exporting a Hold Frame
Many times, you need to export a frame from your Projects for marketing, for approvals, or just to pin up on your wall. Piece of cake—the export, that is. Getting approvals is an entirely different story.
In the old days, when video was being designed, no one ever expected to play movies on a Macintosh. So, video frames were designed without considering the computer. (Since this was the 1930s, perhaps that is understandable.)
The result of this was two evils that continue to bedevil us: interlacing and pixel aspect ratios.
Interlacing are those thin, horizontal lines radiating out from anything that moves in the frame (Figure 15.9). On a normal TV set, you won’t see them. On a computer screen, they stick out like sore thumbs.
Figure 15.9 Those thin, horizontal lines radiating from moving objects signify interlacing. Drives us all nuts!
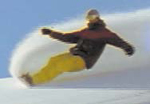
To get rid of them after exporting hold frames, you can open the frames in Photoshop and de-interlace the video. This will make those lines disappear and it will also make your video look a bit softer. When possible, always shoot progressive video.
Pixel aspect ratios are more insidious. In short, for all standard-definition video, and some high-def video as well, images use rectangular pixels rather than square pixels in their images. Then again, just to keep us humble, some video formats use square pixels. This means that video clips look great, but exported hold frames sometimes look squished. Fortunately, Apple added a menu choice that totally solves this.
Here’s how to export a still frame of a video clip:
1. Select a clip on the Timeline. (You can’t export stills from the Event Browser.)
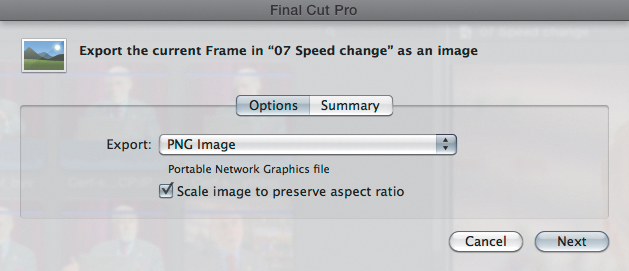
2. Choose Share > Save Current Frame. There are a number of export options, but PNG and TIFF provide the highest quality (Figure 15.10).
Figure 15.10 When exporting, use PNG or TIFF for the highest quality, PNG is the default setting.
3. Do one of the following:
• Select the checkbox “Scale image to preserve aspect ratio” if you want the hold frame converted to square pixels. This is a very good idea for anything you want to work with in Photoshop or display on a computer. (You’ll still need to deinterlace any interlaced images, however.)
• Deselect the checkbox “Scale image to preserve aspect ratio” if you want to use this image in another video editing package—say you want to move it to Motion or After Effects. Maintaining the correct aspect ratio is important, so you would leave this unchecked.
4. Click Next, give the file a name and location, and click Save. After a few seconds, the export is complete. Apple has accelerated this export in version 10.0.1 using the GPU (graphics processing unit).
The “Scale image to preserve aspect ratio” checkbox option is worth its weight in pixels, because converting images to the right size used to be really, really complicated!
Constant Speed Changes
A constant speed retiming changes the speed of the entire clip by the same amount. Constant speed changes always alter the duration of the clip. You can apply constant speed changes to a single clip, a group of clips, a range within a single clip, or a range across multiple clips.
You have essentially two options:
• Use a speed preset, which is quick.
• Create your own custom speed, which is more flexible.
Let me show you how this works.
1. To apply a constant speed change, select where you want the speed change to apply, then do one of the following:
• From the Retime pop-up menu, choose the speed you want.
• Press Command+R to display the Retime Editor, and choose the speed you want.
• Choose Modify > Retime and choose the speed you want.
2. Press Command+R to display the Retime Editor.
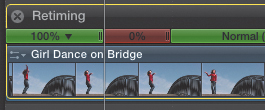
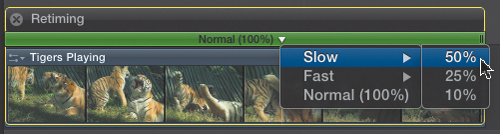
3. Then click the small, downward-pointing arrow next to the label to display the Speed pop-up menu. In this case, I’ll select a slo-mo speed of 50 percent (Figure 15.11).
Figure 15.11 Choose the speed change from the Retime pop-up menu.
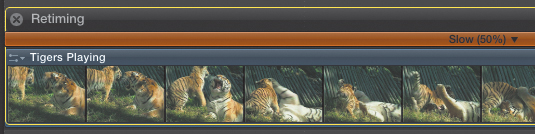
The duration of the clip doubles as the speed is cut in half. The bar at the top of clip will display one of four different colors (Figure 15.12):
• Red indicates a hold frame.
• Orange indicates slow motion.
• Green indicates normal speed.
• Blue indicates fast motion.
Figure 15.12 The bar color indicates speed; orange is slow.
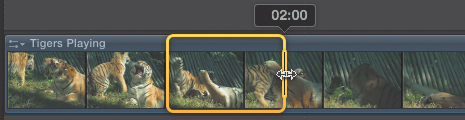
4. To adjust the speed to make the clip run faster or slower than the preset, drag the far-right speed handle in the orange bar to change the speed. This is the same handle you drag to adjust hold frames. Even if you select a speed preset, say 50 percent or 200 percent, you can easily change the speed by dragging the speed handle at the right of the speed bar.
5. To reset the speed of the clip back to normal, do one of the following:
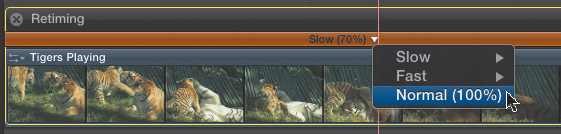
• In the Retime Editor, click the arrow and choose Normal (Figure 15.13).
• Press Option+Command+R.
• From the Retime menu, choose Normal.
• Choose Modify > Retiming > Normal Speed.
Figure 15.13 To reset the speed of a clip, choose Normal (100 percent) from the center pop-up menu.
Tip: Speed Tip
If you want to slow down a clip without adjusting (rippling) the clips downstream, make it a compound clip, then slow the clip inside the compound clip.
You can even apply a speed change to a range within a clip. For example, let’s say you want the clip to run normally for a bit, then slow to 10 percent, then speed back up to 100 percent.
1. First select the range where you want to apply the speed change; this range can even extend across clips (Figure 15.14).
Figure 15.14 You can also apply speed changes to a range in a clip.
2. Then, using one of the techniques I just mentioned, change the speed of the clip. All speed changes within a range use ease-in/ease-out acceleration.
The first frame of the range marks the start of the speed change, and the last frame of the range marks the last frame of the speed change.
When speeds get slower than about 25 percent, you’ll start to see jerkiness in the playback. This is caused when too few frames are played too slowly.
Here’s the problem. Video recorded at 30 fps—I’ll pretend 29.97 NTSC video is running at 30 fps—and playing at 10 percent speed is only playing 3 original frames per second. (Ten percent of 30 is 3.) This makes the video look like a fast slide show.
To fix this, Apple provides three levels of video quality (Figure 15.15). These settings are only relevant for very slow clips. Here are my recommendations:
• Normal: Use for speeds greater than 30 percent.
• Frame Blending: Use for speeds between 15 and 30 percent.
• Optical Flow: Use for speeds slower than 15 percent.
Figure 15.15 Video quality becomes important as speeds slow below 25 percent.
As you change settings, render times will significantly increase. There’s nothing to adjust with these, so if you don’t like how one of these settings looks, try something different. Allow these to render before making decisions on playback quality.
To reset the clip back to normal speed, select the entire clip and press Option+Command+R or select Modify > Retime > Reset Speed. If you want to change the frame where the speed change ends, without changing the speed of the selected range, click the downward arrow for the orange section and choose Change End Source Frame (Figure 15.16).
Figure 15.16 As with hold frames, you can adjust the frame where a speed change ends.
Variable Speed Changes
Variable speed changes are similar to a constant speed change, except that the speed changes during the length of a clip. Apple calls these “speed ramps.”
Speed Ramp to Slow Down Clip
Here’s a simple example. I want the speed of a clip to gradually slow down for the duration of the clip.
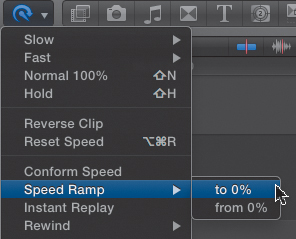
Select the clip, then, from the Retime pop-up menu, choose Speed Ramp > 0 percent (Figure 15.17).
Figure 15.17 You choose variable speed changes from the Retime pop-up menu.
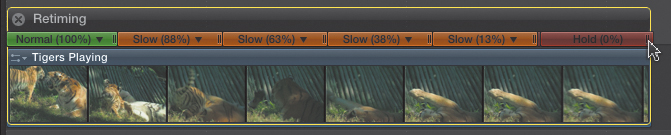
The selected clip immediately divides into four sections (Figure 15.18). The first section runs at 88 percent of normal speed, the second at 63 percent, the third at 38 percent, and the fourth section at 12 percent. In other words, the clip slows down from beginning to end.
Figure 15.18 These four sections are the default speeds for a variable speed clip.
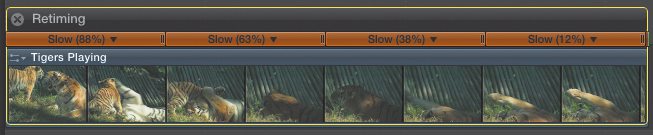
Variable speed ramps always divide the selected clip or range into four sections. You can change speeds and durations by dragging the speed handle on the right side of the color bar.
Speed Ramp to a Still Frame
Let’s say you want the clip to play at 100 percent speed, then slow to a still frame. Here’s how to make this happen.
1. Using the Range tool, select a range in a clip (or across clips).
2. Choose Speed Ramp > 0% in the Retime menu.
The speed ramp is applied just to the range. You can adjust the speed of any section by dragging the speed handle at the right edge of any color bar. This allows you to make the ramp gentler or more abrupt.
3. Position the playhead on the last frame of the clip and select the entire clip, not just the range. (To avoid moving the playhead when selecting a clip, hold the Option key when clicking or press C.)
4. Press Shift+H, or choose Hold Frame from the Retime pop-up menu.
5. Drag the end of the still frame until you have the still frame duration you want (Figure 15.19).
Figure 15.19 Add a hold frame to the end of the speed ramp and drag the duration as you see fit.
Speed Ramp to Slo-mo and Back Again
Here’s one more version. Start playback at 100 percent, slow to zero, then speed back up to 100 percent.
Note: Extra Credit
Click the downward-pointing arrow for each section and watch what happens as you select different settings and different durations, and change the end points.
Using the razor blade, divide the clip into four sections: the initial section that runs at 100 percent, the section that slows down, the section that speeds up, and the final section that runs at 100 percent speed.
Select the second section and, from the Retime pop-up menu, choose Speed Ramp to 0%.
Select the third section and, from the Retime pop-up menu, choose Speed Ramp to 100%.
Play all four sections. The clip starts at full speed, slows to zero, then speeds back up to full speed again.
Each orange bar section can be changed in speed and duration by dragging the speed handle at the right side of each bar.
Other Speed Effects
The Retime pop-up menu hides a variety of other speed options.
Conform Speed. If the frame rate of your source media doesn’t match the frame rate of the project, this enables the clip to play at the project’s frame rate. For example, if you edit a 30 fps clip into a 60 fps Timeline, enabling Conform Speed will make it run at 60 fps or 200% speed. So, if you’ve intentionally applied speed effects with your camera using overcranking or undercranking, this allows your in-camera speed effects to play correctly.
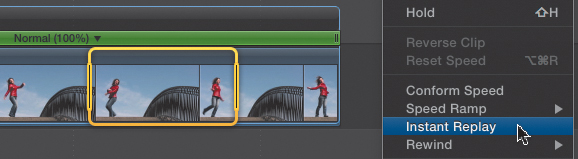
Instant Replay. This option creates the effect of an instant replay like those used in sports. Select the range you want to replay, then choose Instant Replay from the Retime pop-up menu. The selected range is instantly duplicated starting at the end of the range (Figure 15.20).
Figure 15.20 The Instant Replay feature lets you replay a selected range of a clip.
To make Instant Replay more effective, choose Slow > 50 percent from the menu that appears when you click the small arrow at the top of the replay section (Figure 15.21).
Figure 15.21 Adding a slo-mo effect makes Instant Replay more believable.

Rewind. This option lets you duplicate the selected range of a clip and play it in reverse at whatever speed you specify. To make this more effective, set the speed of the rewind section to 4X or faster.
Reverse Clip. To play a clip backward, select the clip, or range within a clip, that you want to reverse, and choose Reverse Clip from the Retime pop-up menu. Negative numbers in the Retiming Editor indicate a clip going backward.
Summary
Speed changes are a fun way to call attention to specific sections of a clip. Slow motion lets you see things that happen too quickly to appreciate properly in real time. It lends grace and delicacy to movement, even if it wasn’t there in the first place. Fast motion lets you see patterns in movements that are too slow to perceive in real time.
Whether you are creating still frames, slo-mo, or high-speed extravaganzas, speed changes can add life and energy to your Projects.
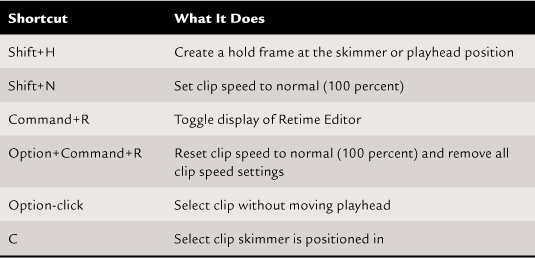
Keyboard Shortcuts