4. Managing Media
All editing software tries to make working with media as easy as possible. Final Cut Pro X is no different in this respect. But, what is different is how it manages media. Unlike any other editing system, FCP X is designed from the ground up to work with tapeless media, which is media recorded to cards and hard disks, not videotape. Working tapeless requires changing how you think about media and changing how your editing system works with media.
Managing this media is what this chapter is all about.
Overview
Apple’s goal with Final Cut Pro X was to create a rock-solid, single-user media workflow that helps editors avoid losing media. To do this, Apple consolidated the Import, Log and Capture, and Log and Transfer screens used in Final Cut Pro 7 into a single interface. Apple also provided three media options:
• You can edit media natively in its original camera format.
• You can optimize media by converting it into ProRes 422 for faster performance and potentially better image quality.
• You can create small proxy files to reduce the file size of media, while still retaining optimum performance with good image quality.
Final Cut Pro X supports importing from a file-based camera via a card, from a hard disk, or from a folder on your hard disk. It supports importing either stills or video from a DSLR or (H)DSLR camera, a tape-based camera or deck connected via FireWire, an iMovie project, an iMovie Event Library, files stored on your hard drives, and a camera archive created from tape or tapeless media.
This chapter explains how to organize your files before you even import them, how to set import preferences, how and why to optimize and analyze media, the different ways you can import media, how to import iMovie projects and media, how to size and import still images, and how to create a camera archive for both tape and tapeless media.
Keep in mind that many video formats require driver updates from camera vendors before they can be used in Final Cut Pro X. So, be sure to confirm compatibility before beginning any project. Final Cut Pro X does not currently support direct capture from videotape using timecode or RS-422 to control playback, and it doesn’t “hide” media; all Event folders are always available.
Note: A Really Important Website
Before you start shooting, be sure your camera and video format work with Final Cut Pro X. To do this, visit Apple’s FCP X website at http://help.apple.com/finalcutpro/cameras/. This site lists all supported cameras and devices. It is always better to discover problems with your gear before you shoot, rather than afterward.
Organize and Name Media
New users often make two common errors when working with tapeless media:
• They import directly from the memory card to Final Cut.
• They copy only some of the files from the card to their hard disk and then try to import them.
Both of these choices lead to catastrophe. Here’s the one rule you need to remember: Always either create a disk image of your camera card or copy the entire contents of your camera card to a folder on your hard disk. My recommendation is to create a folder and copy your card into that folder.
It is impossible to overstress the importance of this rule. Follow it, and everything works great. Try to get fancy and outthink the system, and you’ll always end up with problems.
Copy Your Media
When you edit video, you’re working with two sets of files:
• Source media: This is the media you shoot in your camera. These are your master files.
• Edit media: This is the media you edit with. Sometimes these are the same files. Sometimes they aren’t.
This section illustrates a system you can use to copy, organize, and name the source files you shoot. Figure 4.1 shows the contents of a typical memory card opened in the Finder after media has been recorded to it—lots of weirdly named files and folders.
Figure 4.1 This shows a typical memory card mounted on the Desktop, along with its folder structure.

Here’s the problem. In production, you record images from your camera to a card. You copy the card to a hard disk and then you erase the card(!) so you can use it again in production. (That word—erase—just sends chills down my back!)
For production, you need a fast, reliable, and easy-to-implement system that guarantees all data is transferred from the card to a hard disk. For postproduction, you need a system that assures that you can easily find all the media from that production.
Note: Why All the Weird Files?
The reason there are so many weird files is that the contents of this card are far from a QuickTime movie. When FCP imports a file from a card, it takes all the different elements from all those different folders and builds it into a single QuickTime file. However, constructing that QuickTime movie does not mean it is changing the video format, just the structure of the files.
Well, there are three parts to the solution. First, you want to be sure you are copying the correct files. Second, you want to copy the files safely and accurately to folders on at least one hard disk. And third, you want to organize and name the folders properly so you can associate them with the correct Project and find them when you need them.
You have two options here: Create a disk image of the card that you can store and access later, or copy the entire card to a folder on your hard drive. Both options support backups. Both options work. My preference, though, is copying the card to a folder. The key is to do it right.
Note: Is This Really That Important?
Yes! I can’t tell you how many e-mails I get from editors trying to figure out how to salvage a shoot because they thought they needed to copy only a few files. Make your life simple and sleep well at night—copy the entire card to a single folder on your hard drive. One folder per card.
Always select the entire contents of the card and copy the entire contents of the card to a single folder on your hard disk. You copy one entire card to one folder. Never, ever copy just a portion of the card. It will always lead to disaster. Always copy everything on the card—files, folders, locked files, everything. Final Cut knows what to do with all these files, even if they don’t make sense to you.
And—even though you can—never import files directly from the card. Always copy the files to a folder on your hard disk first and then import them from that folder.
Why? If you import from the card and then erase the card, you don’t have any backups. If, for some reason, the file you imported gets corrupted or lost or erased, you’ve lost that particular shot permanently. There’s no way to get it back. You always want to make a backup because these folders become your camera masters. In fact, I recommend always making at least one backup of all media shot during production before you leave the set that day. That way, you know you have multiple copies of all the media of that day’s shoot.
Note: But, What If You Need to Save Hard Disk Space?
Look, let’s get real for a second. How much time, effort, money, pain, and aggravation did it take to get your video shot? Which costs more—re-shooting or buying a new hard disk?
Storage is dirt cheap compared to the costs of even a simple production. Don’t be penny-wise and pound-foolish. If you need it, buy more storage.
Naming Media Folders
The next step is to name your folders. With tapeless media, you don’t name files; you name folders. Final Cut Pro X can use this folder name as a keyword to help you find that media in the future. Naming is critical because files that you can’t find, or can’t associate with a Project, are useless.
One Method
Whenever I start a new Project, I create a project code so I can easily track elements related to this Project. For example, let’s say I have Just a Moment Productions as a client. They give me a new Project, the second one I’ve done for them. Before I do anything else, I create a project code (Figure 4.2).
Figure 4.2 Here’s the naming convention I use for tapeless media folders. The project code is the first four characters: two letters for the client followed by two numbers for the job.

This code consists of two letters and two numbers: JM is the two-letter client code for Just a Moment Productions, and 02 indicates this is the second job I’ve done for that client. Then I use that project code at the beginning of all filenames for materials created for that Project.
All my Photoshop files start with that project code; so do graphics files, Final Cut Pro Project names, Motion projects, After Effects comps, voice-over recordings, everything. That way, if I ever need to find a file, I simply search for the project code, and every filename that starts with that project code shows up.
Folder naming for tapeless media builds on this project code. Remember, use one card per folder and a folder for every card you shoot. These folders become your camera master files from here on out. Organizing them now makes all the difference. Here’s how I name the folders.
I start with the project code, then the date I shot the card, the camera (i.e., A, B, or C), and the card number. In Figure 4.2, JM02 is the project code, 110928 is the date I shot the card, A is the camera, and it’s the third card I shot that day from that camera.
(Note that the date format is year, month, date. This allows the folder to sort alphabetically and chronologically at the same time.)
These source files are the original camera masters before Final Cut Pro copies them into the Events folder. I store all my source media folders on a separate hard drive from my editing files. Source files are not stored in the Events folder.
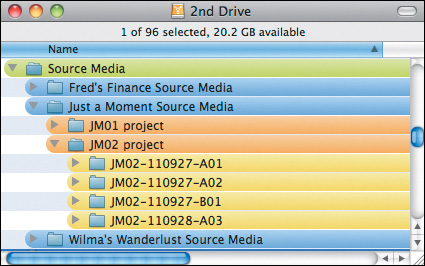
Figure 4.3 shows how I organize my source media folders on the hard disk. On the second drive, I created a folder called Source Media. Inside Source Media is a folder for each client. Inside each client folder is a folder for every Project. Inside the project folder is a folder for every card. (I’ve color-coded the levels to make them easier to see, but these colors are totally optional on your part.)
Figure 4.3 This is how I organize my folders for tapeless media—by client, project, and card.
There are several good things about this system:
• It is easy to implement and understand.
• You can see at a glance what client, date, and camera is inside each folder.
• When it comes time to import, Final Cut Pro X can easily extract the shots you need for edit.
• Final Cut Pro will track the folder name as part of the metadata associated with every clip from that folder, so finding the original media again in the future is trivial.
When working with tapeless media, copy one card into one folder. Final Cut Pro will then take the contents of that folder and import the shots you need from it. Spend a little time thinking about how you want your files organized and named before you start shooting, because what you’re creating with those folders are your camera master files. Make sure you have enough storage on set. Make backups during production. Create and name your folders in an organized fashion. And keep your source files separate from your editing files just in case.
Note: What If You Want to Archive Your Cards?
One way to do this is to make a disk image of the card by choosing Utilities > Disk Utility. A disk image copies the entire contents of the card into a single file on your hard disk, which is easy to archive. Even better, because all the different files are stored in a single file, nothing gets lost.
Once that’s done, you are ready to import your files and start editing.
FCP X Has a Simpler Way
The benefit to making disk images or copying memory cards the way I just outlined is that you can do it on set, without using FCP X. This way, you are making an exact copy of the files as they exist on the memory card.
However, Final Cut Pro X has another way to do this, called a camera archive. As you would expect, an archive is a collection of data. Creating a camera archive makes it easy to make a copy of your memory cards. You’ll see how this works later in this chapter.
Note: Are Camera Archives Only for Tape-Based Media?
No. Camera archives can be used for tape, or tapeless, media. It is also a great way to gather all the media from a project and store it in one spot. You will learn more later in this chapter or by reading the FCP X Help files.
The point I want to make now is that the difference between copying the card manually and using FCP X to make a copy is in the end result. Manually copying files from the card to a folder makes a complete copy of exactly the same files that are on the card. This new folder can be read by any application that knows how to read the contents of a memory card: FCP X, FCP 7, Adobe, Avid...you get the idea.
The limitation of this method is that you no longer have a single file to watch—you need to keep track of the entire folder. And if any of the contents of the folder get lost, there is a very good chance you won’t be able to access the media inside the folder.
What FCP X does is create a single file, which you name, stored in a single folder called Final Cut Camera Archives on whatever hard disk you want. The important point here is that Final Cut Pro transfers all of the media from the card into a single file on your hard disk that is readable only by FCP X.
The advantages are that, because all the contents are sealed into this one file, it is easy to manage and there is no risk of individual files getting lost. The disadvantage is that the only application that can read this file is FCP X. Note that FCP is not applying any data or video compression to the file. The file you create on your hard disk is the same size as the data stored on the card.
I am always leery of storing media in a format that can be read by only one application—even from large companies like Apple. My recommendation is to copy your files manually, from the card to a folder on your hard disk as discussed earlier. This can be done easily on set, without requiring the use of Final Cut Pro X. Additionally, other applications are able to read the contents of this folder.
Finally, you can use utility software, such as Shotput Pro, to copy the files to multiple hard disks at the same time. However, if you prefer simplicity and security to flexibility, a camera archive is hard to beat.
Note: Final Cut Pro X Is Nondestructive
In spite of what it seems as you are editing, Final Cut Pro is not making any changes to the media files you have stored on your hard disk. No matter what you do inside FCP X, the media files on your hard disk are safe. This is a very reassuring thing to know—nothing you do inside Final Cut Pro will harm your media. Even when you ask Final Cut Pro to delete media, it only moves it to the Trash. You still have the opportunity to recover it from the Trash, if you moved it there by mistake.
Importing Media
Importing is the process of making Final Cut Pro X aware that media files exist. Sometimes, this process involves converting the files from a camera format into something that FCP X can read. Other times, you just need to point to a file to let Final Cut Pro know that it is there. Additionally, FCP X can optimize (convert) files into a format that renders and exports faster, or it can create proxy files to allow you to reduce the file size of your media so you can edit it on smaller systems.
In all cases, FCP X is not actually importing anything. It is just creating a pointer, a path, that tells it where the media file it should use for editing is located. No media files are actually copied into your Project.
One of the good things about FCP X is that when Apple created it, it made much of the import process run in the background. “Background” means that you can be doing one thing while Final Cut Pro is importing, analyzing, and processing all your files. This means you don’t have to wait for FCP to finish importing before you can start editing. In fact, you can start viewing and editing files almost immediately, even though they are still importing.
What’s even cooler is you can monitor all this background activity—I’m a big fan of blinking lights and charts and graphs. I’ll show you how to monitor your background tasks shortly, when you actually have some imported media to monitor.
Note: Where Does Media Get Stored?
Good question, and from the previous chapter, you already know the answer. Media used for editing is copied into the Events folder or FCP points to its current location on your hard disk. You control which of these options FCP follows, based upon how you set preferences inside FCP X.
Even better, Apple has added a bunch of options that are handled during import that can save you time later. Those options are controlled from Final Cut Pro’s preferences. Let me start the discussion of importing by looking at these preference settings. Then, I’ll show you how to import a wide variety of media.
Set Import Preferences in the Import Window
My goals for this section are to explain how Final Cut Pro decides where to store media, to describe the settings in the Import Preferences window, and to provide recommended settings for your importing. Final Cut Pro X also makes it easy to change, or verify, import preferences before importing media.
There are three preference windows in Final Cut Pro: Editing, Playback, and Import. For this chapter, you’ll look at the Import preferences. I’ll discuss the other two in Chapter 6.
There are two ways to open Final Cut Pro’s preference window:
• Press Command+[comma].
• Choose Final Cut Pro > Preferences.
The preference window opens (Figure 4.4). Click the Import icon. (In this example, the checkboxes also indicate my recommended import preferences.)
Figure 4.4 This screen sets preferences for importing media.
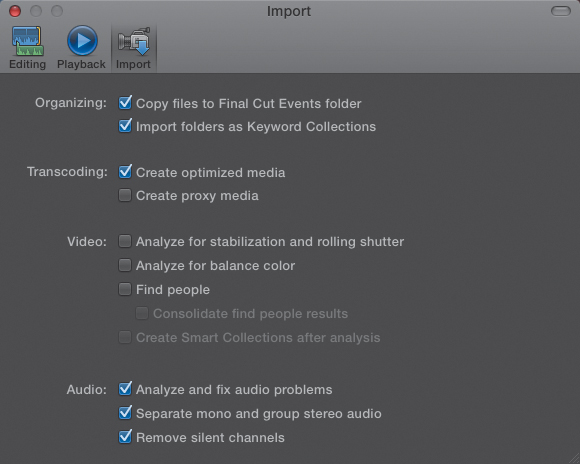
The Import window has four sections: Organizing, Transcoding, Video, and Audio. (Transcoding is a technical term that simply means converting. Transcoding a file means converting a file from one format to another.) Let’s take a look at what each of these settings means.
Organizing
The Organizing section of the Import window contains the following:
• Copy files. If “Copy files to Final Cut Events folder” is checked, FCP will copy your media file from wherever it is into the Events folder. This is the best way to consolidate all your media files into one location. The downside is that, because you are duplicating files, your storage needs will increase. Checking this option does not move the original file.
If you are someone who is very organized and knows where all your files are, you can uncheck this box. If, on the other hand, you have better things to do than organize and track all your files, then check this box. There is no impact on performance regardless of how you check this box. All file copying happens in the background. (More on that later.)
• Import folders. Keywords are one of the powerful tools that Final Cut uses to help you find files. Depending upon how you select your files, when this option is checked, FCP will assign the name of the folder that contains the source media as a keyword for each of the imported clips.
In my case, I generally have both of these checked.
Figure 4.5 Note the organization of files and folders.
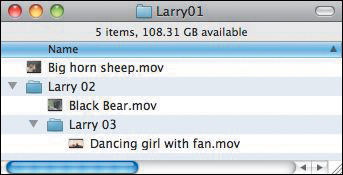
Figure 4.6 Folder names as keywords are imported only if a folder, not a specific file, is selected for import.

Figure 4.7 When the containing folder is selected, all folder names are imported as keywords.
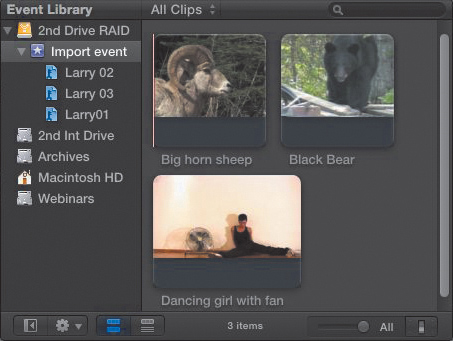
Figure 4.8 However, when a file, not a folder, is selected, no keywords are created.

Figure 4.9 No keywords are applied to the clips.
Transcoding
Apple makes a big deal out of the fact that FCP X edits files in the camera’s native format. This is, in general, a good thing. However, some video formats, because of their complexity, take longer to calculate effects and export than others. Also, some video formats are better for color correction than others.
To solve this problem, Apple provides the option of transcoding (converting) media from one format into another; specifically, ProRes 422. While this is an excellent codec, if you wanted to change to a different format, you can’t.
You can transcode files in two ways:
• Optimize media: Some files are compressed using long-GOP formats such as MPEG-2 and MPEG-4 files. While FCP can edit these formats natively, it works better when they are “optimized.” Optimizing converts these files into ProRes 422. Optimized files provide faster renders, potentially higher image quality for effects, and faster exports. The downside is larger file sizes—generally about four times bigger than the native camera files. Optimizing simply means that FCP is creating a high-quality ProRes 422 file from your source camera media.
• Proxy media: Creating proxy media creates another copy of your media using ProRes Proxy. This version of ProRes is optimized for small file sizes. Proxy files are about the same file size as the camera native files.
If both Optimize and Proxy are checked, then you’ll end up with three versions of your files: the camera master, the optimized file, and the proxy file. If Copy Files is also checked, you’ll end up with a fourth version, which is a copy of your camera source file stored in the Events folder. (Like I said earlier, storage is cheap; be sure you have lots.)
What happens if you don’t create either optimized or proxy media during import? No problem; FCP will edit the video in its native format; plus, you can transcode it later, if you so choose.
Select the Event you want to optimize or create proxies for. Then, choose File > Transcode media. Check the appropriate checkboxes, and click OK. Final Cut Pro will create all necessary files in the background and store them in the Event folder.

Video
The Video section analyzes your video for problems and suggests possible repairs. The nice thing about this feature is that while it suggests ways to repair your media, you can accept, reject, or modify the suggestions. The only downside to this analysis is that it can take a loooonngg time. Yes, it runs in the background, but background processing means you need to leave both your computer and FCP running while FCP processes your files.
Here are your choices:
• Analyze for stabilization and rolling shutter: This option looks at handheld footage for shaky camera moves or DSLR footage for rolling shutter problems (see Chapter 12). This process can take a long time and generate very large render files. My suggestion is to leave this off and manually analyze the clips you need to correct later.
• Analyze for balance color: This looks at your images to see whether there is a color cast (the shot is blue or orange). If there is, FCP can automatically fix it. The automatic correction actually does a pretty good job. Again, however, the analysis takes a long time. I recommend manually analyzing clips that need color correction to save time. Chapter 16 explains how color correction works.
• Find people: This analyzes your shot to see how many people are in the frame. This is not facial recognition, at least not yet. Instead, the program determines whether there are one, two, three, or more people in the frame. And, it determines whether the shot is a close-up, medium shot, or wide shot.
In theory, this is a neat trick. In practice, I’ve found it to be inaccurate and time-consuming. For now, I don’t use it. If you experience problems using this feature, Apple is interested. Upload samples of footage that return inaccurate results and report them to www.apple.com/feedback/finalcutpro.html.
Audio
Audio analysis, unlike video analysis, is very fast. I generally like what FCP is suggesting for audio repairs, and when I don’t, I can override its suggestions. For this reason, I recommend leaving all three of these settings on.
• Analyze and fix audio problems: This examines a clip for hum, distortion, and noise. If it finds any, it applies filters to remove it. I’ll show you how this works in the Chapter 9.
• Separate mono and group stereo audio: Many people mistakenly think that because they want their ultimate mix to be stereo they need to record everything in stereo. For music and sound effects, this is a good idea. For interviews, it is not. Interviews should be recorded where each voice is on its own channel and the audio is imported as dual-channel mono. This option is here to make sure audio imports properly. Again, I recommend you check this.
• Remove silent channels: Sometimes, audio gets exported with too many channels, for example when a stereo pair is exported as a six-channel surround clip. This option prevents importing audio channels that are silent.
Note: Changing Preference Settings
Changing import preferences has no effect on any media that has already been imported.
Again, I suggest checking all three of these options. When you are done setting your preferences, simply close the window, and FCP saves them automatically.
Importing 101
There are two types of files you need to import:
• Files from a camera that need to be converted into something Final Cut Pro can play
• Files already playable that are stored somewhere on a hard disk
There’s a third option, which is importing files from an iMovie project, but that is simply a special case of the second option.
So, how do you decide whether you need to import from a camera or a file? Easy. Try it. If it works, you guessed right. If not, try the other option. If that’s a bit too laissez-faire for you, think of it this way. If you can open the file in QuickTime, you import the file. If you can’t, you import the camera.
You import from camera when you are importing directly from a camera card, from a camera card transferred to your hard disk, or from videotape. The rest of the time, you import from a file. Here are some specific examples.
Importing from a File-Based Camera
There are two main types of cameras: those that record to videotape and those that record tapeless. However, videotape is no longer the wave of the future; tapeless media is. So, we will start by looking at importing tapeless media.
Tapeless media has two main categories: cameras that record to memory cards (of which there is a large variety) and those that record to hard disks. However, hard disks generally record video files that don’t need conversion; they can be played straight from the hard disk. This section talks about media recorded to memory cards.
The Basic Steps
1. If this is the first time you’ve started Final Cut Pro X, you’ll see the screen in Figure 4.11. However, after you create your first event, you’ll never see this screen again.
Figure 4.11 There are a variety of ways to create a new Event—however, these three icons show up only the very first time you run FCP X.

2. As you have come to expect, there are multiple ways to import from a camera:
• Choose File > Import from Camera.
• Press Command+I.
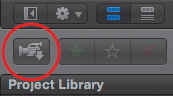
• Click the Camera icon on the extreme left edge of the toolbar (Figure 4.12).
Figure 4.12 To import files from a camera or a memory card, click this Import from Camera icon.
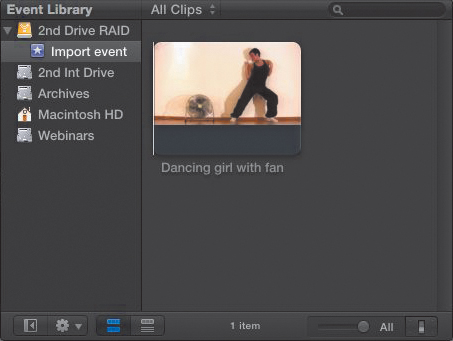
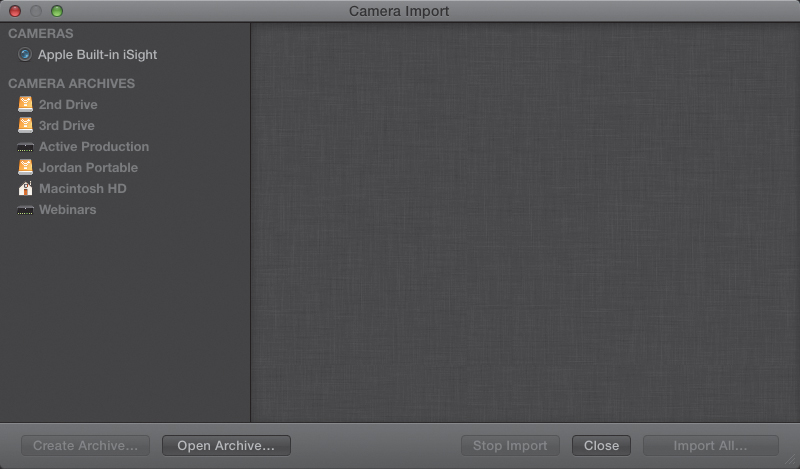
Whichever you select, the Camera Import window opens (Figure 4.13). In the top-left corner is a list of all the drives attached to your system. If you have connected your camera or plugged in your memory card to the computer, it will show up here.
Figure 4.13 This is the Camera Import window—with no files loaded.
3. If, on the other hand, you copied your media to your hard disk before importing it, as I recommend, then you’ll need to do one extra step. To import files from a card you’ve copied to your hard drive, you will need to open an archive.
Opening an Archive
Remember that camera archive we talked about earlier? Well, to Apple, an archive is a collection of media still in its camera-native format (as opposed to a folder of QuickTime files). If you copied your media files into a folder on your hard disk, you open that folder by opening an archive. You can also create archives from either a memory card or a tape-based camera, which I’ll talk about in a few pages.
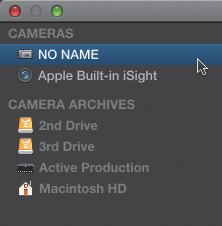
If the memory card is plugged into your computer, it will show up at the top of your list of drives in the top-left corner. In Figure 4.14, the memory card NO NAME is displayed, and the files it contains are displayed in the large window to the right.
Figure 4.14 If a memory card is plugged into your computer, it will show up in this list—for example, the card NO NAME.
If you copied the files to your hard disk first, click Open Archive in the lower-left corner. A standard file picker window shows up. Navigate to where you stored the media you copied from the camera and select the folder. You don’t need to select the files in it. Once you select the folder and click OK, the images from this archive are displayed in the large window to the right.
Whichever option you choose, all the files in the selected device or folder are now displayed on the right side of the window (Figure 4.15).
Figure 4.15 This is what an opened camera archive looks like.
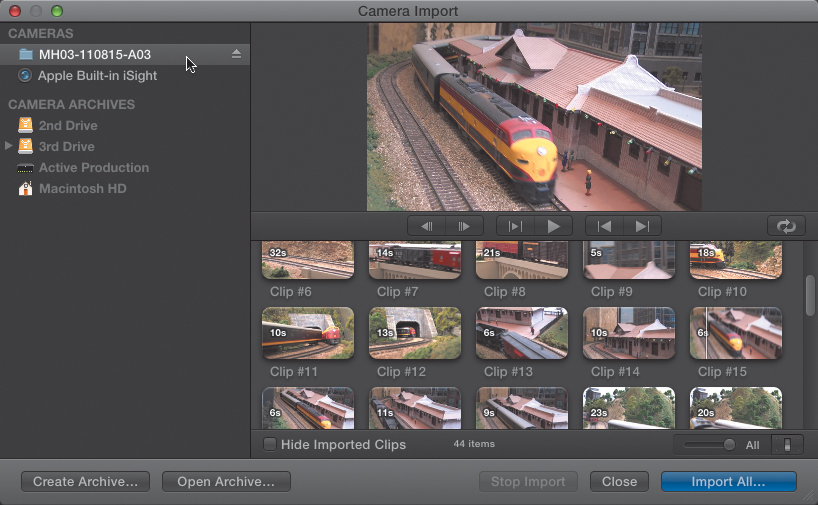
The purpose of this window is to allow you to review all your clips and to decide which ones you want to import into FCP so you can edit them. The large image at the top right allows you to preview a clip. The small images at the lower right allow you to quickly scroll through all the clips in that archive or device.
Note: Your Source Media Is Safe
Regardless of what you decide, all your source images will remain on your hard disk. Nothing you do in this window will affect your source media.
As you would expect, this portion of the Camera Import window allows you to play a clip. The buttons across the bottom, from left to right, allow you to do the following:
• Move left one frame at a time
• Move right one frame at a time
• Play from the beginning to the end of a clip (or from the start to the finish; more on that in a minute)
• Play, or stop, a clip
• Jump to the beginning, or start, of a clip (these are not the same thing)
• Jump to the end of a clip (and end has two different meanings)
Oh, and that small twisty thing on the far right? Click it, and when you play something, it will repeat, over and over and over...until you stop playback.
The small pictures, also called thumbnails, show all the clips stored in that archive. Click the Switch in the lower-right corner to adjust the size of these thumbnails and to turn the display of audio waveforms (a picture of the sound of your audio) on or off (Figure 4.16). I generally tend to work with small thumbnails, but this is absolutely a matter of personal preference, because Final Cut doesn’t care what the thumbnail size is.
Figure 4.16 The Switch allows adjusting the height of the thumbnails and whether the audio waveforms will be displayed.

Selecting and Marking Clips
To select a single clip to import, click it. The yellow box around the clip indicates the portion of the clip that is selected (Figure 4.17).
Figure 4.17 Click a clip to select it—notice the yellow border indicating the portion of the clip that’s selected.

To select a group of clips, select the first clip you want to import; then, while holding down the Shift key, select the last one. All the clips in between are selected as well.
To select any arbitrary group of clips, hold the Command key down while clicking. Whatever you click will be selected, but the clips around it will not (Figure 4.18).
Figure 4.18 You can select a portion of one clip or multiple clips using either the Shift or Command key. One clip with a range and three other whole clips are selected here.

While you might think that being able to select just the clips you want is pretty darn neat, the real magic happens when you realize you can select just a portion of a clip. This is called marking a clip or setting a clip range. This is a real power tool, because you don’t want to clutter up your Event Browser with clips you’ll never use or waste time skipping over portions of clips you don’t need.
There are several ways to mark the Start and End (or In and Out) of a clip:
• Click with the skimmer where you want the shot to start and drag until you reach the end of the portion you want. The yellow box indicates the Start and End of your clip.
• Click the skimmer before the portion you want and press the spacebar to play the playhead in the clip. When you reach the spot you want to start, press I. Continue playing until you reach the spot where you want the clip to end and press O.
• Hover the skimmer over the frame (that is what an individual image within a clip is called) that you want to mark as the Start and press I. Hover over the end of the portion you want to import and press O.
• Click the playhead where you want the shot to start and choose Mark > Set Selection Start. Go to the end of the shot and choose Mark > Set Selection End.
• To select an entire clip, click it; or, if you’ve already set marks (the Start or End), press X.
Note: How Accurate Should This Marking Be?
Not really very accurate. I’ve been editing for more than 30 years, and I’ve learned that bringing in a little more media than you think you need is always a good idea. So, I try to be close but never precise—not on importing. Precision is reserved for the editing process, which, I promise, I am going to cover. But you need to import the media first.
In other words, there are lots of options. And, for the power user, all these marks can be set in real time, during playback, or by precisely positioning the skimmer or playhead. Your choice. They all work.
Note: You Can Always Change Your Mind
There is no limit to the number of clips you import or how many times you can go back to the same archive to grab more clips. If you are not sure you need a clip, you can leave it alone until you are ready to use it. This is why I like copying all my cards to folders on the hard disk. Once that card is erased, I can’t go back to it to recapture more media. This is also a good reason why backups are so important.
There is one problem with all of this, and it is so obvious that I’m expecting it to get fixed in the next update to the software. If you set an In and an Out for a clip and then click another clip to select it, when you go back to the first clip, it’s forgotten the In and the Out.
In every other editing system on the planet, clips remember their In and Out until you change them. I expect that will happen with clips in Final Cut Pro X as well. It just hasn’t happened yet. A corollary to this “not remembering the In and Out” problem is that you can import only one clip with a range at a time, though you can easily import as many whole clips as you want.
Importing a Clip
Let’s try a specific example. Figure 4.19 shows two clips—one with a selected range and one where the entire clip is selected. I’ve decided I want to import these two clips so I can use them for my edit.
1. When all the clips you want to import are selected, click Import Selected in the lower-right corner. You can import as many times and as many clips as you want. You can even return later and import more. No rush.
Final Cut instantly displays the import dialog (Figure 4.20). The settings in this dialog are based upon the preference settings you created at the beginning of this chapter. Displaying this window now allows you to change your settings, should you want to.
Also, in the future, when you return to this archive, click the Hide Imported Clips checkbox at the bottom, and all those marked portions will be made invisible so only those clips you haven’t imported yet are displayed.
Note: New Feature: The Camera SDK
With version 10.0.1, Apple released a camera software development kit (SDK) so that camera manufacturers can add support for FCP X at the same time they release a new camera.
2. Look at the top of the dialog. For the purpose of this example, I created an existing Event called JPutch. I could import this train footage into that Event—except John has given me some excellent dramatic footage that you’ll see in the editing section, so these train clips should be put somewhere else.
Instead, I created a new Event, in this window, during import. This just goes to show, again, that there are multiple ways to do the same thing. In the previous chapter, I talked about creating new Events first. Now, you discover that you can create a new Event during import. However, to do it, you must create an Event to store media. My new Event is called More Trains and is stored on the second drive. (Remember, try really, really hard not to store media on your boot drive, especially if you are going to optimize it.) I discussed these import settings earlier in this chapter, except for “Remove pulldown.” This feature is used for 24-frames-per-second film transferred to videotape.
3. Once you are happy with your import settings, click Import, and FCP leaps into action and imports your clips.
The Camera Import window stays open, but notice at the bottom of each clip, or portion of a clip, that you imported, a pale salmon-colored line (some would call this orange) appears (Figure 4.21). That indicates the portion of the clip that was imported. This is a great visual aid to remind you which shots were imported and which weren’t.
4. When you are done importing, click Close (it’s next to Import Selected), and you’ll discover your clips are already loaded into the Event Browser for that Event, ready for editing.
Figure 4.19 Both an entire clip and a range within a single clip are selected.
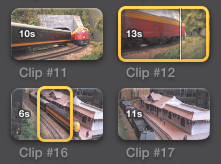
Figure 4.20 Every time you import, you are able to change your import settings. The Import preferences determine the default settings, but you can change these at any time.

Figure 4.21 The orange bar, at the bottom, indicates the portion of the clip that was imported.

Monitoring and Changing Background Tasks
However, while the process of importing clips is both fast and easy, behind the scenes there’s still a lot of work being done. And this shows the power of Final Cut Pro X, because in the past, you would need to wait until all the finding, transcoding, and importing tasks were complete. Not so today. Today, Final Cut Pro X processes all that in the background.
One of the neat features in FCP X—mainly because I’m a fan of blinking lights and charts and graphs—is the Background Tasks window. To open the Background Tasks window, click inside the “clock face” on the left side of the Dashboard in the middle toolbar of Final Cut Pro X. (You can also display this task window by pressing Command+9 or choosing Window > Background Tasks.) This opens the Background Tasks window, which displays the status of all actively running tasks (Figure 4.22). In this case, it shows that FCP is 47 percent done importing the media clips selected earlier.
Figure 4.22 The Background Tasks window displays all the activities FCP is running behind the scenes.

This Background Tasks window can be very useful when running Final Cut Pro. You can reference it to check the status of importing, analyzing clips, transcoding from one format to another, rendering transitions and effects, and exporting.
Importing from a Tape-Based Camera
Wow! That included a lot of steps. The good news is that once you understand how importing works—and you spent a lot of time going over all the steps in the previous section—these other options are just slight variations on the same theme.
Let’s turn our attention to capturing from videotape. Here, Final Cut Pro X has some significant limitations. It can capture only from videotape cameras or decks that are attached via FireWire. Companies such as AJA, Blackmagic Design, and Matrox are working on ways to capture using other videotape protocols. New products are expected about the same time this book is published, so visit these companies to see what their latest gear can do.
However, assuming you do have a FireWire deck or camera, here’s what you need to know to capture clips from it.
1. Connect your FireWire camera or deck to the computer. Turn it on and load a tape. (You can also use this process for capturing from a live camera, but this example assumes you are using tape.)
2. Open Final Cut Pro, select an Event you want to use to store the media, and click the Import from Camera icon (or press Command+I) (Figure 4.23).
Figure 4.23 Here’s an example of a DV videotape deck (Sony DSR-11) attached to the computer via FireWire.

In the top-left corner of the Camera Import window, the name of the camera or deck will be listed.
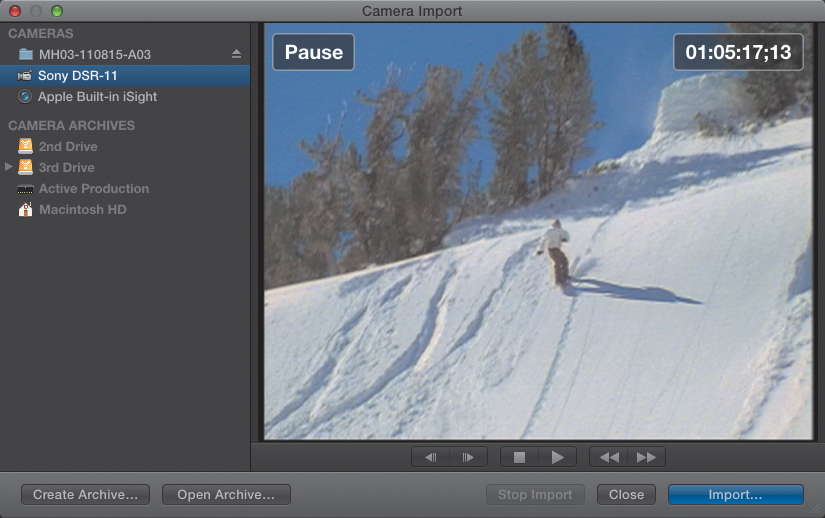
3. In the Camera Import window, you’ll see an image from your tape, along with the word Pause, indicating the tape is not running (Figure 4.24). Unlike earlier versions of Final Cut Pro, you cannot set Ins or Outs when capturing from tape. (In FCP 7 terms, FCP X uses Capture Now when importing from tape.) So, to capture a shot or an entire tape, rewind the tape using either the controls on the camera or deck or the controls at the bottom of the Preview window to rewind the tape until it is a few seconds before the start of the shot you want.
Figure 4.24 This is the Camera Import window. Notice the text displays at the top.
4. Click the Import button at the bottom.
Just as you saw in Figure 4.20, when importing tapeless media, the Import dialog appears, allowing you to configure how you want the clips imported. “Create optimized media” is grayed out because this video format (DV) is already optimized and does not need conversion to ProRes.
5. When you are happy with the settings, click Import.
If the tape does not start playing, push the Play button on your camera or deck. Final Cut Pro will start capturing the images directly to your hard disk, storing them in the Event you selected before opening this window (Figure 4.25).
Figure 4.25 Notice the monitoring display at the top of the screen during tape playback.
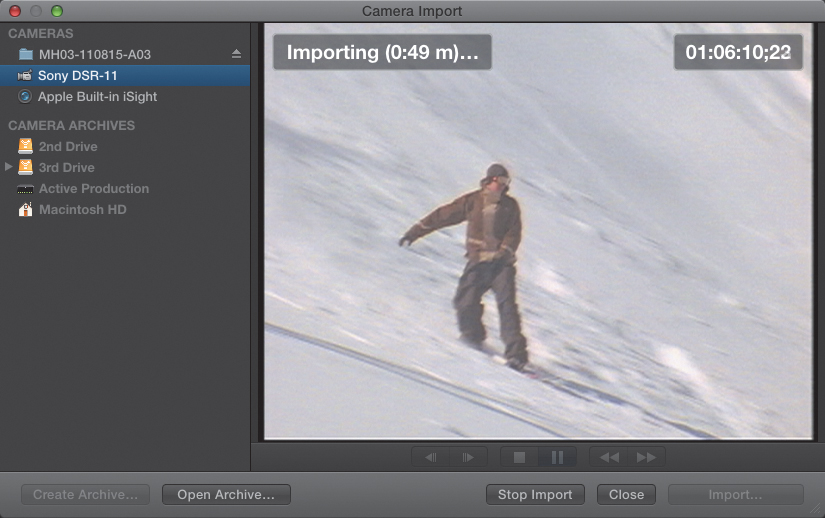
6. The import status at the top displays the shot being captured, the amount of time currently captured to disk (top left), and the timecode on the tape at that moment during playback (top right). When you want to stop the capture, either click the Stop Import button at the bottom or simply stop the camera or deck.
Note: What About Timecode Breaks?
When capturing from videotape, it is essential that timecode remain continuous. If there are timecode breaks on the tape, FCP X will capture each section on the tape, between breaks, as a separate clip. You will probably lose about three seconds of media before and after each break.
Although the Camera Import window remains open, the captured clip is instantly displayed in the Event Browser for the selected Event.
7. Repeat this process until all the shots you need are captured from tape.
Creating a Camera Archive
Camera archives, which were mentioned earlier in this chapter, are also a way to easily digitize entire videotapes so you can store them on your hard disk until you are ready to use them. The benefit of this process is that videotape only has a shelf life of 20 to 25 years. FCP X makes it easy to digitize your historical tapes before they get too old to capture.
What Final Cut Pro does is transfer all the clips from your tape into a single master file stored on your hard disk. This is basically a straight-through transfer. Final Cut Pro is not recompressing these files; it is simply bundling them into a single package to make them easier to label, store, and move around.
Note: What Can I Archive?
You can archive media stored on videotape and accessed through a FireWire connection. You can archive media stored on memory cards or other tapeless formats. You can also archive media stored on a memory card. However, you can’t archive video from a live camera, such as the iSight; a live video stream; or media stored in an Event.
Archiving is not importing. Archiving copies the media from a videotape to a file on your computer. The images are not imported into Final Cut Pro. All files are stored on the hard disk you specify, in a Final Cut Camera Archives folder.
Here’s how this works:
1. As you did in the previous section, connect your camera or deck and turn it on. Load a tape and start Final Cut Pro X.
2. Click the Import from Camera icon, or press Command+I.
3. In the Camera Import window, select your camera or deck from the list at the top left (refer back to Figure 4.24).
4. Click the Create Archive button in the lower-left corner of the Camera import window (Figure 4.26).
Figure 4.26 Click Create Archive to create a new camera archive.
Note: How Much Space Do You Need for an Archive?
In general, an hour of DV media takes 13 GB to store. This storage size is true for both NTSC and PAL DV video. (By the way, an hour of HDV media also requires 13 GB to store.) In other words, the archive takes the same amount of space to store your media as it would if you captured it directly to your hard disk as a media file.
5. Name the archive. Since this is a collection of all the shots on the tape, you are not naming individual shots; rather, you are naming the entire collection. Since I number all my tapes, I make a point to include the tape number as part of the filename.
6. Choose the hard drive where you want the archive stored, and click OK.
FCP automatically rewinds the tape to the beginning and shifts into capture mode. As the tape plays from beginning to end, FCP stores all the media from the tape into the archive and displays the status of this transfer process at the top of the image (Figure 4.27).
Figure 4.27 During the archive process, Final Cut Pro displays a constantly updated status.

7. Just like importing from tapeless media, Final Cut Pro captures your media from tape in the background as well. If you need to stop the transfer at any time, click the Stop button in the lower right or simply stop the tape. FCP asks whether you want to keep what has already been captured or discard everything. When the end of the tape is reached, FCP closes the transfer and saves the file.
8. You can see this archive by opening the hard disk that you specified as the location and opening the Final Cut Camera Archives folder. Additional archives can also be stored in this folder; there’s no limit—aside from storage space—to the number of archives you can create and store.
You can now handle this archive as another other file. Move it, back it up, copy it, or archive to disc or tape—all using the Finder (Figure 4.28).
Figure 4.28 Archives can be mounted at any time, providing “near-line” access to your media.
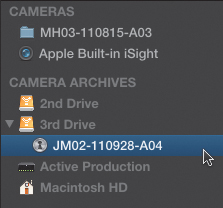
9. Once an archive is created, you can review it at any time and import clips from it. Simply highlight the archive from the list of drives in the top-left window. All the shots from the archive are displayed on the right, the same as for a memory card.
10. Select what you want to import: a portion of a shot, an entire shot, or a collection of shots; this is identical to what you did in the section on importing tapeless media.
11. To close an archive, click the eject icon on the right side of the archive name. This does not affect the file on your hard disk; it just closes the images so they are not displayed in the Camera Import window.
Camera archives are a great way to preserve video assets on tape before time runs out and the tape dies.
Importing Files
After the complexity of importing tapeless files from memory cards or importing from videotape, the process of importing QuickTime movies, or other computer-based media files, is very easy. Importing files is the way you generally import audio files and still images, as well as existing QuickTime movies.
1. Select the Event where you want the imported media stored. (Or, create a new Event. The key is you need to select the Event before importing the media.)
2. Then, do one of the following:
• Right-click the Event and select Import Files (Figure 4.29).
Figure 4.29 A fast way to import files is to right-click the Event you want to import into.

• Press Shift+Command+I.
• Choose File > Import > Files.
• Click the Import Files icon, if this is your first time running FCP X.
3. The standard Import Files dialog appears. By now, you should know to select the files you want to import, set the preference settings the way you want, and click Import. Even when you select an Event as the destination of an import, you can change the Event in the Import Files dialog or even create a new Event for the files. Changing your mind at the last minute is absolutely OK.
As usual, Final Cut Pro charges into action, importing your files and doing any necessary file management in the background. What is especially cool about this process is that, even though FCP is importing the media, you can start viewing and editing that same media into your Timeline!
Apple has done a great job of making the file import process fast and efficient.
Special Cases
Here are some special cases of importing media that require a different approach.
Importing iMovie Projects and Events
Final Cut Pro X finally fulfills a long-held dream of iMovie users that there be some way to get their iMovie Projects and Events into Final Cut Pro. And, in fact, it is very easy.
If all you need is access to your iMovie media, import the iMovie Event Library. This brings in all your iMovie media, allowing you to reedit it using the full power of Final Cut Pro X. Or, if you want to bring in your iMovie Project, you can do that as well.
Here’s how these both work:
1. To import an iMovie Project, choose File > Import > iMovie Project.
2. Navigate to where your project is stored; typically, this is in the Movies folder in the Home directory of your hard disk. Then click Import.
3. By now, you are an old hand at navigating the Import Files dialog. Once you import your files, the project will open and all associated iMovie Events and media are loaded into the Event Library.
Note: Does Final Cut Pro X Import Earlier Final Cut Pro Projects?
No. At the launch of FCP X, Apple said it is not possible for FCP X to import FCP 7 or 6 projects. However, I expect that problem will get solved, at least to some degree, before this book gets published, probably by a third-party developer.
To import all your iMovie media, choose File > Import > iMovie Event Library. This loads all the media that you captured in iMovie into Final Cut Pro.
Using Photos Browser or Music and Sound Browser
Built into Final Cut Pro X is access to your iPhoto, Aperture, and iTunes libraries. This means you can easily access any image, or sound they contain, without even going to the process of importing.
Here’s how.
The Browsers—for images and effects—are all located on the right side of the bar running across the middle of the FCP X interface (Figure 4.30).
Figure 4.30 Click this icon to display the contents of your iPhoto or Aperture library.
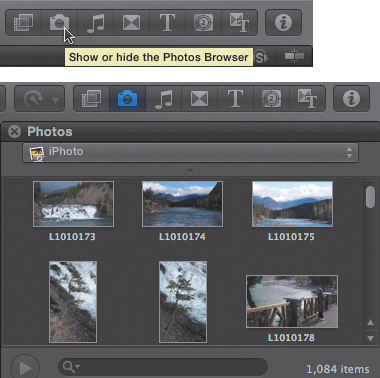
Click the icon for the Photos Browser, and it opens to display images from your iPhoto or Aperture library. These images are always available to you for every Project. You don’t need to import them. Whenever you want to use one of these images, simply drag it from the Browser onto the Timeline. You don’t need to move it to the Event Browser first.
To open the Music and Sound Browser, click the icon with the musical note on it (Figure 4.31). This opens your iTunes library. In addition to iTunes, if you downloaded the extra material from Apple after you purchased FCP X, you also have access to thousands of sound effects and music cues—all royalty free and stored in this Browser.
Figure 4.31 Click this icon to display the contents of the Music and Sound Browser, including your iTunes library.

Again, like the Photos Browser, you don’t need to import these files. If you find one you like, simply drag it from the Browser into the Timeline. (I’ll show you how to do that when I cover editing, in a couple of chapters.)
Note: Why Do You Call It an (H)DSLR Camera?
The term (H)DSLR is used to denote DSLR cameras that also shoot HD video. Since not all DSLR cameras shoot video, this makes it convenient to just talk about the cameras that do. You can find out whether your camera is supported by FCP X by visiting http://help.apple.com/finalcutpro/cameras/.
Importing from an (H)DSLR Camera
(H)DSLR cameras shoot a video format called H.264. This is a very compressed, and mathematically challenging, video format. H.264 is a good format for shooting, it is an excellent format for distribution on the Web, but it is not a good format for editing.
Still images can be directly imported into Final Cut Pro—see the “Dealing with Still Images” section to come—or you can import them into Aperture or iPhoto. Then use the Photos Browser to import them into Final Cut Pro.
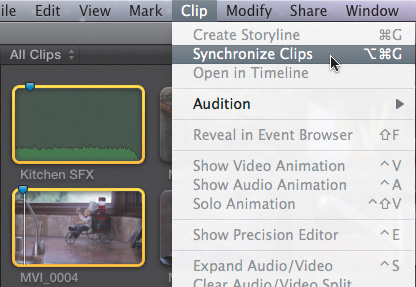
Video files are imported directly from the DCIM folder created by the camera, which you need to copy from the camera card into a folder on your hard disk or from a disk image of the card. Don’t use Import from Camera; use Import > Files. DSLR audio and video files, which are often separate, can be synchronized using Clip > Synchronize Clips. And syncing does not affect source files, only the clips in the Event Browser.
Since audio files are imported using File > Import > Files, you don’t need to cover that process again.
To import (H)DSLR footage, choose File > Import > Files. Navigate to where you stored the contents of the (H)DSLR card on your hard disk. In this example, I’m about to import some files shot by Chuck Spaulding. Notice that the DCIM folder is selected but not the contents of the folder (Figure 4.32). If you select a folder, FCP understands that you want to bring in the contents of the folder.
Figure 4.32 Importing media from an (H)DSLR camera involves navigating to where the actual media is stored, ideally in a folder on your hard disk.

When importing (H)DSLR footage, be sure to check “Create Optimized media” as part of the Import dialog. While FCP can, and will, edit H.264 video natively, you’ll get faster renders, higher-quality effects, and faster exports by optimizing. The only downside is that the optimized files take more space to store.
Once you have your preference settings to your satisfaction, click Import. An error dialog may pop up saying that FCP can’t import all the files in this folder, specifically, those ending with .THM (Figure 4.33). This is OK. When you import files directly from the DCIM folder, you may notice that there are both .MOV and .THM files. Just select everything in the folder.
Figure 4.33 Don’t panic. This message simply means that FCP could not import all the files it found in that folder.
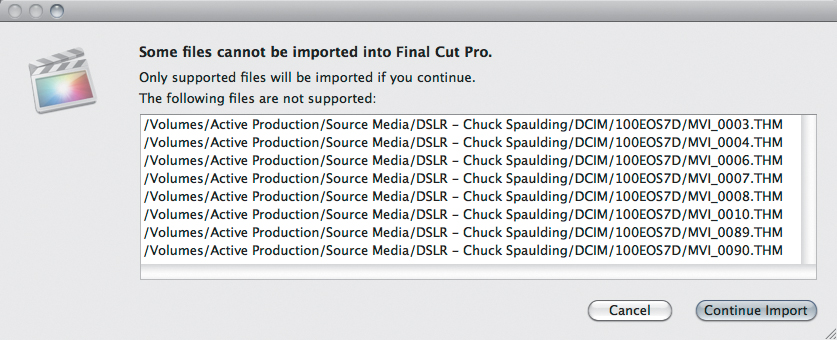
Click OK, and Final Cut Pro will import just the .MOV files and ignore the .THMs. This is much faster than just selecting each movie file individually. You are taking a shortcut so that only the .MOV files are imported.
Sync Double-System Audio
Because the audio recording capability on almost all (H)DSLR cameras is really poor, you often record audio using a “double-system”: The camera records video and a digital audio recorder records audio.
Now, you need to get them in sync. This means during production you need to create a sync point. A sync point is a common point of reference between multiple cameras or between audio and video. Professional movies always use clapper slates. However, you can use a pair of clapping hands, dropping brick, or anything else that has a rapid movement coming to a quick stop and making a sharp noise.
You find the point in the video where the movement stops and the same point in the audio where the noise is made. That point is your sync point, the point that is the same for both audio and video.
Clips are always synced well before the start of action in a shot. So, once you have the sync point set, you still need to set a Start and End (In and Out) for your shot before you edit it to the Timeline. Final Cut provides built-in syncing capability, based upon the following:
• Matching markers
• Matching timecode
• File creation date
• Audio content
Most of the time, the production team will use a clapper slate to mark the start of a shot for both audio and video. So, I’ll show how to sync two clips using markers that you set to match the position where the clapper slaps down.
To create a marker, put the skimmer or playhead on the frame of the video clip that marks the sync point of a shot, and press M. That blue shape at the top of the clip is a marker. (I’ll talk more about markers in Chapter 7.)
Do the same for the audio clip. Put a marker at the sync point by positioning the skimmer or playhead at the exact point where the audio matches the video, and press M.
Select the video clip you want to sync; then, while holding the Command key, select the audio clip. With both clips selected, choose Clip > Synchronize Clips or press Option+Command+G (Figure 4.34).
Figure 4.34 Notice how both audio (green) and video (picture) clips are selected and both have a blue marker set at the top of the clip, which marks the sync point.
This creates a new, synchronized clip in the Event Browser with a little sync icon in the top-left corner (Figure 4.35). Remember to use this clip, not the two source clips, when the time comes to edit.
Figure 4.35 This is the symbol in the top left corner of the synced clip.

Dragging Files in from the Desktop
You can even import files by dragging them in from the Desktop. There are only two places you can drag clips from the Desktop: onto the name of an Event in the Event Library or into the Timeline.
Note: FAQ: Dragging Clips
When you drag files from the Desktop, you don’t get the Import dialog you saw earlier. Instead, the clips are immediately imported using the current Import preference settings.
To import a file by dragging, grab the title bar of Final Cut Pro and drag it to the side so you can see the image, or images, you want to import on the Desktop. Notice when you drag a clip from the Desktop to an Event, a white ring appears around the name of the Event. This tells you where your media will be stored. You can also drag directly into the Timeline. I discuss the Timeline in detail starting in Chapter 5 and continuing for the rest of the book.
Note: Can You Import a Layered Photoshop File?
Yes and no. Yes, it will import. However, Final Cut Pro will convert it to a PNG file and collapse all the layers into a single layer. Any alpha channel data (transparency) in the file will be retained. So, yes to Photoshop; no to layers. However, Motion 5 can import Photoshop files and retain their layers, and Motion projects can be saved or exported to work with Final Cut Pro X.
Dealing with Still Images
I’ve saved this section for last because it causes more confusion than any other. Apple has simplified the process of importing, sizing, saving, and exporting still images. Final Cut Pro works best with bitmapped images, like those taken with a digital still camera or created inside Photoshop, and it supports a wide variety of image formats, though some formats provide higher quality than others.
With the latest version of Final Cut Pro, there does not seem to be a practical limit on image dimensions within Final Cut Pro. If you choose the Import preference to optimize media, images without transparency (called an alpha channel), are converted to JPEG, while those that do contain an alpha channel are converted to PNG. If you don’t choose to optimize media, still images are imported in their native format. PSDs (Photoshop documents) import with all layers flattened but with transparency information retained.
Images are measured in total pixels across by total pixels down, not by dots per inch (DPI). DPI is a printer reference and doesn’t apply to video. Also, you always want to create your images using square pixel dimensions.
If your still image is larger or smaller than the video frame, then the image will import correctly. However, if your still image is exactly the size of the video frame, then you need to size it using specific dimensions in order for the image geometry to be correct after import. The problem of image sizing is caused by the fact that video uses rectangles to describe image pixels, while computers use square pixels. And this difference has caused ulcers in the industry for years.
By default, stills import with a duration of four seconds. Here’s how to modify the default duration for an imported still image:
1. Choose Final Cut Pro > Preferences (or type Command+[comma]) and click the Editing preference icon at the top.
2. Toward the lower portion of this screen is the default duration assigned to imported still images. It’s four seconds by default, but you can change it to anything. The decimal point after the four is not frames but hundredths of a second. So, if you wanted your stills to import at three-and-a-half seconds, enter 00:00:03.50.
3. Close the preference window to accept your changes.
4. Import the files you need using File > Import > Files and select the files you want to bring in.
You remember I mentioned earlier that when images were the same size as the frame, you have problems? Well, Figure 4.36 illustrates that.
Figure 4.36 Importing still images drives all of us nuts. Here’s the problem you often have with trying to get imported still images to look correct.
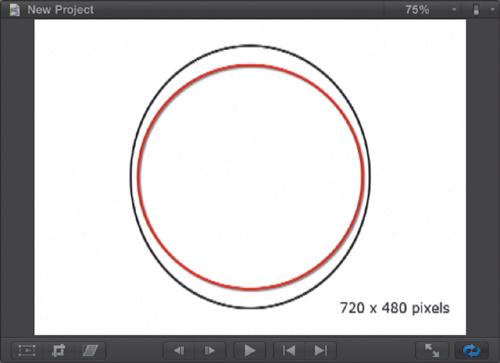
As you may know, NTSC DV video is 720 pixels across by 480 pixels high. These pixel dimensions are the same, surprisingly, for both 4:3 and 16:9 video. (While the pixel count does not change, the pixel shape does!) These aspect ratio issues exist in NTSC, PAL, and many HD video formats, but the numbers are different.
In Figure 4.36, the black circle was created in Photoshop using square pixel dimensions and imported into FCP, where it got squished. The red circle is generated in FCP and is a perfect circle.
The reason for this is the differences in aspect ratio between the computer and video. Video uses rectangles for its default pixel shape, while the computer uses squares. You’ll see a solution for this in Table 4.1.
Table 4.1 Creating the Right Sizes for Still Images*

However, when you properly size graphics in Photoshop before importing into FCP, circles come in as circles and squares look like squares (Figure 4.37).
Figure 4.37 This is what your images look like when you do it right! Whew!
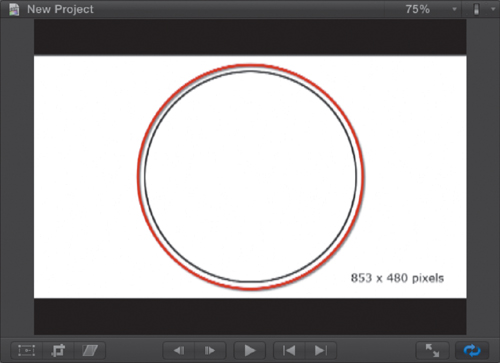
Table 4.1 provides dimensions you can use to determine how to size your graphics. The left column indicates the video format. The middle column indicates the size you should create if you want the entire image to completely fill the frame, without doing any moves on the image. The right column indicates the size you should create if you want the image to completely fill the frame and you want to do moves on the image, which is also called the “Ken Burns Effect” (see Chapter 12).
You’ll be working with stills throughout this book. Chapter 6 shows how to edit and size them to fit the frame, while Chapter 12 illustrates how to do moves on stills. Chapter 15 explains how to export stills for use in other applications.
New Feature! XML Import
New with version 10.0.1 is the ability to import XML, an interchange language that lets applications share data. The process is simple. Once another application has created an XML file, choose File > Import > XML and find the file you want to import. Pick a hard disk to store the data from the Storage Location pop-up menu and click Import. That’s it. What you do with that data depends upon where it comes from, and that varies by application.
Summary
This is the longest chapter in the book, because getting media into FCP is essential if you are going to edit it. You must understand the process well so your clips look as good as they can. Fortunately, once you grasp the process, FCP makes it truly efficient, and you’ll be importing clips in no time.
There’s one more chapter to go before you start editing: working with ratings and keywords. You can’t edit your projects if you can’t find the clips you need.
The good news is that after the next chapter, all the prep work is done, and you get to spend time with the fun stuff—editing your projects and making them look great!
Keyboard Shortcuts
