17. Sharing and Exporting
Once your work is complete, it’s time to share your Project with others. So it’s fitting that sharing, or exporting, is the last chapter in this book.
The Share menu in Final Cut Pro X is the last step in the editing process, where you create finished versions of your Projects. You’ll look at how to export a high-quality master file, plus the benefits of using Roles, then I’ll provide an overview of how to share your files with popular websites.
Overview of the Output Process
Apple adopted a new philosophy on exporting with FCP X: It assumes that the person doing the exporting is not necessarily the one doing the editing. Since you export directly from the Project Library, the person exporting (who may or may not be the editor—in larger facilities and in broadcast, it would probably be someone else) can just select and change the output settings without opening the Project. This means that how the editor configured the Timeline no longer affects what gets exported.
Unlike FCP 7, in which the export process was directly affected by whether the editor had turned on or off all the appropriate audio and video tracks, FCP X allows the output process to be completely separate from the Timeline display, and therefore what you set up in the Export menu is exactly what you get. What makes this possible are Roles, which you first met in Chapter 7.
All output happens from the Share menu. Apple defines sharing as a two-step process: First you create a compressed version of your files, then you publish it. In the past, this consisted of a number of steps:
1. Configure the Timeline for export
2. Render the Project
3. Export the Project
4. Compress the Project
5. FTP the compressed file to a website
6. Update the website with data about your Project
Now, all of those steps can be condensed into a single menu choice. However, to be truthful, I rarely want FCP to do all these things at one time. The main reason is that my clients can’t decide what they want to do. One day they want a YouTube video. A week later, they need something for their website. A few weeks after that, they need to burn a DVD.
I learned long ago that the best thing to do with any Project is to create a high-quality master file and archive it. Having a master file means that whenever a client needs a new version, I don’t have to reopen the Project; I only have to recompress a new version of the master file.
A very cool feature of FCP X is that you don’t have to open a Project to export it. You can select the Project you want to export from the Project Library and export from there. This also prevents accidentally making changes to a Project file that’s been approved by the client.
So first I’ll show you how to create a high-quality master file. Next, I’ll talk about the new Roles feature in FCP X version 10.0.1, which provides some great flexibility in exporting both audio and video. Finally, I’ll wrap up with a quick look at other export options, including sending your files to a variety of websites.
Exporting a High-Quality Master File
Once a Project is complete and approved by everyone who needs to approve it, it’s time to create a master file of the Project. In Final Cut Pro 7 terms, you are creating a self-contained QuickTime movie. This option assumes you don’t need to export any specific Roles from your Project (the next section covers what you need to know if you do).
In the latest update to Final Cut, the process of exporting a QuickTime movie is now faster—if you are working with optimized media, FCP just does a simple file copy of the ProRes in the Project to the ProRes of the export. Also, you can export a master QuickTime file and have it automatically loaded into Compressor while retaining the master file.
Apple also harnessed the power of the graphics card to speed exporting. This provides significant speed improvements in outputting a file. However, when you use the GPU (graphics processing unit), you can’t export in the background.
1. To export your Project, simply select the Project in the Project Library; no need to open it in the Timeline and risk making changes to it.
2. Creating a master file of your Project in Final Cut Pro X is similar to how you did it in FCP 7; in fact, they both share the same keyboard shortcut: Command+E. You can also use Share > Export Media (Figure 17.1).
Figure 17.1 The settings to create a high-quality master file of your Project in Final Cut Pro X are similar to those in FCP 7.

3. Set the export options on the first screen:
• Export. This is self-evident. The default setting is Video and Audio.
• Video Codec. Although you can use Final Cut to transcode into a variety of other formats, my recommendation is to use Current Settings. This matches the settings of your Project and, in almost all cases, yields the highest quality.
• After Export. The Do Nothing option does exactly that. Open with QuickTime Player, the default, lets you quickly review your exported file. Open with Compressor exports the Project, then opens it in Compressor for compression. This tends to be my personal choice.
By the way, you can skim your Project in this window by dragging the cursor across the image at the top; this is an easy way to be sure you have the right Project.
The key point is that you access everything you need to export the Project from the Export Media screen. You no longer need to worry about which tracks are turned on or off, as you did in Final Cut Pro 7. So, to be specific, here’s how I generally set my export options:
• Export: Video and Audio
• Video Codec: Current Settings
• After Export: Open with Compressor
4. Click Next to give the exported file a name and location, then click Save.
Most sharing can happen in the background, except for three menu choices:
• Exporting a high-quality QuickTime movie
• Exporting a single frame
• Sending to Compressor
Note: What If I Need to Output to Tape?
Currently, Final Cut Pro X does not support output to videotape. Instead, you’ll need to export a high-quality master file, then use a combination of software and hardware from companies like AJA (www.aja.com), Blackmagic Design (www.blackmagic-design.com), or Matrox (www.matrox.com/video/) to output your master file to tape.
These three run in the foreground so that the GPU can speed up the process of exporting. In my brief testing, exporting was two to four times faster than real time, assuming all rendering is complete.
Exporting Roles
Roles provide exciting new ways to get work done in less time. Because every clip is tagged with a Role, FCP X lets you group Roles for export. Roles are not the same as batch exporting. Roles let you export different versions of the same Project at the same time; batch exporting lets you export multiple different Projects at the same time.
Here are three scenarios that illustrate what you can do with Roles:
• Scenario 1. You have a single Project with both English and Spanish titles tagged with Subroles for each language during the edit. Roles let you quickly configure the export for a specific language, to create a master file of the Project.
• Scenario 2. You want to create a single multitrack QuickTime movie containing all the video, with three separate stereo pairs for the audio “stems.” Stems are submixes of your Project: dialogue-only, effects-only, and music-only.
• Scenario 3. You want to create three separate audio files, one for each stem, in a single export. Using Roles, you can create a single export that creates all of these files in one pass.
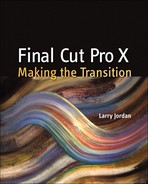
Here’s a sample Project: titles in two languages, with dialogue, effects, and music clips (Figure 17.2).
Figure 17.2 The Timeline Index, with the English titles and the Effects Role highlighted, has titles and effects on different layers.
To illustrate that this contains titles in two languages, I highlighted the English titles. The clips are not all on the same layer, and, while the English titles are highlighted, both languages are active; neither Role is invisible. This Project also has multiple effects clips, with the clips on different layers. Remember, that you don’t need to open a Project to export it.
Scenario 1: Exporting Selected Roles As a Single File
To export a specific language from a multilanguage Project, you need to do an export for each language:
1. Select the Project you want to export in the Project Timeline.
Note: When You Use Roles, You Must Configure the Export
If you don’t configure a Project that uses Roles, all layers and clips in the Project will export into one file where all layers and clips are visible and audible.
2. In the Export Media panel, set Export to “Roles As Multitrack QuickTime Movie” (Figure 17.3).
Figure 17.3 The Export setup window lets you configure the exact export you need, without reopening the Project.

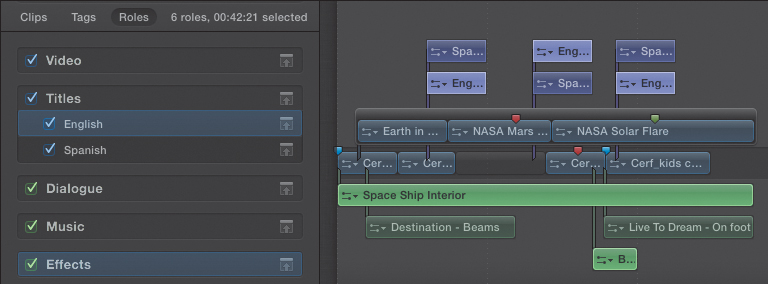
3. Click the Roles tab. This is where you configure what exports. From the Video menu, select just the Roles you want to export (Figure 17.4). In this example, all the video files plus the English titles are checked and will export.
Figure 17.4 Configure the Video Roles so that only the video you want to export is checked. In this case, both the video clips and English titles will export; the Spanish titles will not.
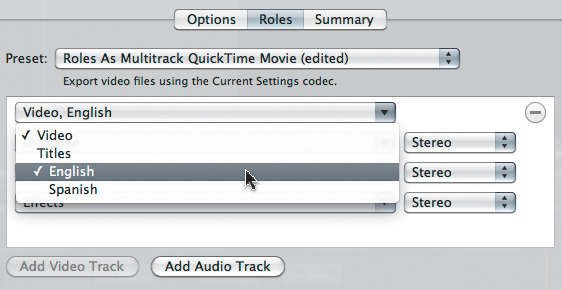
4. In the first audio Roles pop-up menu, select all three options. This means that all three audio Roles will export into a single stereo pair audio file (Figure 17.5).
Figure 17.5 Condense the three separate audio Roles into a single export option. This means all your audio will export as a stereo pair.

5. Click the minus button to the right of a Role to remove the other two audio Roles (Figure 17.6). This means the entire mix will export as a stereo pair.
Figure 17.6 Remove the audio Roles that you no longer need to export as separate files.
6. Click Next, give the file a name and location, and click Save. The selected Roles will all export into a single QuickTime master movie.
Scenario 2: Exporting Multiple Roles to Separate Files in One Export
This next technique is very cool. Let’s say you have multiple language titles in the same Project. You can export all the languages as separate files, all at the same time, plus a master audio file. Here’s how:
1. Select the Project in the Project Library.
2. Choose Share > Export Media, or press Command+E.
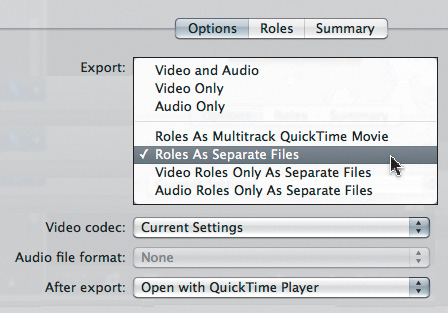
3. In the Export pop-up menu, select Roles As Separate Files (Figure 17.7). This exports each selected Role, which you’ll select in the next step, as a separate file. You can output as many different Roles as you have assigned to your Project. The other export settings remain, as I discussed in the first section.
Figure 17.7 Select the Roles As Separate Files option to export each selected Role as a separate file—all at the same time.
4. Click the Roles tab at the top center.
5. In the Roles tab, specify which Roles you want grouped in each export. Here, the first export includes all video files, plus just those clips tagged with the English Subrole; in this example, that’s the English titles (Figure 17.8).
Figure 17.8 In the Roles tab, select the Roles you want to group in each exported file by combining them in one of the pop-up menus.
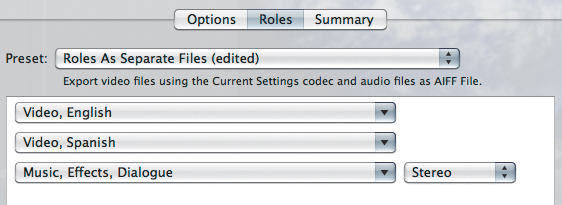
6. The second export combines all the video files with the Spanish titles.
7. The third export combines all the audio files into a single, stereo-pair mix.
8. To remove a Role you don’t want to export, click the minus button on the right side. (You must export a minimum of one Role.)
9. To add a Role to export, click either the Add Video File or Add Audio File button at the bottom (Figure 17.9).
Figure 17.9 Combine multiple Roles in one pop-up menu to combine those elements in the exported file.

10. When the Roles are set, review what you are doing by clicking the Summary tab, then click Next. This allows you to give the files a name and location.
11. Click Export, and Final Cut Pro creates a separate file for each Role in the second screen—in this case a total of three—and includes the stem name as part of the filename.
Note: A Word of Caution
This technique separates the audio from the video, creating two separate files; but they can easily be imported and reassembled in another video application (such as QuickTime 7, or FCP X). However, for Projects destined for DVD authoring, such as DVD Studio Pro, this system for creating separate audio and video files is usually OK.
Scenario 3: Exporting a Single Multitrack File
In this scenario, I want to create a single master QuickTime movie containing the final form of my video, and separate tracks for the audio stems. This could be used for output to tape later, or simply for archiving all the final elements of my Project in one file.
Here’s how to do it:
1. Select the Project in the Project Library.
2. Choose Share > Export Media (press Command+E).
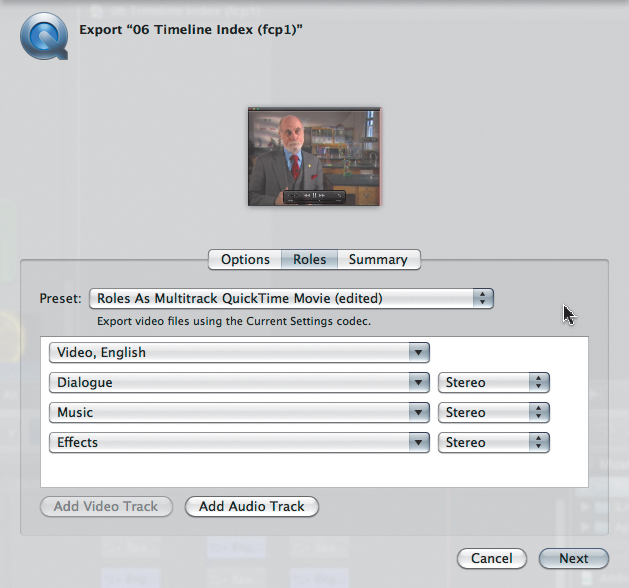
3. In the Options tab, set Export to Roles As Multitrack QuickTime Movie.
4. Click the Roles tab.
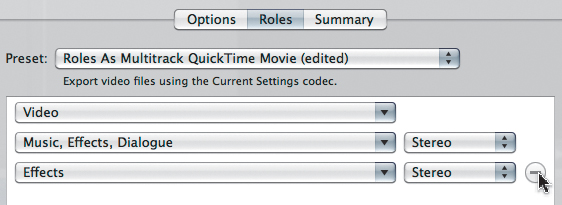
5. Set the Video pop-up to match the settings of the Video Roles (Figure 17.10).
Figure 17.10 This scenario exports a single master QuickTime movie containing separate tracks for the audio stems.
6. Click Next and give your export a name and location.
7. Click Save.
A single high-quality master QuickTime movie containing one video track and three audio tracks (in this example) will be exported.
Scenario 4: Exporting Separate Audio Roles (Stems) of the Same Project
The other major use of Roles is creating audio stems—separate mixes of dialogue, effects, and music, each of which is exported as a stand-alone file (Figure 17.11).
Figure 17.11 The other significant use of Roles is creating audio stems—separate files containing individual mixes for dialogue, effects, and music.
In this example, I want to create a separate audio file for each stem. Here’s how:
1. Select the Project in the Project Library.
2. Choose Share > Export Media (or press Command+E).
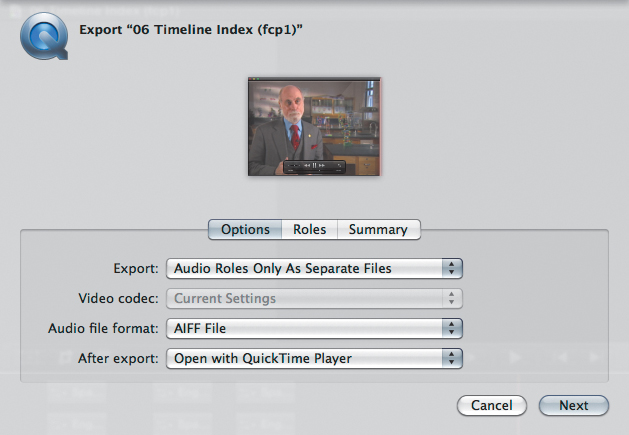
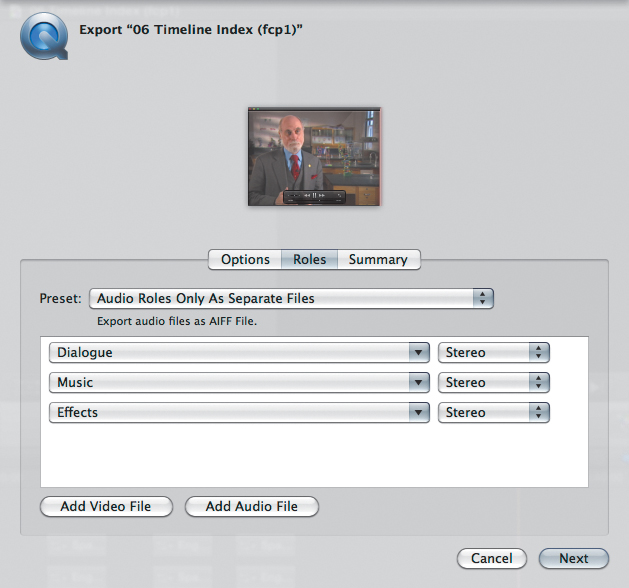
3. In the Option tab, next to Export, select Audio Roles Only As Separate Files.
4. Click the Roles tab (Figure 17.12). Make sure each of the audio Roles that you want to export are displayed as separate lines in this dialog. The default setting is three.
Figure 17.12 The three pop-up menus in the lower half of this window indicate that three separate audio files will be created.
5. Click Next, and give your export a name and location.
6. Click Save.
Final Cut Pro will export a separate audio-only file for each line item in the Roles panel and include the stem name as part of the filename.
Exporting XML Files
Also new with the FCP X 10.0.1 release is the ability to import and export XML files. XML exports can be made only from the Event Library or the Project Library.
For now, this feature is principally of interest to developers because they can now get information into and out of Final Cut Pro X. Over the long term, this will be an essential feature for every editor.
Fortunately, the process of exporting is simple:
1. Do one of the following:
• Select the Project you want to export in the Project Library.
• Select the Event you want to export in the Event Library. (You can only select one at a time for export.)
2. Choose File > Export XML.
3. Enter the filename and select a location.
At this point, you can import that XML file into any other application that supports it to quickly move your data into it from Final Cut Pro. (If you are interested in importing XML, I covered that at the end of Chapter 4.)
Other Options in the Share Menu
There are several other output options in the Share menu. Most are self-explanatory, but there are a couple I want to explain in a bit more detail.
In all cases, select the Project you want to export in the Project Library (the Share menu does not support exporting from the Event Library), then go to the Share menu and pick one of the following:
• Media Browser. This requires OS 10.6.8 or later, and exports files into the Media (also called Movies) Browser so that you can access your movie later from any Mac application that supports the Media Browser, such as Keynote, without needing to access the source Project. This export can run in the background.
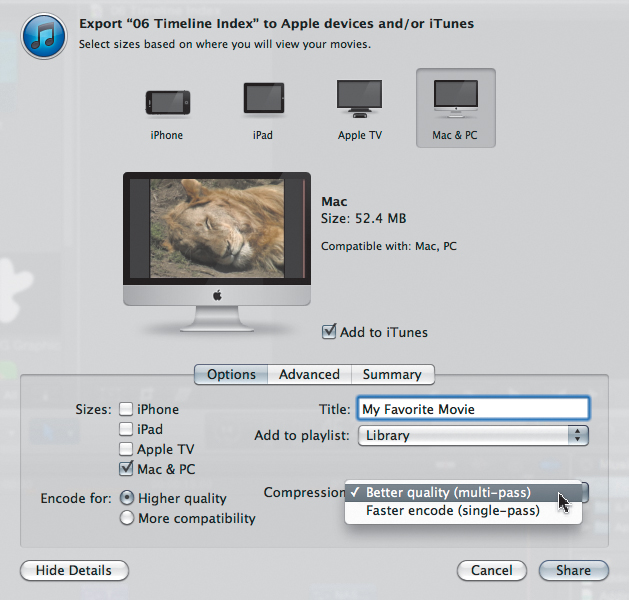
• Apple Devices. This option lets you output movies optimized for the screen size and file-storage capacity of various Apple devices (Figure 17.13). You can output multiple versions at the same time and store them in iTunes. All Apple devices compress the video using MPEG-4 (H.264). This export can run in the background.
Figure 17.13 Using the checkboxes you can configure and output your Project for multiple Apple devices at the same time.
• DVD. This option lets you burn a Project to a DVD using a simple menu template. You can import your own background graphic for the menu, but this does not provide the same level of authoring as DVD Studio Pro. This export can run in the background.
• Blu-ray Disc. Similar to the DVD menu choice, this option lets you burn a Project to a Blu-ray Disc using a simple menu template. You can import your own background graphic for the menu, along with a logo and title. However, this does not provide the same level of authoring for Blu-ray Disc as do Adobe Encore or even Roxio Toast. This export can run in the background.
• YouTube, Facebook, Vimeo, and CNN iReport. These four options let you export and send Projects directly to these social media sites.
Note: Do I Have to Own a Blu-ray Disc Burner?
No. Final Cut Pro supports a high-def format called AVCHD. This lets you burn your HD material using the standard SuperDrive in your computer. The only limitations are that the image quality is not quite as high as that of a standard Blu-ray Disc burned with a Blu-ray Disc burner, and the AVCHD disk will only hold about 20 minutes of material before it is full.
YouTube Example
For example, if you have a Project you want to quickly export to YouTube (Figure 17.14), simply follow these steps:
Figure 17.14 All the social media sites share a similar screen layout, like this one for YouTube.
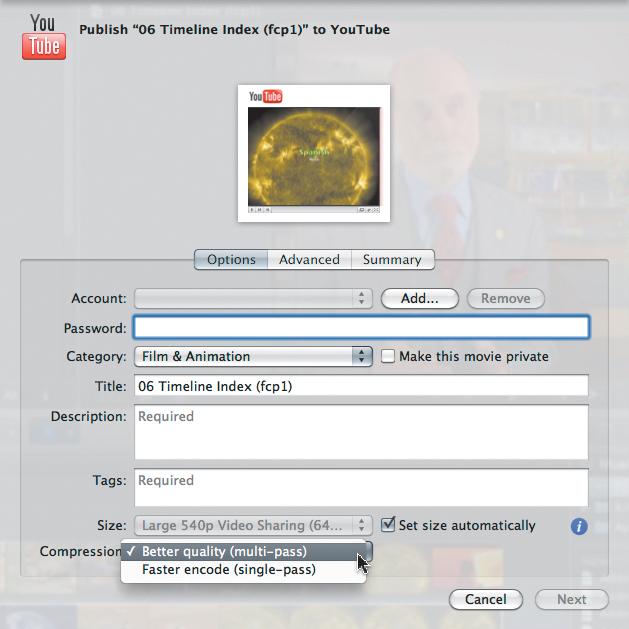
1. Start by clicking the Add button and entering your account and password (no, sorry, I decided not to publish mine in this book).
2. Fill in the required fields, like Category, Title, and such. When all the fields are complete, pick the size you want to export. For YouTube, I select the size that matches my Project files. YouTube scales them as necessary.
3. Click Next. Accept the YouTube Terms of Service, and click Publish.
Final Cut Pro exports and compresses your Project, then automatically sends it to your account at YouTube, in this example.
Best of all, since this process can run in the background, as soon as you click Publish you can get back to work in Final Cut Pro.
Monitoring Sharing
When you select any Sharing menu choice, except Export Media or Save Current Frame, the export can occur in the background. You can monitor the status of the export using the Share Monitor. Unlike the Batch Monitor with Final Cut Studio (3), the Share Monitor can only be accessed from within Final Cut Pro X, Compressor 4, or Motion 5.
As soon as you click Export, a new dialog appears displaying the status of the export (Figure 17.15). Click the Share Monitor button.
Figure 17.15 Click the Share Monitor button to display the Share Monitor, which shows the status of all background sharing and processing.
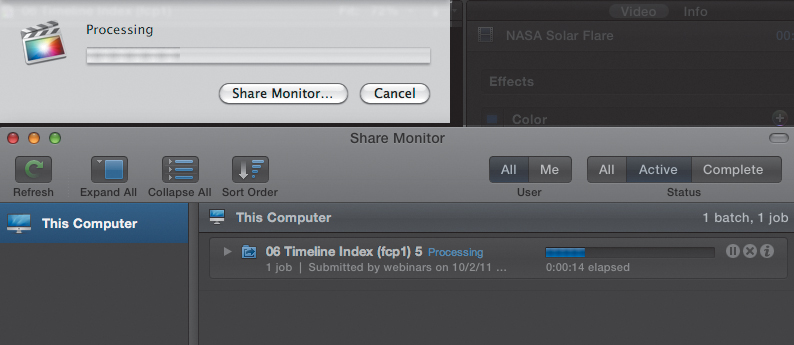
This opens the Share Monitor. On the left, click This Computer to monitor the tasks your computer is working on. At the top, be sure to select All for the User and Active for the Status, to see current jobs in process.
The three small buttons on the right of each active job allow you to pause, cancel, or get information on a job. Pausing is never a good idea, so just use these buttons to cancel a job that you started by mistake, or click the Get Info button to get technical insight on the current active task.
Summary
From planning your first Project to final export, this book has taken you through every step of crafting your vision with Final Cut Pro X. Together, we have covered a tremendous range of material to give you the security you need to tackle even large projects.
Video editing is a never-ending process of discovery. Learning new technology and more efficient ways to apply it is part of the challenge. But technology is only one side of the equation. The other is storytelling. Telling stories is as old as time—stories from hundreds of years ago still captivate us. Stories as new as tomorrow will introduce us to characters we want to learn more about.
Our role as editors is to balance the technology with the craft—to create powerful, compelling, visual stories that can change the world.
I can’t wait to see what you create.
Keyboard Shortcut
