13. Themes and Generators
After all the heavy lifting involved in learning how to use built-in effects, it’s time for something a lot easier to understand: themes and generators.
Believe it or not, you already know how to use themes and generators—these are just plain fun. Themes, simply, are collections of transitions and titles that work well together. Generators create brand-new pieces of video on the basis of parameters that you set in Final Cut Pro.
Let’s continue our exploration of effects by tackling these two short subjects.
Themes
In Final Cut Pro X, themes are collections of video transitions and titles grouped into categories so that all the elements inside a single theme have a common visual look. You access themes in the Themes Browser (Figure 13.1). While there’s no keyboard shortcut to open this, you can create one in the Command Editor.
Figure 13.1 Click the Theme icon to open the Themes Browser.
Inside, you’ll find more than 120 effects in 15 different categories (Figure 13.2). Within a category, elements are organized first by transitions, then by titles, with transitions on top. As you learned earlier, you can find specific themes by entering text into the search box at the bottom, or clicking a specific Themes category on the left.
Figure 13.2 Like all Browsers, the Themes Browser shows categories on the left, while individual effects are grouped by transition and title on the right.

To preview a title or a transition in the Browser, roll the skimmer slowly across it. The effect will be previewed in the Viewer. If you have clips selected in the Timeline, after a second or so FCP will use the images contained in the selected clips to illustrate the transition.
Note: Can I Create New Themes?
Yes. You can also create new effects to put into themes. In all cases, titles, transitions, and effects are created in Motion 5. Then, when you save the new effect, you have the option of saving it as a template that FCP X can use. When you save this template, you can also either store it in an existing theme, or create a new theme category for your effects. It’s easy way to organize the look for all the graphical elements of your Project.
Note: Changing Speed
While you can’t apply speed changes, also called “retiming,” directly to theme elements, you can if they are contained in a compound clip. (I’ll explain speed changes in Chapter 15.)
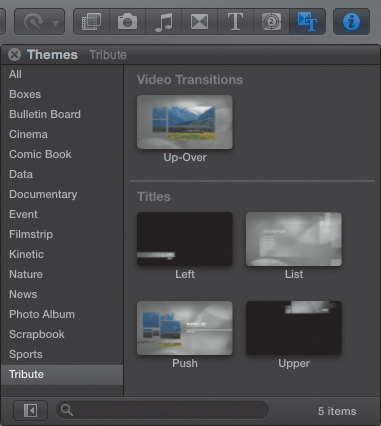
New with FCP X version 10.0.1 is the Tribute theme. This consists of one transition and four new titles (Figure 13.3).
Figure 13.3 The Tribute theme is new with version 10.0.1 of Final Cut Pro X.
Using a theme is as easy as using any other title or transition. As mentioned, all themes do is group existing effects into visual categories, and I’ve already discussed how to use transitions (Chapter 10) and titles (Chapter 11). So, the process of using theme elements is one you already know.
The cool part about themes is the categories. If, however, categories are not your thing, then you can safely ignore themes. There’s nothing there you can’t find somewhere else in FCP X.
Generators
In FCP X a generator is a synthesized video clip that is created inside the application. Generators can be any image size, any frame rate, and any duration. Generators, like titles, transitions, and themes, are stored in a Browser. To see which generators are available, click the Generators Browser button, which is next to the Theme icon (Figure 13.4).
Figure 13.4 Click the Generator icon, next to the Themes icon, to open the Generators Browser.

One of the benefits of using generators is that, since these are synthesized video, they can be any image size or frame rate. This means you can use them in any of your Projects without worrying about a loss in image quality as the image size increases.
Like themes, generators are grouped into four categories (Figure 13.5): Backgrounds, Elements, Solids, and Textures.
Figure 13.5 The Generators Browser has four categories and 28 effects.

All generators are video clips, so you can use the same built-in effects for generators as you do with any other clip. You can scale them, reposition them, add blend modes, and so on. In other words, anything you can do with a clip, you can do with a generator. The exception is you can’t change the speed of a generator unless it is contained in a compound clip.
Generator Backgrounds
There are four background generators (Figure 13.6): Blobs, Curtain, Organic, and Underwater.
Figure 13.6 Generator backgrounds are good to use behind text or composited images.

The easiest way to edit a generator to your Project is to double-click it. This does an insert edit of the generator into the primary storyline at the position of the playhead. You can drag it from the Browser to the Timeline, which allows you to place it anywhere in the Timeline. And, using the E,D,W, and Q editing shortcut keys will also work.
Once a generator is edited to the Timeline, select it and go to the Inspector. Many generators can be modified in their look. For instance, you can change the color of both Curtain and Underwater.
Another feature of generators is that they can be connected below the primary storyline when you need to use them for a compositing background.
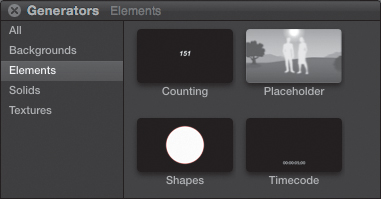
Generator Elements
Background Elements provide four useful utility clips (Figure 13.7):
• Counting. This creates a clip that counts up, down, or randomly, with or without decimals, at any speed you want. This clip can also be superimposed on any other clip or group of clips.
• Placeholder. This lets you place a clip of any length in your Project to hold the place for a clip that is not yet available—most often, a clip that has yet to be shot, or an effects clip still in development. You can also adjust this clip for the number of people and type of shot.
• Shapes. This lets you create up to 12 shapes, with or without borders, in any color you desire, with or without a drop shadow.
• Timecode. This lets you create a timecode display to key, or insert, into the clips in your Project that displays the timecode of your Project.
Figure 13.7 The Elements category is the most useful of the generators.
Counting
Once you edit Counting into your Project, select the clip and go to the Inspector. Here are some things you’ll find there (Figure 13.8):
• You can change the color and font of the numbers.
• The speed the numbers change is determined by the duration of the clip.
• Start is the number displayed at the start of the clip.
• End is the number displayed at the end of the clip.
• If you want the numbers to count down, make the starting number greater than the ending number.
• Decimals allow you to display decimals.
• Minimum Digits pads the start of the number with zeros, so that “1” with a minimum display of 3 would show as “001.”
• If you want the numbers to display randomly, click the Random checkbox.
• If you want to change the order of the random numbers, click the Generate button.
• To slow down the speed of the numbers, slowly increase the Hold Frame using the slider. (I like values between 5 and 10.)
Figure 13.8 These are the settings for creating a clip that counts.

Tip: Random Numbers Aren’t Random
When you turn on random numbers, the numbers are random, but they always display in the same order. To shuffle the order, either click the Generate button, or enter any number you want in the text box next to it. (For best results, enter numbers with four to six digits.) The order of your random numbers will always be the same, until you change the Seed with the Generate button. Otherwise, you’d never get the same sequence of numbers twice in a row.
Placeholder
While the simplest way to use placeholders is to choose Edit > Insert Placeholder, this generator offers more options. The real purpose of it is to hold a place in the Timeline for a clip that is yet to come (Figure 13.9).
Figure 13.9 Placeholders let you add temporary clips to your Project. The fun part is styling the placeholder.

However, Apple decided to spruce this up a bit and provide some additional options (Figure 13.10):
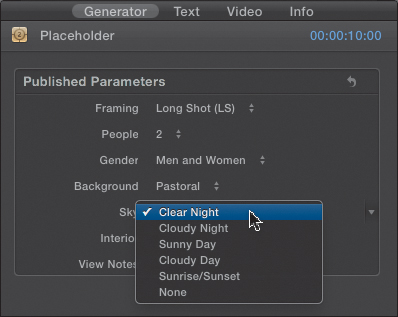
• Framing. You can specify what kind of shot you want, from a long shot to a close-up.
• People. You can display from zero to five people in the frame.
• Gender. You can display men, women, or both in the shot.
• Background. You can change the background graphic from pastoral to urban; there are 14 options.
• Sky. You can pick a sky condition, from starry night to high noon.
• Interior. Checking this puts a wall with a window behind the talent.
• The View Notes checkbox let you enter notes. Then, turning this checkbox on or off lets you display or hide your notes in the Viewer.
Figure 13.10 With placeholders, you can change framing, backgrounds, people, gender and, in general, totally mess with the clip.
Placeholders don’t really need all these options. In fact, they don’t need any of them. But they are still fun to play with and you can use them as storyboarding elements when determining if you need to shoot pickups.
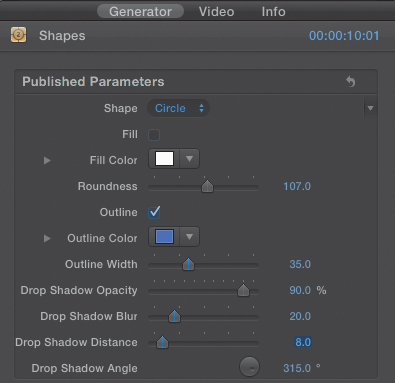
Shapes
You can choose from 12 different geometric shapes to superimpose on other clips (Figure 13.11). Shapes, by the way, are the only clip in FCP X, other than text, that includes a drop-shadow setting.
Figure 13.11 Generators give you a range of geometric shapes to add to your Projects.

However, unlike shapes in Final Cut Pro 7, to adjust these you must use both the Generator controls and the Transform controls, which are part of the built-in effects.
For instance, in Figure 13.11, I selected a circle shape, turned off Fill, changed the color of the outline to blue, and adjusted the outline width (Figure 13.12). Then, I clicked the Video tab at the top of the Inspector to switch to the built-in effects settings and, using Transform, adjusted the position of the circle so that it highlighted the actor’s upper body.
Figure 13.12 These are the settings for the circle in Figure 13.11. Shapes and titles are the only two effects that include drop shadows.
Tip: Switch Between Settings
You switch between settings in the Inspector by clicking the words at the top, Generator and Video.
Timecode
Another very useful element is the Timecode generator (Figure 13.13). This is really helpful when you want to send a review copy of your sequence to a producer for comments. Add the Timecode generator as a connected clip that runs the entire length of your Project. It will exactly mimic the timecode of your Project.
Figure 13.13 The Timecode generator lets you add a timecode display to your Projects.

Use the settings in the Generator tab to adjust font size and font color. Then, use the Transform settings to position the image where you want it in the frame.
This is a very popular technique for marking digital dailies, select reels, and rough cuts so that producers can reference their comments to a specific timecode in the Project.
Here’s a very cool tip for making changes to your Project. When the producer sends you his or her notes, start at the end of the Project and make changes from back to front. If you start at the beginning, as soon as you change one clip, all the timecode references to later clips will be thrown off. By working from back to front, any changes you make will affect only the clips you’ve already changed.
Generator Solids
There are six solid colors shipped with Final Cut Pro, and each of these is useful in providing a variety of colors in a variety of shades. The Custom solid lets you select any color from the standard Mac color picker (Figure 13.14).
Figure 13.14 These solid colors are nice for generic backgrounds; the most flexible choice is Custom.

Once you’ve edited these to the Timeline, select the Generator tab and adjust the color in the Inspector. For the greatest color flexibility, use Custom. For shades of gray in 10 percent increments, use Grey Scale. For simplicity in picking colors, select any of the others.
Generator Textures
Textures include 12 different images, each with a variety of adjustable settings. These are most often used as backgrounds for text (Figure 13.15).
Figure 13.15 Textures provide more interesting elements to use as text fills and backgrounds. Each has a wide variety of settings to modify the look.

Edit a texture to the Timeline as you would any other clip. Then select it, and go to the Inspector to make changes.
Each texture provides a variety of settings and colors to play with. These are especially useful as text fills, or as backgrounds when combined with clip effects like Blurs or Stylize.
Adjusting a Generator in Motion
Any generator, effect, or title can be further adjusted in Motion 5. While explaining how Motion works is well outside the focus of this book, here are a couple of notes.
To send a generator to Motion, right-click it and click the “Open a copy in Motion” menu item. In Motion, make whatever changes you want, then save your changes.
The saved clip automatically appears back in the same Browser from which you sent it. To make additional changes, you can right-click it to “Open in Motion,” but now the generator won’t update until you relaunch FCP X. Unlike in FCP 7, you do not have continuous round-tripping between the two applications.
Also, if you need to delete a customized generator effect, it is stored in [Home Directory] > Movies > Motion Templates > Generators.
Summary
Themes are a fast way to find transitions and titles grouped by visual “look.” Think of this as a shortcut to the Titles and Transitions Browsers.
Generators are special clips that provide a variety of backgrounds and other special effects that you can access at any time in any Project.
Any effect in any Browser can be further customized in Motion 5.