6. Using iTunes with iCloud
Since the whole point of iCloud is that all your stuff should be on all your devices, it wouldn’t make much sense if the contents of your iTunes Library didn’t make it to the iCloud party. Happily, almost any music you have in one place can now appear anywhere you want.
Using a feature called iTunes in the Cloud, you can share your purchased iTunes items with up to ten of your (and perhaps your family’s) iOS devices and computers. New items you purchase from the iTunes Store automatically appear on all your devices; there’s no more need for manual syncing.
You can also purchase a subscription to a service called iTunes Match, which scans your iTunes Library for music tracks you didn’t purchase from the iTunes Store. Matched files are replaced by streaming versions from the Store, at full quality. Any tracks that can’t be matched are uploaded from your computer to iCloud and can be downloaded to all your devices.
Configuring iTunes in the Cloud
With its iTunes in the Cloud feature, iCloud has the ability to automatically download purchases to your iOS devices, and redownload purchases that you bought in the past but aren’t currently on a particular device.
First, let’s talk about automatic downloading. Before iCloud, if you purchased something from the iTunes Store (apps, books, music, movies, or TV shows) you needed to use iTunes to make sure those items were on all of the devices you wanted them on. With iCloud, you can choose to push apps, books, and music automatically to all your devices, no matter on which device you buy the media, as long as you bought the item on the iTunes Store. You can choose to use just Wi-Fi for this automatic downloading, or you can also enable the ability via cellular data. The best part of all this automatic downloading is that it really is automatic: once you set it up, purchased items simply appear on all your devices without you having to worry about item management. Automatic downloading isn’t available if you buy music from other online stores, say, Amazon; see the “Configuring and Using iTunes Match” section later in this chapter for a workaround.
Tip
Although you can buy TV shows and movies from the iTunes Store, they can’t be automatically downloaded, no doubt because they would require so much bandwidth. You can, however, copy video to your iOS device via Wi-Fi, not just USB; that’s one of the new features of iOS 5.
You also have the ability to re-download items to your iOS device. Imagine that you had previously purchased something from the iTunes Store, and you removed it from your iOS device to free up some space. Or perhaps there was an app that you previously used only on your iPhone, but now you would also like it on your iPad. Or if you replace an iOS device with a newer model, you can choose which purchased items you would like to put on the new device.
To set up automatic downloads on a Mac or PC
1. In iTunes, choose iTunes > Preferences > Store ![]() .
.
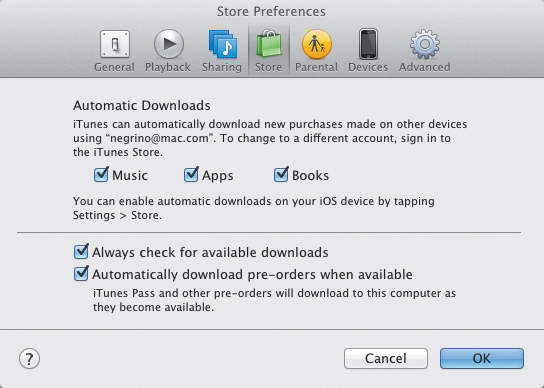
![]() Turn on automatic downloads in iTunes’ Preferences.
Turn on automatic downloads in iTunes’ Preferences.
2. In the Automatic Downloads section of the Store dialog, choose one or more of Music, Apps, or Books.
Tip
As you would expect, iTunes does the right thing when it comes to the appropriateness of its automatic downloading. For example, an app that works only on an iPad won’t be downloaded to an iPhone or iPod touch.
To set up automatic downloads on iOS
1. On your iOS device, tap Settings > Store.
2. On the Store screen ![]() , choose which items (Music, Apps, or Books) you want to automatically download.
, choose which items (Music, Apps, or Books) you want to automatically download.

![]() On an iOS device, you turn on automatic downloads in the Store section of Settings.
On an iOS device, you turn on automatic downloads in the Store section of Settings.
3. (Optional) Turn on Use Cellular Data. On devices with 3G support, this will use the cellular data network to download your purchases, not just Wi-Fi.
Tip
The drawback of using cellular data for automatic downloads is that you may go over your cellular data limitation (in countries and with cellular carriers that impose such caps).
Tip
For publications that appear in iOS 5’s Newsstand app, you can turn automatic downloading on or off for each publication you have installed in Newsstand. Because each publication is actually a different app (even though it shows up in Newsstand, which you can really think of as a specialized folder), you’ll find the publication’s download settings in the long list of app settings at the bottom of the Setings app.
1. You re-download purchases in the iOS app that deals with the item you want to re-download. So you use the iBooks app to retrieve books from the iTunes Store; the iTunes app for Music or TV Shows; and the App Store app to redownload apps. The process is similar in all three apps. Do one or more of the following:
In the iTunes app, tap Purchased at the bottom of the screen, then choose either Music or TV Shows ![]() .
.

![]() In the iTunes app, if you choose TV Shows, you can see a list of the shows you’ve previously purchased.
In the iTunes app, if you choose TV Shows, you can see a list of the shows you’ve previously purchased.
or
In the iBooks app, tap the Library button, tap the Store button, then tap Purchased at the bottom of the screen.
or
In the App Store app, tap Purchased at the bottom of the screen.
2. In the App Store and iTunes apps, tap the Not On This (device name) button so that you don’t inadvertently redownload an item that’s already on your device ![]() .
.
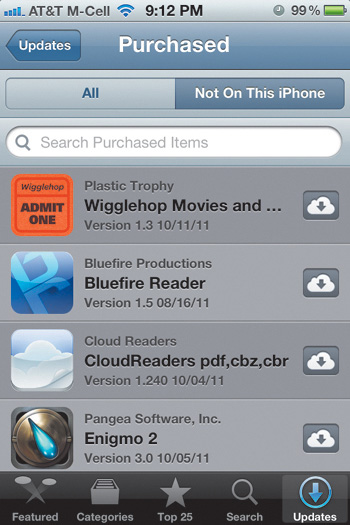
![]() Since you are re-downloading, you probably want to use the Not On This iPhone category.
Since you are re-downloading, you probably want to use the Not On This iPhone category.
3. Find the item or items that you want to re-download, then tap the download button next to the item, or the Download All button (the latter only appears in the iTunes app) ![]() .
.
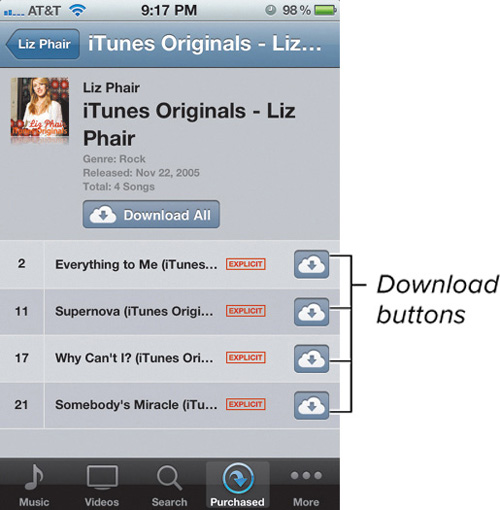
![]() Tap the Download button for an individual item, or Download All for all the items.
Tap the Download button for an individual item, or Download All for all the items.
Tip
It’s important to note that in order to re-download items, you must be signed in to iCloud with the same Apple ID you used to purchase those items in the first place. If you want an item that was purchased under a different Apple ID (for example, my wife and I each have the other’s devices authorized under our individual Apple IDs, so we can share purchases), you must sign out of iCloud on your device and sign back in using the other Apple ID.
To re-download items in iTunes
1. In iTunes, click on the Purchased item in the sidebar.
All the items that you purchased from the iTunes Store appear in the list ![]() .
.
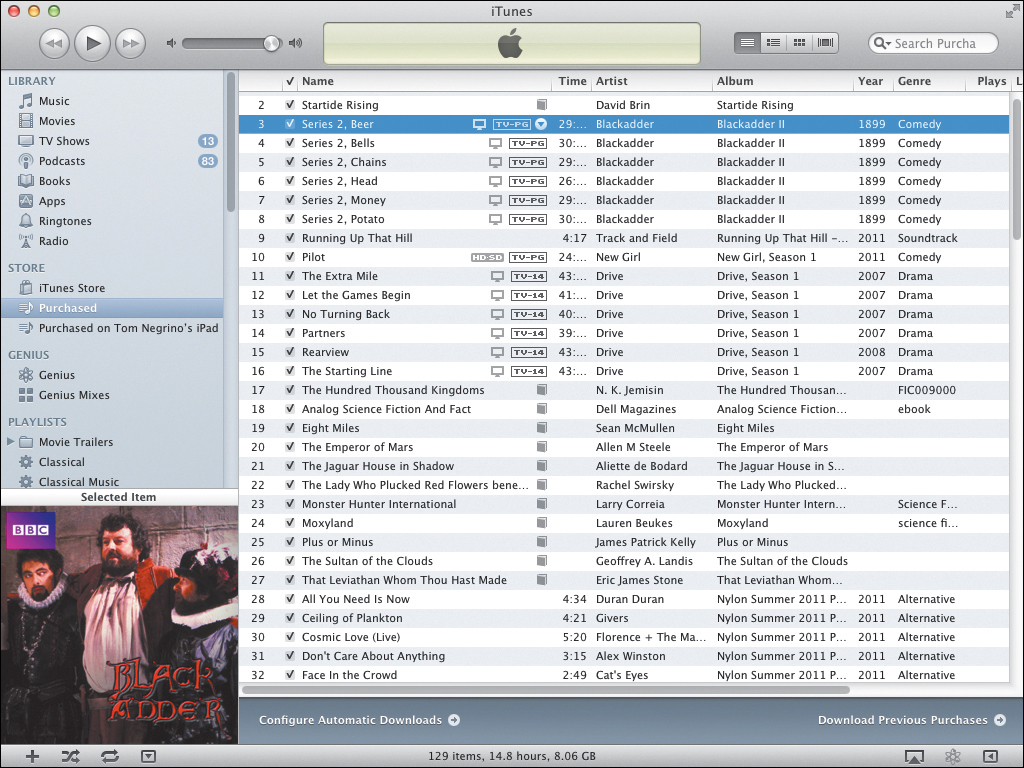
![]() Choose Purchased in the iTunes sidebar to see your purchased items.
Choose Purchased in the iTunes sidebar to see your purchased items.
2. Click Download Previous Purchases in the lower right corner of the window.
iTunes connects to the iTunes Store.
3. Click the category from which you want to re-download an item (Music, TV Shows, Apps, or Books) ![]() .
.

![]() Choose the category of the item that you wish to re-download.
Choose the category of the item that you wish to re-download.
4. Find the item you wish to re-download, then click the Download button next to it. Alternatively, you can click the Download All button at the bottom of the window.
iTunes downloads the selected items.
Tip
The Download All button is not available for TV Shows.
Tip
Even though you can purchase movies through the iTunes Store, you cannot re-download them.
Configuring and Using iTunes Match
iTunes in the Cloud works fine to distribute apps, books, individual music tracks, and albums you purchased from the iTunes Store to your different devices. But if, like many of us, much of your music collection comes from CDs you’ve ripped over the years into your iTunes Library, you probably want a way to get that music onto your devices as well. Of course, you’ve always been able to synchronize your music from iTunes to another device via a cable. But that requires that you know what it is that you want to synchronize before you leave on a trip, and move that music manually over to the mobile device. It would be better if you could simply download any part of your music collection to your mobile device according to your mood.
With a subscription service called iTunes Match, you can do exactly that ![]() . Launched initially only in the United States, iTunes Match costs $25 a year. What it does is clever: it scans all the tracks in your iTunes Library, and then matches them with the same files that are already on the iTunes Store (as of this writing, there are more than 20 million tracks in the iTunes Store). Once it matches your files with the Store’s files, it shows your entire library and marks your files as downloadable on all your devices. When you want to listen to a track, iCloud uses the version from the Store, so you don’t need to upload your entire music library (and saving Apple valuable server space; this way, it doesn’t have to keep thousands of copies of popular songs on their servers, just the one copy from the Store). A real advantage of using iTunes Match is that matched music files that you stream or download from the Store are in the 256 Kbps AAC format, with no DRM (Digital Rights Management). If you had previously ripped a song at a lower quality, the matched version will be sonically superior. See the “Updating Your Music with iTunes Match” section, later in this chapter.
. Launched initially only in the United States, iTunes Match costs $25 a year. What it does is clever: it scans all the tracks in your iTunes Library, and then matches them with the same files that are already on the iTunes Store (as of this writing, there are more than 20 million tracks in the iTunes Store). Once it matches your files with the Store’s files, it shows your entire library and marks your files as downloadable on all your devices. When you want to listen to a track, iCloud uses the version from the Store, so you don’t need to upload your entire music library (and saving Apple valuable server space; this way, it doesn’t have to keep thousands of copies of popular songs on their servers, just the one copy from the Store). A real advantage of using iTunes Match is that matched music files that you stream or download from the Store are in the 256 Kbps AAC format, with no DRM (Digital Rights Management). If you had previously ripped a song at a lower quality, the matched version will be sonically superior. See the “Updating Your Music with iTunes Match” section, later in this chapter.
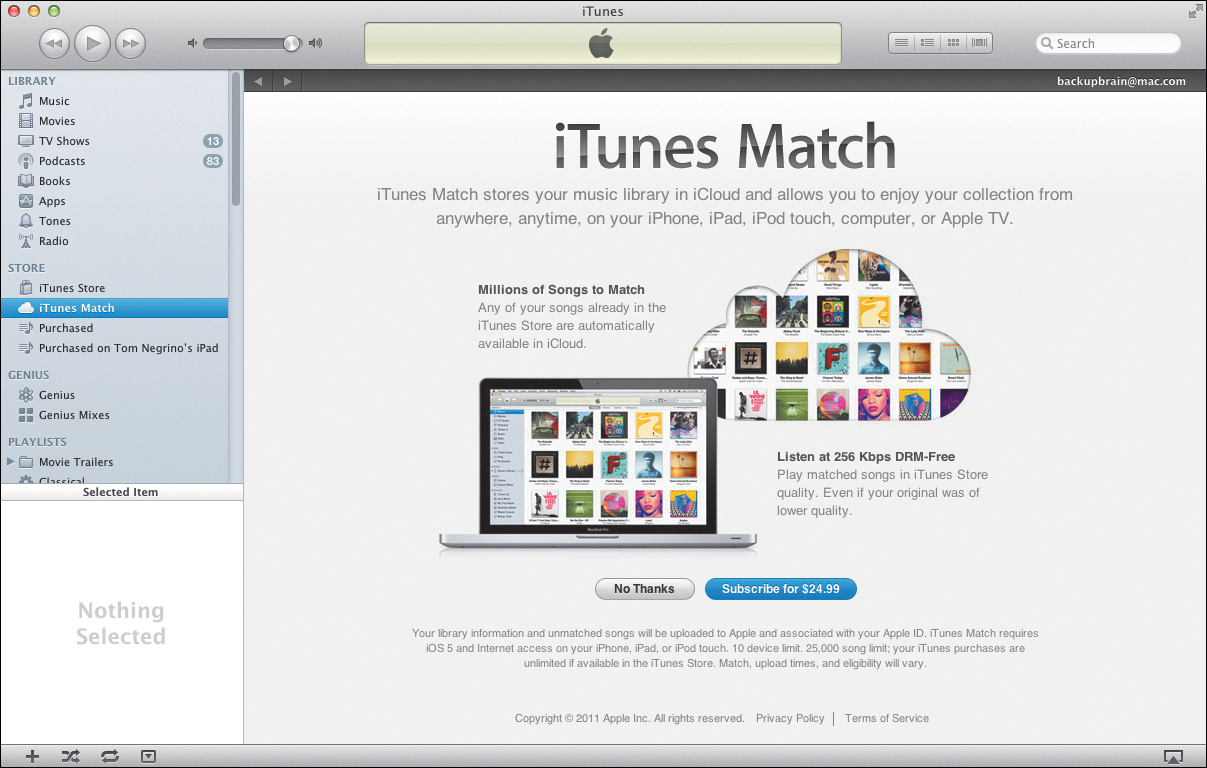
![]() ITunes Match allows you to replicate the contents of your local iTunes Library on iCloud, without the hassle of needing to upload your entire music collection.
ITunes Match allows you to replicate the contents of your local iTunes Library on iCloud, without the hassle of needing to upload your entire music collection.
If iTunes Match can’t find a match for some of your files, it will upload the unmatched files to iCloud for use on all your devices. Neither the matched tracks nor uploaded tracks count against the 5 GB of free storage you get with iCloud.
There are some significant limitations to iTunes Match. First, as noted before, as of November 2011, the service is only available in the United States (though like most Apple services, I would expect the service to become available in other sales territories over time). Second, if you have more than 25,000 tracks in your iTunes Library, you can’t use the service (there are workarounds if you split up your library). iTunes Match will only match music files that are encoded at a bit rate of 96 kbps or greater, and files that are 200 MB or smaller. Also excluded from iTunes Match: podcasts, audio books, TV shows, movies, e-books, and ringtones. However, it does work with music videos purchased from the iTunes Store.
You’ll need to enable all devices you want to use with iTunes Match. First, we’ll see how to enable it in iTunes on a Mac (a PC is similar), then turn the feature on using an iOS device and download music from iCloud onto the device. Finally, we’ll see how you can manage your iTunes Match devices using iTunes.
To add a computer to iTunes Match
1. In iTunes 10.5.1 or later, click iTunes Match in the sidebar. If you haven’t yet subscribed to iTunes Match with the Apple ID you use with the iTunes Store, the informational screen will have a Subscribe button ![]() . Click the Subscribe button and go through the subscription process.
. Click the Subscribe button and go through the subscription process.
or
If you have already signed up for iTunes Match, and simply want to add the computer as one of the iTunes Match devices, click the Add This Computer button ![]() .
.
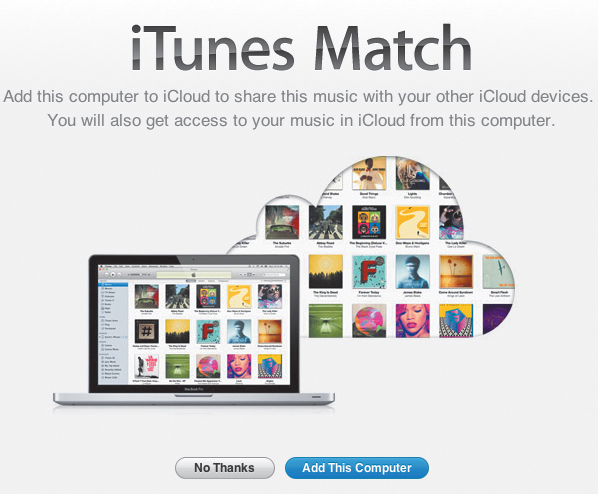
![]() If you have already signed up for iTunes Match on a different computer, click the Add This Computer button to add it as one of your iCloud devices.
If you have already signed up for iTunes Match on a different computer, click the Add This Computer button to add it as one of your iCloud devices.
2. In the resulting dialog ![]() , enter your Apple ID and password, then click the Sign In button.
, enter your Apple ID and password, then click the Sign In button.
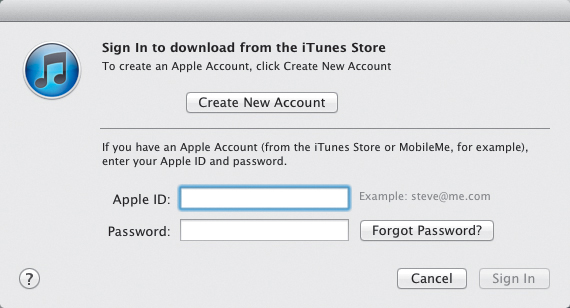
![]() Enter the Apple ID and password associated with the iTunes Store to begin signing up for iTunes Match.
Enter the Apple ID and password associated with the iTunes Store to begin signing up for iTunes Match.
3. Once you’ve agreed to the iTunes Match subscription, iTunes begins scanning your iTunes Library and uploading information about the tracks within it to iCloud ![]() .
.

![]() If you have a fair amount of tracks in your iTunes Library, it could take several hours for the scanning to complete.
If you have a fair amount of tracks in your iTunes Library, it could take several hours for the scanning to complete.
This process can take quite a while (up to several hours), depending on how many tracks you have in your iTunes Library. However, you can still continue using iTunes during the process.
4. Once iTunes has finished scanning your tracks, it begins matching your music with music on the iTunes Store ![]() .
.

![]() Similarly, once the scan is complete, it could take quite a while to match your local files with files in the iTunes Store.
Similarly, once the scan is complete, it could take quite a while to match your local files with files in the iTunes Store.
Again, this is usually a lengthy process, but you don’t have to stop using iTunes. If you are using iTunes for something else, you can tell that the matching process is still going on because an activity icon will appear next to iTunes Match in the sidebar ![]() .
.

![]() While the matching process is going on, you can continue using iTunes; the working icon next to iTunes Match lets you know things are still working.
While the matching process is going on, you can continue using iTunes; the working icon next to iTunes Match lets you know things are still working.
5. When iTunes finishes the matching, it automatically uploads unmatched songs and their artwork to iCloud. When the whole process is complete, iTunes lets you know in the iTunes Match screen ![]() . In the sidebar, a cloud icon will also appear next to the Music entry
. In the sidebar, a cloud icon will also appear next to the Music entry ![]() .
.

![]() When the process is complete, iTunes tells you how many songs are now available in iCloud.
When the process is complete, iTunes tells you how many songs are now available in iCloud.

![]() Once your songs are available in iCloud, an iCloud icon appears next to the Music entry in the iTunes sidebar.
Once your songs are available in iCloud, an iCloud icon appears next to the Music entry in the iTunes sidebar.
• Ineligible ![]() For songs that are too large, podcasts, audio books, and songs recorded at too low a bit rate.
For songs that are too large, podcasts, audio books, and songs recorded at too low a bit rate.
• Removed ![]() Shown when a song has been removed from iCloud from a different computer. Songs deleted from iCloud are immediately deleted from iOS devices, but remain on other computers until they are manually deleted.
Shown when a song has been removed from iCloud from a different computer. Songs deleted from iCloud are immediately deleted from iOS devices, but remain on other computers until they are manually deleted.
• Error ![]() Displayed when there was a problem matching the file.
Displayed when there was a problem matching the file.
• Duplicate ![]() You’ll see this icon when a duplicate version of the song exists in your iTunes library. The icon will appear next to duplicates that weren’t uploaded to iCloud.
You’ll see this icon when a duplicate version of the song exists in your iTunes library. The icon will appear next to duplicates that weren’t uploaded to iCloud.
• Waiting ![]() iTunes shows this icon when a song is in the process of being matched.
iTunes shows this icon when a song is in the process of being matched.
If you want to see the iTunes Match status of the items within your music library, in iTunes, choose View > View Options, then select the iCloud Download and iCloud Status checkboxes ![]() , then click OK. In the Library list, iTunes will show you which items have been matched, which have been purchased, and which items are not on your current computer but are able to be downloaded from iCloud
, then click OK. In the Library list, iTunes will show you which items have been matched, which have been purchased, and which items are not on your current computer but are able to be downloaded from iCloud ![]() . If there is no icon in the iCloud Download column, that means a copy of the track is already stored locally.
. If there is no icon in the iCloud Download column, that means a copy of the track is already stored locally.
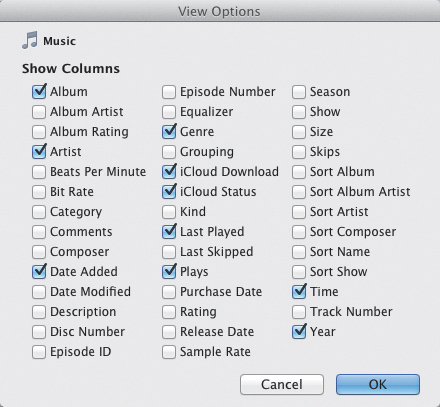
![]() To see what’s going on with individual tracks, turn on iCloud Download and iCloud Status in iTunes’ View Options.
To see what’s going on with individual tracks, turn on iCloud Download and iCloud Status in iTunes’ View Options.
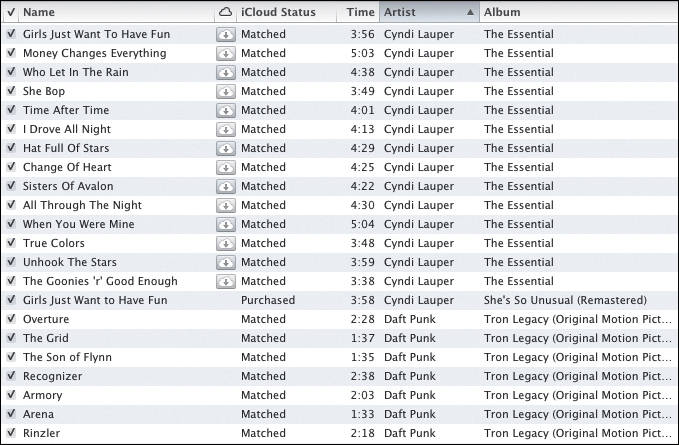
![]() In the iTunes list, you can see which songs need to be downloaded to your local computer, as well as each track’s iCloud status.
In the iTunes list, you can see which songs need to be downloaded to your local computer, as well as each track’s iCloud status.
Tip
To download items from iCloud, select the items in the iCloud Download column of the iTunes list with the download icon, then right-click and choose Download ![]() .
.

![]() Select all the files that need to be downloaded, then right-click and choose Download from the shortcut menu to download them to your computer.
Select all the files that need to be downloaded, then right-click and choose Download from the shortcut menu to download them to your computer.
Tip
On a computer, if you play music that is on iCloud, iCloud will stream the music to you. On an iOS device, playing music stored on iCloud also downloads that track to your device.
To add an iOS device to iTunes Match
1. On your iOS device, tap Settings > Music ![]() .
.
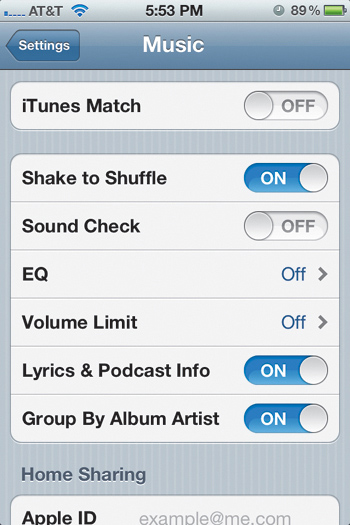
![]() Begin enabling iTunes Match in the Music section of the Settings app.
Begin enabling iTunes Match in the Music section of the Settings app.
2. Turn on iTunes Match.
3. Your device will ask for your Apple ID Password. Enter it, then tap OK.
The Music app warns you that iTunes Match will replace the music library on the device ![]() . However, any tracks already on the device that were previously synced from iTunes will still remain on the device.
. However, any tracks already on the device that were previously synced from iTunes will still remain on the device.

![]() When you turn on iTunes Match, iOS 5 warns you that it will replace the music library on the device.
When you turn on iTunes Match, iOS 5 warns you that it will replace the music library on the device.
4. Tap Enable.
5. Back in the Music screen, a new option, Show All Music, will appear. Turn this on to get access to your entire iCloud music library.
Tip
When you know you won’t have access to your online iCloud library (say, while you are on a plane flight), switching the Show All Music option to Off tells your iOS device to only show locally stored music.
To download music from iCloud to your iOS device
1. In the Music app, the Playlists, Artists, Songs, and Albums tabs will now show everything in your iTunes Library. Navigate to music that you would like to download from iCloud to your device. You can tell that a track is not stored locally because it will have the iCloud Download icon next to it.
2. Tap the iCloud Download icon to begin downloading the track. After a moment, the track will begin downloading and playing, and a progress icon appears next to the track name ![]() .
.
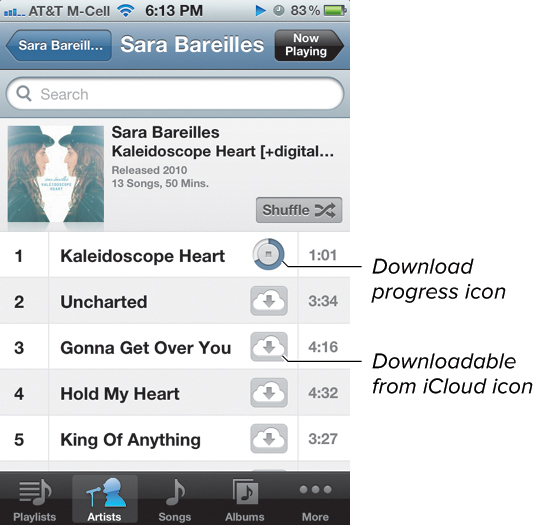
![]() When you download a track from iCloud, it begins playing before it has completed downloading.
When you download a track from iCloud, it begins playing before it has completed downloading.
or
Scroll down to the end of the album tracks and tap the Download All icon.
To manage iTunes Match devices
1. In iTunes, click iTunes Store in the sidebar.
2. In the upper right corner of the iTunes window, click your Apple ID to access your account information.
3. Enter your Apple ID and password when prompted, then click View Account.
4. In the Account Information screen, there will be a section called iTunes in the Cloud ![]() .
.
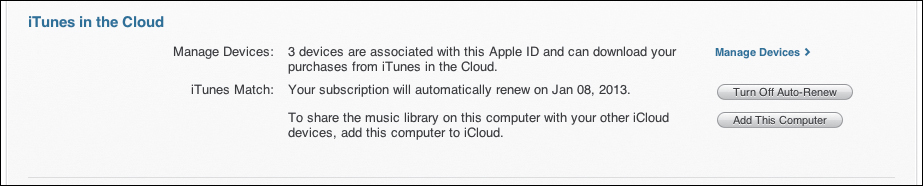
![]() Begin managing your iTunes Match devices in the iTunes Manage Accounts screen.
Begin managing your iTunes Match devices in the iTunes Manage Accounts screen.
5. Click Manage Devices.
6. The resulting screen ![]() will show you the devices associated with iTunes in the Cloud. If you want to remove one of these devices, click the Remove button next to it, then click Done.
will show you the devices associated with iTunes in the Cloud. If you want to remove one of these devices, click the Remove button next to it, then click Done.
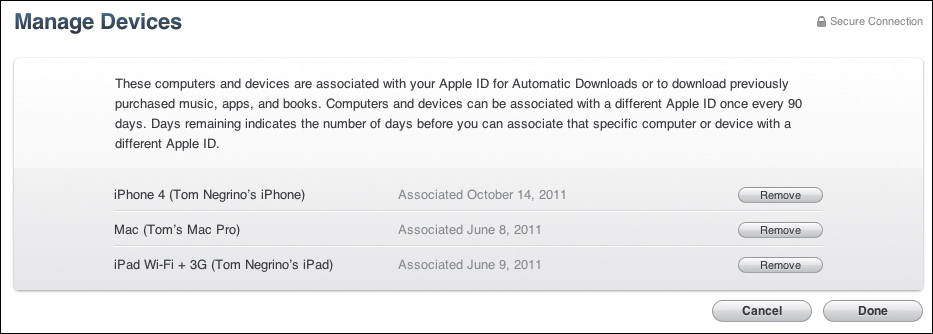
![]() On the Manage Devices screen, you can see which computers and iOS devices are associated with iTunes Match, and you can remove them if needed.
On the Manage Devices screen, you can see which computers and iOS devices are associated with iTunes Match, and you can remove them if needed.
Tip
Apple allows you to associate a particular device or computer with a different Apple ID only once every 90 days.
Updating Your Music with iTunes Match
As mentioned earlier, once iTunes Match scans your music library, it matches the songs that it finds with versions of the same track in the iTunes Store. You can then replace the versions on your computer (which may have been ripped from CD with old programs at lower-quality bit rates; I found a bunch of my music was originally ripped at 128 Kbps with Sound-Jam, the program Apple purchased and turned into iTunes back in 2000!) with new, higher-quality 256 Kbps AAC formatted files. If you previously purchased copyprotected music from the iTunes Store, the replacement tracks will not only be higher quality, but will no longer have copy protection. If you don’t want to invest in iTunes Match, Apple provides a service that allows you to update older-quality files you purchased from the Store to iTunes Plus (that 256 Kbps AAC format) for $.30 per track. Of course, if you want to upgrade more than 83 songs, it makes better financial sense to subscribe to iTunes Match.
To replace the older files with newer versions from the iTunes Store, you need to first find lower-quality versions of music in your library. A great tool to do that in iTunes is a Smart Playlist. Then you need to delete the old files from your library, and finally redownload the improved-quality versions from iCloud to your local library. I’d like to acknowledge Jason Snell, editorial director of Macworld magazine, for his excellent article detailing this process, which you can find at http://www.macworld.com/article/163620/2011/11/how_to_upgrade_tracks_to_itunes_match_fast.html. I’ve built on his work here.
Tip
In the Macworld article referenced above, the author suggests you just replace all of your lesser-quality files in one massive operation. I don’t recommend that, because in my experience, iTunes Match’s matching, while quite good, isn’t yet perfect. See the “It’s Good, But It Ain’t Gospel” sidebar.
To find matched songs that need upgrading
1. Open iTunes.
2. Choose File > New Smart Playlist.
The Smart Playlist window appears ![]() .
.
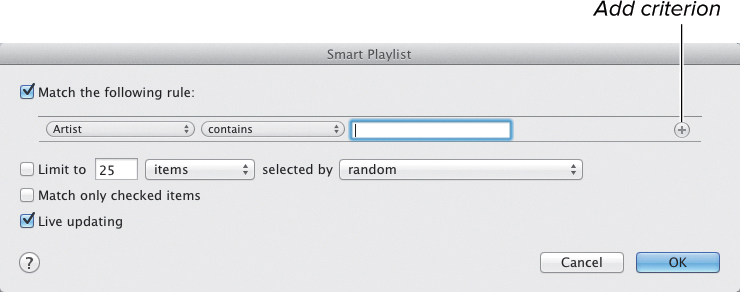
![]() Begin creating your Smart Playlist to root out your files that are good candidates for upgrading to higher quality.
Begin creating your Smart Playlist to root out your files that are good candidates for upgrading to higher quality.
3. Change the first criterion. From the first pop-up menu, choose “Media Kind.”
The other two pop-up menus on that line will change to “is” and “Music.” That’s what we want.
4. Click the plus button at the right edge of the first criterion to add another criterion.
5. In the new criterion, change the first pop-up menu to “Bit Rate,” the middle pop-up menu to “is less than,” and enter “256” in the Kbps field ![]() .
.

![]() These criteria look for lower-bit rate music.
These criteria look for lower-bit rate music.
6. Now we want to create a criterion group, where multiple criteria are treated as though they were one. To do that, hold down the Option key and click the Add criterion button for the criterion you created in Step 5.
The new criterion group appears, with the pop-up menu set to “All” of the following are true, and one sub-criterion ready to be set.
7. In that pop-up menu, change “All” to “Any.”
8. In the first pop-up menu of the sub-criterion, choose “iCloud Status.”
The other two pop-up menus of the sub-criterion will change to “is” and “Matched,” which is what we want.
9. In the first sub-criterion, click its Add criterion button to add a new line to the group.
10. In the first pop-up menu of the new sub-criterion, choose “iCloud Status” again, leave the second pop-up menu set to “is,” and change the third pop-up menu to “Purchased.”
11. (Optional) Select the Match only checked items checkbox.
12. Select the Live updating checkbox.
The settings for your Smart Playlist should now look like ![]() .
.

![]() The final Smart Playlist settings.
The final Smart Playlist settings.
13. Click OK.
The new Smart Playlist appears in the iTunes sidebar with the name “untitled playlist.”
14. Click the words “untitled playlist,” and change the name of the playlist to “Better Quality on iCloud.”
To replace your lower-bit rate music with higher-quality versions from iCloud
1. In the iTunes sidebar, click the “Better Quality on iCloud” Smart Playlist you just created.
The playlist shows a list of lower-quality tracks that iTunes Match has matched and thinks are upgradable to better quality.
2. In the list, select one or more songs that you want to replace.
3. Press Option-Delete.
iTunes will ask if you’re sure if you want to delete the songs from your library ![]() . Make sure that you do not check “Also delete these items from iCloud.”
. Make sure that you do not check “Also delete these items from iCloud.”
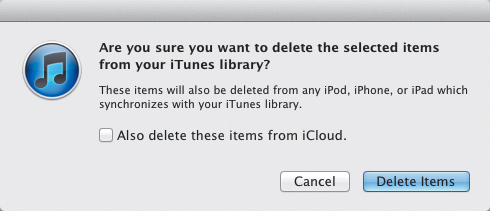
![]() iTunes always asks if you’re sure you want to get rid of items.
iTunes always asks if you’re sure you want to get rid of items.
4. Click Delete Items.
iTunes will ask if you want to keep the local files in the iTunes Media folder ![]() . Scary as it may feel, yes, you do. The tracks are still available for you to redownload from iCloud, which you’ll be doing soon.
. Scary as it may feel, yes, you do. The tracks are still available for you to redownload from iCloud, which you’ll be doing soon.
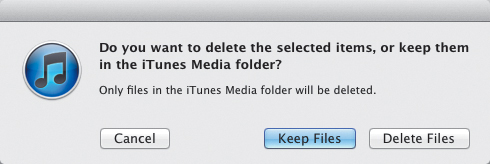
![]() Here, you want to delete the local, lower-quality copies of your songs, so click Delete Files.
Here, you want to delete the local, lower-quality copies of your songs, so click Delete Files.
5. Click Delete Files.
iTunes deletes the local files, and marks the items with the iCloud download icon, showing that the files are now available on iCloud, rather than in your local library ![]() .
.
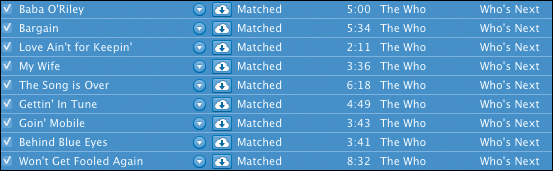
![]() Once you delete local files, the iCloud download icon appears next to them, indicating that the songs are waiting for you in the cloud.
Once you delete local files, the iCloud download icon appears next to them, indicating that the songs are waiting for you in the cloud.
6. Select the files you just deleted, then right-click and choose Download from the shortcut menu.
iTunes downloads the higher-quality files from the iTunes Store.
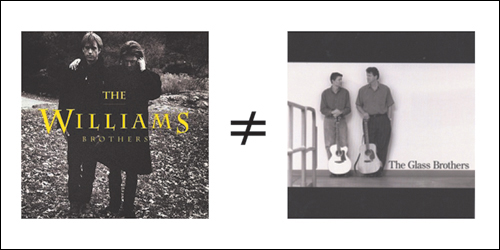
Here are some examples from my own experience. In my iTunes Library, I have three CDs from a folk duo called The Williams Brothers that were made between 1987 through 1993. Only one of these three CDs is in the iTunes Store. Once you do a match, you can ask iTunes to show you the matched track on the Store. For one of these albums, it shows a match to a completely unrelated group called The Glass Brothers ![]() . For another CD (the one that happens to be in the Store), it shows a match to The Williams Brothers, a famous vocal group of three black gospel singers
. For another CD (the one that happens to be in the Store), it shows a match to The Williams Brothers, a famous vocal group of three black gospel singers ![]() .
.
![]() These aren’t the droids we’re looking for.
These aren’t the droids we’re looking for.

![]() This was another incorrect iTunes Match. The folk singers on the left just don’t have the gospel spirit of the group on the right.
This was another incorrect iTunes Match. The folk singers on the left just don’t have the gospel spirit of the group on the right.
• Sometimes, songs within the same CD don’t always match. This is puzzling, to say the least. iTunes will upload the tracks that don’t match from your local copies, but it’s still weird behavior.
• It’s unclear what version of a track you may get if there are multiple versions of the track available on the Store (for example, original and remastered).
• Sometimes artwork isn’t transferred to tracks that are downloaded.