2. Working with Mail, Notes, and iMessages
Like its MobileMe predecessor, iCloud provides a full set of email services. There are changes (some for the better, some not so much) from MobileMe mail, but for the most part I think that iCloud email is a better product. And you can’t beat the price; it’s free with your iCloud account. In this chapter, we’ll see how to set up your iCloud email account on both the Mac and on an iOS device, and manage that mail on the iCloud website.
As part of Apple’s Mail program and the iOS Notes app, you also have the ability to create notes that will sync between your devices via iCloud. You’ll see how to deal with notes on both platforms.
One of the new features in iCloud is iMessages, which allows you to send text messages to other people on iOS devices with iCloud accounts, and without incurring phone carrier messaging charges. iMessage is integrated into the Messages iOS app, and we’ll see how it works and its limitations.
Setting up iCloud Mail Accounts on Your Mac
One of the benefits of every iCloud account is a free @me.com email address (if you previously had a mac.com address, that serves as an alias to the me.com address). All iCloud email accounts use the IMAP email protocol, so messages are saved on the server, and you can read, reply to, and mark your email as read from any device. Because IMAP is a standard mail protocol, you can use many different email programs, on many different computing platforms, to work with your mail. You’re certainly not locked into just using Apple devices.
Because messages are saved on the server, the amount of space your email takes up counts against the free 5 GB of storage space you get with your iCloud account.
When email arrives in your iCloud email account, the email is also automatically pushed to your iOS devices, so your mail picture is the same whether you’re on a Mac or on a mobile device.
Dealing with how to use the Apple Mail program on the Mac (to send and receive mail, for example) is outside the scope of this book; instead, in this chapter I’m going to focus on showing you how to set up Mail with your iCloud account, depending on if you were a previous Mail user or not. Again, since your iCloud email account is just like any other IMAP account, you can set it up on almost any email program, just follow the maker’s instructions for setting up an account. I will go into working with many aspects of mail using the iCloud website, which can be accessed from any web browser; see “Working with Mail on the iCloud Website” later in this chapter.
To set up your iCloud email account in Apple Mail (if you haven’t used Mail before)
1. On your Mac, choose Applications > Mail.
The Welcome to Mail Screen appears ![]() .
.
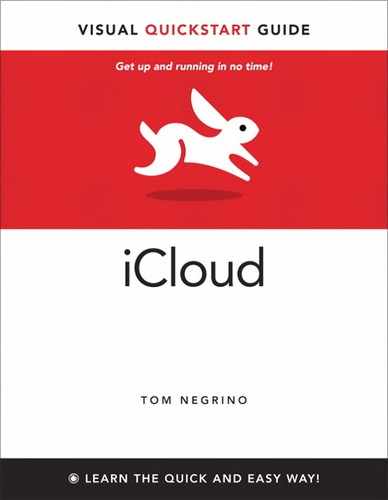
![]() If you’ve never used Mail on your Mac before, setting up your first account welcomes you to the program.
If you’ve never used Mail on your Mac before, setting up your first account welcomes you to the program.
2. You’ll be prompted for the Full Name, the Email Address, and the Password. Enter these, then click Create.
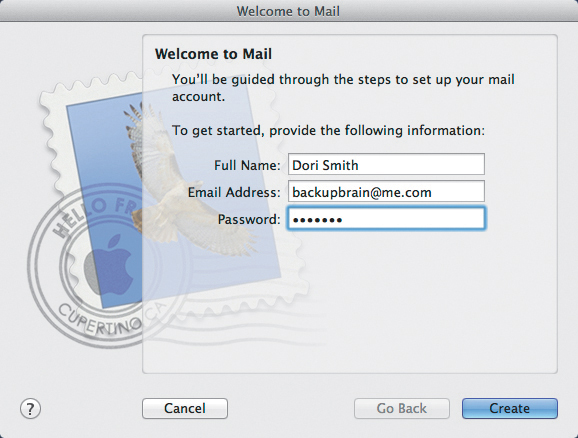
Mail checks to see if the email account exists, and if so signs you in and the Account Summary screen appears ![]() .
.
![]() Mail checks to make sure that the email address and password you entered were valid.
Mail checks to make sure that the email address and password you entered were valid.
3. (Optional) If you also want to set up your Contacts and Calendars to work with iCloud, select those checkboxes next to Also set up. I recommend that you do this.
4. Click Create.
Mail opens, displaying the mail window ![]() .
.

![]() The Mail application window on the Mac, in its default configuration.
The Mail application window on the Mac, in its default configuration.
To set up your iCloud email account in Apple Mail (if you’ve used Mail before)
1. On your Mac, choose Applications > Mail.
2. In Mail, choose Mail > Preferences > Accounts.
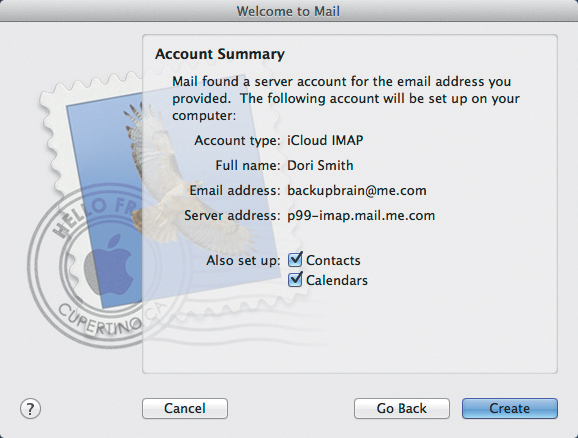
The Accounts pane appears ![]() .
.
![]() If you already have an email address in Mail, you begin adding a new one in the Accounts pane of Mail’s Preferences.
If you already have an email address in Mail, you begin adding a new one in the Accounts pane of Mail’s Preferences.
3. At the lower left corner of the pane, click the plus button.
The Add Account pane appears ![]() .
.
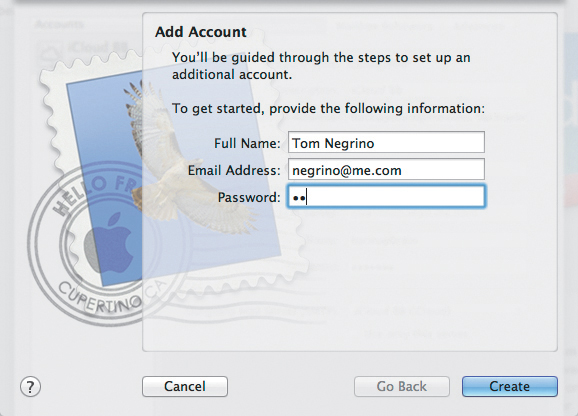
![]() Enter your name, email address, and password on the Add Accounts screen.
Enter your name, email address, and password on the Add Accounts screen.
4. Enter the Full Name, the Email Address, and the Password, then click Create.
Mail checks to see if the email account exists, and if so signs you in and the Account Summary screen appears ![]() .
.
5. (Optional) If you also want to set up your Contacts and Calendars to work with iCloud, select those checkboxes next to Also set up. I recommend that you do this.
6. Click Create.
7. Close the Mail Preferences window.
Setting up Mail Accounts on Your iOS Device
On the Mac, you set up new email accounts in the Mail program, but that’s not the case on iOS. Instead, you use the Settings app. You can have more than one mail account on your iOS device, and you can even have more than one iCloud account (if, for example, you have separate iCloud accounts for personal and school, or home and work). In this example, we’ll focus on setting up an iCloud account, but the steps you take are much the same for any email provider.
To set up a mail account on an iOS device
1. Tap Settings, then scroll down to Mail, Contacts, Calendars ![]() , then tap that.
, then tap that.
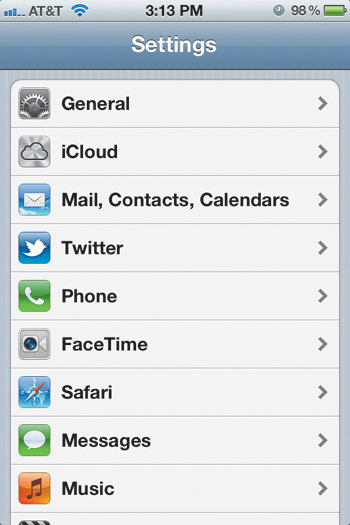
![]() Begin setting up a new email account in the Settings app.
Begin setting up a new email account in the Settings app.
The Mail, Contacts, Calendars screen appears ![]() .
.
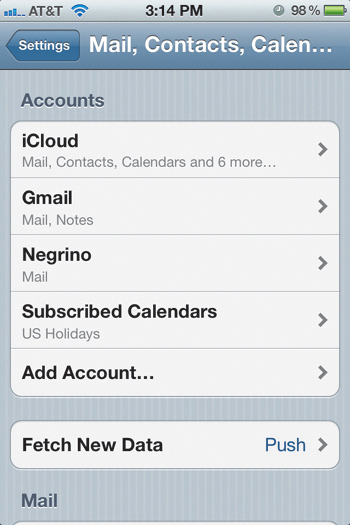
![]() Tap Add Account to start the new account process.
Tap Add Account to start the new account process.
2. Tap Add Account.
3. On the resulting Add Account screen ![]() , tap iCloud from the list of email providers.
, tap iCloud from the list of email providers.
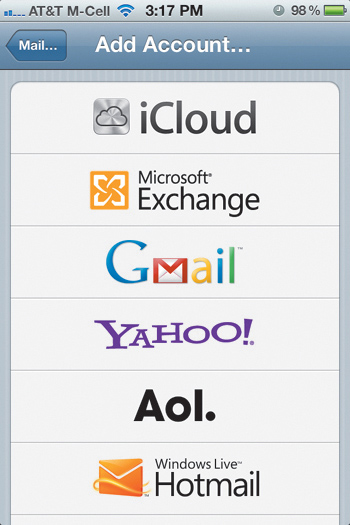
![]() In iOS 5, there are a variety of preset email providers. In this case, we want iCloud.
In iOS 5, there are a variety of preset email providers. In this case, we want iCloud.
If you choose a different provider, you may have to enter a bit more information. For example, if you choose Gmail, you’ll be asked for your name, email address, password, and a description of the account.
4. Enter your Apple ID and password, then tap the Next button ![]() .
.
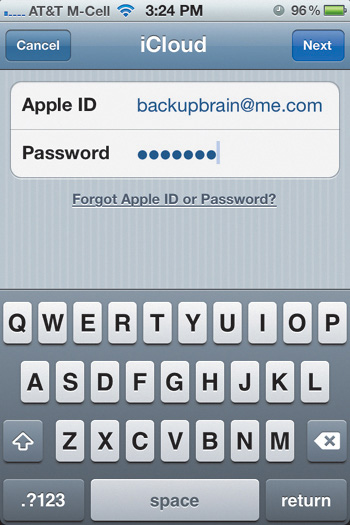
![]() Enter your Apple ID and password, then tap the Next button.
Enter your Apple ID and password, then tap the Next button.
On this screen, if you don’t already have an Apple ID, you have the opportunity to get one by tapping the Get a Free Apple ID button at the bottom of the screen. That takes you through creating an Apple ID process.
5. The device verifies your Apple ID and password, then brings you to the iCloud settings screen ![]() , which allows you to turn iCloud services on or off for your device. As you can see, most settings are turned on by default. Choose the settings you wish to enable on that particular device, then tap Save.
, which allows you to turn iCloud services on or off for your device. As you can see, most settings are turned on by default. Choose the settings you wish to enable on that particular device, then tap Save.
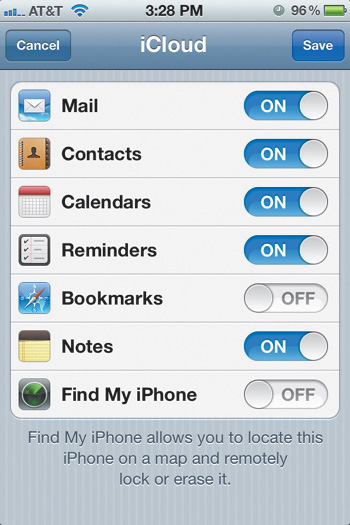
![]() Because we’re setting up an iCloud account, you can choose which iCloud services to enable.
Because we’re setting up an iCloud account, you can choose which iCloud services to enable.
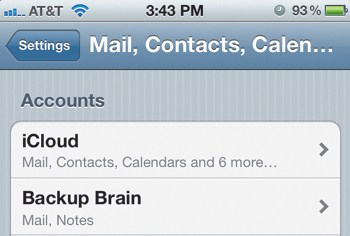
The device will return to the Mail, Contacts, Calendars screen, showing the new account ![]() . If you have more than one iCloud account, the second one will appear showing the email address associated with that account as the name of the account.
. If you have more than one iCloud account, the second one will appear showing the email address associated with that account as the name of the account.
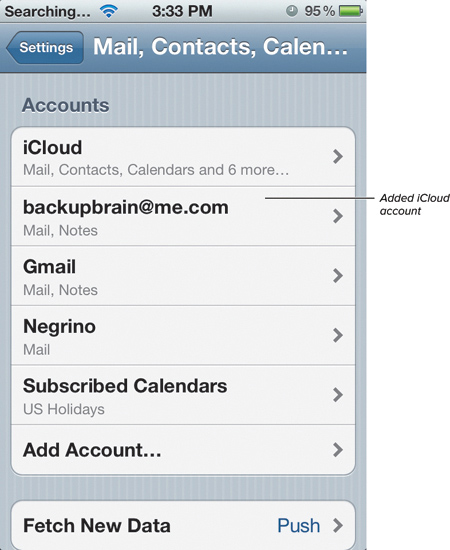
![]() The new iCloud account has now been added.
The new iCloud account has now been added.
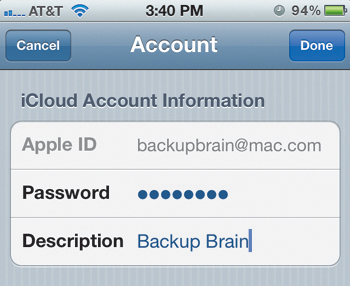
6. (Optional) If you want to rename the additional account to something other than the email address, tap the account name on the Mail, Contacts, Calendars screen, tap the Account field ![]() , and in the resulting Account screen, change the Description
, and in the resulting Account screen, change the Description ![]() . Tap the Done button. When you are returned to the Mail, Contacts, Calendars screen, things may not appear to have initially changed, but leaving that screen and returning shows the change was made
. Tap the Done button. When you are returned to the Mail, Contacts, Calendars screen, things may not appear to have initially changed, but leaving that screen and returning shows the change was made ![]() .
.
![]() Tapping the Account name allows you to change its description.
Tapping the Account name allows you to change its description.
![]() Type the new description for the account.
Type the new description for the account.
![]() Back in the Mail, Contacts, Calendars screen, the updated description appears.
Back in the Mail, Contacts, Calendars screen, the updated description appears.
Working with Notes
Notes on an iOS device (in the Notes app) or in Apple Mail on the Mac are like yellow sticky notes in the real world. You can use them for reminders, general notes, pretty much whatever you want in terms of small snippets of text. Notes that you create or edit on one iOS device will, if you have it set up, automatically synchronize to your other iOS devices, and to Apple Mail on the Mac.
You can have different notes associated with different accounts, depending on whether or not the account supports notes. Most email accounts from many different email providers do, as iCloud treats Notes as a special sort of email. So you can use notes in iCloud, and synchronize them with most IMAP accounts.
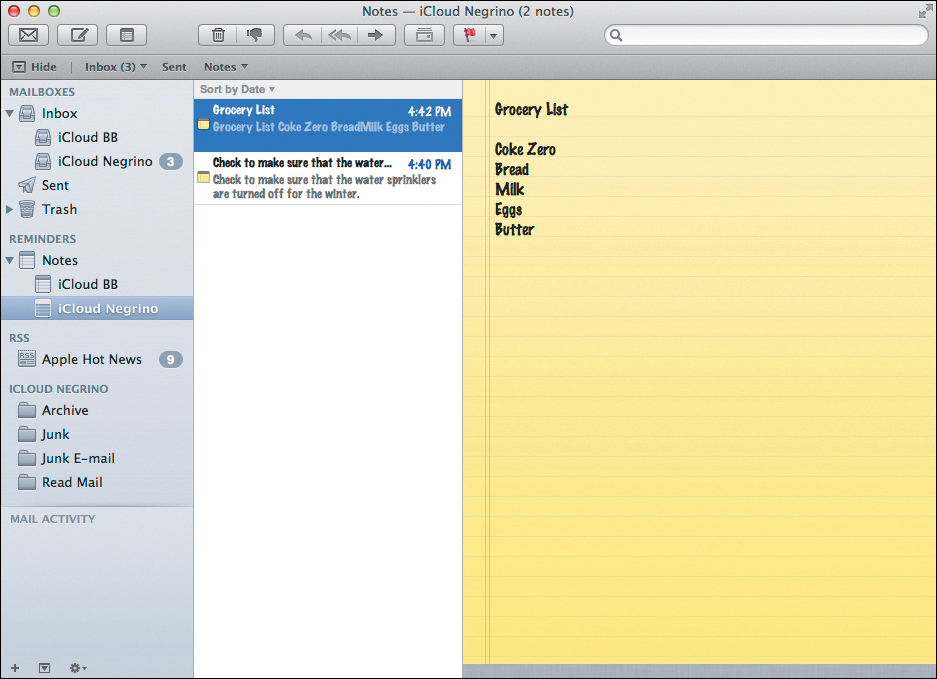
In Apple Mail, notes appear in the sidebar under the Reminders section ![]() . If you have more than one account enabled for Notes, then the accounts will all appear in the sidebar separately.
. If you have more than one account enabled for Notes, then the accounts will all appear in the sidebar separately.
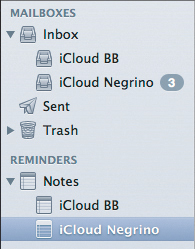
![]() Notes are integrated into Apple’s Mail program on the Mac.
Notes are integrated into Apple’s Mail program on the Mac.
On an iOS device, you create Notes by typing in the Notes app, or if you’re using a Siri-enabled device, you can dictate notes to Siri, and they will appear in the Notes app. On your mobile device, you need to first set the default account destination for your notes.
On the iCloud website, you can only view Notes; you can’t create new ones or edit existing ones.
To configure Notes on an iOS device
1. Tap Settings > Notes.
2. On the Notes settings screen ![]() , choose the font you want to use for your notes, then tap Default Account.
, choose the font you want to use for your notes, then tap Default Account.
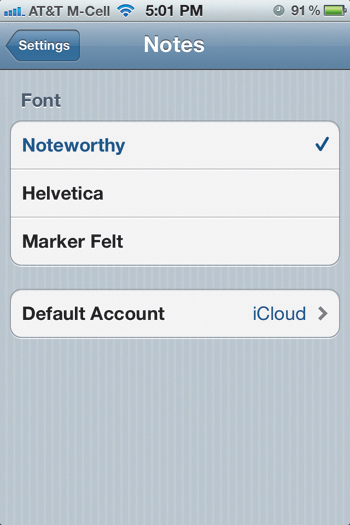
![]() Choose the font and default account you want to use in the Notes app on your iOS device.
Choose the font and default account you want to use in the Notes app on your iOS device.
The screen changes to show the different accounts that can accept Notes.
3. Tap the account you want to use as your default Notes account. A checkmark will appear next to that account name.
4. Press the iOS device’s Home button to save your choice.
To create Notes on an iOS device
1. Tap Notes.
2. Tap the plus button at the upper right of the screen.
A new Note form appears. Type the note ![]() .
.
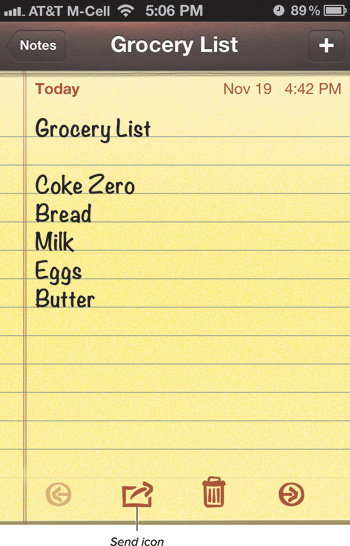
![]() A note that you enter on your iOS device will synchronize to the iCloud website, to your other iOS devices, and to your Macs.
A note that you enter on your iOS device will synchronize to the iCloud website, to your other iOS devices, and to your Macs.
Tip
To delete the note, tap the Trash icon at the bottom of the note.
Tip
You can also email or print a note by tapping the Send icon at the bottom of the note. In order to print, you must have an AirPrint-capable printer available. AirPrint allows an iOS device to print wirelessly over Wi-Fi.
Tip
Though AirPrint is normally a hardware feature in a printer, some clever software, Ecamm Network’s (www.ecamm.com) $20 Printopia 2, installs as a preference pane on a Mac ![]() and then allows any printer your Mac can use to be accessed by AirPrint on your iOS devices. This doesn’t just work with Notes; it works with any app on your iOS device that can print, such as Pages or Keynote. You can also use Printopia to “print” a PDF to your Mac, Dropbox’s Dropbox, or Evernote’s Evernote (if you subscribe to those services).
and then allows any printer your Mac can use to be accessed by AirPrint on your iOS devices. This doesn’t just work with Notes; it works with any app on your iOS device that can print, such as Pages or Keynote. You can also use Printopia to “print” a PDF to your Mac, Dropbox’s Dropbox, or Evernote’s Evernote (if you subscribe to those services).
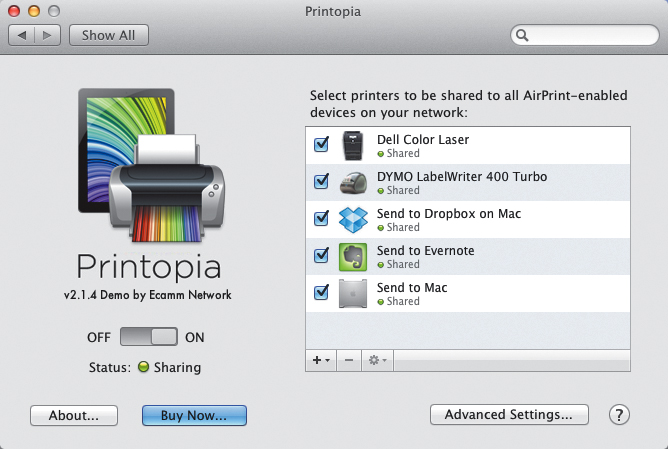
![]() You can use Printopia to AirPrint-enable any printer on your local network.
You can use Printopia to AirPrint-enable any printer on your local network.
To work with Notes in Apple Mail
1. In Mail’s sidebar, click the account that you created the note in, then select the note in the message list.
The contents of the note appear in the message area ![]() .
.
![]() On the Mac, an iOS Note appears much the same as it does on the mobile device.
On the Mac, an iOS Note appears much the same as it does on the mobile device.
2. Double-click an existing note in the message list to open it in a new window for editing ![]() .
.
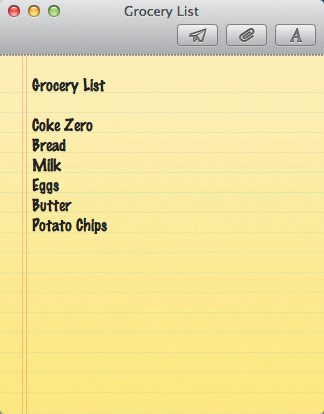
![]() If you want to edit the Note, you can open it in a new window.
If you want to edit the Note, you can open it in a new window.
or
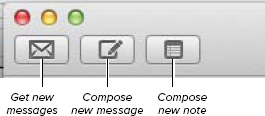
To create a new note, choose File> New Note, or click the Compose new note button in the toolbar ![]() .
.
![]() You can also create new Notes in Mail.
You can also create new Notes in Mail.
or
To delete a note, select it in the message list and then press the Delete key or choose Edit > Delete.
Tip
Annoyingly, notes you create on iOS devices don’t just show up in the sidebar under Reminders in Apple Mail; by default, they also show up in your Inbox. If this makes as little sense to you as it does to me (the Inbox is for mail, darn it), choose Mail > Preferences > Accounts, then click the account whose behavior you want to change in the list on the left of the window. Click the Mailbox Behaviors tab, then deselect the Show notes in Inbox checkbox.
To view Notes on the iCloud website
1. Log in to the iCloud website.
2. If necessary, from the homepage, click the Mail icon. If you are in another application, click the iCloud icon in the upper left corner of the window, then click the Mail icon.
3. In the website’s Mail application, under Folders in the sidebar, click Notes, then in the message list, click the note you wish to view ![]() .
.
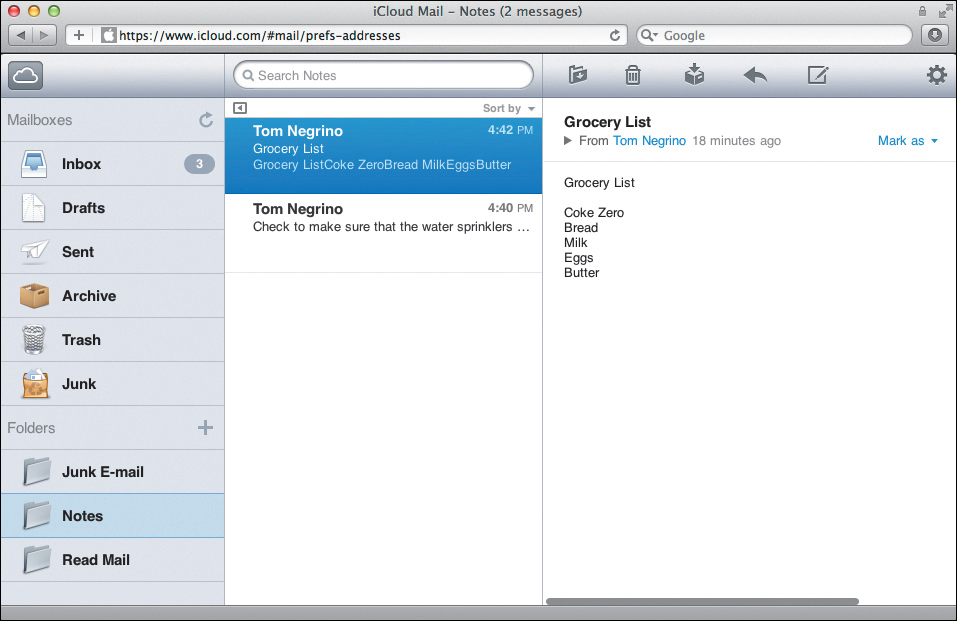
![]() You can view Notes in the Mail application on the iCloud website, but you can’t add new Notes or edit them.
You can view Notes in the Mail application on the iCloud website, but you can’t add new Notes or edit them.
On the iCloud website, you can only view and not edit or create Notes.
Working with Mail on the iCloud Website
If you are familiar with Mail on the Mac, you’ll immediately feel at home in the Mail application on the iCloud website. It’s designed to resemble the desktop application fairly closely ![]() .
.
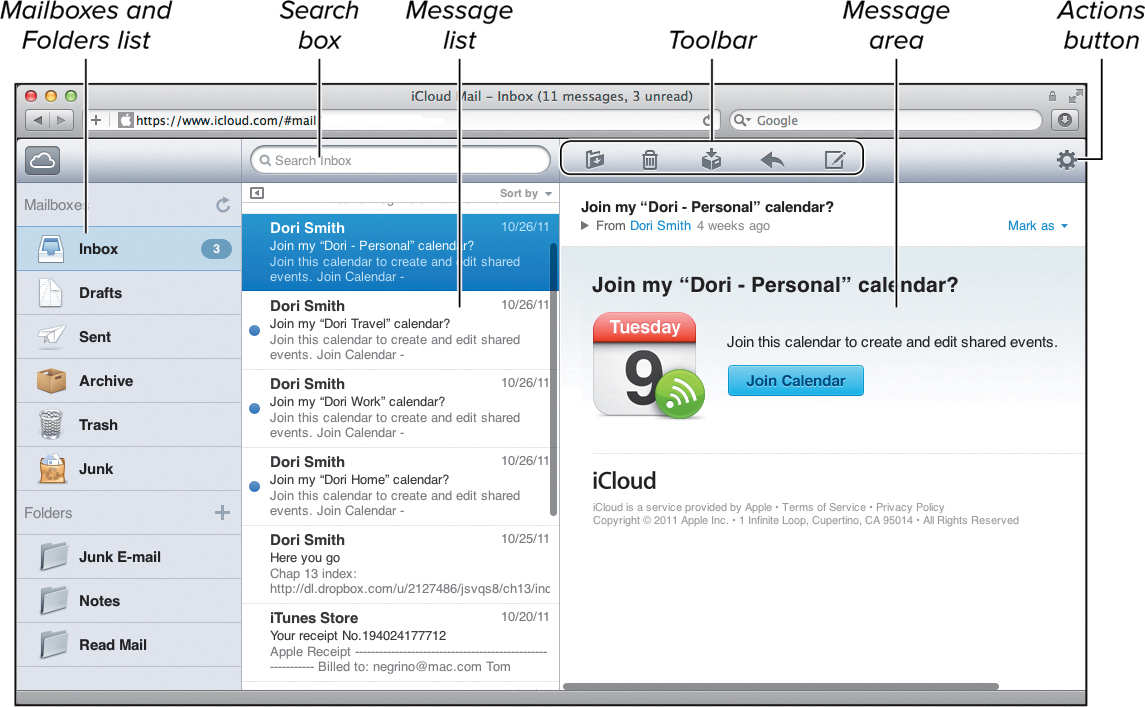
![]() Mail on the iCloud website looks a good bit like Mail on the Mac.
Mail on the iCloud website looks a good bit like Mail on the Mac.
Like the desktop application, you’ll find a Mailboxes and Folders list; a message list; a message area; a search box; and a toolbar that allows you to create and work with messages. The Actions icon, which looks like a gear in the upper right corner of the window, allows you to customize the behavior of the web application and apply actions to individual messages.
If you’re wondering about spam, I’m happy to report that Apple has generally got a pretty good set of spam filters. On my iCloud account (and before that on my MobileMe account) spam rarely gets through to my Inbox. And from a security standpoint, iCloud Mail uses the HTTPS protocol, which encrypts all traffic to and from the website; it’s the same level of security used for online shopping.
Using the Mail Application
Besides working with messages, mailboxes, and folders, Mail lets you customize it so that it works the way you want it to.
To resize or hide the Mailboxes and Folders list or message list
To resize the width of the Mailboxes and Folders list, point to the bar between that list and the message list. The cursor will change to a double-headed arrow ![]() . Click and drag to the right or left to resize.
. Click and drag to the right or left to resize.
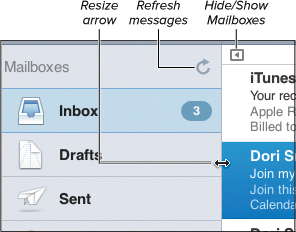
![]() Drag the double-headed arrow right or left to change the width of the Mailboxes and Folders list.
Drag the double-headed arrow right or left to change the width of the Mailboxes and Folders list.
or
To resize the width of the message area, point to the bar between the message list and the message area. The cursor will change to a double-headed arrow. Click and drag to the right or left to resize.
or
To hide the Mailboxes and Folders list altogether, click the Hide/Show mailboxes toggle button. Click it again to display the list again.
To view messages
1. In the Mailboxes and Folders list, click the mailbox or folder whose contents you wish to view.
The contents of the message list will change to display the contents of the selected mailbox or folder.
2. In the message list, click the message you wish to view to show its contents in the message area ![]() .
.
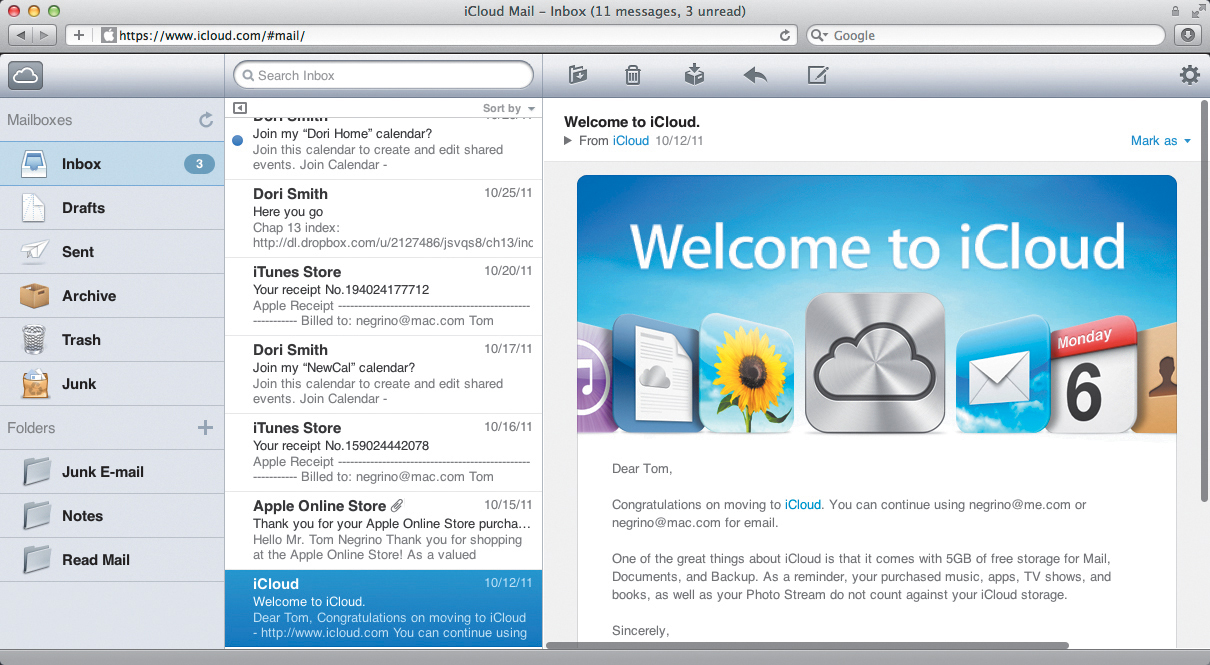
![]() Clicking a message in the message list shows its contents in the message area.
Clicking a message in the message list shows its contents in the message area.
or
In the message list, double-click the message you wish to view to open the message in a new window.
Working with Email
When working with email, you want to receive it, file it, write replies to emails you get, sort it so that you can see your message list in some comprehensible fashion, and search your email to find mail that matches a particular keyword. The iCloud Mail application handles all these needs with aplomb.
Many of these features use the toolbar at the top of the message list ![]() . Let’s take a closer look at the functions of each of the toolbar icons.
. Let’s take a closer look at the functions of each of the toolbar icons.
• Move to Folder takes a selected message and moves it to one of the other folders in the Mailboxes and Folders list.
• Delete moves the selected message to the Trash mailbox. Messages in the Trash are automatically deleted after 30 days. You can also immediately delete the contents of the Trash mailbox by clicking the Actions icon in the upper right corner of the window and choosing Empty Trash from the pop-up menu.
• Archive moves the selected message to the Archive mailbox. Each account you have has its own Archive mailbox. Use Archive when you want to move something out of the Inbox—to get it out of your way—but you still want to be able to easily search for that item.
• Reply, Reply All, Forward allows you to reply to an incoming message, reply to all addressees for that message, or forward that message to a new recipient.
• Compose allows you to create a new message.

![]() You’ll use the toolbar to do a lot of your work with email messages.
You’ll use the toolbar to do a lot of your work with email messages.
When you first sign in, iCloud checks for new messages automatically, but if you’re working in the application for a while and you want to recheck manually, click the refresh icon at the top of the Mailboxes and Folders list ![]() . You can tell a message is unread because it has a blue dot next to it.
. You can tell a message is unread because it has a blue dot next to it.
To compose new mail
1. In the toolbar, click the Compose button.
A new message window opens ![]() .
.
![]() You’ll compose new messages in the New Message window.
You’ll compose new messages in the New Message window.
2. Begin typing the recipient’s name in the To field. If the recipient is in your Contact list, a pop-up menu with matching addresses will appear. Choose the recipient you want from the pop-up menu, then press the Return key.
3. (Optional) To add additional recipients to the To field, click the blue plus in a circle icon at the right edge of the To field, then choose additional recipients.
4. (Optional) To add CC recipients, add them to the CC field.
5. Enter the email subject in the Subject field.
6. Type the message body.
7. (Optional) You can use the Style toolbar to style text in your message by changing the font, font size, font color, adding bold, italic, or underlined text, changing the justification, adding a bulleted or numbered list, changing the text indent, adding hyperlinks, or adding file attachments.
By default, iCloud mail is HTML mail, which supports this sort of text styling.
8. When you are done composing your message, click the Send button.
Tip
If you click the Save button at the right edge of the Style toolbar, it saves the message as a draft, and files a copy of the message in the Drafts mailbox. You can then close the message window without sending the message and return to it later to finish it up.
To reply to or forward mail
1. Click to select a message in the message list.
2. In the toolbar, click the Reply, Reply All, Forward button.
A pop-up menu appears with the various choices ![]() .
.

![]() The pop-up menu in the toolbar gives you your choices of Reply, Reply All, or Forward.
The pop-up menu in the toolbar gives you your choices of Reply, Reply All, or Forward.
3. Pick the choice you want from the pop-up menu, and a new message window appears, by default with the contents of the message you’re replying to already in the message body as a quotation.
4. (Optional) If you are forwarding the message, enter the new recipient in the To field.
5. Enter your reply, or a message you want to add if you are forwarding the original mail, then click the Send button.
1. In the message list, click to select the message you want to file.
2. Do one of the following:
• Click the Move to Folder button in the toolbar, then choose one of the folders from the resulting pop-up menu.
• Drag the message from the message list to one of the folders in the Mailboxes and Folders list.
• Click the Archive button in the toolbar to move the selected message to the Archive mailbox.
Tip
You can move multiple contiguous messages in the message list by clicking the first message, holding down the Shift key, then clicking the last message. All messages in between will be selected. Then you can drag them or use one of the toolbar buttons to move them as a group. If you want to move noncontiguous messages in the message list, hold down the Command key and click the messages you wish to move before dragging or using the toolbar buttons.
To add a new folder
1. At the top of the Folders section of the Mailboxes and Folders list, click the plus button.
A new folder will appear in the Folder list, ready to be named ![]() .
.
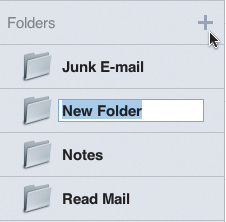
![]() When you click the plus button, the new folder appears, ready to be named.
When you click the plus button, the new folder appears, ready to be named.
2. Type the name of the new folder, then click anywhere else in the window.
Tip
You can drag one folder into another to make it a subfolder. To move a folder out of another folder, drag it to the Folders header in the list.
1. Click to select the folder in the Mailboxes and Folders list.
2. Click the Actions button at the upper right corner of the window, then from the resulting pop-up menu, choose Delete Folder.
iCloud will ask you if you’re sure you want to delete the folder and its contents.
3. Click Delete.
Tip
Remember that because your iCloud email account is synchronized across all your devices, folders that you create or delete on the website will also appear or disappear on the rest of your devices.
To mark messages
1. Click to select one or more messages from the message list.
2. Click the Actions button in the upper right corner of the window.
3. From the resulting pop-up menu ![]() , choose Unread, Flagged, or Junk Mail in the Mark as section.
, choose Unread, Flagged, or Junk Mail in the Mark as section.
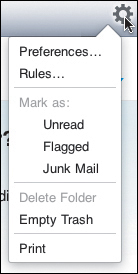
![]() You mark messages from the Actions pop-up menu.
You mark messages from the Actions pop-up menu.
Choosing Unread returns a message’s state to unread if you’ve already looked at it. Choosing Flagged adds a flag icon to the message, which you can later use for sorting purposes. And choosing Junk Mail moves the message to the Junk folder.
Tip
If you’ve accidentally moved mail to the Junk mailbox, you can click a message in the message list for that mailbox and the menu choice in the Actions pop-up menu will change to Not Junk Mail. Choosing that moves the message back to your Inbox.
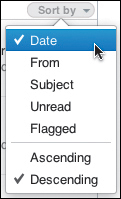
At the top of the message list, click the Sort by button. From the resulting pop-up menu ![]() , choose how you want to sort the contents of the message list. Your choices are by Date, From, Subject, Unread, or Flagged. You can also choose Ascending or Descending order.
, choose how you want to sort the contents of the message list. Your choices are by Date, From, Subject, Unread, or Flagged. You can also choose Ascending or Descending order.
![]() Choose your Sort by criteria.
Choose your Sort by criteria.
The message display in the Message list changes according to the sort order you picked.
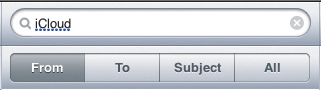
To search for messages
1. In the Mailboxes and Folders list, click the mailbox or folder that you wish to search.
Unfortunately, you can’t search your entire mail system at once.
2. Click in the Search box, and enter your search term.
3. (Optional) When you click in the Search box, an additional toolbar appears allowing you to narrow your search to the From, To, Subject, or All fields in the messages ![]() . Click one of these toolbar buttons to narrow your search.
. Click one of these toolbar buttons to narrow your search.
![]() When you click in the Search box, you have the option of narrowing your search by one of four criteria.
When you click in the Search box, you have the option of narrowing your search by one of four criteria.
4. Press the Return key.
iCloud displays the matching messages in the message list.
Tip
Although you can’t search all of your Mailboxes and Folders simultaneously, iCloud does allow you to search in the contents of the messages, which is an improvement over MobileMe.
To add contacts from incoming mail
1. In a message list, click to select the message with a contact you wish to add to your iCloud Contacts list.
2. In the message, click the sender’s email address, and then click Add in the resulting popover ![]() .
.
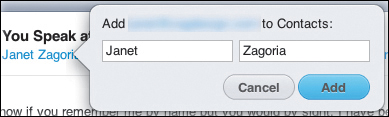
![]() Click an email address in an incoming message to add that person to your iCloud Contacts list.
Click an email address in an incoming message to add that person to your iCloud Contacts list.
To print a message
1. Click to select a message from the message list.
2. From the Actions pop-up menu, choose Print.
The message will open in a new window and the Print dialog for the system you’re working on will appear. Choose the printing options, then click Print.
Working with Mail Preferences
The Actions menu has a Preferences choice, which leads you to a window with five tabs: General, Addresses, Composing, Rules, and Vacation ![]() . In the sections below, we’ll go through each of these Preferences tabs.
. In the sections below, we’ll go through each of these Preferences tabs.
![]() The iCloud Mail application has many useful preferences.
The iCloud Mail application has many useful preferences.
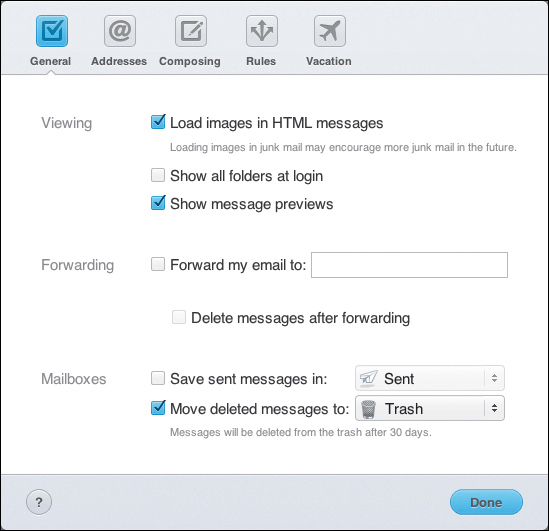
To set General preferences
1. Click the Actions button, then choose Preferences.
2. Click the General tab to show the general preferences ![]() .
.
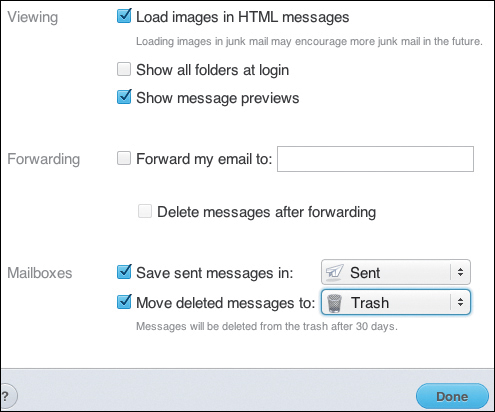
![]() Choose the preferences you want from the General tab.
Choose the preferences you want from the General tab.
3. Choose one or more of the following:
• Load images in HTML messages shows you all images in messages. If this is unchecked, you won’t see images in HTML mail unless you click a Load Images button in the message.
• Show all folders at login shows you all the folders in the list when you sign in to iCloud mail. If you have a lot of folders, you might want to turn this off so that only the top level folders appear in the list and you don’t have to scroll your browser window to see everything.
• Show message previews tells the iCloud mail application to show the first couple of lines of each message in the message list. This is one of the default choices, and I find it extremely useful.
• Forward my email to allows you to send all of your incoming email to another address. If you have an assistant who also monitors your mail, you might want to use this option. You’ll need to select the checkbox and enter the forwarding email address.
• Delete messages after forwarding erases your incoming messages after they have been forwarded to the alternate email address.
• Save sent messages in allows you to pick the folder where sent messages are automatically filed from the pop-up menu. This is off by default, which makes no sense to me. Why wouldn’t you want copies of message that you send? The only reason I can think of is that an outgoing messages count against your iCloud storage quota.
• Move deleted messages to allows you to choose the folder where deleted messages are sent, usually the Trash folder. A message moved to the Trash is automatically and permanently deleted after 30 days.
1. Click the Actions button, then choose Preferences.
2. Click the Addresses tab ![]() .
.
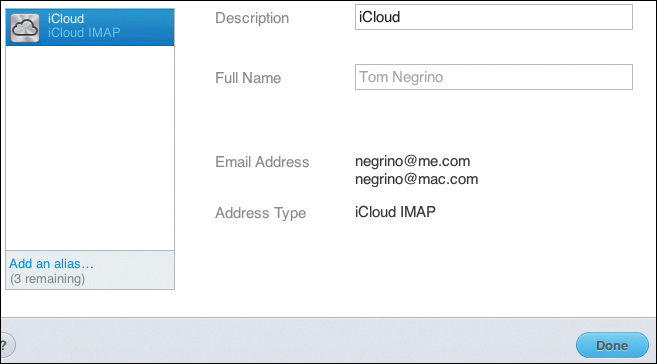
![]() You can add new email addresses in the Addresses tab.
You can add new email addresses in the Addresses tab.
3. Click the Add an alias link to add an email alias (iCloud allows you to have up to three aliases), which is a secondary me.com address that points to your main me.com address. Email sent to one of the aliases is delivered to your main account. Here’s how it might work in practice: my main iCloud account address is [email protected]. But I might also create an alias of [email protected].
4. In the Alias field, add the alias you want to you (you don’t need to enter the me.com part).
5. Click OK. The site checks to see if the alias is already in use; if it is, the alias you asked for will be rejected, and you’ll be prompted for a new one.
6. Click Done.
The new alias appears in the Addresses Preferences pane.
Tip
You can use an alias as the From address in outgoing mail, if you want to keep a particular email address private. Replies will go to the alias.
1. Click the Actions button, then choose Preferences.
2. Click the Composing tab ![]() .
.
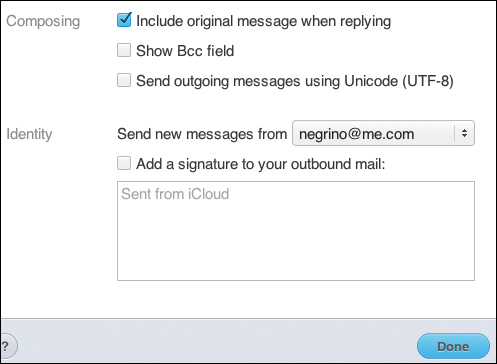
![]() You can fine-tune the way you send email in the Composing section of Preferences.
You can fine-tune the way you send email in the Composing section of Preferences.
3. Choose one or more of the following:
• Include original message when replying includes the entire message that you’re replying to as a quote. I usually prefer to edit the quote down to just the essentials, because I think that it makes email conversations easier to read.
• Show Bcc field makes the blind carbon copy field always appear in the Add Message window.
• Send outgoing messages using Unicode (UTF-8) tells Mail to allow your messages to contain non-Latin characters, such as Hebrew, Arabic, or Chinese.
• Send new messages from sets Mail to automatically use the email address or email alias you choose from the pop-up menu for new messages.
• Add a signature to your outbound mail allows you to append a message to the end of every mail that you create. For example, you might want to include your contact information.
Tip
Signatures that you set up on the iCloud website don’t synchronize with email signatures from Mail on the Mac or on your iOS devices, and vice versa.
1. Click the Actions button, then choose Preferences.
2. Click the Rules tab ![]() .
.
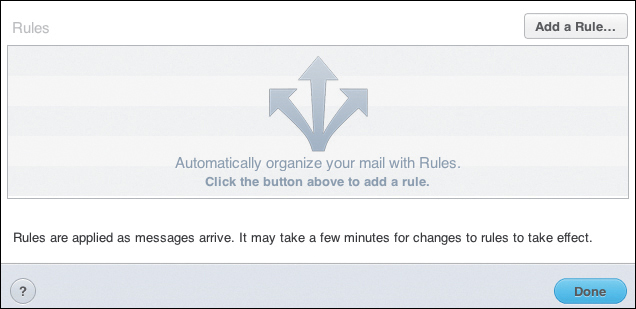
![]() iCloud doesn’t start with any Rules. You must add them.
iCloud doesn’t start with any Rules. You must add them.
Mail rules run on the server and can automatically run actions on incoming messages. You set some criteria, and then an action to automatically occur when that criterion is met. Let’s say that I have a mail folder called Family. I can set up a rule so that all incoming email from my wife automatically gets routed to the Family folder.
3. Click the Add a Rule button.
4. In the resulting popover, set the If criterion and the Then action to be taken ![]() . You don’t have a lot of choices here; in the If section, you can trigger an action on the From, To, CC, or Subject fields. In the Then section, your choices are Move to Folder, Move to Trash, or Forward to a different email address.
. You don’t have a lot of choices here; in the If section, you can trigger an action on the From, To, CC, or Subject fields. In the Then section, your choices are Move to Folder, Move to Trash, or Forward to a different email address.
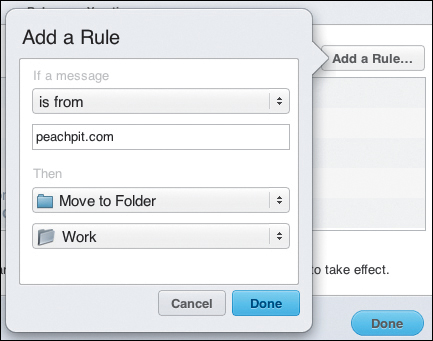
![]() Choose the criteria you want for your Rule in the popover.
Choose the criteria you want for your Rule in the popover.
5. Click Done.
The rule that you created appears in the Rules tab of Preferences.
Tip
The Rules ability of the iCloud website is fairly rudimentary; although you can set up multiple rules, you can’t set up multiple criteria or actions for a single rule, which makes it much less powerful than the Rules ability in Apple Mail, Gmail, and other systems.
1. Click the Actions button, then choose Preferences.
2. Click the Vacation tab ![]() .
.
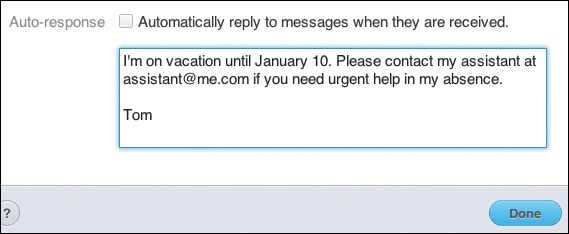
![]() Enter your Vacation message.
Enter your Vacation message.
3. If you want to send out a vacation message, select the Automatically reply to messages when they are received checkbox.
4. Enter a vacation message in the text field, then click Done.
Sending iMessages
SMS text messaging has been around for a long time, and for just as long, the cellular carriers have been making money hand over fist on the feature. It’s widely reported that text messaging costs carriers virtually nothing, since the texts are sent over control channels used for network maintenance. At best, carrier costs have been estimated as 1/1000th of a cent per text message. But they cost you a lot: in October 2011, Macworld magazine compared unlimited text messaging plans for the U.S. carriers (AT&T, Verizon, and Sprint) and found that carriers were charging $20 for unlimited text messaging, or you can pay-as-you-go for $.20 per text message. Anyway you look at it, that’s not a good deal. If you look at MMS (text messages that include pictures or video), the pay-as-you-go rate is $.25 or $.30, depending on the carrier. It’s safe to say that there is an obscene amount of profit in the text messaging business.
iCloud and iOS 5 include a free service called iMessage that allow you to send unlimited messages between you and anyone else who is also using a device with iOS 5 (an iPhone, iPad, or iPod touch) and an iCloud account. You can send photos, videos, locations, and contacts, as well as texts. If you have more than one iOS device, you can start a conversation on one device and continue it on another.
With iMessage, you can send a message to more than one person at a time, and if you do, a reply from one person is seen by everyone on the list. Unlike regular text messages, when your message appears on the recipient’s iOS device, you get a delivery confirmation, and you can tell with a text balloon when the other person is typing a reply.
Of course, if you are signed up for a text plan with your carrier, you can still send text messages over the cellular network. From your standpoint, there’s almost no difference between the two (except for cost, convenience, and better performance), because both standard texting and iMessage are integrated into the iOS Messages app.
To send an iMessage
1. On an iOS device, tap Messages.
2. In the Messages app, either choose a previous recipient, or tap the New Message button in the upper right-hand corner of the screen.
3. (Optional) If you’re sending to a new recipient, enter their name in the To field.
4. If your recipient is eligible for an iMessage, the text entry field will faintly show iMessage ![]() .
.

![]() You can tell you’re in an iMessage conversation because it says iMessage in the text field, and because of the text balloons with the blue background.
You can tell you’re in an iMessage conversation because it says iMessage in the text field, and because of the text balloons with the blue background.
5. Enter your iMessage, then tap the Send button.
Tip
You can tell the difference between an iMessage and regular text messaging in the Messages app easily, because your outgoing text balloons will have a blue background for people who can accept iMessages. For people with whom you are doing regular text messaging, your outgoing text balloon will have a green background (the color of U.S. money, Apple? Real subtle).
Tip
Besides the delivery confirmation you get when the recipient gets your iMessage, you can also get a receipt when they actually read the message. This seems just a bit creepy, until you think about it; it can be nice to know that not only did you send that text to your spouse about picking up some milk on the way home, but that the message isn’t just waiting forlornly in their pocket or purse. To turn on this receipt feature, choose Settings > Messages, then turn on Send Read Receipts.
Tip
iMessage is tied not just to mobile phone numbers, as regular SMS messages are; it’s also attached to email addresses. So any email address that iCloud knows about can receive an iMessage. That’s how you can use iMessage with the iPad or iPod touch, which don’t have mobile phone numbers. In the Receive At section of Settings > Messages, you can specify what email addresses can be used for iMessages. These addresses don’t have to be the ones associated with your Apple ID; if you want, you can use any valid email address, not just a .me or .mac address.