7. Backing up to iCloud
Before the advent of iCloud, backing up an iOS device meant physically connecting it to a computer running iTunes via a USB cable, then letting that connection make a copy of the contents of the device onto your computer. iCloud eliminates the need for that cable, because it allows you to backup the data on your iOS device over a Wi-Fi connection to the iCloud servers. It’s your choice: you can back up over Wi-Fi, or continue your backups via a direct connection to your computer. Naturally, if disaster strikes, you can also restore your data to an iOS device from a previous iCloud backup.
If iCloud’s free 5 GB of storage aren’t enough for you, you can manage the amount of data stored in the cloud, and even purchase more storage if needed.
Understanding and Configuring iCloud Backup
Everyone knows you should back up the data on your computers and mobile devices in case of hardware failure or theft. The problem is that unless the process is made incredibly easy (as in set it and forget it) most people simply don’t back up their stuff. Apple has tried to solve the backup problem with the Mac with Time Machine, and with the introduction of iCloud, backing up your iOS device can now be done wirelessly and automatically, as long as you set it up once.
As part of its synchronization process, iTunes has always backed up your data when you connect your iOS device with a USB cable. Now, Apple uses iCloud to backup your data over Wi-Fi, and all you have to do to make the backup happen is turn it on once, either in iTunes or on your iOS device, be on a Wi-Fi network, connect the device to a power source (which you have to do to recharge the battery anyway), and not be using the device for a while.
Before we jump into setting it up, let’s talk for a moment about what gets backed up. Some of the items that are backed up count against the free 5 GB of storage you get with an iCloud account, and some items do not.
Items that count against the 5 GB of free iCloud storage:
• Data kept inside apps. For example, I have the Amazon Kindle app on my iPad. I have about 60 MB worth of books loaded in the app. That counts against part of my 5 GB storage quota.
• Photos and videos in the Camera Roll.
• Messages, such as SMS, MMS, and iMessages.
• Device settings, such as Mail, Contacts, and Calendar accounts.
• Home screen and app organization information.
• Ringtones.
You get unlimited free storage for:
• Music, apps, books, and TV shows that you purchased from the iTunes Store.
• Items that are in your Photo Stream.
Things that don’t get backed up to iCloud include:
• Music and TV shows you didn’t buy from the iTunes Store (though if you subscribe to iTunes Match, music you didn’t buy from the iTunes Store may still be available on iCloud, but it won’t get backed up, and won’t count against your storage quota).
• Movies.
• Podcasts and audio books.
• Photos that were originally synced from your computer (instead of using Photo Stream).
Your first backup could take a while, depending on how much data is on your mobile device that needs backing up. Because iCloud Backup is smart, subsequent backups only copy items that have been added or changed, so those subsequent backups go much quicker.
After the first backup, the backup happens automatically once a day, when the device is connected to the Internet over Wi-Fi, is connected to a power source, and the screen is locked.
So now we know what does and doesn’t get backed up, and when the backups happen, let’s set up your device for automatic backup, so you need never worry about it again.
To turn on iCloud Backup on an iOS device
1. Choose Settings > iCloud > Storage & Backup.
2. In the Backup section, turn on iCloud Backup ![]() .
.

![]() Turn on iCloud Backup to begin backing up your iOS device via Wi-Fi to Apple’s servers.
Turn on iCloud Backup to begin backing up your iOS device via Wi-Fi to Apple’s servers.
3. In the resulting dialog, tap OK to confirm you want to use iCloud Backup.
4. (Optional) Scroll down on the Storage & Backup screen and tap the Back Up Now button to begin your first backup. Make sure you’re connected to a power source and to Wi-Fi.
To turn on iCloud Backup in iTunes
1. Connect the iOS device to iTunes, then select the device in the sidebar.
2. In the Backup section of the Summary screen, select the Back up to iCloud button ![]() .
.
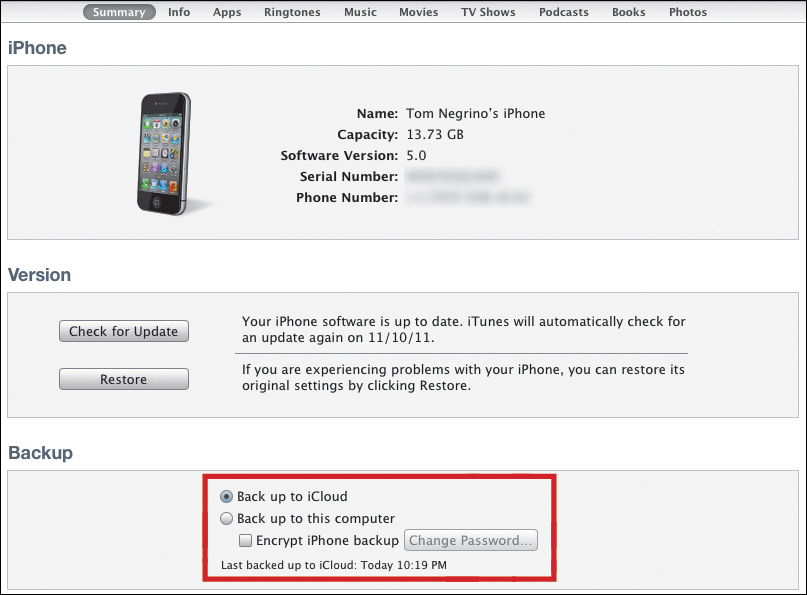
![]() In iTunes, you can choose to either backup to iCloud or to the local computer.
In iTunes, you can choose to either backup to iCloud or to the local computer.
Tip
Once you turn on iCloud Backup, iTunes no longer backs up your iOS device when you sync; it all happens in the cloud.
Restoring an iOS Device from Backup
Restoring an iOS device from a backup is a bit weird. You have very little control over the process. You can only restore to an iOS device that has been wiped clean or is brand-new. The restoration happens as part of the Setup Assistant on a new iOS 5 device.
To restore from an iCloud Backup
1. On an erased or new iOS device, turn it on. The Setup Assistant will automatically run.
2. When you get to the Set Up (device name) screen, you’ll have the option to Restore from iCloud Backup. Tap that choice ![]() , then enter your Apple ID and password.
, then enter your Apple ID and password.
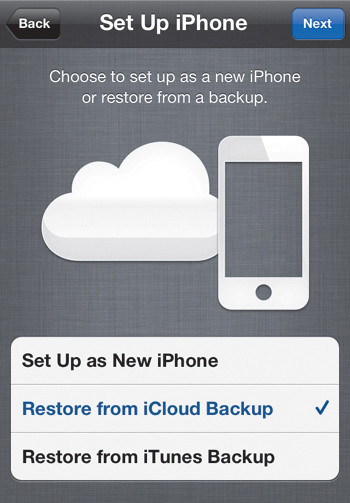
![]() The Setup Assistant gives you the opportunity to restore from an iCloud Backup.
The Setup Assistant gives you the opportunity to restore from an iCloud Backup.
3. From the next screen, which shows the three most recent backups for each of your backup devices, choose the backup you wish to use for the restore, then tap Restore.
The backup will be downloaded, after which your device will restart and restore your settings and data.
Managing Your iCloud Storage
You have some control over the amount of storage that you’re using iCloud. From the iCloud preference pane on Mac or the iCloud control panel on Windows, you can view how much storage you’re using from your free 5 GB allocation, choose to remove some data to free up space, and purchase more iCloud storage space.
Remember, music, apps, books, and TV shows that you purchased from the iTunes Store, and photos in your Photo Stream, don’t count against your 5 GB of free storage.
To manage your iCloud storage on a computer
1. Choose System Preferences > iCloud on the Mac.
or
Choose Start Menu > Control Panel > iCloud on Windows.
The iCloud settings window appears ![]() . At the bottom of the settings window, there is a bar graph showing you how much iCloud storage you have available.
. At the bottom of the settings window, there is a bar graph showing you how much iCloud storage you have available.
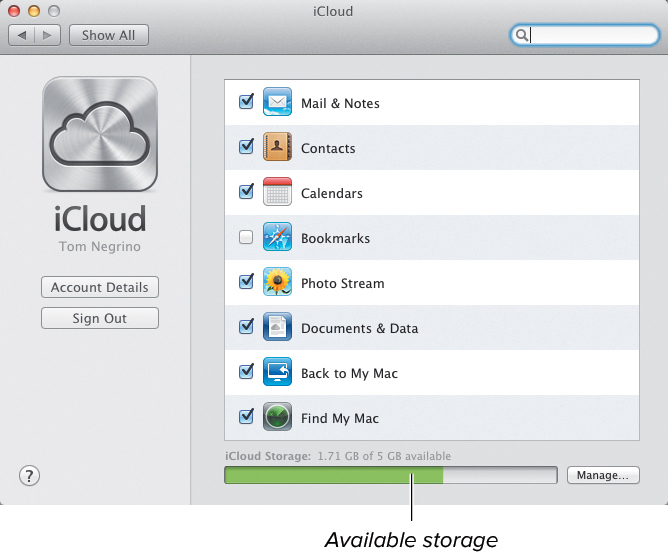
![]() Begin managing your iCloud storage on the Mac in the iCloud pane of System Preferences.
Begin managing your iCloud storage on the Mac in the iCloud pane of System Preferences.
2. Click Manage.
The Manage Storage pane appears ![]() . On the left, it lists the different categories of storage you are using in iCloud, and how much space each category is using.
. On the left, it lists the different categories of storage you are using in iCloud, and how much space each category is using.

![]() You can see what is taking up room in your iCloud storage in the Manage Storage pane.
You can see what is taking up room in your iCloud storage in the Manage Storage pane.
3. Click a category to see the documents within it ![]() .
.
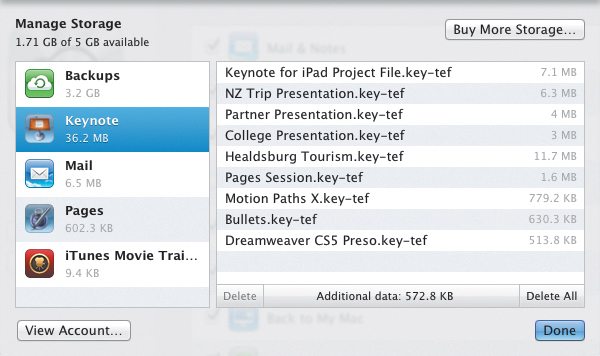
![]() Clicking one of the categories shows you its details.
Clicking one of the categories shows you its details.
4. If you want to delete one of the items within the category, click to select it, then click Delete ![]() .
.
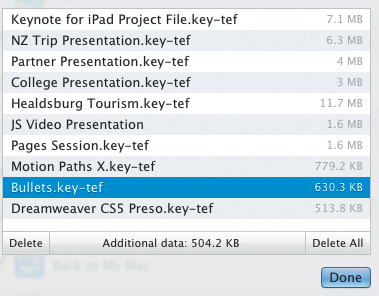
![]() Select an item and click Delete to remove it from iCloud.
Select an item and click Delete to remove it from iCloud.
or
If you want to delete all of the items within the category, click Delete All.
iCloud asks if you are certain you wish to delete, and warns you that the item will be immediately deleted from iCloud and your devices ![]() .
.
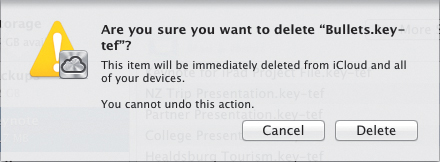
![]() If you’re not sure you want to get rid of that item, this is the time to click the Cancel button.
If you’re not sure you want to get rid of that item, this is the time to click the Cancel button.
5. Click Delete.
The item is deleted and you’ll return to the Manage Storage pane.
6. Click Done.
To manage your iCloud storage on an iOS device
1. Tap Settings > iCloud.
2. At the bottom of the list, tap Storage & Backup ![]() .
.

![]() On an iOS device, begin managing your storage in the iCloud portion of Settings.
On an iOS device, begin managing your storage in the iCloud portion of Settings.
3. On the Storage & Backup screen ![]() , tap Manage Storage.
, tap Manage Storage.

![]() Next, in the Storage & Backup screen, tap Manage Storage.
Next, in the Storage & Backup screen, tap Manage Storage.
On the Manage Storage screen, the categories of storage you’re using appears ![]() .
.
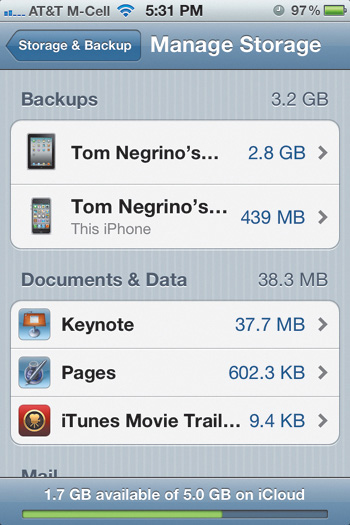
![]() The Manage Storage screen shows you how your iCloud storage is distributed.
The Manage Storage screen shows you how your iCloud storage is distributed.
4. (Optional) On an iOS device, you have a bit more granular control over the storage used for backups on that particular device. In the Backups section of the Manage Storage screen, tap the backup for the iOS device you are working with to choose backup options for the apps you are backing up ![]() . If you want to stop backing up data for a particular app, simply turn it off under the Backup Options section.
. If you want to stop backing up data for a particular app, simply turn it off under the Backup Options section.

![]() You can turn back up on or off for individual apps on your device.
You can turn back up on or off for individual apps on your device.
5. Tap a category to see the documents within it.
6. To delete a particular item, swipe a finger to the right on the item to make the Delete button appear ![]() , then tap Delete.
, then tap Delete.
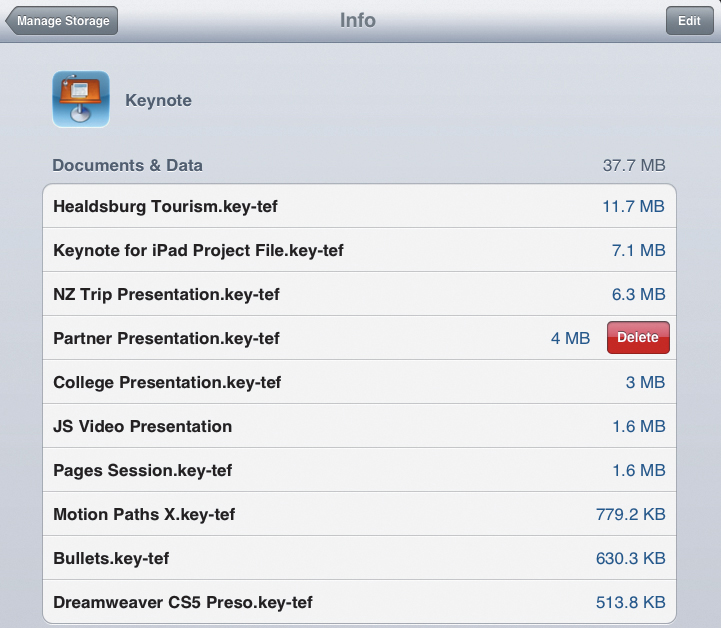
![]() If you like, you can delete individual files from iCloud.
If you like, you can delete individual files from iCloud.
To purchase more iCloud storage
1. Choose System Preferences > iCloud on the Mac.
or
Choose Start Menu > Control Panel > iCloud on Windows.
The iCloud settings window appears.
2. Click Manage.
The Manage Storage pane appears.
3. Click Buy More Storage.
In the resulting dialog ![]() , choose the amount of storage upgrade you wish, then click Next.
, choose the amount of storage upgrade you wish, then click Next.

![]() You can use the iCloud preference pane on Mac or the iCloud control panel on Windows to purchase more storage.
You can use the iCloud preference pane on Mac or the iCloud control panel on Windows to purchase more storage.
Your storage upgrade will be charged to your iTunes account and go into effect immediately, and will automatically renew each year unless you downgrade to the free storage plan before your renewal date. Once you upgrade your plan, if you decide you made a mistake, you can get a full refund within 15 days of an upgrade, or within 45 days after a yearly payment.
Tip
To purchase more iCloud storage on an iOS device, tap Settings > iCloud, then tap the Buy More Storage button. In the resulting dialog ![]() , you’ll get the same storage upgrade options. Choose the option you want, then tap the Buy button.
, you’ll get the same storage upgrade options. Choose the option you want, then tap the Buy button.
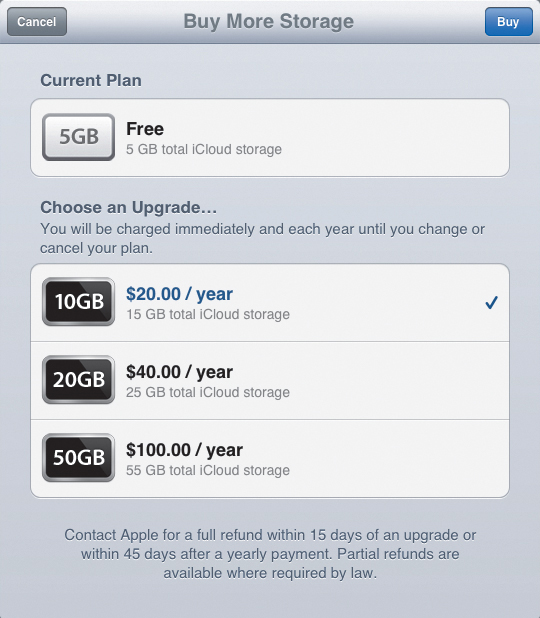
![]() You can also purchase more iCloud storage on an iOS device.
You can also purchase more iCloud storage on an iOS device.