Getting to Know Your iPhone
Your new iPhone is a powerful communications, organizational, and productivity tool that also can be used as a state-of-the-art device to entertain and even educate you. Depending on which iPhone model you’ve purchased, the handset design is slightly different; however, because all iPhone models run the iOS 5 operating system, they operate in basically the same way.
The differences between iPhone models have to do with hardware features, such as the resolution of the built-in cameras, the amount of memory built into the unit, the size and resolution of the touch-screen display, the layout of the phone’s buttons and ports, hardware compatibility with one or more specific wireless service providers, and which microprocessor is used to control the smartphone.
This chapter introduces you to the basic design and layout of the iPhone hardware and explains some of its basic features and functions, in terms of what the various buttons on the device do, how to turn your iPhone on and off, and how to charge your phone’s battery.
Using the Home Button
As you hold the iPhone in your hand, you’ll discover just one circular button located on the front of the device (near the bottom center). This is the Home button (as shown in Figure 2.1). It is used for several important functions, including
• To wake up the iPhone from Sleep mode (which is also referred to as Standby Mode) and to reveal the Lock screen
• To quickly launch the Camera app and access the Music controls directly from the Lock screen
• To return to the iPhone’s Home screen whenever the phone is in use
• To access the iPhone’s Multitasking mode
• To access the Spotlight Search screen from the Home screen.

Figure 2.1 You use the Home button on your iPhone often because it performs a variety of important tasks.
If your iPhone is in Sleep mode, to wake it up, press the Home button once to reveal the Lock screen. When the Lock screen (shown in Figure 2.2) is displayed, using your finger, drag the Slide to Unlock slider from left to right. This unlocks the iPhone and displays the Home screen.

Figure 2.2 When woken up from Sleep mode or powered on, the iPhone always displays the Lock screen. You can fully customize the look of the Lock screen by changing the Wallpaper (see Chapter 5, “Customizing your iPhone”).
When the Lock screen is displayed, if you don’t use the Unlock slider (or another function), within a few seconds, the iPhone returns to Sleep mode.
Another new iOS 5 feature that impacts the look of your Lock screen is the Notification Center app. This app comes pre-installed on your iPhone and monitors all your other compatible apps. It displays alerts, alarms, and notifications within a central location.
When you initially configure the Notification Center app, you can have it display important alerts, alarms, and notifications within a window that appears on your Lock screen.
![]() To learn more about the new Notification Center app and how to customize it within the Settings app, see “Using the Notification Center,” (Chapter 5).
To learn more about the new Notification Center app and how to customize it within the Settings app, see “Using the Notification Center,” (Chapter 5).
If your iPhone is in Sleep mode, a new feature of iOS 5 allows you to wake up the phone and immediately access the Camera app and Music controls directly from the Lock screen. To use this feature, double-tap the Home button to wake it up from Sleep mode.
When you do this, near the top center of the Lock screen, you will discover onscreen controls for the Music app (used for playing music stored on your iPhone). Near the bottom of the screen, next to the unlock slider, you see a Camera icon (as shown in Figure 2.3).
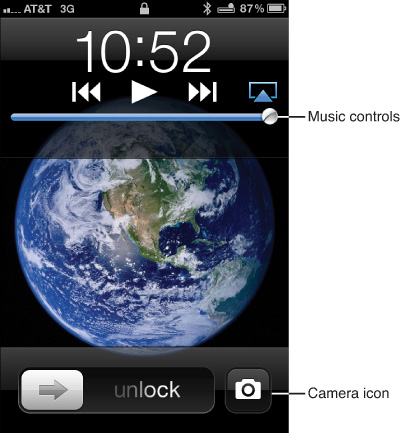
Figure 2.3 If you double-tap the Home button to wake up your iPhone from Sleep mode, the Lock screen offers additional functionality. This is a new feature of iOS 5.
From the Lock screen, tap on the Camera icon to launch the Camera app. You can then use the onscreen Shutter button or the Volume Up (+) button that’s on the side of your iPhone to take a picture.
Alternatively, you can press the Play/Pause, Track Back, or Track Forward buttons that appear to control the music you want to play from the Lock screen.
To unlock the iPhone and access the Home screen, use your finger to slide the Unlock slider from left to right.
As you’re using your iPhone’s various apps, at anytime, to return to the Home screen (shown in Figure 2.4), press the Home button once. When you do so, you exit the app you’re currently using, but depending on the app, it may continue running in the background.
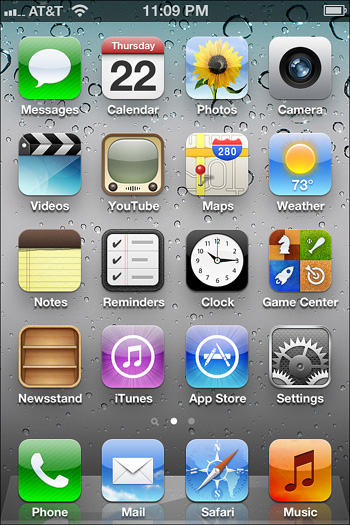
Figure 2.4 The Home screen displays icons for all the apps currently installed on your iPhone. From this screen, you can launch any of these apps.
Thanks to iOS 5, your iPhone has a vastly improved Multitasking mode. It allows you to run multiple apps simultaneously and quickly switch between apps. To access Multitasking mode, from within any app, double-tap the Home button. The Multitasking bar, which is explained shortly, appears at the bottom of the screen.
 SHOW ME Media 2.1—Introduction to Multitasking Mode
Access this video file through your registered Web edition at my.safaribooksonline.com/9780132954310/media.
Using the Spotlight Search Screen
One of the major improvements made to the iPhone thanks to iOS 5 is that many apps now offer functionality that is fully integrated with other apps. This allows apps to share information and data more easily.
To find something quickly within your iPhone, such as a contact from the Contacts app, an appointment scheduled within the Calendar app, an important email, a to-do item being tracked by the new Reminders app, or any other piece of information, you can locate and view it easily using the iPhone’s Spotlight Search screen.
To access the Spotlight Search screen from the Home screen, either tap the Home button once, or from the main Home screen, swipe your finger from left to right.
The virtual keyboard appears at the bottom of the screen, and at the top of the screen is a blank Search field. Enter any search phrase or keyword, based on what you’re looking for, and then tap the Search key on the keyboard.
A listing of related content within your iPhone is displayed based on your search. Tap any of the search result listings to launch the relevant app, such as Calendar, Contacts, Mail, Reminders, or Music, and quickly access the related data, document, or file.
You can customize which apps the Spotlight Search feature will access from within the Settings app. This feature can also help you quickly find and launch an app that’s displayed on one of your Home Screens.
The iPhone’s Virtual Keyboard
The virtual keyboard (shown in Figure 2.5) appears at the bottom of the iPhone’s screen whenever it’s needed. It allows you to use your fingers to manually input data, text, or numbers. Depending on which app you’re using, the virtual keyboard automatically modifies itself. Throughout this book, as you read about how to interact with various apps, you see the different layouts the virtual keyboard can take.

Figure 2.5 This is what the iPhone’s virtual keyboard looks like when you’re composing a tweet (message) within the official Twitter app. The layout of the keys is similar to a typical computer keyboard.
Working with the Sleep/Wake Button
Your iPhone has several power-related modes, including the following:
• Active mode—Your iPhone is turned on and fully functional.
• Sleep mode—Your iPhone’s screen is turned off; however, apps continue running in the background and can automatically access the Internet to access data or information. If you leave your iPhone dormant for a predetermined amount of time, to conserve battery life, it automatically enters into Sleep mode. You can adjust this setting within the Settings app. When you wake up the iPhone, the Lock screen always appears.
• Power Off—All functionality of your iPhone is turned off. No apps are running in the background, and the device cannot access the web automatically. Likewise, you cannot make or accept phone calls. All incoming calls are redirected to voicemail.
• Airplane mode—Your iPhone is fully functional, except that it is not able to access the Internet using a 3G connection or make or receive calls. This also precludes it from accessing your email, allowing you to surf the Web, or sending/receiving text messages, for example. When you place it in Airplane mode, you can manually turn on Wi-Fi functionality to connect to the Internet via a Wi-Fi hotspot. Basically, when in Airplane mode, your iPhone is unable to transmit or receive anything wirelessly via the 3G network. Thus, when it’s in Airplane mode, it can still be used while aboard an airplane. Keep in mind, after putting your iPhone into Airplane mode, you can turn on Wi-Fi connectivity separately from within the Settings app.
Using the Sleep/Wake button that’s located on the top right of your iPhone, you can turn the power of your iPhone on and off, place it in Sleep mode, or wake it up from Sleep mode.
Powering Your iPhone On or Off
When your iPhone is powered off, press and hold down the Sleep/Wake button for 3 to 5 seconds to turn it on. As soon as you do this, the Apple logo appears on your iPhone’s screen, and the device boots up. Within 15 to 30 seconds, the Lock screen appears, and the iPhone is ready to use.
To power off your iPhone completely, press and hold down the Sleep/Wake button for three to five seconds. At the top of the screen, the Slide to Power Off slider appears. Using your finger, move this slider from left to right. Your iPhone shuts down.
When you power off your iPhone, everything you were working on is saved. However, your iPhone is not able to alert you of appointments, accept incoming phone calls, receive text messages, access your email account (and alert you of new incoming messages), or communicate with the Internet in any way.
All incoming calls, for example, go straight to voicemail when your iPhone is powered off. When you turn your iPhone back on, you are alerted of any calls, text messages, alerts, alarms, or notifications, for example, which were received or generated while the phone was inactive.
Placing the iPhone in Sleep Mode and Waking It Up
Instead of powering off your iPhone altogether, most of the time, you can simply place it into Sleep mode (also referred to as Standby mode). While in Sleep mode, the iPhone’s screen is turned off, but the device itself remains fully functional. In fact, your iPhone can wake itself up out of Sleep mode automatically to alert you of an incoming call or text message, for example, or display an alert, alarm, or notification generated by one or more apps.
To manually place your phone into Sleep mode, press the Sleep/Wake button once quickly (as opposed to holding it down). To wake up your iPhone from Sleep mode, either press the Sleep/Wake button or press the Home button. Whenever your iPhone is awakened from Sleep mode, the Lock screen is displayed.
Working with the Mute Switch
Located on the left side of your iPhone, above the Volume Up (+) and Volume Down (-) buttons, is the Mute switch. When it is turned on, all sounds generated by your iPhone are muted. This setting is ideal when you’re in a meeting or quiet location.
If you receive an incoming call, for example, the Caller ID details are still displayed on the iPhone’s screen, and from within the Settings app, you can set the iPhone itself to vibrate. However, you cannot hear the ringtone, and no other alerts, alarms, or sounds are generated by the iPhone.
When the Mute switch is turned on, you see a small orange line within the switch itself, and on the iPhone’s display, a Bell icon with a line through it briefly appears.
![]() To learn how to turn on or off your iPhone’s vibrate mode, see “Customizing Your iPhone’s Sounds,” (Chapter 5).
To learn how to turn on or off your iPhone’s vibrate mode, see “Customizing Your iPhone’s Sounds,” (Chapter 5).
If you receive an incoming call and your phone starts to ring, you can quickly turn off the ringer and send that call directly to voice mail by pressing the Sleep/Wake button on the top of the phone. This temporarily silences your phone, but only for that incoming call. All other sounds generated by your iPhone can still be heard.
Operating the Volume Controls
On the left side of your iPhone are two buttons that control the volume of the sounds, music, ringtones, and alarms generated by your iPhone. If no headphones, headset, or external speakers are connected to the iPhone, these buttons control the volume of the phone’s internal speaker. If you have wireless or corded headphones, a headset, or external speakers connected to your iPhone, these volume buttons control what you hear through the external listening accessory.
When no music or sound effects are playing, pressing the Volume Up (+) icon increases the Ringer volume (what you hear when you receive an incoming call). Likewise, pressing the Volume Down (-) button decreases the Ringer volume.
However, if music or sound effects are playing, the Volume Up or Volume Down buttons control the audio level of whatever is being played. If your headphones or headset that’s connected to the iPhone has its own volume control buttons, they also work to control the sound or music volume of whatever you’re listening to.
Turning the Rotation Lock On and Off
As you begin using your iPhone, you’ll discover that almost all your apps run in either landscape or portrait mode, and that by rotating your iPhone, you can instantly switch between viewing modes.
However, sometimes you may want to turn off this auto screen rotation feature.
![]() LET ME TRY IT
LET ME TRY IT
Turning On or Off Rotation Lock
To turn on or off the Rotation Lock feature of the iPhone’s screen, follow these steps:
1. Double-tap the Home button to enter into Multitasking mode.
2. Using your finger, swipe from left to right along the Multitasking toolbar until the Music controls appear.
3. Displayed to the left of the Track Back, Play/Pause, Track Forward, and Music App icons, you see the Rotation Lock icon. Press this icon once to turn on the Rotation Lock feature. This prevents the screen from switching between landscape and portrait mode when the iPhone is rotated.
4. When Rotation Lock is turned on, a Lock icon with a circle around it appears in the upper-right corner of the iPhone’s screen, next to the Bluetooth and Battery Life indicators.
5. To turn off the Rotation Lock feature, repeat steps 1 through 3.
Getting to Know the Rest of Your iPhone
The four main features on the front of your iPhone are the touch screen, the front-facing camera (on most iPhone models), the phone’s speaker (used to hear whom you’re speaking with when engaged in a phone call, if you have the iPhone held up to your ear), as well as the Home button.
Now, look at the rest of the features you find on the iPhone itself, starting on the bottom of the phone. Here, you find the Dock Connector port, the iPhone’s microphone, and its built-in speaker (for playing music, sound effects, and audio).
The Dock Connector is used to connect your iPhone to accessories and peripherals, as well as to connect the supplied white USB cable, so you can link your iPhone directly to your computer via a USB connection. This is also the cable and connection you use to charge your iPhone’s battery (a topic you focus on later in this chapter).
Unless you have external speakers, headphones, or a headset connected to your iPhone, all sounds and music that your iPhone generates can be heard through the phone’s tiny built-in speaker. Don’t be fooled by its size; the speaker quality is actually impressive. However, if this speaker is covered up by an iPhone case or your hand, for example, the sound generated by the iPhone may get muffled.
The iPhone’s built-in microphone is also located on the bottom of your iPhone. This is used by the Phone app, as well as any other app that captures audio, such as the Camera app when you’re shooting video, or a voice recorder app.
If you have a headset connected to your iPhone, the microphone built into the headset overrides the iPhone’s built-in microphone when you’re participating in a phone conversation, for example.
You can use a headset for your iPhone with the Phone app to keep your hands free while you’re on a call. This way, you can drive without distraction and converse without holding the iPhone up to your ear. This also allows you to use other iPhone apps (or on some iPhone models, surf the Web) while you’re on a call.
A headset typically fits into or over one ear and has a built-in speaker and microphone, allowing you to participate in hands-free conversations. Both corded and wireless headsets are available for the iPhone.
Headphones for your iPhone can be corded or wireless and typically cover both ears to provide stereo sound as you’re listening to music or audio. Headphones do not have a microphone built in, but they often have their own Volume Up, Volume Down, and perhaps a Mute button that override your iPhone’s audio controls.
Now, look at the top of your iPhone. Here, you find the Sleep/Wake button as well as the headphone jack. If you’re using corded headphones, for example, they’d be plugged into your iPhone using this jack. However, a growing selection of wireless Bluetooth headphones and headsets, as well as external speakers, are available for the iPhone, eliminating the need for cords and the use of the headphone jack.
Depending on which model iPhone you’re using, the SIM card tray is located on the top or the side of your iPhone. Not all iPhone models use SIM cards. Whether yours does depends on which wireless service provider your iPhone is compatible with.
If applicable, your iPhone comes with a SIM card already installed. However, if you need to change SIM cards to be able to switch wireless service providers, use the supplied SIM card removal tool (or a small paperclip) to open the SIM card tray. As you do this, be gentle because the SIM card tray and the SIM card itself are delicate.
On the left side of your iPhone, you’ll discover the Volume Up (+), Volume Down (-), and Mute buttons. And finally, on the back of your iPhone (on most models), you’ll discover a second built-in camera, as well as a tiny flash.
![]() To learn more about shooting photos and videos with the iPhone’s built-in cameras, see “Taking and Viewing Photos and Videos,” (Chapter 13).
To learn more about shooting photos and videos with the iPhone’s built-in cameras, see “Taking and Viewing Photos and Videos,” (Chapter 13).
![]() To learn more about using the iPhone’s built-in cameras for FaceTime video conferencing, see “FaceTime Video Conferencing,” (Chapter 6).
To learn more about using the iPhone’s built-in cameras for FaceTime video conferencing, see “FaceTime Video Conferencing,” (Chapter 6).
Aside from using the buttons and ports described in this section, just about everything you do with your iPhone is through interaction with the device via its touch screen and the use of apps.
Connecting an iPhone to Your Computer
Prior to the release of iOS 5, to be able to transfer files between your primary computer and iPhone, you either needed to email that data or directly connect the computer to your iPhone via the supplied USB cable. The iTunes software also needs to be running on your Mac or PC to establish the connection.
Now, with the introduction of Apple’s iCloud service (which you learn more about in Chapter 4, “An Introduction to iCloud”), not only can you easily transfer and share files, documents, data, and content between your iPhone and your primary computer (as well as other iOS devices, including an iPad, iPod touch, and/or Apple TV), you can also wirelessly sync data from apps and wirelessly back up your entire iPhone using iCloud.
Thus, you no longer need to directly connect your iPhone to your primary computer via a USB cable and the iTunes software; although this is still a viable option. In fact, thanks to iOS 5, you now have multiple options for syncing, backing up, and transferring data to and from your iPhone, including
• The traditional iTunes Sync process—With the latest version of iTunes running on your PC or Mac, you can transfer files, data, documents, and content (such as music, videos, movies, photos, eBooks, audiobooks, ringtones, and apps) between your iPhone and primary computer. To do this, you need to connect the devices together using the supplied USB cable. When you back up your iPhone using iTunes Sync, the iPhone’s backup files are stored on your computer’s hard drive.
• The Wireless iTunes Sync process—If you have a wireless home network set up, you can link your primary computer and iPhone together wirelessly (using Wi-Fi connectivity) and then back up your iPhone to your primary computer’s hard drive; sync data between apps running on your iPhone with software running on your computer; and transfer data, files, documents, and content between your iPhone and computer. iTunes still needs to be running on your primary computer, but no USB cable is needed, as long as the iPhone and computer can connect to the same wireless home network.
• iCloud—This online-based file-sharing service allows you to back up your iPhone; sync files and data; and transfer files, documents, data, and content, for example, between your iPhone and the iCloud service. All of your computers and other iOS devices can be connected to the same iCloud account, allowing you to transfer files wirelessly from anywhere, via the Internet. When you use the iCloud Backup feature with your iPhone, those backup files are stored online (as opposed to on your primary computer). Thus, you can later restore your iPhone from virtually anywhere an Internet connection can be established.
![]() To learn more about Apple’s iCloud online service, see “An Introduction to iCloud,” (Chapter 4).
To learn more about Apple’s iCloud online service, see “An Introduction to iCloud,” (Chapter 4).
• Email—Using the Mail app, you cannot directly use email attachments to send files, documents, data, or content from your iPhone. However, from within many of your iPhone’s apps, you can create emails with app-related attachments and share information via email. For example, you can send someone a Pages (word processor) document from your iPhone via email from within the Pages app. Or you can email someone photos stored on your iPhone from within the Photos app.
Beyond using the supplied USB cable to connect your iPhone to your primary computer to transfer information, when your iPhone is connected to your computer via the USB cable, it also recharges the iPhone’s battery.
Charging Your iPhone
Your iPhone is powered using a built-in rechargeable battery that regularly needs to be recharged. How long the battery lasts per charge depends on how you’re using your iPhone. For example, surfing the Web using a 3G Internet connection depletes the iPhone’s battery much faster than listening to music with the Music app.
 TELL ME MORE Media 2.2—iPhone Battery Charging Options
Access this audio file through your registered Web edition at my.safaribooksonline.com/9780132954310/media.
While your iPhone is charging, it can still be used. However, the recharging process will take longer.
There are several ways you can recharge your iPhone, including the following:
• Connecting your iPhone to Your primary computer—This connection is done using the supplied USB cable.
Instead of connecting your iPhone directly to the USB port of your computer, you can use an optional Docking Station, which connects to your computer. As needed, the iPhone can be placed within the Docking Station to charge its battery, sync data or create a backup.
• Connect your iPhone directly to an electrical outlet—This is done using the supplied USB cable. One end of the cable gets connected to the Dock port on the bottom of your iPhone, and the other end gets connected to the supplied AC adapter, which then gets plugged into any electrical outlet. This is the fastest way to charge your iPhone.
Available as an option from several companies, including Energizer (www.energizer.com/inductive), charging mats are also available for the iPhone. The mat is plugged into an electrical outlet, but then the iPhone is simply placed on the charging mat to recharge its battery.
• Connect your iPhone to an external battery pack—Sold separately, you can purchase an external rechargeable battery pack for your iPhone which is portable, which allows you to greatly extend the battery life of your iPhone. The external battery pack connects to your iPhone via its Dock port.
• Connect your iPhone to a car charger—While you’re driving in your car, you can use an optional car charger adapter to power your iPhone. One end of this adapter plugs into the Dock port of your phone, while the other end plugs into the power port/cigarette lighter of your car.
Whenever your iPhone’s battery is charging, the battery life indicator that’s displayed in the upper-right corner of the screen will depict a lightening-bolt within it. Or from the Lock screen, a large Battery icon will be displayed in the center of the screen while the battery is charging.
Especially if you’re constantly out and about, and you use your iPhone heavily, you’ll need to be diligent about keeping its battery charged throughout the day, or you could wind up with a dead iPhone at an inconvenient time, until you can get to a power source to recharge it.
If you’re an average iPhone user, however, if you get into the habit of charging your iPhone each night, the battery should last throughout the day.
TELL ME MORE Media 2.3—Tips for Extending Your iPhone’s Battery Between Charges
Access this audio file through your registered Web edition at my.safaribooksonline.com/9780132954310/media.