12. Creating Keepsakes: Books, Cards, Calendars, and Slideshows

In this chapter, you learn all the physical ways to share your photos by creating photo keepsakes such as books, calendars, and cards that you can create and give to your friends and family. It also explores slideshows, the digital keepsake you can share, and having your photos professionally printed via iPhoto.
→ Creating professional-quality photo books
→ Sending greetings with personalized cards
→ Keeping a beautiful annual outlook with calendars
→ Creating stunning slideshows
When you have all your photos organized and edited, you’ll most likely want to share them with people and not keep them all to yourself. Luckily, iPhoto makes sharing fun and easy. iPhoto lets you share your photos in two ways: electronically and physically. You find these sharing options in the Share button in iPhoto’s toolbar. The physical share options are known as creating keepsakes—that is, printed items you can hold.
Keepsakes and the Create Menu
iPhoto has a single powerful button that makes creating keepsakes easy and fun. This button is called the Share button. It looks like an arrow breaking out of a box.
The Share button has three subsections: Share, Create, and Print. The Share submenu handles all of the ways you can share your photos online (which is covered in Chapter 13, “Sharing Your Photos Digitally”). For now, let’s concentrate on the Create and Print submenus, which are how you create your iPhoto keepsakes.
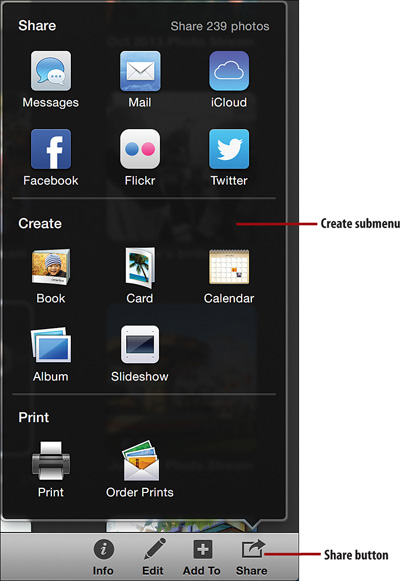
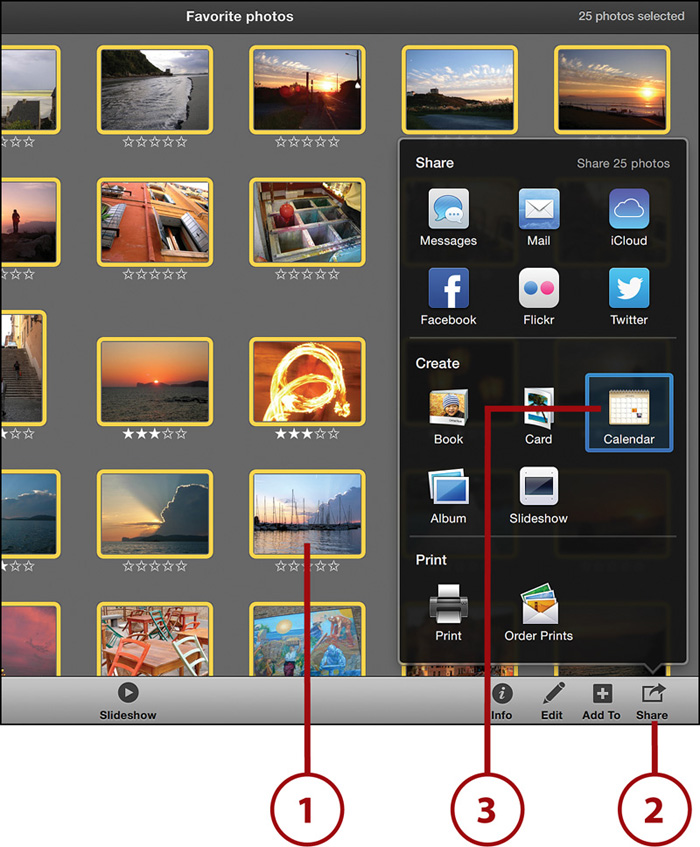
Selecting Book, Card, Calendar, or Slideshow in the Create submenu takes you to that keepsake’s theme chooser screen. You can also create a new keepsake by selecting File, New, and then Book, Card, Calendar, or Slideshow from iPhoto’s menu bar.
Before you delve into creating keepsakes, here’s a little information about how iPhoto displays your keepsakes in the source list.
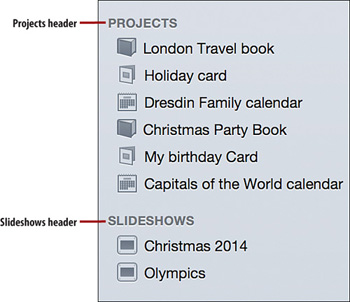
Inside iPhoto’s source list are all the keepsakes you have created sorted under two headers: Projects and Slideshows. Collectively, I refer to all of iPhoto’s Create submenu items as keepsakes, but for some reason Apple has decided to segregate slideshows from books, cards, and calendars. This results in Books, Cards, and Calendars being placed under the Projects heading and Slideshows being under the Slideshows heading.
You can view any keepsakes you’ve created by clicking them in the source list. You can also double-click them to change their names.
If You’ve Created One Keepsake, You’ve Created Them All
After you know how to create one keepsake—a book, for instance—you know how to create them all. This chapter walks through creating all the different kinds of keepsakes, but it starts with books because they are the most popular. The chapter then covers cards, calendars, and slideshows and notes any of the major differences in creating those keepsakes.
Creating a New Book Project
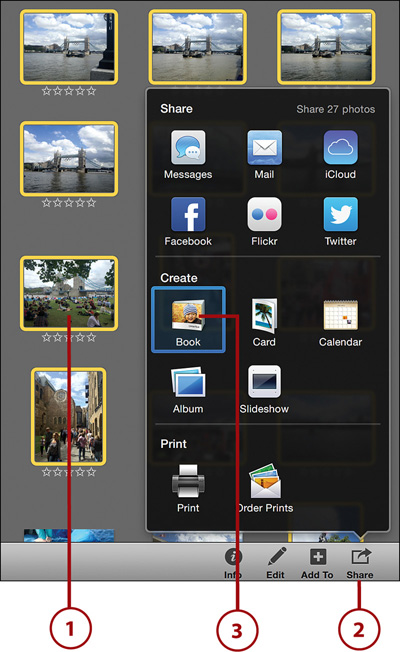
To get started creating a book, you first need to create a new book project.
1. Select the images you want to use in the book. These can be individually selected images or entire albums or events.
2. Click the Share button.
3. Click the Book button. The book theme chooser screen appears.
Nothing’s Ever Free
iPhoto’s ability to enable you to create books, calendars, and cards is great, but remember: You need to pay for the actual item if you want to hold it in your hands. Check out the “Buying Your Keepsakes” section of this chapter for details.
Speeding Up Your Book’s Creation
An easy way to speed the creation of a book is to select all the images you want to use in it and move them into a dedicated album. This way, you can simply select the album and then select Book from the Share menu to create a book with those photos. You avoid having to go through your library and clicking each individual photo you want to use in your book.
Work with the Book Theme Chooser
The book theme chooser has several mini-elements and four main interactive elements. The main interactive elements are the ones that enable you to take action and determine the look of your book:
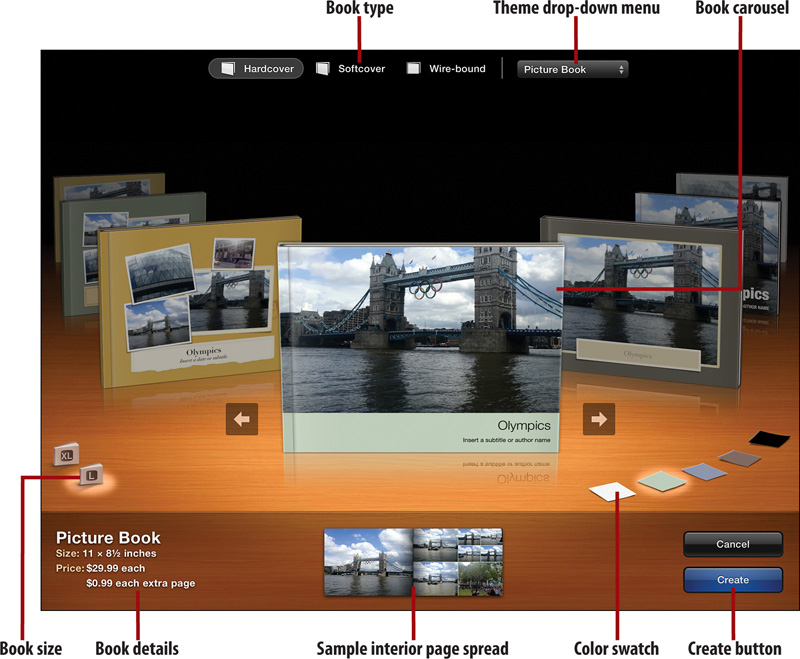
• Book carousel: This is a representation of the books available to you. In the examples shown in the carousel, your photos have already been applied to the covers. The book carousel contains a number of different book themes. Each theme provides you with a different look and layout depending on the one you choose. Some examples of book themes are Travel, Picture Book, Journal, and Photo Essay. Click the books to rotate through the carousel.
• Book type: iPhoto lets you choose the type of book you want to create. Your options include Hardcover, Softcover, or Wire-bound.
• Book size: Books can be made in large or extra-large size.
• Color swatch: These colored squares show the available colors for the background pages and cover of a book.
As you change themes and other selections, such as type, size, and color swatches, the images of the books in the carousel change in real time to show you a preview of what the book is going to look like when printed. Also, as you make your selections, the bottom portion of the theme chooser updates to show you a sample spread of the pages inside the book. The sample spread also lists the size and price of each book.
Build a Book
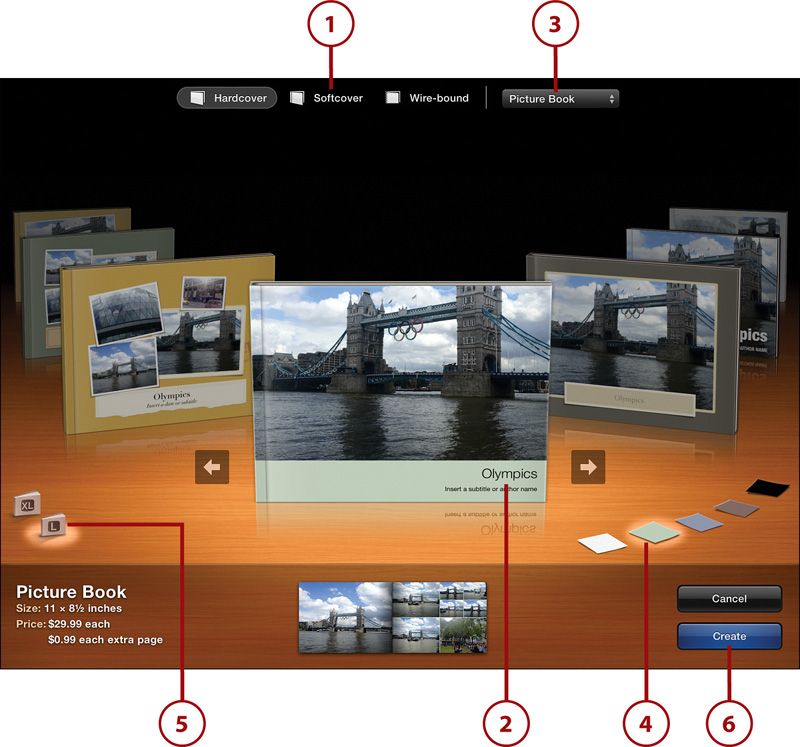
1. Select your book type. Choices are Hardcover, Softcover, or Wire-bound.
2. Select the book’s theme from the book carousel. Or...
3. ...select the book’s theme from the Theme drop-down menu.
4. Select the book’s color from the color swatches.
5. Select the book’s size.
6. Click the Create button.
Work with the All Pages Screen
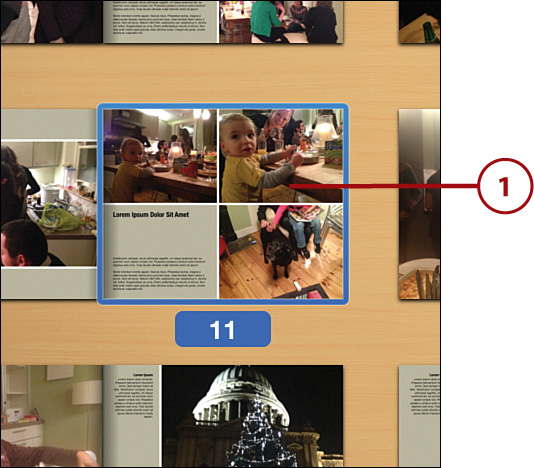
Once you click the Create button in the theme chooser, you are taken to the All Pages screen. The All Pages screen shows you the exact layout of your book from front cover to back cover.
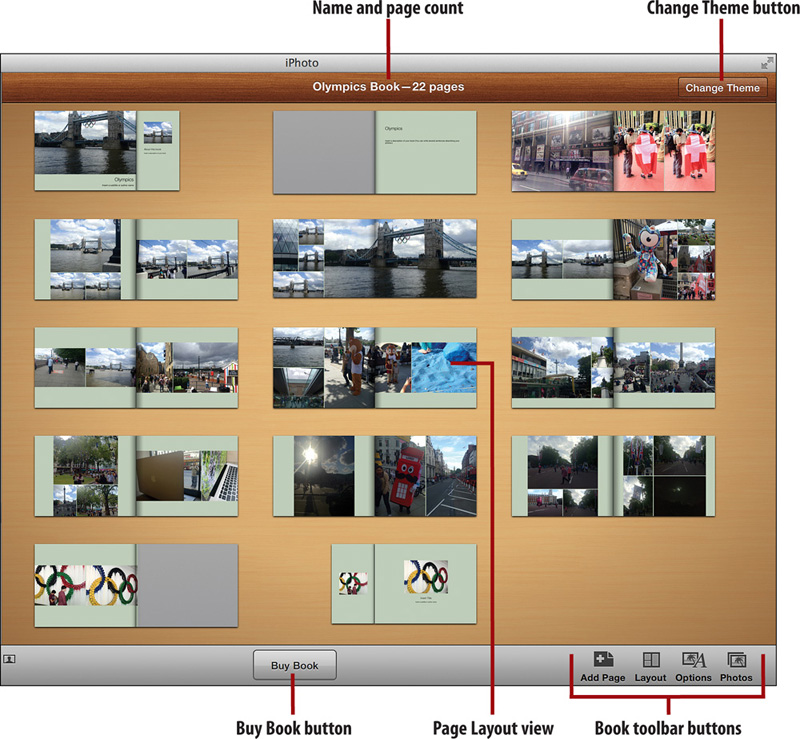
At the top of the All Pages screen, the name of your book project and the number of pages in the book are displayed. You can also click the Change Theme button to return to the theme chooser screen if you don’t like the overall theme of the book.
In the main body of the All Pages screen are your book’s pages. You can click and drag pages around to sort them into the order you want, or you can simply leave everything as it is and click the Buy Book button. However, if you want to do some fine-tuning with your book, the four toolbar buttons in the lower right of the screen enable you to make any changes you want.
Change the Layout of Individual Pages
You can manipulate the individual layout of your book’s pages. There are so many settings and options in the app that it’s almost guaranteed no one will ever produce a book with the exact same look and layout as someone else’s iPhoto book. As a matter of fact, to show every single option and style combination would require that this book be tens of thousands of pages long. Thankfully, you don’t need to see every layout and style option to grasp how to create iPhoto books.
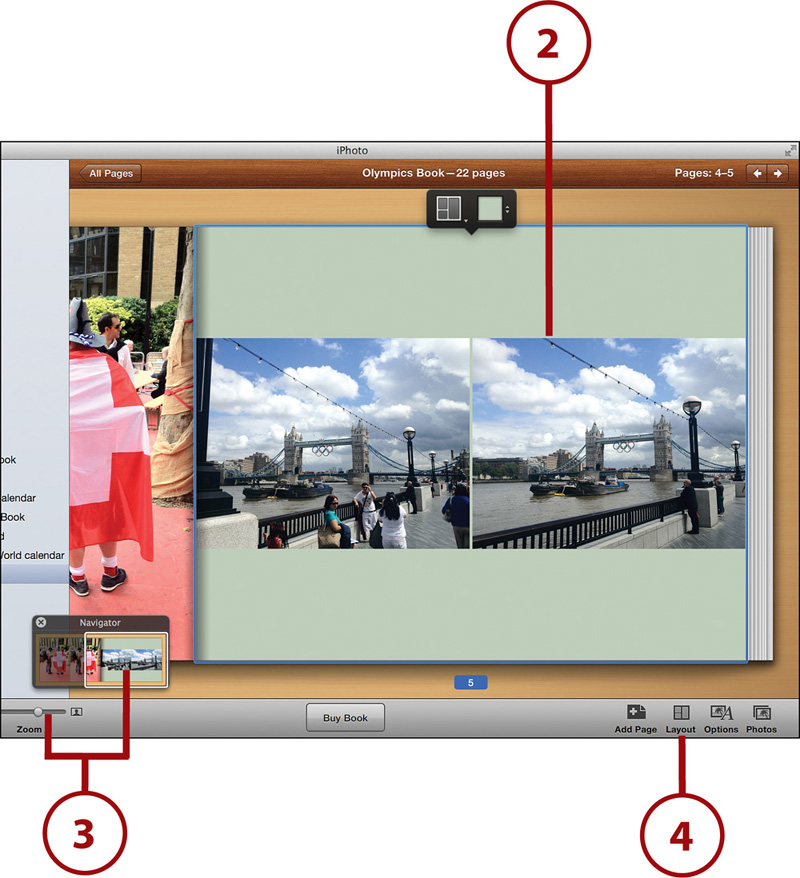
1. Double-click the page you want to change.

2. The selected page is displayed in iPhoto’s window.
3. Use the Zoom slider to zoom in on the elements in the page. A navigator window displays to show you which part of your two-page book spread you are zoomed in to.
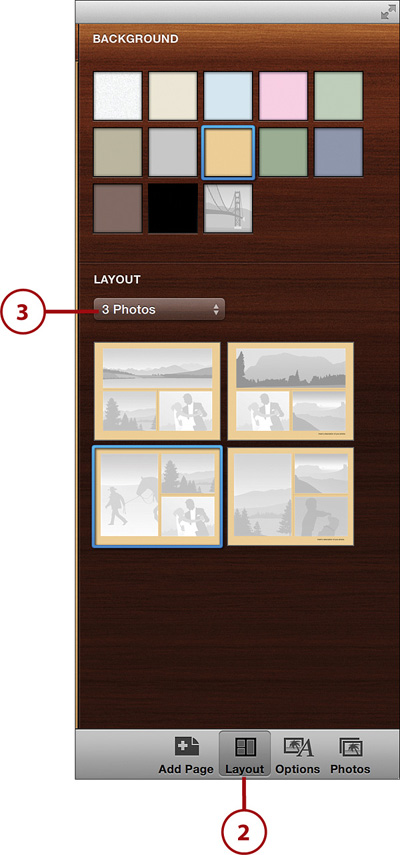
4. Click the Layout button to open the Layout pane.
5. Select the color of the page you want as the background behind your pictures.
6. Select the number of photos you want to appear on the page, or the type of page you want it to be. Page types include text, maps, spreads, and even blank pages.
7. Click a thumbnail that has the organization you want on it.

Editing on the Page
You actually don’t need to use the Layout, Options, or Photos buttons at the bottom of the Books toolbar. You can completely edit your book’s pages on the individual page’s screen itself. Simply select a page to bring up it’s pop-up layouts and color theme menu or select an image on the page to zoom in and out of it.
Add New Photos to a Page
If you’ve changed a page’s layout and now have some extra space for additional photos, adding those photos to a page is easy.
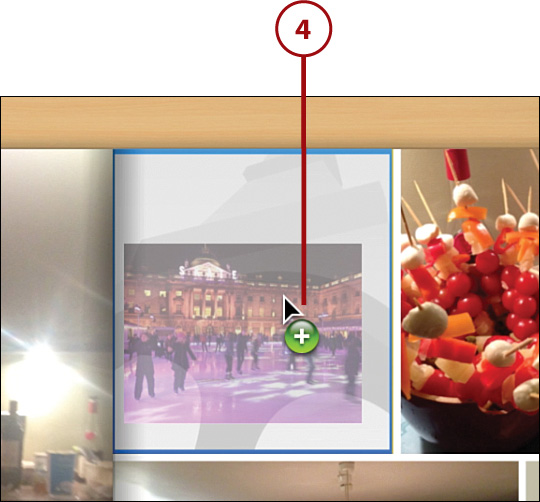
1. Double-click the gray placeholder for the new photo.
2. The Photos pane opens.
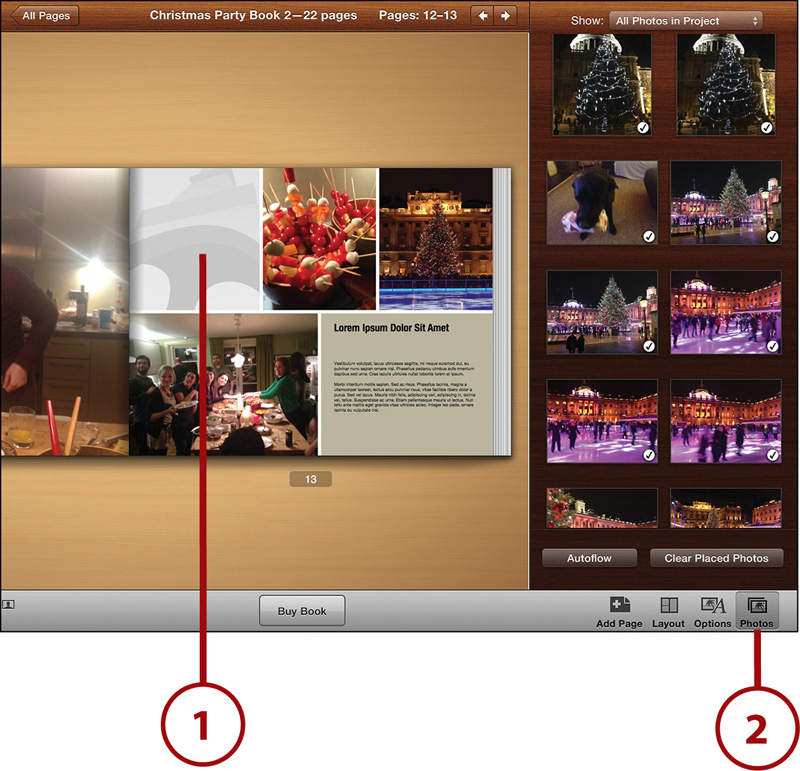
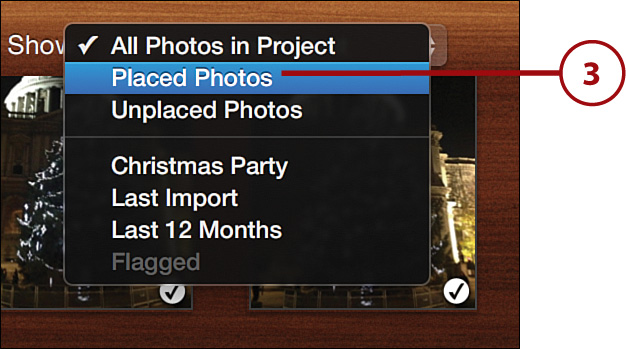
3. Use the Show menu to select what photos you would like to view. Options include All Photos in Project, Placed Photos, Unplaced Photos, the album you are currently working in, all photos from the last 12 months, flagged photos, and more.
4. Drag a photo from the sidebar into the photo placeholder.
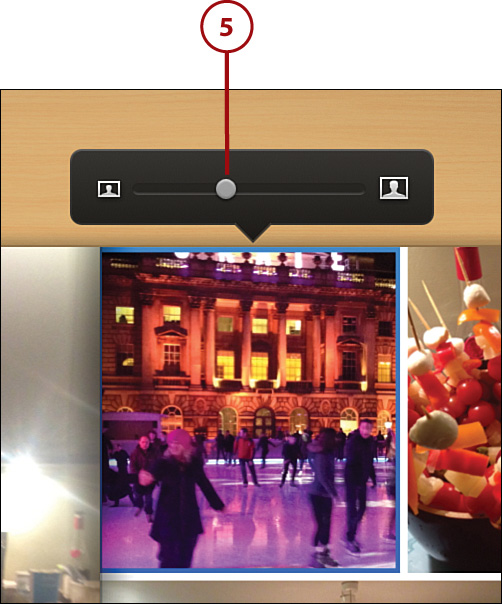
5. Zoom in on the photo using the Zoom slider.
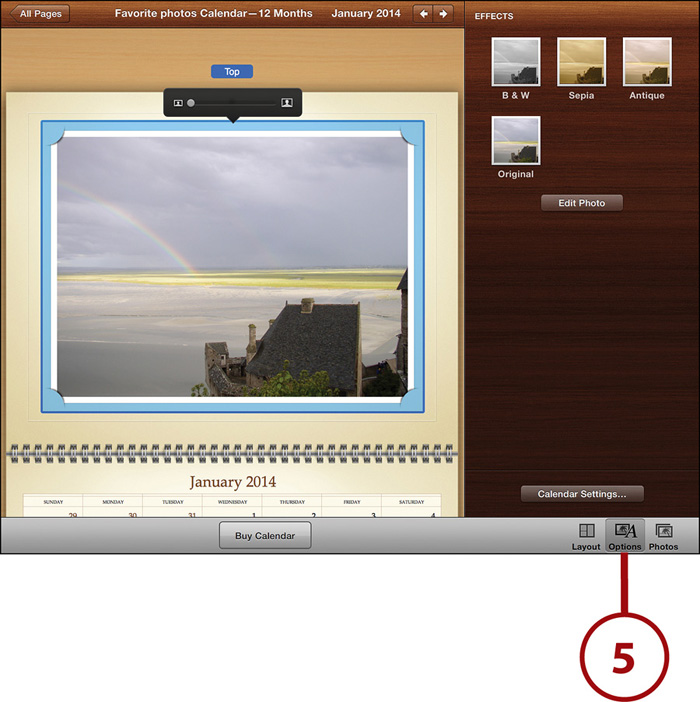
Edit Photos on a Page
You aren’t limited to just rearranging your photos and their layout on an individual page. You can also edit and manipulate individual photos on the page as well.
1. Double-click the page you want to change.
2. Double-click the photo you want to edit. The Option pane opens. Or...
3. ...click the Options button to open the Options pane and then select any photo in the book you want to edit.
4. Select a border to apply to your photo.
5. Choose an effect to add to the photo. Options include B&W, Sepia, or Antique filters.
6. Click the Edit Photo button to go to the regular Edit mode in iPhoto for that image.
7. Use the Zoom slider to zoom in or out of the photo and then click and drag the photo around to place it in your desired position.

Clear and Autofill All Photos in Your Book
When creating a new book based on a selection of photos (such as an event or album), iPhoto automatically populates the book’s pages with the photos from that album. It doesn’t do this randomly, however. iPhoto features your higher-rated photos as larger images on the page and also knows to center images with faces in them, so your spouse’s face, for example, isn’t going to get cut off in the photograph.
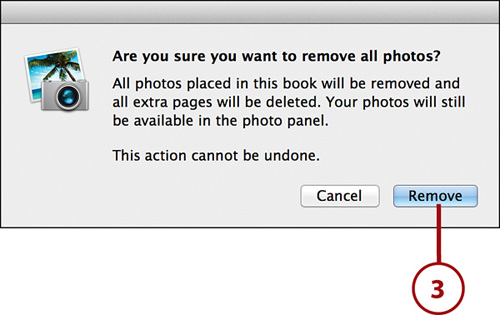
However, as you’ve seen, you can easily manipulate and change the layout of entire pages or individual photos. But if you think you’ve done too much and got a bit lost, you can also wipe the entire book clean and start new.
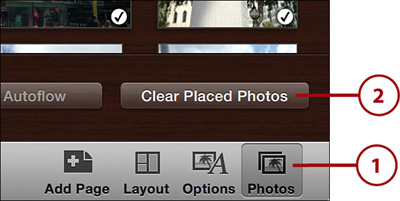
1. Click the Photos button in the toolbar.
2. Click Clear Placed Photos.
3. Click Remove to confirm that you want to remove all the photos from your book.
4. To add the photos again manually, click and drag them from the Photos pane to the pages of your choosing. Or...
5. ...click the Autoflow button if you decide iPhoto had laid out the photos better than you did.
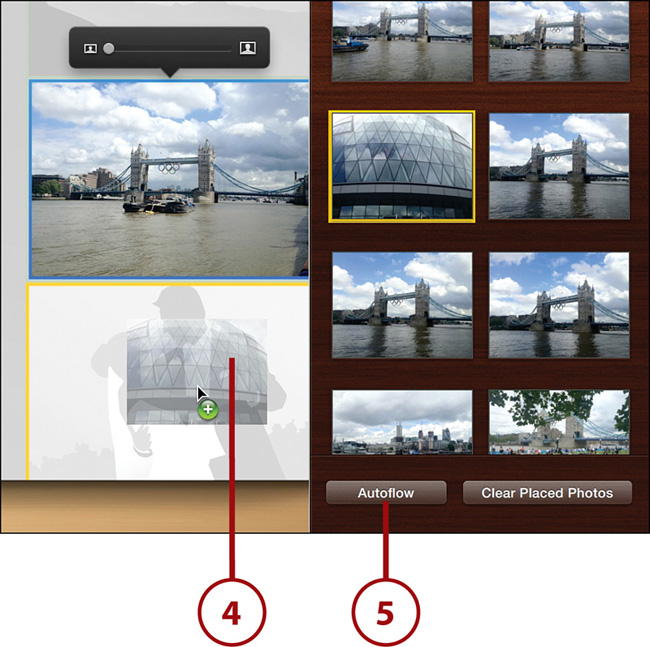
6. Click Autoflow to confirm that iPhoto should automatically fill the remaining pages with photos you have not used.

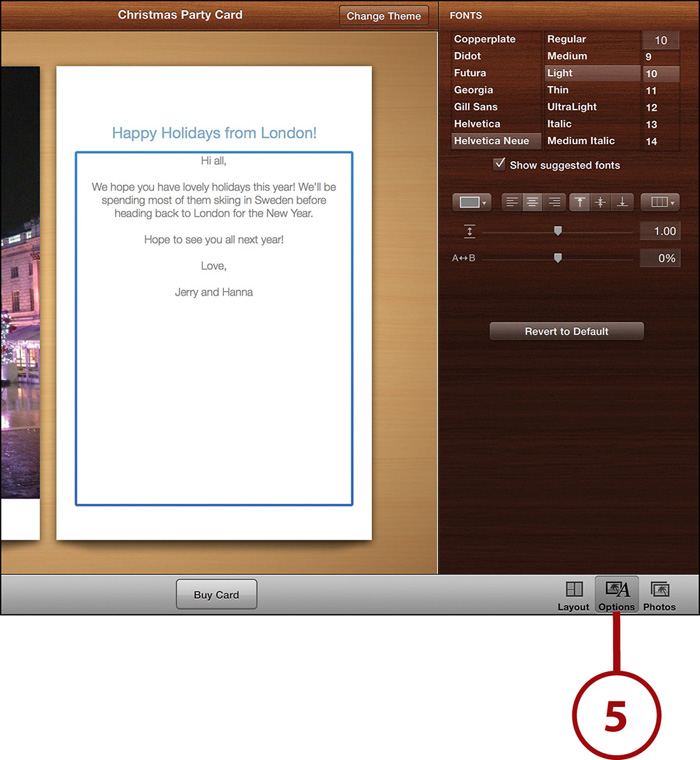
Format Text
Many book themes enable you to add text to pages—and alter the placeholder text in keepsakes.
1. Find a page with a text field, click in it, and start typing.
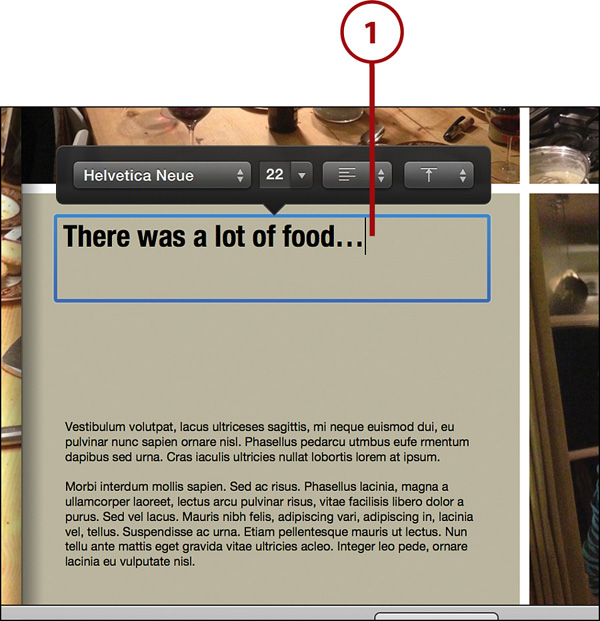
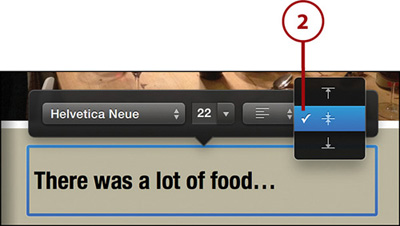
2. Select the text and then choose options from the drop-down menu. From the Quick Format menu, you can change font, text size, and horizontal and vertical alignments. Or...
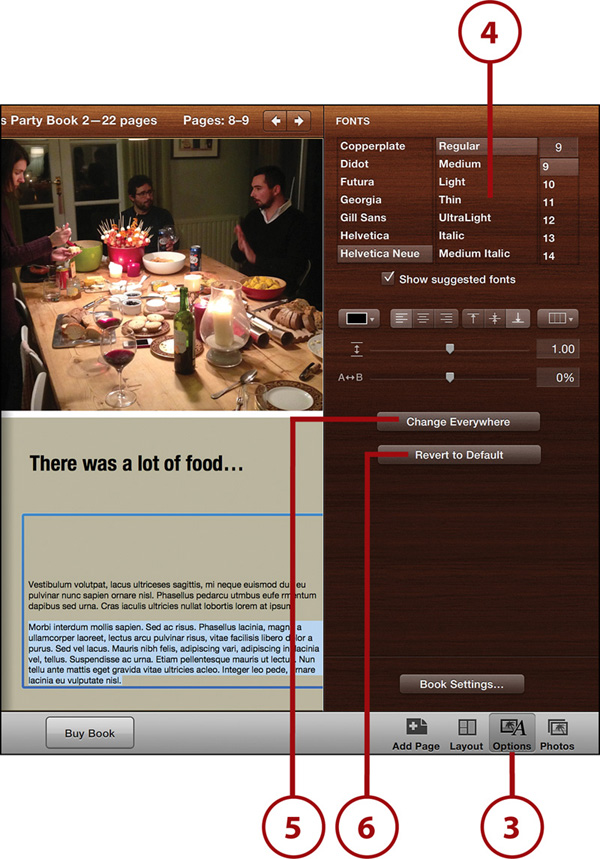
3. ...select text and click the Options button to open the Options pane and display all of the additional text-formatting features iPhoto offers.
4. Make your changes using the complete assortment of fonts, text sizes, text colors, alignments, columns, kerning, and spacing options available to you.
5. (Optional) Click the Change Everywhere button if you want to apply the same formatting to all the text in the project.
6. (Optional) Click the Revert to Default button if you’ve changed your mind about your formatting choices. It undoes your selected text settings and applies the book theme’s default text settings to your text.
Formatting Text in Cards and Calendars
Apple has made formatting text in projects simple. The process is exactly the same no matter whether you’re formatting text in a book, card, or calendar.
Use Maps in Books
Out of the myriad layouts you can choose to have in your book, perhaps one of the coolest is the map layout. Choosing a map layout lets you add a map to your book and mark the locations where your photos were taken. This is an excellent feature to include in a book of travel photos.
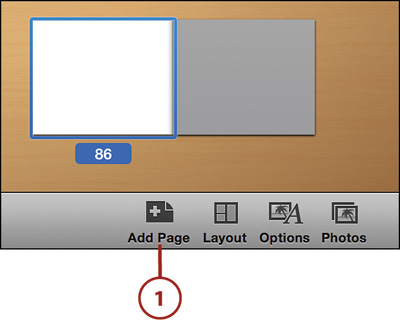
1. Click the Add Page button. A new page appears.
3. Choose Map from the Layout drop-down menu.
4. Pick one of the gray map placeholders that appears.
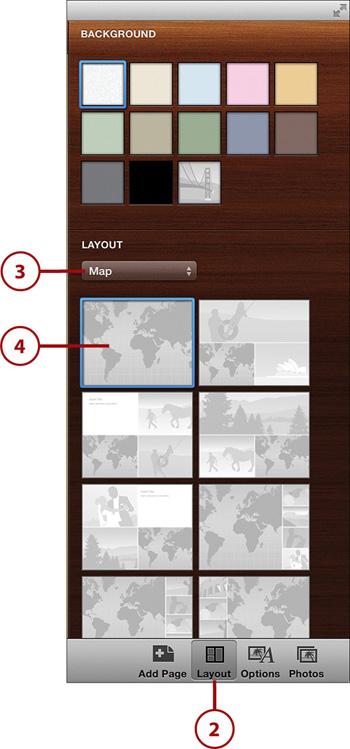
5. Select the new map page.
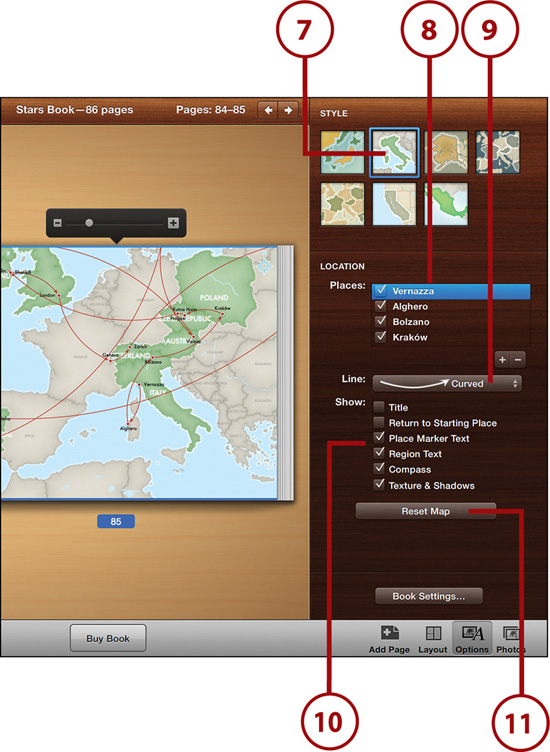
6. Click the Options button.

7. Choose one of seven different map styles.
8. Manually add locations to the map by clicking the + button, or if your photos are tagged with GPS data, their locations show up automatically. You can drag the locations up or down in the Places list.
9. Use the Line drop-down menu to apply a connection line to visually show the path you took between the locations.
10. Show or hide other details on the map using the check boxes under the Show heading. These include a title, place markers, a compass, and more.
11. Click the Reset Map button to reset all the map’s properties.
Add Additional Pages to Your Book
Just because you first assembled your book based on a selection of photos doesn’t mean you can’t add extra pages of photos to your book.
1. Click the Add Page button. A new blank page appears.
3. In the Layout drop-down menu, select the type of page you want to create.
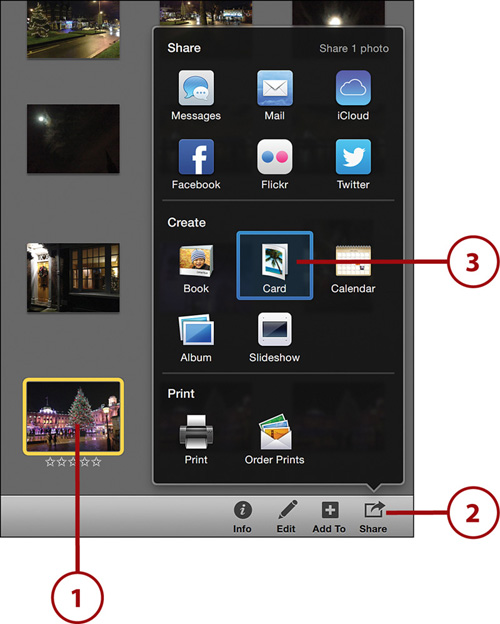
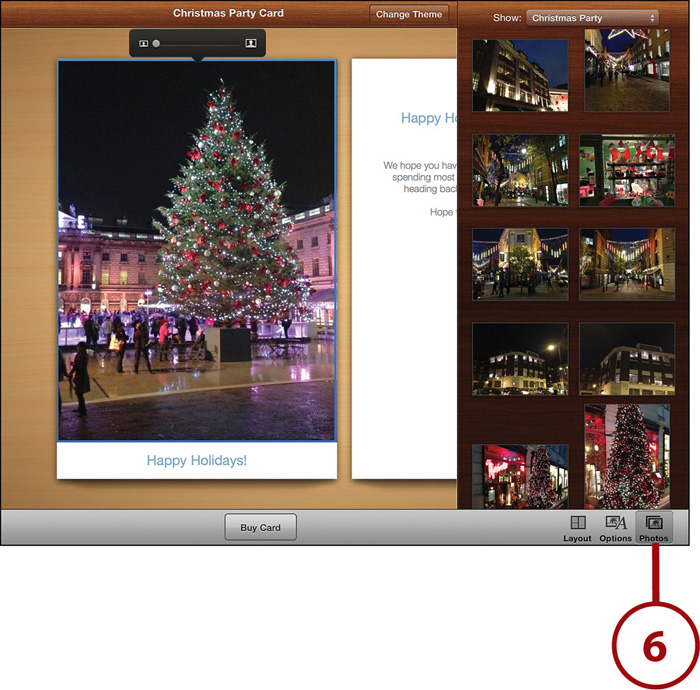
Creating a Card
After you’ve learned how to create a book in iPhoto, you pretty much know how to create a card and calendar, too. Apple wisely chose to make the creation process and tools the same.
1. Select the image you want to use in the card.
2. Click the Share button.
3. Click the Card button. The card theme chooser screen appears.
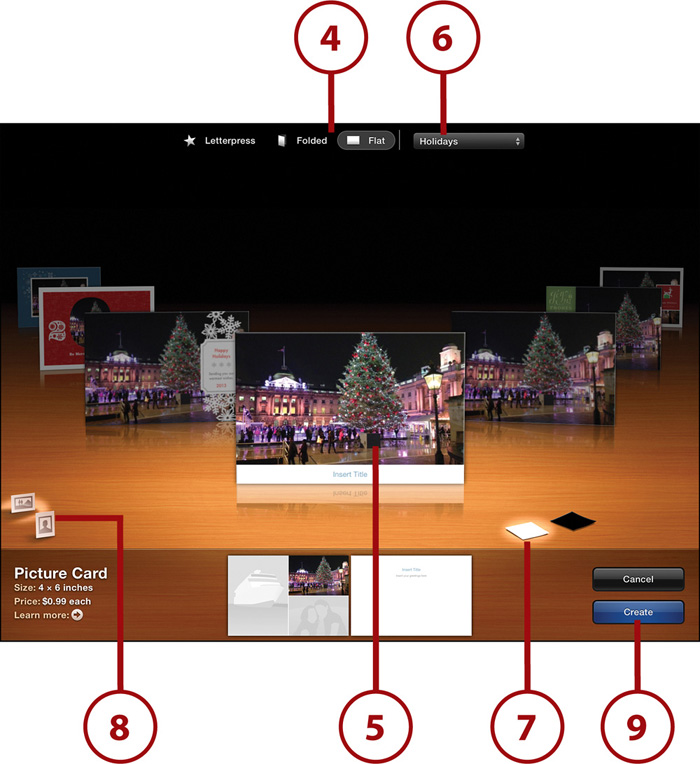
Look Familiar?
As you can see, the theme chooser for cards is much the same as the theme chooser for books.
4. Select your card type. Choices are Letterpress, Folded, or Flat.
5. Select the card’s theme from the card carousel. Or...
6. ...select the card’s theme from the Theme drop-down menu.
7. Select the card’s color from the color swatches.
8. Select the card’s orientation.
9. After you have made your selections, click the Create button.
Change the Layout of Your Cards
After you’ve clicked the Create button in the card theme chooser window, the card layout screen appears. Here you can make changes to your card’s layout, such as changing the colors or switching between horizontal and vertical landscapes. You can also enter custom text and stylize the text using the text style options in the Options pane.
1. Click the Layout button.
2. Select the color of the card you would like.
3. Choose a vertical or horizontal layout.
4. Select a template to use as the cover and interior of the card.
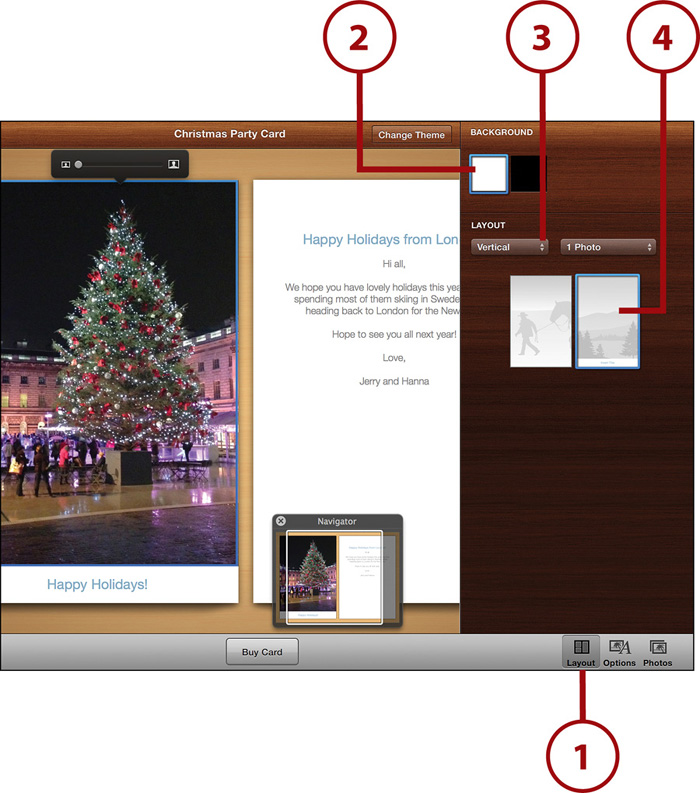
5. Click the Options button and make changes to the photograph used in the card or changes to the text.
6. Click the Photos button and select a new photograph to change the photo used on the card.
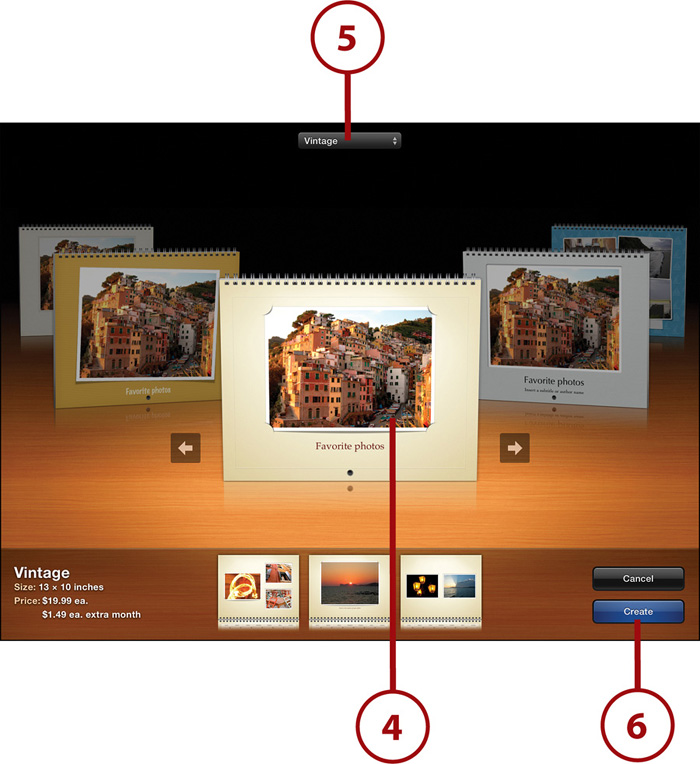
Creating a Calendar
Believe it or not, creating a calendar is even easier than creating a card—at least when it comes to the theme chooser step. To get started creating a calendar, the best thing to do is first group the images you want to use in the calendar into one location, just like you did when creating a book. This single location could be an album or an event. You don’t need to put all your images in one location, but doing so just makes it easier for your workflow.
1. Select the images you want to use in the Calendar.
2. Click the Share button.
3. Click the Calendar button. The Calendar theme chooser screen appears.
4. Choose which theme to use, which is the only option you have to specify for a calendar; you can’t modify calendars by size or color swatches like you can with books and cards. Navigate through the calendar carousel until you find the right calendar theme. Or...
5. ...select the calendar theme from the drop-down menu.
6. Click the Create button once you are ready to assemble the calendar. The Calendar Settings dialog box opens so you can determine what data to include in your calendar.
7. Choose the month and year you want your calendar to start on.
8. Decide how many months you want your calendar to contain. You don’t always have to do 12; sometimes an 18-month calendar is nice.
9. Select which country’s national holidays to display.
10. From the Show Calendars heading, you can select to import events from your Calendar on your Mac. Calendar is OS X’s built-in calendar software. Check a particular calendar’s check box to include it in your iPhoto calendar.
11. Check Show Birthdays from Contacts if you want any birthdays you have recorded for people in your OS X Contacts to show up on your calendar.
12. Click OK to be taken to the calendar layout screen.

Change Your Calendar Layout
The calendar layout screen displays thumbnails of each page of your calendar. Just as you do with the All Pages view when you create a book, you can drag and drop the picture sections of calendar months to rearrange the images in the calendar.
While in Calendar Layout view, the Layout pane gives you access to all your calendar design settings.
2. Select the color of the calendar you would like.
3. Choose between 1 and 7 photos for the month’s image.
4. Choose the arrangement of the photos on the calendar page by clicking on the thumbnail placeholder.
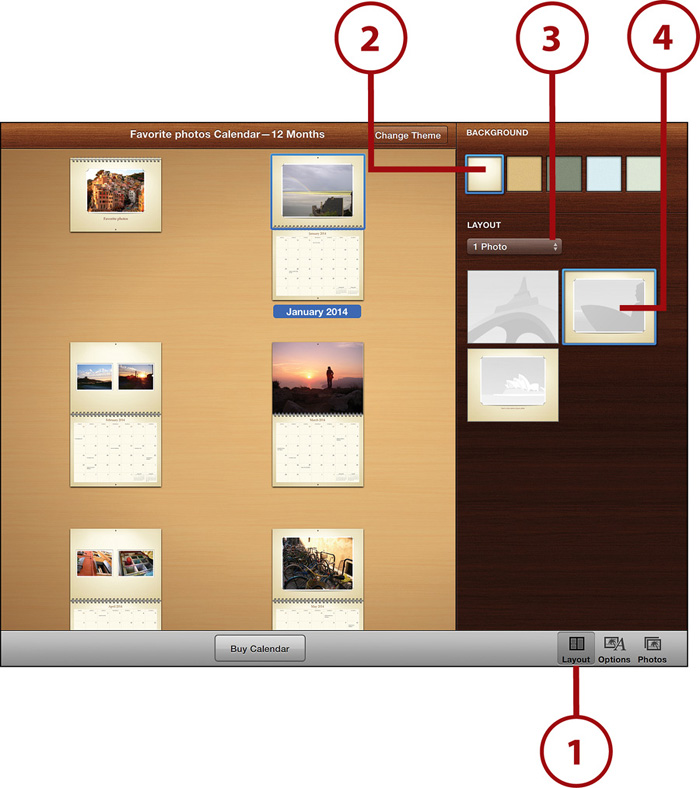
5. Click the Options button and make changes to the photograph(s) used in the calendar or make changes to the text.

6. Click the Photos button and select a new photograph.
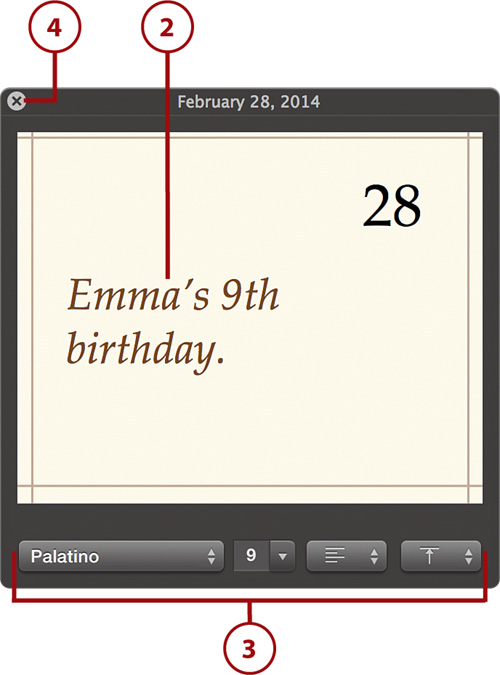
Add Text to Specific Dates
One really cool feature of calendars is the ability to add text to any specific date square on the calendar. This is handy when you want to specify a certain event, such as an anniversary or the beginning of your trip to Europe.
1. From the calendar page layout screen, double-click any date square to display a pop-up window.

2. Enter whatever text you want.
3. Use the font-formatting menu at the bottom of the date square window to format your text, or use the text-formatting options available in the Options pane.
4. When you are done editing and formatting your text, click the X in the upper-left corner of the date square window to close it. You can now view your text on the calendar.
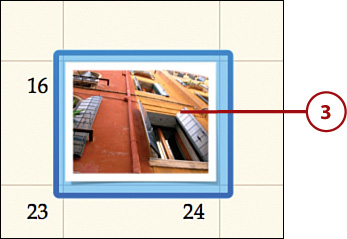
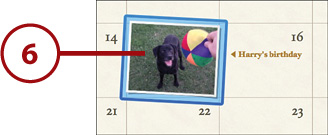
Add Photos to Specific Dates
You can also fill date squares with photos. Perhaps you want to signify your child’s birthday with her photograph, or maybe you just want to spice up the calendar page by adding random photos throughout the month.
1. Click the Photos button so your photos are displayed in the pane next to the calendar.
2. Choose the photo you want to fill a date square with, and then drag and drop it onto the date square.
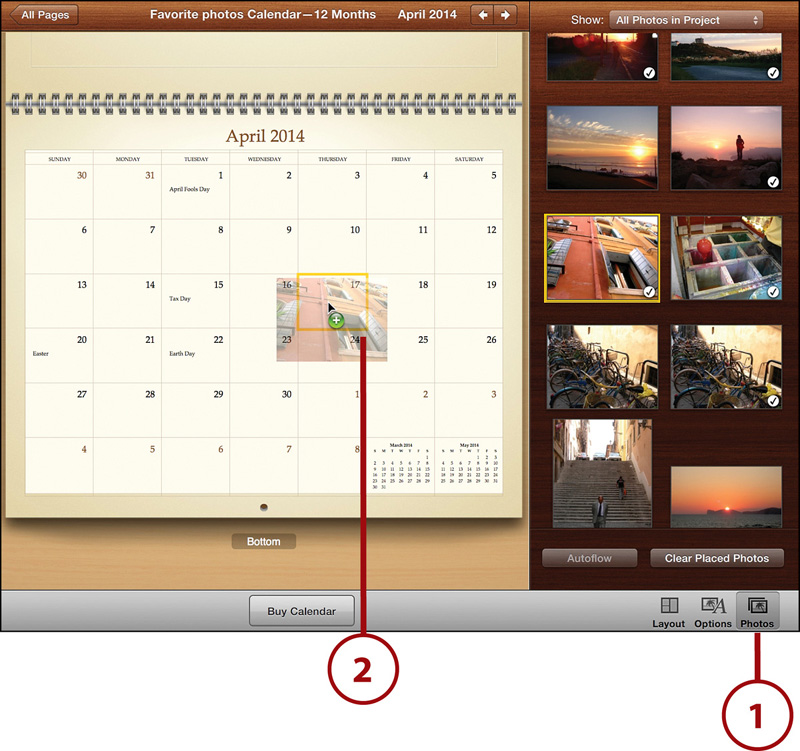
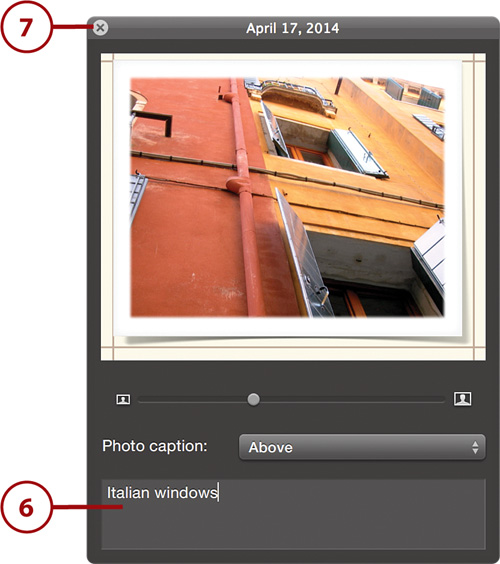
3. Double-click the photo inside the date square to open the date square pop-up window.
4. Use the slider to zoom in or out on the photo and then drag the zoomed image around to place it in the date square how you want it.
5. Add a caption to the photo date by selecting Above, Right, Bottom, or Left from the drop-down menu.
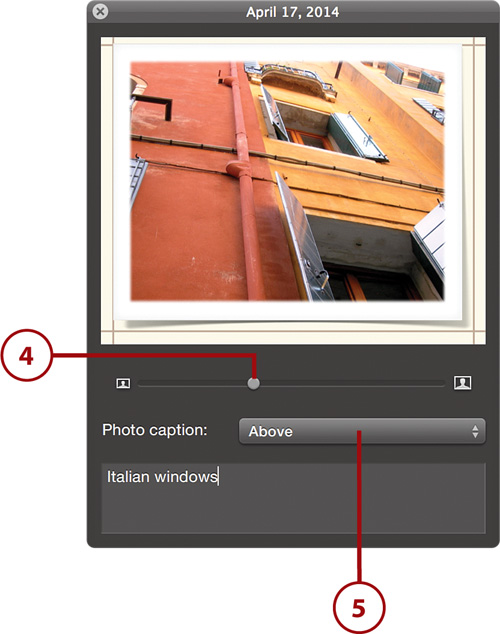
6. Enter text in the caption field. Note that the caption isn’t overlaid on the image in the date square; it is placed in the date square above or below, or to the left or right, of the date square with the photo in it. An arrow next to the caption points toward the photo it is referencing.
7. When you are done editing and formatting your date square photo, click the X in the upper-left corner of the date square window to close it.
Buying Your Keepsakes
You need to buy the keepsakes when you are done creating them. Actually, you can print them yourself using iPhoto’s Print menu found under File, Print in the menu bar, but then you’d have to assemble and bind the book, calendar, or card yourself. It’s just much easier (and truthfully, prettier) to let Apple do all the printing for you.
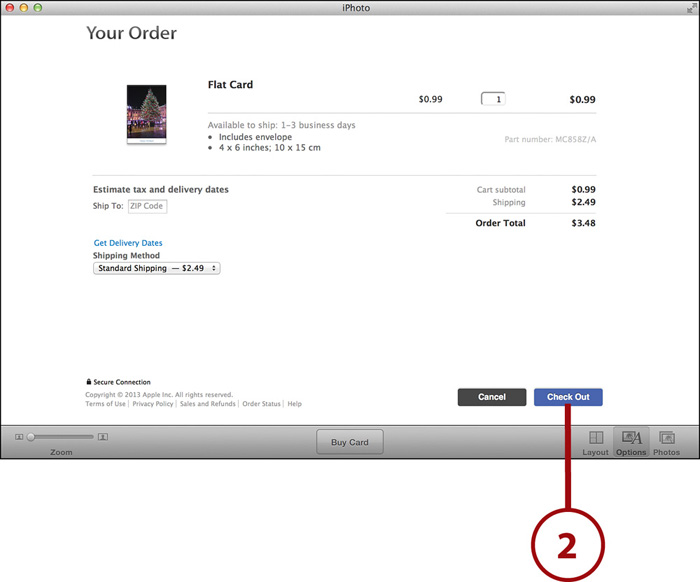
1. Click the Buy Book, Buy Card, or Buy Calendar button at the bottom of your project’s window.

2. Double-check what you are ordering and the price of it in the summary window. Enter the quantity you want to purchase and choose your shipping ZIP Code and method. After you have made your selections, click the Check Out button.
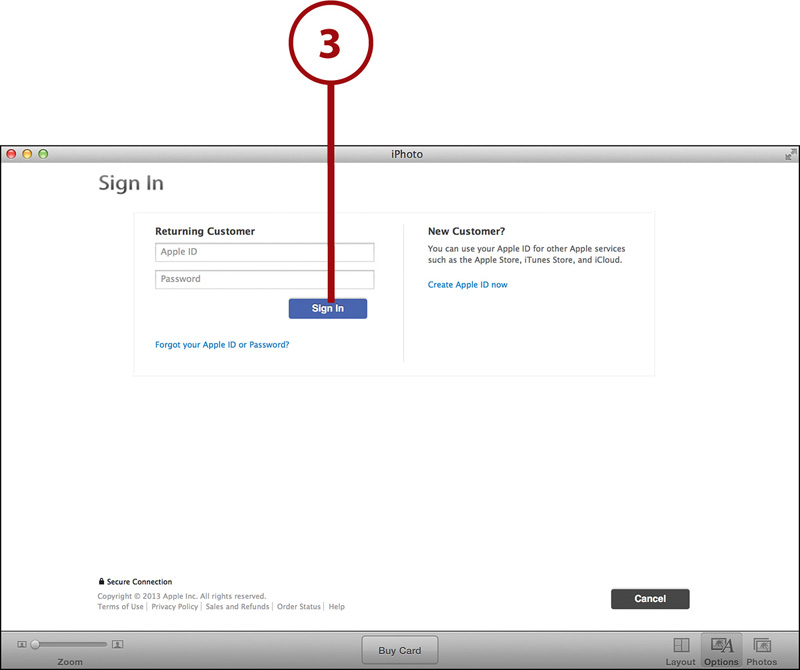
3. Enter your Apple ID. If you have an iTunes account, you have an Apple ID. If you need to create an Apple ID, click Create Apple ID Now and then enter your credit card information.
Ordering Prints of Your Photographs
Remember the days when you would take photos with a film camera and then go to your local drugstore to have them printed? It was kind of expensive, somewhat of a pain, and, unless you went to the more expensive one-hour photo places, a long wait before you had nice glossy prints of your photographs.
Nowadays, the traditional print is being usurped by photo-sharing sites (such as Flickr), digital picture frames, and smartphones. However, sometimes it’s still nice to have a printed photograph. You can, of course, print your own photos from within iPhoto using File, Print, but that’s handy only if you have a really good photo printer. Consequently, Apple provides a way for you to order physical prints of photos and send them to anyone, anywhere in the world.

1. Select one or more photos from your iPhoto Library.
2. Click the Share button in iPhoto’s toolbar.
3. Click Order Prints.
4. Select the size of each print and the number of copies of each print that you want. For one photo, you can order prints of multiple sizes. As you enter the size and number of prints, the subtotaled cost updates at the bottom of the screen.
5. (Optional) If you know you want the same size and number of copies for all your selected photos, use the Quick Order drop-down menu at the upper right of the order screen to choose the size, and then choose the number of copies using the up or down arrow.
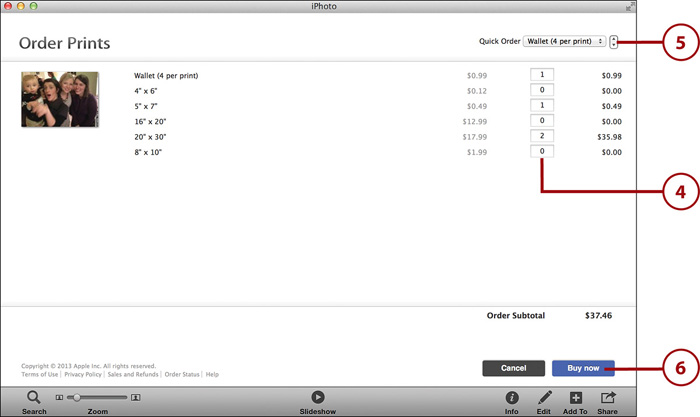
6. Click the Buy Now button when you are done choosing your print sizes and copies.
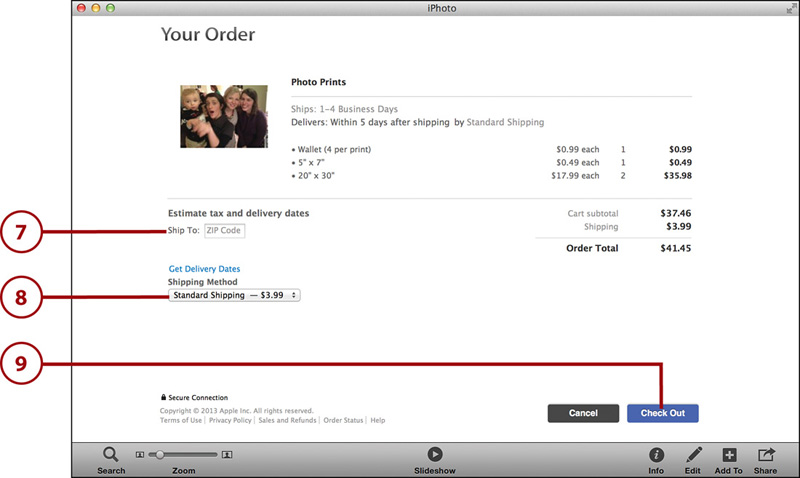
7. Enter a shipping ZIP Code.
8. Choose a shipping method.
9. Click the Check Out button.
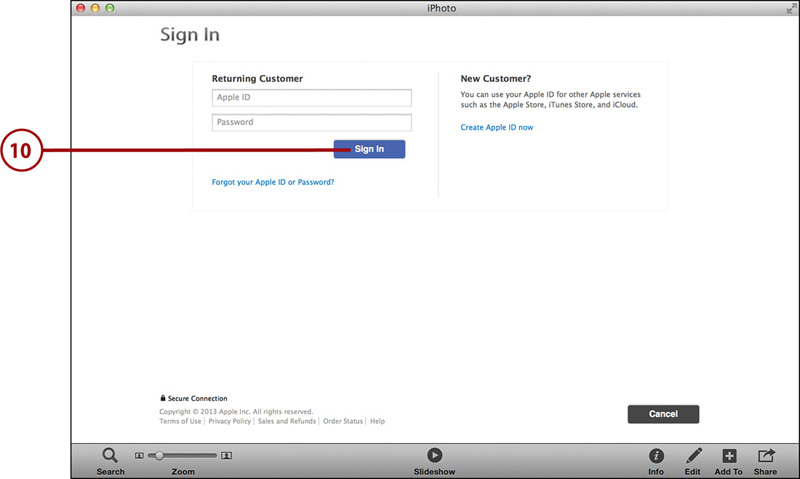
10. Enter your Apple ID and click Sign In. If you have an iTunes account, you have an Apple ID. If not, you can create one on this screen using the Create Apple ID Now link.

11. Confirm the shipping and credit card details of your order. By default, the shipping address is the billing address associated with your Apple ID. To change it to any other address, click the Edit Shipping link and enter in the new shipping address on the screen that appears.
12. Click Place Order to complete the order.
Creating a Slideshow
Slideshows are great and, unlike other keepsakes, a free way to show off your photos. With a slideshow, you can add text, music, and transitions quickly and easily to your photos and then show your pictures off with the click of a button.

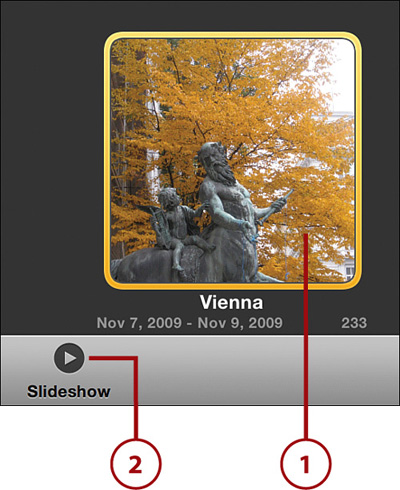
1. Select an album or event to create your show from.
2. Click the Share button in iPhoto’s toolbar.
3. Click the Slideshow button. Your slideshow is automatically assembled and listed under the Slideshows header in iPhoto’s source list. The slideshow window allows you to browse through the photos in your slideshow one slide at a time. Here you can choose to preview your slideshow, play it, add effects, or export it.
Work with Your Slideshow
To browse through the photos in your slideshow, use the photo browser at the top of the screen. You can click and drag your photos around if you want to change the order they appear in your slideshow. Then, in the slideshow toolbar, you have the following options:
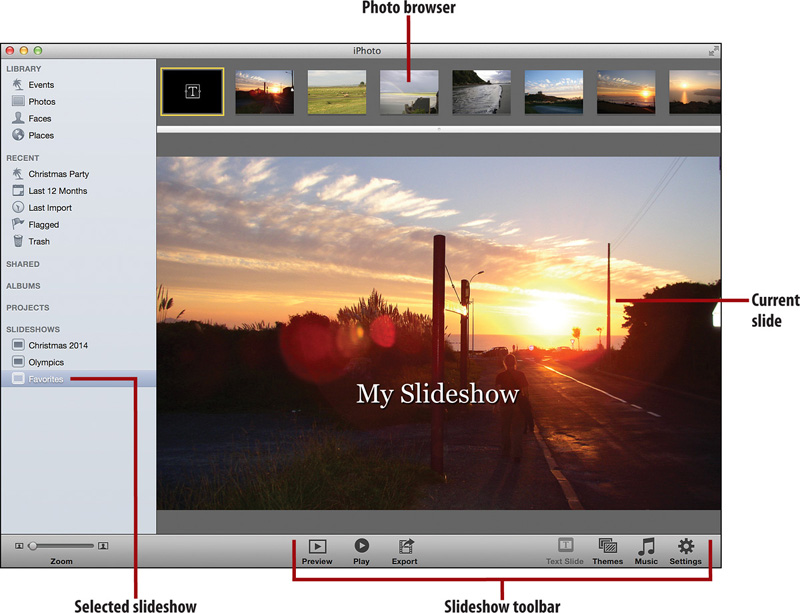
• Preview button: Quickly previews your slideshow in iPhoto’s window. This is handy when you want to see how the show flows from a specific slide (like one in the middle).
• Play button: Plays your slideshow from the beginning in full screen.
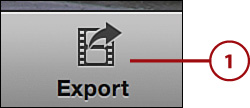
• Export button: Opens the Export dialog box. This also allows you to save your slideshow as a movie, which is then playable on a number of devices, including iPods, iPhones, and iPads.
• Text Slide button: Adds a text slide on top of a photo.
• Themes button: Shows you the slideshow themes chooser.
• Music button: Opens the music browser for your slideshow.
• Settings button: Opens the settings options for your slideshow.
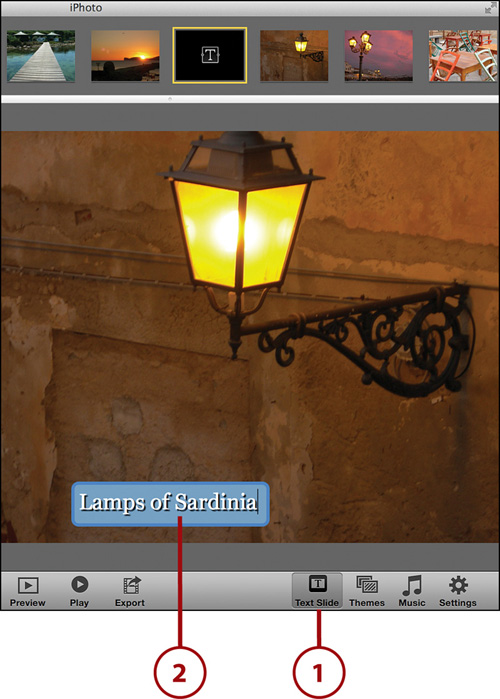
Add Text to a Slideshow
Some slideshows only need photos, but by adding text, you can give slideshows more context.
1. Click the Text Slide button.
2. A text field appears over the photo that is displayed in the slideshow window. Enter any text you want.
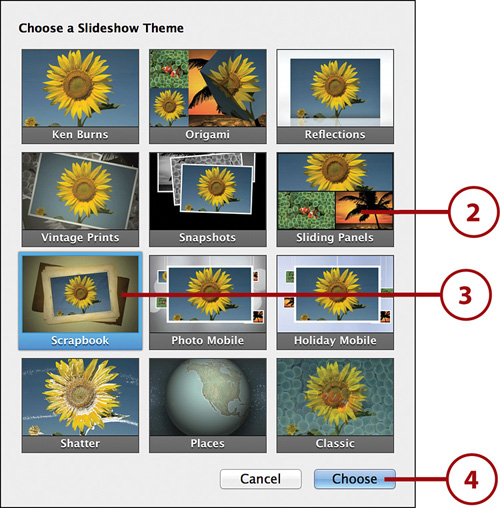
Choose a Slideshow Theme
iPhoto offers several built-in themes for your slideshows that make you look like you spent hours working on them.
1. Click the Themes button.

2. A dialog box appears showing you the available themes. Move your mouse over the theme to preview it.
3. When you have decided on a theme, click it so it is highlighted with a blue border.
4. Click the Choose button. Your slideshow theme is applied to your show.
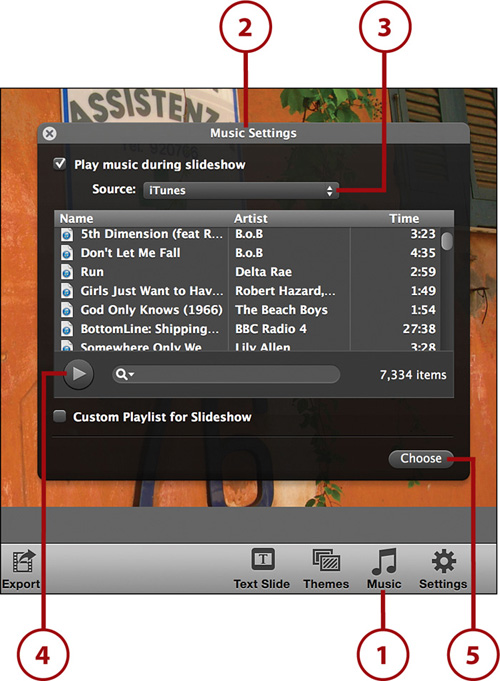
Add Music to a Slideshow
Adding music to a slideshow can give it some much needed “zing!” to keep your audience interested.
1. Click the Music button.
2. A pop-up window appears that displays all your music settings. Basically, if you have music anywhere on your computer, it shows up in the Music Settings box.
3. Choose the music source, such as iTunes, or even a specific playlist, and then choose a song from the list of available music.
4. Preview the song by pressing the triangular Play button.
5. Click the Choose button to apply the song to your slideshow.
Use Additional Slideshow Settings
iPhoto gives you a number of additional settings that let you tweak your slideshows to your liking. From these settings, you can choose the length of time each slide is displayed, the type of transitions between slides, the aspect ratio of the slideshow, and more. It’s best just to play around with all the possible settings to see what you like best because the combinations are virtually limitless.
2. A pop-up window appears displaying all the possible settings. The settings are broken down into two tabs: one for all slides and the other for just the selected slide.
3. Make sure the All Slides tab is selected.
4. Choose how long you would like each slide to play for or whether you want to time the slides to fit the music you chose.
5. Choose the type of transitions between slides and the transition speed.
6. Then choose whether you want to show slide captions and titles, whether you want to repeat the slideshow on a loop, whether you want to scale photos to fill the screen, and then select the aspect ratio of your slideshow.
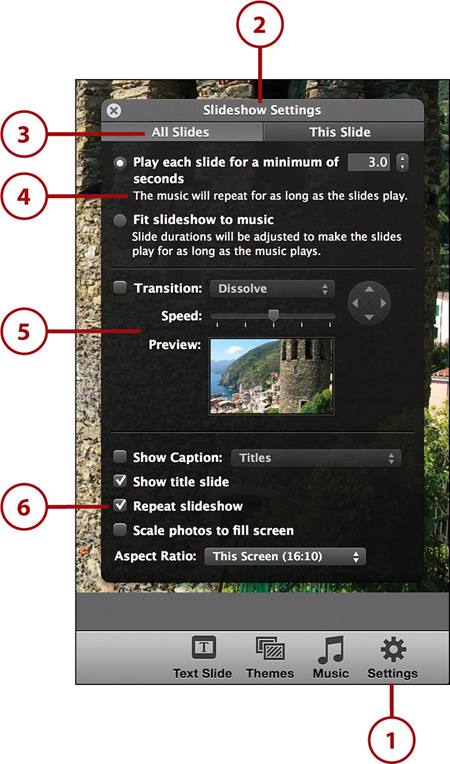
7. Select the This Slide tab and choose to apply Black & White, Sepia, or Antique filters to the photo of the selected slide.
8. Choose how long the individual slide should play.
9. Choose the type of transition for the individual slide and the transition speed.
10. Choose whether you want to apply a Ken Burns effect to the slide.
11. Close the Slideshow Settings window to apply your settings to the slideshow.

The Ken Burns effect is named after famous documentary filmmaker Ken Burns. Burns pioneered a way to make looking at static photos on screen more interesting by adding a subtle pan and zoom to them. The effect proved so popular with audiences that virtually every documentary—and news report—today uses it.
Play a Slideshow
1. Click the Play button. The slideshow begins to play.
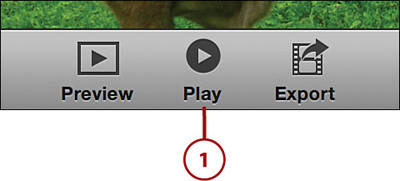
2. Move your mouse while the slideshow is playing to see the onscreen controls. The onscreen controls enable you to play or pause the slideshow; advance to the next slide or go back to the previous one; and quickly access and change the theme, music, and settings for the currently playing show.

Export Your Slideshow
Sometimes you might want to show your slideshow to someone but they aren’t in the same room (or city) as your computer. Good news! They don’t need to be. With iPhoto, you can export your slideshow to any iOS device, like an iPhone or iPad, and even save it as a movie so you can email it to people or post it to the Web. Keep in mind that some email services may have a limit on the size of the movie that can be mailed.
1. Click the Export button.
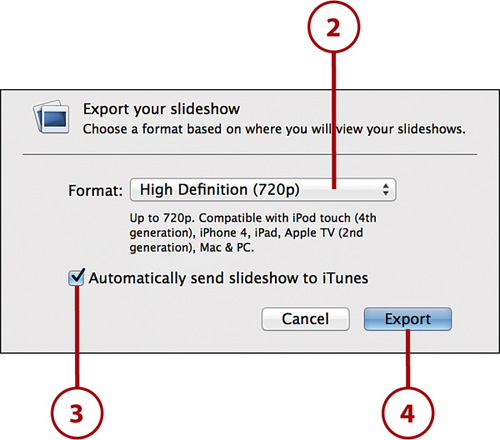
2. Choose a format from the drop-down menu. Format options include 480p, 720p, or 1080p.
3. Check the check box if you want your exported show to be automatically added to your iTunes library. Doing this ensures that it will sync with your iPhone the next time you connect it to your computer.
4. Click Export.
5. Choose the location where you want to save the slideshow.
6. Click OK. The slideshow may take some time to export depending on its size.
Create an Instant Slideshow
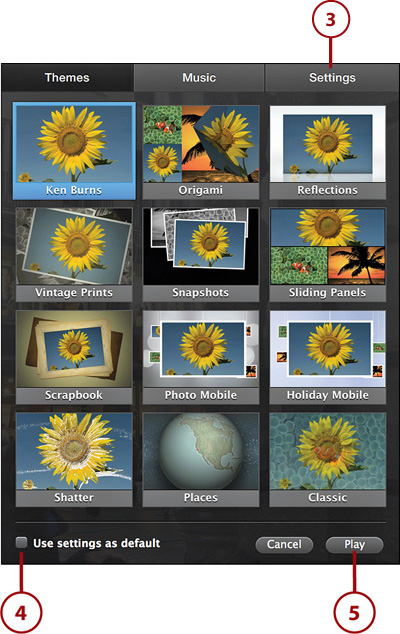
Creating slideshows is cool, but with all the settings options, it can sometimes take a bit of work. If you want to quickly play a selected event, album, or group of photos as a slideshow, you can create an instant slideshow. An instant slideshow differs from a regular one in that it is never saved. So, if you create an instant slideshow, it will not show up in the Slideshows header in iPhoto’s source list.
1. Choose the album, event, or group of photos you want to play as an instant slideshow.
2. Click the Slideshow button at the bottom of the iPhoto toolbar.
3. The screen fades, and the first image from your selected photos appears. Over the image is a combined settings window. This combined settings window lets you quickly choose your slideshow theme, music, and additional settings, such as transitions and slide duration.
4. Check the Use Settings as Default check box if you want to immediately begin playing future instant slideshows with your current settings.
5. Click the Play button, and your slideshow begins playing.