3. Making the Phone Your Own

In this chapter, you find out how to customize your phone by populating the Home screen with widgets, shortcuts, and folders; change the default wallpaper; set default and contact-specific ringtones; issue voice commands and ask questions; and more. Topics include the following:
→ Customizing the Home screen with new wallpaper, shortcuts, folders, and widgets
→ Setting default, contact-specific, and group ringtones
→ Configuring and using voice services (S Voice, Voice Control, and Google Voice Search) to find information and perform actions
Nothing prevents you from using the phone exactly as it was when you first opened the box—keeping the default wallpaper, installing no additional widgets, downloading no new apps, and ignoring Settings for the operating system and apps. But the fun of having a powerful smartphone is in customizing it—personalizing the phone in ways that make it easier, more efficient, and fun to use.
Customizing the Home Screen
The easiest and most obvious way to personalize the phone is to customize its Home screen. In fact, many of the Home screen customization options, such as changing the wallpaper, adding widgets, and adding shortcuts to your favorite apps, are what users do first with their new phones.
Selecting Wallpaper
The simplest way to customize the phone is to change its Home screen background (called wallpaper) by selecting an image that’s aesthetically pleasing, amusing, or touching. Wallpaper can be a static image or a live, moving image. The image you choose is applied to all Home screen pages.
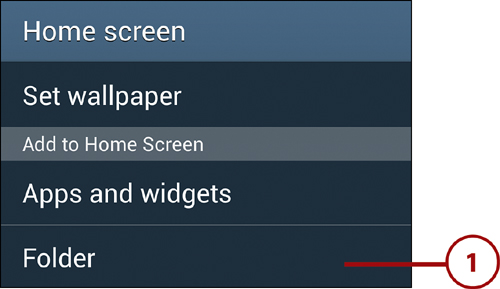
1. On the Home screen, press the Menu key and tap Set Wallpaper.
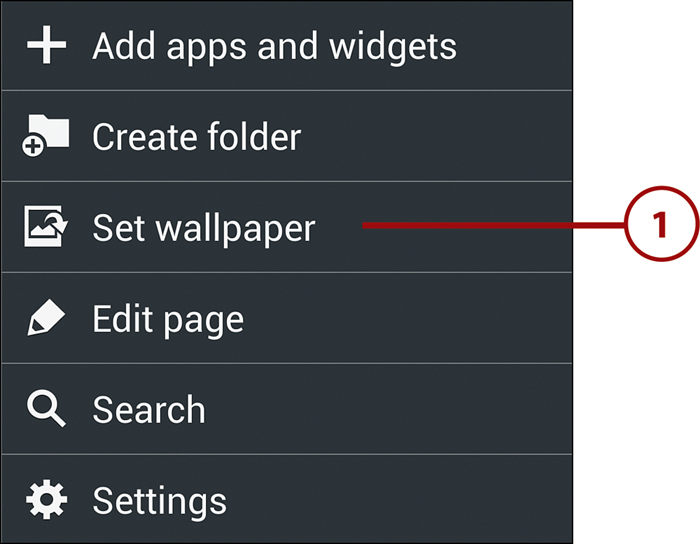
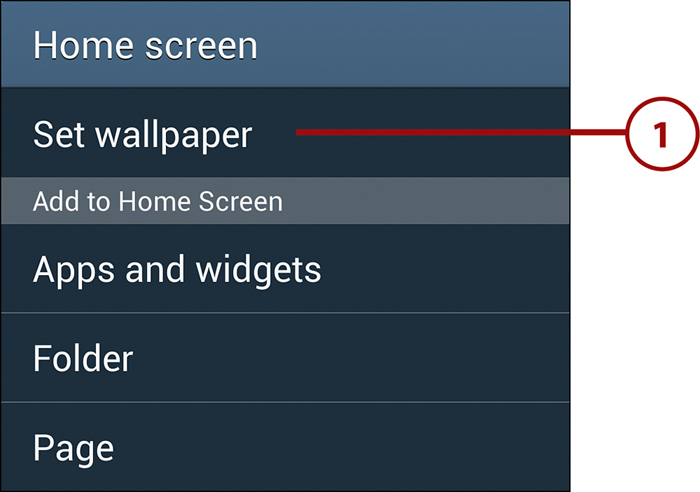
Wallpaper Shortcut
As an alternative, press and hold any empty spot on a Home screen page, and tap Set Wallpaper.
2. Tap Home Screen, Lock Screen, or Home and Lock Screens—depending on the screen(s) that you want to customize.
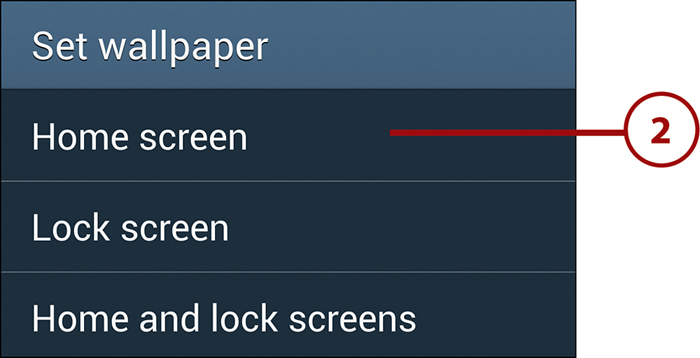
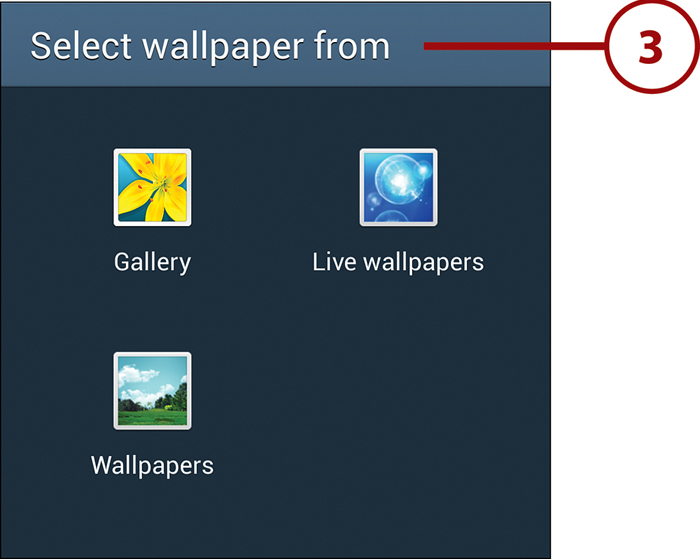
3. Select the type of wallpaper that you want to use. Options include Gallery (a cropped area of a photo or other image stored in Gallery), Live Wallpapers (images that move), and Wallpapers (static, full-screen images).
Carrier-Provided Wallpaper
Some carriers provide their own custom wallpaper. For example, Sprint phones include an ID Wallpapers category.
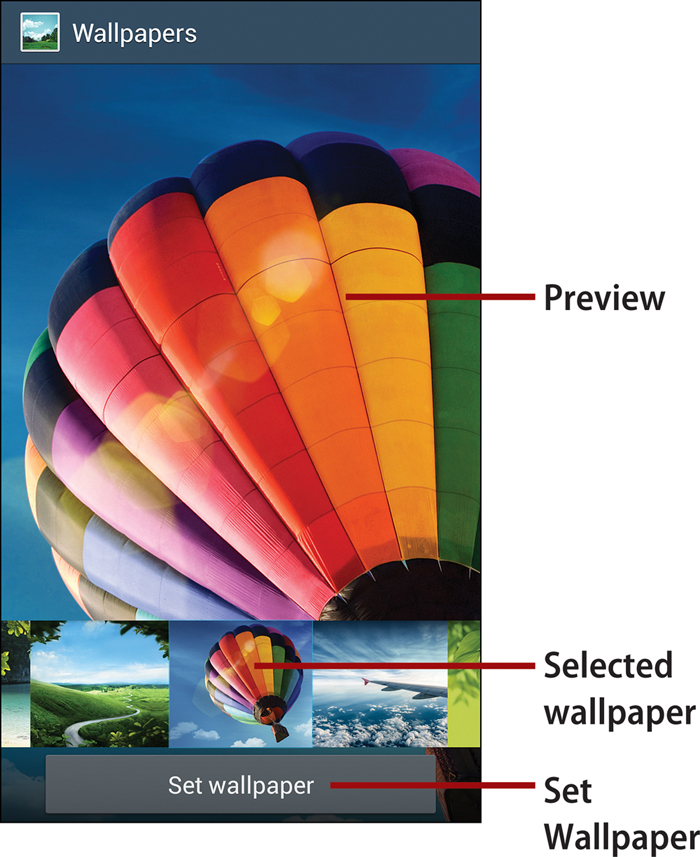
• Wallpapers. Tap a thumbnail in the horizontally scrolling list, and tap Set Wallpaper.
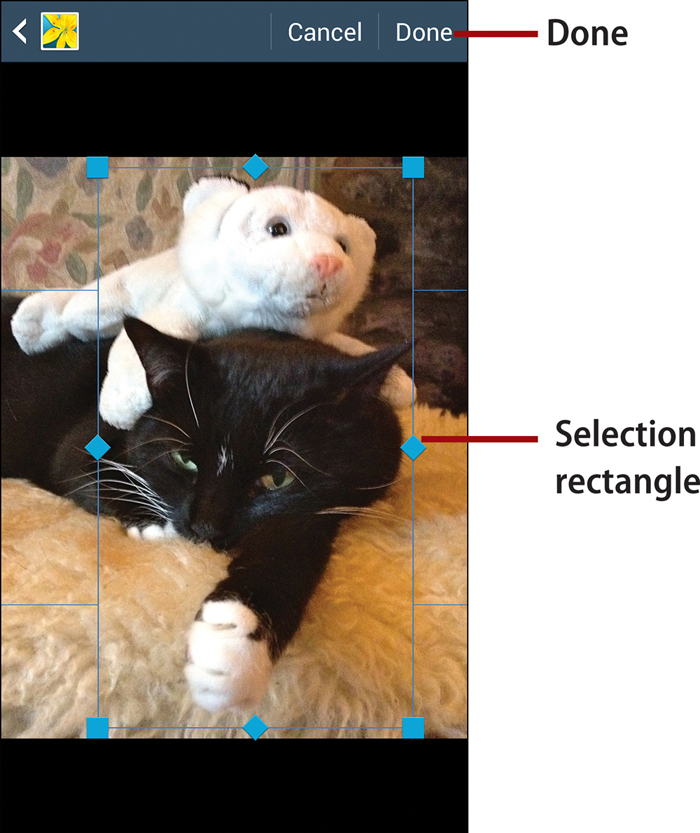
• Gallery. Open the folder that contains the image. Tap the image thumbnail, resize and move the selection rectangle to select the desired area, and tap the Done button.
• Live Wallpapers. Tap a wallpaper style to see a preview, and tap the Set Wallpaper button.
Static Versus Live Wallpaper
Live wallpaper contributes more to battery drain than a static Wallpaper or Gallery image. If you find that you’re running out of power too quickly, consider replacing your live wallpaper with static wallpaper.
Rearranging, Removing, and Adding Home Screen Pages
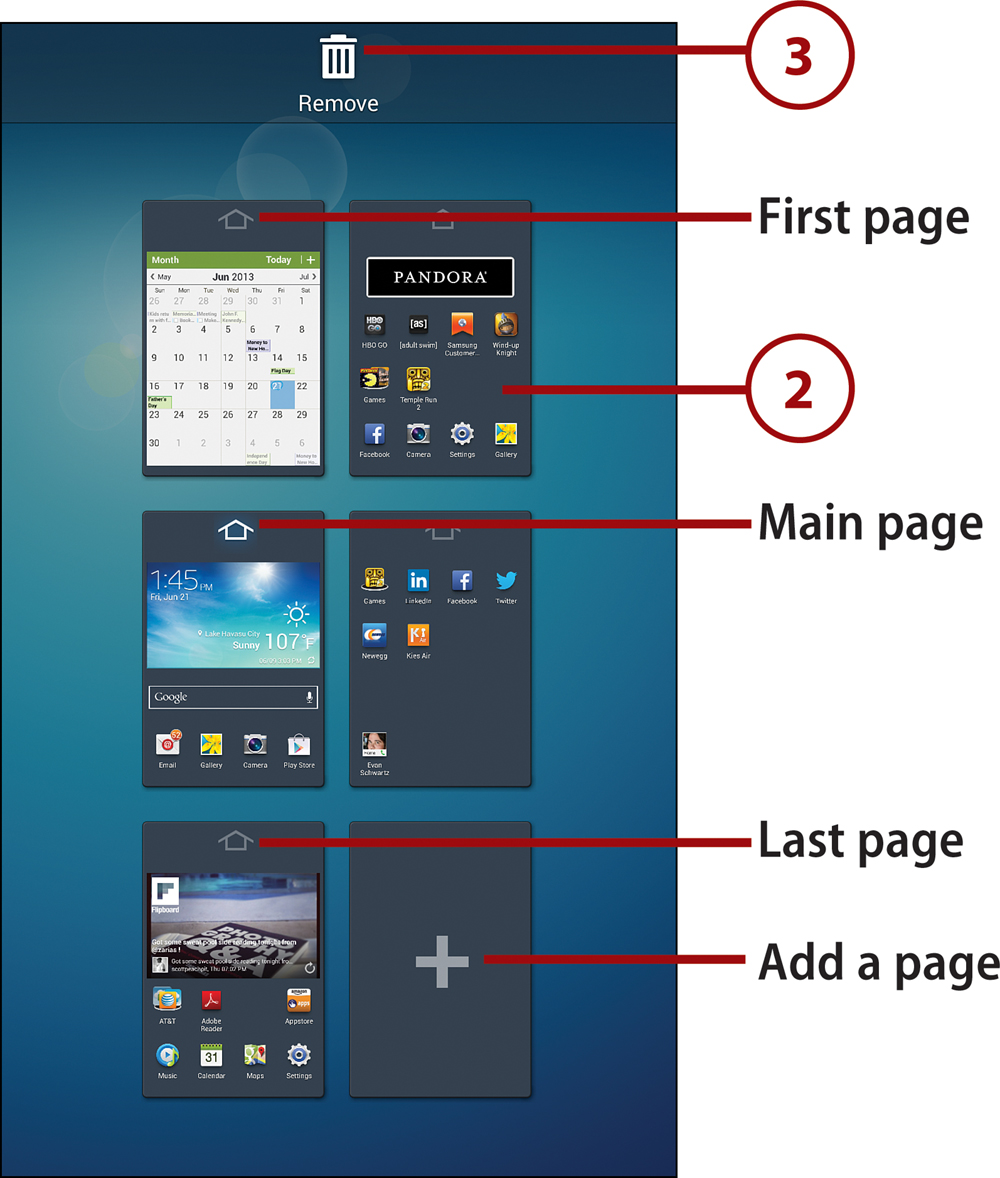
The default Home screen has five horizontally scrolling pages. You can rearrange the pages, remove ones that you don’t need, or add new pages (up to the maximum of seven).
1. On the Home screen, press the Menu key and tap Edit Page.
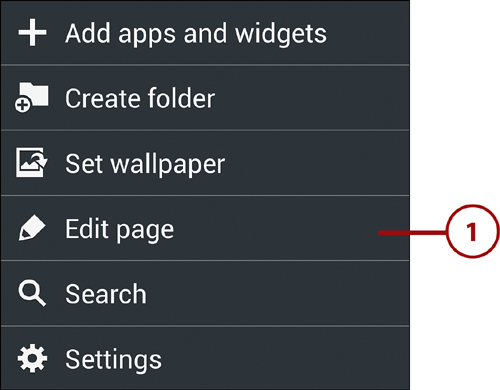
2. To change the position of a page, press and hold its thumbnail, and then drag it to a new location in the array.
The Main Home Screen Page
If you rearrange Home screen pages, the main page (marked with a white up arrow) can be placed anywhere in the array—not just in the center. Whenever you’re on the Home screen, pressing the Home button always takes you to this main page.
3. To delete a page, press and hold its thumbnail, and then drag it onto the Remove icon at the top of the screen. If the page contains one or more items, a confirmation dialog box appears. Tap OK to confirm the deletion.
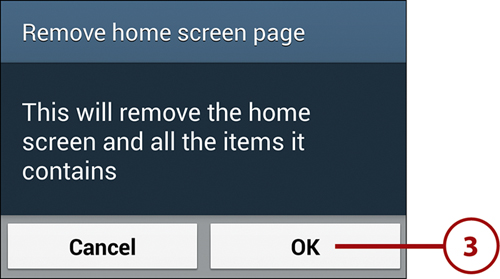
Effects of Deleting a Page
As indicated by the confirmation dialog, deleting a page also removes the items on that page, such as widgets and shortcuts. Of course, you can place those items on the remaining or new pages again.
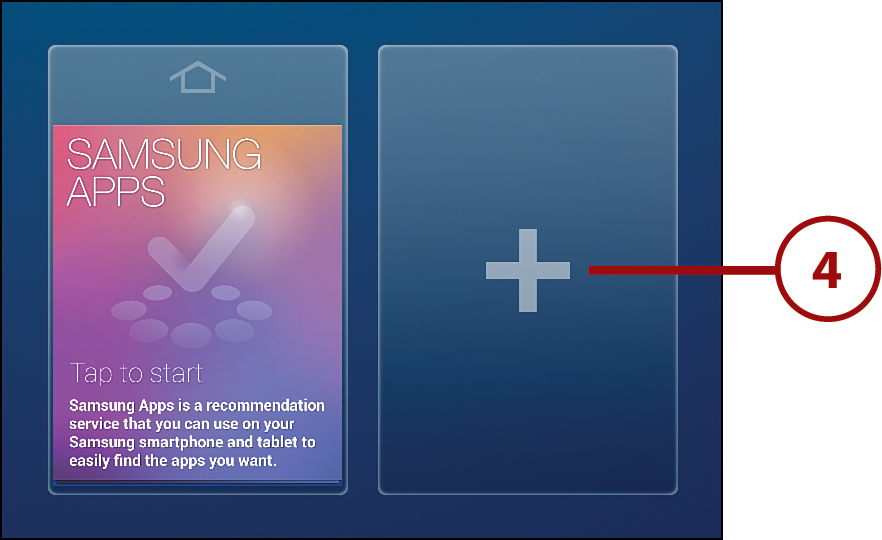
4. To add a new page, tap any thumbnail that contains a plus (+) symbol (representing an available page). You can optionally change the location of the new page, as described in step 2.
5. When you finish editing, complete the process by returning to the Home screen—press the Back or Home key, or tap a Home screen page thumbnail.
Adding Shortcuts
You can place shortcuts to your favorite apps on the Home screen. When you tap an app shortcut, the app that it represents launches. An Android shortcut is the equivalent of a Mac alias or a Windows shortcut.
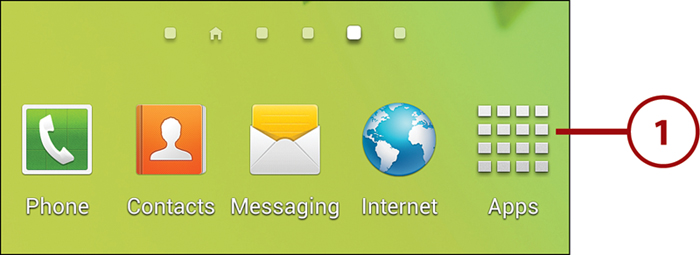
1. Navigate to the Home screen page to which you want to add the shortcut, ensure that it has an open space for the shortcut, and tap the Apps icon. (You can add the shortcut to any page, but the current one is initially offered as the destination.)
Fast Way to Add a Shortcut
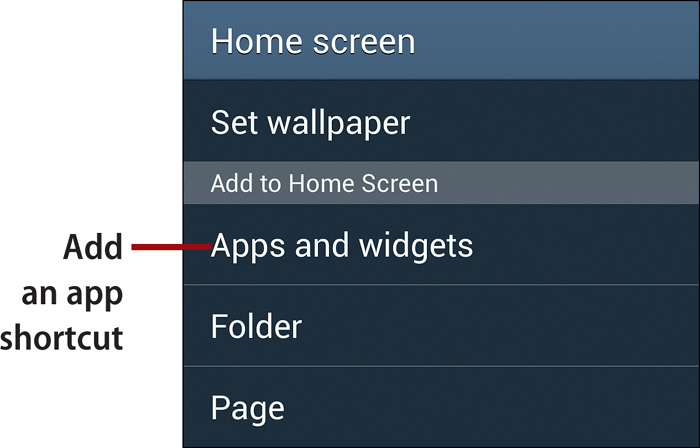
To quickly add a new app shortcut to a Home screen page, press and hold any open spot on the page. The Home Screen dialog box appears. In the Add to Home Screen section, tap Apps and Widgets. Press and hold the app icon and drag it to its destination on the page.
2. Ensure that the Apps tab is selected. Locate the app for which you want to create a shortcut, scrolling horizontally as needed.
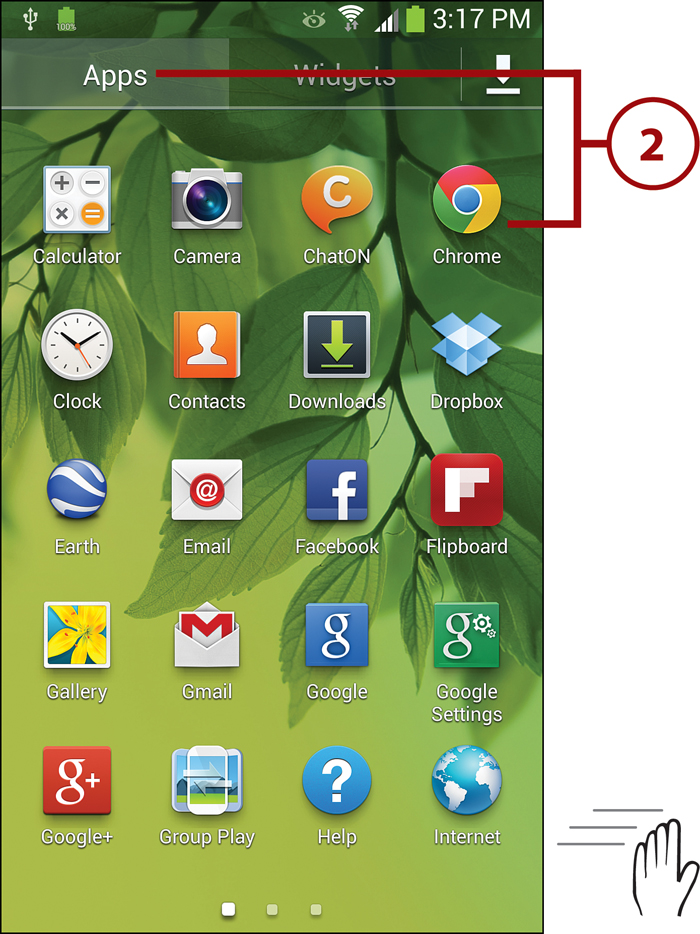
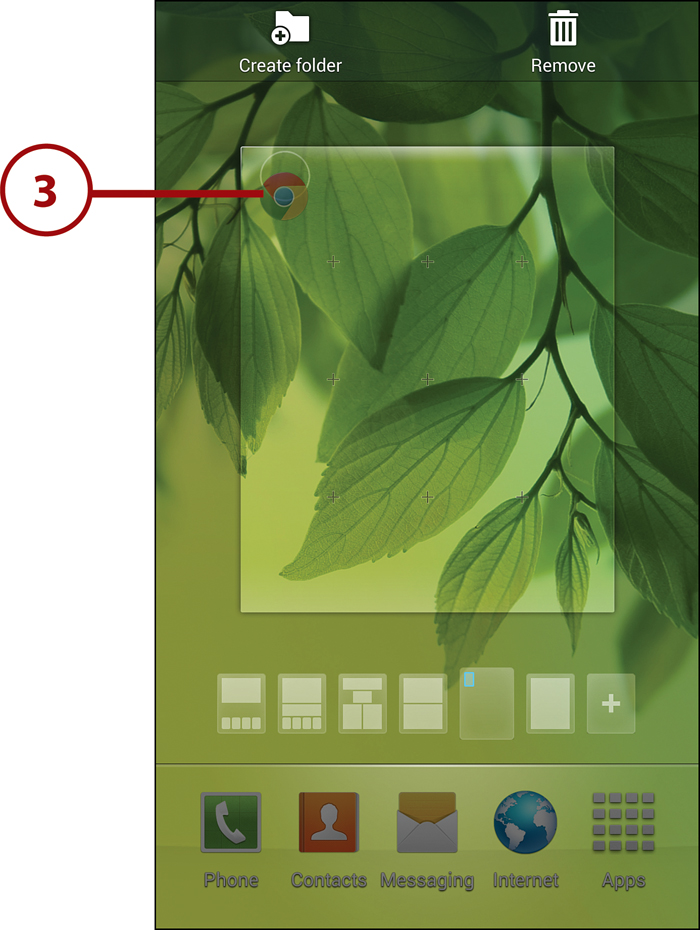
3. Press and hold the app’s icon, drag it into an open spot on the current Home screen page and release the icon.
Repositioning or Removing a Shortcut
After creating a shortcut, you can reposition it on the current or a different Home screen page. Press and hold the shortcut, and then drag it to the desired position.
To remove a shortcut that you no longer need, press and hold it, and then drag it onto the Remove icon. Removing a shortcut doesn’t affect the item that it represents.
Creating a Bookmark Shortcut
You can also create shortcuts to your favorite web pages. In the Internet app, open the page or site for viewing. Press the Menu key and tap Add Shortcut. The bookmark is added to a Home screen page.

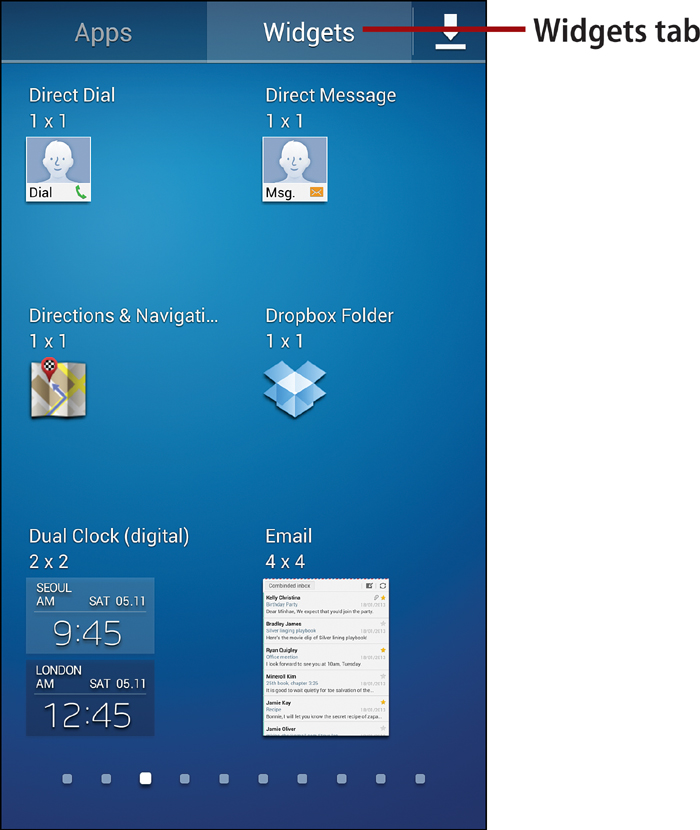
Adding Widgets
A widget is an application that runs on the Home screen. Many, such as Weather, aren’t interactive or are only minimally so. For example, you can tap the refresh icon on the Weather widget to force an update of the weather info. Otherwise, such widgets simply provide continuously updated information. Other widgets, such as the Music widget, are designed for interaction. By tapping its buttons, you can pause or restart playback, and skip to the next or previous song.
You can add a widget in any free space on a Home screen page, as long as there’s room for it. Widgets come in a variety of sizes, from one- or two- section widgets to full-screen ones. In addition to the widgets supplied with your phone, downloaded applications sometimes include their own widgets.
To add a widget to a Home screen page, follow the steps listed in “Adding Shortcuts.” In step 2 on the Apps screen, select the Widgets tab rather than the Apps tab. Under each widget name is the number of screen sections (horizontal × vertical) required by the widget.
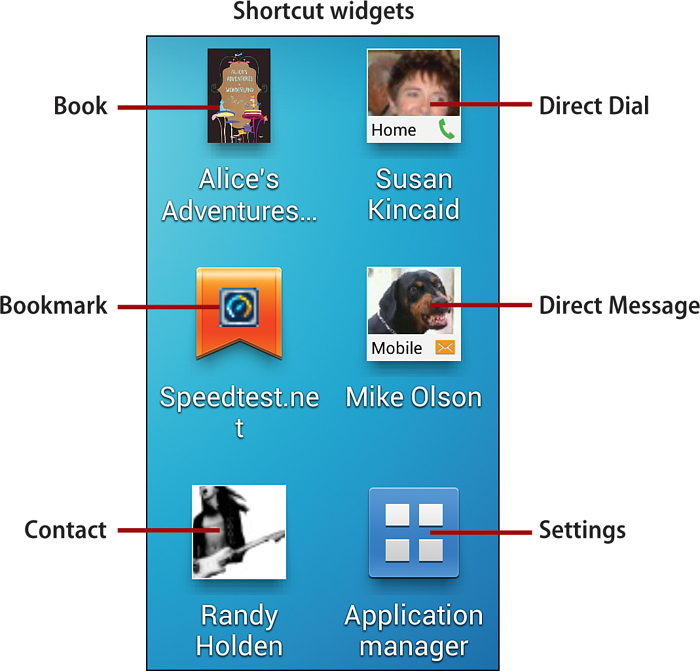
>>>Go Further: Widget Shortcuts
• Book. Links to a favorite downloaded ebook that you can read with the Play Books app.
• Bookmark. Links to a web page selected from your stored bookmarks.
• Contact. Links to a person’s record in Contacts, enabling you to easily call, message, email, or locate the person.
• Direct Message. Enables you to create a new text or multimedia message to a specific person in Contacts.
• Settings Shortcut. Opens a Settings category that you frequently access.
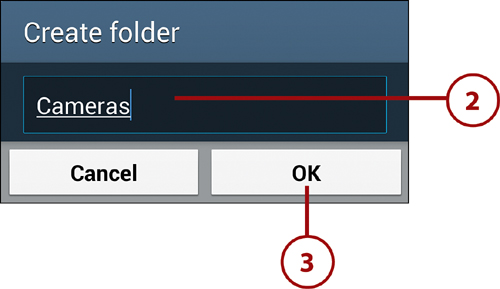
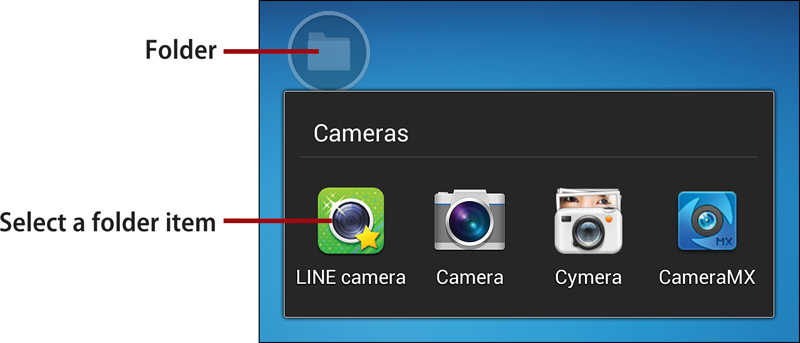
Creating Folders
To help organize your Home screen items, you can add folders in which to store them.
1. On the Home screen, navigate to the page to which you want to add the folder, and do either of the following:
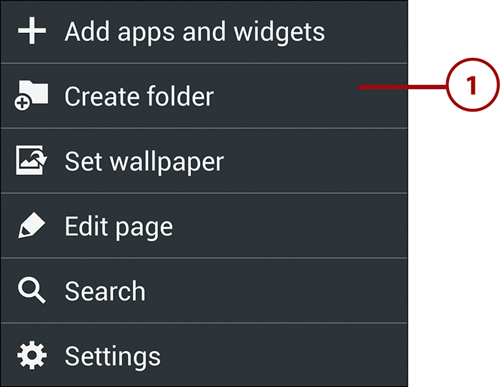
• Press the Menu key and tap Create Folder.
• Press and hold any open spot on the page. In the Home Screen dialog box, tap Folder.
2. Type a name for the folder in the Create Folder dialog box.
3. Tap OK.
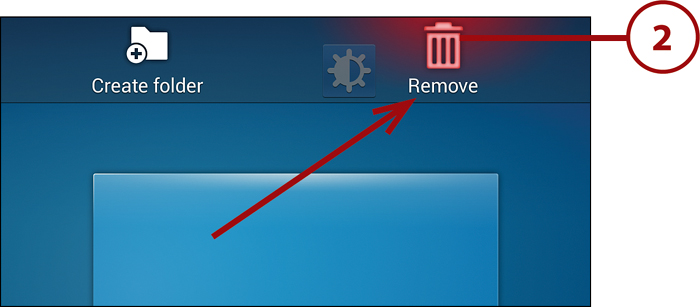
Repositioning and Removing Home Screen Items
Part of the fun of setting up your Home screen pages is that you can freely rearrange items. And because many items are shortcuts, removing them from the Home screen has no effect on the actual items they represent. Follow these steps to reposition or remove Home screen items.
1. On the Home screen page, press and hold the item that you want to reposition or remove.
2. To remove the item, drag it onto the Remove (trash can) icon that appears at the top of the screen. When you release the item, it is removed.
3. To reposition the item, drag it to an empty or occupied spot on the current or another Home screen page. (If the destination is currently occupied, items will shift to make room—if possible.) When you release the item, the move is completed.
Moving Between Pages
When moving an item between Home screen pages, don’t let up on the finger pressure until the destination page appears. If you inadvertently release the item on the wrong page or in the wrong spot, press and hold the item again and finish the move.
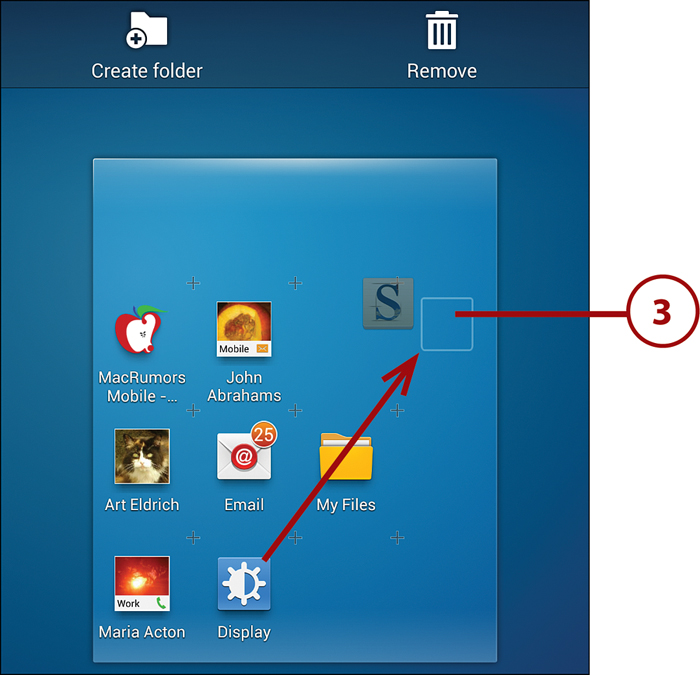
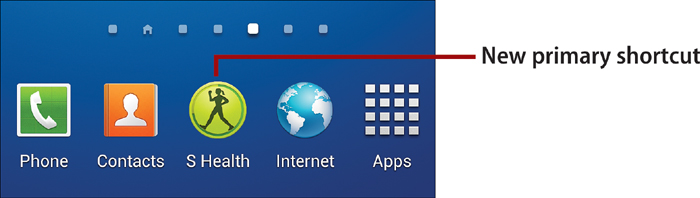
>>>Go Further: Rearranging and Replacing the Primary Shortcuts
• To rearrange the primary shortcuts, press and hold the one that you want to move, drag it to the left or right, and then release it when it’s in the desired position.
• To remove a primary shortcut, press and hold it, and then drag it to the Remove icon at the top of the Home screen page. If you want to remove the primary shortcut from the bottom of the screen but keep it on the page, drag it to any blank spot on the current Home screen page.
• To replace a primary shortcut (or add one, if you currently have less than four), find the replacement shortcut on a Home screen page, and drag it onto the primary shortcut you want to replace. (If the desired app shortcut isn’t already on a Home screen page, you must first create a shortcut for it as described earlier in “Adding Shortcuts.”)
Setting the Apps View
The default method of viewing your installed apps is an alphabetical, multipage grid. Because you’ll spend a lot of time in Apps, you may prefer to change this display to show your apps as an alphabetical scrolling list or as a custom grid arranged in any fashion and order that you like.
1. On the Home screen, tap the Apps icon.
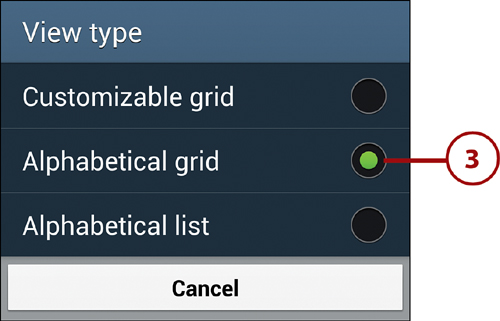
2. Select the Apps tab, press the Menu key, and tap View Type.
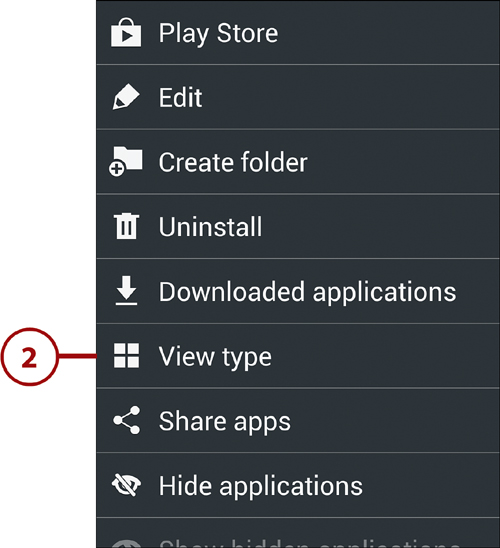
3. In the View Type dialog box, select one of the following:
• Customizable Grid. This option enables you to create additional grid pages and arrange the app icons however you like, such as putting all games together, placing the most frequently used apps on the first page, and creating folders in which to store certain apps.
• Alphabetical Grid. This is the default display style, presenting all app icons alphabetically on a series of 4×5 grid pages.
• Alphabetical List. Select this option to present the apps in an alphabetical, vertically scrolling list—like the contact list in Contacts.
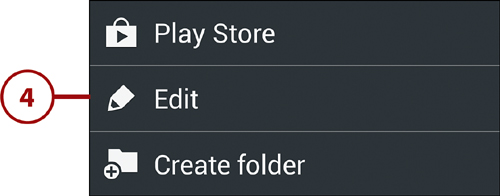
4. If you chose Customizable Grid in step 3, you can customize the grid by pressing the Menu key and tapping Edit. (Be sure to choose the Edit command. Otherwise, changes made are to Home screen pages rather than the Apps pages.) Then do any of the following:
• To change an icon or folder’s position, press and hold the item, and then drag it to a new position on the current page or another page. Surrounding icons move to make room for the item.
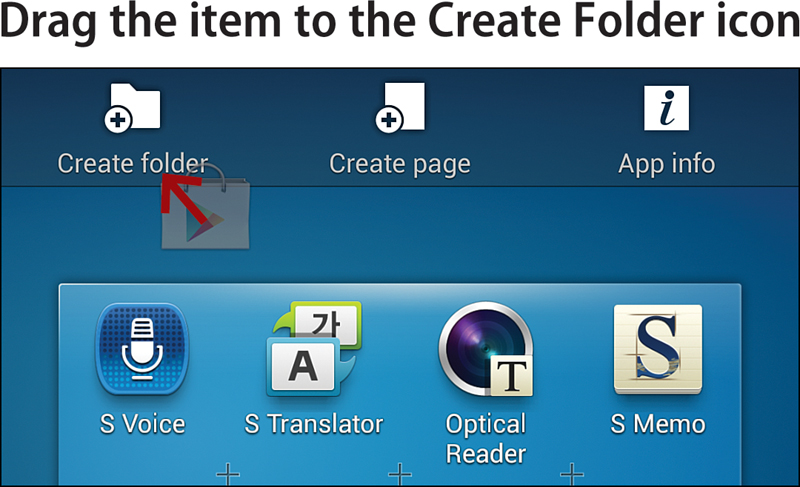
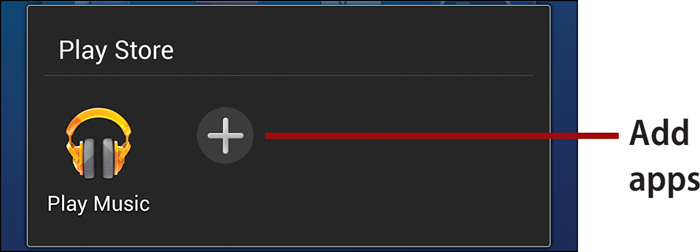
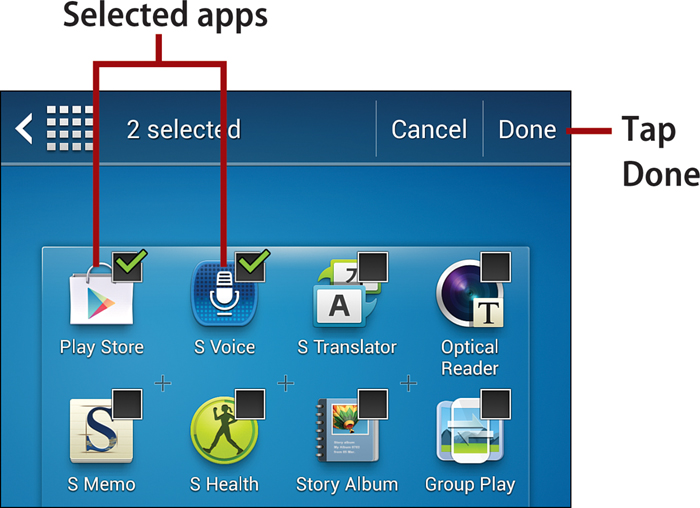
• To create a folder, press and hold an icon that you want to move into the folder, and drag it onto the Create Folder icon at the top of the screen. Type a name for the new folder in the Create Folder dialog, and then tap the OK button. To add other apps to the folder, tap the folder, tap the plus (+) icon, select the check box for each app to add, and tap the Done button.

Removing Apps from a Folder
To remove an app from a folder, tap the folder to display its contents, and then drag the app out of the folder.
• To remove a folder, press and hold it, and then drag it onto the Remove icon at the top of the screen. Tap OK in the Remove Folder confirmation dialog. Apps within the deleted folder are restored to the Apps pages.

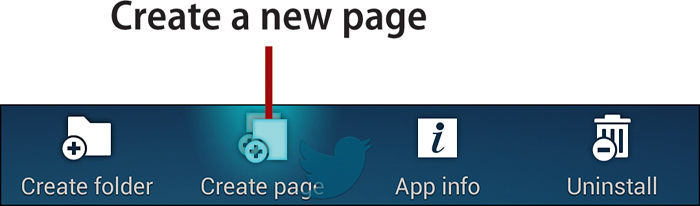
• To add a new Apps page, navigate to the page after which you want to insert the new page. Press and hold an icon that you want to add to the new page, and drag it onto the Create Page icon at the top of the screen.
When you finish making changes to the Apps pages, tap the Save button or tap Cancel to ignore all changes.

Changing System Settings
By changing preferences in Settings, you can make the phone look and work to match your needs. Although system and app settings are discussed throughout the book, this section points out some settings that aren’t mentioned elsewhere but are important in customizing your phone.
To access system settings, go to the Home screen, press the Menu key, and tap Settings. To access an app’s settings (for those that provide them), launch the app, press the Menu key, and tap Settings.
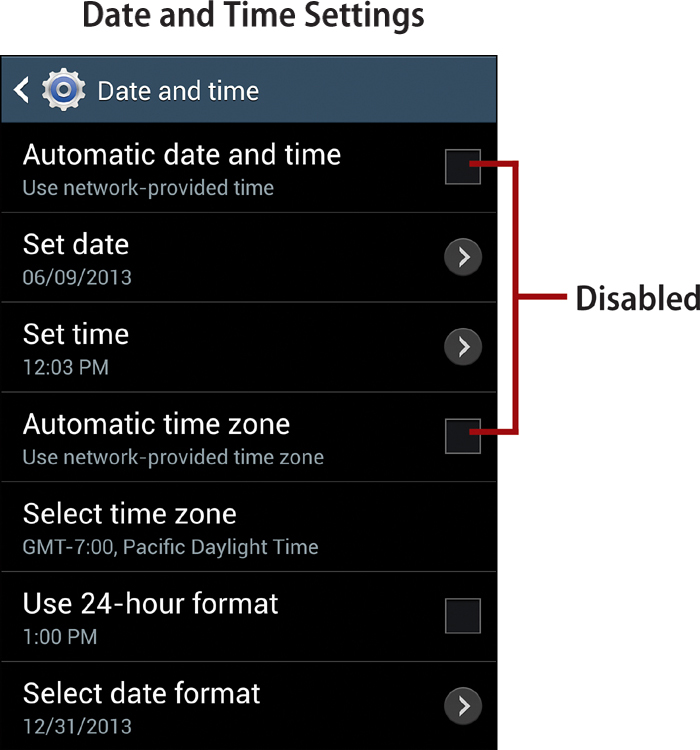
Setting the Date and Time
In Date and Time Settings, when the Automatic Date and Time and Automatic Time Zone settings are enabled, date, time, and time zone information is automatically obtained from the network. To change these settings, open Settings, select the More tab, and tap Date and Time.
If necessary, you can override this information by disabling the two Automatic settings and then making changes to the Set Date, Set Time, and Select Time Zone items. Tap Select Date Format if you want to change the format for displaying dates.
Enabling Motion and Palm Motion Settings
You can selectively enable Motion and Palm Motion settings to control phone features by tilting, shaking, or making special movements with the phone.
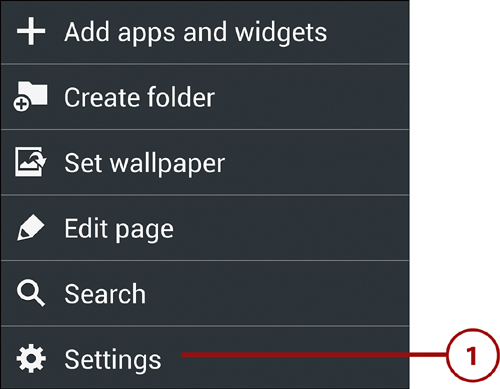
1. On the Home screen, press the Menu key and tap Settings.
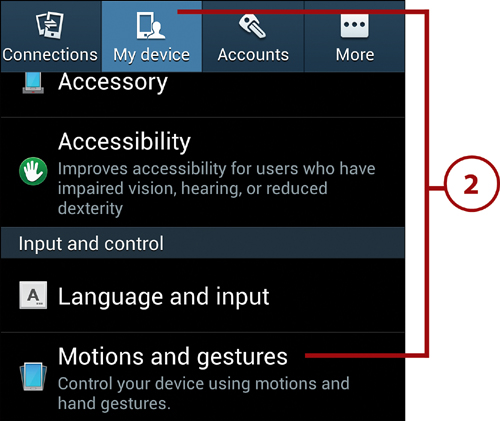
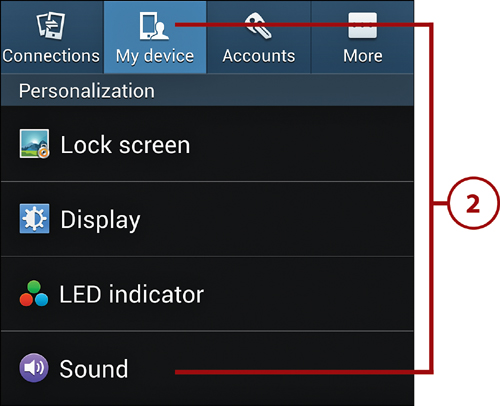
2. Select the My Device tab. Scroll to the Input and Control section, and tap Motions and Gestures.
3. Move the sliders to On or Off to control the three categories of motions and gestures: Air Gesture, Motion, and Palm Motion. Tap Gyroscope Calibration to start a calibration routine for the phone’s gyroscope.
4. Tap Motion to enable or disable the various Motion settings.
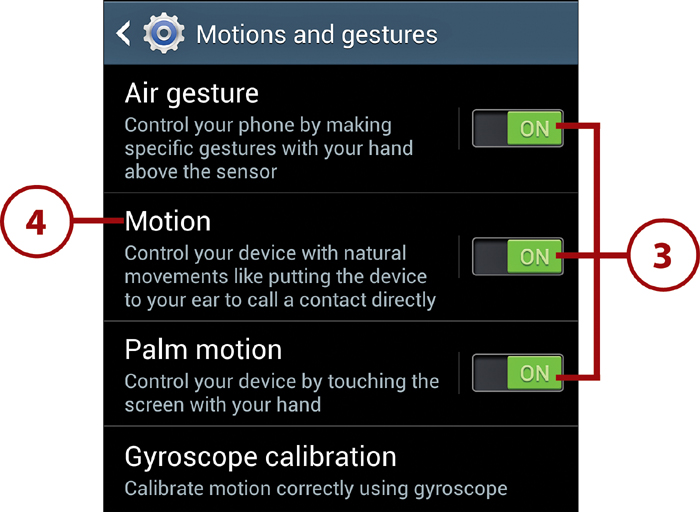
5. To use any of the motion features, you must set the Motion switch to On. Similarly, you can simultaneously disable all motion features by setting the Motion switch to Off.
6. When the Motion switch is On, the individual Motion settings work as follows:
• Direct Call. When viewing a person’s contact record, you can move the phone to your ear to place a call to the person.
• Smart Alert. When you pick up the phone, you’re notified of missed calls or messages.
• Zoom. When viewing an image in Gallery or a web page in the Internet app, place two fingertips on the screen, and tilt the phone toward you to zoom in or away from you to zoom out.
• Browse an Image. Press and hold an onscreen image in Gallery to pan within it by tilting the phone up, down, left, and right.
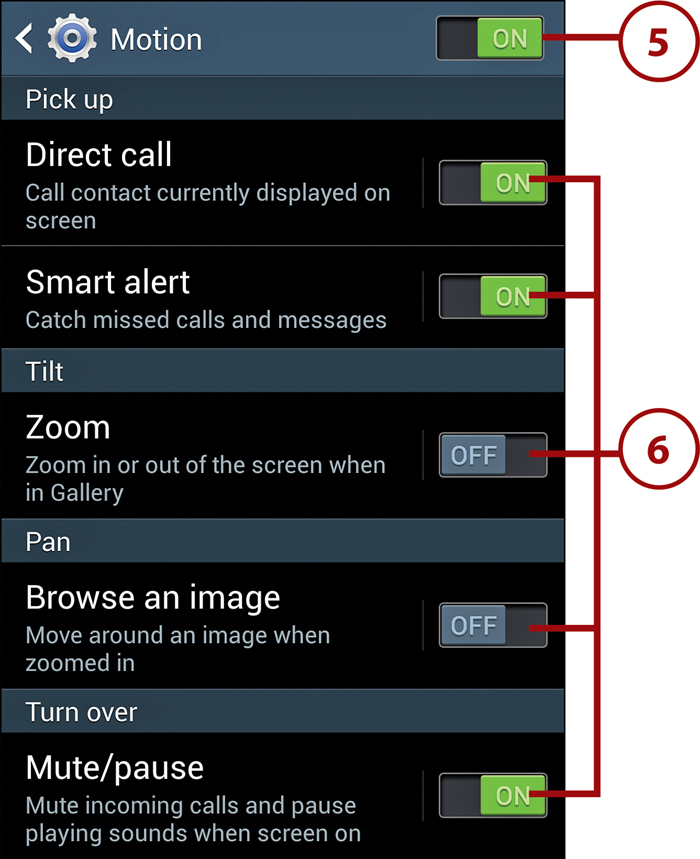
• Mute/Pause. Mute incoming call ringtones or pause playing media by turning the phone over so that it’s face down.
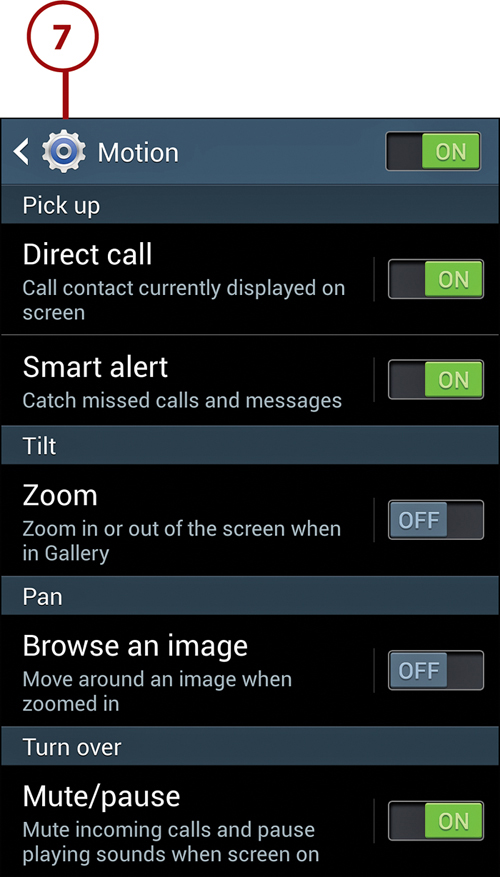
7. Tap the Settings icon or press the Back key to return to the Motions and Gestures screen.
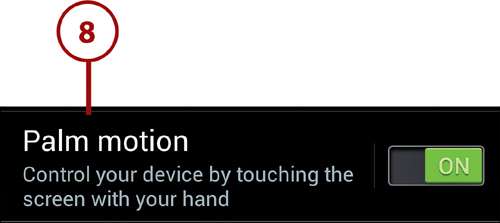
8. Tap the Palm Motion text to view the Palm Motion settings.
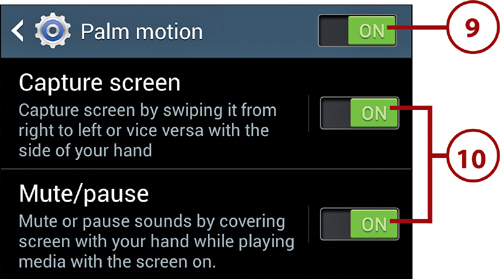
9. To use either of the Palm Motion features, you must set the Palm Motion switch to On. (You can turn both features off at once by setting the Palm Motion switch to Off.)
10. The Palm Motion settings work like this:
• Capture Screen. Create screen captures by placing the edge of your hand on the screen and dragging across it. Captured screens are saved in the Screenshots folder. (You can also create screen captures by simultaneously pressing the Home key and Power button.)
• Mute/Pause. Mute audio or pause video by covering the touchscreen with your palm.
Enabling Air Gesture
The Air Gesture feature enables you to control your phone by gesturing over the sensor at the top of the screen—without touching the screen.
1. Tap the Air Gesture text on the Motions and Gestures screen.
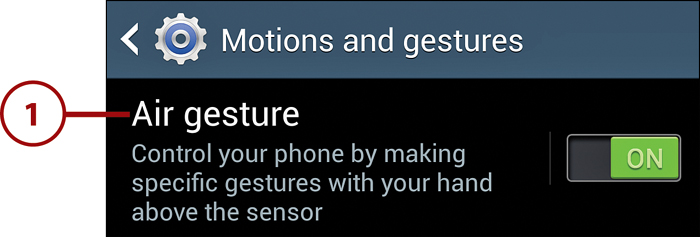
2. To use any of the Air Gesture features, you must set the Air Gesture switch to On. When you want to turn off all the Air Gesture features, move this switch to Off.
3. When the Air Gesture switch is On, the individual Air Gesture settings work as follows:
• Quick Glance. When your phone’s screen is off, move your hand over the sensor at the top of the screen to display information such as notifications, missed calls, unread messages, and battery level. To choose which information appears, tap the Quick Glance text and select check boxes in the scrolling More Information list.
• Air Jump. When viewing a web page or an email message, wave your hand up or down over the sensor to scroll up or down by a screenful of text.
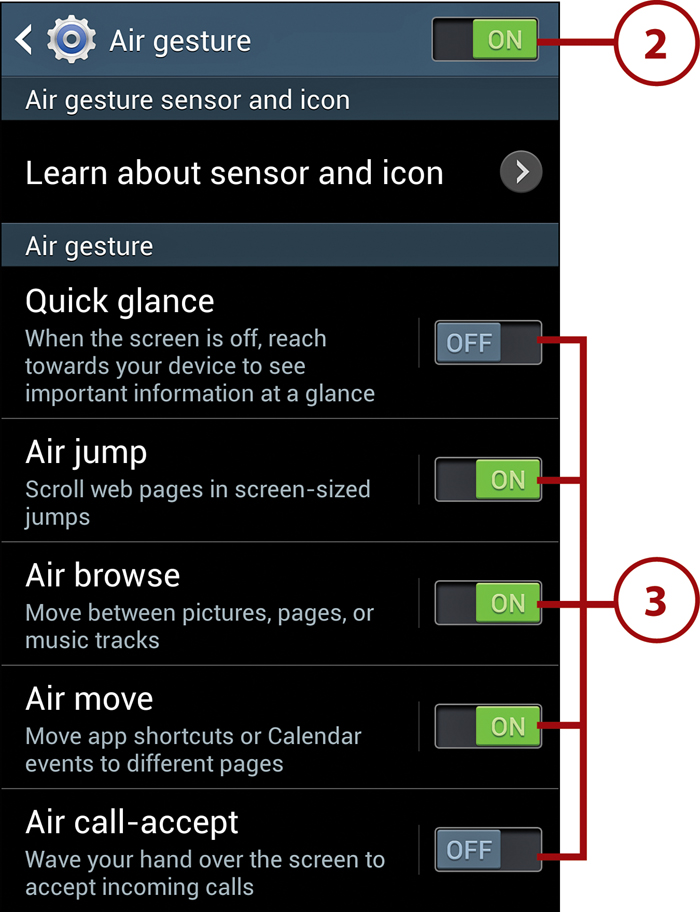
• Air Browse. When playing music, viewing pictures, browsing pages in the Internet app, or working in S Memo, move your hand left or right above the sensor to move to the next or previous item. To choose the apps in which Air Browse works, tap the Air Browse text, and then select check boxes in the scrolling Supporting Applications list.
• Air Move. When working on the Home screen, in the App list, or in Day or Week view in Calendar, tap and hold an item on screen with one hand, and then wave the other hand to the left or right over the sensor to move the item to another page.
• Air Call-Accept. When you receive an incoming call, wave your hand over the screen to accept it.
Where’s the Air Gesture Sensor?
Tap Learn About Sensor and Icon to review some explanatory information about the sensor’s location and the Air Gesture status bar icon.
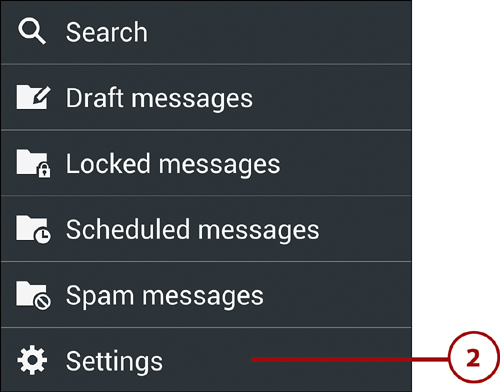
Setting Ringtones
A ringtone is an audible event notification, such as a sound effect or a snippet of music. You can specify default ringtones for incoming calls and text messages, as well as set person-specific ringtones for anyone with a Contacts record.
Setting the Default Incoming Call Ringtone
Unless overridden by a personal or group ringtone, the default ringtone plays to notify you of an incoming call.
1. On the Home screen, press the Menu key and tap Settings.
2. Select the My Device tab, and tap Sound.
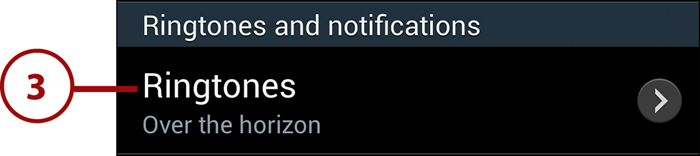
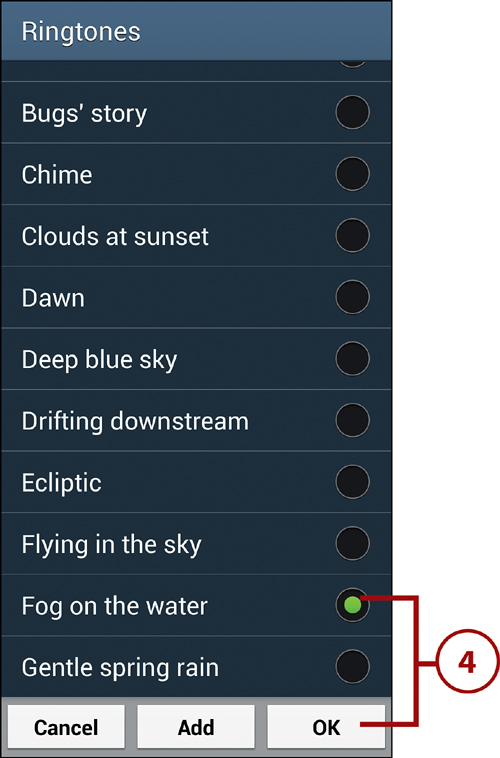
4. The Ringtones dialog box appears, showing a scrolling list containing all built-in, created, and downloaded ringtones. Tap a ringtone to play it. When you’re satisfied with your choice, tap OK.
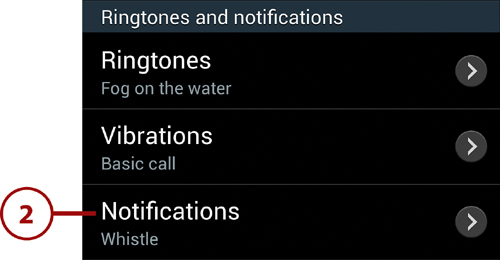
Setting the Default Notification Ringtone
Unless overridden by a personal or group ringtone, the default notification ringtone plays to signify new email, a text message, a missed call, a waiting voicemail, or an upcoming Calendar event. Unlike call ringtones, notification ringtones are brief and less intrusive.
1. Perform steps 1–2 from the previous task (“Setting the Default Incoming Call Ringtone”).
2. On the Sound setting screen, tap Notifications.
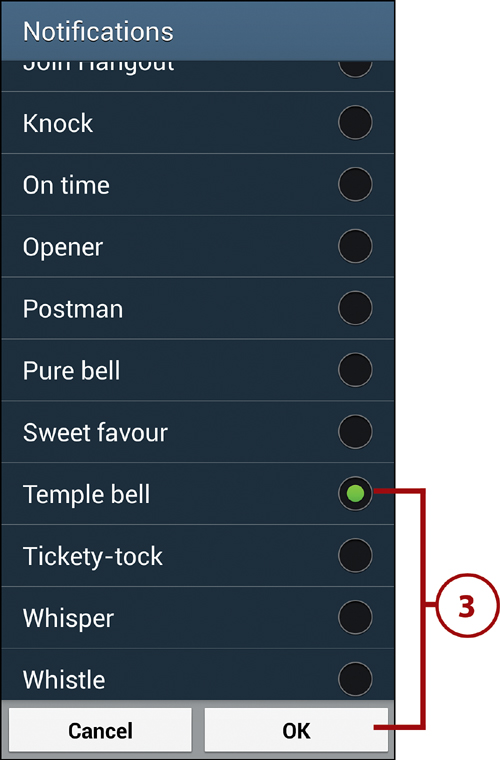
3. The Notifications dialog box appears, showing a scrolling list containing all the notification ringtones. Tap an entry to play it. When you’re satisfied with your choice, tap OK.
Assigning a Ringtone to a Contact
To make it easier to quickly recognize an incoming call from a person, you can associate a distinctive ringtone with his or her record in Contacts.
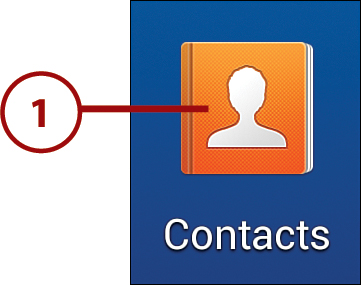
1. On the Home screen, tap the Contacts icon.
2. With the Contacts tab selected, find the person’s record by scrolling or searching. Tap the record to open it.
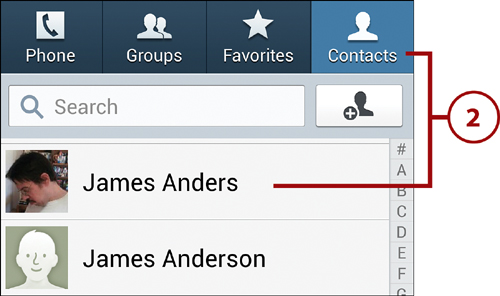
3. Scroll to the Ringtone section of the record, and tap the ringtone entry.

4. Select the ringtone that you want to use and tap OK. Select Default Ringtone (at the top of the list) only if you want to use the default ringtone for this contact.

Using Sound Files as Ringtones
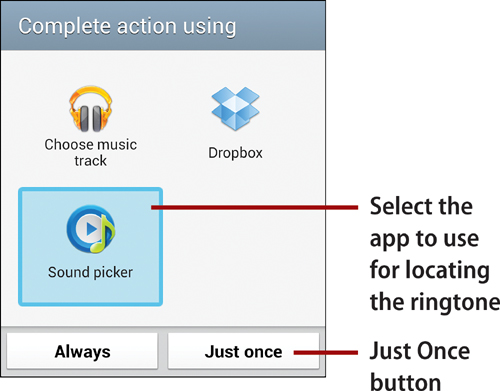
If the ringtone you want to use does not appear in the Ringtones dialog box, tap Add. If the Complete Action Using dialog box appears, select the app that you want to use to locate the ringtone—for example, Choose Music Track or Sound Picker—and tap Just Once. When the app opens, navigate to the ringtone or sound file, select it, and tap OK.
5. The selected ringtone is associated with the person’s contact record.

Assigning a Ringtone to a Contact Group
You can also associate a distinctive ringtone with all members of a contact group. (To learn about groups, see “Working with Contact Groups” in Chapter 5.)
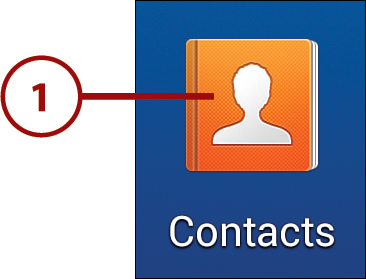
1. On the Home screen, tap the Contacts icon.
2. Tap the Groups tab to display the list of defined groups, and tap a group to show its members.
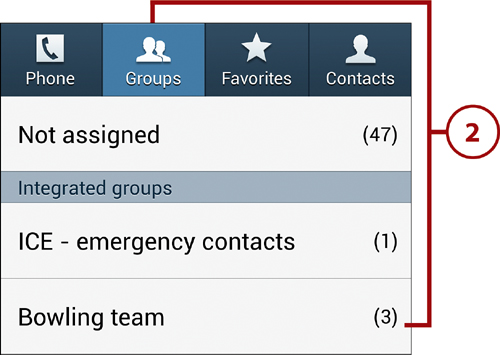
3. Press the Menu key and tap Edit.
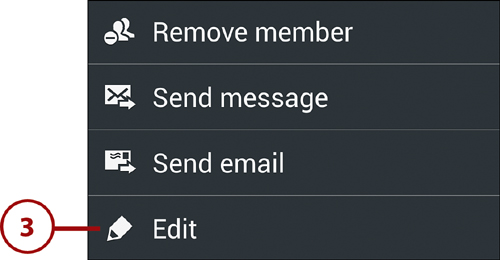
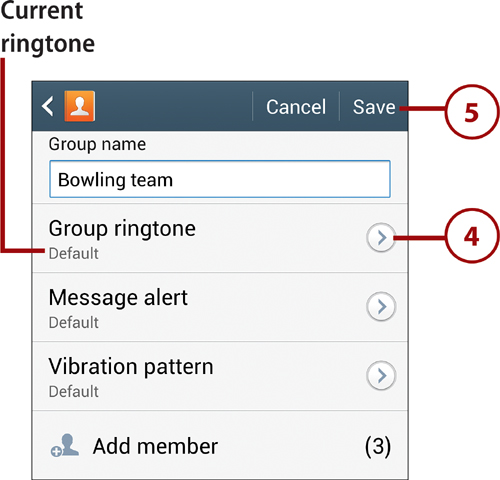
4. Tap Group Ringtone and select a ringtone as described in step 4 of the previous task (“Assigning a Ringtone to a Contact”).
5. Tap the Save button.
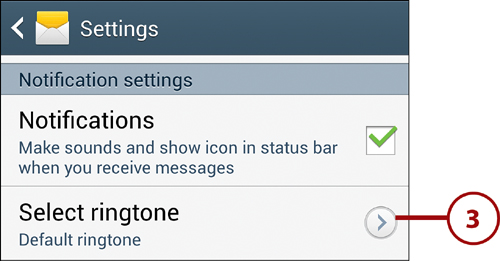
Assigning a Default Messaging Ringtone
You can also select a ringtone to announce new text and multimedia messages.
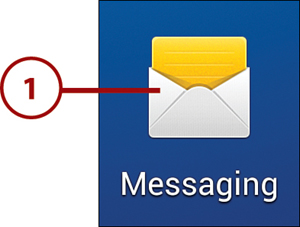
1. On the Home screen, tap the Messaging icon.
2. On the main Messaging screen, press the Menu key and tap Settings.
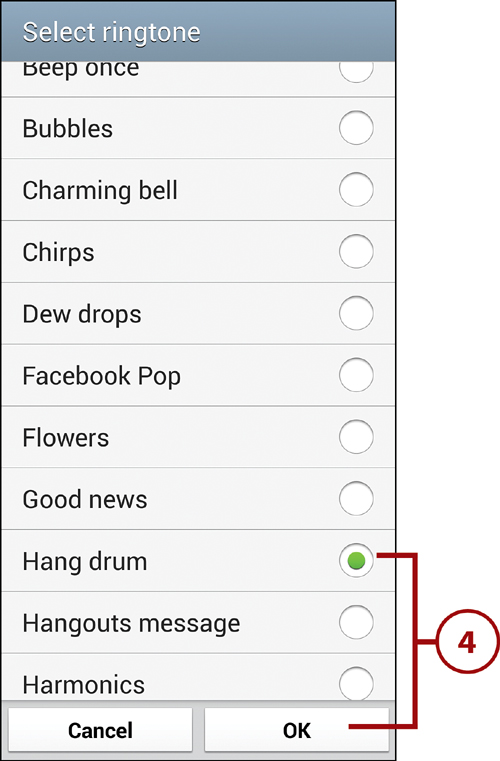
3. Scroll to the Notification Settings section, and tap Select Ringtone.
4. Select a sound effect from the scrolling list and tap OK. (If you’d rather not have a messaging ringtone, select Silent.)
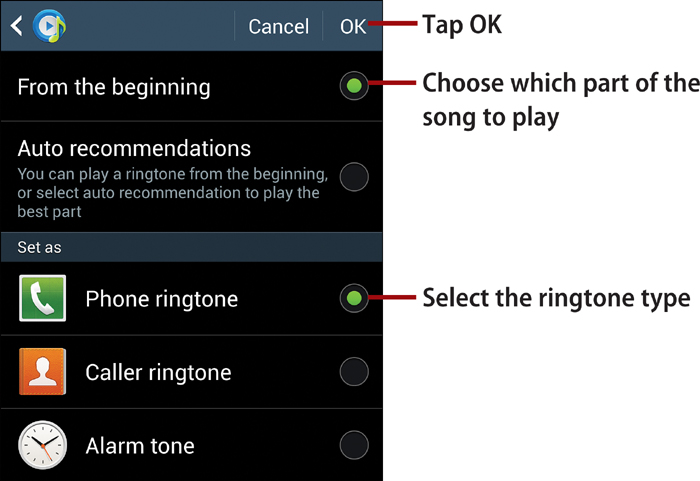
>>>Go Further: Creating Ringtones from Songs
1. Launch Music, and press and hold the song title.
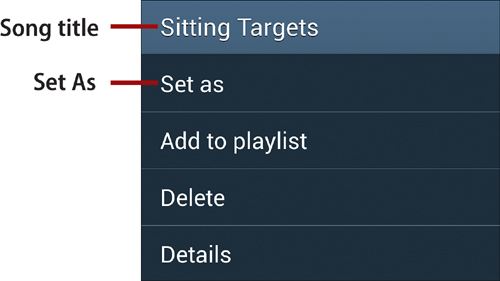
2. In the dialog box that appears, tap Set As.
3. Tap From the Beginning or Auto Recommendations to specify the part of the song to play as the ringtone.
4. In the Set As section, tap Phone Ringtone to use the song as the default ringtone for incoming calls. Tap Caller Ringtone to play the song whenever you receive a call from a particular person in Contacts. Tap Alarm Tone to use the song as the alarm tone for an alarm you’re about to create in the Clock app.
5. Tap OK.
Personalize Your Call Sound
You can personalize the call sound by adjusting the sound balance. This enables you to compensate for hearing loss in one or the other ear or in the upper or lower ranges.
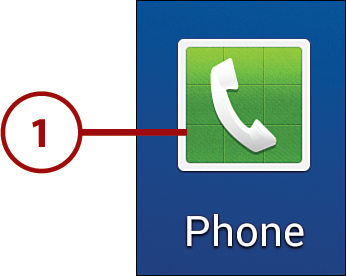
1. On the Home screen, tap the Phone icon.
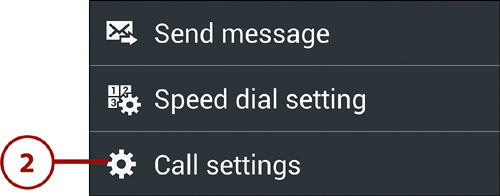
2. In the Phone app, press the Menu key and tap Call Settings.
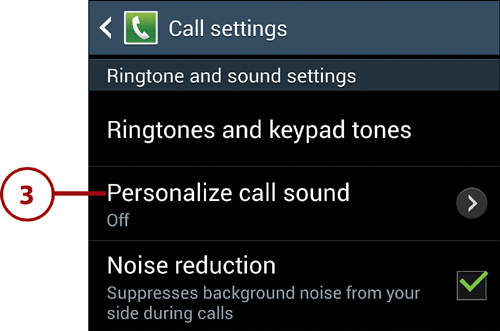
3. Tap Personalize Call Sound.
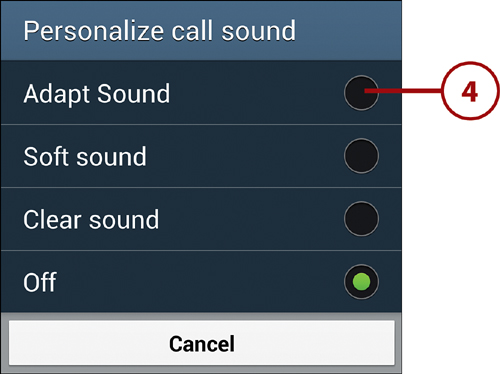
4. Do either of the following:
• To set up a personalized sound balance, tap Adapt Sound and perform the remaining steps in this task.
• Tap Soft Sound, Clear Choice, or Off, and skip the remaining steps.
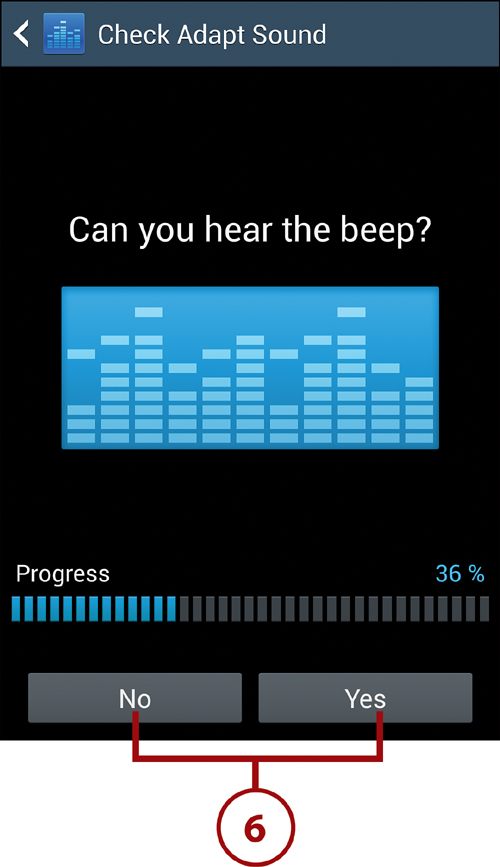
5. Plug in your headphones, put them in or on your ears, and tap Start.

6. Listen for the tones your phone is playing. Tap Yes if you can hear each tone; tap No if you cannot.
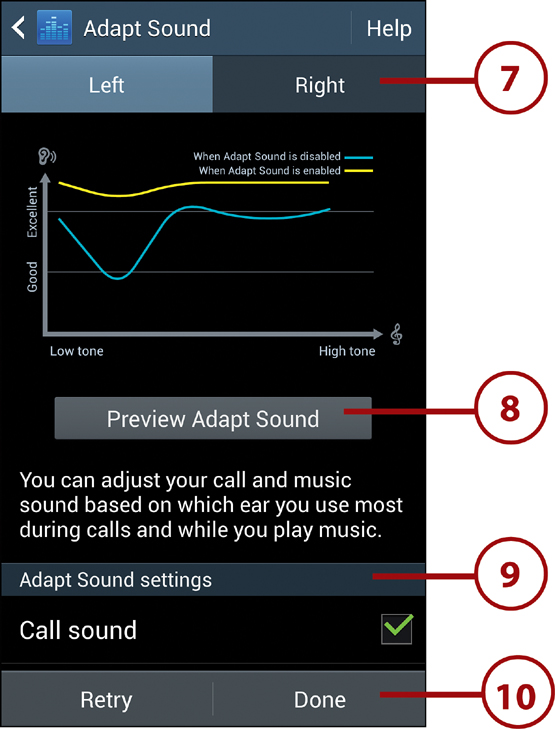
7. On the Adapt Sound screen that appears at the end of the test, tap Left or Right to see a graph of the results for that ear.
8. Tap Preview Adapt Sound to hear audio with the adaptation applied. If the result isn’t satisfactory, tap Retry to go back to step 5 and try again.
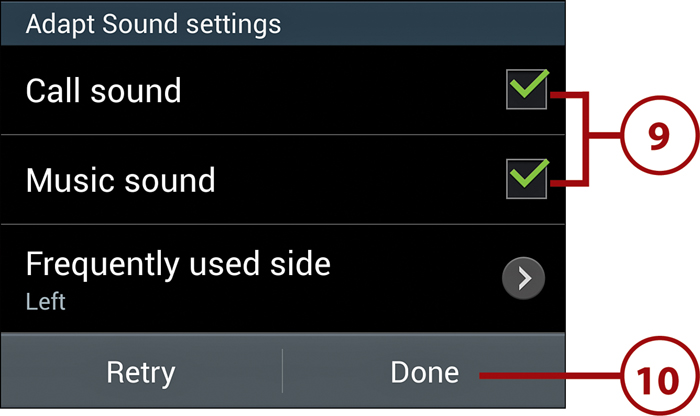
9. Optional: In the Adapt Sound Settings section of the screen, tap check boxes to indicate where you want to enable Adapt Sound—on phone calls and/or when playing music. If you tend to use one ear when you’re on calls, tap Frequently Used Side and select your favored side.
10. Tap Done when you are satisfied with the results.
Using Voice Services
If you don’t like tapping and typing (or are driving, making such activities dangerous and probably illegal), you can use S Voice, Voice Control, and Google Search/Voice Actions to control the phone. Note that Voice Control and Google Search run independently of S Voice.
S Voice and S Voice Driving Mode
S Voice is a voice app that enables you to ask questions in natural language (“Where can I find pizza?”) and launch apps (“Open Calculator”). The result may be a direct answer, a web search, or the launch of an appropriate app, such as Maps. You can also turn on S Voice’s Drive mode for hands-free navigation.
S Voice
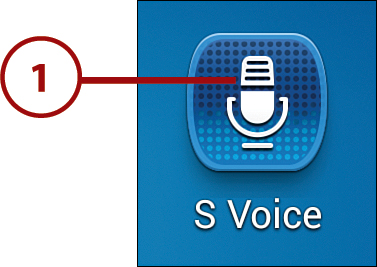
1. First Run Only: Launch S Voice by tapping Apps, followed by S Voice.
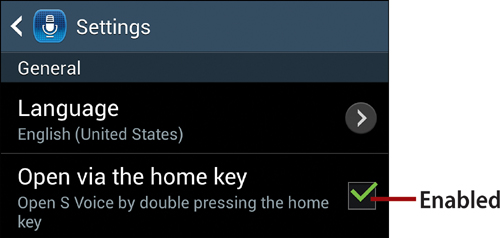
Subsequent Launches
You can configure S Voice so that you can subsequently launch it by double-tapping the Home key, as well as by tapping the S Voice icon. With S Voice running and onscreen, press the Menu key, tap Settings, and enable Open Via the Home Key.
2. The S Voice screen appears. Say your first question or command. For example, you might ask, “What’s the weather like today?” to see the weather forecast for your city. S Voice displays the information it finds.
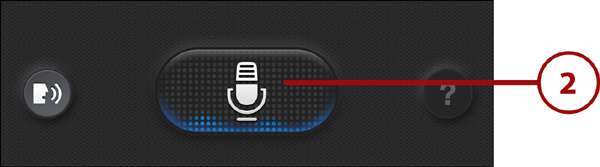
3. To ask S Voice the next question or give it a new command, tap the microphone button or say the wake-up phrase. (“Hi, Galaxy” is the default phrase.)
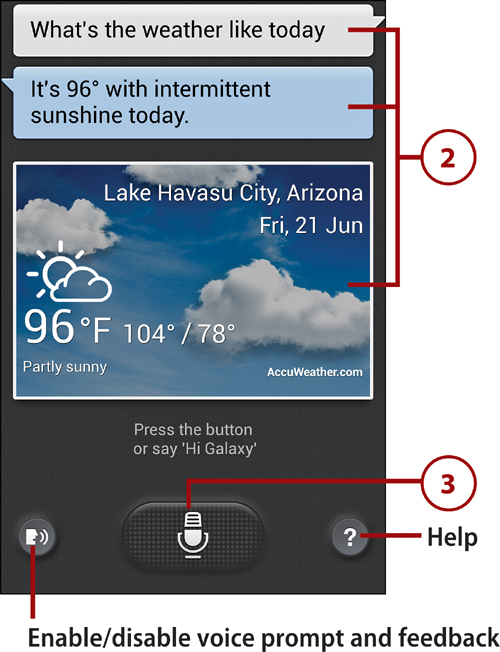
S Voice Command Help
If you want assistance with question phrasing and app commands, tap the Help icon; say “Help”; or press the Menu key, tap Settings, and tap Help.
Be sure to check out the other settings, too. You can change the wake-up command, show or hide offensive words, and set your home address, for example.
S Voice Driving Mode
S Voice Driving mode is a hands-free mode in which you can control the phone with your voice. Driving mode has a simplified interface with larger text, so you can easily read the prompts when the phone is mounted on your dash. In Driving mode, your phone automatically speaks notifications to make you aware of them.
1. To activate S Voice, press the Home key twice or tap Apps, followed by S Voice.
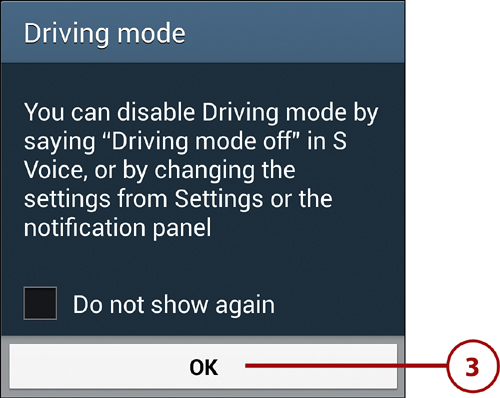
2. Say “Driving mode on.”
3. The S Voice screen switches to Driving mode. Read the Driving Mode dialog box, and tap OK to dismiss it.
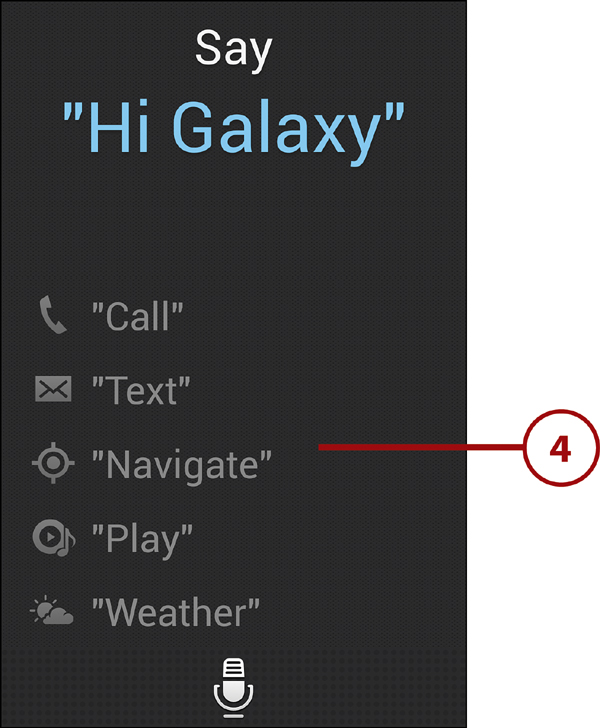
4. To give a command, say “Hi, Galaxy” (or the wake-up phrase you’ve set) and then speak the command. For example, say “Navigate to Phoenix, Arizona.”
5. When you finish using Driving mode, say “Hi, Galaxy” to get S Voice’s attention and then say “Driving mode off.” S Voice restores its regular screen and announces that it has deactivated Driving mode.
Voice Control
When Voice Control is enabled, you can use voice commands to control Phone, Clock, Camera, and Music. (Some carriers may also support voice control of other apps, such as ChatON.)
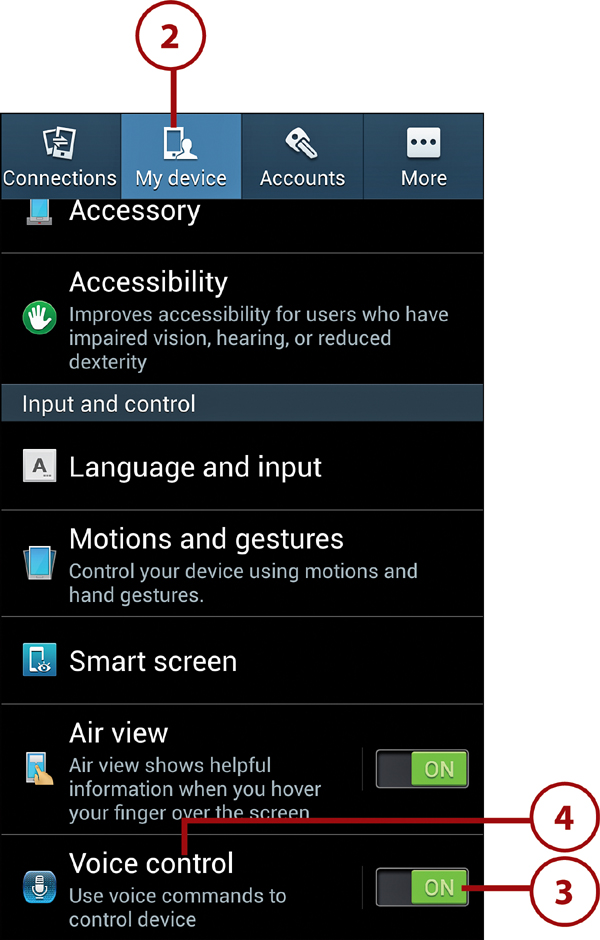
1. On the Home screen, press the Menu key and tap Settings.

3. Scroll to the Input and Control section. Enable Voice Control by moving its slider to the On position, and tap OK to dismiss the Voice Control dialog box that appears.
4. To specify the apps that you want to control, tap Voice Control.
5. On the screen that appears, add or remove check marks to enable/disable Voice Control in each app.
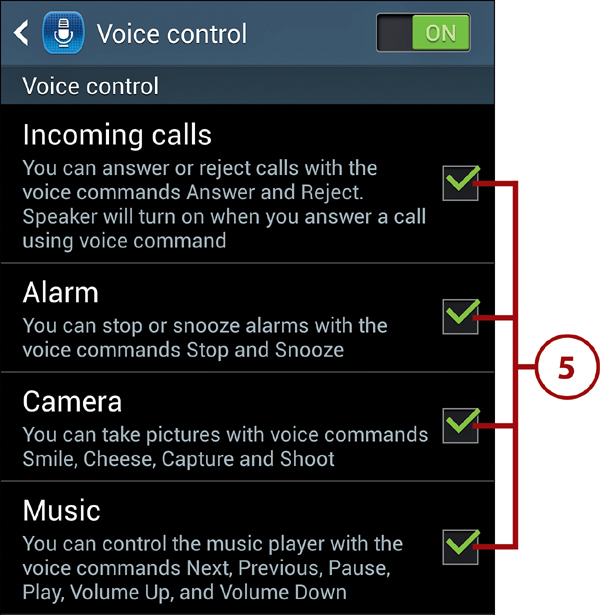
Supported Voice Commands
Review the screen for examples of supported voice commands, such as Pause, Play, and Next in Music. You must launch the appropriate app and make it active before saying commands; they don’t work from the Home screen or within other apps.
Google Voice Search
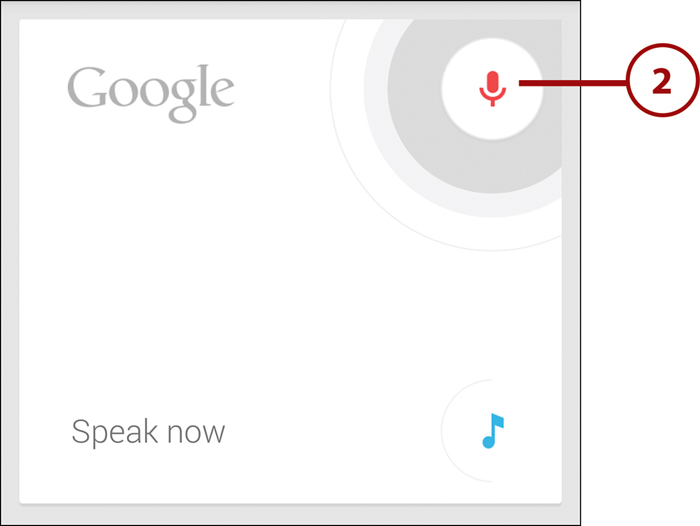
Using the voice input feature of Google Search, you can perform a web search, find people in Contacts, or issue commands—called voice actions—to apps.
1. On a Home screen page that contains the Google Search widget, tap the microphone icon to its right. (From the Home screen, you can also tap Apps, followed by Voice Search.)

2. Say the search text, such as “Samsung Galaxy S 4,” or issue a voice action command, such as “Listen to Talking Heads,” “Call Jameson Auto Body,” or say the name of a person or company in Contacts.
Reminders and Notes
A particularly useful voice command is “Note to self,” followed by the note text. Whatever you say is automatically sent to your Gmail account as both an audio and a text note.
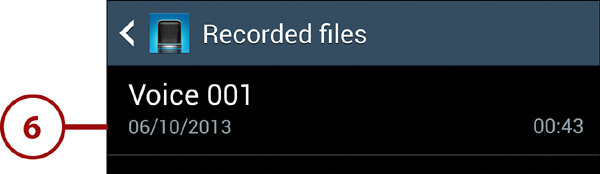
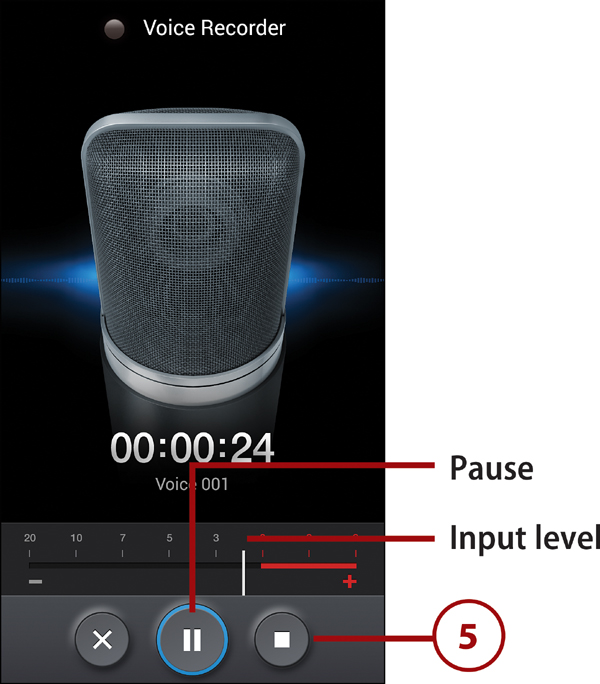
Voice Recorder
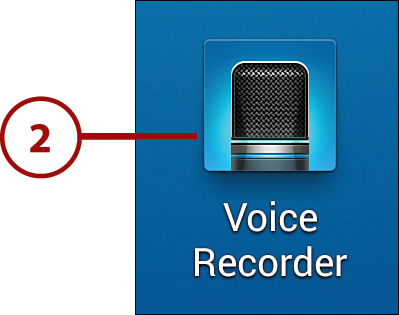
When you need to make a voice note or capture some audio, you can use the Voice Recorder app.
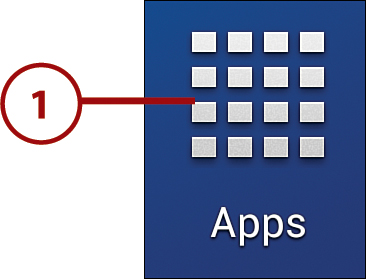
1. On the Home screen, tap Apps.
2. Tap Voice Recorder.
3. Tap the microphone icon to switch between Normal and High quality recording. When High quality is enabled, the icon has two white arcs above it.
4. Tap to start recording.
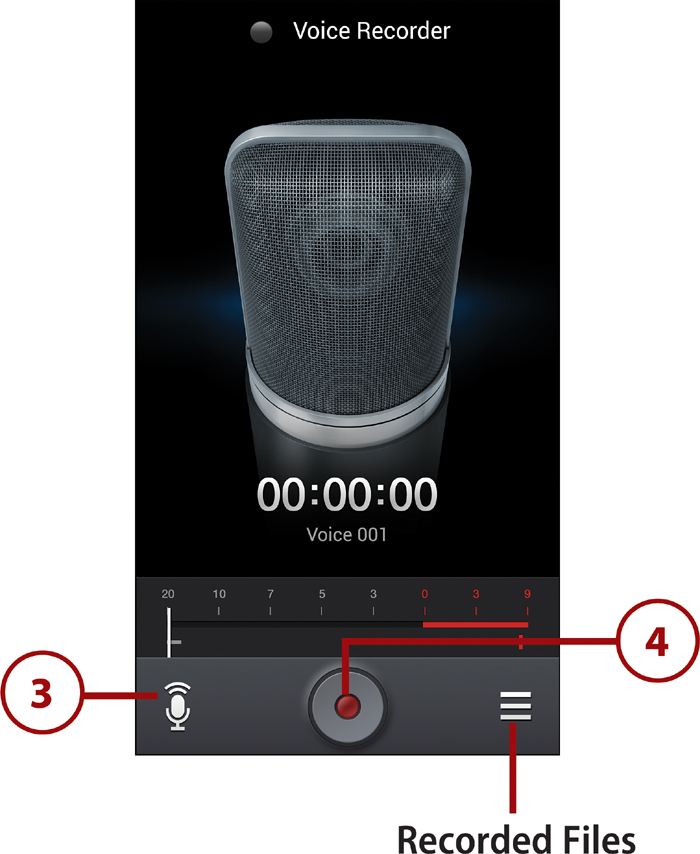
6. In the Recorded Files list, tap the recording to listen to it.