
Chapter Four. Shooting Landscapes Like a Pro
More Tips for Creating Stunning Scenic Images
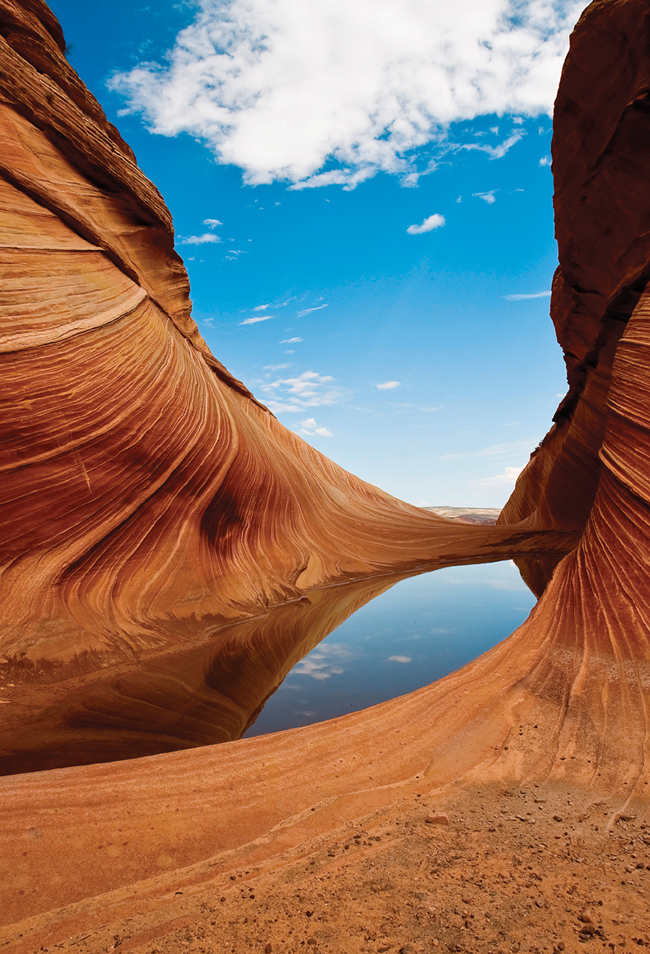
SHUTTER SPEED: 1/160 SEC F-STOP: F/8 ISO: 100 FOCAL LENGTH: 16MM PHOTOGRAPHER: SCOTT KELBY
 In part 1 of this book, I had a chapter on shooting landscapes, and it turned out to be one of the most popular chapters in the book. So, when I started on part 2, I knew right then I would have to include another chapter with even more landscape techniques. And the only way to come up with new landscape techniques is to (you guessed it) shoot more landscapes, and what better place to shoot landscapes than at a landscape photography workshop? So, since I published the last edition of this book, I’ve taught at photography workshops in beautiful locations like Yosemite National Park, Cape Cod, Great Smoky Mountains National Park, and Glacier National Park, and then I just did some shooting in Maine this summer, and some other amazing places like Utah’s Monument Valley, and the Grand Canyon, and a half-dozen other incredibly scenic spots. But when it’s all said and done, do you know what all these places really meant to me? Tax deductions. That’s right, because I went to these locations on business (the images will be used by me to teach photography), I get some really juicy write-offs for these trips. For example, you see that photo on the facing page? That’s The Wave, which is just outside Page, Arizona, and not only is access to The Wave tightly restricted by the Bureau of Land Management, it was a grueling two-hour hike in scorching 112° desert heat over rocky mountains and hot desert sand, lugging all my camera gear, tripod (and bottles of water), and I have to be honest with you—there were times when I almost gave up, but you know what kept me going? It was the fact that if I didn’t get there, and get a decent enough shot to make it into this book, I couldn’t write my trip off as a tax deduction. See, I really do care.
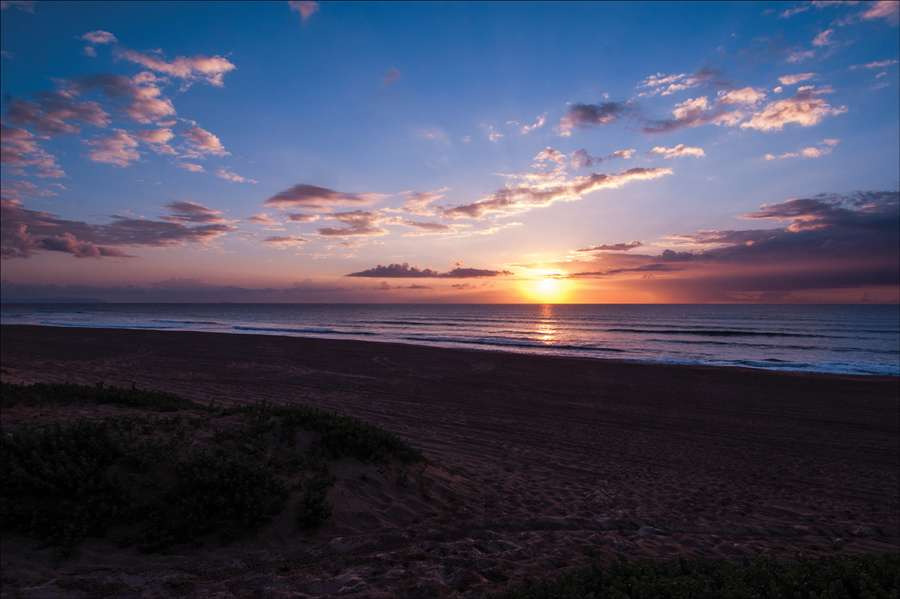
Because you’re shooting into the sun, it can really throw your camera’s built-in light meter way off, and what looked so beautiful when you were standing there comes out...well...pretty lame. Luckily, there’s a simple trick to getting perfect sunset shots every time. The trick is to aim just above the setting sun itself (but make sure you can’t see the sun itself through your viewfinder), then hold your shutter button halfway down, which tells the camera to set the exposure for just what it sees in the viewfinder right now. This gives you a perfect sunset exposure, but don’t let go of that shutter button quite yet (keep it held down), then you can move your camera and recompose the shot as you’d like it to look. By keeping that button held down, you’ve locked in that perfect exposure, and once everything looks good to you, just press the shutter button down the rest of the way and take the shot. You will have nailed the exposure and captured the scene perfectly.
Cutting Reflections in Water
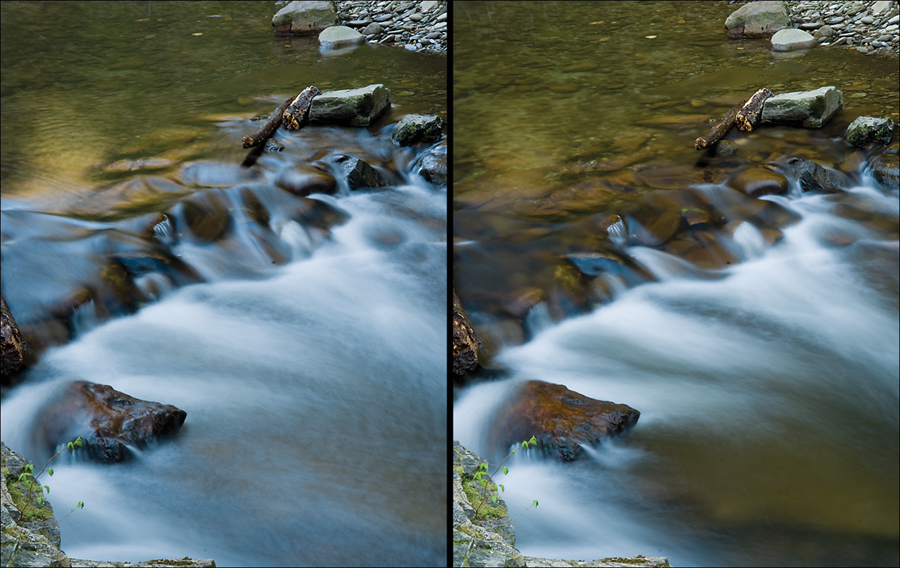
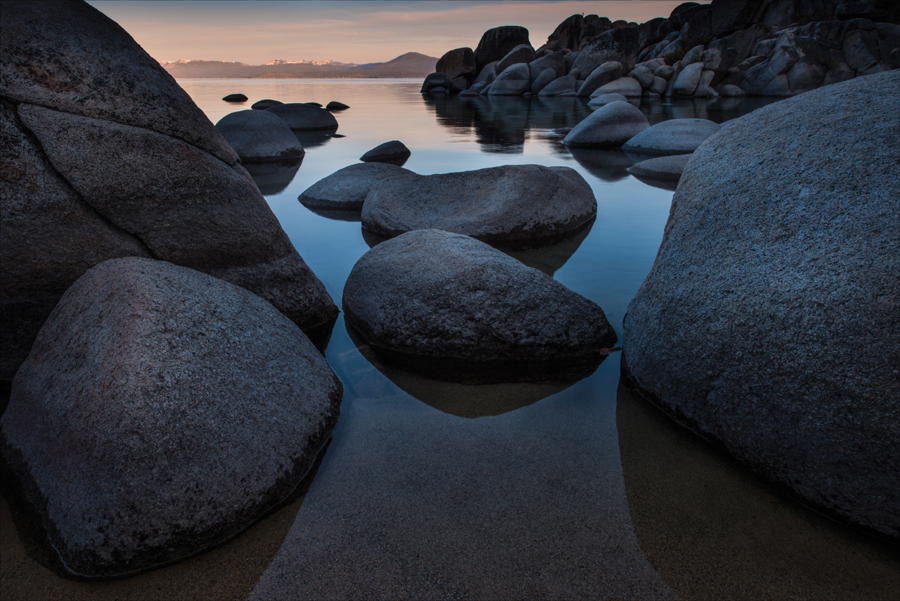
If you’re shooting streams or lakes, or really anything with water, there’s a filter you’re going to want to use that does something very important—it removes the reflection of the sky from the water and lets you see through the water. That way, things like rocks below the shore or in a stream, fish in a koi pond, etc., all suddenly appear crystal clear, and that can make for some very compelling images. The thing that surprises most folks is that it’s a filter that most photographers use to get bluer skies—a circular polarizer. As I mentioned in part 1 of this book, a polarizer is indispensable for getting those blue skies, but it’s just as important for this overlooked double-duty of cutting reflections. Here’s how it works: screw the filter onto your lens, aim at the water in front of you, and then rotate the circular ring at the end of the filter, and as you do, you’ll almost magically cut through the reflections and see right through the water, as seen on the right here. It’s one of those things you really just have to try to appreciate it, but believe me—you’ll love it.
One of the things that kills a lot of landscape shots is that there’s no clear subject, and for a landscape shot to really work, you have to be able to look at it and explain what you shot in one simple sentence. It’s a lighthouse. It’s that seagull on the rocks. It’s that old barn. It’s the palm trees on the beach. If you can’t explain your landscape shot in a short sentence like that, you don’t know what the subject is, and if you don’t know, people viewing your image won’t know either, and if that happens, the photo just isn’t working. Keep this in mind when you’re composing your landscape shots, and ask yourself the question, “What’s my subject?” If you can’t come up with a solid answer immediately, it’s time to recompose your shot and find a clear subject. It makes all the difference in the world.
Using Your LCD Monitor Outdoors
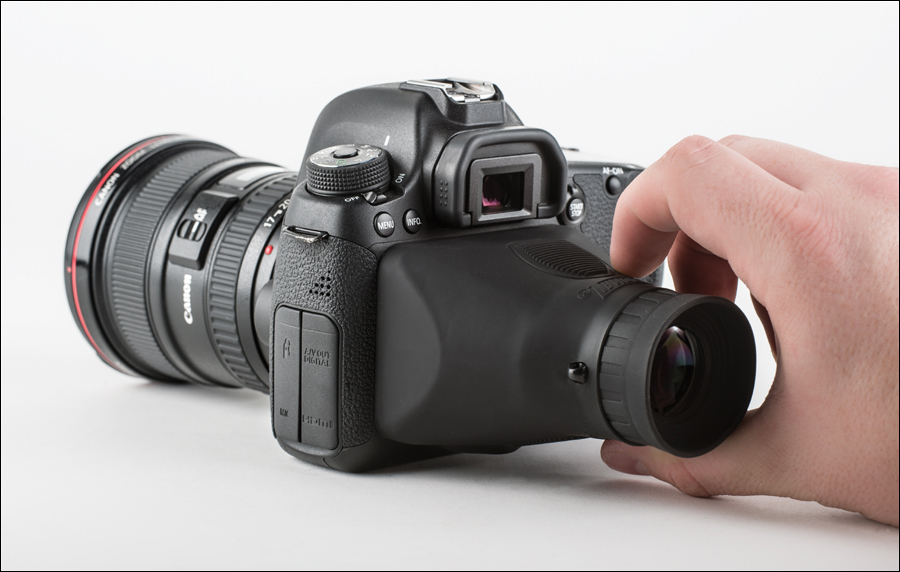
If it’s bright outside, you’re going to quickly run into one of the biggest challenges of shooting outdoors, and that is you can’t see anything on your LCD monitor—the sunlight washes everything out. In fact, it’s often so hard to see anything that you might as well turn off your monitor and save your battery, but then your LCD monitor becomes about useless. That’s why I’ve fallen in love with the Hoodman HoodLoupe Professional. You wear this around your neck (when you’re shooting outdoors), then you simply hold it up over your LCD monitor and its soft rubber enclosure blocks out the sun and gives you a crystal clear view of your monitor. I carry this with me to all my outdoor shoots, and after you use it even once, you won’t want to be without it. (Note: Even though it’s called a “loupe,” it doesn’t really magnify your image like a traditional loupe—it just blocks the sun out, but really, that’s all we need.) It sells for around $80 at B&H Photo.

Want to really bring out the vibrance and color of your shots that have a rainbow in them? Then use a circular polarizer (now we’ve got three reasons to have a polarizer: [1] bluer skies, [2] cutting the reflections in water, and [3] making your rainbows “pop!”). Just turn the circular end of the filter while you’re aimed at the rainbow and stop when the colors look their most vibrant. Easy enough to do, and the results are worth it. Now, beyond that, there’s a wonderful tip I learned from my buddy, and renowned landscape photographer, Bill Fortney. Bill says, “If you see a rainbow, drive like the devil until you find something interesting for the rainbow to come down in.” He doesn’t mean drive until you come to the end of the rainbow, or all you’ll get is a shot of that pot of gold. Just drive until you can find a gorge, or a water source, or something—anything interesting—for it to end with. Do those two things and you’ll wind up with a remarkable shot.
A Timesaving Pano Trick
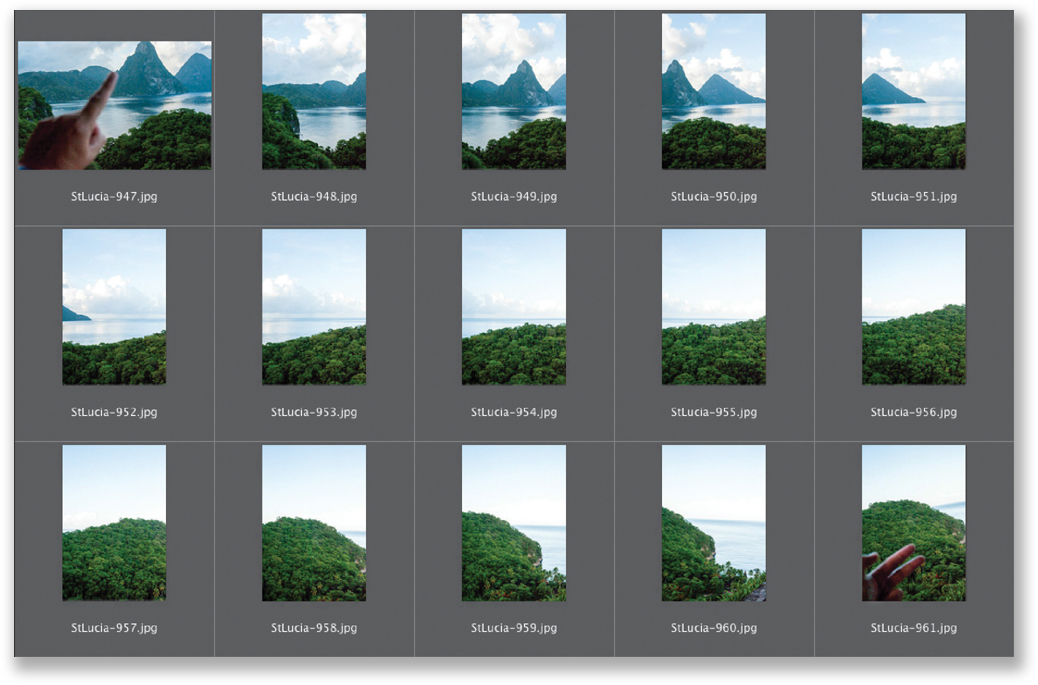
When you come back in from your shoot, if your shoot included some panos, you’re going to quickly find out one of the hidden challenges of shooting panos: finding them. For example, when you open your images in Adobe Photoshop Lightroom, or Adobe Bridge, or in iPhoto, etc., you’re looking at thumbnails of perhaps hundreds of images from your shoot, and it’s a bit of a challenge to figure out where your panos start and end. In fact, numerous times I’ve been looking through thumbnails from a shoot, and I look at a shot and think, “What was I thinking when I took this one?” Only to find out later it was one frame from a 10-frame pano. Worse yet, if I’m shooting on vacation, it might be a week or more before I get home to look at the images, and I completely forget that there’s even a pano included in a particular shoot, because they just don’t jump out at you. Luckily, there’s a simple trick that makes finding your panos a two-second job: Before you shoot the first frame of your pano, hold your finger up in front of your lens and take a shot (as you see in the first frame above). Now start shooting your pano. Once you finish shooting the last shot of your pano, hold two fingers in front of the camera and take another shot (as seen in the last frame). Now, when you’re looking at your photos in a photo browser and you see one finger in your shot, you know there’s a pano starting there. So, select all the photos that appear between your one-finger shot and your two-finger shot—that’s your pano. Open those in Photoshop and let it stitch them together for you (we looked at this in Part 1 of this book series).
The Trick for Using a Fisheye Lens
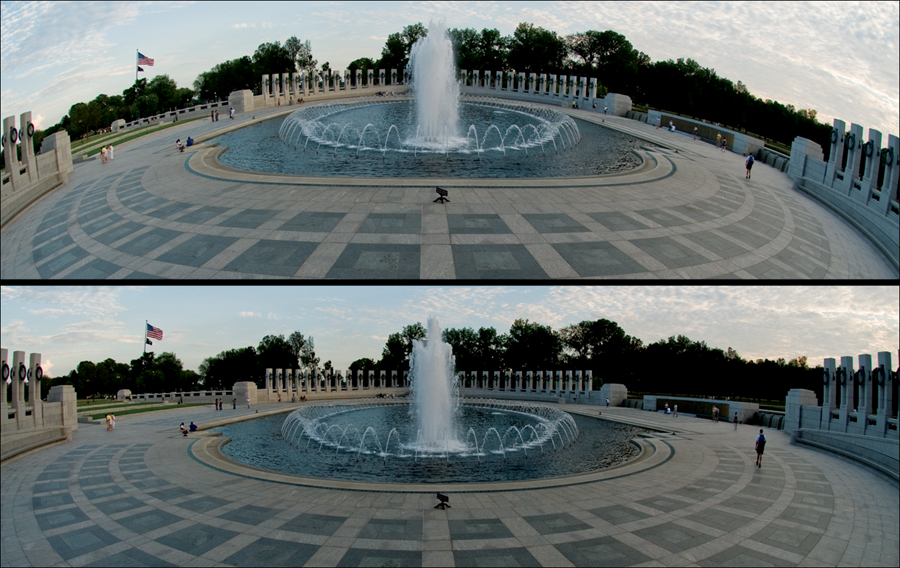
Fisheye lenses are making a big comeback, and they actually can be very cool for a variety of landscape shots—you just don’t want your final image to look rounded and distorted, like many fisheye shots you see. You only want a very wide field of view. The trick to doing that is to simply keep the horizon line in the center of your image. This limits the amount of fisheye-like distortion and makes a huge difference in the final look. The best way to test this is to actually tip your camera downward, then back up toward the sky, all while looking through the viewfinder. You’ll see the edges of your image distort as you move up and down (as seen in the top image), but you’ll notice that as your horizon line gets centered in the image, the fisheye distortion is at its very minimum (like in the bottom image), and it just looks like a really, really wide-angle lens. Give it a try—you’ll see what I mean (by the way, this is the only time you really want the horizon line in the center of your image, as you learned in part 1 of this book).
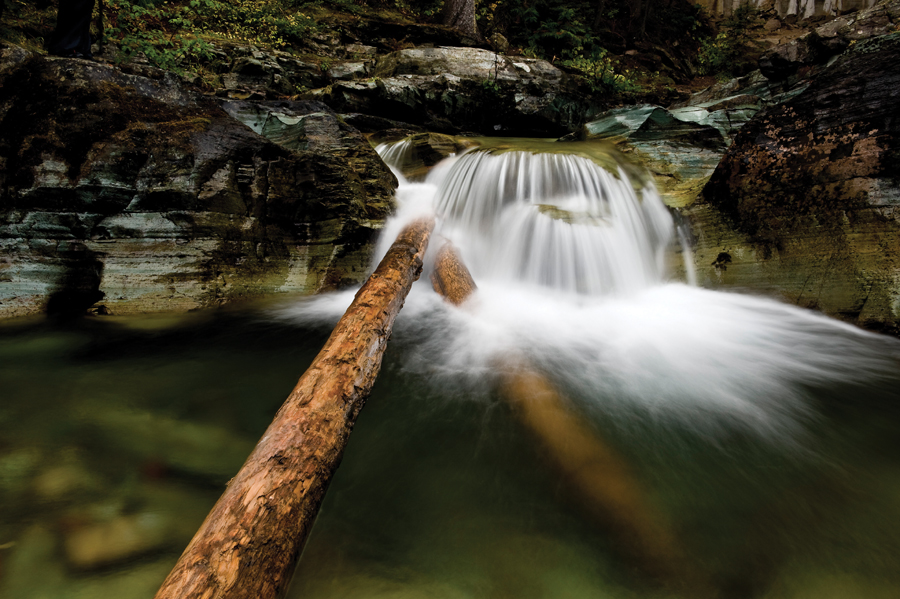
If it’s a gray, cloudy, rainy day (I don’t mean pouring rain—a light drizzle or soft rain), then head to a local stream, because you’re about to make some magic. The overcast, cloudy, rainy sky does two things that make it ideal for shooting streams: (1) it makes the rocks, leaves, and everything sticking out of the stream nice and wet, which looks great in stream photographs, and (2) it makes the scene much darker (and the darker it is while still daylight, the better), which lets you use long shutter speeds, and it’s those longer shutter speeds that give the stream that wonderful silky-water effect. Try shooting in aperture priority mode, and set your aperture (f-stop) to f/22 (or a higher number if your lens has it). With this darker sky, f/22 will leave your shutter open long enough to give you that silky-water look. The shot above was taken on a drizzly afternoon where there was literally nothing else to shoot, and shooting at f/22 in the forest, under that dark, cloudy sky, left my shutter open for 13 seconds (in aperture priority mode, you pick the f-stop and then your camera will leave the shutter open for however long it takes to get the right exposure—in this case, I stood there in the gentle rain for 13 seconds. How do you like the way that phrase “gentle rain” made the experience sound? Actually, I was cold and wet, but cold, annoying rain just doesn’t paint a pretty picture—but the camera sure captured one).
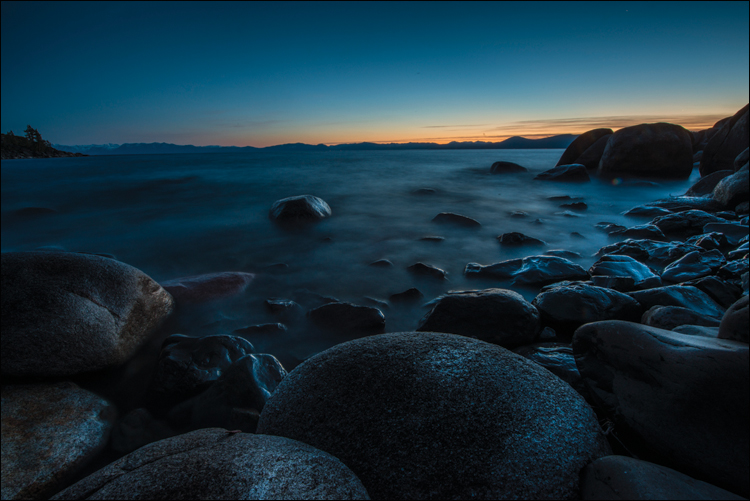
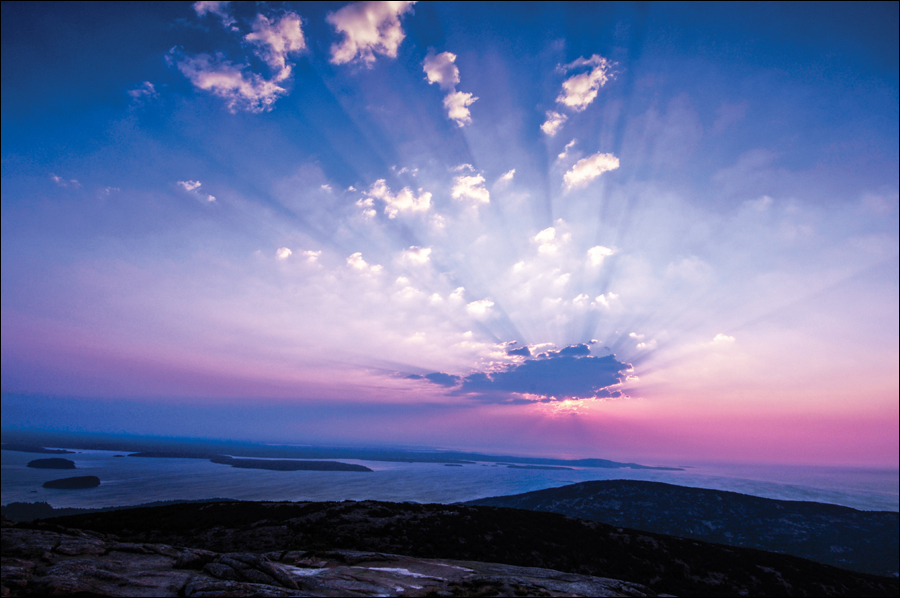
More and more people have totally embraced the golden rule of landscape photography, which is to only shoot when that wonderful, magical light is available, and that only happens just before and during dawn, and just before and during sunset. However, a lot of folks pack up their gear just a few minutes after the sun has gone down, and the sad part is, they’re about to miss what is often the most magical light of all. Around 20 to 30 minutes after sunset, sometimes the clouds turn bright orange, or deep red, or purple, or if you’re lucky, a combination of all three, and some of my all-time best shots have been taken after everyone else has gone to dinner. Wait even longer (30 to 45 minutes or more after sunset), and the sky will often turn a vibrant, deep blue (not black, like the night—I’m talking blue—and it happens right before night). It only lasts for a few minutes (10 or 12 minutes usually), but what wonderful twilight photos you can get then. Try this blue twilight-hour shooting when you have a cityscape, or bridge, or other lit object in the background—it makes for a wonderful scene.
Remember, Your Camera Has Similar Settings
If I’m talking about white balance, and I’m showing the Canon white balance menu, but you’re not shooting with a Canon, simply breathe deeply and say to yourself, “It’s okay, my [insert your camera name here] also has a white balance setting and it works pretty much like this one.” Remember, it’s about choosing the right white balance, not exactly which buttons to push on your camera.
I love the look of fog or mist in images. To me, it adds mystery and intrigue to the scene, but one unfortunate side effect is that it also is very hard for your camera’s built-in light meter to read properly, so you get what you’re seeing with your naked eye. Of course, like so many things, there’s a trick of the trade that helps you get a good exposure that keeps that foggy look. Start by aiming at the fog itself, and then hold your shutter button halfway down (which tells your camera to take a reading of that area). Now, go to your camera’s exposure compensation control and increase the amount of exposure by one stop (basically, what you’re doing is disagreeing with what the camera read for the fog, and overriding it by increasing the exposure by one stop). On Nikon cameras, you do this by holding down the exposure compensation button on the top right of the camera (just behind the shutter button), and while you’re holding that button down, turn the command dial on the top back of the camera to the right until you see +1 in your camera’s viewfinder. On Canon cameras, you’ll set the shooting mode to anything but manual, and then you’ll spin the quick control dial (the big one on the back of the camera) to the right until you see +1 in the camera’s viewfinder. Just one reminder: when you’re done shooting your fog shots, set your exposure compensation back to zero, or you’ll be shooting the rest of the day with every shot overexposed by one stop.
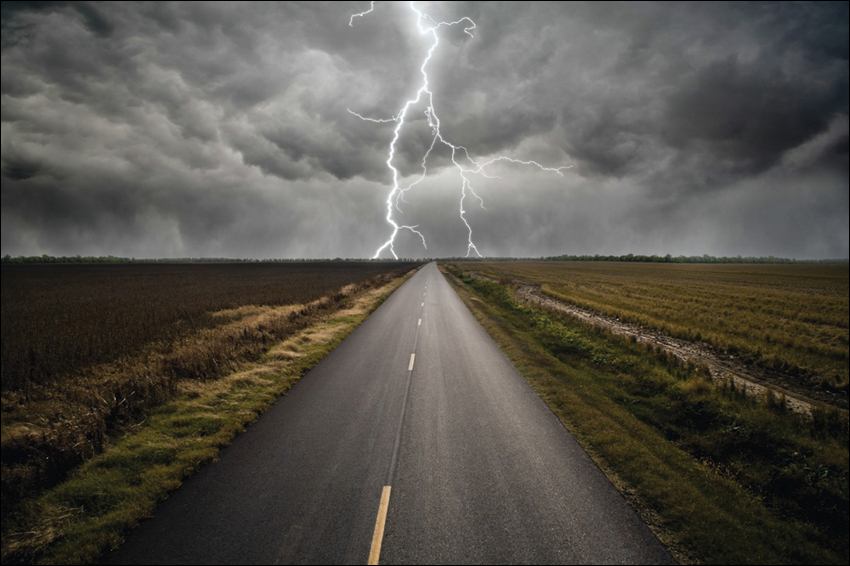
Shots of lightning can be very dramatic, because usually we only see lightning for a fraction of a second. If you can freeze that moment, it makes for a fascinating photo, but like many landscape shots, it requires a certain amount of timing (and luck). Now, before I share how to capture lightning with your camera, I want to make sure you don’t capture lightning with your body. Don’t stand in the rain, or under a tree, etc. Shoot from a very safe distance (because lightning will see you as a portable lightning rod) and exercise the same caution you would if you weren’t a distracted photographer. Now, on to the technique. First, put your camera on a tripod (this is a must). Then, set your mode to bulb (the B setting on some cameras), which leaves the camera’s shutter open for as long as you hold down the shutter button. Now, you can’t actually press the button on your camera—for this to work properly you need to use either a shutter release cable (a cable that attaches to your camera with a shutter button you hold in your hand) or a wireless shutter release (you can find these for most camera makes and models at B&H Photo). The reason is: any minor vibration while your shutter is open, and the shot will be so blurry, it will be unusable. So, set up on a tripod, compose your shot (aim your camera in an area where you’ve been seeing lightning), use f/8 as a starting place, make sure your camera is set to bulb mode, then when you see a strike of lightning, press-and-hold the shutter release cable (or wireless) shutter button down and when you see a second strike, wait just a moment and then release the shutter button. It may take you a few tries at first, but you’ll get it (hopefully the shot, not the lightning itself).

If you try some lightning shots and fall in love with this type of photography, you might want to consider buying a Lightning Trigger (they’re not cheap—so make sure you’re truly “in love” first). This unit sits on your camera and it has a sensor that detects the bright flash of light from lightning, so it opens the shutter at exactly the right moment and gets the shot for you. In fact, you can pretty much set up your camera, set your camera to shutter priority mode (with your shutter speed anywhere from ⅛ to ¼ of a second), aim in the right direction, sit back with a cool drink, and wait for the magic to happen, knowing that your camera is doing all the hard work for you. Later, when you’re showing off your amazing work, there is no obligation (from the manufacturer’s point of view) for you to tell the people viewing your work that you used a Lightning Trigger. Hey, it’s just another tool in your bag of tricks. Go to www.lightningtrigger.com for a model that works with most cameras (it runs around $329 direct from the manufacturer. Hey, I told you it wasn’t cheap).
When you’re taking a landscape shot, where do you focus your camera’s focal point (that red dot in the center of your viewfinder. Well, its default spot is in the center, but you can move that spot, so if you moved yours, get it back to the middle for this)? With landscape shots, the rule is: you want to focus about one-third of the way into the image. This gives you the widest possible range of focus throughout the image. Also, another trick you can use is to shoot big, sweeping landscape shots at f/22, which gives you the most focus from front to back in your shot.
Getting the Clearest Landscapes Possible
Have you ever seen a landscape photo that just has incredible clarity throughout the image? I’m not talking about sharpness—I’m talking clarity (like a total lack of haze, or fog, or any other atmospheric effect). Well, there’s a technique for getting that amazing clarity, and it’s simple: shoot in winter. The air is the clearest during winter time, and it’s the perfect time of year to get those amazingly clear shots that you just can’t get any other time of year.
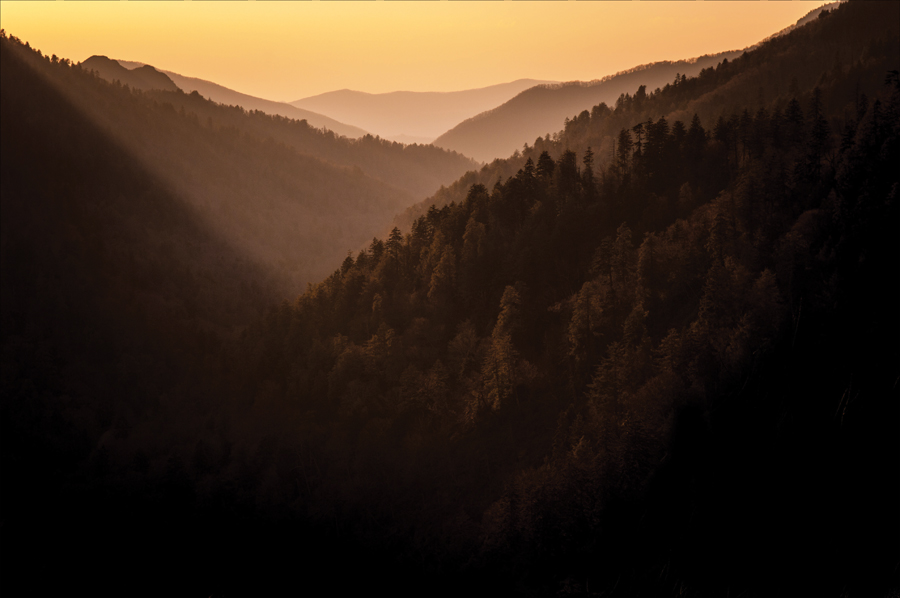
A few years ago, my friend, and landscape photography hero, Bill Fortney said something that really had an impact on my photography and I’m going to pass it on to you. Bill feels that the single most important thing in a shot of any kind is the quality of light, and that the quality of light is so important that he’ll search for great light first, and then once he finds that great light, he’ll find a subject—something or somebody to shoot in that wonderful light. Essentially, if the light is great, you’ll find a subject, but if you’ve found a great subject, you have to be very, very lucky for great light to just magically appear. In short: “It’s all about the light.” Once you get that, everything else falls into place. It’s deeper than it sounds.
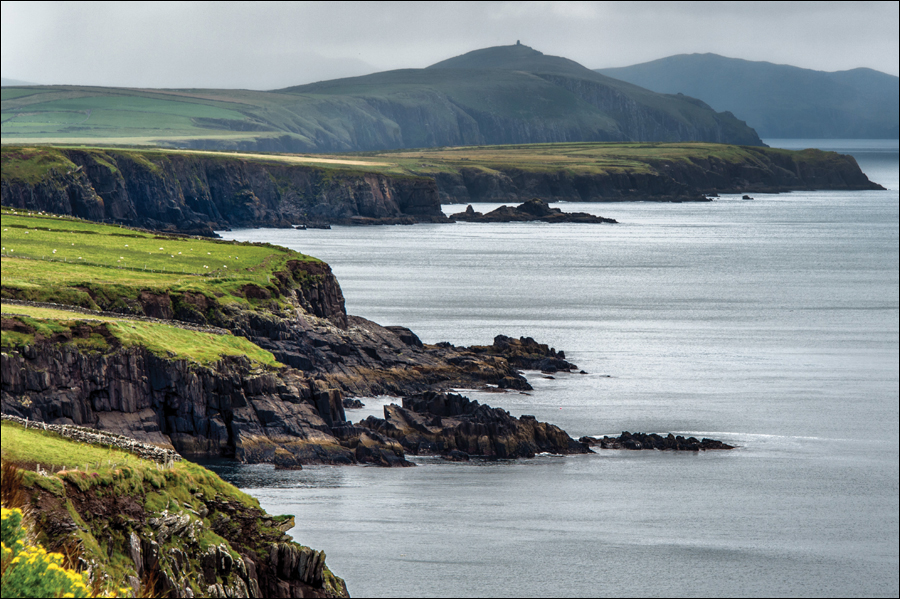
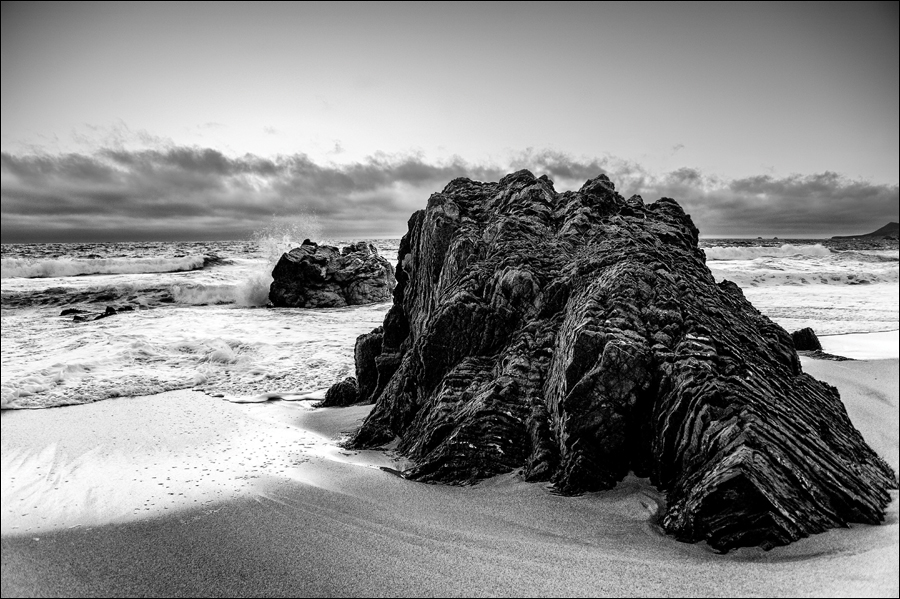
This one might sound kind of obvious when I say it, but I can’t tell you how many times I’ve been out shooting with a group and one or more people in the group has come up and said, “Well, the sky is totally messing up our shoot today.” While a gray sky definitely stinks, there is something you can employ for shooting on gray-sky days, and that is simply to compose so little (like the shot you see here) or literally none of that gray sky winds up in your shots. If you go into the shoot knowing that you’re going to do your best to avoid seeing much of the sky in any of your shots, you can then get all of the benefits that a gray sky usually brings, which are colors that are actually fairly saturated and softer shadows throughout your images. You probably won’t be able to fully eliminate the sky from your photos, so just compose your shots so the amount of sky you do see is kept to a minimum. This simple technique has saved many a landscape shoot.
A Trick for Great-Looking Flower Shots
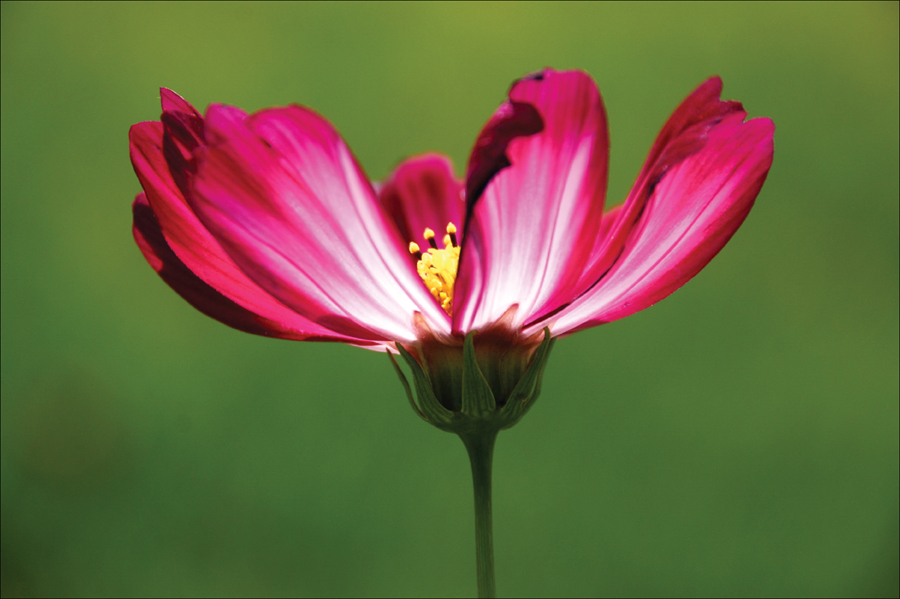
Want a great quick trick for some interesting-looking flower shots? Get down low, and shoot the flowers so they’re backlit, with the sun behind them. The sunlight shining through the translucent petals creates a beautiful effect, and this is a popular trick employed by serious flower shooters that works every time. Don’t forget to get down low (so low that you’re either shooting straight on or up at the flowers) to get the most from this effect.
The Full-Frame Camera Advantage
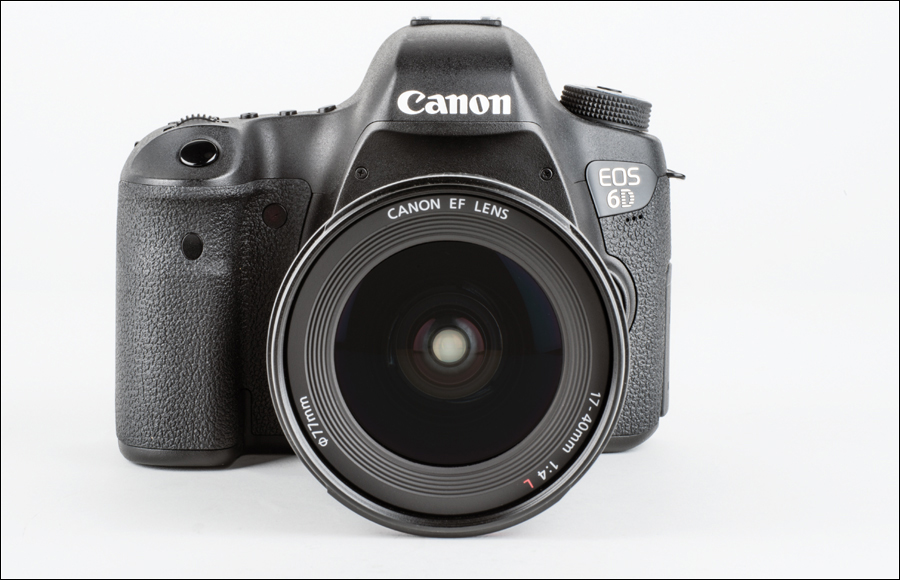
The vast majority of today’s digital cameras have a built-in magnification factor because of the size of the sensors in the camera. For example, most Nikon cameras have a 1.4x magnification factor, and what that means is if you put a 100mm lens on a Nikon digital camera (like a D3200, D5200, or D7100), that 100mm lens becomes a 140mm lens because of the sensor’s magnification factor. Most Canon cameras have a 1.6x magnification (like the Rebel T3i, Rebel T5i, 60D, 70D, and 7D), which makes a 200mm lens more like a 320mm lens. Many sports shooters, birders, and a host of other photographers who routinely use zoom and telephoto lenses love this added reach from digital sensors, but when it comes to the wide-angle lenses landscape photographers use, it can somewhat work against us. For example, a 12mm wide-angle Nikon lens becomes a less-wide 16mm lens. For Canon shooters, a 14mm wide-angle lens becomes a 22mm equivalent. That’s why some landscape photographers are drooling over the full-frame digital cameras, like Nikon’s D4 or Canon’s 6D (shown above), both of which are full-frame, and when you put a 12mm on the Nikon, it’s that same, beautifully wide 12mm aspect ratio we used to enjoy back in the film days. When you put a 14mm on a Canon 6D, it’s the same thing—a real 14mm with no extra magnification. I’m not saying you need to switch, or that you bought the wrong camera, I just want you to know what all the fuss is about for landscape photographers and other people who “go wide.”
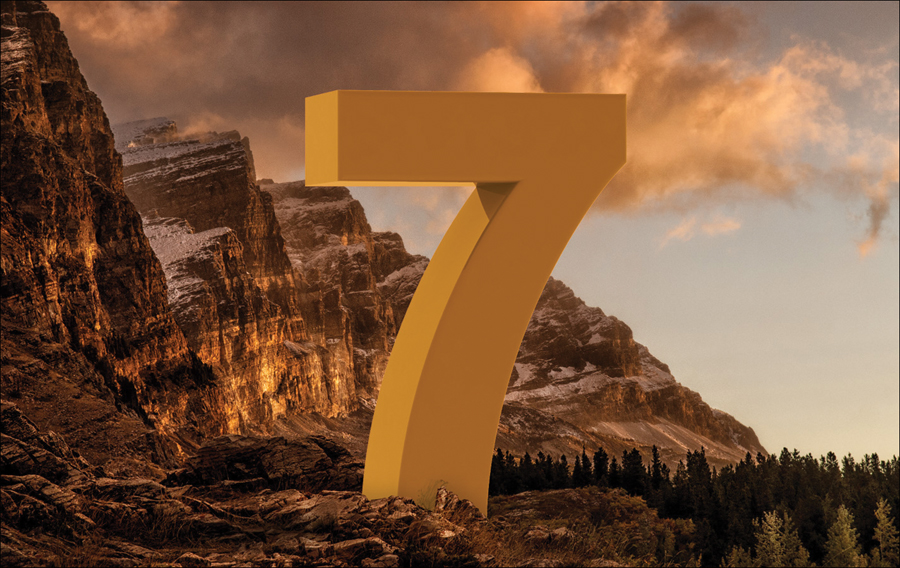
Okay, in this chapter (and in part 1 of this book series), I’ve talked a lot about the things you need to do to make great landscape photos, but I haven’t talked a whole lot about what to avoid when taking landscape shots. That’s why in this new edition of the book I have included what I call “The Seven Deadly Sins of Landscape Photography,” and one more I threw in just for good measure, but that last line isn’t part of the official name because that would be really clunky. By the way, the shot you see above was taken in Glacier National Park in Montana (which is one of our largest national parks, spanning 1,013,322 acres) during a workshop I taught there with renowned landscape photographer Bill Fortney. Bill, who not coincidentally is one of but a handful of working photographers who happen to know the precise GPS location from which you can actually photograph this giant monolithic number seven (which soars more than 212 feet high at its peak), would be cringing right now if he read this because he would know that I obviously stuck that big seven there in Photoshop, after the fact (or he’d have a big seven in his shot, as well, which I’m pretty certain he does not). Nevertheless, this all makes a great (okay, decent) gateway to this new addition to the landscape chapter. If you can live your life avoiding these seven perilous pitfalls, your landscape shots will be blessed with the magical kiss of first morning light (not really, but they will certainly look a whole lot better).
When we’re shooting a lake or a cozy harbor, what we’re looking for is that still, glassy water that creates a beautiful reflection. So, if you hike up to that beautiful lake with the snow-capped mountains off in the distance, but it’s windy out that day and the lake looks more like the ocean...just keep walking. That’s right, keep walking back to your car, drive back to your hotel, and try again the next morning at dawn. Dawn is your absolute best chance for having calm, still water (by mid-morning it’s usually too late), and it’s worth getting up early for (not to mention the quality of the light), because choppy water is instant death to lake and harbor shots. By the way, that telephone pole lookin’ log there on the left isn’t helping this photo much either.
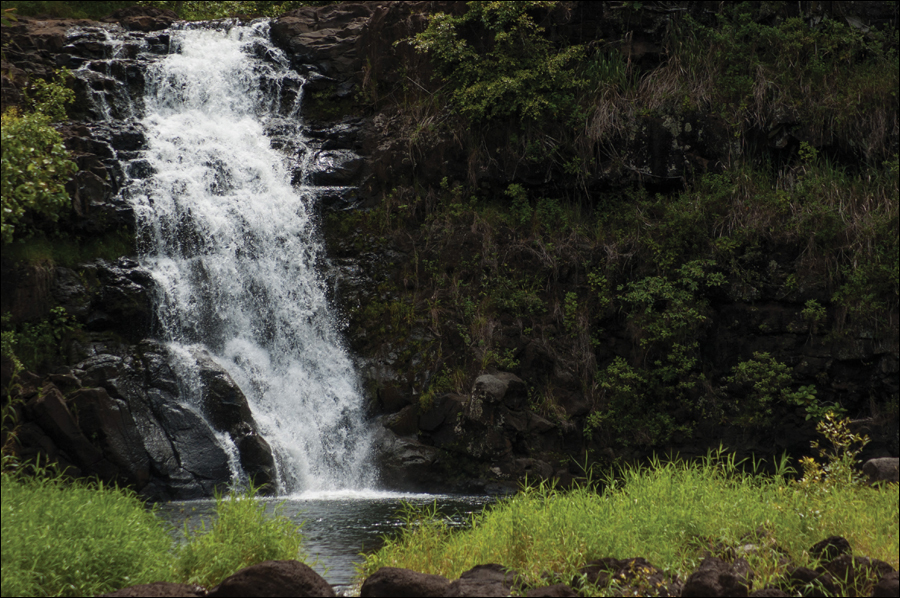
For a pro look to your stream and waterfall shots, you’re looking for that smooth, silky water—the silkier, the better—and that means you have to keep your shutter open for a long time (the longer it’s open, the smoother your water will be. See page 115). We’re talking 30 seconds to 2 minutes here, and if you’re snapping stream or waterfall photos in broad daylight, your shutter speed is going to be around 1/1000 of a second at the minimum, but more likely 1/2000 of a second or higher. This means two things: (1) frozen water, and (2) an amateurish looking shot. Don’t let this happen to you.
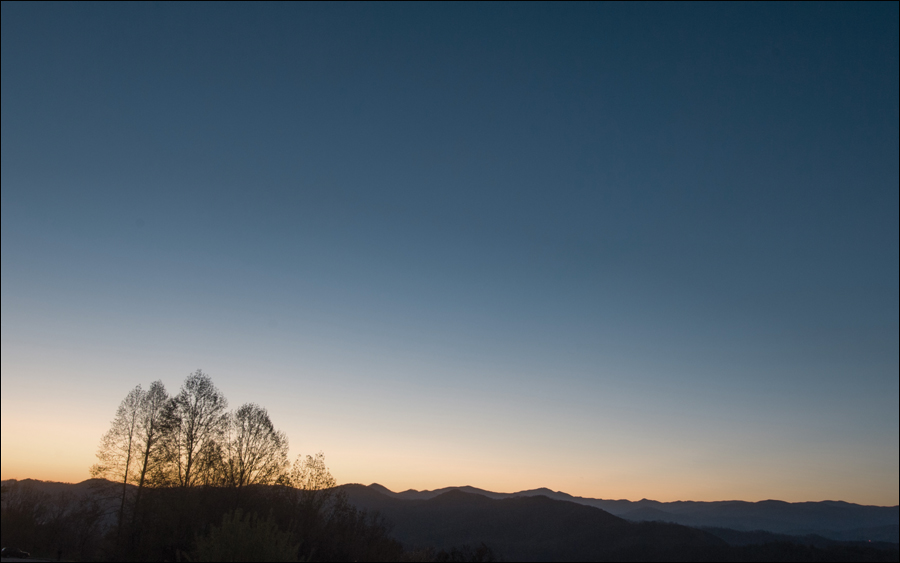
Most people find clouds beautiful (I sure do), but when it comes to landscape photography, they’re not just there to be pretty. They are there to hold the amazing colors of a sunrise or sunset, and without clouds, you get...well...pretty much what you see here—a whole lotta nuthin’. Now, picture this same shot with just an amazing sky of really interesting clouds that are red, pink, and purple. Then, look back at this one. See what I mean? So, even though you did the right thing by getting up early for the great light, and you got in place and were ready to shoot before dawn, and you were on a sturdy tripod, with a cable release, and you had a wide-angle lens on your camera, and you were at f/22, and you were at the top of a really cool ridge of mountains, if the clouds don’t show, you won’t look like a pro. Mother Nature is totally in charge of this one, and sometimes she delivers a spectacular cloud formation that makes you look like a star because all you have to do is literally press the shutter button, and sometimes she gives you squat! She’s finicky that way.
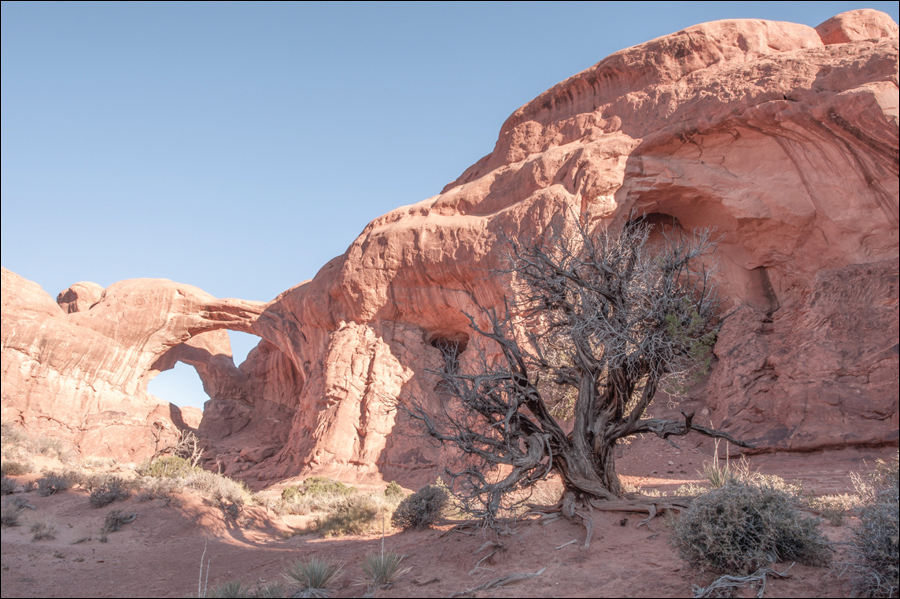
This shot really has it all. Sure, it has that trademark harsh, dried-out, awful, soul-sapping, direct midday sun look to it (even though it was actually shot around 10:20 a.m., so the light will actually get worse as the day goes on). But, it also has some bonus features, like an ugly dead tree, a bald, cloudless sky, and junk coming into the frame from the edges. (I ought to win some sort of bad light award for this one.) So, if you look around and the light on your landscape looks anything like this, you know one thing: you’re in the wrong place at the wrong time. You should be at breakfast, back in your hotel taking a nap, feeding a gopher the contents of your purse, whittling a scale model of the U.S. Capitol building out of a dead tree branch, anything other than actually taking a photo. This light was designed to punish nature and the efforts of anyone who holds up a camera and aims it at any landscape.
If there is one thing that drives people crazy when they look at a photo, it’s a crooked horizon line. What’s even worse, a lot of times people looking at an image with a crooked horizon line will tell you there’s “just something about it that doesn’t feel right,” even if they don’t realize the problem is the horizon line (it’s easy to get distracted by beautiful colors and cool clouds, but the viewer will still perceive that something is wrong with the image, even if they can’t articulate exactly what it is). Since just about every post-processing program out there has some sort of built-in straightening, there’s no excuse for having a crooked horizon line. Hey, while we’re here, although these clouds aren’t spectacular or epic by any means, imagine this same shot without them, and instead you have a bald, empty sky. Really makes a difference, doesn’t it?
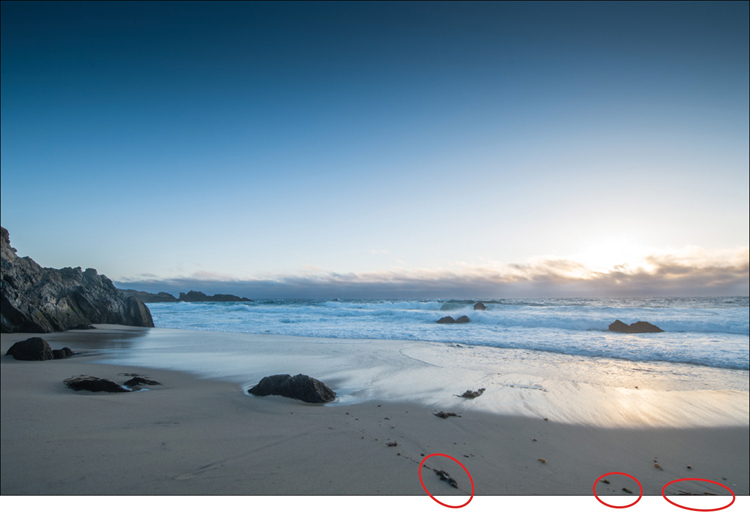
This one is particularly deadly because it’s so easy to miss. When I teach landscape photo workshops, we do a class critique of shots from the participants in the workshop (the person who took the image always remains anonymous during the critique, unless we all really love the shot, then they usually stand up and shout, “Hey, I took that!”). Anyway, one thing that always stands out as a spoiler of some otherwise great images is that the image has a distracting element (also known as “distracting junk”) in the photo. It can be a road sign, some seaweed on the beach, an empty beer can, some telephone wires, or quite often it’s a tree branch extending into the photo. I’ve always felt that if it doesn’t add to the photo, it takes away from it. There are three different ways you can deal with this “junk” that creeps into your photos: (1) Compose around it. When you’re shooting, be very aware of what’s in your shot, especially around the edges (we actually refer to this act of checking the outside edges of your frame as “border patrol”). Check all four sides of the frame (top, left side, right side, and bottom) for anything that you’ll wish later wasn’t there, and if you see something, change your composition to eliminate it. (2) Physically remove the distracting element (as long as you’re not a photojournalist). If there’s a beer can, a twig, some trash, etc., pick it up and move it out of the frame (be careful not to damage anything in nature—period!). Or, (3) remove it later in Photoshop or Lightroom, using the Healing Brush tool, the Patch tool, the Clone Stamp tool, or the Spot Removal tool. I’ve done a quick video clip for readers of this book to show you how to use these tools, and you can watch it at http://kelbytraining.com/books/digphotogv2.
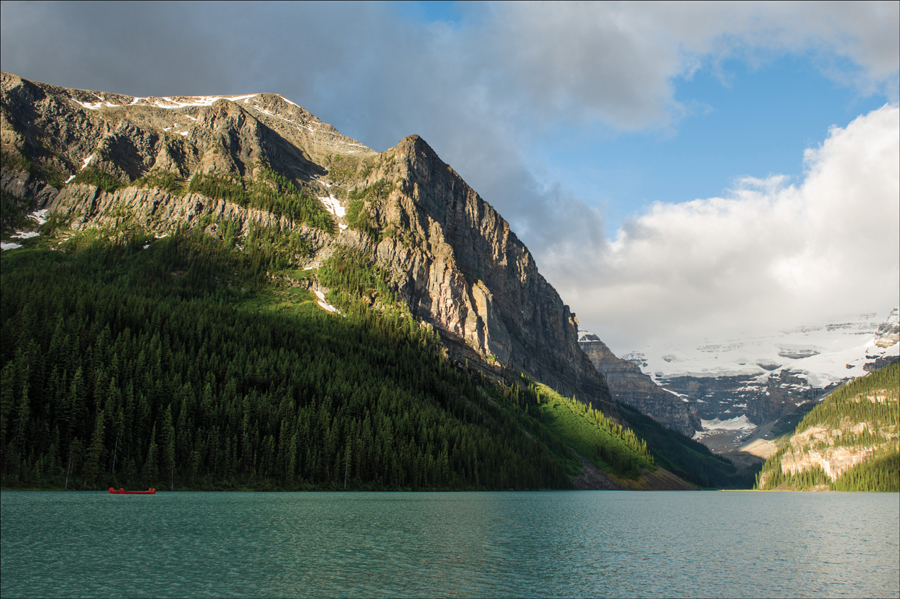
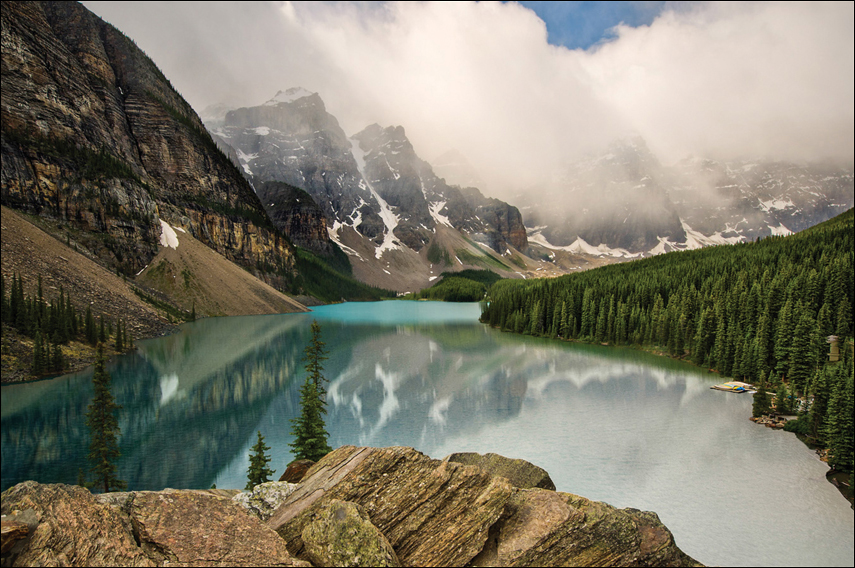
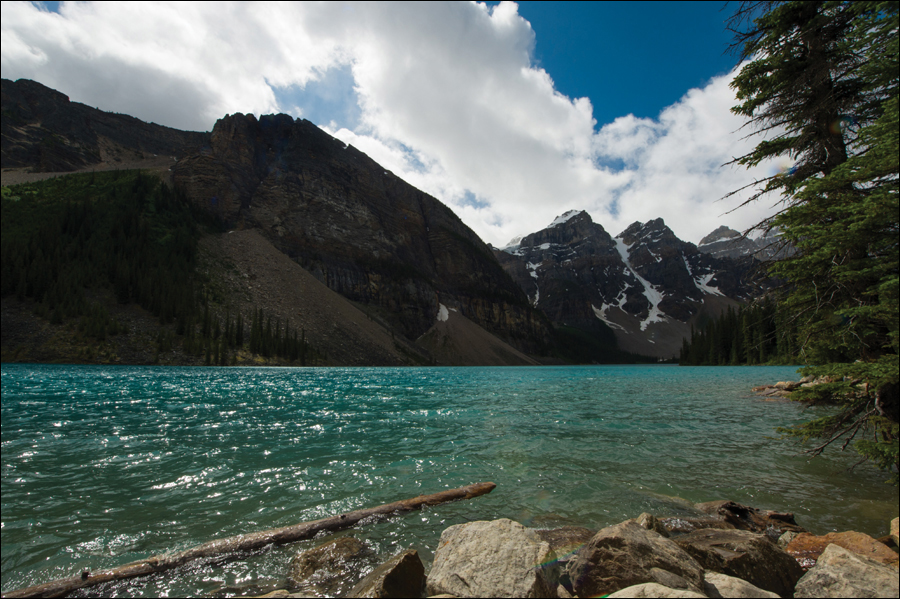
If your shot doesn’t have a strong foreground element, it’s pretty much sunk. That’s because one of the basics of landscape composition is that for a landscape shot to really work, it has to have three things: (1) something strong in the foreground, (2) an obvious middle ground, and (3) the background. This one has two out of three. It has a middle ground (the lake and the mountain). It has a background (the sky behind the mountains, although some might argue that the mountain and the sky are background elements, but it doesn’t really matter because neither one of those is the problem here). What’s missing is the strong foreground element, which is why this image looks so flat. If there were some large rocks at the bottom of the frame, or the tip of a canoe, or the shore, or a dock, or anything to show the depth of the image and lead the viewer into it, this shot would then have all three elements. It’s kind of like a novel. If you skip the first few chapters and then jump in and start reading, you’ll be missing key parts of the book, and you won’t enjoy it nearly as much. You’ll know you’re missing something. Landscape photos are the same way—you shouldn’t jump-in in the middle of the photo (or, in this case, the middle of the lake). You should start in the foreground and lead the viewer’s eye throughout to the background. It’s what gives landscape photos real depth and that big, epic feel. Don’t start your photo in the middle of the lake, or the middle of the ocean, or in a flat, open desert. Find some object to include in the foreground and your composition will be much stronger.
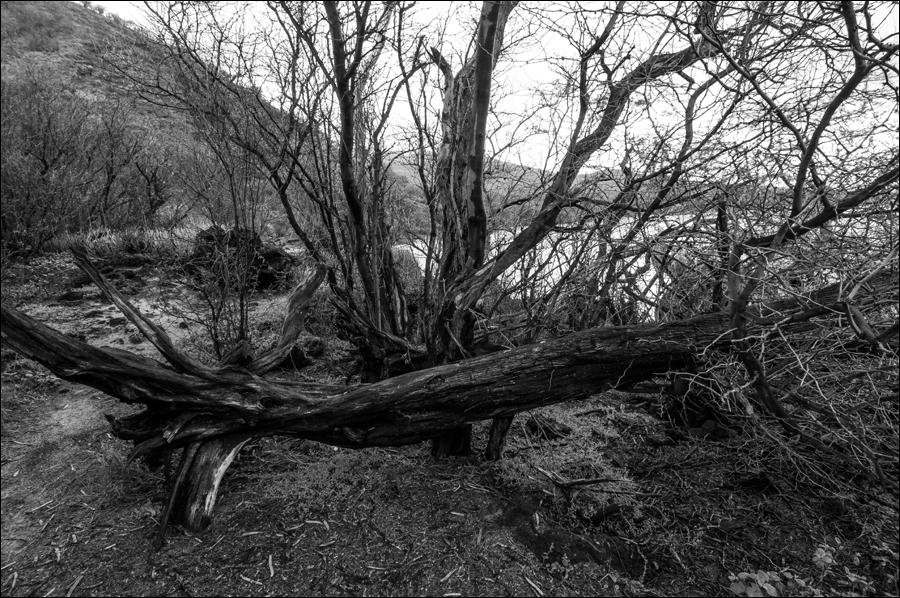
Okay, I said there were just seven, but since I had this extra page, I thought I’d add a couple more in. They’re not nearly as deadly, but still worth avoiding like a festering boil. I’m just going to rapid-fire these off: Dead trees and tree stumps. I’m begging you, stop trying to make a good picture of these. And, no, converting your image to black and white won’t help. There are beautiful living things found all over in nature. Stop shooting dead ones. Next, don’t have out-of-focus things in your foreground. Not tree branches, or railroad crossing signs, or a big blurry rock. It’s distracting to the viewer, who is programmed to try to focus on whatever is closest to them. Also, stop shooting really boring stuff just because you’re standing in front of it. If you’re looking at a scene and you realize that there’s no chance anyone is going to look at the photo you’re about to take and say, “Wow!” then here’s what you do: move someplace else. It’s like Joe McNally says, “If you want to take more interesting photos, stand in front of more interesting things.” If you’re standing in front of those ugly dead trees above, keep moving. Here’s another: if you see a flat gray sky, avoid it like the plague. Another is if you’re processing an HDR shot, or if you’re adding tonal effects with a plug-in, keep this in mind: Clouds aren’t black. They also don’t have drop shadows or glows around them. Although you see incredibly vibrant colors in nature, don’t make them all appear in your photo at once. Go easy on the saturation. Okay, now ya know, so there are no excuses for breaking the “Seven Deadly Sins.”