
Chapter Nine. Photo Recipes to Help You Get “The Shot”
The Simple Ingredients That Make It All Come Together
SHUTTER SPEED: 1/400 SEC F-STOP: F/7.1 ISO: 200 FOCAL LENGTH: 300MM PHOTOGRAPHER: SCOTT KELBY
 The chapter from part 1 of this book that I probably got the most emails on was this last chapter—the photo recipe chapter. In this chapter, I show some of my shots, and then give the details for how to get a similar shot, including what kind of equipment you’d need, what time to shoot (if it’s relevant), where to shoot it, where to set up your lights, tripod, etc., so it’s kind of a photo recipe cookbook. Although there are a lot of shooters that do anything to get “the shot,” you’ll be happy to know—I’m not one of them. In fact, I’ve often toyed with the idea of starting a trade association for people like me and calling it “The International Society of Convenient Photographers” (or the ISCP, for short). Our credo would be, “Any shot worth getting, is worth driving to.” Our ideal situation would be we drive up to a location, roll down the window, take the shot, and drive off. It doesn’t get much more convenient than that. There would be special recognition for members who abide by our 50-ft. Cone of Convenience rule, which states: “If a once-in-a-lifetime photographic opportunity presents itself, the member may venture as far as 50 ft. from the member’s vehicle, in any one direction, as long as they leave the car’s engine running and the air conditioner turned on.” But then I realized this was very limiting, because it would exclude most studio photographers. So, we added a special dispensation for them, in rule 153.45, Section B, which states: “A studio photographer should avoid changing their subject’s pose, as doing such could force an inconvenient repositioning of the light, which breaks with the sacred tenets of our group.” Sure, it’s a small group, but we really get around.
The Recipe for Getting This Type of Shot
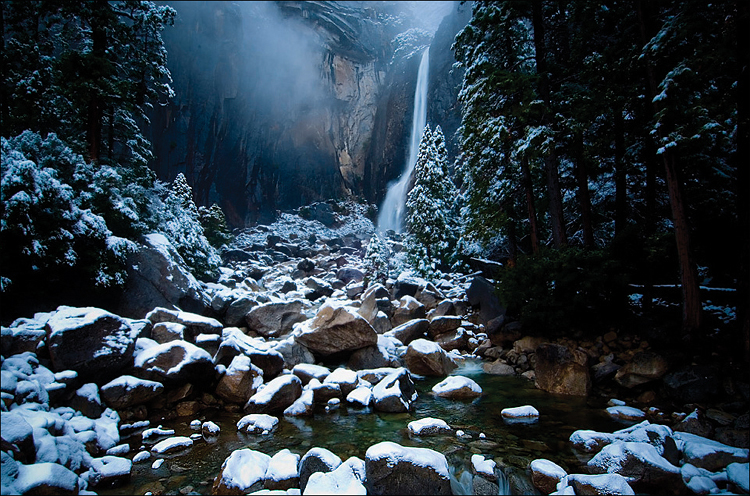
LOCATION: YOSEMITE FALLS, YOSEMITE NATIONAL PARK, CALIFORNIA
Characteristics of this type of shot: A sweeping shot with a silky waterfall effect, with lots of detail front-to-back and a real sense of depth.
(1) To get this type of sweeping look, you need to use a very-wide-angle lens. This was shot with a 12mm wide-angle (it’s not a fisheye lens—just a super-wide-angle).
(2) To get the detail from front to back, shoot in aperture priority (Av) mode and choose the highest number f-stop you can (this was shot at f/22, which keeps everything in focus from front to back).
(3) You absolutely need to shoot on a tripod for a shot like this because you’re shooting at f/22, which means your shutter will be open long enough that even a tiny bit of movement will make the photo blurry.
(4) Another benefit of shooting at f/22 is that since your shutter stays open longer, the water in the waterfall looks silky (you might remember this trick from part 1 of this book—how to get that smooth, silky water effect). You’ll also want to use a cable release (or your camera’s self-timer function), so you don’t add any blur when pressing the shutter button (yes, it makes a difference).
(5) The final key to this shot is shooting it right around dawn. This does two things, the first being that since it’s darker outside, your shutter will stay open longer and your water will look silkier. You couldn’t get that silky water look at 1:00 in the afternoon. The second thing is even more important: the quality of the light and the nice soft shadows only happen like this around dawn (and around sunset), so get up early and get the shot!
The Recipe for Getting This Type of Shot
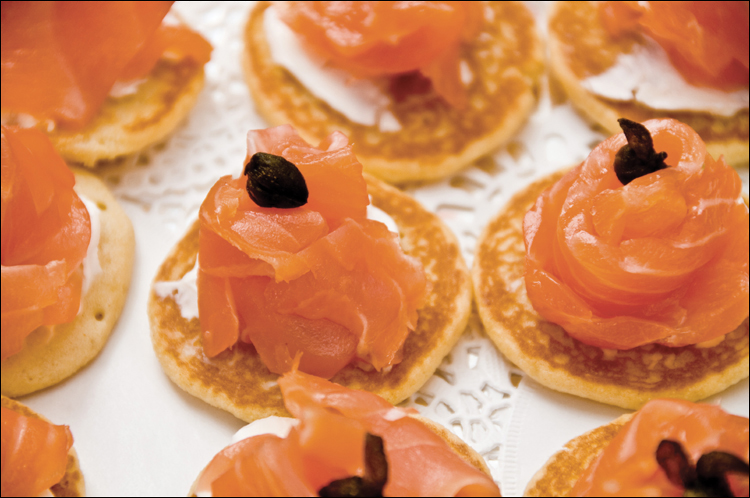
Characteristics of this type of shot: Very shallow depth of field (the front of the plate is out of focus, so is the back). The subject looks very sharp and the lighting is just great.
(1) The biggest challenge in getting a shot like this in a restaurant is having enough light to make the shot look great. The secret is, of course, to ask to sit outside (dining alfresco) or near a window, so you can use natural light to light your food (this shot was taken at a table outside, so there was plenty of light, but the umbrella over the table kept the light from being too harsh). Next, position the food so the light is coming from either behind it, so it’s backlit (my first choice), or from the side.
(2) The second technique for capturing a shot like this is to use a long lens, so you can zoom in really tight on one part of the plate (for this shot, I used an 18–200mm f/3.5–5.6 lens zoomed in all the way to 200mm). By zooming in tight and locking focus (in this case, on the appetizer right in the center), it puts the rest of the food out of focus at the top and bottom of the image, which is what you want.
(3) The last part is the compositional part, and it’s perhaps the most important one (well, besides the light, anyway). Don’t try to capture the entire plate of food. Pick one part of it and zoom in tight on that. It’s okay to include the curve of the plate, but if you do, just show that one side.
(4) If you’re shooting indoors, even near a window, you might need a very small tabletop tripod (I use a Manfrotto tabletop tripod, barely big enough to hold my camera). To minimize any blur, use your camera’s self-timer feature to take the shot.
The Recipe for Getting This Type of Shot
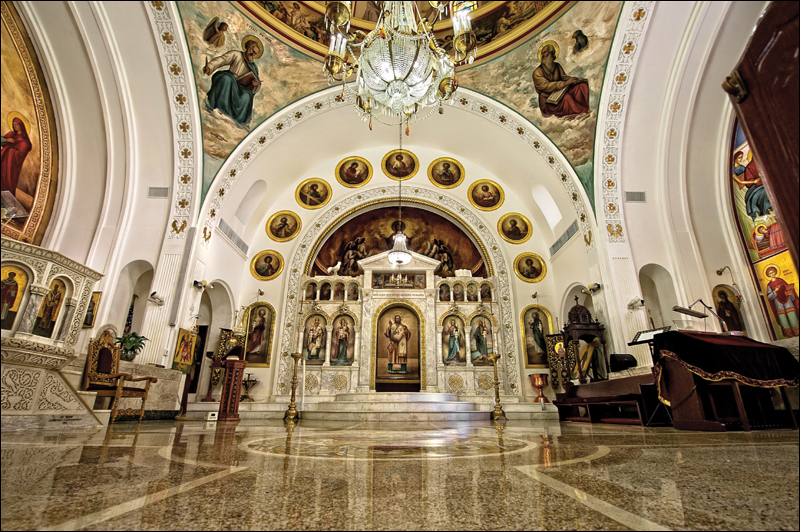
LOCATION: ST. NICHOLAS GREEK ORTHODOX CATHEDRAL, TARPON SPRINGS, FLORIDA
Characteristics of this type of shot: A large, wide, sweeping shot of a cathedral with lots of detail in all the ornate objects in the scene.
(1) In many ways, this shot was taken like it was a landscape shot—it was designed from the outset to have that big, sweeping look. Shoot a church like this with a wide-angle lens (this was shot with a full-frame camera, which means it was extra-wide compared to a cropped sensor camera, and it was shot with a 14mm lens).
(2) Churches generally have low light, and even though the ceiling of this church was white and there was natural light coming in through the windows, it was still dark enough that, at f/4, my camera needed to keep the shutter open 1/13 of a second, which is way too slow to handhold. So, you’ll absolutely have to be on a tripod.
(3) This is the beautiful St. Nicholas Greek Orthodox Cathedral in Tarpon Springs, Florida. I’m positioned in the center aisle between the pews, right at the first pew, so there are no obstructions (pews) between the camera and altar.
(4) Compositionally, I used a trick that helps make it look like a big, sweeping shot: I collapsed the tripod legs, so the tripod was only about 18″ tall (if that). That way, you see a lot of the marble floor leading up to the altar, which creates its “bigness.”
(5) To bring out the detail, you finish off this shot in Photoshop (or Elements or Lightroom) using a plug-in filter that creates a tonal contrast effect, like Nik Software’s Color Efex Pro, onOne’s Perfect Effects, or Topaz Labs’ Topaz Adjust—all offer one-click presets for that effect (you can download fully-functional, free trial versions of all three from their websites).
The Recipe for Getting This Type of Shot
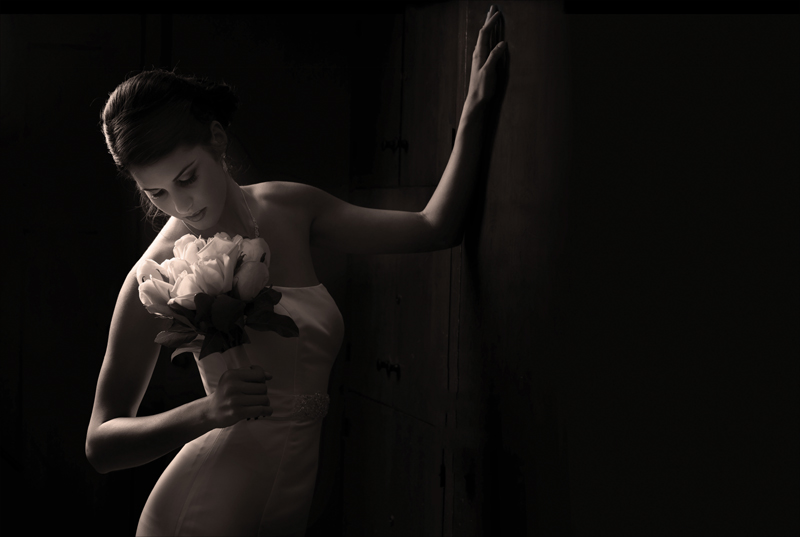
Characteristics of this type of shot: A soft, dramatic, backlit silhouette of a bride taken with just one small light.
(1) This was shot using only one light with a small (24×24″ square) softbox attached. Start by making the room she’s standing in so dark that the only thing lighting her is the light from the softbox. Set your camera to manual mode, so you can control the shutter speed and aperture separately. Set your shutter speed to the highest number that will still sync your camera/flash (for most studio strobes, that’s 1/200 of a second. For most hot shoe flashes, it’s 1/250 of a second). By using a high shutter speed number like this, it lets in less existing room light.
(2) Keep your flash turned off, set your f-stop to f/8, take a test shot, and then look at the image on the back of your camera. If you can clearly see the bride, raise the f-stop to f/11, and take another shot. Keep doing this until you’re pretty much getting a solid black image (no bride, no detail, no nuthin’). Now, turn on your flash.
(3) You’re going to position the flash with the small softbox behind her, but not directly behind her. You want to position it off to one side behind her, so it is coming from behind but aiming back at her at an angle. Next, position her so her head is turned a little toward that light, so some of that angled back light reflects back onto her face (here, you can see some of the light reflecting off the flowers back into her face). Now, your job is to keep the power of the flash low (like ¼ power or less) to keep it looking dramatic.
(4) When you’re done, convert the photo to black and white and add a brown tint in Photoshop or Elements (use a Photo Filter adjustment layer), or Lightroom (use a Develop preset).
The Recipe for Getting This Type of Shot
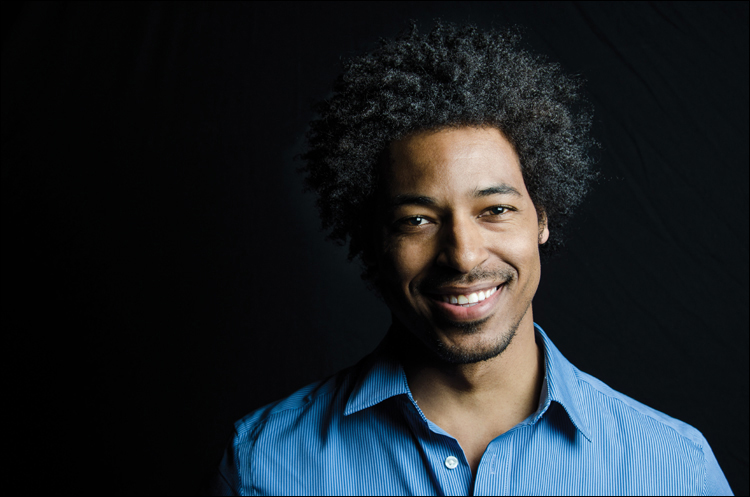
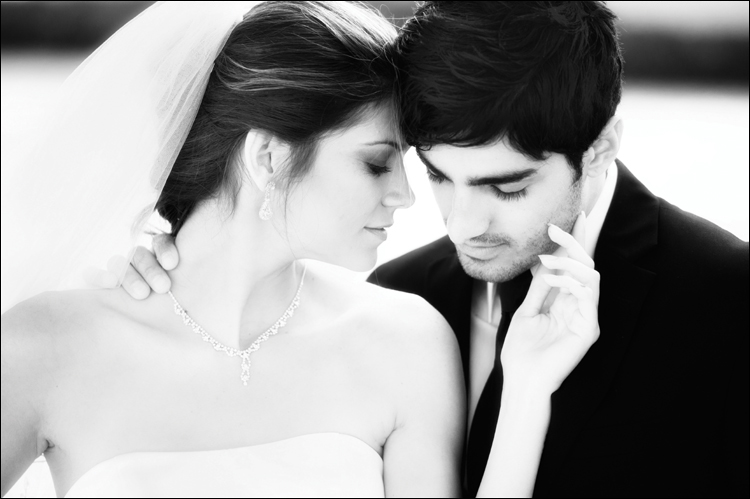
Characteristics of this type of shot: Dramatic portrait, nicely suited for male subjects, with lots of drama to the lighting.
(1) This was taken with an inexpensive hot shoe flash on an inexpensive 6′ light stand.
(2) I used a roll of black seamless paper for the background (around $25 for a 53″ roll).
(3) To get directional light like this, you have to get the flash off the camera, and to get it off the camera this far, you have to use either a wireless flash or a really long sync cable (but, try not to use a long sync cable—at some point you’ll trip over it).
(4) To get the softness and wrapping quality of the light from the flash, you’ll need to either fire the flash through a diffuser or use a small softbox made for hot shoe flash (that’s what I used for this shot. It was a 27×27″ hot shoe softbox from Impact. Lastolite makes a softbox like this, too, and there’s even a Joe McNally signature version of this handy hot shoe softbox that folds up flat like a reflector).
(5) Position the flash to the right of the camera, up about one foot higher than your subject, at about a 45° angle aiming down toward them. Put it about six feet back from your subject. If you’re using a small softbox, you’re all set. If you’re using a diffusion panel, position it as close as you can get it to your subject without actually seeing it in the photo. Put your flash about one foot behind that panel.
(6) No reflector is necessary (you want the dark shadows on the far side of his face) and no tripod is necessary because the flash will freeze your subject and stop any movement.
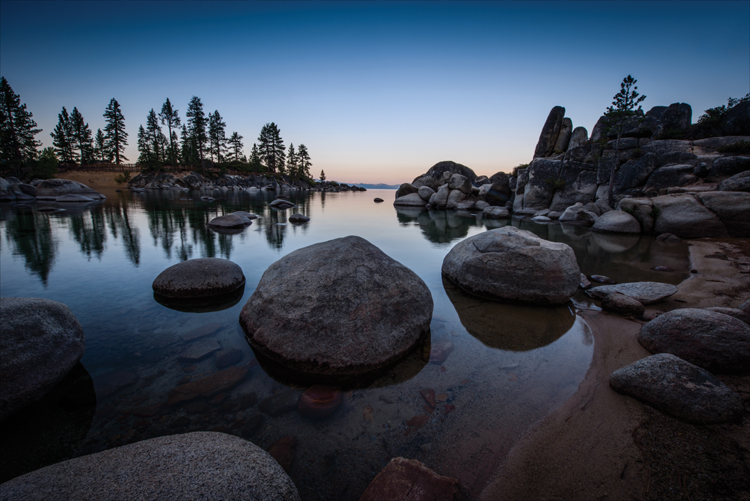
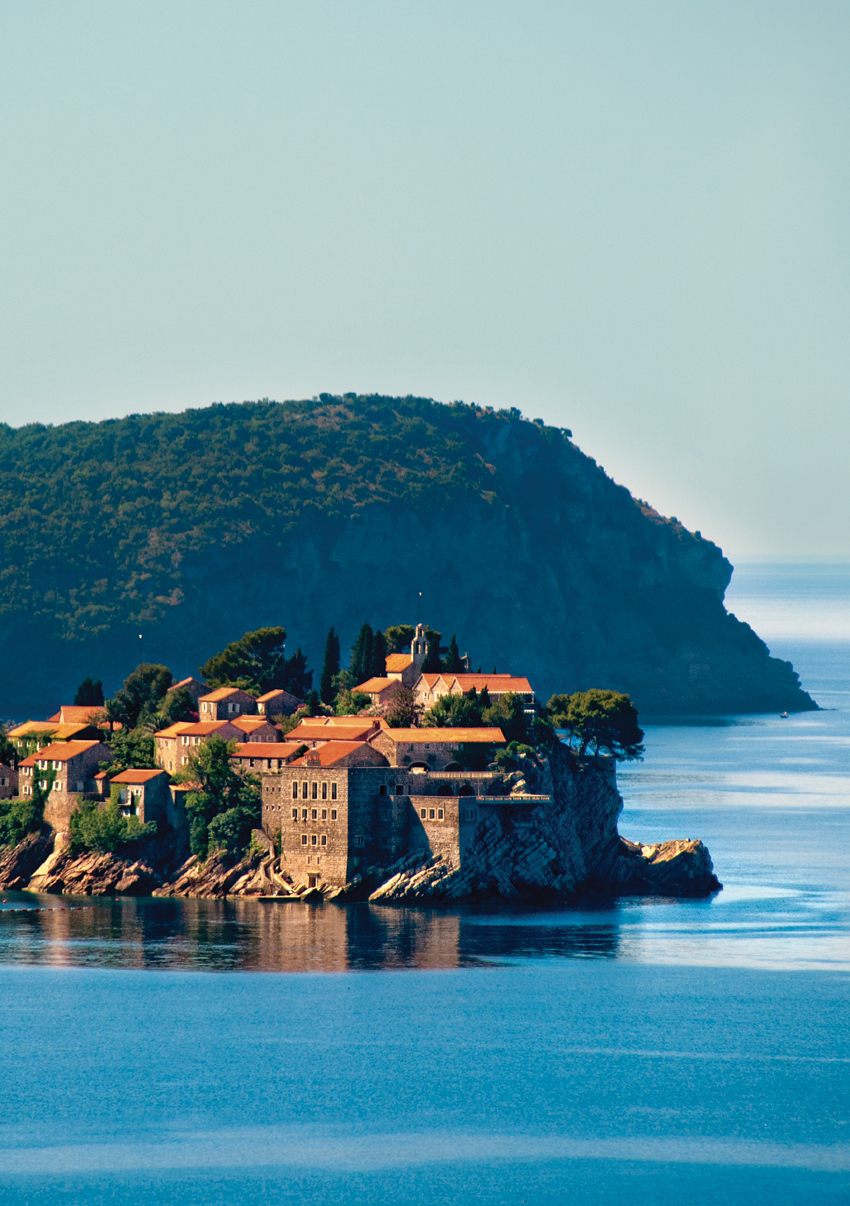
Characteristics of this type of shot: Glassy, still water; a beautiful gradient of colors in the sky; and a wide, interesting vista.
(1) The key to this shot is when you shoot it. This type of shot needs to be taken before sunrise, not just for quality of light, but perhaps more importantly, to get the glassy, still water. The best time for this is at dawn. About an hour later and, in most cases, that water won’t be still and glassy any more.
(2) While the sky does have a nice color gradient, it has something really important missing—clouds. Clouds are what make the sky interesting, so when you have a bald, cloudless sky like this, compose the shot so the horizon line is up in the top third of the frame. That way, you don’t show much of the sky at all.
(3) In low dawn light like this, you need to, of course, shoot on a tripod and use a cable release or your camera’s self-timer to minimize any camera shake. Because you’re on a tripod, you can shoot at your lowest ISO (here, that was 100 ISO) to minimize any noise.
(4) You’ll need to use a wide-angle lens to capture this wide a view (this was taken with a 14–24mm f/2.8 lens set at 14mm).
(5) This is another one of those occasions where you want to use a high f-stop number to keep as much in focus, front to back, as possible. I used f/22 (my go-to f-stop for landscapes).
(6) For a landscape shot to be successful, you need a strong foreground element (like these rocks, and to accentuate them, I put my tripod way down low).
The Recipe for Getting This Type of Shot
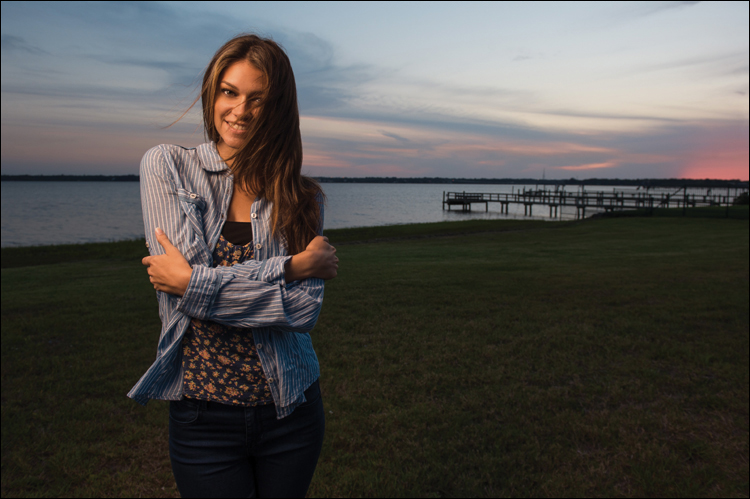
Characteristics of this type of shot: A simple sunset portrait using hot shoe flash.
(1) Start by positioning your subject with their back to the setting sun.
(2) Make sure your flash is turned off, because you first want to meter as if you’re taking a regular ol’ natural-light photo with no flash. Switch your camera to manual mode, set your shutter speed to 1/125 of a second (that’s important), then aim at your subject, and hold the shutter button down halfway so your camera takes a meter reading of the scene. Look inside your camera’s viewfinder, and you’ll see a meter graph (on a Nikon, it’s on the right; on a Canon or Sony, it’s on the bottom). You’re going to adjust only your f-stop until the meter reading reads 0 (zero; the proper exposure). So, move the dial to adjust your f-stop and, as you move it, you’ll see that meter move, as well (keep it aimed at your subject while you’re doing this). Once you’ve got the meter set to 0, look at your f-stop (let’s say it’s f/5.6, for example). Your job is to underexpose (make darker) the scene you’re about to shoot by about 2 full stops (or more). So, if you were at f/5.6, you’ll go two stops higher to f/11. Now, take a test shot. Does your subject look like a silhouette against the sky? If not, darken the scene more—try f/13 and take another test shot. When your subject looks like a silhouette, your settings are good to go.
(3) Turn on your flash with a very low flash power setting, like ¼ or ⅛ power, and put an orange gel over your flash so the light isn’t white (see page 26). Use a diffuser or softbox to soften the light and take a test shot. If the flash is too bright, lower the power. If it ‘s not bright enough, raise the power, but keep it natural looking—don’t “over-light” your subject.
The Recipe for Getting This Type of Shot
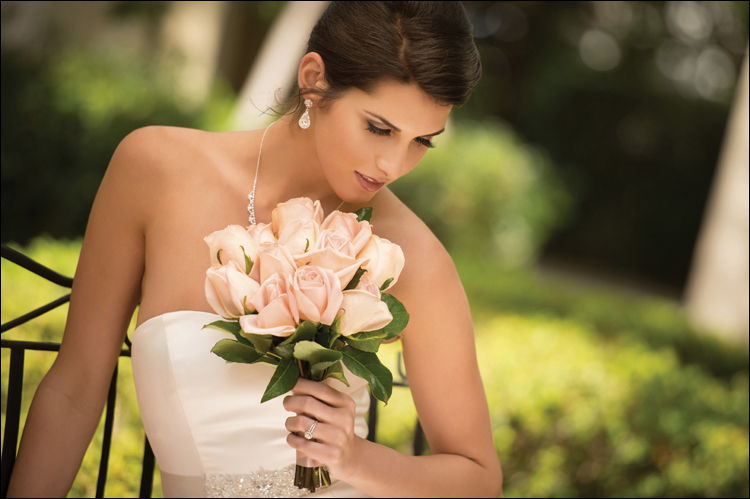
Characteristics of this type of shot: A natural-light shot taken in direct sunlight, with a soft, out-of-focus background and a shallow depth of field.
(1) This shot, taken in the garden area between the church and the church office, was in direct sunlight. To get soft, beautiful light in a situation like this, we have to diffuse the light (use something to make the harsh, direct sunlight soft and beautiful), so standing just to her left (from the camera position) is a friend holding up a diffuser right over her head (see page 84 for more on diffusers). You basically put the diffuser between the sun and your subject and it spreads and softens the light in a big way (as you can see above).
(2) To make the diffused light even softer, have your friend hold the diffuser as close to the top of your subject’s head as possible without actually being visible in the frame itself. The closer you get the diffuser to your subject, the softer the light (in fact, you can almost see a glow as the diffuser gets really close).
(3) By looking at the photo, you can probably figure out the f-stop I used, because the background is way out of focus, and you’ve learned that f-stops that do that are “wide open” f-stops with low numbers, like f/1.8, f/2.8, f/4, and f/5.6 (in this case, it was f/2.8).
(4) If you remember back to page 77, then you also know that f-stop alone won’t give you that out-of-focus background look like this—you have to use a longer lens and zoom in (in this case, it was a 70–200mm zoomed in to 200mm).
The Recipe for Getting This Type of Shot
Characteristics of this type of shot: A bright, clean, dreamy look using softened natural light.
(1) This shot was taken in the worst light possible, at “high noon” (well, at 12:07 p.m. to be exact), in an empty lot near downtown, but still the light is just gorgeous. The trick is simply to make the sunlight soft (you learned that trick back on page 84), which is to put a diffuser between the sun and your subjects. We used an inexpensive Westcott diffuser (part of their 5-in-1 reflector/diffuser kit for around $40) and I had a friend hold up the diffuser over their heads to block the harshness of the light, making the light source larger by spreading and diffusing it.
(2) At high noon like this, the sun is usually straight overhead, but if it’s not (you’re shooting earlier or later in the day), just remember to position the sun behind your subjects (so their backs are facing the sun). That way, any sunlight from behind them just creates a nice rim light around them and doesn’t spill onto their faces.
(3) To create a soft glow with your diffused light, have your friend (or assistant) hold the diffuser right over their heads, as close to your subjects as possible without actually seeing the diffuser itself in your frame.
(4) Now, give the entire image a soft glow effect in Photoshop (or Elements). Just duplicate the Background layer and apply a 50-pixel Gaussian Blur filter to this layer. Lower the Opacity of this layer to 30%, and then, at the top of the Layers panel, change the layer’s blend mode from Normal to Soft Light. Lastly, convert the photo to black and white.
The Recipe for Getting This Type of Shot
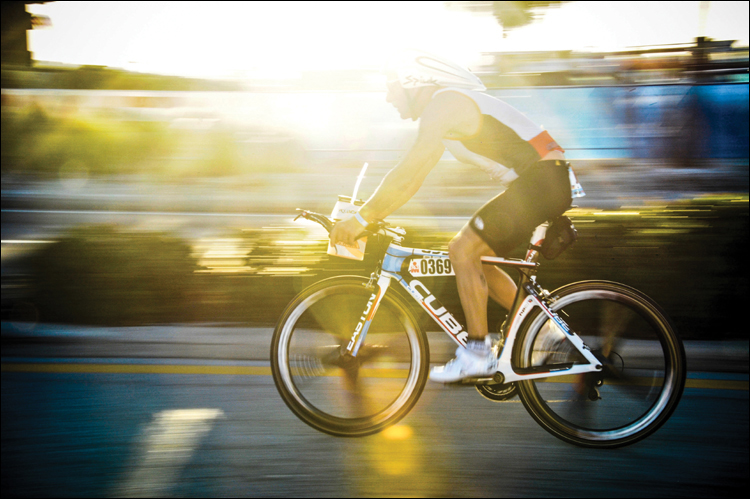
Characteristics of this type of shot: A bright, backlit, blown-out look shot with visible motion to give the sense of speed.
(1) In sports photography, you normally try to freeze the action, which means getting a shutter speed of 1/1000 of a second or faster. However, there are times (and certain sports, like cycling and motorsports) where you want to create a sense of motion and speed, so the athletes (cars) appear to be moving (and not parked in position, ready for the race to start). To do this, shoot at a slow shutter speed and pan with your subject (in this case, the cyclist), which keeps most of the bike in focus, but makes the wheels and background show motion.
(2) To do this, shoot in shutter priority mode (S) and set your shutter speed to 1/60 of a second (far below the 1/1000 you’d use to freeze motion), and then turn on Continuous High-Speed mode (on a Nikon) or Continuous Shooting (on a Canon or Sony), so it takes multiple photos when you press-and-hold the shutter button.
(3) When the athlete is nearly to you, lock your focus on them (I usually aim my center focus point at their helmet), and then track along with them, firing in continuous mode, taking a series of photos as they go by. Hold that shutter button down until they are well past you.
(4) Many of the shots will be terribly out of focus and that’s normal, but in that burst of shots, you’ll usually find one that looks just right (and that’s the only one you need).
(5) Lastly, to get the popular blown-out look, take your lens hood off your camera, position the athlete between you and the sun, and fire away. Lens flare will come.
The Recipe for Getting This Type of Shot
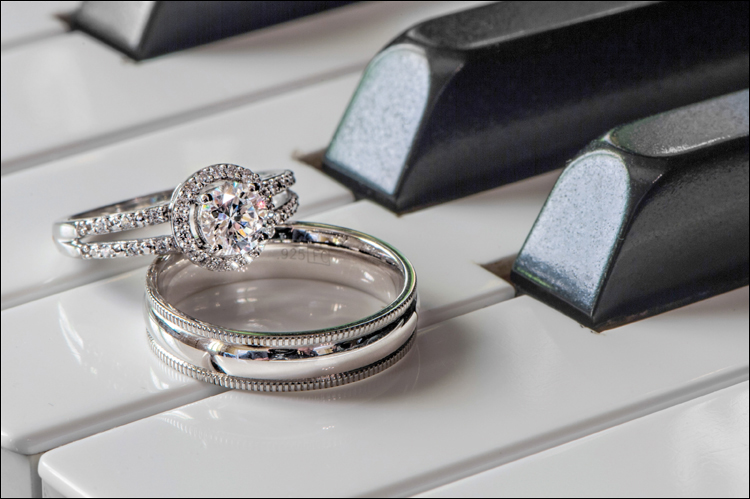
Characteristics of this type of shot: A tight, close-up shot of the wedding rings with a glassy reflection.
(1) Getting something as small as two wedding rings to fill the frame, like these do, and still look really sharp means using a lens that was made for this type of shot: a macro lens. If you have a macro lens, you’re all set. If not, there are three alternatives that can help: (a) Use a Canon Close-Up lens, which screws onto the front of your regular size lens like a filter, turning it into a macro lens. It’s cheaper and smaller and does the trick. (b) Many zoom lenses have a Macro mode, in which case you’re already set. Or, (c) you can use an extension tube (see page 183).
(2) The reflection comes from just placing the rings on a shiny surface (in this case, ivory piano keys. You can also place the rings on a black area of the piano for a more mirror-like reflection). On the off chance that neither the church nor the reception hall has a piano, then head out to the parking lot to see who has a shiny white or black car (maybe the bride and groom hired a limo, or someone in the wedding party has one). Just put the rings on the hood and—voilá—instant reflection (of course, ask permission before you put things on someone’s hood or a reflection may become the least of your worries).
(3) If you have a tripod, this is the time to pull it out, because you’ll be shooting at an f-stop that will help keep as much in focus as possible, like f/22. You’ll need this because the depth of field for macro lenses, even at f/22, is so small that the front of the rings will be in focus, and the back will be a little out of focus.
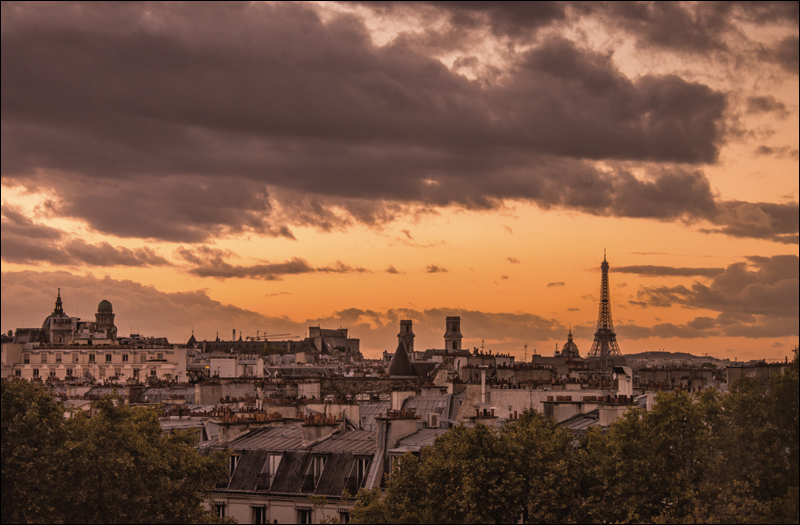
Characteristics of this type of shot: A sweeping view of a city skyline at sunset.
(1) The first key to this shot is the high vantage point. To get a rooftop skyline shot like this, you have to be up at least as high as the average building height. This shot was taken from the roof of the ultra modern L’Institut du Monde Arabe in Paris, along the Seine River, just behind Notre Dame. It has an open rooftop where you can even set up a tripod for a beautiful view of Notre Dame at night. However, this shot was taken on the opposite side of the building where there is no open rooftop and no clear view of the Eiffel Tower, which is what made getting this shot a bit of a challenge. But, I used the technique from page 162 on shooting through the glass window in your hotel. By the way, I used this same technique for the opening shot for this chapter, except it was pressed against the glass window of a moving tour bus.
(2) Near the elevators on the opposite side of the building is a patterned facade facing the building’s courtyard. It covers the entire side of the building, but the pattern had a circular hole in the center of each square—just big enough for me to press my lens up firmly against the glass to minimize glare. That was total luck, but there’s more to it than this. The way it’s constructed, I couldn’t use my tripod to hold the camera, but of course, it’s sunset and low lighting (not to mention the fact that I’m now shooting through what I imagine is tinted glass). So, I had to raise the ISO on my camera to 800 ISO. This raised my shutter speed above 1/60 of a second, which is a fast enough shutter speed where I could handhold the shot and not get a blurry photo.
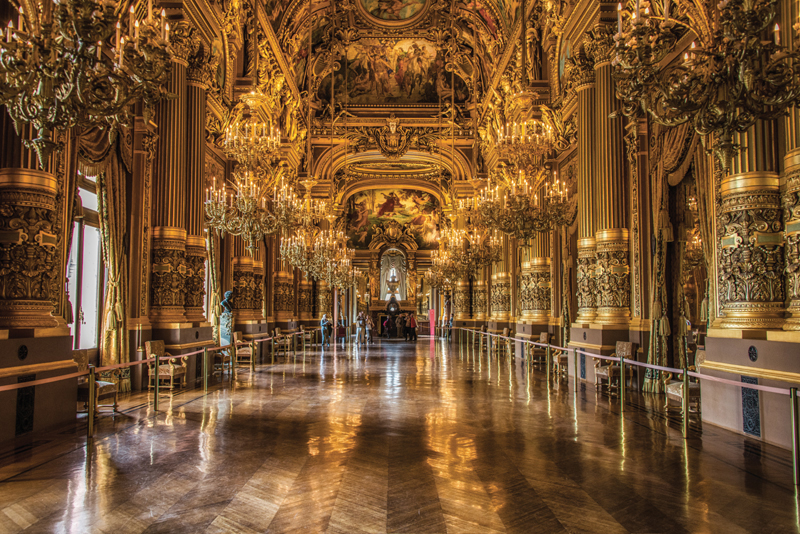
Characteristics of this type of shot: An empty hallway with a wide, long look, lit with natural light, with lots of detail visible throughout.
(1) There were two keys to this photo: The first was patience. There is nothing that kills a shot faster than one filled with tourists, and this is a hallway in the Paris Opera House, which is open to the public all day for self-guided tours. Loads of tourists were walking right in front of me from this vantage point, going to the balcony outside to the left that overlooks the street below, and even more people were walking down the hallway itself straight toward me. The only way to get a shot where it was not packed with people was to stand there, camera in hand, and literally just wait. I stood there for nearly 25 minutes to get this shot (you can still see a few tourists way off at the other end, but for the most part, they blend into the background).
(2) The other key was kindness and a smile. As soon as I started to set up a tripod (it doesn’t look like it, but the light was pretty low), a security guard immediately came up to me and told me it was “not allowed.” I smiled and said “just one quick shot.” He shook his head, “No.” But, I was really nice about it, and then said, “I’ll just take one quick shot—this hall is so beautiful, and I’d love a quick shot.” He paused and then said, “Well...I’m just going to walk into this next room and if you take a quick shot with the tripod, just don’t let me see you do it.” He smiled. I smiled. And, I didn’t abuse it—when the time was right, I unfolded the legs, took the shot, and then packed it up. I smiled, winked, and gave a thumbs up as I left. He smiled back. Kindness and a smile go a long way.
The Recipe for Getting This Type of Shot
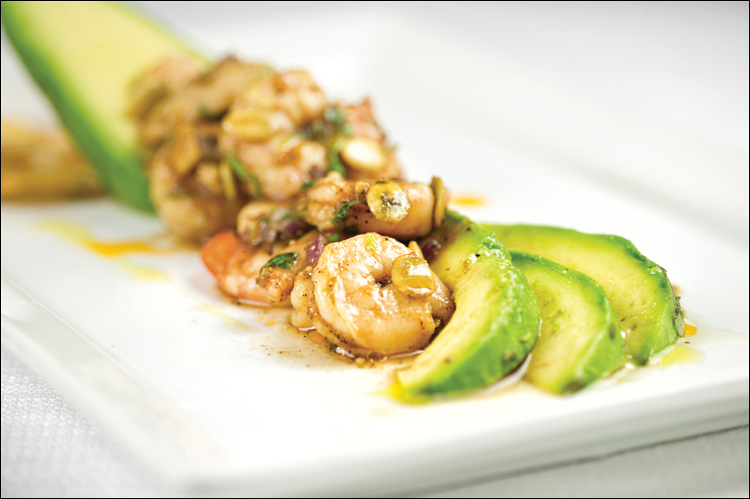
Characteristics of this type of shot: A simple two-light food shot using a couple of little tricks that make the food look more appetizing and the shot look better.
(1) This was actually shot in the restaurant (I was hired by the restaurant to shoot different dishes for their menu), but they set us up in a dark back corner in a part of the restaurant that wasn’t being used. We used a dining table as our shooting platform.
(2) I used two continuous, always-on lights from Westcott (see page 46), which are perfect for food and product shots like this. I placed one light behind the food, at an angle off to the right, with a small softbox, and another in front of the food, off to my left, with a small softbox.
(3) This is taken with a macro lens (to get that super-shallow depth of field, where only part of the food is in focus). This means shooting on a tripod with a shutter release, and keeping the barrel of the macro lens pretty straight (not tipping it down too much—see page 174).
(4) To keep the food looking moist and fresh, we kept a small bowl nearby with vegetable oil and we brushed it liberally on the food to give it that shine.
(5) To make the highlights really pop, we used four very small, inexpensive (we bought them at the local pharmacy) tabletop swivel vanity mirrors, and we bounced light from the back light into areas where we wanted an extra kick of light in front (that swivel comes in really handy for this—with continuous lights like we’re using, you can literally see the beams of light from these mirrors as you swivel them up/down).
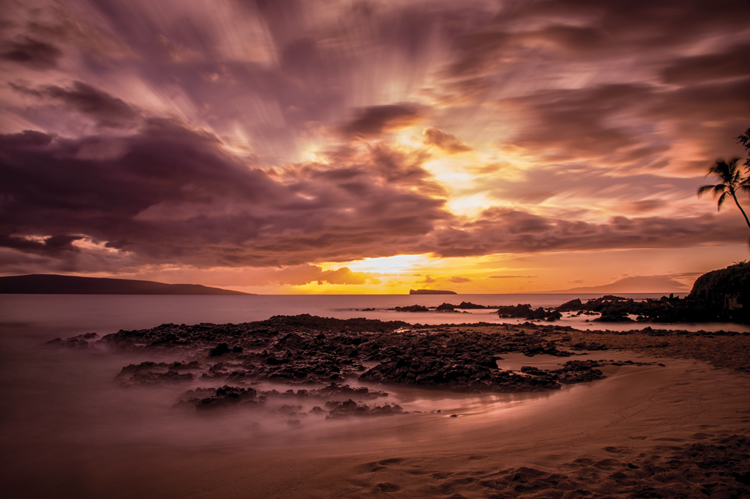
Characteristics of this type of shot: A misty, almost cloudy sea with beautiful clouds above to make a classic sunset scene.
(1) A key part of this is simply luck. The next day I could have come to this same location, at the same time, with the same equipment, and been faced with a bald, cloudless sky. But this particular night, I got lucky with a beautiful, cloud-filled sky, which is exactly what you need to create a beautiful sunset image.
(2) For a sweeping landscape like this, you need to use a wide-angle lens (this was taken with a 28–300mm zoom lens, set at 28mm—its widest angle). To keep a decent amount of focus throughout the shot, you should choose a higher number for your f-stop (f/14, f/16, f/22, etc.).
(3) Since you’re shooting around dusk, the light will be low, so you absolutely need to shoot this type of shot on a tripod or your shot will be blurry. Also, use a cable release or your camera’s self-timer to minimize any camera shake. Since you’re on a tripod, you can shoot at 100 ISO for the cleanest image.
(4) But just shooting a f/22 alone won’t get you that misty, cloudy water you see here—you’re going to need a filter to darken the scene even more, so your shutter can stay open for 30 or 40 seconds or longer (longer is better). It’s called a Neutral Density (or just ND, for short) filter. It screws onto your lens and darkens the scene by 2 stops, 4 stops, or even 10 stops (the more stops, the longer your shutter stays open). Here’s a link to a video tutorial I did on using ND filters: http://bit.ly/173IgGL.
The Recipe for Getting This Type of Shot
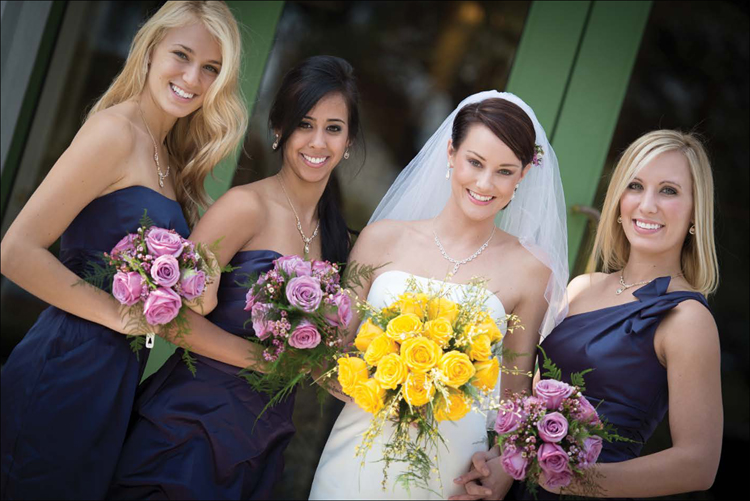
Characteristics of this type of shot: Nice, soft, beautiful light on the bride and bridesmaids, even though it’s taken outside at “high noon.”
(1) Have you noticed a theme in this chapter? It’s all about getting soft, beautiful light, and once you have that, the rest all falls into place. Here, we have a shot of the bride and bridesmaids, taken outside when the sun is its harshest, and all it took to get this shot was to make sure all of them were fully under an awning in front of the reception hall. By simply having them under an awning, so they’re in the shade, the light is soft and beautiful. For softer, more beautiful light, move them toward the edge of the shade (I had them move a few steps forward, toward the camera, until they were almost in the sun without any of it actually hitting them directly).
(2) To have the background behind them a little bit out of focus, you want to use an f-stop that makes the background soft and out of focus, like f/2.8 or f/4. It’s not super-out-of-focus because I wasn’t able to zoom in tight enough (I would have had to use a really long lens and stand across the street to zoom in tight and fit four people in the frame).
(3) To add a little more energy to the shot, I tilted the camera to its side a bit (you might hear some photographers say, “Oh, not that cliché tilty trick,” but clients still love it, and that’s who you want to make happy)..