
Chapter Five. Shooting Weddings Like a Pro
How to Get Professional Results from Your Next Shoot
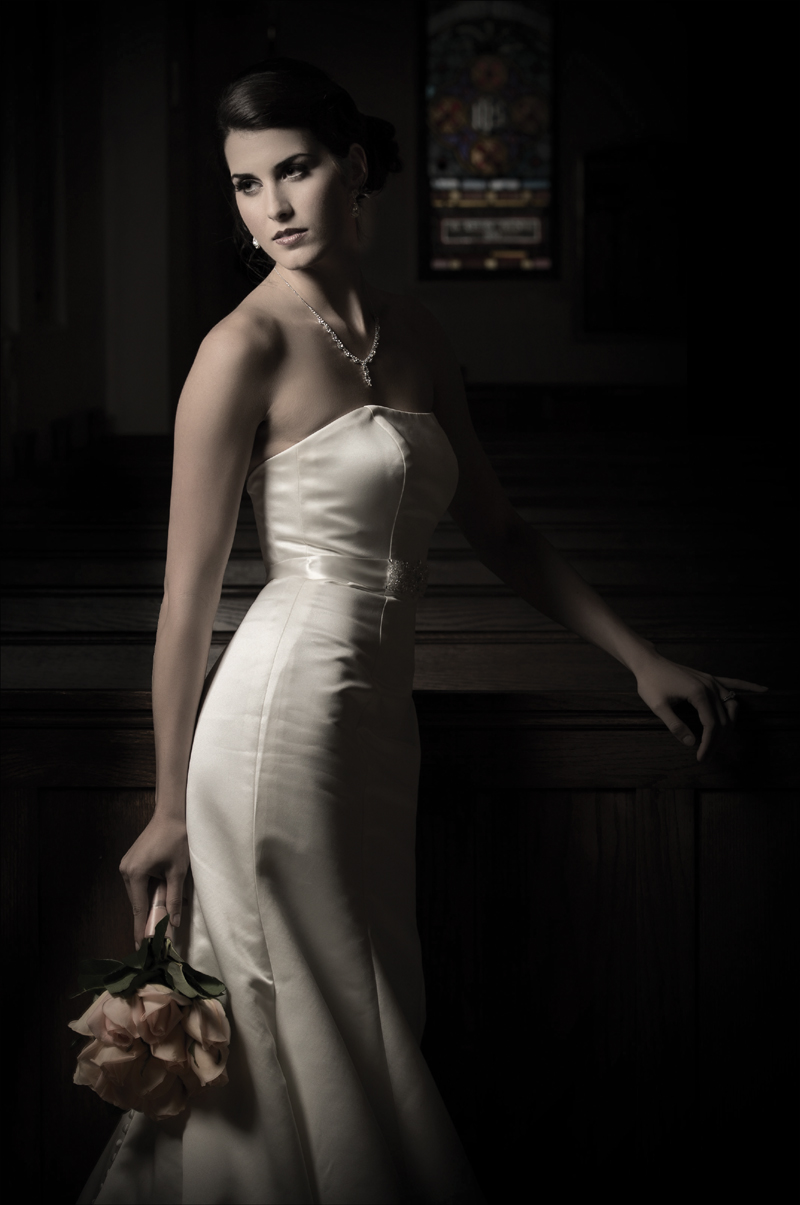
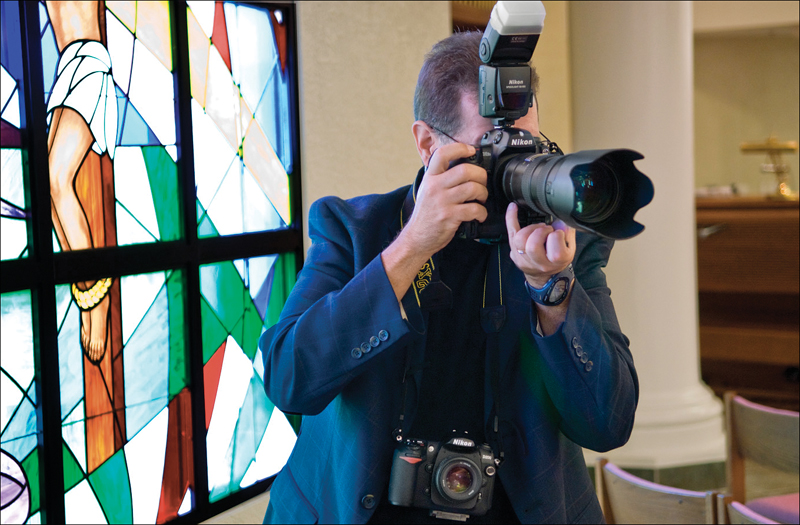
SHUTTER SPEED: 1/80 SEC F-STOP: F/6.3 ISO: 100 FOCAL LENGTH: 82MM PHOTOGRAPHER: SCOTT KELBY
 Shooting a wedding is tricky business, and if you have friends (and they know you have a nice camera), it’s only a matter of time before you’re standing in a church yelling things like, “Okay, next I need the groom’s grandmother and grandfather.” Once you’ve said that line aloud in a church, you are officially ordained as a temporary wedding photographer. Now, just because you took the gig for free, as a favor to that guy you know over in accounting, don’t think for a minute that the bride is expecting anything less than absolute pro-quality images. Worse yet, the nicer gear you have, the better they expect those images to be, and if, up until this day, you’ve been a sports shooter or a landscape photographer, all that goes out the window, because today you are a wedding photographer, which is arguably the single hardest photography job in the known world. The reason is simple: there is no reshoot. This particular wedding, the one you are responsible for shooting, only happens once. There is no, “Oh, my camera broke” or “I didn’t bring enough memory cards” or “I forgot my charger for my flash,” because if the bride hears anything even approaching one of those excuses, she will take her bare hands and squeeze your neck until either your lifeless body falls to the floor like a wet bag of cement, or a pack of AAA alkaline batteries pops out of you like a Pez dispenser. That’s because regardless of whether you’re getting paid or not, she has waited, dreamed about, meticulously planned, agonized over, and micro-managed this special day to death, and if you miss any one of those critical moments (the ring, kissing the bride, walking down the aisle as man and wife for the first time, cutting the cake, the first dance, etc.), then it’s time for you to die. That’s why this chapter is all about one thing: increasing your life expectancy.
Create a Shot List
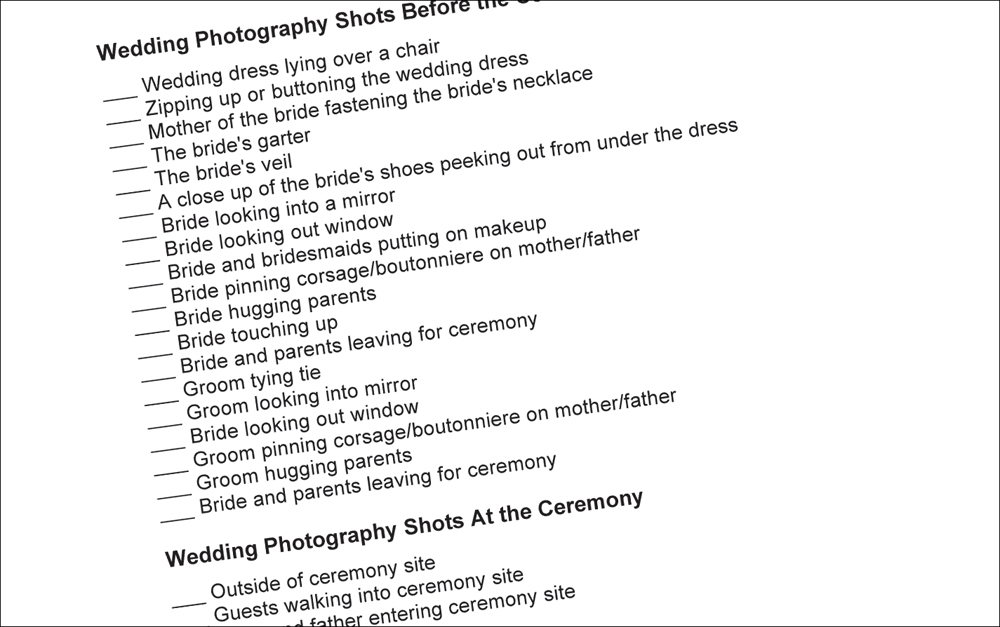
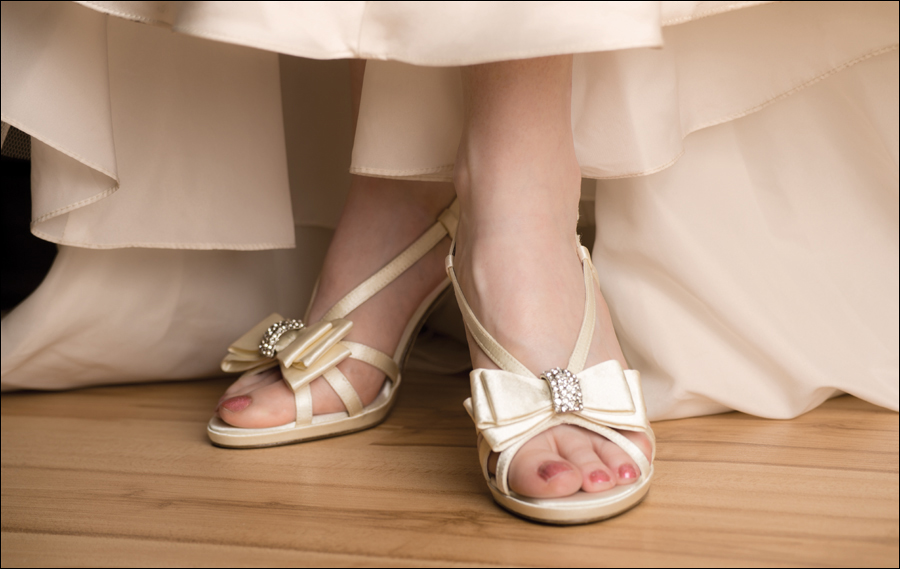
Before you even leave your office to head to the wedding, you should put together a shot list of photos you’ll need to take for the wedding album, prints, etc. There are no redos at weddings, so you’d better be sure you leave with a list in hand of which shots you need, from bride and groom formals, to detail shots (the invitations, the rings, the bouquet, the bride’s shoes, etc.), to reception shots like cutting the cake, receiving lines, place cards, and more. Without a written shot list, you’re winging it, and it’s almost an absolute lock that you’ll miss one or more critical shots that your clients (the bride and groom) are going to expect to be in their album, so don’t take a chance—this little bit of preparation can make a world of difference. Luckily, you can find wedding photography shot lists online for free at places like http://bit.ly/aboutshotlist or this article and shot list from Amazon.com at http://bit.ly/amazonshotlist (actually, there are literally hundreds of different shot lists available for downloading—just Google “wedding shot list” and you’ll have a wide range of choices). Find a shot list that makes sense to you, and although you can get creative and do far beyond what it suggests, at least you’ll have the most critical shots covered. Also, make sure you talk to the bride and groom before you finalize your shot list to ensure the specific shots they want are included (they may want shots with old friends from high school or college, or a special relative, and the only way to find out about these is to talk with the bride and groom in advance).
Have Backups for Everything!
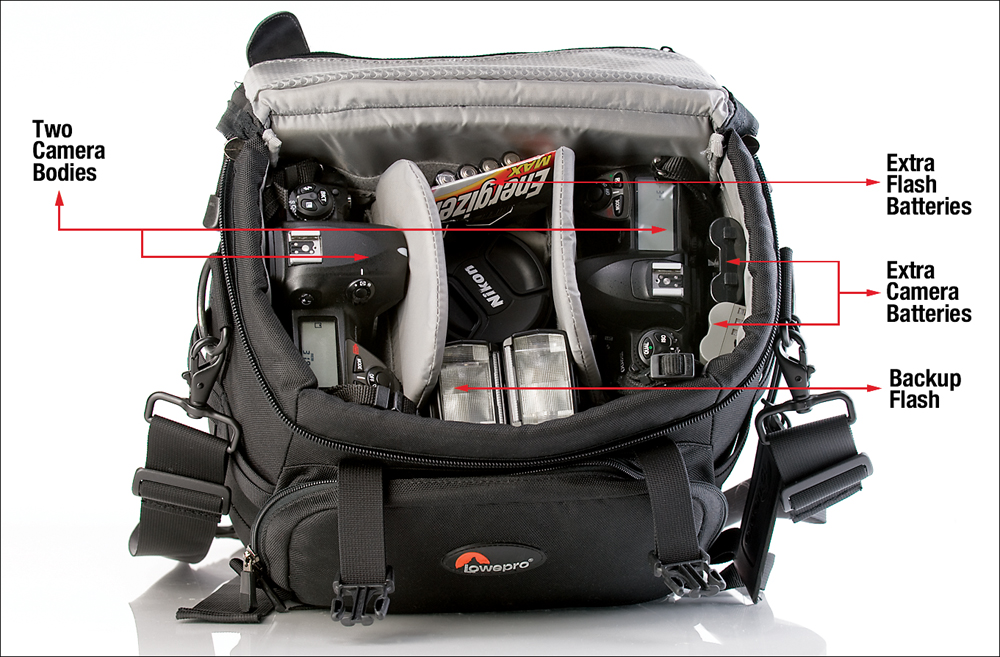
If anything can go wrong at the wedding you’re shooting, it will. That’s why the pros always take backups for everything, because there are no retakes, no redos, no “do overs.” Go through each piece of your gear and ask yourself what you would do if it wound up missing or broke. I can tell you this, at the very minimum you need to have two camera bodies—one main and one backup (a friend of mine was shooting a wedding, his camera slipped out of his hands, and the shoot was over. He was lucky enough to have a friend race him a replacement camera, but if his friend wasn’t available, or was shooting a wedding himself that day, or was at the movies, etc., he probably would have ended up in court). You also need backup batteries for your flash, and even a backup flash unit. You need extra memory cards and a backup lens (I recently saw a photographer pick up his camera bag, which he thought was zipped, and we all cringed at the sound of breaking glass). Also, don’t forget to bring backup batteries for both of your cameras. It comes down to this: you don’t want to put yourself in a situation where one piece of equipment fails, one piece gets dropped, or your battery dies, and your job is in jeopardy (not to mention the loss of future wedding gigs from the fallout of having a large public event like a wedding day shoot go belly up).
Silencing Your Camera’s Beep
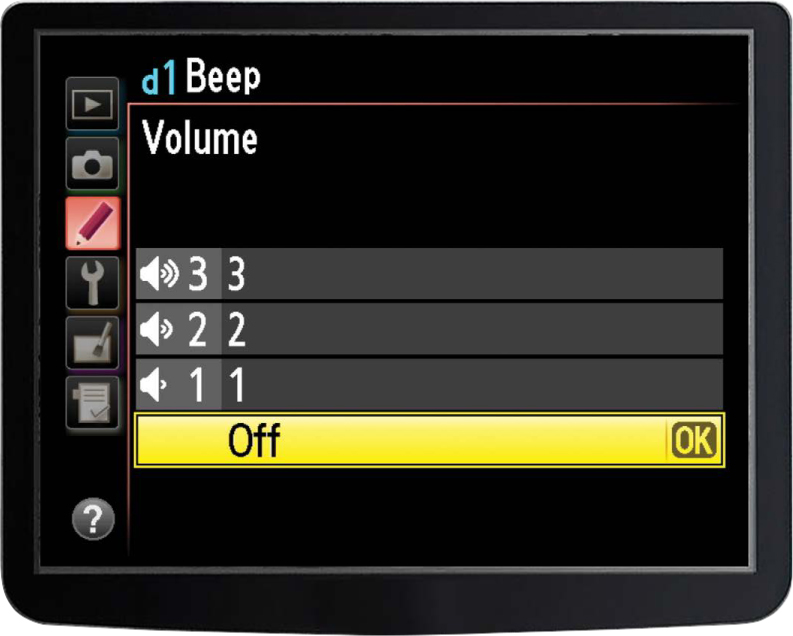
The last thing the wedding couple (or the clergy, or the guests) wants to hear during the ceremony is the distracting sound of your camera beeping as it locks focus. Before the wedding begins, go to your camera’s menu and disable the audible beep sound. From that point on, use the focus symbol that appears in your camera’s viewfinder to let you know when the autofocus has locked on. Once the ceremony is over, you can always switch back.
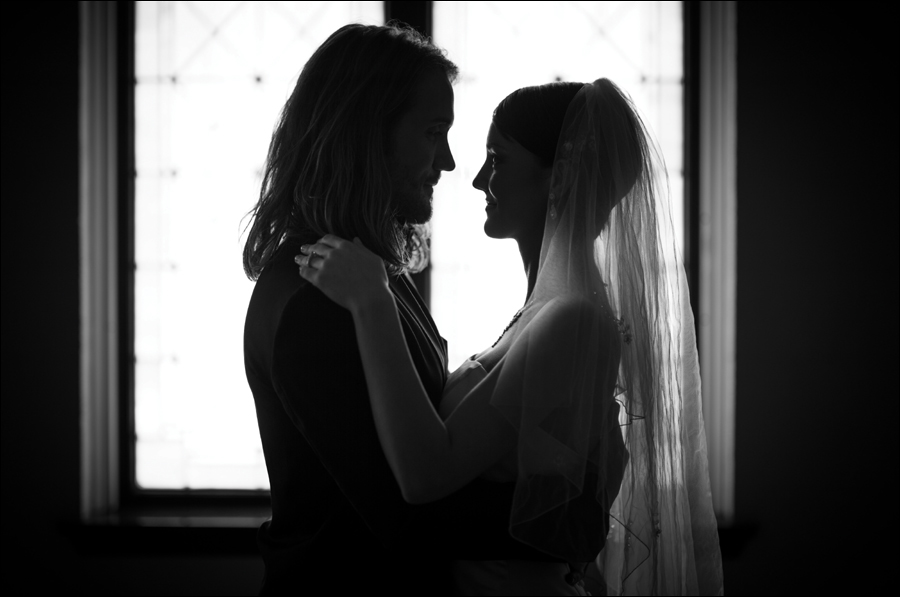
Backlighting Your Bride

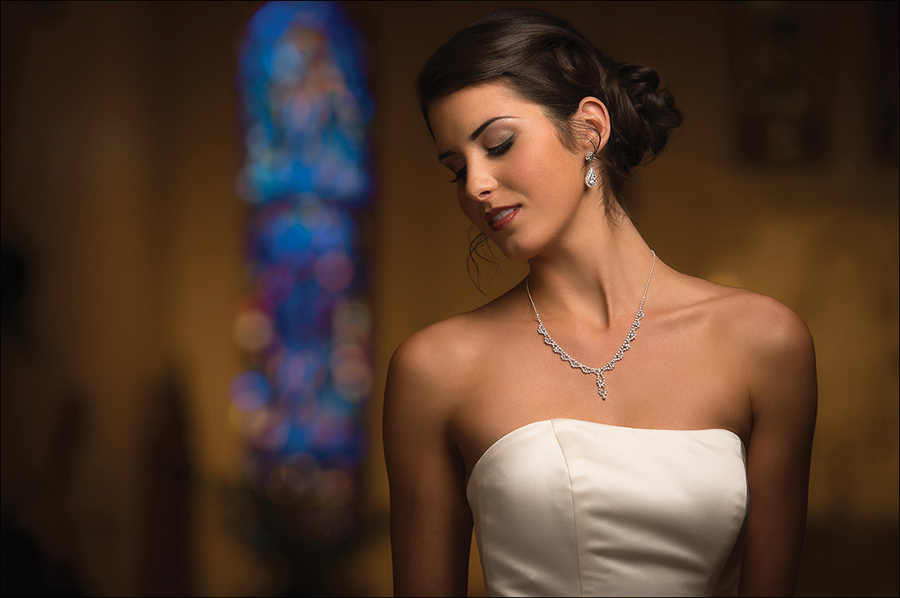
A popular effect with wedding photographers is to backlight the bride—where a bright light rims the outline of the bride—and then add in just a little bit of flash to light the front of the bride, so she’s not a silhouette (as shown above). This takes two flash units: one in front of the bride (in this case, I used an off-camera flash on a light stand, positioned to the left of the camera at a 45° angle), and a second flash on a light stand behind the bride (here, it was behind and to the right, just out of the frame). The flash of light from the front flash triggers the second flash behind the bride. The key is to make sure the flash behind the bride is much brighter than the flash in front of the bride (in the shot above, I lowered the power of the front flash as low as I could, but kept it bright enough so it would still trigger the flash behind her. It took a couple of test flashes to find out just how low that front flash could go). Another nice look (which is very dramatic) is to go ahead and let her just be lit with a flash behind her, then turn the flash in front off, so she actually is mostly a silhouette. If you do this, you’ll have to set your front flash so it doesn’t fire the full flash, but only a very low light pulse—just enough to trigger the wireless flash behind her, but so it doesn’t throw any measurable light on the bride (Nikon’s DSLRs with pop-up flash have this feature built in).
Don’t Changes Lenses, Change Cameras
Once a wedding starts, things happen very quickly and you’re not going to have a lot of chances (read as: none) to change lenses. So, if you’re shooting with your zoom lens, and you suddenly need to switch to a wide angle, take a tip from professional sports shooters and don’t switch lenses—switch camera bodies instead. That’s right—keep two camera bodies around your neck (or one around your neck, one in your hand), and put a wide-angle lens on one body, and a zoom lens on the other. That way, switching lenses takes two seconds, not two minutes, and because of that, now you “get the shot.”
Another Two-Camera Strategy
Besides the zoom and wide-angle double-camera technique above, here’s another one to consider: have one camera with a flash mounted on your hot shoe for when you need flash, and have your second camera with a really fast lens, like a 50mm f/1.8 or f/1.4 (see page 145) for when you can’t use flash (or don’t want to use it), so you can capture those intimate moments without being obtrusive.
Bring a Stepladder for a Higher Vantage Point

At weddings, you’re going to be posing and shooting large groups (for your formals), and one trick the pros use is to carry a small, lightweight, collapsible aluminum ladder, like the Conair Travel Smart LadderKart, which doubles as a hand truck to help you move your gear (when you’re not standing on it). It holds up to 300 lbs., and sells for around $61, but I’ve found other similar ladders online, as well. Being able to shoot the formal group portraits from a higher angle is a big help, because it enables you to see more faces and arrange your groups more easily. Also, it’s great for shots during the reception, where a higher angle gives you a better view of the bride and groom on the crowded dance floor. Actually, you can put it to use anytime you want a different perspective, plus you can even use it as a posing stool in a pinch. You’ll find this to be an indispensable tool (even if you only wind up using it for lugging your gear).
Why You Want a Second Shooter
Many pro wedding photographers bring a second shooter to their jobs (sometimes even a third shooter) as an insurance policy to make sure they cover all the most important shots, and the bigger the wedding, the more you need a second shooter. After all, you can’t be everywhere, and if any little thing goes wrong (equipmentwise or otherwise), there’s someone else to either keep shooting, or to deal with the problem so you can keep shooting. This second shooter also usually acts as an assistant, and in the fast pace of a wedding, they can be an absolute lifesaver. But, beyond that, the second shooter may (will) have a different style than you and can bring a different dimension (they can shoot zoom while you’re shooting wide), a different camera angle, they can shoot from a different location in the church and reception hall, plus there’s a good chance that if you missed “the shot,” your second shooter will have gotten it (or vice versa).
When to Shoot in RAW
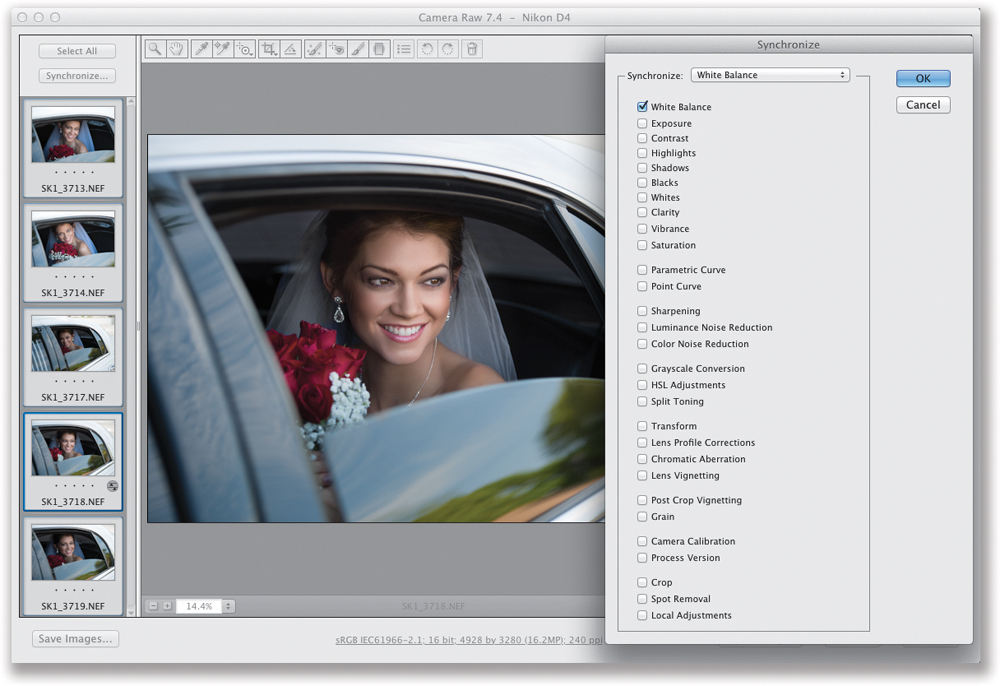
Although many wedding photographers choose to shoot exclusively in JPEG mode, when you get in a tricky lighting situation, your Get Out of Jail Free card is to switch to RAW mode. Here’s why: when you shoot in JPEG mode, the white balance you set in the camera is embedded into the file. If you set it wrong (which can happen in tricky lighting situations), you’ve got a color correction nightmare. However, when you shoot in RAW mode, you have the option of changing the white balance to any one of the same white balance settings you could have chosen in the camera itself. Best of all, once you’ve fixed the white balance for one photo, you can apply that change to all the other images at once. If you use Adobe Photoshop, here’s how: (1) Select all the RAW photos you want to adjust and open them in Photoshop’s Camera Raw (it will open all your selected photos at once). (2) Choose the White Balance setting from the pop-up menu. (3) Click the Select All button at the top left. (4) Click the Synchronize button, and when the dialog appears, choose White Balance from the pop-up menu at the top, then click OK. Now the white balance you chose for the current RAW photo will be applied to all your other open RAW photos. If you use Adobe Lightroom, select the photos you want to adjust, then go to the Develop module and choose your new white balance. Click the Copy button on the bottom left. When the dialog appears, click the Check None button, turn on just the checkbox for White Balance, then click Copy. Now click the Paste button to paste that white balance setting to all your other selected photos. Also, if you want the best of both worlds, set your camera to Raw + JPEG, which captures a RAW image and a JPEG version at the same time.
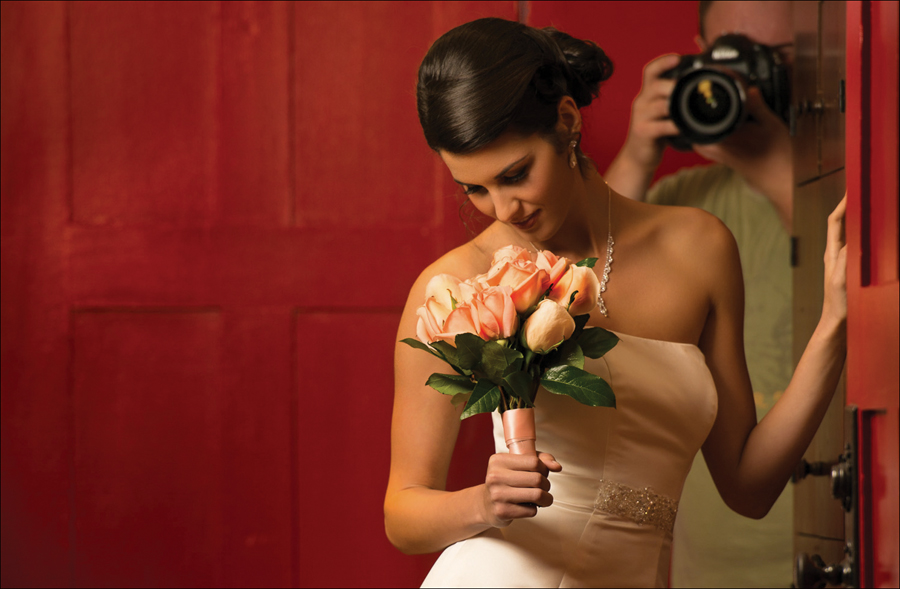
Where to Aim Your Flash
Another one of the tricks the pros use to get just that little extra bit of light into their wedding photos (even ones taken in daylight) is to aim their flash head straight upward (as shown here). This works best if you’re not standing too far from your subjects, and even if there’s no ceiling to bounce the light from the flash off of, it still sends that little bit of light forward to light the face. This helps in adding catch lights in the eyes, but it does it without creating that “too much flash” look. To help make sure those catch lights appear, pull up your flash’s bounce card to help direct more of that straight-up light forward (you can see the white bounce card pulled up in the photo above). So, if you’ve got a nice white ceiling to let the light from your flash bounce off of—great (but keep that bounce card extended either way). If not, still keep that flash aimed straight up most of the time, especially if there’s already some existing room light, as the light from your flash will be subtle enough to nicely blend in.
Shoot in Lower Light Without Raising Your ISO
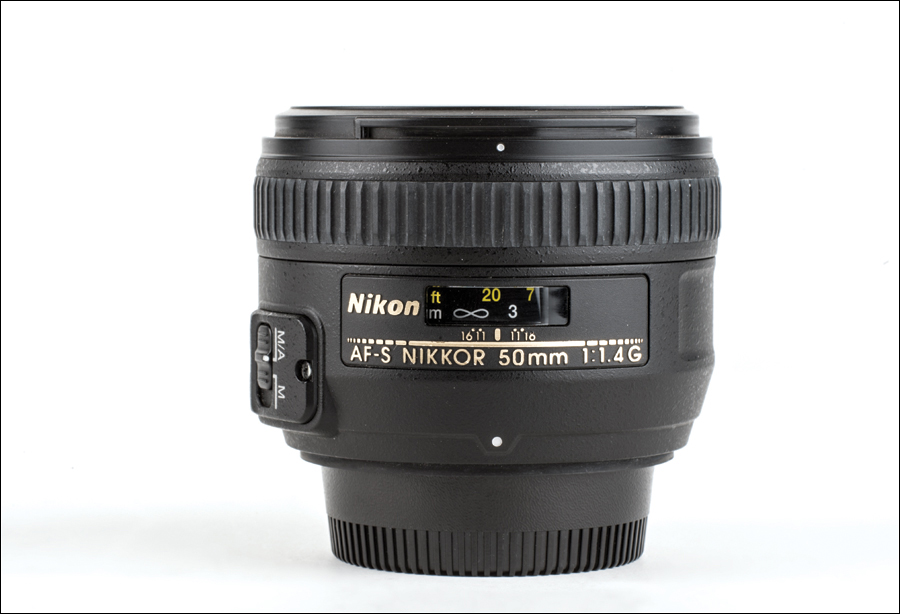
Since you’ll be shooting on a regular basis in the low lighting of a church, there’s a tool many of the top pros use that lets them get away with shooting perfectly exposed, sharp, handheld shots without using flash, or without pumping their ISO up to 1200. They buy an inexpensive 50mm f/1.8 lens (right around $100), or better yet, a 50mm f/1.4 lens (like the one shown above, which goes for around $469). These super-fast lenses let you shoot handheld in really low light, and you won’t find a wedding pro that has one who doesn’t swear by it. They’re lightweight, surprisingly crisp (considering their low cost), and another tool in your bag of tricks to make sure you get the most important shots.
Charge Everything the Day before the Wedding
The day before the wedding, make sure you charge everything—including your cameras (both bodies). Make sure you have fresh batteries in all your flash units. If you’re taking your laptop, make sure its batteries are charged. And just make certain that if a piece of your equipment has a battery, it’s a fresh battery, or a freshly charged battery. Also, it’s not a bad idea to fill your car up with gas now, too.
A Recipe for Balanced Flash in Church
When you’re shooting the formals in the church (before or after the ceremony), here is a recipe you can use to get a natural-looking light balance between your flash and the available light in the church: set your ISO to 800, set your shutter speed to 1/60 of a second, and set your f-stop to f/5.6, or a lower number if possible (like f/4, f/3.5, or even f/2.8). By using a relatively low shutter speed like 1/60 of a second, it’s a slow enough speed that your camera can properly expose the background (you see it lit with the available light in the room), and then your flash comes in to freeze the action. Once you’ve got those two settings in place, now all you have to do is take a test shot with your flash, and if it overpowers the room light (the background looks black), then lower the brightness (power) of your flash unit, so although your subject will be mostly lit with flash, you’ll still see some of the natural light in the church. This gives a nice balance between the natural light (which should be around 30% to 35% of the light in the photo) and your flash (which should be 65% to 70% of the light).
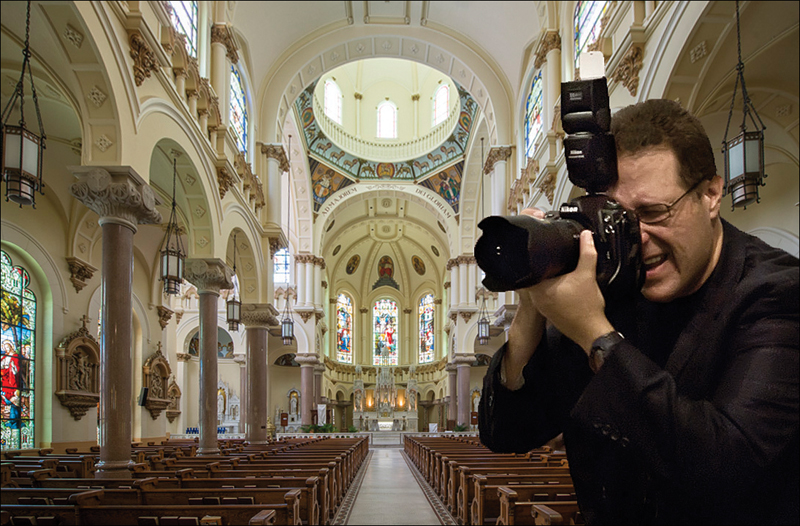
Compose to Include the Church

This is one of many tricks I learned from my friend, and wedding photography guru, David Ziser (a master wedding photographer and brilliant teacher): compose a decent number of the formal bride and groom portraits to include a lot of the interior of the church (as shown above). It’s important to brides to see the church where the ceremony took place, and by composing it into the formals, it really gives the shots a sense of place (after all, if you compose them so tight that you don’t see the church, you might as well have taken them the day before in the studio).
Don’t Forget Your Business Cards
There is no better place to book new business than at the wedding you’re shooting, and if you seem calm, in control, and confident, you may get inquiries right there on the spot (before your prospective client has even seen a single image). They assume if you got this gig, you must be good, so make sure you have some extra business cards on you. Writing your number on a napkin doesn’t instill confidence.
Tip for Posing the Bride
Another tip I picked up from David Ziser is a posing tip for formal shots of the bride that lowers the shoulder that’s farthest from your light source, which creates a flattering diagonal line between her shoulders. To do this, have the bride stand with her feet in a staggered V-shape (as shown above), and then have her shift her weight to her back foot, which creates a much more dynamic look for your pose.
Dealing with the “Unofficial” Wedding Shooters
When you’re hired as the official wedding photographer, these days you’re probably going to have to deal with a number of “unofficial” photographers (friends of the bride/groom with digital SLRs) who want to shoot over your shoulder while you’re doing the formals. Well-known photographer and author Derrick Story shared a tip with me that might help give you some breathing room so you can get your job done. Derrick goes over to the unofficial shooters and asks that they let him get his job done first, then he’ll hold the group in place for a few a moments so they can step in and get their shots. He finds that this usually does the trick, and they stay out of his hair while he’s getting the formals taken care of.
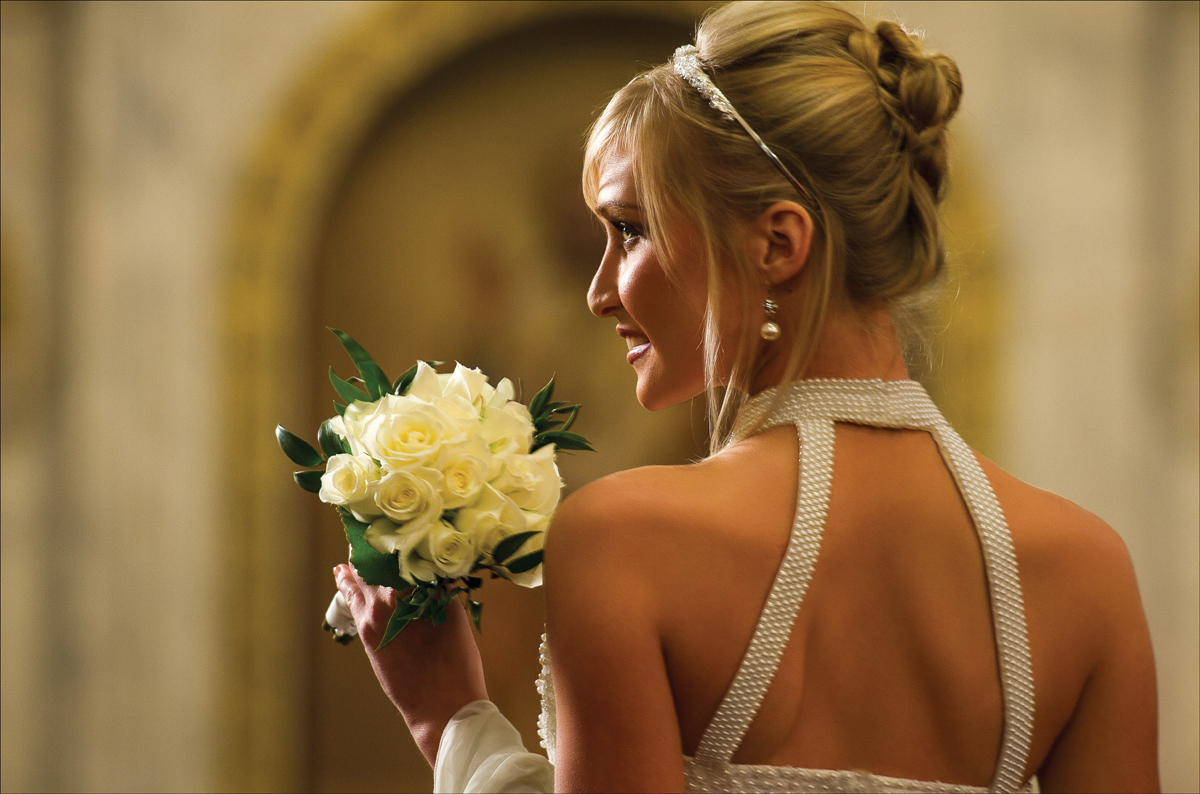
Keeping Detail in the Bridal Gown
Since most bridal gowns are white, we have to be careful how we position the bride when shooting the formal bridal portraits, so we don’t blow out the highlights on the gown and lose all the important detail of the dress (and that detail is very important to the bride). David Ziser taught me a great trick that works every time for keeping this critical detail, and it has to do with how you position the bride. You want the light from your flash (or from a window, if you’re using window light) to cross the dress (so it accentuates the shadows and brings out detail), not hit it straight on and blow everything out. The easiest way to do this is simply to position your bride so her shoulder that is closest to the light source is angled toward the light source. That’s it. This is important because if the shoulder closest to the light isn’t in front, the flash hits the gown straight on and you lose the shadows and the detail. So, just make sure to angle the bride so her shoulder that’s closest to the light is angled toward the light (as shown here, where you can see by looking at the bride, the flash is to the left of my camera, because she’s much brighter on that side. The shoulder closest to the camera is aiming toward the light). Easy enough.
Getting More Flashes Per Wedding
Your flash is going to get a workout at a wedding, and you’re going to be stopping to pop in fresh batteries on a pretty regular basis. Batteries must sense fear, because they always seem to die during absolutely critical moments in the wedding, so you want to be changing batteries as little as possible. (Plus, as your batteries start to wear down, it starts to take longer and longer for your flash to recycle so it’s ready to fire again.) That’s why many pros use a small external battery pack to double how long they can shoot with flash before having to change batteries. Better yet, it greatly cuts the recycle time between flashes. These packs are a little larger than a deck of cards, and run on six or eight AA batteries (depending on the model). You just connect the pack’s cable to your flash, pop the pack into your shirt or suit pocket, and fire away. If you don’t have a battery pack and your battery’s getting low, try shooting at a higher ISO—it cuts the flash output and extends your battery life considerably.
Scott’s Gear Finder
 Canon Compact Battery Pack CP-E4 (around $150)
 Nikon SD-9 High Performance Battery Pack (around $200)
 Quantum Slim & Compact Turbo Battery Packs (around $350 and up)
How to Lessen Noise in Your Photos
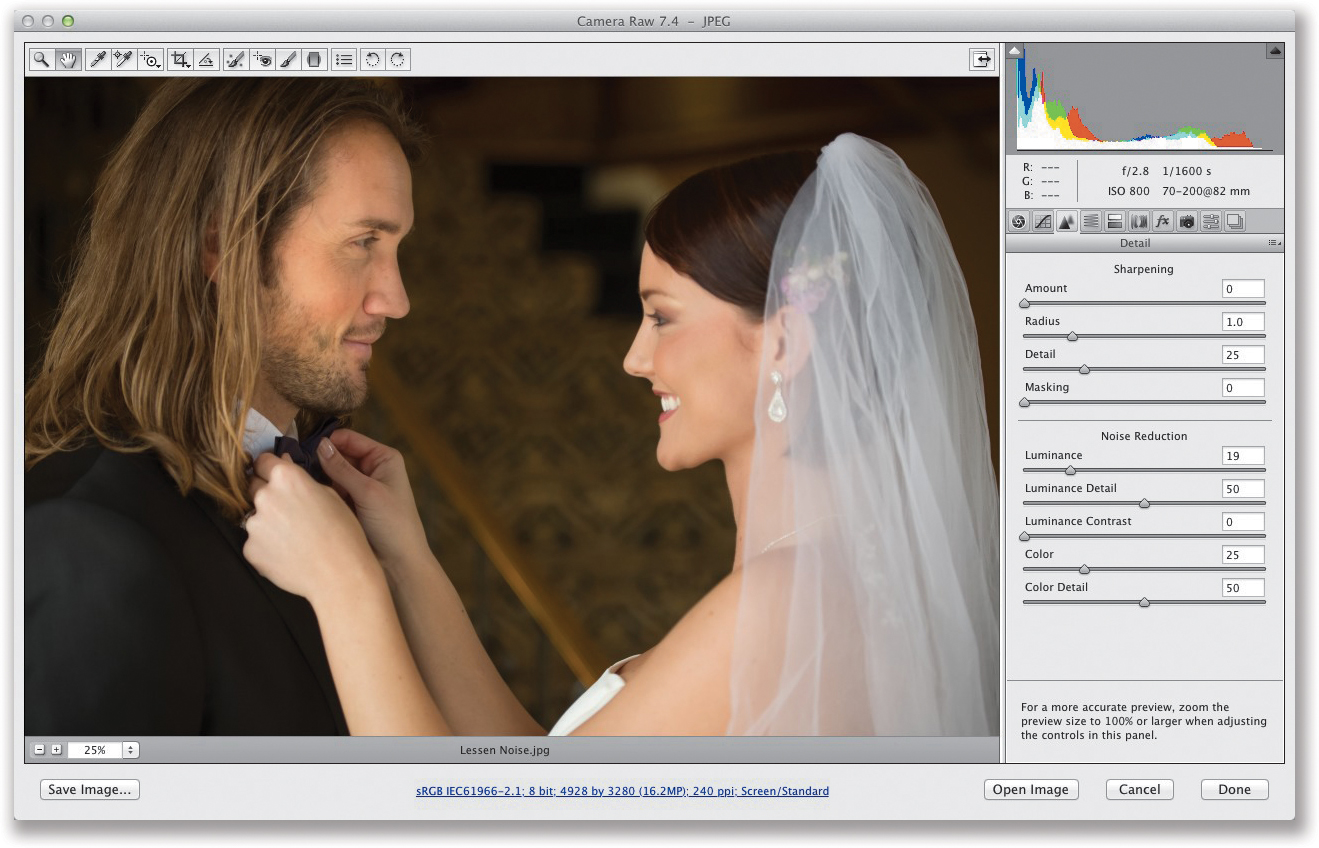
When you raise the ISO on your camera (so you can shoot in lower light), there is a tradeoff, and that is you increase the amount of noise (grain) in your shots. Depending on the make and model of your camera, this noise might be acceptable or it might be so visible that it kind of ruins the shot. If you have Photoshop CS5 or later or Lightroom 3 or later, they all have excellent built-in noise reduction (I used to have to use a plug-in for reducing noise, but not anymore). Here’s what you do: Just open your noisy image in Camera Raw (or Lightroom’s Develop module) and zoom in really tight, so you can see the noise (usually lurking in the shadows). Click on the Detail icon (panel) to get to the Noise Reduction controls, and then just use the Color slider to remove the color noise (those red, green, and blue color spots) and the Luminance slider to remove the luminance noise (those grainy-looking gray spots).
A Tip for Outdoor Weddings
If you go a day early to scope out the location where you’ll be shooting an outdoor wedding, make sure you’re there at the exact same time of day that you’ll be actually shooting the wedding. That way, you can see what the real lighting conditions will be when you’re shooting the “real thing.”
Tips for Shooting the Bride’s Profile
Here are a few more tips I picked up from David Ziser for making perfect profile portraits of your bride: (1) Shoot horizontal. As I mentioned in the portrait chapter, this puts some breathing room in front of your subject, so they don’t look squeezed into the frame. (2) Position the bride so it’s a full profile shot, where you don’t see any of the eye on the other side of her head, or any of the other side of her face at all. (3) Don’t position your flash (or softbox) directly in front of her face—position it slightly behind her so the light wraps around her face. (4) Don’t have her look straight ahead, or you’ll see too much of the whites of her eyes. Instead, have her look just a tiny bit back toward the camera (don’t let her move her head—just her eyes). That way, you see more iris and less whites. (5) If the shadow side of her face (the side facing the camera) gets too dark, use a silver reflector to bounce some of that light into that dark side of her face.
Get to the Church Early and Scope Everything Out
The last thing you want during the wedding shoot is to frantically search for good light, good backgrounds to shoot in front of, or a power outlet to plug in your charger. Get there crazy early (or go a day before the wedding, if possible) and scope everything out in advance. That way, you’re calm, prepared, and you have some great spots already picked out so the couple looks their best.
Wedding Zoom Effect Made Easy
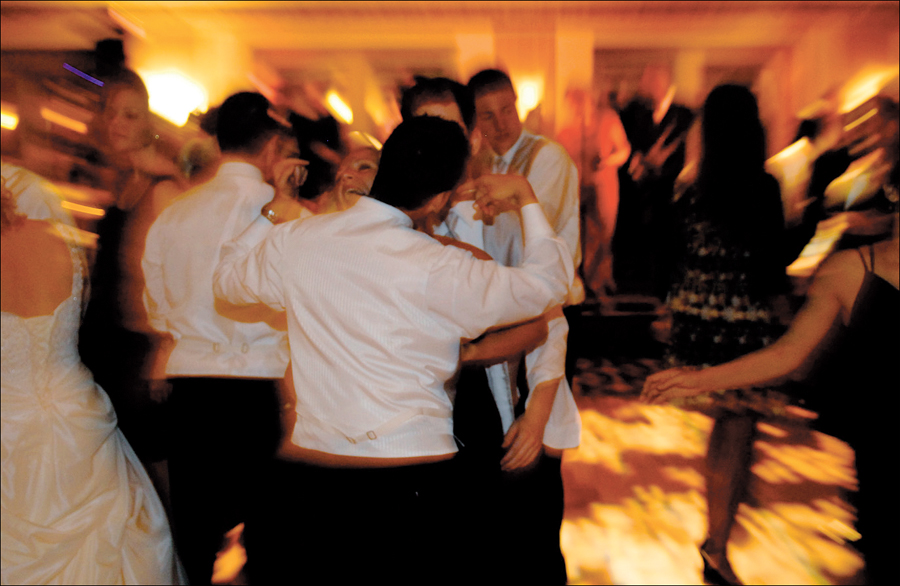
Here’s a popular effect for adding a sense of motion and energy to your reception shots (perfect for dance floor shots). It’s a zoom effect that you create using your flash and zoom lens, and it’s easier to get than it looks. First, set your camera to manual mode, and lower your shutter speed to around ⅛ of a second (or slower). Then, zoom in tight on the couple dancing, press the shutter button with your right hand, and then immediately zoom the lens out all the way to wide angle with your other hand. Because the shutter is open while you’re moving the zoom lens, it creates that motion effect, and then your flash fires to freeze the motion. The key is to zoom out to wide just as soon as you press that shutter button. Try this just a few times and you’ll “get it.” (That’s another benefit of digital photography—you can try the trick and look at the LCD on the back of your camera to see if you got the zoom effect or not. If you didn’t, you can just try again.)
Throw Some Snacks in Your Camera Bag
While everybody else is eating, you’re expected to be shooting, so make sure you throw a few small snacks (energy bars are ideal) and some bottled water in with your gear. Even if the bride and groom have offered to feed you while you’re there, you probably won’t get a chance (once a reception starts, there’s no break—too much is happening), so keep some snacks and water handy.
Add B&W to the Album
Another popular element in today’s wedding albums is to include a number of black-and-white images. You’ll still shoot these in color, and then you’ll use Adobe Photoshop to convert some of your images into black and white. This enhances the “photojournalistic” look of the wedding album, it adds contrast to the album, and many wedding photos look just wonderful in black and white. If you have Photoshop or Lightroom, there is a black-and-white conversion tool that you can use to convert your color image into black and white (and it comes with some built-in presets—you just have to choose one you like). If you have Photoshop Elements, it can do the job, as well. While I do use Photoshop for converting images into black and white from time to time, most of the time I use Nik Software’s Silver Efex Pro 2 black-and-white plug-in. Almost all the pros I know use it as well, and it’s absolutely brilliant (and super-easy to use. You can download a free 15-day trial copy from www.niksoftware.com and see for yourself). I’ve created a short video clip to show you how to convert from color to black and white—you can find it on this book’s download site at http://kelbytraining.com/books/digphotogv2.
Read David Ziser’s Digital ProTalk Blog Daily
If you’re serious about this stuff, do what I do: read David Ziser’s Digital ProTalk blog every day. He is an absolute fountain of information for professional wedding photographers, and on his blog, he not only shares his tricks of the trade and hard-earned techniques, he also shares some of his amazing photography (including some wonderful non-wedding imagery). Plus, David does a lot of live speaking gigs, and if you ever get to see him in person, he will just blow you away. David speaks for me each year at the Photoshop World Conference & Expo, and the first time I sat in on his class (which was an on-location wedding shoot at a local church, complete with professional bride and groom models), I was amazed. When I came back to the conference hall, one of my buddies asked me how his workshop was, and I described it this way: “He was teaching more than just lighting and posing. He was teaching them the business of today’s wedding photography, in such a meaningful and straight-to-the-point way that it was like he was running around stuffing money in their pockets. It was that good!” I find his blog as inspirational as it is informative. Check it out at www.digitalprotalk.com. Also, David wrote what many consider to be the Bible on wedding photography—it’s called Captured by the Light (shown above). I worked with David on this book and I think he did just a wonderful job sharing his techniques and photography.