
Introduction
This short introduction is intended to make sure you know the essentials for navigating your Android device.
If you’re already familiar with Android, feel free to skip the introduction and dive straight into Chapter 1, “Getting Up to Speed”—or into whichever chapter will be most helpful to you.
Grasping the Essentials of Android Navigation
Google has made Android as easy to navigate as possible using straightforward taps and gestures on the touch screen.
This section covers navigating the lock screen, the Home screen, and the Apps screen; opening the Notifications panel and the Quick Settings panel; and opening the Settings app.
Navigating the Lock, Home, and Apps Screens
As you work with your device, you will likely use three screens the most. These are the lock screen, which protects your security; the Home screen, which is your home base in Android; and the Apps screen, from which you launch the apps you want to use.
Unlocking the Lock Screen
When you start your Android device, it normally displays the lock screen. This security screen has two purposes: to prevent Android from responding to accidental touches on the screen and (optionally) to make the user authenticate himself by using the unlock method that the owner has set.
You can apply different unlock methods to the lock screen. The default unlock move is a simple swipe that provides no security at all, but you can apply strong security by requiring a PIN or passcode. Figure I-1 shows the lock screen secured with the PIN unlock method.
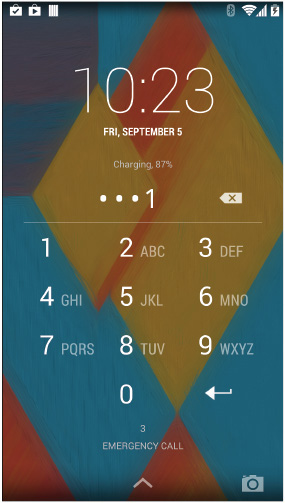
FIGURE I-1 To unlock a device secured with a PIN, type the PIN at the lock screen and tap the arrow below the 9 button.
You can turn off the lock screen by tapping the None button on the Choose Screen Lock screen in the Settings app. This move is seldom wise except for devices you are using for demonstration purposes.
Getting Around the Home Screen and Using the Buttons
After you’ve unlocked your device, the Home screen appears. The Home screen is your base for taking actions in Android and typically contains several types of items. Figure I-2 shows a Home screen with its essential parts labeled:

FIGURE I-2 The Home screen consists of a series of horizontal panels that give you access to many different Android features.
![]() Status bar. The status bar appears at the top of the Home screen and most other screens.
Status bar. The status bar appears at the top of the Home screen and most other screens.
![]() Google Search box. This box enables you to search quickly straight from the Home screen. You can tap the microphone icon and speak your search terms.
Google Search box. This box enables you to search quickly straight from the Home screen. You can tap the microphone icon and speak your search terms.
![]() Clock widget. A widget is a small, single-purpose app, such as the Clock widget shown here. You can put any of a wide variety of widgets on the Home screen to display the information you find useful or entertaining.
Clock widget. A widget is a small, single-purpose app, such as the Clock widget shown here. You can put any of a wide variety of widgets on the Home screen to display the information you find useful or entertaining.
![]() App icon. You can place icons for apps on the Home screen so that you can access them quickly.
App icon. You can place icons for apps on the Home screen so that you can access them quickly.
![]() Folder icon. You can put your Home screen icons into folders to keep them organized.
Folder icon. You can put your Home screen icons into folders to keep them organized.
![]() Home screen panel indicator. The Home screen consists of a series of panels that you can scroll among by swiping or dragging left or right. The larger dot shows the current panel in the series of panels.
Home screen panel indicator. The Home screen consists of a series of panels that you can scroll among by swiping or dragging left or right. The larger dot shows the current panel in the series of panels.
![]() Apps button. Tap this button to display the Apps screen (discussed in the next section).
Apps button. Tap this button to display the Apps screen (discussed in the next section).
![]() Favorites tray. This tray contains a handful of icons for apps that you want to have available on every Home screen panel.
Favorites tray. This tray contains a handful of icons for apps that you want to have available on every Home screen panel.
![]() Back button. Tap this button to return to the previous screen or to cancel out of a dialog box.
Back button. Tap this button to return to the previous screen or to cancel out of a dialog box.
![]() Home button. Tap this button to display the Home screen. Android displays whichever Home screen panel you used last. Tap the Home button again to display your main Home screen panel.
Home button. Tap this button to display the Home screen. Android displays whichever Home screen panel you used last. Tap the Home button again to display your main Home screen panel.
![]() Tip
Tip
Tap and hold the Home button to access the Google Now information feature. You can also tap the Home button and swipe up to access Google Now.
![]() Recent Apps button. Tap this button to display the Recent Apps screen. You can then tap the app you want to display.
Recent Apps button. Tap this button to display the Recent Apps screen. You can then tap the app you want to display.
Using the Apps Screen
From the Home screen, tap the Apps button to display the Apps screen. This screen (see Figure I-3) consists of one or more panels among which you can move by dragging or swiping left or right.
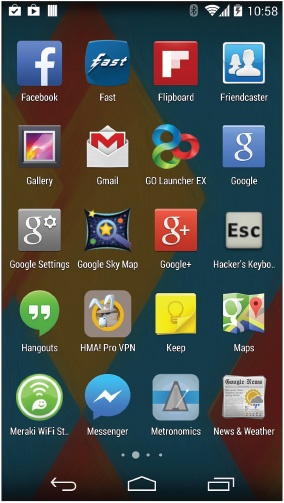
FIGURE I-3 On the Apps screen, drag or swipe left or right to find the app you want, and then tap its icon.
When you find the app you want to use, tap its icon. That app’s screen then appears.
Opening the Notifications Panel
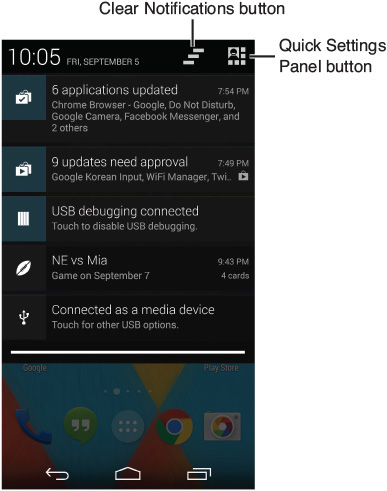
The Notifications panel contains notifications raised by apps to alert you to events. For example, when you receive a message in Gmail, the Gmail app raises a notification in the Notifications panel. Similarly, when Android detects that a software update has become available, it displays a notification to let you know about the update.
To open the Notifications panel (shown in Figure I-4), drag or swipe down from the top of the screen with one finger. On a phone, you can drag or swipe down on the left, in the middle, or on the right; on a tablet, drag or swipe down in the left half of the top of the screen. You can then view your notifications, deal with any that need your attention, and close the Notifications panel again by dragging or swiping upward.
Opening the Quick Settings Panel
The Quick Settings panel is a screen that gives you swift access to frequently used settings. You can open the Quick Settings panel in any of these three ways:
![]() Pull down from the top of the screen with two fingers on a phone.
Pull down from the top of the screen with two fingers on a phone.
![]() Pull down in the right half of the top of the screen with one finger on a tablet.
Pull down in the right half of the top of the screen with one finger on a tablet.
![]() Open the Notifications panel and then tap the Quick Settings Panel icon in its upper-right corner.
Open the Notifications panel and then tap the Quick Settings Panel icon in its upper-right corner.
Figure I-5 shows the Quick Settings panel on a phone.
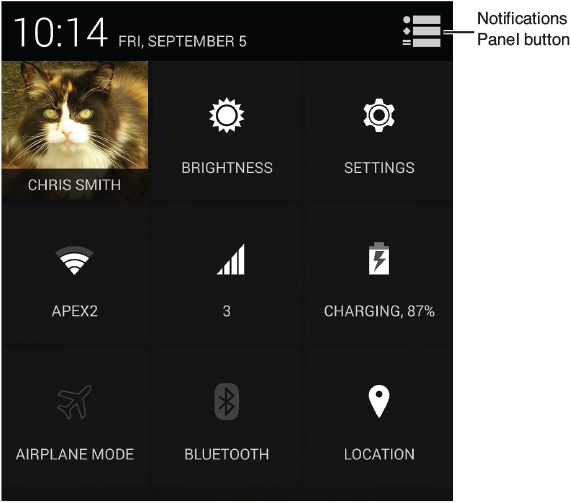
To close the Quick Settings panel, drag or swipe up.
![]() Tip
Tip
On a phone, tap the Notifications Panel button to switch from the Quick Settings panel to the Notifications panel.
Opening the Settings App
Android has a vast number of settings that you can customize to configure your device the way you want it. You configure most of the settings through the Settings app. You can open the Settings app in three easy ways, as explained next. From here on, this book tells you to “Open the Settings app” rather than telling you which way to open it.
The quickest way to open the Settings app is to use the Quick Settings panel:
1. Open the Quick Settings panel by pulling down from the top of the screen with two fingers on a phone or with one finger on the right side of the top of the screen on a tablet.
2. Tap the Settings icon to open the Settings app.
Alternatively, you can open the Settings app from the Notifications panel:
1. Pull down from the top of the screen with one finger to open the Notifications panel.
2. Tap the Quick Settings icon to display the Quick Settings panel.
3. Tap the Settings icon to open the Settings app.
Or you can simply open the Settings app from the Apps screen like any other app:
1. Tap the Home button to display the Home screen.
2. Tap the Apps icon to display the Apps screen.
3. Tap the Settings icon to open the Settings app.
![]() Note
Note
Some Android skins make major changes to the Settings app, so if your device uses a skin, you may need to find your own way to the settings. See Chapter 14, “Using Samsung TouchWiz,” and Chapter 15, “Using HTC Sense.”
Using the Menus, Controls, and Dialog Boxes
To enable you to give commands easily and clearly, Android uses menus, controls such as check boxes and radio buttons, and dialog boxes.
Using the Menus
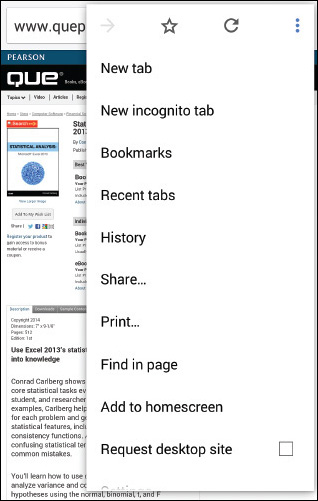
Many apps include a Menu button that you can tap to display a menu of commands. For example, in Google’s browser app, Chrome, you tap the Menu button (an icon with a vertical line of three dots) to display the menu (see Figure I-6), and then tap the command you want to use.
Working with Controls
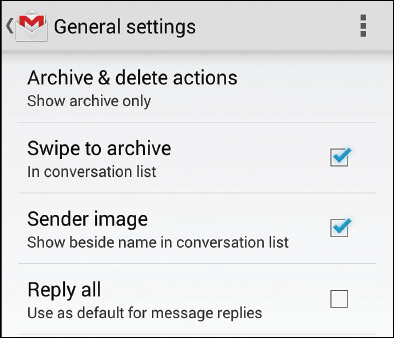
Android uses check boxes to enable you to turn individual options on and off. For example, in Figure I-7, the Swipe to Archive box and the Sender Image box are checked, indicating that these options are turned on, while the Reply All box is unchecked, meaning that this option is turned off.
![]() Note
Note
This book uses the term check to mean tapping a box to put a check mark in it and the term uncheck to mean tapping a box to remove the check mark from it. If the box is already checked or unchecked (as appropriate), you don’t need to change the setting.
Android uses groups of radio buttons to enable you to make a choice among two or more mutually exclusive options. For example, in the Archive & Delete Actions dialog box shown in Figure I-8, the Show Archive Only radio button is selected, showing the blue circle. Tapping the Show Delete Only radio button or the Show Archive & Delete radio button deselects the Show Archive Only radio button, because only one radio button in the group can be selected at any time.
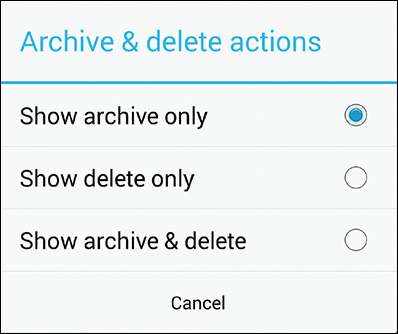
FIGURE I-8 Tap a radio button to select that option, deselecting whichever other option in the group is currently selected.
Making Choices in Dialog Boxes
When you need to make a decision, Android displays a dialog box to present the choices clearly. You can’t take other actions until you have dismissed the dialog box.
If a dialog box contains only radio buttons, as in Figure I-8, tapping a radio button closes the dialog box.
Otherwise, you normally tap a command button, such as the OK button or the Cancel button, to dismiss the dialog box. For example, in the Ringtones dialog box (see Figure I-9), you tap a radio button to select the ringtone you want to use, but the dialog box remains open. You then tap the OK button to close the dialog box, accepting the choice you have made, or tap the Cancel button to close the dialog box without making a choice.
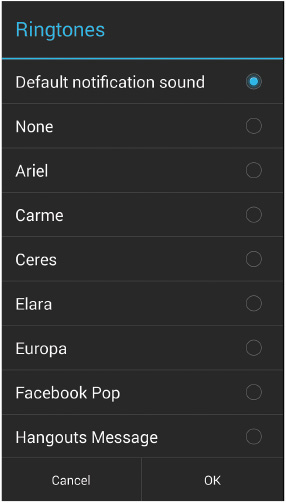
FIGURE I-9 Many dialog boxes contain command buttons, such as the OK button and Cancel button shown here.
Some dialog boxes appear only to confirm an action you have taken and so contain only an OK button.
Using the Touchscreen
Android uses seven main gestures on the touchscreen:
![]() Tap. Tap the screen and then lift your finger.
Tap. Tap the screen and then lift your finger.
![]() Tap and hold. Tap the screen and keep your finger on it, usually until a menu appears or another change occurs. This action is also called “long-press.”
Tap and hold. Tap the screen and keep your finger on it, usually until a menu appears or another change occurs. This action is also called “long-press.”
![]() Double-tap. Tap the screen twice in rapid succession.
Double-tap. Tap the screen twice in rapid succession.
![]() Drag. Tap an item on the screen, keep your finger on the screen, and then drag the item to its destination. In many cases, you need to tap and hold for a moment before the item becomes free for dragging.
Drag. Tap an item on the screen, keep your finger on the screen, and then drag the item to its destination. In many cases, you need to tap and hold for a moment before the item becomes free for dragging.
![]() Swipe. Move your finger left, right, up, or down across the screen.
Swipe. Move your finger left, right, up, or down across the screen.
![]() Pinch in. Place your finger and thumb (or two fingers, if you prefer) apart on the screen and then pinch them together. This action is often used for zooming out (for example, on a map or a photo).
Pinch in. Place your finger and thumb (or two fingers, if you prefer) apart on the screen and then pinch them together. This action is often used for zooming out (for example, on a map or a photo).
![]() Pinch out. Place your finger and thumb (or two fingers) together on the screen and then spread them apart. This action is often used for zooming in.
Pinch out. Place your finger and thumb (or two fingers) together on the screen and then spread them apart. This action is often used for zooming in.
Preventing the Screen from Rotating
Most Android devices include sensors (such as accelerometers) that detect the device’s orientation. Android can automatically rotate the display to match the way the screen is pointing.
This automatic rotation is often handy, but you may want to turn it off at times, such as when you are holding your device nearly flat rather than upright. To turn off automatic rotation, open the Settings app, tap the Display button, and then uncheck the Auto-Rotate Screen box.