
1. Getting Up to Speed
In This Chapter
![]() Identifying skins, managing notifications, and entering text
Identifying skins, managing notifications, and entering text
![]() Setting up a tablet for multiple users
Setting up a tablet for multiple users
![]() Optimizing battery performance and managing storage
Optimizing battery performance and managing storage
This chapter will get you familiar with your Android device so that you can get the most benefit out of the rest of this book. You’ll start by establishing which version of Android your device is running and whether it uses stock Android or a skin. You’ll then move into setting volume levels for your various audio sources; managing your notifications; and entering text using the onscreen keyboard, hardware keyboards, and dictation. After that, it’s time to examine how you set up a tablet for multiple users, get the best battery performance from your device, and manage files and storage on it.
Identifying Your Device’s Android Version and its Skin
At this writing, you can choose from a vast range of devices that run the Android operating system (OS). These devices not only have widely varying capabilities but also run different versions of Android. To make matters even more confusing, many devices also use what’s called a skin, a layer of software that runs on top of the Android OS, makes it look different, and gives it additional capabilities.
All this means that, to get the most out of this book, you need to know not only exactly what device you have but what version of Android it’s running—and what skin, if any. Armed with this knowledge, you can identify which tips and tricks apply to your device, its version of Android, and its skin.
Understanding Android Version Numbers and Names
Table 1.1 shows Android’s versions as of fall 2014, starting with the latest version. Each version has a number and a name. For example, the latest version is Android 4.4, which is called KitKat; Android 5.0, Lollipop, is imminent.
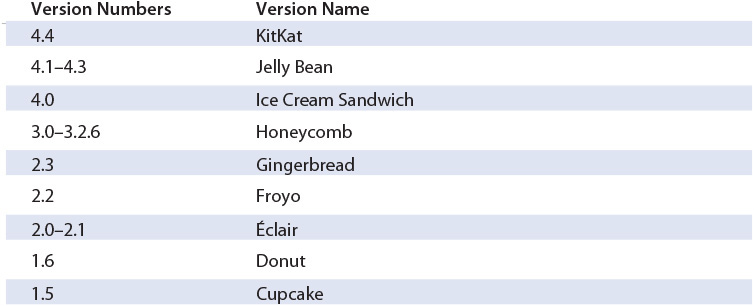
At this writing, the current version of Android is KitKat (4.4). Jelly Bean (versions 4.1–4.3) is widely used, but so is Ice Cream Sandwich. Some Honeycomb (versions 3.0–3.2.6) are still in use.
Finding Out Which Android Version Your Device Is Running
To find out which version of Android your device is running, follow these steps:
1. Open the Settings app.
2. Scroll down to the bottom of the list.
3. Tap the About Phone button or the About Tablet button to display the About Phone screen or the About Tablet screen. (On some devices, the button and screen may be called About Device.)
4. Look at the Android Version readout. You’ll see a number such as 4.4.2 (which means your device is running KitKat) or 4.0.4 (which indicates Ice Cream Sandwich).
Establishing Whether Your Device Is Using a Skin
A skin is an extra layer of software that makes the Android user interface look different and work differently. Skins typically provide extra functionality that is not available in stock Android, so by adding a skin, a manufacturer can provide extra features to a device, make it more attractive, or make it easier to use.
These are all points in favor of skins. But because implementing a skin involves running extra software, a skin tends to make your Android device respond more slowly. If the device has a powerful processor and plenty of RAM, it may have enough punch to run Android and the skin without slowing down. But if the device is underpowered, a skin may make it slow and cumbersome to use.
Google periodically issues new versions of Android with new features, new looks, or other improvements. If you have one of Google’s branded devices, such as the Nexus 5 phone or the Nexus 7 tablet, you can update to the newest version immediately. By contrast, manufacturers that provide custom versions of Android need to create new custom versions for their devices, which takes time and money. So if your device has a skin, you will likely have to wait months before a new version becomes available—and that’s for one of the manufacturer’s latest or biggest-selling devices. For older or lesser devices, manufacturers may not provide updated versions of Android.
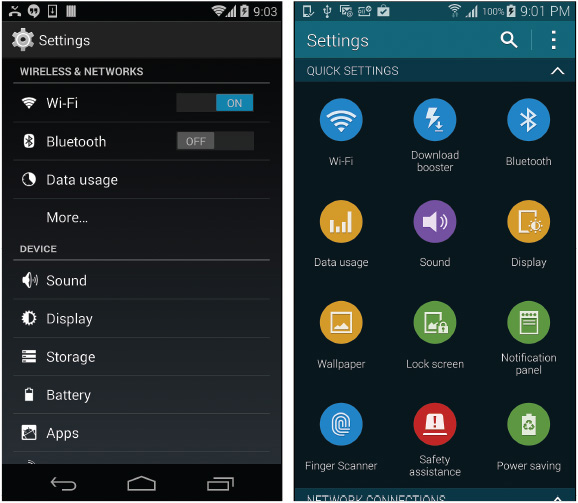
The easiest way to tell whether your device has a skin is to see whether it’s different from the stock Android screens shown in most of this book. For example, Figure 1.1 shows the Settings screen in stock Android on the left and the Settings screen in Samsung’s TouchWiz skin on the right. You can clearly see the huge differences between the two.
Tips for Choosing an Android Device
If you’re looking for an Android device, take your time because there’s a wide array of options. Here are four suggestions to help:
![]() Android version. If possible, get a device that has the latest version of Android. At this writing, that means KitKat (Android 4.4). You can get bargains on older devices, but be clear that you may not be able to update them to newer versions of Android.
Android version. If possible, get a device that has the latest version of Android. At this writing, that means KitKat (Android 4.4). You can get bargains on older devices, but be clear that you may not be able to update them to newer versions of Android.
![]() Battery. If you plan to use your device extensively, look for a model that enables you to easily change the battery.
Battery. If you plan to use your device extensively, look for a model that enables you to easily change the battery.
![]() Budget device. When buying a budget Android device, choose a vanilla device—one without a skin—for better performance. A vanilla device is also more likely to receive Android OS updates quickly than a device with a skin.
Budget device. When buying a budget Android device, choose a vanilla device—one without a skin—for better performance. A vanilla device is also more likely to receive Android OS updates quickly than a device with a skin.
![]() SD card. Look for one that accepts an SD card so that you can easily increase the storage, load your media files, and switch quickly between libraries of content.
SD card. Look for one that accepts an SD card so that you can easily increase the storage, load your media files, and switch quickly between libraries of content.
Setting Different Volume Levels for Different Audio Sources
Android enables you to set different volume levels for media playback, ringtones and notifications, and alarms. You can adjust the levels to make sure that notifications don’t swamp the music you’re enjoying and that alarms are loud enough to wake you or get your attention.
Here’s how to set different audio levels for different audio sources:
1. Open the Settings app.
2. Tap the Sound button in the Device section to display the Sound screen.
3. Tap the Volumes button to display the Volumes dialog box (see Figure 1.2).
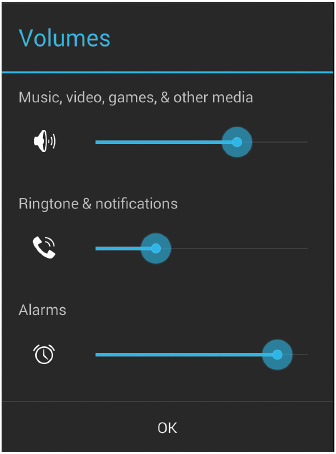
FIGURE 1.2 Drag the sliders in the Volumes dialog box to set the relative volumes for media playback, ringtones and notifications, and alarms.
![]() Note
Note
The Volumes dialog box on your device may display a different number of sliders than Figure 1.2 shows. For example, it may have a Ringtone slider and a Notifications slider instead of a Ringtone & Notifications slider.
4. Drag the sliders for Music, Video, Games, & Other Media; Ringtone & Notifications; and Alarms.
5. Tap the OK button.
Managing Your Notifications
Android displays notifications to help you keep up with your messages, appointments, and other events. You can choose which apps can give you notifications. If your device has a notification light, you can control whether Android pulses the light to make you aware of notifications you have not yet viewed.
Responding to a Notification
When an app raises a notification, the notification appears briefly at the top of the screen and then disappears. Drag down from the top of the screen to display the Notifications pane (see Figure 1.3). You can then take the following actions:
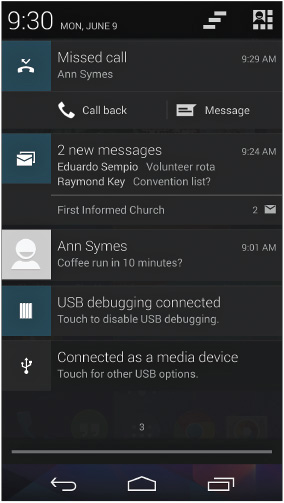
FIGURE 1.3 Tap a notification in the Notifications pane to go to the app that raised the notification.
![]() Tap a button on the notification to take an action. For example, on a Missed Call notification, you can tap the Call Back button to return the call or tap the Message button to send a message to the caller.
Tap a button on the notification to take an action. For example, on a Missed Call notification, you can tap the Call Back button to return the call or tap the Message button to send a message to the caller.
![]() Swipe a notification left or right to dismiss it.
Swipe a notification left or right to dismiss it.
![]() Tap the Clear All button (the button that shows three horizontal bars staggered like a staircase) to clear all the notifications you can dismiss.
Tap the Clear All button (the button that shows three horizontal bars staggered like a staircase) to clear all the notifications you can dismiss.
![]() Note
Note
You cannot dismiss system notifications such as the Connected as a Media Device notification shown in Figure 1.3.
![]() If the notification is collapsed, tap it and drag down to expand it.
If the notification is collapsed, tap it and drag down to expand it.
![]() Tap and hold the notification until the App Info pop-up button appears, and then tap the button to display the App Info screen for the app.
Tap and hold the notification until the App Info pop-up button appears, and then tap the button to display the App Info screen for the app.
![]() Tap a notification to go to the app that raised it.
Tap a notification to go to the app that raised it.
Catching Up with Notifications You Missed
If you clear all notifications by mistake, or you clear them deliberately and realize that you didn’t read something vital, don’t worry—you can easily catch up with them by using a Settings Shortcut widget to display the Notifications screen.
Tap and hold empty space on the Home screen until the customization controls appear; then tap the Widgets icon to display the widgets list. Tap and hold the Settings Shortcut widget until it appears on the Home screen. When you lift your finger, the Settings Shortcut screen appears. Tap the Notifications button to make the Settings Shortcut widget take you to the Notifications screen.
You can now tap your Notifications widget to display the Notifications screen. This screen shows all your recent notifications, so you can easily catch up on what you missed. You can tap a notification to display the App Info screen for the app that raised the notification, not to go to the app itself.
Android clears the Notifications screen when you restart your device.
Turning the Notification Light On or Off
If your device has a notification light, you can make the light blink to alert you to notifications you haven’t yet seen. Here’s how to control whether the light blinks:
1. Open the Settings app.
2. Tap the Display button to go to the Display screen.
3. Tap to check or uncheck the Pulse Notification Light check box.
Turning Off Notifications for an App
Here’s how to turn off notifications for an app:
1. Open the Settings app.
2. Tap the Apps button in the Device section to display the Apps screen. The Apps screen displays the Downloaded tab at first.
3. If the app for which you want to turn off notifications does not appear on the downloaded tab, swipe left once to display the Running tab or twice to display the All tab.
4. Tap the app’s button to display its App Info screen.
5. Tap to clear the Show Notifications check box.
![]() Tip
Tip
Here are two ways to quickly display an app’s App Info screen. If the app is currently running, tap the Recent Apps button, tap and hold the app’s thumbnail in the Recent Apps list, and then tap the App Info button on the pop-up menu. If the app has raised a notification, tap and hold the notification on the Notifications panel, and then tap the App Info button on the pop-up menu.
Clearing Repeat Notifications
Sometimes Android may display the same notifications repeatedly. Usually, this happens with download notifications, but other apps can also raise notifications more than once.
If you find this happening, first restart your device. Restarting can solve any number of problems, and it takes only a minute or two.
If restarting doesn’t suppress old download notifications, you may need to clear the cache and data for the Download Manager app. To do so, follow these steps:
2. Tap the Apps button in the Device section to display the Apps screen.
3. Swipe left twice to display the All list.
4. Tap the Download Manager button to display the App Info screen for the Download Manager app.
5. Tap the Clear Cache button to clear the cached data.
6. Tap the Clear Data button. The Delete App Data? dialog box opens (see Figure 1.4).
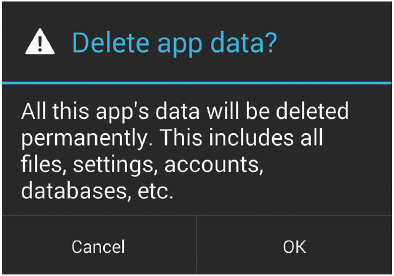
FIGURE 1.4 You may need to delete the app data for the Download Manager app to get rid of repeated download notifications.
7. Tap the OK button.
8. Tap the Force Stop button. The Force Stop? dialog box opens.
9. Tap the OK button.
Restart your phone after clearing Download Manager’s cache and data.
![]() Tip
Tip
Another way to clear old notifications is to install a notification-management app. You can find various notification-management apps on the Play Store, but watch out for two things. First, make sure the app doesn’t require Internet access. Second, make sure that the app doesn’t require your phone to be rooted. Rooting gives you access to the root account, which enables you to take full control of your device’s software and hardware and install unapproved software on it.
Entering Text
To enter text on your Android device, you can use the onscreen keyboard, a hardware keyboard, or dictation. You can also enter emoticons to liven up your messages or documents.
Using the Keyboard and Spelling Correction
The most straightforward means of entering text in a document is the onscreen keyboard. Android automatically displays the onscreen keyboard when you touch a text field in a document or the user interface. The keyboard has a letters layout, a symbols and numbers layout, and an extended symbols layout.
Here’s what you need to know about the keyboard:
![]() Switch among layouts. Tap the ?123 button to display the symbols and numbers layout. From there, tap the ABC button to return to the letters layout or tap the =< button to display the extended symbols layout. From the extended symbols layout, tap the ABC button to display the letters layout or tap the ?123 button to return to the symbols and numbers layout.
Switch among layouts. Tap the ?123 button to display the symbols and numbers layout. From there, tap the ABC button to return to the letters layout or tap the =< button to display the extended symbols layout. From the extended symbols layout, tap the ABC button to display the letters layout or tap the ?123 button to return to the symbols and numbers layout.
![]() Note
Note
You can hide the keyboard by tapping the Back button (this button appears as a downward-caret icon when the keyboard is displayed). You may want to hide the keyboard so that you can read larger amounts of text or navigate to other text fields. To display the keyboard once more, tap in the text field again.
![]() Type numbers from the letters keyboard. The top row of letters on the letters layout has a number in the upper-right corner, from 1 on the Q key to 0 (zero) on the P key. To type the number, tap and hold the appropriate key until the pop-up panel appears, and then lift your finger. Some of the pop-up panels also contain alternate characters (discussed next), but the numbers are the default characters.
Type numbers from the letters keyboard. The top row of letters on the letters layout has a number in the upper-right corner, from 1 on the Q key to 0 (zero) on the P key. To type the number, tap and hold the appropriate key until the pop-up panel appears, and then lift your finger. Some of the pop-up panels also contain alternate characters (discussed next), but the numbers are the default characters.
![]() Type alternate characters. The vowel keys, some letter keys (such as N, S, and C), and many of the symbol keys give access to pop-up panels containing alternate characters. For example, tapping and holding the A key opens a pop-up panel with alternate characters such as ã and æ (see Figure 1.5); and tapping and holding the asterisk key gives you access to star, dagger, and double-dagger symbols. So when you need to type a character that does not appear on any of the keyboard layouts, tap and hold the key for the base character, and then tap the character on the pop-up panel.
Type alternate characters. The vowel keys, some letter keys (such as N, S, and C), and many of the symbol keys give access to pop-up panels containing alternate characters. For example, tapping and holding the A key opens a pop-up panel with alternate characters such as ã and æ (see Figure 1.5); and tapping and holding the asterisk key gives you access to star, dagger, and double-dagger symbols. So when you need to type a character that does not appear on any of the keyboard layouts, tap and hold the key for the base character, and then tap the character on the pop-up panel.
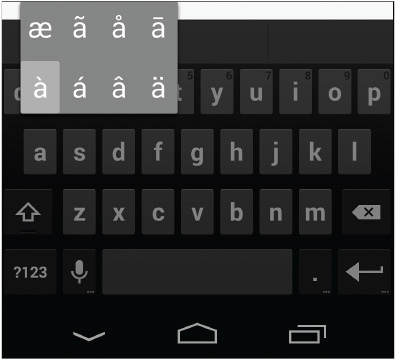
FIGURE 1.5 Tap and hold a character to display a pop-up panel of alternate characters, and then tap the character that you want to enter.
![]() Type real fractions. To type a real fraction, display the symbols and numbers layout, tap and hold the number key for the first part of the fraction, and then tap the fraction on the pop-up menu that appears. For example, tap and hold the 1 key to type 1/3, or tap and hold the 5 key to type 5/8.
Type real fractions. To type a real fraction, display the symbols and numbers layout, tap and hold the number key for the first part of the fraction, and then tap the fraction on the pop-up menu that appears. For example, tap and hold the 1 key to type 1/3, or tap and hold the 5 key to type 5/8.
![]() Type quickly with Gesture Typing. The Gesture Typing feature enables you to type words by sliding your finger from one letter to another over the keyboard without removing it. At the end of a word, you can either swipe over the spacebar to type a space and continue swiping the next word, or lift your finger off the screen and then put it back down to start the next word.
Type quickly with Gesture Typing. The Gesture Typing feature enables you to type words by sliding your finger from one letter to another over the keyboard without removing it. At the end of a word, you can either swipe over the spacebar to type a space and continue swiping the next word, or lift your finger off the screen and then put it back down to start the next word.
Turning On Gesture Typing and Configuring It
If Gesture Typing doesn’t work on your device, you may need to turn it on. You may also need to configure it to work the way you prefer. Follow these steps:
1. Tap and hold the key to the left of the spacebar on the keyboard. Depending on your device and the keyboard, this may be the comma key or the Voice Input key (the microphone icon).
2. When the Settings icon appears, release the button to display the Input Options menu.
3. Tap the Google Keyboard Settings button to display the Google Keyboard Settings screen.
4. Select the Enable Gesture Typing check box to turn on Gesture Typing.
5. Select the Dynamic Floating Preview check box if you want to see a preview of the word as you slide.
6. Select the Phrase Gesture check box if you want to be able to type spaces by sliding your finger over the spacebar.
7. Tap the Back button to return to the document you were working in.
![]() Using suggestions. By default, the Google Keyboard displays suggestions as you type in the area above the top row of the keyboard. The suggestion with three dots below it is the default one; you can enter this word by tapping the spacebar or a punctuation key (such as the period key). You can enter another suggestion by tapping it. To see the full list of suggestions, tap and hold any of the suggestions until the pop-up panel appears (see Figure 1.6).
Using suggestions. By default, the Google Keyboard displays suggestions as you type in the area above the top row of the keyboard. The suggestion with three dots below it is the default one; you can enter this word by tapping the spacebar or a punctuation key (such as the period key). You can enter another suggestion by tapping it. To see the full list of suggestions, tap and hold any of the suggestions until the pop-up panel appears (see Figure 1.6).
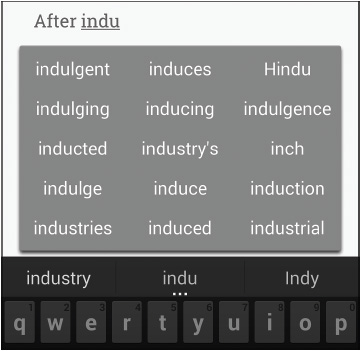
FIGURE 1.6 Tap and hold a suggestion to display the full list of suggestions. You can then tap a suggestion to insert it in the document.
Configuring Text Correction
Android’s Text Correction feature automatically corrects words and phrases you type that appear to be wrong. You can control how aggressively Text Correction corrects text, so if you find Android changing too many words and phrases that you actually want to use, try turning down the degree of correction.
Here’s how to configure Text Correction:
1. Open the Settings app.
2. Tap the Language & Input button in the Personal section to display the Language & Input screen.
3. Tap the Settings button (the sliders icon) to the right of the Google Keyboard button in the Keyboard & Input Methods section. The Google Keyboard Settings screen appears. Figure 1.7 shows the Text Correction section of this screen.
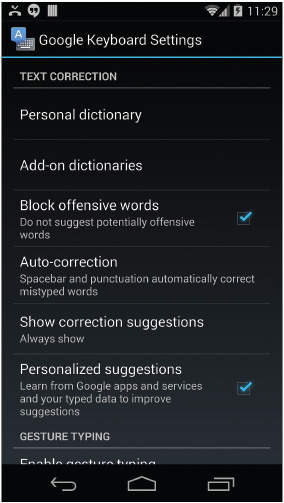
FIGURE 1.7 Use the controls in the Text Correction section of the Google Keyboard Settings screen to configure automatic corrections, correction suggestions, and add-on dictionaries.
4. Check the Auto-Capitalization check box in the General section if you want Android to automatically capitalize the first letter of each sentence or new paragraph.
If you want to load or remove add-on dictionaries, tap the Add-On Dictionaries button on the Google Keyboard Settings screen. On the Add-On Dictionaries screen that appears, tap the Refresh button to get the latest list of add-on dictionaries. You can then install an add-on dictionary by tapping its button and then tapping the Install button that appears, or delete a dictionary by tapping its button and then tapping the Delete button that appears.
5. Check the Block Offensive Words check box if you want Android to suppress words that some people may find offensive.
6. Tap the Auto-Correction button to display the Auto-Correction dialog box, and then tap the option button for the degree of correction you want: Off, Modest, Aggressive, or Very Aggressive. You’ll probably want to experiment with the Modest and Aggressive settings to see which suits you best.
7. To control whether Android displays correction suggestions, tap the Show Correction Suggestions button, and then tap the appropriate button in the Show Correction Suggestions dialog box: Always Show, Show in Portrait Mode, or Always Hide.
![]() Tip
Tip
The Show in Portrait Mode setting for Show Correction Suggestions is useful on phones and small tablets, on which the keyboard and correction suggestions together take up much of the screen in landscape mode.
8. Check the Personalized Suggestions check box if you want Google Keyboard to learn words and phrases from what you type. Personalized suggestions are usually helpful.
Adding Words to Your Personal Dictionary
Android enables you to maintain a personal dictionary containing words that are correctly spelled but do not appear in Android’s dictionary. By adding words to your personal dictionary, you can prevent Android from querying them. You can also create a shortcut for any word or phrase so that you can enter it by typing the shortcut.
1. Open the Settings app.
2. Tap the Language & Input button in the Personal section to display the Language & Input screen.
3. Tap the Personal Dictionary button to display the Personal Dictionary screen.
4. Tap the + button to display an input screen.
5. Type the word or phrase on the upper line.
6. Tap the Shortcut field and type any shortcut you want to use for the word or phrase.
7. Tap the Back button to finish adding the word.
![]() Tip
Tip
You can also add a word to the personal dictionary when typing. Finish typing the word but don’t type a space or punctuation. Tap the word in the suggestions bar, and then tap the Touch Again to Save prompt that appears. (On some devices, you may not see the Touch Again to Save prompt.)
![]() Note
Note
To edit or delete a word or shortcut, tap it on the Personal Dictionary screen. Android opens the word for editing. You can then change the word or shortcut or tap the Delete icon (the trash can) to delete it.
Entering Text Using a Hardware Keyboard
The stock Android onscreen keyboard is easy enough to use, but very few people are able to touch-type on it, especially on a phone rather than a tablet. So if you need to type large amounts of text on your Android device, you should think seriously about connecting a hardware keyboard to it.
You can connect a wide variety of keyboards via either Bluetooth or a cable. Bluetooth is handy, especially if you get a Bluetooth keyboard built into a case that fits your device. See Chapter 4, “Connecting to Networks and Devices,” for instructions of connecting Bluetooth devices.
But if you simply need to enter a lot of text quickly, any regular USB keyboard will do the trick as long as your device supports the USB On-the-Go standard. Get a USB A female to micro USB B male adapter cable that also supports USB OTG, plug the keyboard into the USB female port, and plug the micro USB jack into your device.
USB OTG is short for USB On-The-Go. USB OTG enables a device (such as an Android phone or tablet) to act as a USB host, so you can plug in USB hardware and use it.
After connecting a hardware keyboard, you can use the keyboard shortcuts explained in Table 1.2 to navigate through text.
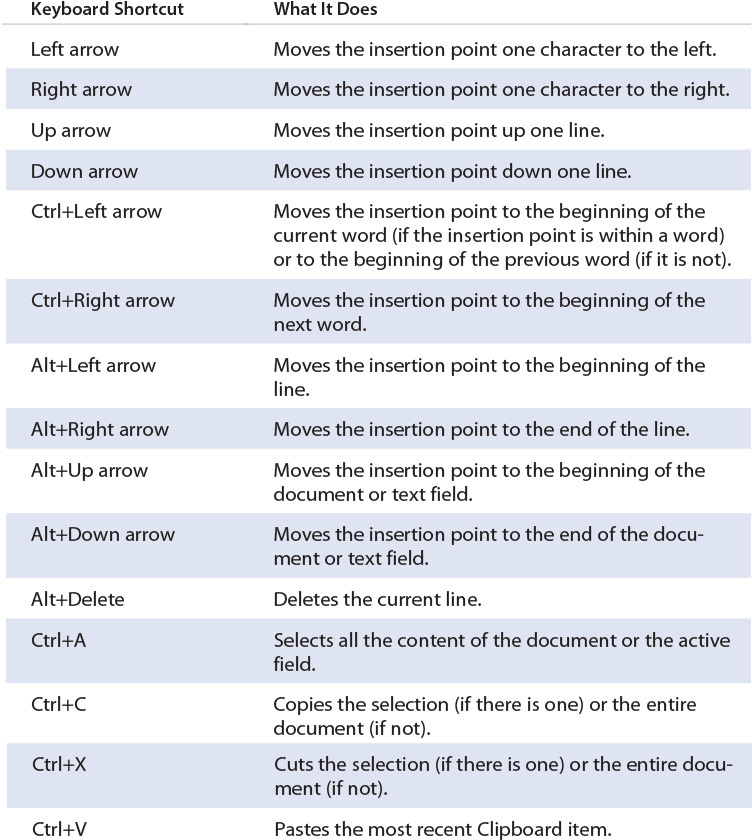
You can select text using the keyboard by holding down Shift while you press the navigation keys or keyboard shortcuts. For example, press Shift+Right arrow to select the character to the right of the insertion point (or to extend the existing selection by one character to the right) or press Shift+Alt+Right arrow to select from the insertion point’s current position to the end of the line.
Changing the Layout of a Hardware Keyboard
After connecting a hardware keyboard, you can change the layout if necessary. For example, you may prefer the Dvorak layout to QWERTY, or you may want the layout for a different language or region.
Open the Settings app, tap the Language & Input button, and then go to the Physical Keyboard section of the Language & Input screen.
Tap the keyboard’s button (this shows the keyboard’s description, such as Logitech USB Keyboard) to display the Choose Keyboard Layout dialog box. If the layout you want appears, tap it to apply it. If not, tap the Set Up Keyboard Layouts button to display the Keyboard Layouts screen, and then tap the check box for each keyboard layout you want to make available.
Tap the Back button, tap the appropriate keyboard in the Choose Keyboard Layout dialog box, and then start typing using that layout.
Entering Text Using Dictation
Typing is the standard way of entering text, but you may be able to enter text more quickly—and accurately—by using the Google Voice Typing feature.
Google Voice Typing may already be set up on your phone or tablet. If so, you’re good to go, but you may want to set up your input languages or install offline speech recognition.
Follow these steps to set up and configure Google Voice Typing:
1. Open the Settings app.
2. Tap the Language & Input button in the Personal section to display the Language & Input screen.
3. Check the Google Voice Typing check box.
4. Tap the Settings button on the right of the Google Voice Typing button to display the Google Voice Typing Settings screen.
5. If you want to select input languages, tap the Choose Input Languages button and work on the Choose Input Languages screen.
6. Check the Block Offensive Words check box if you want Google Voice Typing to censor your input.
7. Tap the Offline Speech Recognition button to display the Download Languages screen. This screen has three tabs: Installed, All, and Auto-Update. The Installed tab appears first.
8. Review your current languages on the Installed tab.
9. If you need to install another language for offline speech recognition, tap the All tab, and then tap the language you want to download and install.
10. Tap the Auto-Update tab to reveal its controls, and then tap the option button for the way you want to update. Your choices are Do Not Auto-Update Languages; Auto-Update Languages At Any Time; Data Charges May Apply; and Auto-Update Languages over Wi-Fi Only.
![]() Tip
Tip
The Auto-Update Languages over Wi-Fi Only setting is the best choice for keeping your Google Voice Typing languages up to date without incurring data charges from downloading over the cellular network.
After you’ve turned on Google Voice Typing, tap the microphone button to the left of the spacebar on the onscreen keyboard to start dictation.
![]() Tip
Tip
If you plan to dictate a lot, use a high-quality headset microphone. Google Voice Typing delivers impressive results with just the open microphone built into your device, but you can get much clearer input by using a headset microphone.
Entering Emoji
The Google Keyboard provides a large selection of emoticons that you can enter in your messages and documents. To access the emoticons, tap and hold the Enter key at the lower-right corner of the onscreen keyboard, and then tap the smiley-face icon on the pop-up panel.
![]() Note
Note
Depending on your device and keyboard configuration, you may be able to access emoticons by tapping an emoticon key that appears on the keyboard or by tapping and holding the key to the left of the keyboard and then tapping the Emoticons button on the pop-up panel.
With the emoticons displayed (see Figure 1.8), tap the Tab button for the category you want to view, and then scroll right to see further characters. Tap the Recents tab button (the leftmost button, with the clock icon) to see the characters you’ve used recently. Tap the ABC button to return to the letters keyboard.
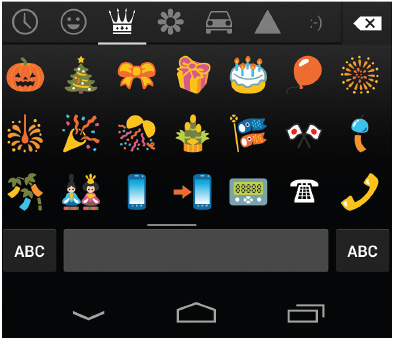
FIGURE 1.8 You can easily enter emoticons in your messages and documents by using the Google Keyboard.
Using Alternative Keyboards
If you find the Google Keyboard difficult to use, you can install another keyboard that suits you better. You’ll find a wide variety of alternative keyboards in the Play Store. Here are three alternative keyboards to consider:
![]() Hacker’s Keyboard (free) is a highly customizable keyboard that includes keys you normally find on hardware keyboards, such as Ctrl and Tab, but not on Android keyboards. This keyboard is great for remote access to computers.
Hacker’s Keyboard (free) is a highly customizable keyboard that includes keys you normally find on hardware keyboards, such as Ctrl and Tab, but not on Android keyboards. This keyboard is great for remote access to computers.
![]() SwiftKey is a trace keyboard (like the Gesture Typing feature on the Google Keyboard) with strong predictive text features. Download the SwiftKey Trial app to give the keyboard a spin and see if you want to pay for the full version.
SwiftKey is a trace keyboard (like the Gesture Typing feature on the Google Keyboard) with strong predictive text features. Download the SwiftKey Trial app to give the keyboard a spin and see if you want to pay for the full version.
![]() Smart Keyboard Pro ($2.75) is a customizable keyboard that includes skins for different looks and optional transparency. You can customize the key height separately for portrait and landscape orientations; hide the period and comma keys; and switch among Normal mode, T9 mode, and Compact mode. Smart Keyboard Pro includes a calibration tool that you can run to improve accuracy if you find you tend to tap the wrong keys. Download the free Smart Keyboard Trial to test; you can then pay for the upgrade to Pro if you like it.
Smart Keyboard Pro ($2.75) is a customizable keyboard that includes skins for different looks and optional transparency. You can customize the key height separately for portrait and landscape orientations; hide the period and comma keys; and switch among Normal mode, T9 mode, and Compact mode. Smart Keyboard Pro includes a calibration tool that you can run to improve accuracy if you find you tend to tap the wrong keys. Download the free Smart Keyboard Trial to test; you can then pay for the upgrade to Pro if you like it.
Setting Up a Tablet for Multiple Users
Android includes multiuser features for tablets, so if you have a tablet, you can set it up with a separate account for each user. By creating user accounts, you give each user his own home screen, settings, and storage for documents. Each user can send and receive email and browse the Web without sharing his messages and history with other users. Each user can choose a different unlock method to keep his data safe.
Instead of creating a user account for another person, you can create a restricted profile, a kind of limited account that enables the user to access only some apps and content on your account. Like a user account, a restricted profile has a separate space and data on the tablet. You might want to create a restricted profile for a child that you allow to occasionally use your tablet.
Creating a User Account
When you create a new user account, it is best to have the person who will use the account with you so that she can set up the account immediately. In this way, you can ensure that the right person sets up the user account; you can also insist that the person sets an unlock method on the account to help protect the tablet.
If you must set up the new user account when the person is not available, the account appears on the lock screen without a security method. Anyone with access to the tablet can set up the user account, and there is no obligation to set an unlock method.
Here’s how to create a user account:
1. Open the Settings app.
2. Tap the Users button in the Device section to display the Users screen.
3. Tap the Add User or Profile button to display the Add dialog box (see Figure 1.9).
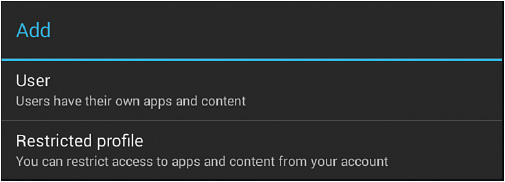
FIGURE 1.9 In the Add dialog box, tap the User button to start creating a new user account on your tablet.
4. Tap the User button to display the Add New User dialog box (see Figure 1.10).
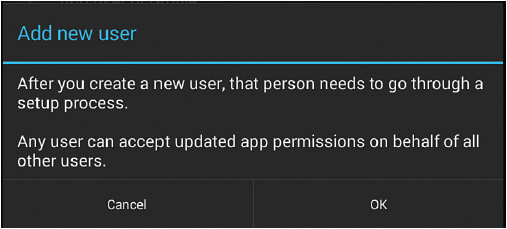
5. Tap the OK button. Android displays the Set Up User Now? dialog box (see Figure 1.11).
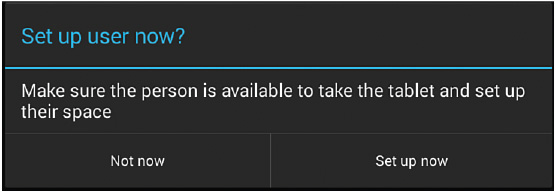
FIGURE 1.11 In the Set Up User Now? dialog box, tap the Set Up Now button if the user is available to set up her user account. Otherwise, tap the Not Now button.
6. If the user is with you and can set up the account now, tap the Set Up Now button and hand over the tablet to the user. Otherwise, tap the Not Now button.
7. Assuming you tap the Set Up Now button, the lock screen appears, showing an account button called New User. This account button is selected automatically. The user can swipe to unlock the screen, tap the Next button on the Welcome screen that appears, and then follow through the steps to set up the account.
If you tap the Not Now button in the Set Up User Now? dialog box, the user account appears in the Users & Profiles list on the Users screen as New User, Not Set Up. When the user is present and can set up the account, lock the tablet by opening the Quick Settings panel and tapping your account picture. The user can then tap the New User icon, swipe to unlock the screen, and follow through the screens to set up the account.
Understanding Owner and Nonowner Accounts
To create a new user account on your tablet, you must log in using the owner account. This is the account you used when you first set up the tablet. As long as that account is the only account that your tablet contains, there’s no confusion; but if your tablet already contains multiple user accounts, and you find that the Add User or Profile button does not appear on the Users screen, the reason is most likely that you are using a nonowner account.
1. Open the Settings app.
2. Tap the Users button in the Device section to display the Users screen.
3. Tap the Add User or Profile button to display the Add dialog box.
4. Tap the Restricted Profile button to display the Application and Content Restrictions screen (see Figure 1.12).
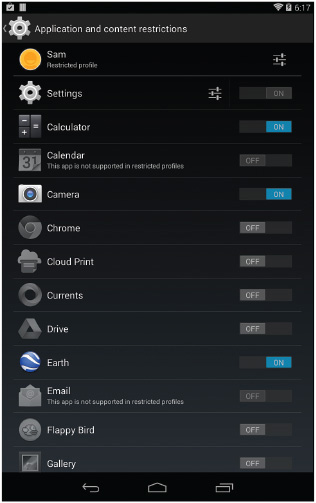
FIGURE 1.12 On the Application and Content Restrictions screen, choose which apps to make available in the restricted profile.
Setting a Screen Lock to Protect Your Apps and Data
For the restricted profile feature to work, you must use a screen lock to protect your apps and data. So if you haven’t yet set a screen lock, Android prompts you to set a lock when you tap the Restricted Profile button in the Add dialog box. Tap the Set Lock button to display the Unlock Selection screen, tap the lock type you want (Pattern, PIN, or Password), and then follow through the steps for setting the lock. Android then displays the Application and Content Restrictions screen, and you can continue with step 5 in the main text.
5. Tap the New Profile button at the top to display the Profile Info dialog box.
6. To add a custom icon to the profile, tap the default icon on the left side of the dialog box, tap the Take Photo button or the Choose Photo from Gallery button on the pop-up menu, and then take the photo or select the existing photo to use. You can then crop the photo as needed.
7. Type the name for the profile, replacing the default name, New Profile.
8. Tap the OK button to close the Profile Info dialog box and apply the name.
9. Touch the Settings icon to the left of the On/Off switch on the Settings button to display the list of settings. You can then tap a check box to control whether the user can use the feature. For example, select the Location check box to enable the user to use the Location feature.
10. Specify which apps you want the user to be able to use by setting its switch to the On position. Make sure the switch for each app you don’t want the user to use is set to the Off position.
11. Tap the Back button to return to the Users screen.
Switching Among User Accounts and Profiles
After you set up an account for each full user and a restricted profile for each person who needs less freedom, you can easily switch among the accounts and profiles. Follow these steps:
1. Pull down from the upper-right corner of the screen to display the Quick Settings panel.
2. Touch your user account icon to lock the tablet. The lock screen appears, showing the list of users as circular buttons at the bottom. The larger circle indicates the last user. The lock screen shows that user’s lock screen wallpaper and unlock method (for example, swipe or password).
You can also lock your tablet by pressing the Power button briefly. The tablet turns off, and the screen goes dark. Press the Power button again to wake the tablet. The lock screen appears, and you can choose which account or profile to use.
3. Tap the button for the user account or restricted profile to which you want to switch. The circle for that account or profile grows larger, and the lock screen changes to show the wallpaper and unlock method set for that account or profile.
4. Unlock the screen by using that unlock method. For example, type the password and press the Enter key.
Deleting a User Account or Restricted Profile
If you no longer need a particular user account or restricted profile, you can delete it from your tablet. Follow these steps:
1. Open the Settings app.
2. Tap the Users button in the Device section to display the Users screen.
3. Tap the Delete icon (the trash can) on the button for the account. The Remove User? dialog box or the Remove Profile? dialog box opens, warning you that the user’s or profile’s space and data will disappear from the tablet.
4. Tap the Delete button to finish removing the user account or profile.
Understanding and Avoiding Problems
Sharing a tablet with others can be a great way to get more computing out of your hardware budget, but it may bring some problems with security, storage space, and performance.
Apart from actually having to share the physical device, you need to ensure security for your data and that of each user. Make sure you lock the tablet consistently so that nobody can access it without entering a PIN or passcode.
Be aware that each user can accept updated app permissions for the tablet as a whole. This means you should create full user accounts only for people you can trust to deal sensibly with app updates.
With several users storing data and files (especially media files) on the tablet, space may run low. You will need to manage the device’s storage using the techniques discussed later in this chapter.
If several users have sessions open at the same time, the tablet may start running more slowly because it is low on memory. You can try closing apps, or getting other users to close their apps so yours will run better, but you will normally be better off restarting the tablet.
Getting the Best Battery Performance
To get the most use out of your Android phone or tablet, you will need to manage its battery life. You can do this using either the tools that come with the device or with extra tools that you add. You can identify features and apps that consume large amounts of power so that you can either disable them or simply not use them. You can reduce the amount of power your device needs by choosing settings to spare power. And you can give yourself the means to recharge your device at every opportunity.
Identifying Power Hogs
To identify power-hogging features and apps, follow these steps:
1. Open the Quick Settings panel. For example, pull down from the top of the screen with two fingers.
2. Tap the Power icon to display the Battery screen (see Figure 1.13). This screen shows currently running features and apps listed in descending order by power consumption—in other words, greediest first.
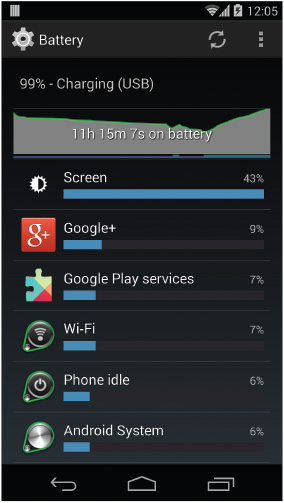
FIGURE 1.13 Look at the Battery screen to see which features and apps have been consuming the most battery power.
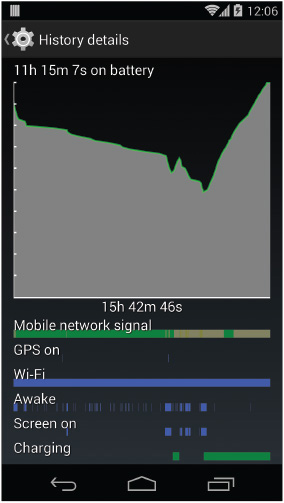
3. Tap the Battery graph at the top to display the History Details screen (see Figure 1.14). This screen shows a larger battery chart, enabling you to see the relative rates of power consumption more clearly, and bar charts showing when each feature was consuming power.
4. Tap the Back button to return to the Battery screen.
5. Tap the button for a feature or app whose usage details you want to view. The Use Details screen appears. Figure 1.15 shows the Use Details screen for Google Play services.
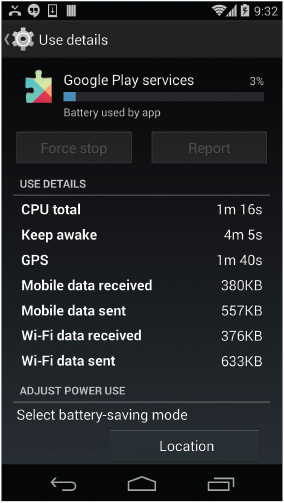
![]() Note
Note
The Use Details screen for some apps and features includes controls for adjusting the battery usage.
Eking Out Battery Life
To get the most runtime out of your device, you need to reduce power consumption to an acceptable minimum. What that means depends on what the device is and what you’re doing with it.
Here are 10 ways you can easily reduce the amount of power your device consumes:
![]() Turn down the display brightness. Open the Quick Settings panel, tap the Brightness icon, and then drag the slider as far to the left as you can bear. The display gets through a huge amount of power, especially on a tablet with a large screen.
Turn down the display brightness. Open the Quick Settings panel, tap the Brightness icon, and then drag the slider as far to the left as you can bear. The display gets through a huge amount of power, especially on a tablet with a large screen.
![]() Set a short sleep interval. Open the Settings app, tap the Display button, and then tap the Sleep button to display the Sleep dialog box. Tap a short time, such as 15 Seconds or 1 Minute, to save power by turning off the screen quickly when you’re not using it.
Set a short sleep interval. Open the Settings app, tap the Display button, and then tap the Sleep button to display the Sleep dialog box. Tap a short time, such as 15 Seconds or 1 Minute, to save power by turning off the screen quickly when you’re not using it.
![]() Use Airplane mode when you can go offline. Open the Quick Settings panel and tap the Airplane Mode icon to quickly shut down all communications services. Repeat the move when you need to go back online.
Use Airplane mode when you can go offline. Open the Quick Settings panel and tap the Airplane Mode icon to quickly shut down all communications services. Repeat the move when you need to go back online.
Turn on Airplane mode when you don’t absolutely need connectivity and you’re in a place with no signal or poor signal, such as rural wastelands or convention centers. Otherwise, your device will happily squander valuable battery power on chasing will-o’-the-wisp signals.
![]() Turn off communications services you don’t need. Open the Quick Settings panel and tap the icon for any communications service that is currently turned on but which you can afford to turn off: Cellular (on a phone or cellular-capable tablet), Wi-Fi, or Bluetooth. If your device has Near Field Communication (NFC), turn that off as well.
Turn off communications services you don’t need. Open the Quick Settings panel and tap the icon for any communications service that is currently turned on but which you can afford to turn off: Cellular (on a phone or cellular-capable tablet), Wi-Fi, or Bluetooth. If your device has Near Field Communication (NFC), turn that off as well.
![]() Set the Location mode to Battery Saving. Open the Settings app and tap the Location button in the Personal section to display the Location screen. Tap the Mode button at the top to display the Location Mode screen, and then tap the Battery Saving button. Alternatively, set the Location switch on the Location screen to the Off position to turn off location tracking entirely.
Set the Location mode to Battery Saving. Open the Settings app and tap the Location button in the Personal section to display the Location screen. Tap the Mode button at the top to display the Location Mode screen, and then tap the Battery Saving button. Alternatively, set the Location switch on the Location screen to the Off position to turn off location tracking entirely.
![]() Check for email less frequently. Unless it’s vital that you receive all your messages as soon as possible, reduce the frequency of checking for new messages to a minimum. See Chapter 6, “Taking Gmail to the Pro Level,” for instructions on configuring the Gmail app and Chapter 7, “Becoming Expert with the Email App,” for instructions on configuring the Email app.
Check for email less frequently. Unless it’s vital that you receive all your messages as soon as possible, reduce the frequency of checking for new messages to a minimum. See Chapter 6, “Taking Gmail to the Pro Level,” for instructions on configuring the Gmail app and Chapter 7, “Becoming Expert with the Email App,” for instructions on configuring the Email app.
![]() Store copies of cloud files on your device. Services such as Dropbox are great because they enable you to access your documents from anywhere you have an Internet connection. But to save power, you can store copies of files on your phone or tablet so that you don’t need to download them. For example, in Dropbox, you can mark a file as a favorite to make Android store a copy of it locally.
Store copies of cloud files on your device. Services such as Dropbox are great because they enable you to access your documents from anywhere you have an Internet connection. But to save power, you can store copies of files on your phone or tablet so that you don’t need to download them. For example, in Dropbox, you can mark a file as a favorite to make Android store a copy of it locally.
![]() Avoid playing videos and music. Playing videos eats through battery power quickly because it uses the screen, but even playing back music takes a fair amount of power. If you find your Android device runs out of power regularly, consider getting a minute music player (such as an iPod shuffle or one of its competitors) so that you can listen to your essential music without running down the battery on your phone or tablet.
Avoid playing videos and music. Playing videos eats through battery power quickly because it uses the screen, but even playing back music takes a fair amount of power. If you find your Android device runs out of power regularly, consider getting a minute music player (such as an iPod shuffle or one of its competitors) so that you can listen to your essential music without running down the battery on your phone or tablet.
![]() Turn off live wallpapers. Live wallpapers look pretty, but they make your device’s processor work harder and consume power. To turn off live wallpapers, open the Settings app, tap the Display button to go to the Display screen, and then tap the Wallpaper button to display the Choose Wallpaper From screen. You can then tap the Wallpapers button to set a static wallpaper, tap the Gallery button to choose a picture from the Gallery app, or touch the Photos button to use a photo from the Camera app.
Turn off live wallpapers. Live wallpapers look pretty, but they make your device’s processor work harder and consume power. To turn off live wallpapers, open the Settings app, tap the Display button to go to the Display screen, and then tap the Wallpaper button to display the Choose Wallpaper From screen. You can then tap the Wallpapers button to set a static wallpaper, tap the Gallery button to choose a picture from the Gallery app, or touch the Photos button to use a photo from the Camera app.
![]() Streamline your Home screens. Widgets that require updating, such as those for email or social networking, consume power both through updating and network connections, so run as few widgets as possible if you’re trying to squeeze more time out of your battery.
Streamline your Home screens. Widgets that require updating, such as those for email or social networking, consume power both through updating and network connections, so run as few widgets as possible if you’re trying to squeeze more time out of your battery.
![]() Tip
Tip
Some skins and devices offer extra power-management features. For example, the Samsung Galaxy S 5’s Ultra Power Saving mode enables you to shut off all nonessential features and even uses black-and-white output to reduce the power draw. Look into any extra features that your device provides for getting you through power shortages.
Recharging Secrets
As you saw in the previous sections, you can take various actions to reduce your device’s power consumption. But given that most of these actions make your device not only less useful but also harder to use, you may prefer to take a damn-the-torpedoes approach and confront the power problem head on by running your device at full bore but also recharging it whenever you get the chance.
Here are suggestions for recharging your Android device:
![]() Carry a spare battery. If your phone or tablet enables you to easily change batteries, carry one or two spare—and fully charged—batteries with you wherever you go and swap them out as needed. Being able to easily change batteries is one of the great advantages of some Samsung phones, such as the Galaxy Note 4 and the Galaxy S 5.
Carry a spare battery. If your phone or tablet enables you to easily change batteries, carry one or two spare—and fully charged—batteries with you wherever you go and swap them out as needed. Being able to easily change batteries is one of the great advantages of some Samsung phones, such as the Galaxy Note 4 and the Galaxy S 5.
![]() Get a battery case. If your phone or tablet is a high-profile device, you may be able to find a case with a built-in battery. If you consistently need more battery power than the built-in battery delivers, a battery case can be a great solution.
Get a battery case. If your phone or tablet is a high-profile device, you may be able to find a case with a built-in battery. If you consistently need more battery power than the built-in battery delivers, a battery case can be a great solution.
![]() Get an external battery or portable charger. No matter which device you have, you can choose from a wide range of external batteries, also called portable chargers, to which you connect your device via USB to recharge it. If you live in a sunny climate, consider getting one with a solar charger.
Get an external battery or portable charger. No matter which device you have, you can choose from a wide range of external batteries, also called portable chargers, to which you connect your device via USB to recharge it. If you live in a sunny climate, consider getting one with a solar charger.
![]() Upgrade the battery. If your device’s battery is user-replaceable, you may be able to replace it with a higher-capacity version. First, if your device is still under warranty, check whether replacing the battery will invalidate the warranty; if so, decide whether this is a sacrifice you’re prepared to make in your pursuit of power or whether to wait until the warranty expired. Next, look up the specs for your device’s battery, and then search on the Internet for a higher-capacity version.
Upgrade the battery. If your device’s battery is user-replaceable, you may be able to replace it with a higher-capacity version. First, if your device is still under warranty, check whether replacing the battery will invalidate the warranty; if so, decide whether this is a sacrifice you’re prepared to make in your pursuit of power or whether to wait until the warranty expired. Next, look up the specs for your device’s battery, and then search on the Internet for a higher-capacity version.
![]() Caution
Caution
When buying a third-party charger or battery for your Android device, read professional and user reviews to make sure you choose a quality unit. A poorly made charger can not only overload your device, damaging the battery, but can also be a fire hazard to the place where you use it. A poorly made battery can damage your Android device directly. Also check the battery’s date of manufacture before buying. A lithium-ion battery gradually loses capacity over two to three years because of oxidization, so make sure the battery you buy is fresh.
![]() Get a car charger. If you drive a car, get a car charger so that you can plug your device in to charge for the duration of each journey. That should more than offset the power taken by using your device for navigation in the car.
Get a car charger. If you drive a car, get a car charger so that you can plug your device in to charge for the duration of each journey. That should more than offset the power taken by using your device for navigation in the car.
![]() Get a spare charger. Carrying a charger to and from work is a headache, especially when you leave the charger at your workplace for the weekend. Get a spare charger to keep at work.
Get a spare charger. Carrying a charger to and from work is a headache, especially when you leave the charger at your workplace for the weekend. Get a spare charger to keep at work.
![]() Carry a USB cable. When no external battery or dedicated charger is available, plug your device into the USB port on whichever computer is handy. The battery may charge more slowly, but you’ll pick up at least some power.
Carry a USB cable. When no external battery or dedicated charger is available, plug your device into the USB port on whichever computer is handy. The battery may charge more slowly, but you’ll pick up at least some power.
Understanding How Device Batteries Charge
These days, most devices use lithium-ion batteries, which deliver a good amount of power relative to their size, are usually very stable, and prefer frequent charging to full discharging and recharging.
To get the most out of your device’s battery, you need to understand the essentials of how it works so that you can charge it in the ways that work best for the battery and for yourself.
Some manufacturers recommend charging the battery fully at the first charge. Most experts agree that this isn’t necessary, suggesting that the manufacturers have carried the recommendation over from the days of nickel batteries, which did require a full charge at first. But if you want to go ahead and give your device’s battery a full charge at first, it will do no harm.
A battery’s life is measured in charge cycles; a typical lithium-ion battery gives around 500 charge cycles. A charge cycle involves charging and discharging the battery fully. Normally, you’ll use partial charge cycles rather than full charge cycles for your device’s battery, using the device for a while and then plugging it into a power source to recharge. Partial charge cycles add up to full charge cycles as you’d expect, so if you discharge your battery 50% on Monday, 25% on Tuesday, and 25% on Wednesday, charging it up again each evening, you’ve consumed a full charge cycle.
Using partial charge cycles like this is in general the best way to treat a lithium-ion battery. This is in contrast to some older battery technologies, in which partially discharging and recharging the battery could cause a “memory effect” that reduced the battery’s charge capability to the amount you had used.
If you want to keep your device’s battery working well, it’s a good idea to give it a full discharge and recharge every 30 or so charge cycles—say, once a month if you use your device heavily, or once every couple of months for moderate use. This full discharge and recharge helps to sync the battery’s fuel gauge with the actual state of the battery’s charge. Without this discharge and recharge, the fuel gauge gradually becomes less accurate, so the power status Android reports to you may not be correct.
Most recent lithium-ion batteries charge relatively quickly up to the 80% level and then charge more slowly for the last 20%. So charging your device for 20 minutes can bump up the level substantially if the battery is depleted, but if the battery is above the 80% level, it may add only a few percent.
Some third-party chargers claim to be able to charge a lithium-ion battery fully in just a few minutes. Experts agree that such instant charging is not possible and that attempting to charge in this way is likely to damage the battery.
Never charge a lithium-ion battery in freezing conditions, because doing so can damage the battery. If the battery gets really cold (for example, because you leave your phone in the car in winter), allow it to warm up before you try to charge it.
Managing Files and Storage
You might be familiar with Parkinson’s Law, which states that “work expands so as to fill the time available for its completion”—but do you know the Law’s corollary that states “Storage requirements will increase to meet storage capacity”?
Sadly, this corollary seems to be all too true: However much storage space you have, on your Android device in this case, you’ll find you want to carry around that quantity of files—or usually more. Between the songs and movies you bring for entertainment, the books and documents you need for work or study, and the files you create directly on your device, the built-in storage can quickly become full. This is especially true if you record video, which can chew through several gigabytes of storage space in next to no time.
Most devices come with only a modest amount of storage space. At this writing, manufacturers pretend that 16GB is a generous size and charge a savage premium for higher-capacity devices. So chances are that you’ll need to manage the files and storage on your device.
![]() Note
Note
Whether you can use SD cards with your device or not, back it up frequently in case it suffers an accident or you delete a priceless file by accident.
Adding an SD Card
If your device accepts an SD card, add the highest-capacity SD card that works. If your device’s SD card is awkward to insert and remove, you will probably want to leave a single card in place, but if you can swap SD cards easily, you can use several of them. This gives you an easy way to quickly load files onto your device from your computer: Copy them to the SD card, and then insert it in your Android device.
![]() Tip
Tip
Before adding an SD card, read your device’s documentation to find out the largest size of SD card it supports. Then search online to see if other people who have the device have gotten a larger SD card to work—and if so, which make and model of card. The manufacturers’ recommendations are often conservative or out of date, so be prepared to research your device and SD cards if you need the maximum storage possible.
Understanding KitKat’s Limitations on SD Card Storage
Android devices have a strange relationship with SD cards. On the one hand, few manufacturers sell high-capacity devices, so you pretty much need to add an SD card in order to give yourself plenty of storage. On the other hand, Google’s own devices don’t have SD card slots, and Google keeps making changes to the ways in which Android apps can use SD cards. Most of the recent changes have been restrictive, limiting the ways in which apps can use SD cards.
The latest changes, introduced in KitKat, largely prevent third-party apps from writing data to the SD card. Before this, if you gave a third-party app permission to access the SD card, it could read and write to any folder on the SD card. But now, even with permission to access the SD card, a third-party app can write only to folders it creates or folders of which it takes ownership. And if you uninstall the third-party app, you also delete the app’s folders and their contents.
Google made these changes for good reason: The SD card uses the old file allocation table (FAT) file system, which doesn’t support file and folder permissions of the type that most modern operating systems do. So whereas in the Windows NT File System (NTFS for short), the Mac HFS Plus file system (also called Mac OS Extended file system), and most Linux file systems, you or the OS can set separate permissions on each file or folder, in FAT you cannot: Any app that has access to a FAT volume can access all that volume’s folders and files. This lack of security enables any malicious or ill-programmed app to compromise sensitive data on the SD card.
Locking down the SD card like this increases your security, but it makes the SD card that much less useful to you. For example, a third-party camera app may no longer be able to store photos and videos on the SD card, or a video-editing app may no longer be able to edit videos. The problem is most acute for file-management apps, which can no longer create folders, move files, or perform other essential actions in areas of the SD card they don’t themselves own.
If you need to run apps that worked using the SD card on older versions of Android but don’t work under KitKat, you may need to root your device. This book doesn’t cover rooting, but you can find instructions by searching online for root and your device’s name. Proceed with great care because rooting can “brick” a device, rendering it useless (even as a brick).
If you root your device, you can install a fix such as the KitKat External SD Card Patch (free from the Play Store), which enables apps to write to the SD card again. You can also connect a physically external storage device, such as a USB memory stick or a USB drive, to your device. The result is physically awkward but enables you to add massive amounts of storage to the device.
Android expects SD cards to use the FAT file system. Almost all SD cards come formatted with FAT, so if you’ve got a new card, you’re good to go. If the SD card is formatted with another file system, you need to reformat it before your device can use it.
You can reformat the SD card on your device itself or by using a computer. The following sections explain how to reformat an SD card on Android, on Windows, and on OS X.
![]() Caution
Caution
Reformatting an SD card removes any files and folders it currently contains. You may also want to reformat an SD card to remove all its contents.
Formatting an SD Card on Android
Here’s how to format an SD card on Android:
1. Insert the SD card into the slot.
2. Open the Settings app.
3. Tap the Storage button in the Device section.
4. Tap the Unmount SD Card button to unmount the SD card from the file system.
5. Tap the Format SD Card button.
6. Tap the OK button in the confirmation dialog box that opens.
Formatting an SD Card on Windows
Here’s how to format an SD card on Windows:
1. Insert the SD card into a card reader built into or connected to your computer.
2. Open a File Explorer window showing This PC (on Windows 8) or a Windows Explorer window showing Computer or My Computer (on earlier versions).
3. Right-click the SD card and then click Format on the shortcut menu to open the Format dialog box.
4. Click the File System drop-down list and then click FAT32.
5. Clear the Quick Format check box to make Windows check the SD card for errors while formatting it.
7. Click the OK button in the confirmation dialog box that opens.
8. When the Format Complete dialog box opens, click the OK button.
9. Right-click the SD card and then click Eject to eject the card.
10. Remove the card from the card reader.
Formatting an SD Card on OS X
Here’s how to format an SD card on OS X:
1. Insert the SD card into a card reader built into or connected to your Mac.
2. Click the Launchpad icon on the Dock, type dis, and then click the Disk Utility icon to launch Disk Utility.
3. In the left pane, click the SD card. The right pane displays controls for managing the card.
4. Click the Erase tab to display its controls.
5. Click the Format pop-up menu and then click ExFat.
6. Click the Name field and type the name you want to give the card.
7. Click the Erase button.
8. Click the Erase button in the confirmation dialog that opens.
9. After the format operation finishes, click the Eject button on the toolbar.
10. Remove the card from the card reader.
Choosing a File Manager
You can manage files and folders on your device by running a file manager on the device itself. Some devices include file managers, whereas others don’t. If your device doesn’t have a file manager, download and install one from the Play Store.
Both ES File Explorer (see Figure 1.16) and ASTRO File Manager are powerful file managers that are easy to use. Both are free from the Play Store; ASTRO File Manager also offers a paid version, ASTRO File Manager Pro, which removes the ads.
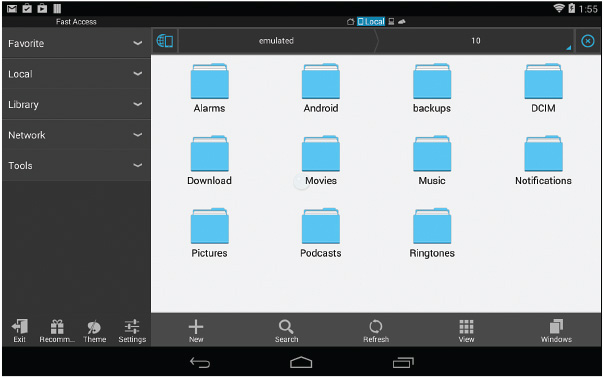
FIGURE 1.16 If your device doesn’t come with a file manager, you can install one from the Play Store, such as ES File Manager.
![]() Note
Note
Because of the KitKat limitations discussed in the previous section, file managers can manage only the apps on the internal storage, not on the SD card.
Checking Free Space and Seeing What’s Taking Up Space
To see how much space you have left on your device, open the Settings app and touch the Storage button. The Storage screen appears (see Figure 1.17), showing the Internal Storage section at the top and the SD Card (if your device has an SD card) further down the screen.
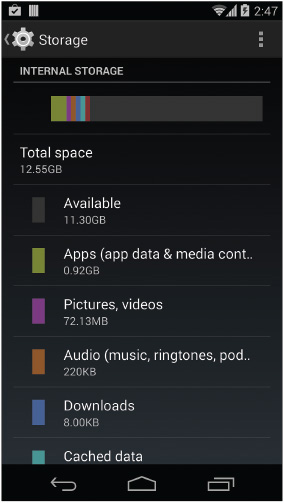
FIGURE 1.17 Use the Storage screen to identify which types of files are taking up your device’s storage space.
The Storage screen is easy to read:
![]() The bar chart at the top of the Internal Storage section shows what proportion of your device’s storage is in use and how much is free. The color bars show you the file types.
The bar chart at the top of the Internal Storage section shows what proportion of your device’s storage is in use and how much is free. The color bars show you the file types.
![]() The Total Space readout gives your device’s total capacity.
The Total Space readout gives your device’s total capacity.
![]() Note
Note
The Total Space readout on the Storage screen shows a capacity lower than your device’s nominal capacity for two reasons. First, manufacturers give the nominal capacity in gigabytes calculated using billions of bytes (10003 bytes) rather than the gigabytes that computers actually use (10243 bytes), which are 7.4% bigger; so a device with 16GB nominal capacity has a true capacity of 14.9GB. Second, the operating system takes up several gigabytes of space.
![]() The Available readout shows how much space is available.
The Available readout shows how much space is available.
![]() The Apps readout shows how much space the apps are taking up. You can tap the Apps button to display the Apps screen, from which you can uninstall apps to recover space.
The Apps readout shows how much space the apps are taking up. You can tap the Apps button to display the Apps screen, from which you can uninstall apps to recover space.
![]() The Pictures, Videos readout shows how much space your pictures and videos are occupying. You can tap this button to view your photos in the Gallery app or the Photos app. You can delete photos using these apps if necessary.
The Pictures, Videos readout shows how much space your pictures and videos are occupying. You can tap this button to view your photos in the Gallery app or the Photos app. You can delete photos using these apps if necessary.
![]() The Audio readout shows how much space your audio files—such as songs, ringtones, and podcasts—are taking. You can tap this button to display the Open From panel, which gives you several ways to browse the files. But usually it is easier to manage your music from your computer if you sync your device with it.
The Audio readout shows how much space your audio files—such as songs, ringtones, and podcasts—are taking. You can tap this button to display the Open From panel, which gives you several ways to browse the files. But usually it is easier to manage your music from your computer if you sync your device with it.
![]() The Downloads readout shows the amount of space occupied by files you have downloaded. You can tap the Downloads button to display the Downloads screen, from which you can delete files to free up space.
The Downloads readout shows the amount of space occupied by files you have downloaded. You can tap the Downloads button to display the Downloads screen, from which you can delete files to free up space.
![]() The Cached Data readout shows how much space is devoted to cached data. Cached data is data saved by apps to enable them to display it more quickly; for example, web browsers cache recent web pages in case you visit them again.
The Cached Data readout shows how much space is devoted to cached data. Cached data is data saved by apps to enable them to display it more quickly; for example, web browsers cache recent web pages in case you visit them again.
![]() This Misc. readout shows how much space miscellaneous files are occupying.
This Misc. readout shows how much space miscellaneous files are occupying.
Recovering Space
After reading the previous section about the Storage screen, you can likely see several straightforward ways of recovering space on your device: You can delete apps you no longer need; remove pictures, videos, and audio items; delete any downloaded files; and clear your cached data.
Deleting Apps
If you’ve installed a lot of apps, deleting any that you don’t use is a good way to start recovering space on your device.
Open the Settings app and tap the Apps button in the Device section to display the Apps screen. This screen can display the apps sorted either by name in alphabetical order or by size in descending order. If the apps appear in alphabetical order, tap the Menu button and then tap Sort by Size to get a list with the biggest apps at the top.
If you want to see what’s taking up space, tap the Menu button and then tap Sort by Size (see Figure 1.18) to get a list of apps in descending order of size.
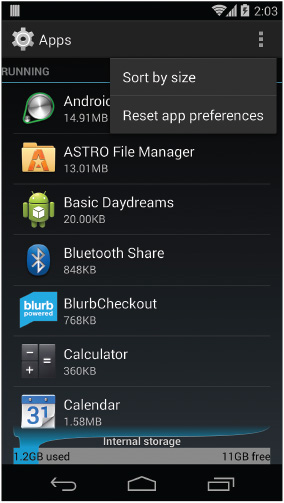
FIGURE 1.18 On the Apps screen, tap the Menu button and then tap Sort by Size to see which apps are taking up the most room.
To remove an app, tap its button on the Apps screen. The App Info screen for the app appears, and you can tap the Uninstall button to uninstall the app.
Removing Pictures and Videos
Pictures can take up a large amount of space on your device, and videos can eat up all your remaining storage in just a few minutes of shooting.
You can access your photos and videos by tapping the Pictures, Videos button on the Storage screen. If the Complete Action Using dialog box opens, tap the app you want to use (such as Gallery) and then tap the Always button or the Just Once button, as appropriate. You can then use the app to select individual photos or videos and delete them as necessary.
![]() Tip
Tip
Managing your photos and videos using the Gallery app or the Photos app on your device works fine up to a point. But if you need to remove whole swaths of photos or reels of videos, it’s easier to connect your device to your computer and manage them from there.
Removing Audio Items
If you need to remove audio items from your device, tap the Audio button on the Storage screen. Android displays the Open From pane, in which you can touch the app in which you want to view the files.
![]() Tip
Tip
As with photos and videos, removing large numbers of audio items from your Android device using the device itself tends to be awkward. If you use your device with a computer, use the computer to remove to remove the files.
Deleting Downloaded Files
If you no longer need files you have downloaded to your device, delete them to recover space on it. Tap the Downloads button on the Storage screen to display the Downloads folder. You can then tap and hold a file to select it, select other files as needed, and then tap the Delete icon (the trash can).
Clearing Your Cached Data and Miscellaneous Files
If you’ve deleted all other content you can spare from your device, but you’re still short of space, you may want to clear your cached data and delete your miscellaneous files.
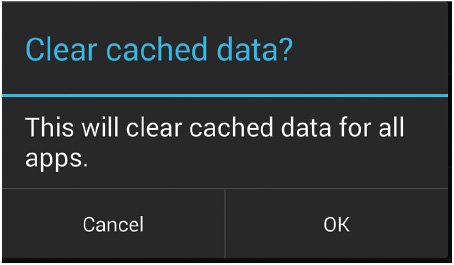
You can clear your cached data by tapping the Cached Data button and then tapping the OK button in the Clear Cached Data? dialog box (see Figure 1.19).
You can tap this button to display the Misc Files screen, which provides controls for selecting the files and deleting them. Normally, the miscellaneous files take up only a small amount of space.