Chapter 7. Make Projects
Too often with our photos, this is the end of the story. We capture, import, edit, and share a few, and then move on to the next photo adventure and start the process again.
You’ll notice a distinct absence of paper. For most of the history of photography, a “photo” didn’t exist beyond the negative until it was printed on paper.
Digital photography has pushed paper away, but now there are actually many more options for putting images to paper—you don’t need to leave Photos for OS X to do them. Using the application’s Projects features, you can create photo books, calendars, cards, and prints, order them from Apple, and have them printed and delivered.
And while you’re waiting for the goods to arrive, you can take those photos and build a slideshow you can show friends on the Mac, an iOS device, or an Apple TV.
Slideshow
The Photos application actually has two slideshow options: You can play an impromptu slideshow within the program (on OS X and iOS), or you can build a slideshow as a project where you have control over titles, transitions, and music.
Play a slideshow in the app
In Photos for OS X, any moment, collection, or album can be played as a slideshow:
1. Click the Slideshow button at the upper-right corner of the moment or collection (7.1), or the Slideshow button that shows up in the toolbar when you’re viewing an album.
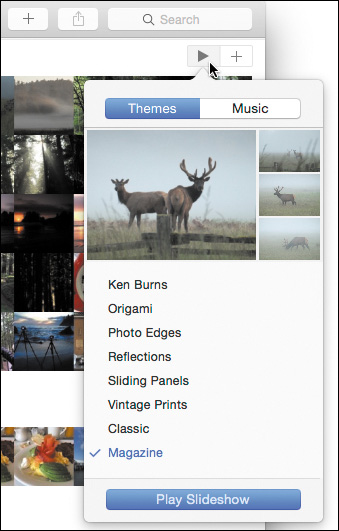
2. Choose a theme from the list provided.
3. Each theme has its own song; if you’d rather choose something from your music library, click the Music button and select something else. To remove the music, deselect the current song.
4. Click the Play Slideshow button to start the show, which plays full-screen. Press the Esc button to exit and return to Photos.
In Photos for iOS, you take a slightly different approach:
1. In a moment or album, open the photo that will be the starting image.
2. Tap the Share button.
3. Tap the Slideshow button (7.2). (Although you can select more than one photo on this screen, you don’t need to; the first selected image marks the first slide.)
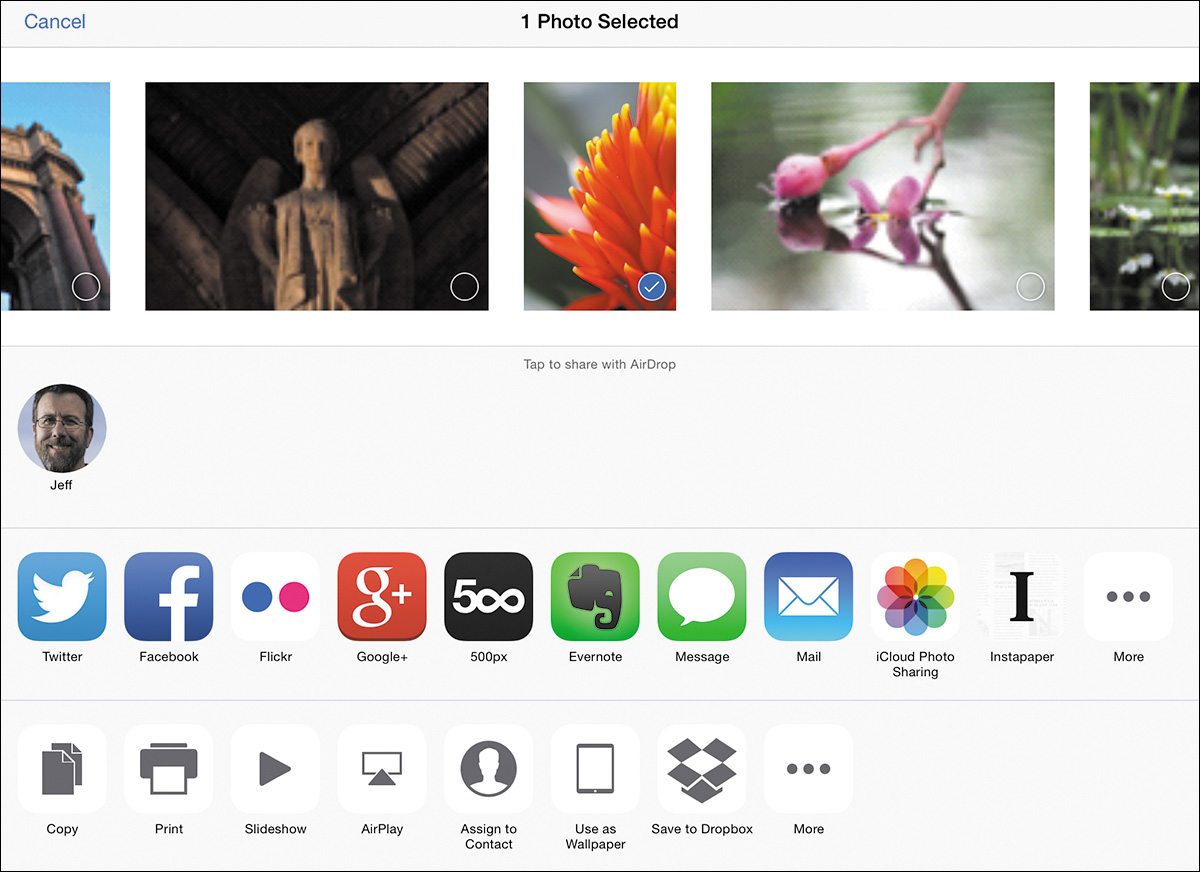
4. In the Slideshow Options screen, choose an output device (such as an Apple TV if one is on the network; otherwise, stick with your current device), choose a transition, and decide whether to play a song.
5. Tap Start Slideshow to begin the show. Tap anywhere on the screen during the presentation to end it.
![]() Note
Note
If your library contains optimized versions of photos, you may have to wait a few seconds or minutes for the full-resolution versions of those images to download before the slideshow begins.
Create a Slideshow project
When you want more creative control over the slideshow, create a Slideshow project on the Mac:
1. Select the photos you want to include. That can be in the Photos view or in an album, or you can navigate to a collection or moment if you want to share all the photos from that time period.
2. Click the Add (+) button in the toolbar, or the same button belonging to a moment or collection at the right side of the window, and choose Slideshow.
3. In the dialog that appears, choose New Slideshow and give it a name. Click OK.
The slideshow is built using the photos in the order they appear in the view or album. To edit the slideshow, do any of the following:
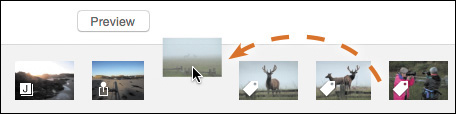
• Re-order slides: Select one or more slides and drag them to a new position in the timeline at the bottom of the window (7.3).
• Delete slides: Photos makes it easy to create a slideshow, but it’s up to you to make an interesting one. Your viewers will appreciate you removing repetitive shots (such as those captured in bursts in the same location) and those photos that are just middling quality. Select one or more photos and press the Delete key, or choose Image > Delete Slides; they’re removed just from the slideshow, not your photo library.
• Add titles: The first photo automatically includes the title of the album or the moment. Select the title proxy (the black box with a T) and then edit the text in the preview area (7.4).
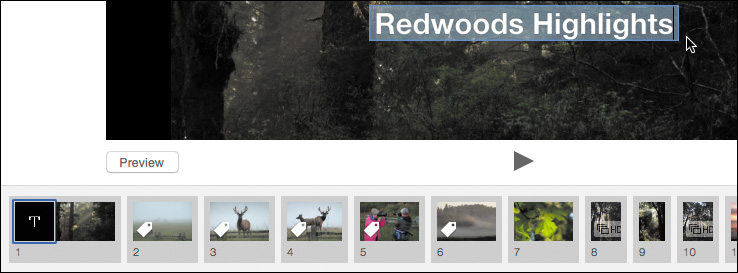
To add a title, click the Add (+) button to the right of the timeline and choose Add Title.
Each theme uses its own font and size for text, but you can change it. Choose Edit > Fonts > Show Fonts (or press Command-T) and make any adjustments you want.
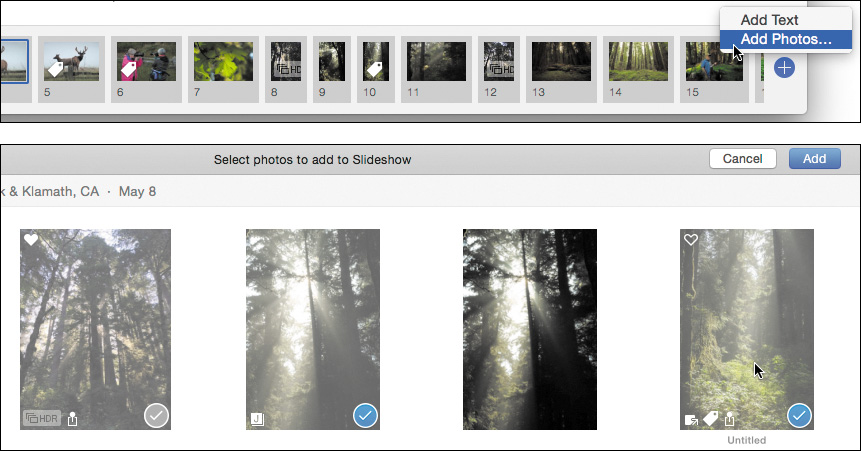
• Add photos: Click the Add (+) button to the right of the timeline and choose Add Photos (7.5). Next, select the images you want to add; shots already in the slideshow appear with a gray checkmark. Click the Add button to put the new selections into the slideshow.
• Change the theme: Click the Theme Picker button at the right to apply a different theme to the slideshow.
• Make the slideshow loop or not: Click the Loop button below the preview to set the slideshow to restart when it reaches the end (the default) or play once and stop.
• Change the song: If you want to hear something other than the theme’s default song, click the Music button (7.6). Choose any of the other theme songs, or choose iTunes from the Music Library pop-up menu and select something from your own set of tunes. If you want silence, click the X that appears when you hover over the Selected Music item.

• Choose a transition: Click the Duration Options button and choose an effect from the Transition pop-up menu (7.7); the setting applies to the entire slideshow, not individual slides. The Speed and Direction controls dictate how fast and from which side the transition occurs.
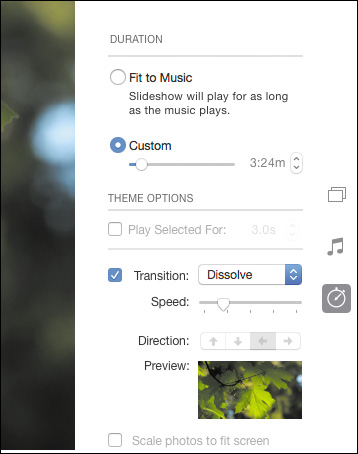
• Change the duration of the slideshow: The Duration buttons let you set a custom overall time (which is calculated for you when you first create the slideshow). Or, choose Fit to Music to play all the slides in the time it takes for the music to play.
• Change the timing of selected slides: The duration options apply the same amount of time to every slide, but you can override that in some cases. Select one or more slides and then click the Play Selected For checkbox to make those appear onscreen shorter or longer.
• Scale photos: When the “Scale photos to fit screen” option is enabled, the application makes each entire image visible, adding black bars to the sides or top as needed.
• Export the slideshow: Click the Export button to create a movie file of the finished slideshow if you want to take it outside the Photos application. You can optionally choose to have it added to your iTunes library (to sync it to a device later).
Since I rarely sync items through iTunes anymore, I prefer to put the movie file into a Dropbox folder, where I can download it from my iOS devices. When iOS 9 is released in the Fall of 2015, there will also be the ability to open files stored in your iCloud Drive folder.
Click the Preview button at any time to play the slideshow within the window. When you’re done setting it up, click the Play button to play the slideshow full-screen.
The slideshow is saved in the Projects view for the next time you want to view or edit it.
![]() Tip
Tip
There’s no way within the Slideshow project to edit the photos—say, if you want to crop or adjust them—but you can return to the images in the Moments or Albums views and edit them there. The changes apply to the image in the slideshow.
Photo Book
I discovered an old set of photo prints in a drawer the other day that had been forgotten for years. It was a fun find, but it reinforced how invisible photos become when they’re put away—out of sight, out of mind, as the old saying goes. A photo book, however, gets more attention. Even when it’s put away in the bookcase, its spine is there to announce itself. Plus, it’s easier to flip through a photo book than to paw through prints.
In Photos for OS X, you can build a book, order it through the application, and have a professionally printed product in your hands within a few days. Or, order a book as a gift and put it into someone else’s hands.
To create a Book project, start by doing the following:
1. Select the photos you want to include. That can be in the Photos view or in an album, or you can navigate to a collection or moment if you want to share all the photos from that time period.
Making projects is when I like having smart albums set up. For example, I can quickly find all favorited photos captured during a time frame, such as a vacation. See Chapter 3 to learn how to make smart albums.
2. Click the Add (+) button in the toolbar, or the same button belonging to a moment or collection at the right side of the window, and choose Book.
3. In the dialog that appears, click the Select button for the size and style of book you want to create: Square, Classic, or Softcover. Although the prices are listed, you’re not committing yourself to any purchase yet. You can change the book type later, but keep in mind that if you’re shifting sizes, that could affect layout and text you add.
4. Choose a layout theme on the next screen and then click Create Book. You’ll probably want to test several themes at first; you can change the theme easily after this step.
The photos you selected are automatically added to the book’s pages.
![]() Tip
Tip
It’s also possible to create an empty book and then add photos to it after it’s made. Go through the previous steps, but make sure no photos are selected, and use the Add (+) button found in the toolbar to choose the Book option.
Add or remove pages
Note that the pricing is based on a 20-page book, with additional fees per page as you add more pages. The current number of pages and the price appear at the upper-right corner of the window.
To delete a few pages, select the ones you want to delete and choose Remove Pages from the Add or Remove Pages button (7.8). Or, click the Project Options button and drag the Number of Pages slider to the amount you want. If you’re looking at a much bigger book than you expected, feel free to scratch pages with abandon—the photos are placed in the Photos bin at the bottom of the window for you to grab later. The same pop-up menu also lets you add pages if necessary.

To rearrange pages, select one or more and drag them to a new position within the book.
Change a page’s layout
The Photos application randomly assigns layouts to the pages, depending on the theme. Each page can include from 1 to 12 photos, plus titles and text options. To change a page’s layout, do the following:
1. Double-click a page to zoom in and edit just that two-page spread.
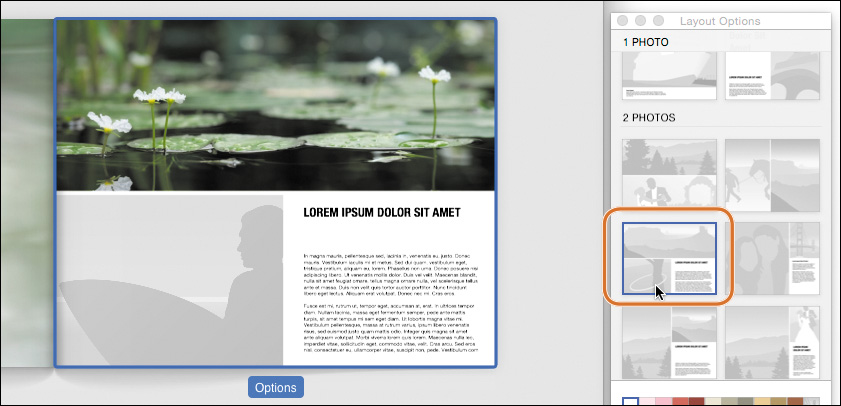
2. Click the Options button to view the Layout Options window.
3. Select one of the pages and then choose a layout style in the Layout Options window (7.9).
![]() Tip
Tip
Make sure you scroll down to view all the options, such as two-page spreads and maps based on the geolocation data in the associated photos.
![]() Tip
Tip
You can also change pages’ layouts in the book’s overview. Choose Window > View (Command-I) to view the Layout Options window, select the page you want to change, and click a new layout.
Add or remove photos
To fill a blank spot or replace an existing photo, drag an image from the Photos bin onto that section of the page’s layout. Or, drag a picture out of the page and into the Photos bin to remove it.
If you remember a photo that would be perfect in a spot but wasn’t included initially, click the Add Photos button above the Photos bin to search your library for the image.
Edit photos and text
With a layout established, you can fine-tune the appearance of each page. Double-click a photo to edit it and do any of the following:
• To adjust how the photo fits into its frame, drag it into position. You may need to change the Zoom & Crop slider in the Photo Options window (7.10).
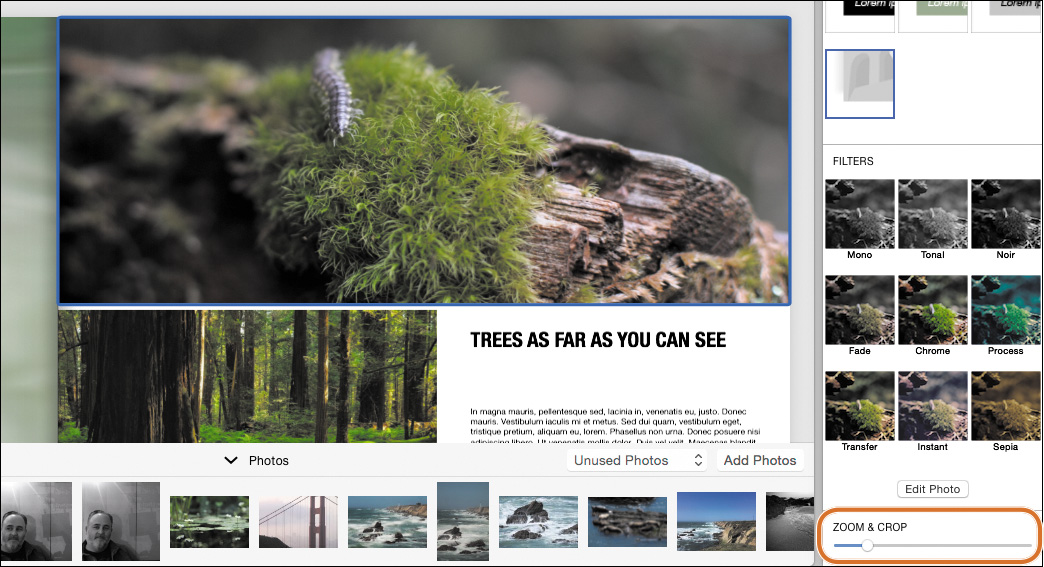
• To apply a filter to the image, click one of the filters in the Photo Options window. Or, click the Edit Photo button to switch to the editing view and use all of the application’s editing tools (see Chapter 5).
• Click within a text element to rewrite the text.
Lastly, when your book is ready and you’ve proofed the text (a fifth or sixth or tenth time), click Buy Book to place an order.
Calendar
To make sure your photos are seen all year, why not create a calendar that features them? (This option is a big hit with grandparents.) Here’s how to create one:
1. Select the photos you want to include, and choose Calendar from the Add (+) button. Or, click the button with nothing selected to start with an empty template.
2. Choose how many months will be in the calendar (from 12 to 24), and the month it begins. Click Continue.
3. Choose a theme and click Create Calendar.
Once that’s set up, there are a number of ways to customize it:
• Select a page and click the Layout Options button to change how many photos appear on each page.
• Rearrange the pages by dragging them into position. (The months remain in chronological order, of course.)
• Double-click a photo to edit it: zoom, crop, apply filters, or open the editing view, just as with Book projects.
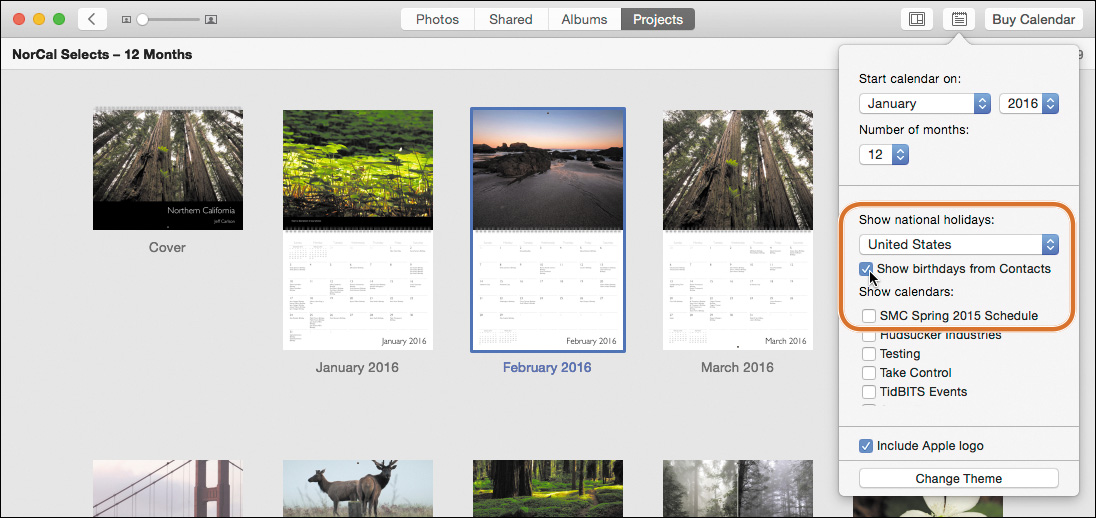
• Click the Calendar Options button to include national holidays and birthdays from your Mac’s Calendar and Contacts applications (7.11).
• Click within any date to add your own notes or events.
When the calendar looks good, click the Buy Calendar button to order it.
Prints
My daughter’s teacher had an odd request: Bring in a photo of our family. I didn’t have one. Oh yes, I have plenty of pictures of us stored in my photo library, but nothing I could put in her backpack. It turns out that photo prints aren’t so passé after all.
1. Select the photos you’d like to create prints from, and choose Prints from the Add (+) pop-up menu.
2. Choose a size and style, ranging from automatically sized prints based on the photos’ dimensions to standard prints and posters.
![]() Tip
Tip
The Auto-Sized option is fun if you shoot panoramas—they’re printed wide and intact, not cropped.
As with the other projects, you can do a few things to make sure the photos appear their best before placing an order:
• The print size is set at the outset, so you don’t need to worry about pre-cropping photos to the correct aspect ratio in the editing view. In the Prints interface, double-click a photo and drag it to place it in its frame; the Zoom & Crop slider in the Photo Options window helps with composition.
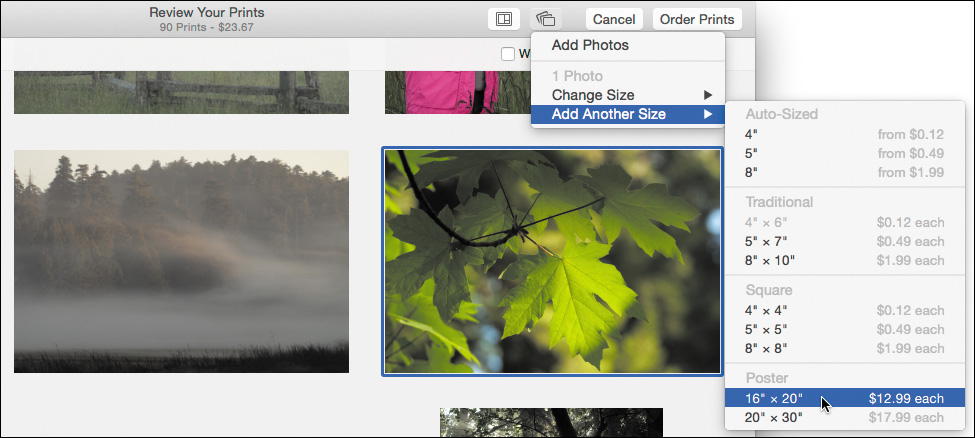
• Click the button next to the Photo Options button to change or add photos, change the print size, or add a new print size to the order. For example, you could select one of your photos and order a poster of it in addition to the bevy of 4x6 prints (7.12).
• If you want multiple copies of an image, select it and enter the number in the Prints portion of the Photo Options window.
• Choose whether to print with white borders or a glossy finish (or both) by marking the options at the top of the screen.
Click the Order Prints button to place the order. If you’re not ready yet, click Cancel; you’ll have the opportunity to save the order for later.
Cards
At some point in the last few years, nearly all of the holiday cards I started to receive were photo cards. (No real surprise, since those are the type I was sending, too!) Photos can create cards for all sorts of occasions:
1. Choose one or more photos to use for the card, and choose Card from the Add (+) pop-up menu.
2. Choose the type of card you want: Letterpress, Folded, or Flat.
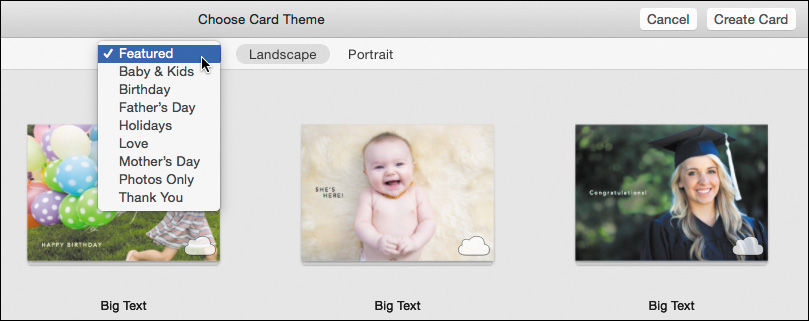
3. Select the card’s theme, and whether it should be landscape or portrait orientation. The Featured themes appear initially, but you can choose other types and occasions from the pop-up menu at the top of the window (7.13). Click Create Card.
4. If you selected multiple photos or chose a card theme that supports more than one image, drag the shots from the Photos bin to the card front.
5. Click the Layout Options button if you want to choose an alternate layout for the card face.
6. Click the text on the card to change it and type something custom.
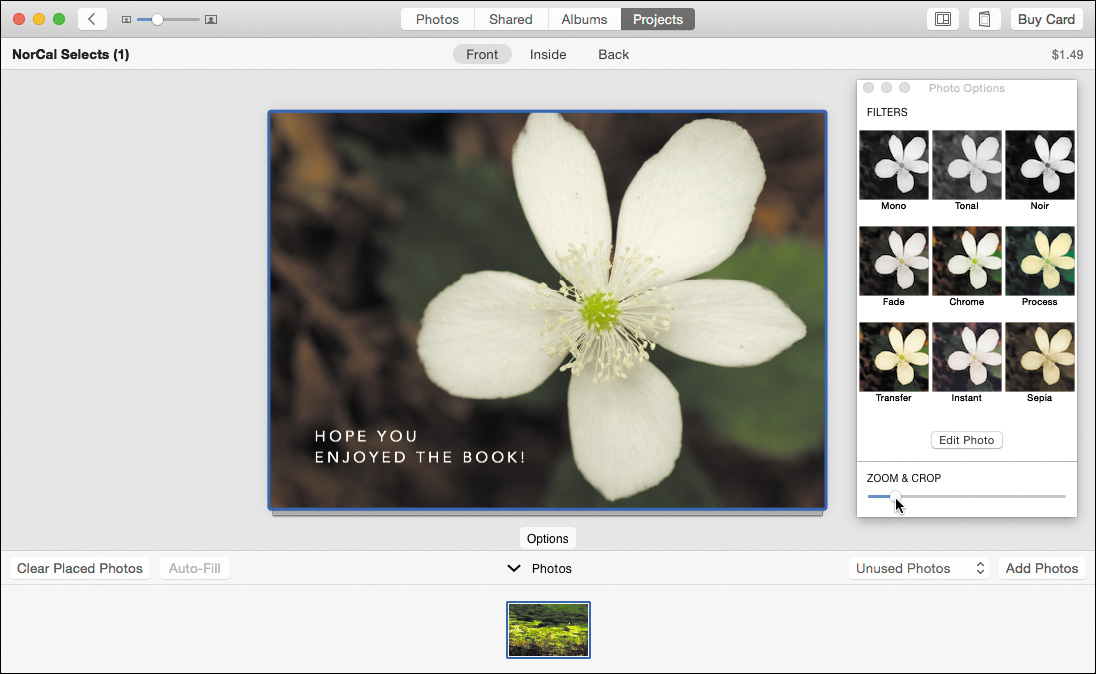
7. Double-click the photo to edit its composition or appearance (7.14).
8. Click the Inside and Back buttons and select from the available layouts and photo options (such as adding an inside greeting or including a small photo on the back).
9. Click the Buy Card button when you’re ready to check out.