
Chapter 12. Developing Custom Views
Android has a significant number of views already created for your use. Throughout this book, you’ve learned how to work with many of them, and in the previous chapter, “Working with the Canvas and Advanced Drawing,” you learned how to create custom drawables that could display almost anything you could imagine. Now it is time to begin to combine the knowledge of drawing with an understanding of views to dive into creating your own.
General Concepts
Before you can start developing your own custom views, it’s a good idea to understand the general concepts behind views. Views must know how to measure themselves, lay themselves (and any children) out, draw themselves (although some views do not actually draw anything), and save/restore their own state. They also have to handle various input events such as clicks and swiping (interaction and scrolling are covered in Chapter 13, “Handling Input and Scrolling”).
When you are first creating a view, you will find it very useful to look at the source code for views that are similar to what you want. Although you can check out the source code for Android to see how the views work (http://source.android.com/source/downloading.html), it is handy to use the Chrome extension “Android SDK Search.” This extension adds a “view source” link to every class in the Android documentation (http://developer.android.com/reference), including the views. Note that many of the fields stored in views have package visibility, so you will see subclasses often accessing these fields directly, such as mPaddingLeft. In general, you should avoid doing the same to ensure that your code remains compatible with any changes to the Android classes outside of your control. You can nearly always store copies of the values in your own class when you need the performance benefit of avoiding a method call.
Measurement
The first part to understand about views is how measurement happens. Measurement is when a view says how big it would like to be given certain constraints. For instance, a view might be asked how tall it would like to be given a width of 300px.
The parent view will call each child view’s measure(int, int) method, passing in two integers that represent the measurement specification for the width and height, respectively. This triggers the child’s onMeasure(int, int) method with the same parameters, which is required to call setMeasuredDimensions(int, int) with the actual pixel values for the width and height of the view. Both measure and setMeasuredDimensions are final, so you will only ever override onMeasure. After that has happened, the view’s getMeasuredWidth() and getMeasuredHeight() methods will return those dimensions.
The measurement specification is an integer packed with MeasureSpec (https://developer.android.com/reference/android/view/View.MeasureSpec.html) that has both a mode and a size. You will find that this and many other properties of views are stored as ints instead of objects to make all views more efficient. The mode can be one of AT_MOST, EXACTLY, and UNSPECIFIED. The AT_MOST mode means the child can specify any size for this dimension up to the size provided in the MeasureSpec. The EXACTLY mode says that the view must be the exact number of pixels passed in as the size (note that this is actual pixels and not density independent pixels, so you do not need to convert the value based on density). The UNSPECIFIED mode means that the parent has not provided any restrictions on the size of the child, so the child should determine its own ideal size.
The parent usually considers the LayoutParams of the child to determine what measurement specifications to pass down. For instance, a view’s LayoutParams might specify MATCH_PARENT for the width, and the parent might then pass down a MeasureSpec that says the child will be exactly 768px (a possible exact width of the parent). However, regardless of what is requested by the LayoutParams, the MeasureSpec that is passed from the parent to the child is what must be obeyed.
Layout
The method layout is called on each view, triggering onLayout just as the measure method triggers onMeasure. In the onLayout method, each parent view can position its child views according to the sizes determined in the measurement phase. Once the positions for a given child are determined, its layout method is called. For instance, a vertically oriented LinearLayout might go through its children, positioning one, and using its height to position the next one (LinearLayout actually does significantly more than this, but this is the basic idea).
The four ints passed to the layout method are the left, top, right, and bottom pixel positions relative to the parent. The onLayout method receives a boolean that indicates if this is a new size and/or position along with those four ints.
There are times when a view determines that it needs to be laid out again because its size has changed. In this case, it calls the requestLayout method. For example, if you call setImageDrawable on an ImageView with a Drawable that is not the same size as the current Drawable, it will call requestLayout so that it can be given the right amount of space for the new Drawable.
Drawing
The drawing phase is when the view actually creates the pixels that it will display. This all happens in the onDraw method, which is the view equivalent of the draw method from the Drawable class. The view should avoid allocating any objects in this method (unless they are retained for future draws) and should be as efficient as possible to keep the user interface smooth.
If a view has determined that its drawing state has changed (such as when you give an ImageView a new Drawable), then it can call invalidate (just like a drawable calls invalidateSelf) to request that onDraw is called. The invalidate call is asynchronous; it merely flags the view as needing to be redrawn. This means that you can safely call it multiple times. For example, if you set the text of a TextView, invalidate will be called. If you then change the color of the text, invalid will be called again. None of the drawing will happen until the next drawing pass. When you need to invalidate a view from a background thread, you can use postInvalidate.
Note
When views do not need to draw anything (such as ViewGroups that just lay out other views), they can call setWillNotDraw, passing in true. This allows Android to do some extra optimization. When extending existing views, be aware that some set this value to true, which means your onDraw method will never be called. For instance, a LinearLayout without dividers sets this to true. To check the current value, call willNotDraw on your view.
Saving and Restoring State
Views should be able to save and restore state themselves. For instance, a ListView might save the currently selected position, so that when the device is rotated and the views are recreated, it can select the new view that represents that position. There are two methods to handle here: onSaveInstanceState and onRestoreInstanceState. When saving state, a view should always call through to the super method to save its state and then create a new object that represents its own data to save (typically this is a custom class that extends BaseSavedState). When restoring state, a view will trigger the parent method and then restore anything it needs to.
Creating a Custom View
The previous chapter, “Working with the Canvas and Advanced Drawing,” covered PorterDuff compositing and even used the SRC_IN mode to create a faded image. The PorterDuff modes can be very difficult to understand, so it is helpful to be able to easily try different modes and images and see what results. To that end, we’ll create a new project and in it we’ll create a class called PorterDuffView that extends the View class to easily combine two images with different modes.
To keep this view efficient, we should create class variables to store the Paint object called mPaint, the Bitmap (which will be the combination of the two images) called mBitmap, the default sizes of the images (mDefaultBitmapWidth and mDefaultBitmapHeight), and both the Mode as mMode and the XferMode called mXferMode. The Paint object can be immediately instantiated.
Each of the constructors should call out to initDefaultBitmapDimens. That method needs to simply read in the size of one of the images that will be used to set mDefaultBitmapWidth and mDefaultBitmapHeight. Since the images aren’t needed at this time, just the dimensions are, we can use the BitmapFactory.Options trick of setting inJustDecodeBounds.
We need to add a method to allow you to set the PorterDuff.Mode, so we’ll create a method called setPorterDuffMode(PorterDuff.Mode). It should simply set the mXferMode to a new PorterDuffXferMode that takes the Mode that was passed in. It also needs to null out the reference to mBitmap because it will need to be re-created with the new XferMode. At this point, our PorterDuffView should look like Listing 12.1.
Listing 12.1 The Initial PorterDuffView
public class PorterDuffView extends View {
/**
* The width used for measuring when a bitmap has not been generated
*/
private int mDefaultBitmapWidth;
/**
* The height used for measuring when a bitmap has not been generated
*/
private int mDefaultBitmapHeight;
/**
* The Paint used to draw everything
*/
private final Paint mPaint = new Paint(Paint.ANTI_ALIAS_FLAG);
/**
* The Bitmap containing the two images blended together
*/
private Bitmap mBitmap;
/**
* PorterDuff Mode used to generate the Xfermode
*/
private PorterDuff.Mode mPorterDuffMode = PorterDuff.Mode.CLEAR;
/**
* The Xfermode to combine the images with
*/
private Xfermode mXfermode = new PorterDuffXfermode(mPorterDuffMode);
public PorterDuffView(Context context) {
super(context);
initDefaultBitmapDimens();
}
public PorterDuffView(Context context, AttributeSet attrs) {
super(context, attrs);
initDefaultBitmapDimens();
}
public PorterDuffView(Context context, AttributeSet attrs, int defStyleAttr) {
super(context, attrs, defStyleAttr);
initDefaultBitmapDimens();
}
@TargetApi(Build.VERSION_CODES.LOLLIPOP)
public PorterDuffView(Context context, AttributeSet attrs, int defStyleAttr, int defStyleRes) {
super(context, attrs, defStyleAttr, defStyleRes);
initDefaultBitmapDimens();
}
/**
* Sets the new PorterDuff.Mode, removes the existing Bitmap and invalidates the view
*
* @param mode PorterDuff.Mode to use
*/
public void setPorterDuffMode(PorterDuff.Mode mode) {
if (mode == mPorterDuffMode) {
// No change
return;
}
mPorterDuffMode = mode;
mXfermode = new PorterDuffXfermode(mode);
mBitmap = null;
invalidate();
}
private void initDefaultBitmapDimens() {
BitmapFactory.Options options = new BitmapFactory.Options();
options.inJustDecodeBounds = true;
BitmapFactory.decodeResource(getResources(), R.drawable.shape1, options);
mDefaultBitmapWidth = options.outWidth;
mDefaultBitmapHeight = options.outHeight;
}
}
Measuring
To determine how large the view will be, we need to override onMeasure. Remember that this method is automatically called for us and received an int for the width and an int for the height. Each of these ints is packed with a mode and a size, so we can make use of the MeasureSpec methods of getMode and getSize to do the bitmask work for us and get values we can easily work with. We first check if the mode is EXACTLY, because we can just directly use the size when that’s the case (saving any calculations we would do otherwise). When it’s not EXACTLY, we just add the padding on both sides and the desired content size (we’ll use the mDefaultBitmapWidth). We need to also check if the mode is AT_MOST, ensuring that we don’t pass a size bigger than desired if that’s the mode. Listing 12.2 shows the full onMeasure method.
Listing 12.2 The onMeasure Method
@Override
protected void onMeasure(int widthMeasureSpec, int heightMeasureSpec) {
// Calculate the width
int width;
int specMode = MeasureSpec.getMode(widthMeasureSpec);
int specSize = MeasureSpec.getSize(widthMeasureSpec);
if (specMode == MeasureSpec.EXACTLY) {
width = specSize;
} else {
width = getPaddingLeft() + getPaddingRight() + mDefaultBitmapWidth;
if (specMode == MeasureSpec.AT_MOST) {
width = Math.min(width, specSize);
}
}
// Calculate the height
int height;
specMode = MeasureSpec.getMode(heightMeasureSpec);
specSize = MeasureSpec.getSize(heightMeasureSpec);
if (specMode == MeasureSpec.EXACTLY) {
height = specSize;
} else {
height = getPaddingTop() + getPaddingBottom() + mDefaultBitmapHeight;
if (specMode == MeasureSpec.AT_MOST) {
height = Math.min(height, specSize);
}
}
// Set the calculated dimensions
setMeasuredDimension(width, height);
}
Handling Layout
Once we’ve handled measuring, we need to handle layout. Our onLayout method will be triggered once the size and position of our view are determined. Because we don’t have any children, we don’t have to do anything, but this is actually a great place for us to check if the bitmap we may have created is the right size.
The general way that this view will work is that it will create a bitmap combining the two images when drawing and then it will retain and reuse that bitmap for future onDraw calls. This lazy initialization allows us to avoid creating a bitmap when the view isn’t going to be displayed. This means that all we need to do here is set mBitmap to null if changed (a boolean we get when onLayout is called) is true.
Building the Bitmap
Next up, we’ll make a method called createBitmap that will do the heart of the work. To support a range of image sizes, we will create a Rect that represents the image scaled to the size of the view. To keep the example simple, it will assume the images are square, so it just has to take the smaller of the width or height (called minDimension) and create a Rect based on that (thus, if the view is 500px by 800px, the resulting Rect is 500px by 500px).
We will use the static createBitmap (int, int, Config) method of Bitmap to create the actual Bitmap (mBitmap) we will draw into. The two ints represent the width and the height (in this case, both are the minDimension) and a Config that says how many bits are used to represent the colors in the Bitmap. We want to pass in Config.ARGB_8888, which means that the alpha, red, green, and blue channels each get 8 bits for 256 levels per channel. This is the highest quality configuration and is almost always the one you want to use. Using a lower quality configuration can result in visual artifacts and, depending on the images passed in, might make the compositing harder to understand.
Now we create a new Canvas, passing in the target Bitmap we just made. This Canvas will handle the calls to draw the images into the target Bitmap. To get a Bitmap instance of one of our images, we use the BitmapFactory’s static decodeResource(Resources, int) method, passing in a reference to Resources, which we can obtain with getResources(), and the identifier for our image (the example uses R.drawable.shape1). We use the Canvas’s drawBitmap(Bitmap, Rect, Rect, Paint) method to draw the newly loaded Bitmap into the target Bitmap. As mentioned in the previous chapter, there are several methods for drawing Bitmaps. This one takes the Bitmap to draw (the one we just loaded from Resources), a Rect that represents the portion of that Bitmap to use for drawing, a Rect that represents where to draw the Bitmap, and the Paint. We can leave the first Rect null, which means that the full image will be used. The second Rect will be the one we already created, and the Paint will be mPaint.
Next we use the BitmapFactory again to load our second image but, before drawing it, we call setXfermode(mXfermode) on our Paint. This sets it up to use the transfer mode when drawing (in this case, whichever PorterDuff.Mode has been set in the PorterDuffXfermode object). We draw this second Bitmap to the target Bitmap using the same Canvas method we used for the previous image. Finally, we remove the Xfermode from the Paint by calling setXfermode(null).
When we’re all done with the createBitmap() method, it should look like Listing 12.3.
Listing 12.3 The createBitmap() Method
/**
* Creates mBitmap using the set XferMode
*/
private void createBitmap() {
// Prepare the Bitmap
final int width = getWidth();
final int height = getHeight();
final Rect rect = new Rect();
final int minDimen = Math.min(width, height);
rect.right = minDimen;
rect.bottom = minDimen;
mBitmap = Bitmap.createBitmap(width, height, Bitmap.Config.ARGB_8888);
final Canvas c = new Canvas(mBitmap);
// Create the destination Bitmap and paint it
Bitmap b = BitmapFactory.decodeResource(getResources(), R.drawable.shape1);
c.drawBitmap(b, null, rect, mPaint);
// Create the source Bitmap, set XferMode, and paint
b = BitmapFactory.decodeResource(getResources(), R.drawable.shape2);
mPaint.setXfermode(mXfermode);
c.drawBitmap(b, null, rect, mPaint);
// Remove the XferMode
mPaint.setXfermode(null);
}
We are almost done with the custom view, but there is a little more to do. We need to override the onDraw(Canvas) method to actually draw our mBitmap. First, we check if mBitmap is null. If it is, call createBitmap(). Now it should make sense why we remove our mBitmap reference when setting a new PorterDuff.Mode in the setPorterDuffMode call (to create a new Bitmap using the new Xfermode). Although you should not allocate objects in the onDraw(Canvas) method, it is okay to do so when the object is then retained for future draw calls.
Outside of the if block, we simply call the passed-in Canvas’s drawBitmap(Bitmap, float, float, Paint) method. Notice that this one takes two floats instead of two Rects. These floats specify the left and top positions in the canvas to draw the bitmap to. The bitmap will not be scaled. We are simply saying, “Start the top-left corner of the bitmap here and draw all that will fit.” Because we already handled the scaling by using the Rect earlier, calling this method with the two floats is very efficient.
Saving and Restoring State
We want to save and restore the PorterDuff mode that is being used. To do this, we create a private static class called PorterDuffSaveState inside of our view that extends BaseSavedState. It needs a single member variable to store the PorderDuff.Mode value. There are two constructors, one that uses a Parcel and one that uses a Parcelable. That’s a bit confusing, but the one that uses a Parcel is the one that’s being restored and the one that’s using a Parcelable is the one that’s being saved. We need to override the writeToParcel method and simply call writeSerializable to save the mode. Similarly, we need to call readSerializable to get the mode in the constructor that takes a Parcel.
Now we can override onRestoreInstanceState and check if the Parcelable that was passed in is our custom type. If it is a different type, we can just call the super method and be done with it. If it is our type, we can cast it, call the super method, and then restore our mode.
Next up, we override onSaveInstanceState. We call through to the super method to get its Parcelable, then we construct our custom PorterDuffSaveState, passing in the Parcelable. We simply set the mode on our saved state and return the object.
Listing 12.4 shows the complete class, including the code required to handle saving and restoring state.
Listing 12.4 The Complete PorterDuffView
public class PorterDuffView extends View {
/**
* The width used for measuring when a bitmap has not been generated
*/
private int mDefaultBitmapWidth;
/**
* The height used for measuring when a bitmap has not been generated
*/
private int mDefaultBitmapHeight;
/**
* The Paint used to draw everything
*/
private final Paint mPaint = new Paint(Paint.ANTI_ALIAS_FLAG);
/**
* The Bitmap containing the two images blended together
*/
private Bitmap mBitmap;
/**
* PorterDuff Mode used to generate the Xfermode
*/
private PorterDuff.Mode mPorterDuffMode = PorterDuff.Mode.CLEAR;
/**
* The Xfermode to combine the images with
*/
private Xfermode mXfermode = new PorterDuffXfermode(mPorterDuffMode);
public PorterDuffView(Context context) {
super(context);
initDefaultBitmapDimens();
}
public PorterDuffView(Context context, AttributeSet attrs) {
super(context, attrs);
initDefaultBitmapDimens();
}
public PorterDuffView(Context context, AttributeSet attrs, int defStyleAttr) {
super(context, attrs, defStyleAttr);
initDefaultBitmapDimens();
}
@TargetApi(Build.VERSION_CODES.LOLLIPOP)
public PorterDuffView(Context context, AttributeSet attrs, int defStyleAttr, int defStyleRes) {
super(context, attrs, defStyleAttr, defStyleRes);
initDefaultBitmapDimens();
}
/**
* Sets the new PorterDuff.Mode, removes the existing Bitmap and invalidates the view
*
* @param mode PorterDuff.Mode to use
*/
public void setPorterDuffMode(PorterDuff.Mode mode) {
if (mode == mPorterDuffMode) {
// No change
return;
}
mPorterDuffMode = mode;
mXfermode = new PorterDuffXfermode(mode);
mBitmap = null;
invalidate();
}
@Override
public void onDraw(Canvas canvas) {
if (mBitmap == null) {
createBitmap();
}
canvas.drawBitmap(mBitmap, 0, 0, mPaint);
}
@Override
protected void onLayout(boolean changed, int left, int top, int right, int bottom) {
if (changed) {
mBitmap = null;
}
}
@Override
protected void onMeasure(int widthMeasureSpec, int heightMeasureSpec) {
// Calculate the width
int width;
int specMode = MeasureSpec.getMode(widthMeasureSpec);
int specSize = MeasureSpec.getSize(widthMeasureSpec);
if (specMode == MeasureSpec.EXACTLY) {
width = specSize;
} else {
width = getPaddingLeft() + getPaddingRight() + mDefaultBitmapWidth;
if (specMode == MeasureSpec.AT_MOST) {
width = Math.min(width, specSize);
}
}
// Calculate the height
int height;
specMode = MeasureSpec.getMode(heightMeasureSpec);
specSize = MeasureSpec.getSize(heightMeasureSpec);
if (specMode == MeasureSpec.EXACTLY) {
height = specSize;
} else {
height = getPaddingTop() + getPaddingBottom() + mDefaultBitmapHeight;
if (specMode == MeasureSpec.AT_MOST) {
height = Math.min(height, specSize);
}
}
// Set the calculated dimensions
setMeasuredDimension(width, height);
}
/**
* Creates mBitmap using the set XferMode
*/
private void createBitmap() {
// Prepare the Bitmap
final int width = getWidth();
final int height = getHeight();
final Rect rect = new Rect();
final int minDimen = Math.min(width, height);
rect.right = minDimen;
rect.bottom = minDimen;
mBitmap = Bitmap.createBitmap(width, height, Bitmap.Config.ARGB_8888);
final Canvas c = new Canvas(mBitmap);
// Create the destination Bitmap and paint it
Bitmap b = BitmapFactory.decodeResource(getResources(), R.drawable.shape1);
c.drawBitmap(b, null, rect, mPaint);
// Create the source Bitmap, set XferMode, and paint
b = BitmapFactory.decodeResource(getResources(), R.drawable.shape2);
mPaint.setXfermode(mXfermode);
c.drawBitmap(b, null, rect, mPaint);
// Remove the XferMode
mPaint.setXfermode(null);
}
private void initDefaultBitmapDimens() {
BitmapFactory.Options options = new BitmapFactory.Options();
options.inJustDecodeBounds = true;
BitmapFactory.decodeResource(getResources(), R.drawable.shape1, options);
mDefaultBitmapWidth = options.outWidth;
mDefaultBitmapHeight = options.outHeight;
}
@Override
protected void onRestoreInstanceState(Parcelable state) {
if (!(state instanceof PorterDuffSavedState)) {
// Not our saved state
super.onRestoreInstanceState(state);
return;
}
final PorterDuffSavedState ourState = (PorterDuffSavedState) state;
super.onRestoreInstanceState(ourState.getSuperState());
setPorterDuffMode(ourState.mode);
}
@Override
protected Parcelable onSaveInstanceState() {
final Parcelable superState = super.onSaveInstanceState();
final PorterDuffSavedState ourState = new PorterDuffSavedState(superState);
ourState.mode = mPorterDuffMode;
return ourState;
}
private static class PorterDuffSavedState extends BaseSavedState {
public PorterDuff.Mode mode;
public PorterDuffSavedState(Parcel source) {
super(source);
mode = (PorterDuff.Mode) source.readSerializable();
}
public PorterDuffSavedState(Parcelable superState) {
super(superState);
}
@Override
public void writeToParcel(@NonNull Parcel dest, int flags) {
super.writeToParcel(dest, flags);
dest.writeSerializable(mode);
}
}
}
Now that we have a custom view, we need a layout to make use of the view. Edit activity_main.xml to simply be a vertically oriented LinearLayout with a Toolbar, Spinner and our custom view. The Spinner will be used to select the PorterDuff.Mode and our view will display it. The layout should look like Listing 12.5.
Listing 12.5 The Layout with the Custom View
<LinearLayout xmlns:android="http://schemas.android.com/apk/res/android"
xmlns:tools="http://schemas.android.com/tools"
android:layout_width="match_parent"
android:layout_height="match_parent"
android:orientation="vertical"
tools:context=".MainActivity">
<android.support.v7.widget.Toolbar
android:id="@+id/toolbar"
android:layout_width="match_parent"
android:layout_height="?attr/actionBarSize"
android:elevation="4dp"
android:background="?attr/colorPrimary" />
<Spinner
android:id="@+id/spinner"
android:layout_width="wrap_content"
android:layout_height="wrap_content"
android:layout_marginBottom="@dimen/activity_vertical_margin"
android:layout_marginLeft="@dimen/activity_horizontal_margin"
android:layout_marginRight="@dimen/activity_horizontal_margin"
android:layout_marginTop="@dimen/activity_vertical_margin" />
<com.auidbook.porterduffview.PorterDuffView
android:id="@+id/porter_duff_view"
android:layout_width="match_parent"
android:layout_height="match_parent"
android:layout_marginBottom="@dimen/activity_vertical_margin"
android:layout_marginLeft="@dimen/activity_horizontal_margin"
android:layout_marginRight="@dimen/activity_horizontal_margin"
android:layout_marginTop="@dimen/activity_vertical_margin" />
</LinearLayout>
Open the activity and add two variables to the class: mAdapter, which is an ArrayAdapter that holds PorterDuff.Mode enums, and mPorterDuffView, which is a reference to our custom view. In onCreate(Bundle), we set the content view, set up the toolbar, and set the reference to mPorterDuffView. Then we get an array of all the available PorterDuff.Modes by calling PorterDuff.Mode.values(). We create a new ArrayAdapter, passing in the Context (this), android.R.layout.simple_spinner_item (for a basic layout), and our array of PorterDuff.Modes. We need to also call setDropDownViewResource(int), passing in android.R.layout.simple_spinner_dropdown_item.
We get a reference to the Spinner and set the ArrayAdapter on it. We also need to make the activity implement OnItemSelectedListener so that it will be notified of changes to the spinner, and call the setOnItemSelectedListener method, passing in the activity.
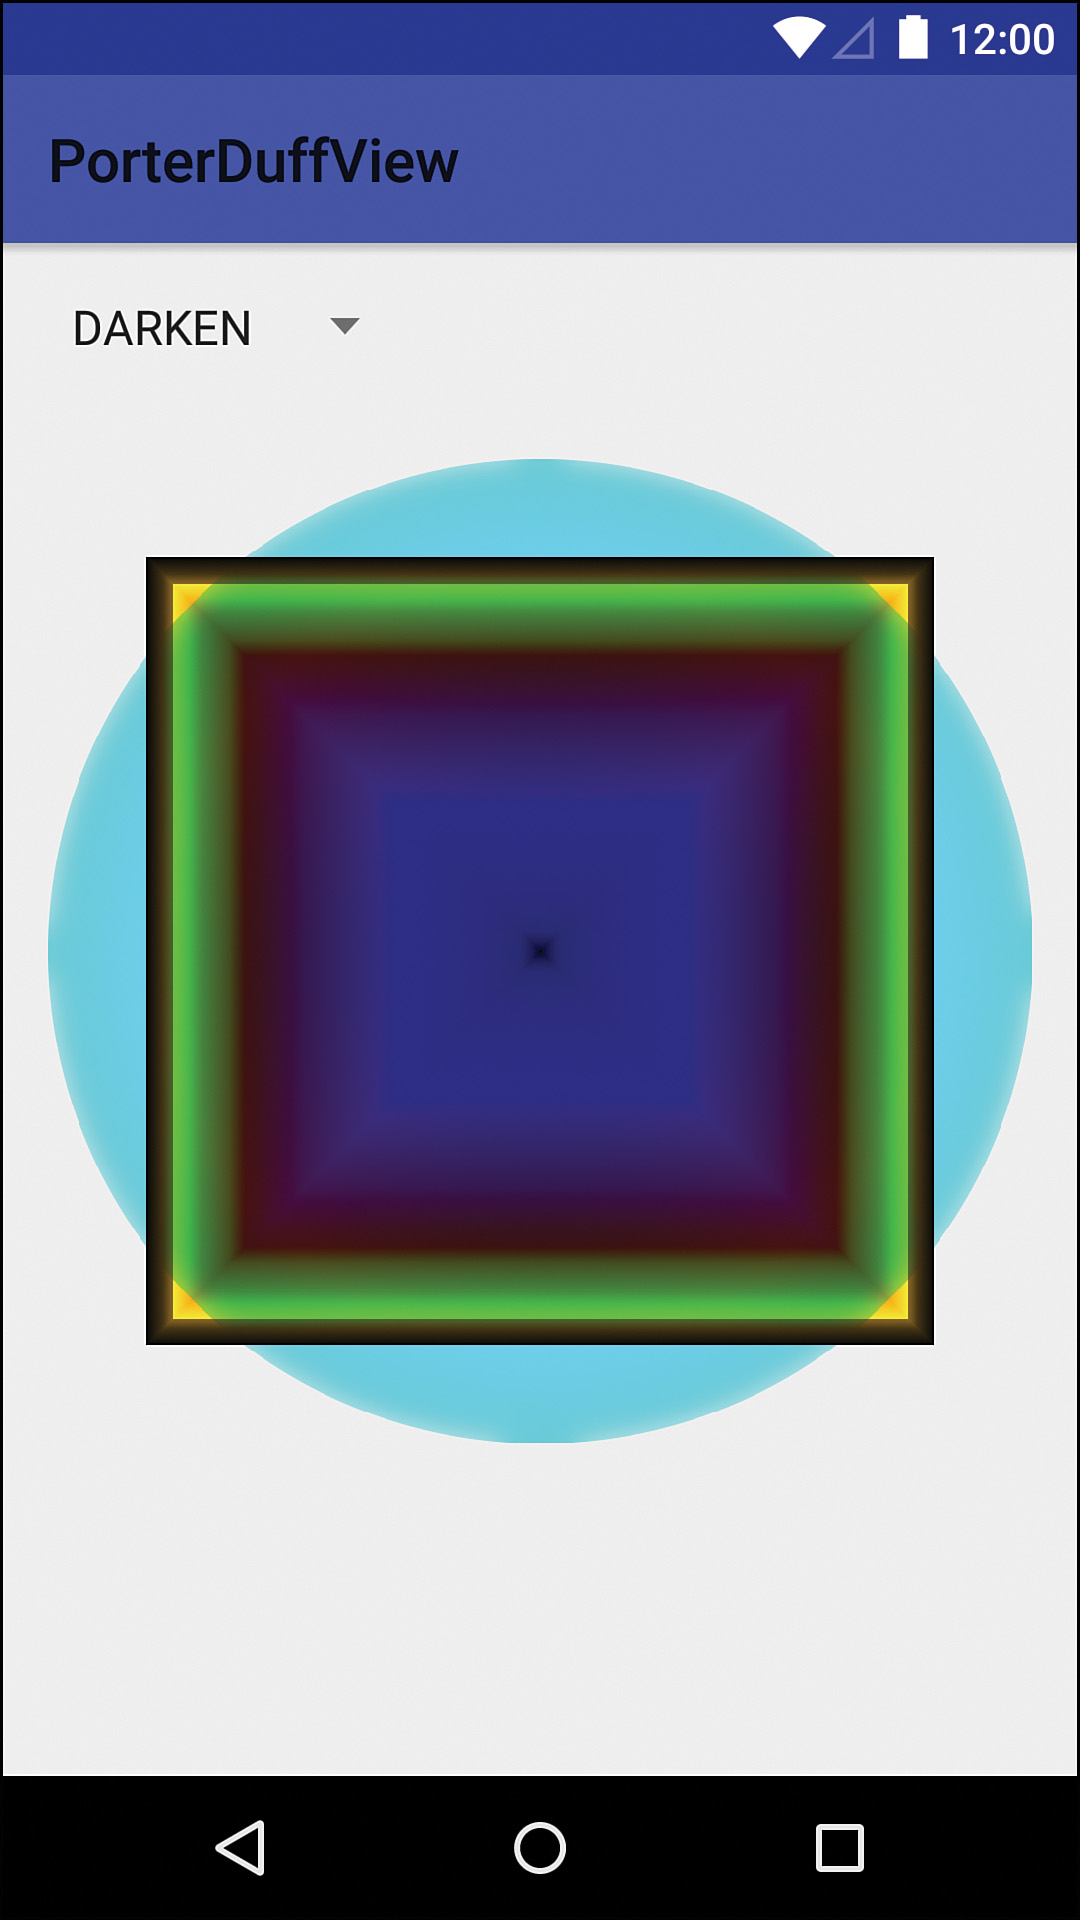
We don’t need to do anything in the onNothingSelected method, but in the onItemSelected method, we need to update our custom view with the newly selected PorterDuff.Mode enum. To get the selected Mode, we call getItem(int) on our ArrayAdapter, passing in the position int. The complete activity is in Listing 12.6. Figure 12.1 shows this custom view in action.
Listing 12.6 The Activity that Uses the Custom View
public class MainActivity extends AppCompatActivity implements AdapterView.OnItemSelectedListener {
private ArrayAdapter<PorterDuff.Mode> mAdapter;
private PorterDuffView mPorterDuffView;
@Override
protected void onCreate(Bundle savedInstanceState) {
super.onCreate(savedInstanceState);
setContentView(R.layout.activity_main);
final Toolbar toolbar = (Toolbar) findViewById(R.id.toolbar);
setSupportActionBar(toolbar);
// Get reference to the PorterDuffView
mPorterDuffView = (PorterDuffView) findViewById(R.id.porter_duff_view);
// Create array of PorterDuff.Modes
final PorterDuff.Mode[] porterDuffModes = PorterDuff.Mode.values();
mAdapter = new ArrayAdapter<PorterDuff.Mode>(this, android.R.layout.simple_spinner_item, porterDuffModes);
mAdapter.setDropDownViewResource(android.R.layout.simple_spinner_dropdown_item);
final Spinner spinner = (Spinner) findViewById(R.id.spinner);
spinner.setAdapter(mAdapter);
spinner.setOnItemSelectedListener(this);
}
@Override
public void onItemSelected(AdapterView<?> parent, View view, int position, long id) {
mPorterDuffView.setPorterDuffMode(mAdapter.getItem(position));
}
@Override
public void onNothingSelected(AdapterView<?> parent) {
// Ignored
}
}
Summary
In this chapter, you applied your knowledge gained working with drawables to custom views. You also learned about the measurement and layout processes for views as well as the methods used for saving and restoring state. With this knowledge, you can create most of the types of views you might need, but one big piece is missing and that’s handling input. Handling input can be confusing, so the next chapter dives head-on into input, including handling any related scrolling.