3. Using and Customizing the Start Menu and Taskbar
In this chapter, you learn how to use and customize the Windows 10 Start menu and Taskbar. You learn about
→ Organizing the Start Menu and Taskbar
→ Customizing the Start Menu and Taskbar
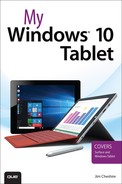
Windows 8 introduced a new Start screen to Windows that threw many Windows users for a loop. It was unlike any user-interface Microsoft had ever used, but the hope was that users would eventually grow accustomed to it and would learn to love it. That didn’t happen, and the new Start menu in Windows 10 is evidence of that. The Windows 10 Start menu has all the interactivity and visual appeal of the Windows 8 Start screen, but it brings back the familiar elements of earlier versions of Windows.
Locating and Launching Apps
The Start menu in Windows 10 shows you both Windows Desktop apps and what Microsoft calls Windows Store Apps, which are apps that either come preinstalled in Windows or are purchased from the Windows Store.
By default, the Start menu shows you only some of the apps installed on your tablet. However, you can easily view all apps with the click of a button, and you can also search for hard-to-find apps.
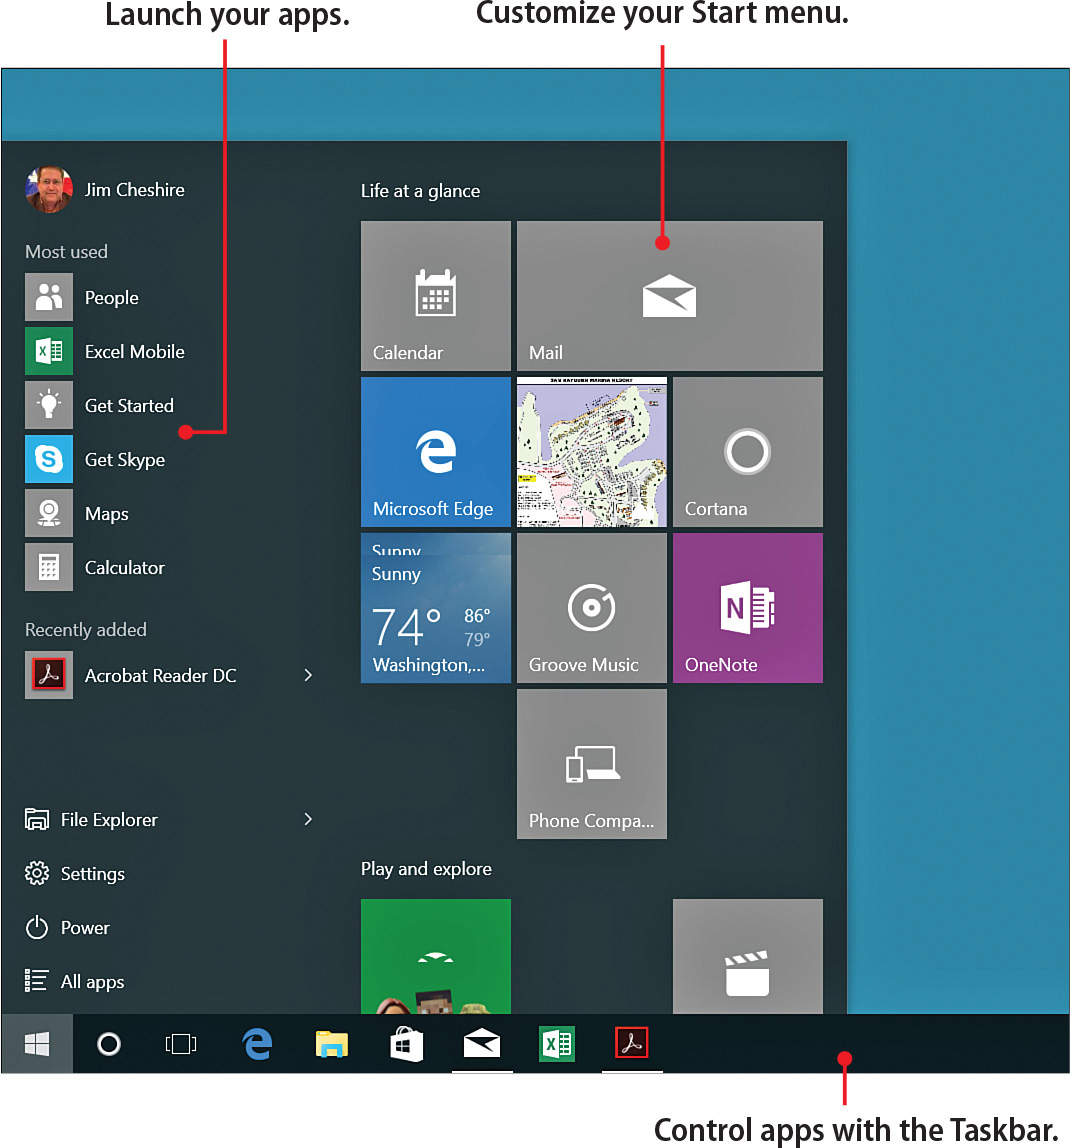
1. Tap or click the Start button to show the Start menu.
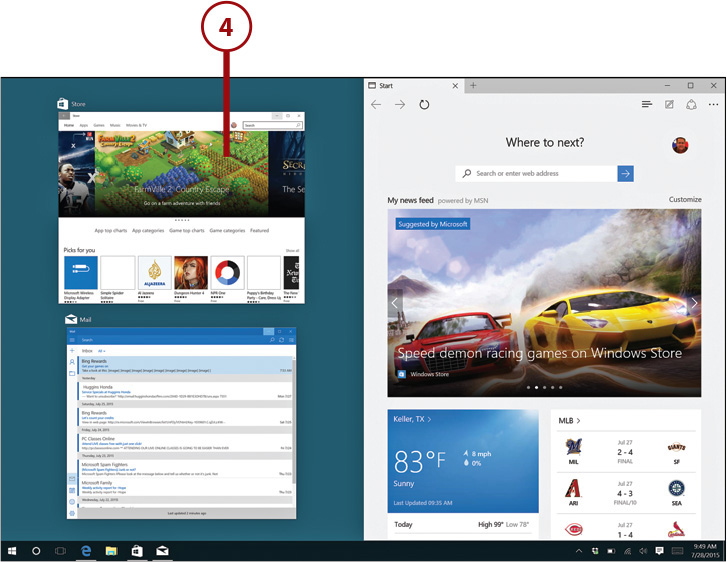
2. To locate apps not currently visible on the Start menu, tap or click All Apps.
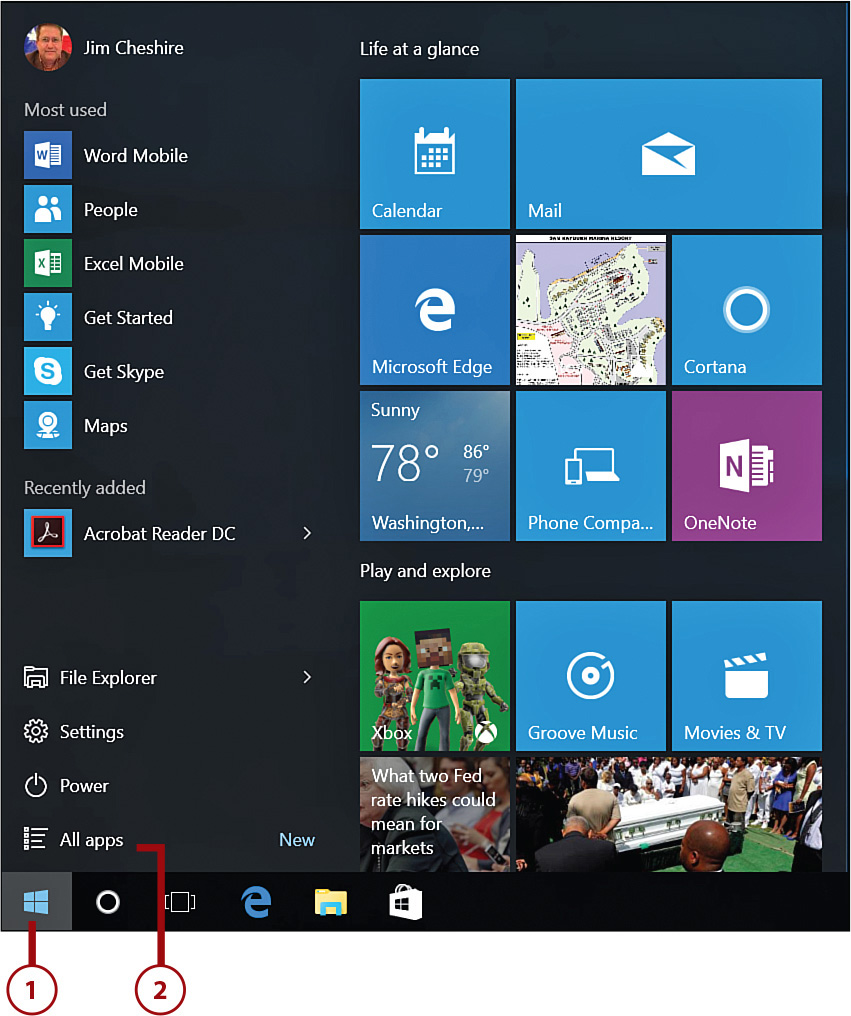
3. Slide or scroll up and down to locate the app you want to launch.
4. Tap or click the app’s icon to launch the app.
Launching Apps from the Taskbar
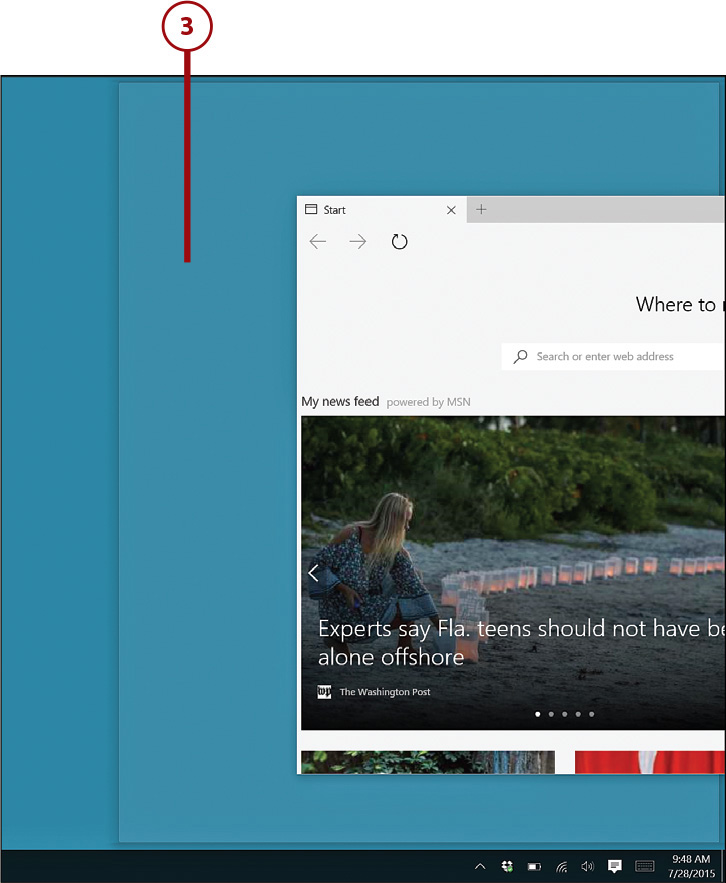
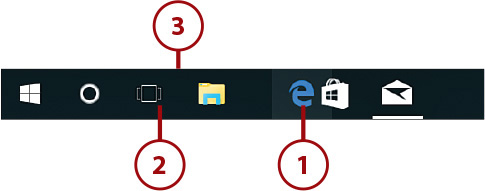
The Taskbar provides a fast and convenient way to launch often-used apps.
1. If the Taskbar is hidden, tap the edge of the screen or move your mouse corner to the edge where the Taskbar is located.
2. Tap or click the Taskbar button for the app that you want to launch.
3. After the app launches, a line appears at the bottom of the app’s button on the Taskbar.
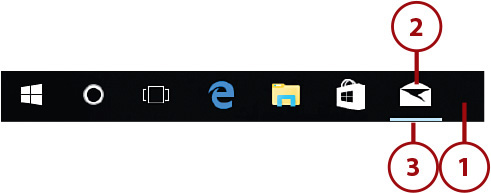
Active Apps
If an app is active, the line under the app’s taskbar button will be slightly wider than otherwise.
Searching for Apps
If you have a lot of apps installed, you might have a hard time locating an app on your Start menu. You can quickly find the app you want by searching for it.
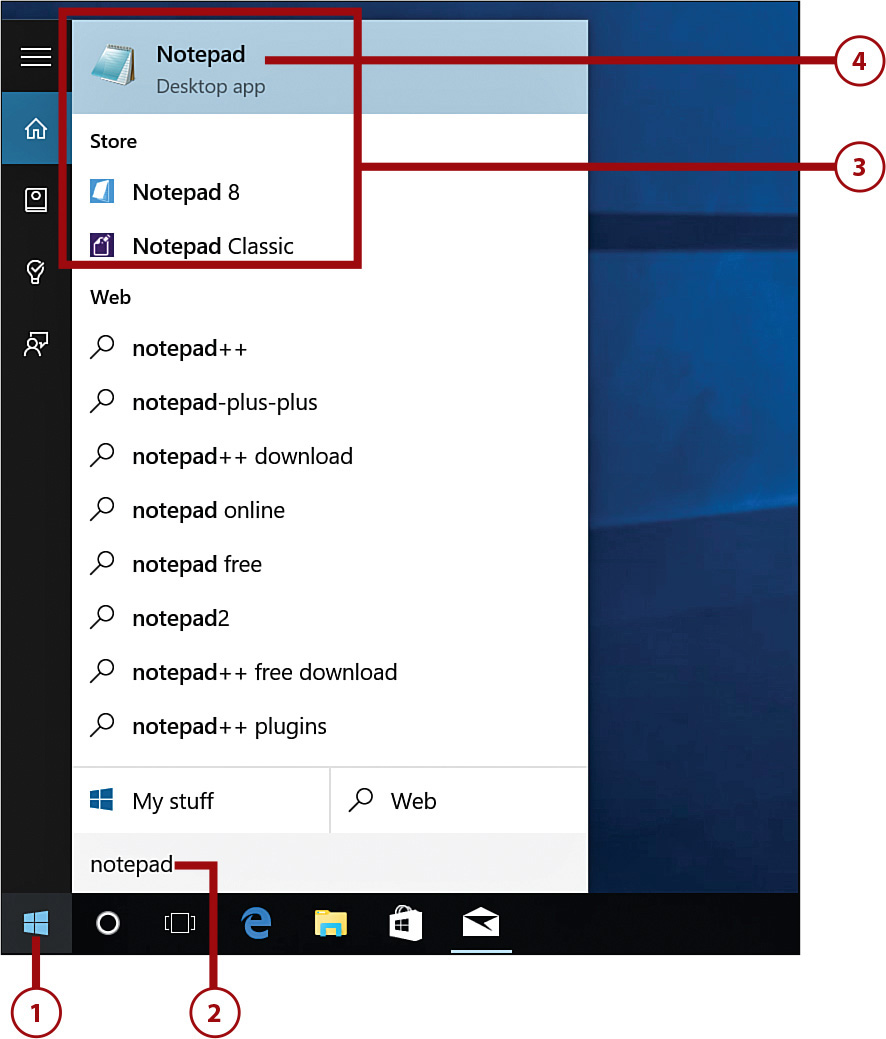
1. Tap or click the Start button.
2. On your keyboard, enter one or more letters included in your app’s name.
3. Locate the app from the list of apps.
4. Tap or click the app to launch it.
Switching Between Apps
Windows 10 is designed to run multiple apps at the same time. You can run a single app full screen, but you can also display multiple apps at the same time so that you can copy and paste between apps or so that you can reference one app while using another.
Switching Between Running Apps
Each app that is running will have a button displayed on the Taskbar. You can easily switch between apps using the Taskbar buttons.
One App with Multiple Windows
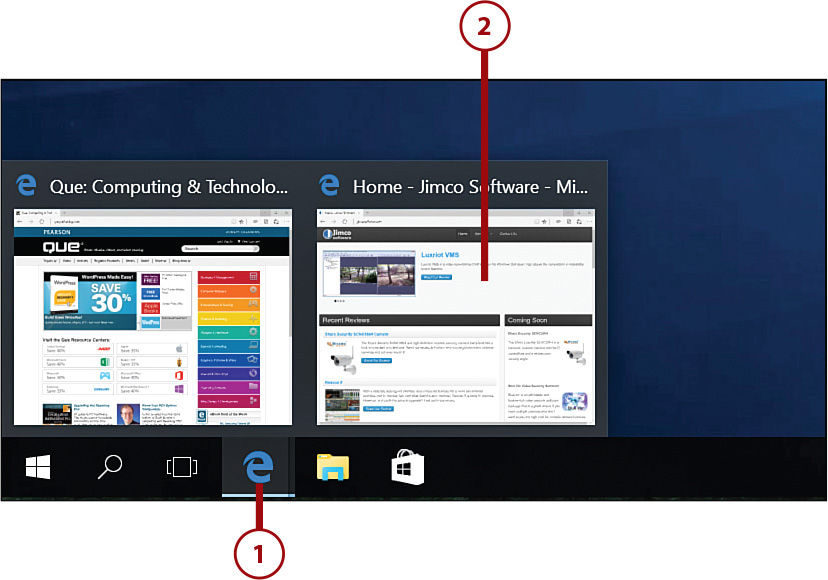
Some apps enable you to have multiple windows open. For example, your web browser enables you to have multiple websites open at one time. By default, the Taskbar will display multiple overlapping Taskbar buttons when an app has multiple windows open.
1. Tap or click the Taskbar button of the app you want to switch to.
2. If the app has multiple windows, tap or click the preview of the window you want to activate.
Displaying a List of Running Apps
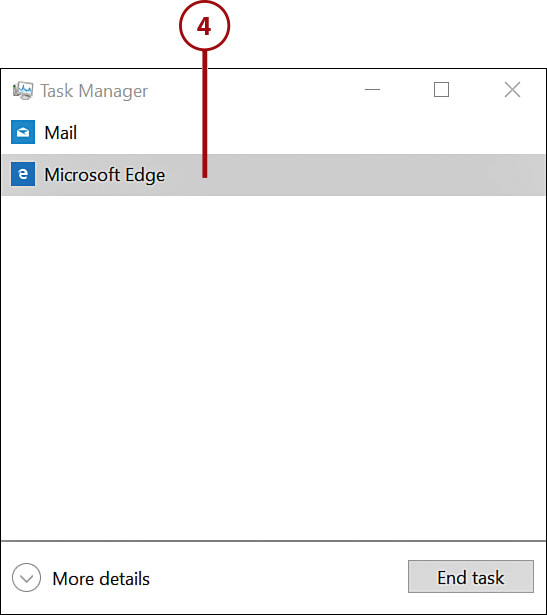
If you have a lot of apps running, it can be convenient to see a list of running apps. Windows Task Manager can display a list of them.
1. Tap and hold or right-click an empty area of the Taskbar.
2. If tapping, release your finger to display the context menu.
3. Tap or click Task Manager.
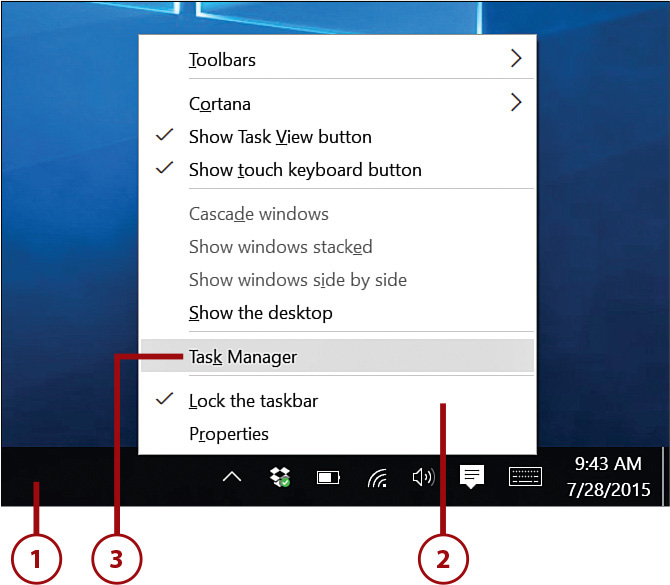
4. Tap or click an app to switch to that app.
Quick App Switching
Pressing Ctrl+Tab will display thumbnails of currently running apps. Each subsequent press of Ctrl+Tab will highlight the next app in the list. Release the Ctrl key to switch to the highlighted app.
Displaying Two Apps Simultaneously
You might encounter situations in which you want to use two different apps simultaneously. For example, you might be copying information from your email that you want to add to a Microsoft Word document. In such situations, being able to display two apps onscreen at the same time can be quite helpful.
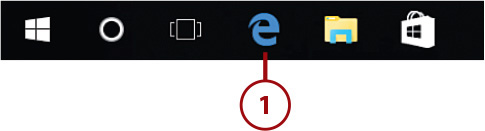
1. Open the first app you want to display.
Activating an App That’s Already Open
If an app is already running but you can’t see the app’s window, use the steps in “Switching Between Running Apps” earlier in this chapter to activate the app’s window.
2. Tap or click and hold on the app’s title bar and drag it to the right or left edge of the screen.
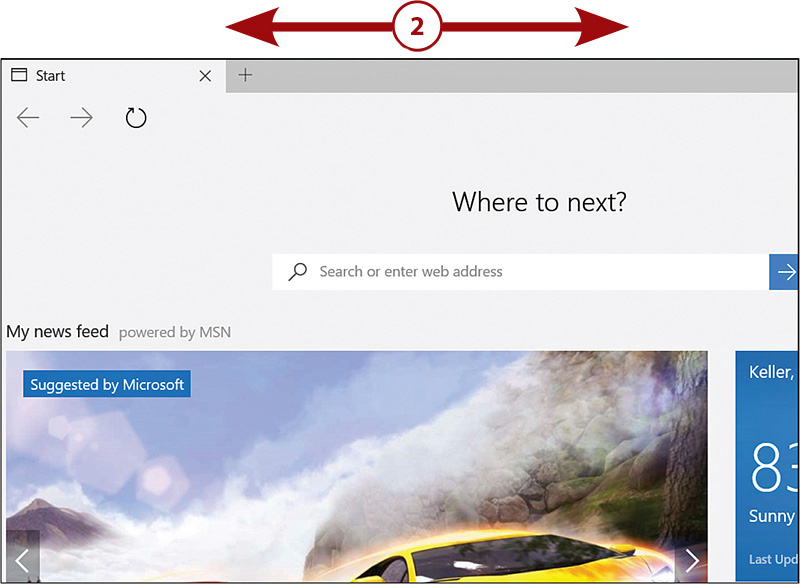
3. Release your finger or the mouse button when you see a shaded app window on the screen. The app will snap to that size and position.
4. From the Task View previews, tap or click the app you want to show in the remaining portion of your screen.
Using the Keyboard
You can snap an app to the side of the screen quickly using the keyboard. After you activate the app, press Winkey+left arrow to snap the app to the left side of the screen or Winkey+right arrow to snap the app to the right side of the screen.
Using Task View
Tablets are convenient and portable computers, but they don’t come with the giant screen you might have for a desktop computer. Because of that, running a lot of apps simultaneously can really clutter your Taskbar and make for a less-than-optimal computing experience. Windows 10’s Task View can rescue you from that kind of frustrating experience.
Task View makes it easy to create one or more virtual desktops. Each virtual desktop can have completely different apps running; by default, each desktop’s Taskbar will show only the apps running on that desktop.
Creating a Virtual Desktop
You can easily and quickly create new virtual desktops to better organize your tablet experience.
1. Tap or click the Task View button on the Taskbar to launch Task View.

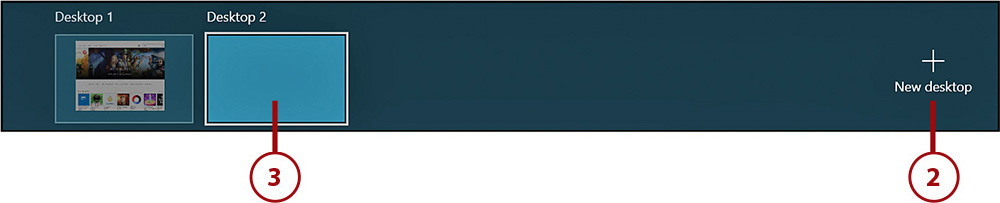
2. Tap or click New Desktop to create a new desktop.
3. Tap or click the desktop you’d like to make active.
Desktop Names
Your original desktop (the one you see when you first log in to Windows) will always be called “Desktop 1.” The first virtual desktop you create will be called “Desktop 2,” and each subsequent desktop will use a name with an incremented number. Unfortunately, you cannot rename desktops.
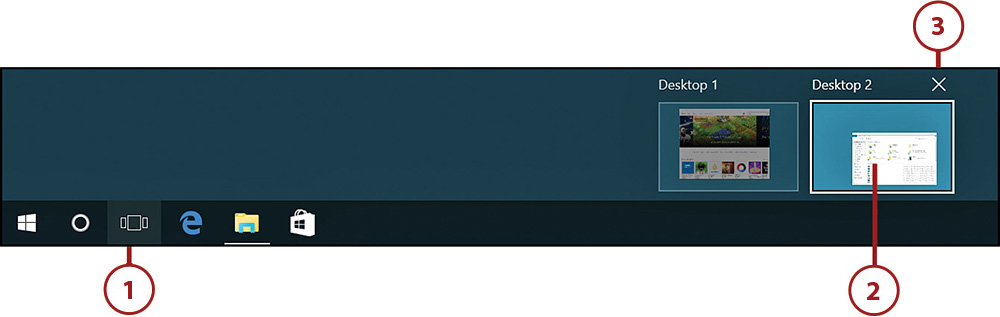
1. Tap or click Task View.
2. If you’re not using touch, hover your mouse pointer over the desktop you want to delete.
3. Tap or click the Close button at the top of the desktop.
Deleting a Desktop with Open Apps
If there are any open apps on a desktop you delete, they will be moved to the desktop that appears immediately to the left of the deleted desktop in Task View. For example, open apps on Desktop 2 will be automatically moved to Desktop 1 if you delete Desktop 2.
Switching Desktops
You can switch between desktops you create so that you can use apps on any desktop.
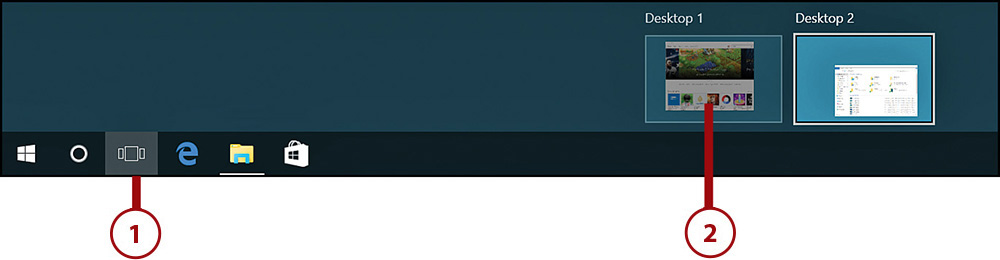
1. Tap or click Task View.
2. Tap or click a desktop to switch to that desktop.
Switching Desktops with the Keyboard
You can switch between desktops quickly with your keyboard. Press Winkey+Ctrl+right arrow to move to the next desktop or Winkey+Ctrl+left arrow to move to the previous desktop.
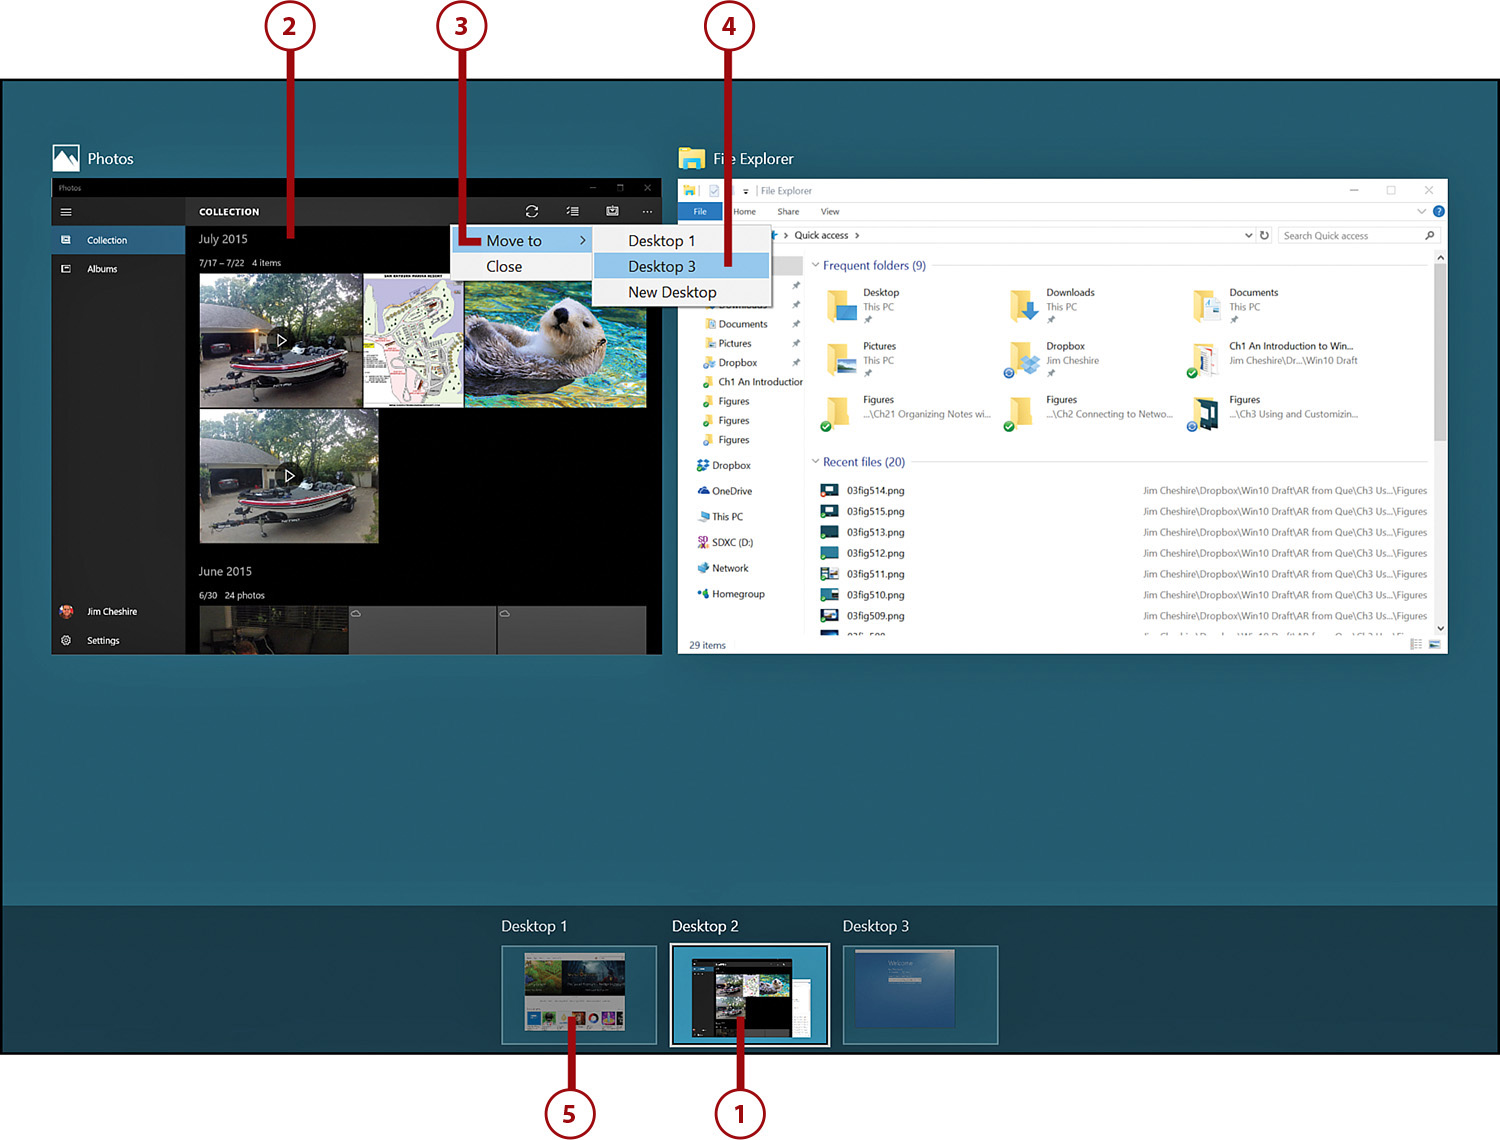
Moving Apps Between Desktops
By default, an app will appear on the desktop that was active when the app was launched. However, you can move an app to another desktop easily.
1. Switch to the desktop running the app you want to move to another desktop.
2. Tap and hold or right-click the app you want to move to show the context menu.
3. Tap on or hover over Move To.
4. Tap or click the desktop to which you want the app to be moved.
5. Tap a desktop to make it the active desktop.
Dragging Apps Between Desktops
You can also drag an app to a new desktop. Instead of using the context menu in step 2, tap or click and then hold and drag the app to the desired desktop. Make sure you tap or click somewhere on the app other than on the title bar. If you tap or click the title bar, you won’t be able to drag the app.
Organizing the Start Menu and Taskbar
The right side of the Start menu is reserved for displaying tiles for apps. After you’ve installed some of your own apps, the tiles on your Start menu might begin to get a little unwieldy. You can bring order back to your Start menu by organizing tiles into groups.
Rearranging Apps on the Start Menu
You can move a tile to a new location by dragging it.
1. Tap or click and then drag the tile to release it from its current location.
2. Drag the tile to a new location. Other tiles will move to accommodate the tile you are moving.
3. Release the tile when it is in the desired location.
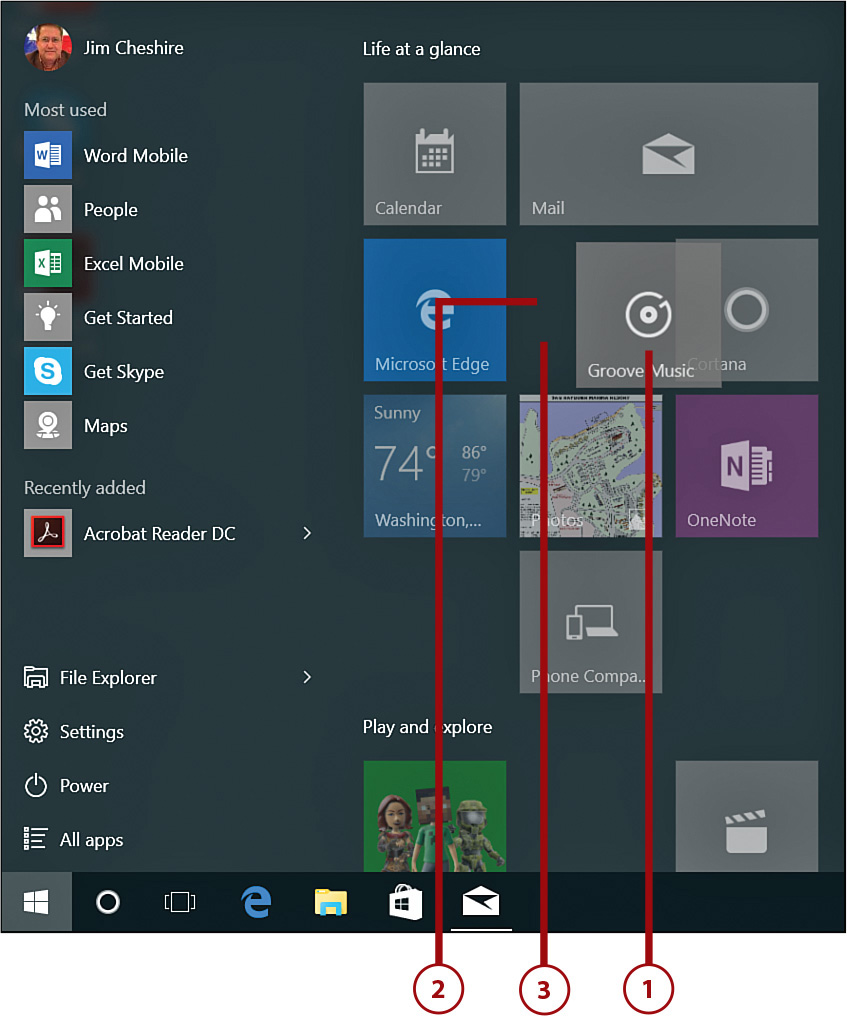
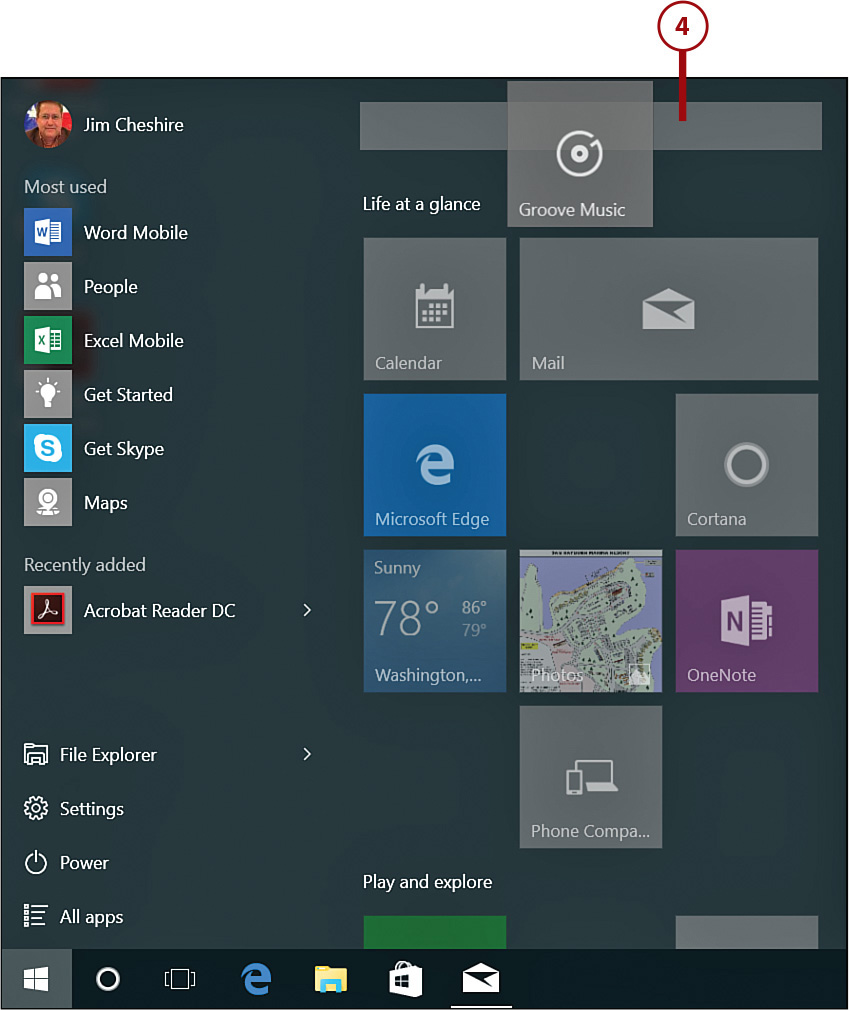
4. To create a new tile group, drag the tile to a blank area at the top edge of the Start menu and release it when a highlighted group separator appears.
Adding New Tiles
You can drag an app from the list on the left side of the Start menu to a group on the right side, and a new tile will be added for that app. You’ll learn how to do that step-by-step in the “Pinning Apps to the Start Menu” section later in this chapter.
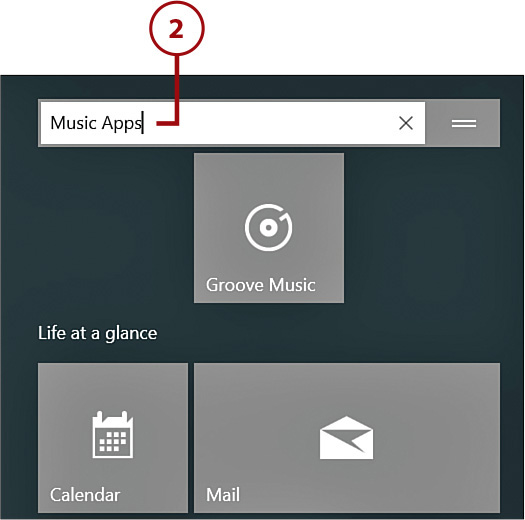
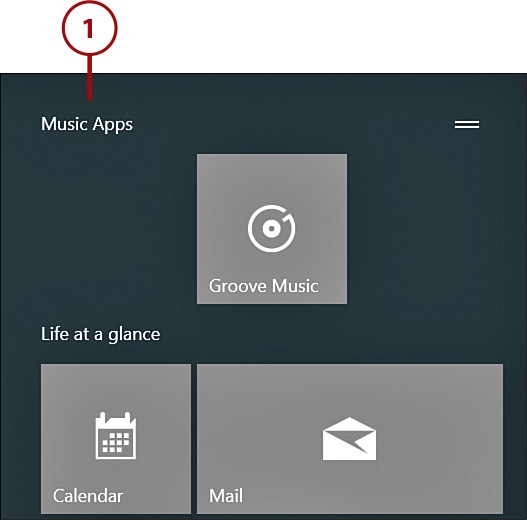
Naming Start Menu Groups
Naming groups of tiles is another way of providing additional organization to your Start menu.
1. Tap just above a tile in the group you want to rename or hover your mouse above the tile until the group separator appears, and then click.
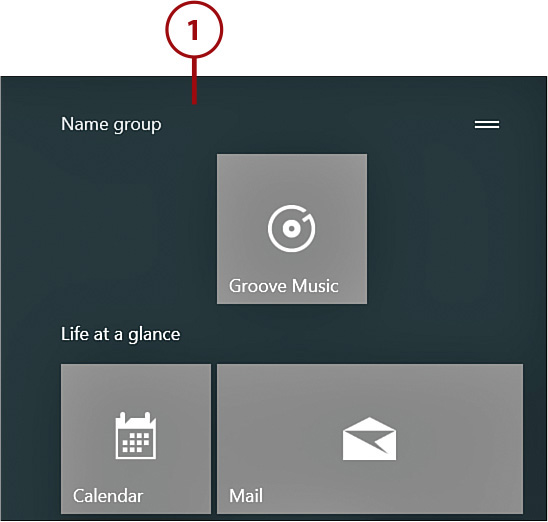
2. Type a name for the group and press Enter to add the group name.
Groups with No Name
Tile groups aren’t required to have a name. If a tile group has no name assigned to it, you will see a space between those tiles and other tiles, but no name will appear in the group separator.
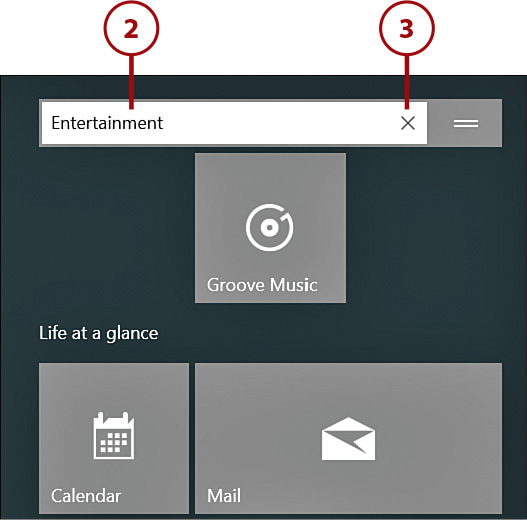
Changing or Removing a Start Menu Group Name
You can change the name of a group that you named previously or remove the group name.
1. Tap or click the existing group name.
2. Enter the new name and press Enter.
3. To remove a group name, tap or click the X.
Rearranging Start Menu Groups
You can change the order of groups on the Start menu by dragging a group to a new location.
1. Tap or click and then hold on the handle on the right edge of the group separator.
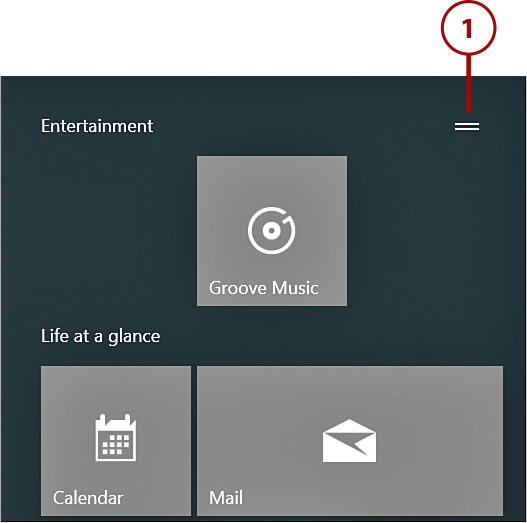
2. While holding your finger or the mouse button, drag the group separator to the desired location.
3. Release your finger or mouse button to move the group.

Tiles Move with Groups
When you move a group, any tiles in that group move along with it. However, as you are moving the group separator, you won’t see the tiles. The tiles reappear when you finish moving the group.
Rearranging Taskbar Buttons
You can move Taskbar buttons so that they are organized the way you want them. You can move buttons for open apps and for apps that are pinned to the Taskbar but not currently open.
Pinning Apps to the Taskbar
You learn how to pin apps to the Taskbar in the “Pinning Apps to the Taskbar” section later in this chapter.
1. Tap or click and then hold on the Taskbar button you want to move.
2. Drag the button to the desired location on the Taskbar.
3. Release your finger or mouse button to move the Taskbar button.
Customizing the Start Menu and Taskbar
You can customize the Start menu by adding and removing apps and changing tile sizes. You can customize the Taskbar by adding and removing Taskbar buttons and by changing on which edge of the screen the Taskbar is located.
Pinning Apps to the Start Menu
You can pin an app to the Start menu so that a tile is displayed for the app. Doing so makes it easier to find your most often used apps.
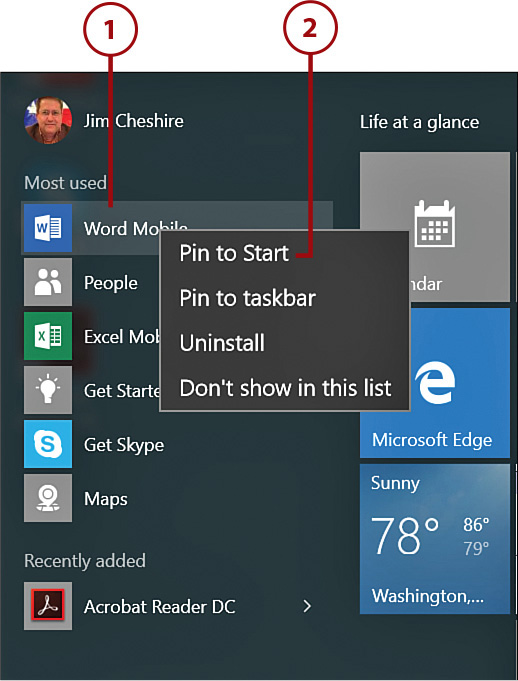
1. From the list of apps on the left side of the Start menu, tap and hold or right-click the app you want to pin to the Start menu.
2. Tap Pin to Start to pin the app to the Start menu.
Cannot Find Pinned App
When you pin an app to the Start menu, it gets added to a new group at the bottom of the Start menu. You can move the app to a new group if you want.
Pinning Apps to the Taskbar
If you want to add a button to the Taskbar for an app that you use a lot, you can pin the app to the Taskbar. After you pin an app to the Taskbar, the Taskbar will show a button for the app even when it’s not running so that you can launch the app quickly.
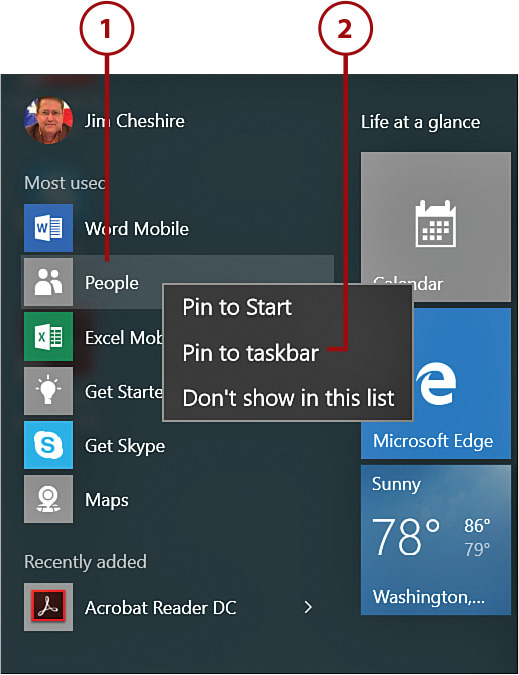
1. From the Start menu, tap and hold or right-click an app that you want to pin to the Taskbar.
2. Tap Pin to Taskbar to pin the app to the Taskbar.
Pinning Running Apps to the Taskbar
If an app is running, you can tap and hold or right-click the app’s Taskbar button and tap Pin to Taskbar on the menu to pin the app to the Taskbar more easily.
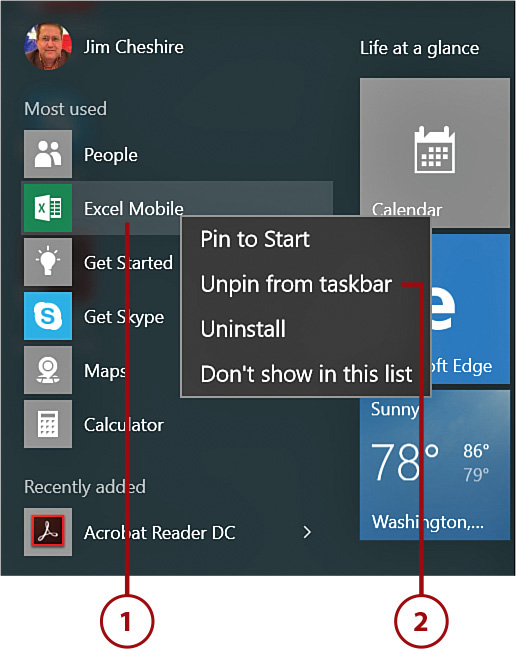
Removing Apps from the Start Menu
You can remove a tile from the Start screen by unpinning it. You can unpin any tile that you no longer want displayed on your Start menu, including those that are included on the Start menu by default.
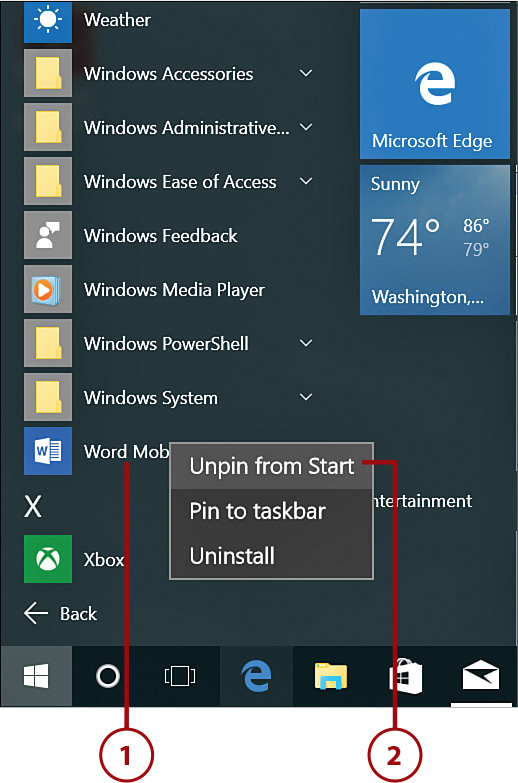
1. Tap and hold or right-click the tile you want to remove to display the context menu.
2. Tap or click Unpin from Start to remove the tile.
Removing Buttons from the Taskbar
You can remove a button from the Taskbar for an app that has been pinned to the Taskbar.
1. Tap and hold or right-click the Taskbar button you want to remove to display the context menu.
2. Tap Unpin from Taskbar to remove the button.
Removing the Button for a Running App
If you remove a button for an app that is currently running, the button will remain until you close the app.
Removing Apps from the Most Used List
Windows 10 displays the seven most-often-used apps in the Most Used list on the Start menu. If you would like to remove an app from the Most Used list, you can.
1. Tap and hold or right-click the app you want to remove from the list.
2. Tap Don’t Show in This List to remove the app from the list.

Always Seven Apps
The Most Used list will always contain seven apps. If you remove an app from the list, Windows will add the eighth most-used app to the bottom of the list.
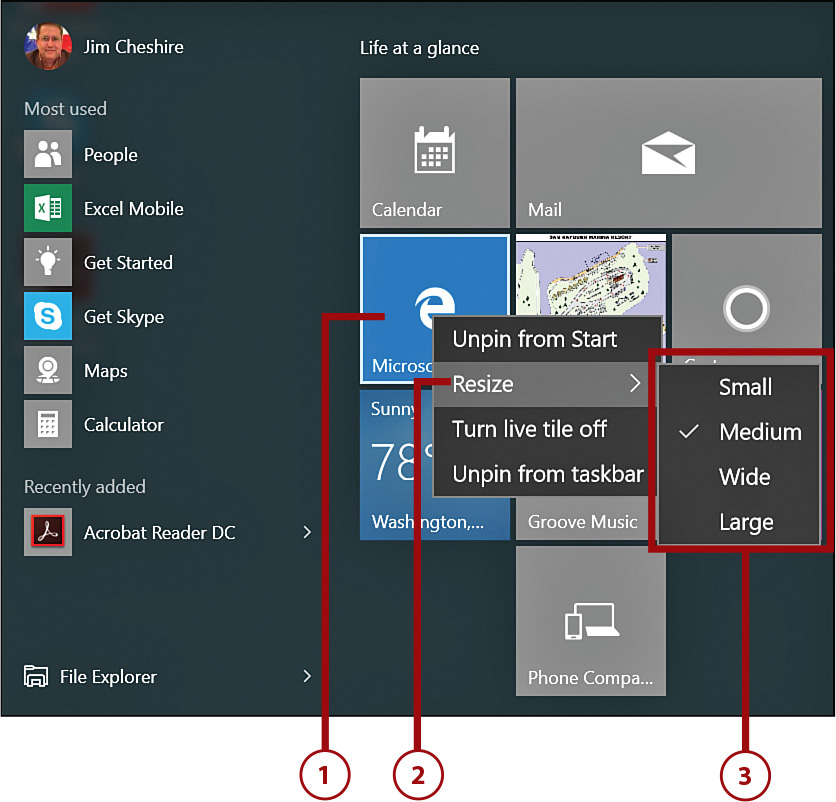
Changing the Start Menu Tile Size
Tiles can appear in up to four different sizes that are labeled Small, Medium, Wide, and Large. Because Windows 10 uses Live Tiles (tiles that display useful information directly), making a tile larger can allow more information to be displayed on the tile.
1. Tap and hold or right-click the tile you want to resize.
2. Tap or point to Resize.
3. Tap or click the desired tile size.
Changing the Taskbar Location
By default, the Taskbar is at the bottom of the screen. You might find it more convenient to have the Taskbar on the left or right edge or possibly even the top of the screen. Moving the Taskbar might be especially helpful if you use touch a lot and you want to move the Taskbar so that it’s closer to where your fingers rest when you are holding your tablet.
1. Tap and hold or right-click a blank area of the Taskbar.
2. If Lock the Taskbar is checked, tap or click this option to unlock the Taskbar.
3. Tap or click and hold on a blank area of the Taskbar.
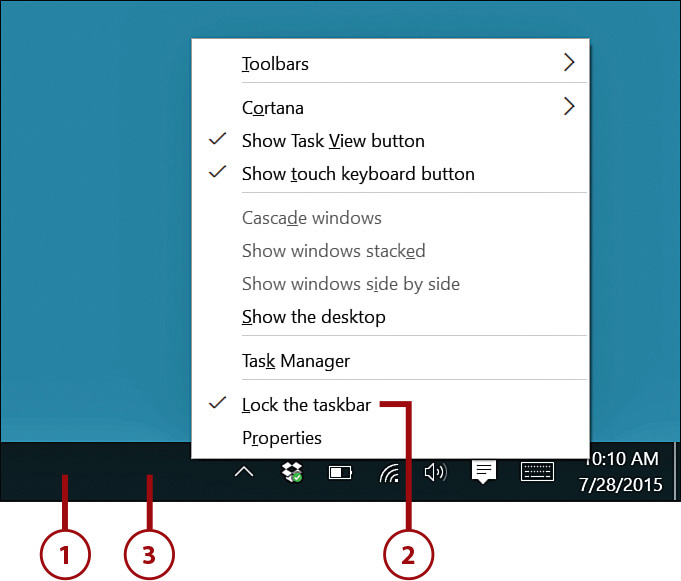
4. Drag the Taskbar to the desired edge of the screen until it snaps into place.
